1
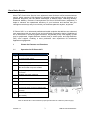
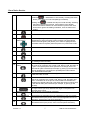
Cloud Voice Service Cisco Unified IP Phone 9971 User Guide (Version 1.0) Cloud Voice Service Table of Content 1 2 3 4 5 6 7 8 Phone Set Features and Functions..................................................................................... 3 1.1 Operation for IP Phone 9971 ......................................................................................... 3 1.2 Location of Control ......................................................................................................... 4 Preference Setup .................................................................................................................. 7 2.1 Adjust Brightness ........................................................................................................... 7 2.2 Adjust Ringtone .............................................................................................................. 7 2.2.1 Change Volume ...................................................................................................... 7 2.2.2 Change Ringtone .................................................................................................... 7 2.3 Adjust Wallpaper ............................................................................................................ 8 Basic Features ...................................................................................................................... 9 3.1 Placing a Call ................................................................................................................. 9 3.2 Answering a Call ............................................................................................................ 9 3.3 Ending a Call .................................................................................................................. 9 3.4 Muting a Call .................................................................................................................. 9 Call Management Features ................................................................................................ 10 4.1 Putting a Call on Hold .................................................................................................. 10 4.2 Using Call Waiting ........................................................................................................ 10 4.3 Transferring a Call to another Party ............................................................................. 10 4.4 Redialing the Last Number Dialed ............................................................................... 11 4.5 Forwarding Calls to another Phone.............................................................................. 11 4.5.1 Setting up Call Forwarding from your IP Phone ................................................... 11 4.5.2 Setting up Call Forwarding from your Mobile ....................................................... 11 4.5.3 Setting Up Call Forwarding from your Computer.................................................. 12 4.6 Placing a Conference Call............................................................................................ 12 4.7 Call Pickup ................................................................................................................... 13 4.7.1 Call Pickup within your Group............................................................................... 13 4.7.2 Directed Call Pickup (Specific Group Member) .................................................... 13 4.8 Sim-Ring Mobility ......................................................................................................... 13 4.8.1 Enable/ Disable SIM-Ring Mobility ....................................................................... 13 4.8.2 Switching Call Conversation to Mobile ................................................................. 14 4.8.3 Switching Call Conversation from Mobile back to IP Phone ................................ 14 VoiceMail Service................................................................................................................ 15 5.1 Activating VoiceMail ..................................................................................................... 15 5.1.1 Activating VoiceMail on your IP Phone .................................................................. 15 5.1.2 Remote Activation of VoiceMail ............................................................................. 15 5.2 Accessing VoiceMail .................................................................................................... 15 5.3 Remote Access to VoiceMail ....................................................................................... 16 5.4 Retrieval of VoiceMail via Outlook 2000 ...................................................................... 16 5.5 Visual VoiceMail ........................................................................................................... 17 Using Phone Log ................................................................................................................ 18 6.1 Viewing and Dialing from the Phone Log ..................................................................... 18 6.2 Deleting Call Record from Phone Log.......................................................................... 18 Extension Mobility .............................................................................................................. 19 7.1 Login ............................................................................................................................. 19 7.2 Logout .......................................................................................................................... 19 Password Management ...................................................................................................... 20 8.1 Change The Cloud Voice Password ............................................................................ 20 8.2 Change The IP Phone PIN........................................................................................... 20 Version 1.0 2 ©Wharf T&T Limited 2011 Cloud Voice Service Wharf T&T Cloud Voice Service is an advanced, state-of-the art unified communications service which consists of full-featured IP telephony and performs all the functions of a traditional telephone with the added advantages of Mobility Apps, SIM-Ring Mobility, Extension Mobility, Presence Communicator and Cloud Communicator (softphone). It helps to enhance the operational efficiency of your business and assures that your colleagues can always stay in touch with your business partners anytime, anywhere. IP Phone 9971 is an advanced professional media endpoint that delivers an enhanced user experience with an easy-to-use and eco-friendly ergonomic design. Highlights of the IP Phone 9971 include a higher-resolution, fully backlit (VGA) color display, a USB port for peripherals, Gigabit Ethernet network and pc switch ports, and High-definition (HD) voice support, enabling a more productive user experience for multimedia application engagement. 1 Phone Set Features and Functions 1.1 Operation for IP Phone 9971 Item Description 1 DC adaptor port (DC48V). 2 AC-to-DC power supply. 3 AC power wall plug. 4 Network port (10/100/1000 SW) with IEEE 802.3af and 802.3at power enabled. 5 Computer port (10/100/1000 PC) connection 6 Headset connection (optional). 7 Analog headset connection 8 USB port 9 Anti-theft security lock connector 10 Camera pin holes (for Cisco Unified Video Camera) 11 Secure Digital I/O (SDIO) slot (not used for this release) Note: IP Phone 9971 cannot function properly when there is a failure in power supply. Version 1.0 3 ©Wharf T&T Limited 2011 Cloud Voice Service 1.2 Location of Control Item 1 Phone screen 2 Session buttons Description Shows information about your phone, including directory number, call information (for example caller ID, icons for an active call or call on hold) and available softkeys. Phone screen items, such as menu options and softkeys, are touchsensitive. Each corresponds with an active call or a call function. Pressing the button takes the default action: • Active calls—Pressing the button takes the default action for an active call. For example, pressing the session button for a ringing call answers the call and pressing the button on a held call resumes the call. Session information, such as caller ID and call duration, appears on the phone screen next to the session button. • Call functions—When a session button is not being used for an active call, it can be used to initiate functions on the phone, as indicated by the adjacent phone screen icons. For example, pressing the session button can display missed calls, take the phone off hook, or dial your voice-messaging system (with a Voicemail icon). Color LEDs reflect the call status . LEDs can flash (blink on and off rapidly), pulse (alternately dim and brighten), or appear solid (glow without interruption). • Flashing amber the call. —Ringing call. Pressing this button answers — Can be a connected call or an outgoing call • Solid green that is not yet connected. If the call is connected, pressing this button displays the call details or the participants of a conference call. If the call is not yet connected, pressing this button ends the call. • Pulsing green held call. Version 1.0 —Held call. Pressing this button resumes the 4 ©Wharf T&T Limited 2011 Cloud Voice Service • Solid red —Shared line in-use remotely. Pressing this button allows you to barge in on the call (if Barge is enabled). 3 Back button —Shared line call put on hold remotely. Pressing • Pulsing red this button resumes the held call. (The positions of the session buttons and feature buttons can be reversed on phones that use a locale with a right-to-left reading orientation, such as Hebrew and Arabic.) Returns to the previous screen or menu. 4 Release button Ends a connected call or session. 5 Navigation pad and Select button The four-way Navigation pad allows you to scroll through the menus, highlight items, and move within a text input field. The Select button (center of the Navigation pad) allows you to select a highlighted item. The Select button is lit (white) when the phone is in power-save mode. 6 Conference button Creates a conference call. 7 Hold button Places a connected call on hold. 8 Transfer button Transfers a call. 9 Keypad Allows you to dial phone numbers, enter letters, and select menu items (by entering the item number). 10 Speakerphone button 11 Mute button 12 Headset button 13 Volume button 14 Messages button 15 Applications button 16 Contacts button Version 1.0 Selects the speakerphone as the default audio path and initiates a new call, picks up an incoming call, or ends a call. During a call, the button is lit green. The speakerphone audio path does not change until a new default audio path is selected (for example, by picking up the handset). If external speakers are connected, the Speakerphone button selects them as the default audio path. Toggles the microphone on or off during a call. When the microphone is muted, the button is lit red. Selects the headset as the default audio path and initiates a new call, picks up an incoming call, or ends a call. During a call, the button is lit green. A headset icon in the phone screen header line indicates the headset is the default audio path. This audio path does not change until a new default audio path is selected (for example, by picking up the handset). Controls the handset, headset, and speakerphone volume (off hook) and the ringer volume (on hook). Silences the ringer on the phone if an incoming call is ringing. Dials to retrieve your Voicemail messages. Opens/closes the Applications menu. Depending on how your system administrator sets up the phone, use it to access applications such as call history, preferences, and phone information. Opens/closes the Contacts menu. Depending on how your system administrator sets up the phone, use it to access personal directory, 5 ©Wharf T&T Limited 2011 Cloud Voice Service corporate directory, or call history. 17 Phone display Can be positioned to your preferred viewing angle. 18 Programmable Each corresponds with a phone line, speed dial, and calling feature. Pressing a button for a phone line displays the active calls for that line. If you have multiple lines, you may have an All Calls button that displays a consolidated list of all calls from all lines (oldest at the top). Then it is recommended that you keep your phone in the All Calls view. Color LEDs indicate the line status : feature buttons (also called feature buttons) 19 Handset light strip Version 1.0 • Amber —Ringing call on this line • Green —Active or held call on this line —Shared line in-use remotely • Red (The positions of the session buttons and feature buttons can be reversed on phones that use a locale with a right-to-left reading orientation, such as Hebrew and Arabic.) The handset light strip lights up to indicate a ringing call (flashing red) or a new voice message (steady red). 6 ©Wharf T&T Limited 2011 Cloud Voice Service 2 Preference Setup 2.1 Adjust Brightness As the IP Phone display may be affected by the lighting of the office, you can adjust the brightness accordingly. 1. Press the Applications button . 2. Select Preferences. (Use the Navigation bar and Select button to scroll and select.) 3. Select Brightness. To increase brightness, press the right arrow on the Navigation bar To decrease brightness, press the left arrow on the Navigation bar 4. Press the Save softkey to confirm the brightness level, or just press the Cancel softkey to exit without changing the setting. 2.2 Adjust Ringer Volume and Ringtone You can also change the volume or ringing tone to suit your business environment by the of following procedures. 2.2.1 2.2.2 Change Volume: 1. Press the Volume button to adjust the loudness of the ringtone. Change Ringtone: 1. Press the Applications button . 2. Select Preferences. (Use the Navigation bar and Select button to scroll and select.) 3. Select Ringtone and different types of ringing tone are displayed. 4. Press the Play softkey to play a sample. 5. Press the Set softkey to select the ringtone. 6. Press the Apply softkey to confirm your selection, or press the Cancel softkey to go back to the Ringtone screen. Version 1.0 7 ©Wharf T&T Limited 2011 Cloud Voice Service 2.3 Change the Wallpaper There are some standard IP phone wallpaper background templates prepared by Wharf T&T. You can easily change it accordingly. 1. Press the Applications button . 2. Select Preferences. (Use the Navigation pad and Select button to scroll and select.) 3. Select Wallpaper and different wallpapers are displayed . Select the wallpaper you preferred. 4. Press the Preview softkey to preview the wallpaper. 5. Press the Set softkey to apply the wallpaper to your IP phone. Version 1.0 8 ©Wharf T&T Limited 2011 Cloud Voice Service 3 3.1 Basic Features Placing a Call There are 4 options for placing a new call: 1. When using the handset, lift the handset and dial a number. 2. To make a new call on the current line, press the NewCall softkey and dial the number. 3. To dial with the phone on hook, from the main screen, perform either of these actions: Dial the number and lift handset or press the Dial softkey. The phone will not produce a dial tone until after you lift the handset or press the Dial softkey. Press the NewCall softkey and dial the number. 4. To dial the last dialed number, press the Redial softkey. 3.2 Answering a Call There are 3 options for answering a call: 1. Lift the handset. 2. Press the Answer softkey. 3. Press the Speakerphone button 3.3 Ending a Call There are 3 options for answering a call: 1. Hang up the handset. 2. Press EndCall softkey. 3. Press the Speakerphone button , when using hand-free conversation mode. 3.4 Muting a Call 1. Press the Mute button. 2. To disengage mute, press Mute again. Version 1.0 9 ©Wharf T&T Limited 2011 Cloud Voice Service Note: If you are using mute along with the speakerphone, lifting the handset will disengage mute function. 4 4.1 Call Management Features Putting a Call on Hold During the call conversation, you can put the other call party temporarily onhold. 1. To put a call on hold, Press the Hold button The Hold icon . will be displayed and the Line button will be pulsed to green color. 2. To resume the highlighted call, you can Press the Resume softkey. 4.2 Using Call Waiting If you are enabled with call waiting for your phone and you are on a call, you will hear a call waiting tone and the caller ID information will be shown on the phone’s LCD screen if a new call comes in when you are on the phone. 1. To answer the new call, press the Answer softkey. When you do so, the original call will be put on hold. 2. To return to the original call, press the Hold button . 3. If the second call is still active, the call will be put on hold when you return to the original call. 4. You can continue to use the Hold button to switch between the calls. 4.3 Transferring a Call to another Party Version 1.0 10 ©Wharf T&T Limited 2011 Cloud Voice Service During the call conversation (not ‘On-hold’ mode), if you wish to transfer your call conversation to another party, you can: 1. Press the Transfer button 2. Enter a 8-digit local number / a 4-digit extension number of the recipient. 3. Press the Transfer button again or the Transfer softkey. Note: If you wish to transfer the call to an external party, please remember to add “9” before the 8-digit telephone number. 4.4 Redialing the Last Number Dialed To redial the most recently dialed number, press the Redial soft key.If you have not lifted up the handset, it will be in speakerphone mode and automatically activate the speaker. 4.5 4.5.1 Forwarding Calls to another Phone Setting up Call Forwarding from your IP Phone 1. Press the Forward All softkey. You will hear two beeps. 2. Enter the destination number to which you want to forward all of your calls, as if you were placing a call to that number. 3. To cancel all call forwarding, press the Forward Off softkey. Note: If you wish to forward the call to external partner, please remember to add ”9” before the 8-digit telephone number Tips: To forward all incoming calls to your voicemail, just simply press Forward All and Message button. 4.5.2 Setting up Call Forwarding from your Mobile 1. Dial 2112 1113 to access Remote Call Forwarding hotline. 2. Follow the voice prompts and select the language by pressing ‘1’ for Cantonese / ‘2’ for English. 3. Enter your Cloud Voice Number and Cloud Voice Password accordingly. 4. Enter the destination of number to which you want to forward all of your calls (e.g. your mobile). Version 1.0 11 ©Wharf T&T Limited 2011 Cloud Voice Service 5. To cancel call forwarding, please dial 2112 1113 to deactivate the call forwarding setting accordingly. Note: Starter Cloud Voice Password is your Cloud Voice Number For security reason, please change your Cloud Voice Password regularly by login to Cloud Voice User Portal accordingly. 4.5.3 Setting Up Call Forwarding via Internet 1. www.wharftt.com/cloudvoice. 2. Click Cloud Voice User Portal 3. Enter your Cloud Voice number and Cloud Voice Password to log onto Cloud Voice User Portal. 4. Click Call Management to activate the Call Forwarding function. 5. Enter the destination of number to which you want to forward all of your calls (e.g. your mobile). 6. To cancel call forwarding, please log onto Cloud Voice User Portal again to deactivate the call forwarding accordingly. Note: Starter Cloud Voice Password is your Cloud Voice Number 4.6 Placing a Conference Call During the call conversation, you can invite more business partners to join the conversation by means of N-way Conference Call. 1. During an active call conversation, press the Conference button 2. Enter 8-digit local number / 4-digit extension number of the other invited party. 3. Press the Call softkey and wait for the invited party to answer. 4. Press the Conference button again or the Conference softkey. 5. The conference call with 3 parties will be begun. 6. Repeat these steps to add more parties, if desired. Note: If you wish to make a conference with external partner, please remember to add ”9” before the 8-digit telephone number Version 1.0 12 ©Wharf T&T Limited 2011 Cloud Voice Service Tips: To view and remove conference participants, you can press Show Details button and press Remove button to remove a conference participant. 4.7 4.7.1 Call Pickup Call Pickup within your Group When the phone of your pickup group member rings, you can use your own phone to pick up and answer the call directly. 1. Press the PickUp button to transfer a ringing call within your pickup group to your phone. 2. When your phone rings, press the Answer softkey to pick up and connect to the call. 4.7.2 Directed Call Pickup (Specific Group Member) 1. Press Group Pickup button. 2. Enter the extension number of the phone line with the call that you want to pick up. (For example, if the call is ringing on line extension number ‘1234’, please enter ‘1234’.) 3. When your phone rings, press the Answer softkey to pick up and connect to the call. 4.8 SIM-Ring Mobility The simultaneous ringing features allow you to bring any incoming call to your Cloud Voice number to both your desk IP phone and mobile. 4.8.1 Enable/ Disable SIM-Ring Mobility 1. Press the Mobility button to display the current status (Enable Mobile Connect/ Disable Mobile Connect) 2. Press Select softkey to toggle the status. 3. Press the Exit softkey once you confirm the SIM-Ring Mobility status. Version 1.0 13 ©Wharf T&T Limited 2011 Cloud Voice Service Note: 1. Please remember to submit your mobile phone number to Wharf T&T before you can enjoy SIM-Ring Mobility. 2. If the call is not answered in desk IP Phone and you have Enable Mobile Connect, the incoming call will be diverted to your mobile phone after 4 seconds. 4.8.2 Switching Call Conversation to Mobile When you are using IP Phone for call conversation with your business partner and wish to leave from your desk, you can continue the call conversation by using switching call to mobile. 1. During the call conversation via IP Phone, press the Mobility button. 2. Select Send call to Mobile Phone. 3. The call will be in ‘On-hold’ status and transferred to your mobile within a few seconds. 4. Please answer the call in your mobile and you can continue the call conversation via your mobile. 4.8.3 Switching Call Conversation from Mobile back to IP Phone Similarly, if the call received by your mobile via SIM-Ring Mobility and back to your desk, you can continue the call conversation by using switching call to your IP Phone. 1. During the call conversation via mobile, hang up the call on your mobile phone to disconnect the call via mobile phone (it will terminate the call). 2. The call will be in Hold status. 3. Within a few seconds, Resume softkey will be displayed in your IP phone. 4. Press the Resume softkey on your IP phone. 5. The call will be transferred to IP phone and you can continue the call conversation. Version 1.0 14 ©Wharf T&T Limited 2011 Cloud Voice Service 5 VoiceMail Service 5.1 5.1.1 Activating VoiceMail Activating VoiceMail on your IP Phone 1. Press the Message button on your IP Phone. 2. Enter your VoiceMail PIN followed by “#”. 3. Follow the voice instructions to change the VoiceMail PIN to activate the VoiceMail service. 5.1.2 Remote Activation of VoiceMail 1. Dial the access number 2112-1234. [Please dial (852) 2112-1234 when you are accessing VoiceMail service from overseas.] 2. A welcome greeting message will be announced and please select the language by pressing ‘1’ for Cantonese or ‘2’ for English. 3. Enter your User ID (your Cloud Voice Number) followed by “#” 4. Enter your VoiceMail PIN followed by “#” 5. Follow the voice instructions to change the VoiceMail PIN to activate the VoiceMail service Note: Starter VoiceMail PIN is your Cloud Voice Number. For security reason, please change your VoiceMail PIN regularly. 5.2 Accessing VoiceMail 1. The red light on your Handset will light up when you have a voicemail message. 2. To access the voice messaging system, press the Message button and follow the voice instructions. Version 1.0 15 ©Wharf T&T Limited 2011 Cloud Voice Service 5.3 Remote Access to VoiceMail 1. Dial the access number 2112-1234. [Please dial (852) 2112-1234 when you are accessing VoiceMail service from oversea.] 2. A welcome greeting message will be announced and please select the language by pressing ‘1’ for Cantonese / ‘2’ for English. 3. Enter your User ID (your Cloud Voice Number) followed by “#” 4. Enter your VoiceMail PIN followed by “#” 5. Follow the voice instructions for voice mail service. Note: Starter VoiceMail PIN is your Cloud Voice Number. For security reason, please change your VoiceMail PIN regularly. 5.4 Retrieval of VoiceMail via Outlook 2000 1. Open your Microsoft Outlook 2. Click Tools 3. Select Accounts 4. Click New 5. Select Microsoft Exchange, POP3, IMAP, or HTTP and click Next 6. Enter Account Information * and click Next 7. Select Internet E-mail and click Next 8. Enter Server Information ** and click Next 9. Click Finish * When entering the Account Information, please input the following • Your Name: Name wish to be displayed in email • E-mail Address: [email protected]; ‘3xxxxxxx’ is your Cloud Voice Number • Username: Your Cloud Voice Number (eg 3xxxxxxx) • Password: Your Cloud Voice Password ** When entering Server Information, please input the following • Account Type: IMAP • Incoming mail server: imap.wtt-cloudvoice.com; • Outgoing mail server: smtp.wtt-cloudvoice.com Note: Starter VoiceMail PIN is your Cloud Voice Number. For security reason, please change your VoiceMail PIN regularly. Version 1.0 16 ©Wharf T&T Limited 2011 Cloud Voice Service 5.5 Visual VoiceMail By using Visual VoiceMail service, your voicemail messages will be displayed in your IP phone so that you can prioritize which messages to listen first. 1. Press and select Visual Voicemail. 2. Enter your VoiceMail PIN for your voicemail account. (Toggle on Remember Me to keep you sign-in status) 3. Press the Sign In softkey. 4. The VoiceMail will be displayed accordingly. Version 1.0 17 ©Wharf T&T Limited 2011 Cloud Voice Service 6 Using Phone Log If your phone display indicates that you have missed calls, you can use the Missed Call option on the Directory menu to view your call history and to call back the person that you have missed. You can also view call history and place calls from the Received Calls and Placed Calls directories. 6.1 Viewing and Dialing from the Phone Log 1. Press the Applications button . 2. Select Call History. (Use the Navigation bar and Select button to scroll and select.) 3. Select All Lines or the line that you want to view. 4. From the Call History list, select the call you want to dial and do one of the following: Press the Call softkey. Press the line key. Pick up the handset. Press the Speakerphone or Headset button. 6.2 Deleting Call Record from Phone Log 1. Press the Applications button 2. Select Call History. (Use the Navigation bar and button to scroll and select.) 3. Select All Lines or the line that you want to view. 4. Select the call you want to delete. 5. Press the Del Call softkey (you may need to press the more softkey first). 6. Press the Delete softkey to delete the call, or press the Cancel softkey to go back to the Call History screen. Note: For dialing Missed call from external parties, you should press More and EditDial to add “9” to the contact number Version 1.0 18 ©Wharf T&T Limited 2011 Cloud Voice Service 7 Extension Mobility The Extension Mobility feature allows you to associate your phone number and user profile with any IP Phone. When you use your IP Phone Personal Identification number (PIN) to login to an IP Phone, your assigned telephone number, and the settings that you have established will be associated with that phone. Extension Mobility is useful particularly for those who do not routinely conduct business in the same office. However, you can only login one phone at a time. If you want to use another phone, you must logout of the first phone. 7.1 Login 1. Press the Applications button . 2. Select Extension Mobility. 3. Enter your user ID (your Cloud Voice Number) and IP Phone PIN. 4. You can use the IP Phone from now on. Note: Starter IP Phone PIN is your Cloud Voice Number. For security reason, please change your IP Phone PIN regularly. 7.2 Logout 1. To sign out, press the Applications button . 2. Select Extension Mobility. 3. When prompted to sign out, press the Yes softkey. Version 1.0 19 ©Wharf T&T Limited 2011 Cloud Voice Service 8 Password Management 8.1 Change the Cloud Voice Password 1. Visit Wharf T&T Cloud Voice User Portal at http://www.wharftt.com/cloudvoice 2. Enter your Cloud Voice Number and Password 3. Click Login 4. Click Password Management 5. Enter Existing Password 6. Enter New Password 7. Re-enter New Password 8. Click Submit Note: i. Starter Cloud Voice Password is your Cloud Voice Number. ii. New Cloud Voice Password will be applied to the following services: - Cloud Voice User Portal - Presence Communicator Service – Cisco Unified Personal Communicator (Account and VoiceMail Login) - Mobility Apps Services – Cisco Mobile 8.1 (Configuration of VoiceMail, Desk Phone Integration and Corporate Directory) - 8.2 Retrieval of VoiceMail via Outlook 2000 Change the IP Phone PIN 1. Visit Wharf T&T Cloud Voice User Portal at http://www.wharftt.com/cloudvoice 2. Enter your Cloud Voice Number and Cloud Voice Password 3. Click Login 4. Click here in the foot note of the Call Management page 5. Enter your Cloud Voice Number and Cloud Voice Password 6. Click Login 7. Click User Option and choose User Setting 8. Enter Current PIN Version 1.0 20 ©Wharf T&T Limited 2011 Cloud Voice Service 9. Enter New PIN and Confirm PIN 10. Click Save Note: Version 1.0 i. Starter IP Phone PIN is your Cloud Voice Number ii. The New IP Phone PIN will be applied to the following services - Personal Directory - Extension Mobility 21 ©Wharf T&T Limited 2011