1
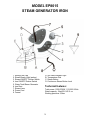
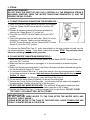
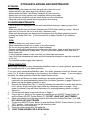
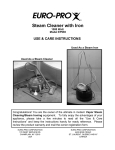
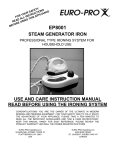
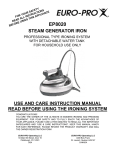
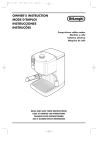
ETY NS
F
A
R S UCTIO ANCE
U
O
Y
TR
PLI
FOR LL INS IS AP
D A ING TH
A
E
S
R
EU
R
O
BE F
EP8015
STEAM GENERATOR IRON
PROFESSIONAL TYPE IRONING SYSTEM FOR
HOUSEHOLD USE
USE AND CARE INSTRUCTION MANUAL
READ BEFORE USING THE IRONING SYSTEM
CONGRATULATIONS! YOU ARE THE OWNER OF THE ULTIMATE IN MODERN
IRONING AND PRESSING EQUIPMENT. FOR YOUR SAFETY AND TO FULLY ENJOY
THE ADVANTAGES OF YOUR APPLIANCE, PLEASE TAKE A FEW MINUTES TO
READ ALL THE IMPORTANT SAFEGUARDS AND “USE & CARE INSTRUCTIONS”.
KEEP THIS MANUAL HANDY FOR EASY REFERENCE. PLEASE REVIEW THE
PRODUCT WARRANTY AND MAIL THE OWNER REGISTRATION FORM
EURO-PRO OPERATING LLC
21 LAWRENCE PAQUETTE INDUSTRIAL DRIVE
CHAMPLAIN, NY 12919
USA
TEL.: (800) 798-7398
EURO-PRO OPERATING LLC
4400 BOIS FRANC
ST. LAURENT, QUEBEC H4S1A7
CANADA
IMPORTANT SAFEGUARDS
When using your Steam Generator Iron, basic safety precautions should always be followed.
Read carefully the following instructions as they provide important information concerning how to
install, use and care for this appliance.
1. Use steam generator iron only for its intended use.
2. Use ironing system only for its intended use.
3. To protect against a risk of electric shock, do not immerse the iron or any part of the ironing
system in water or any other liquids.
4. The ironing system (iron and steam generator) should always be turned OFF before plugging
into or unplugging from wall outlet. Never pull power cord to disconnect from outlet; instead,
grasp plug and pull to disconnect.
5. Do not allow cord to touch hot surfaces. Let the ironing system cool completely before putting
away or opening water tank (removing safety cap). Wrap cord loosely around the ironing
system when storing.
6. Always disconnect ironing system from electrical outlet when filling with water or emptying and
when not in use. Always turn the safety cap slowly when opening the water tank.
7. Always make sure that there is no steam in the steam generator (water tank) before
opening the safety cap. Follow instructions to release all remaining steam though the iron
by pressing the steam release button. Unplug the unit and allow to cool before starting to
open safety cap. Always turn the cap slowly when opening the water tank to allow any
remaining steam to escape gradually.
8. Do not operate the ironing system with a damaged cord, plug or if the iron or any other part of
the system has been dropped or damaged. To avoid risk of electric shock, do not
disassemble or attempt to repair the ironing system. Return the unit to EURO-PRO Operating
LLC (see warranty) for examination, repair or replacement. Incorrect reassembly or repair
can cause a risk of electrical shock or injury to persons when the ironing system is used.
9. Close supervision is necessary for any appliance being used by or near children. Do not
leave ironing system unattended while connected or while on an ironing board. Always
position the iron flat on the silicone rubber posts.
10. Burns can occur from touching hot metal parts, hot water or steam. Use caution when turning
the system upside down, as there may be hot water in the unit. Never direct steam at any
person, especially when using the iron in the vertical position. The steam is very hot and can
cause burns.
11. The hot iron base (soleplate) must always rest on the non combustible silicone rubber posts
on top of the steam generator.
12. Do not operate in the presence of explosive and/or flammable fumes.
13. This appliance is intended only for household use. Follow all user instructions in this manual.
SPECIAL INSTRUCTIONS
1. To avoid a circuit overload, do not operate another high-wattage appliance on the same circuit
simultaneously with the steam generator iron.
2. If an extension is absolutely necessary, a 15-ampere rated cord with a polarized plug should be
used. Cords rated for less amperage may overheat. Care should be taken to arrange so that it
cannot be pulled on or tripped over.
3. Do not leave iron unattended when the system is connected to a power supply/electrical outlet.
POLARIZED PLUG
This appliance has a polarized plug (one blade is wider than the other).
As a safety feature, this plug will fit into a polarized outlet only one way. If
the plug does not fit fully into the outlet, reverse the plug. If it still does
not fit, contact a qualified electrician. Do no attempt to defeat this safety
feature.
SAVE THESE INSTRUCTIONS
FOR HOUSEHOLD USE ONLY
1
Rev. 05/01B
Even if you have used a steam generator iron before, please read all instructions and safeguards
in the Use and Care Instruction Book. In addition, please note the following user tips:
USING STEAM
PLEASE NOTE: Steam performance improves after the first 6-8 hours of usage. The steam
power increases and initial condensation at maximum temperature is reduced.
1. Make sure the temperature setting of the iron is within the steam range on the temperature
selector.
2. Turn power on for iron and steam generator. Before starting to use steam, make sure the
Steam Ready Light (2) is “ON”, indicating that steam is available.
NOTE: Trying to use steam before the Steam Ready Light (2) is “ON” can cause water
drops in the stem coming out of the iron.
CLEARING THE INITIAL CONDENSATION:
3. Clear the initial condensation by pressing the Steam Button (C) up to 3 seconds. Repeat if
necessary.
IMPORTANT NOTE:
4. While using the ironing system, if steam has not been released for more than approximately
5 minutes, the hose has cooled and any steam remaining in the hose from the last use
might condense. Clear this condensation by pressing Steam Button (C) before proceeding
to use the iron.
2
MODEL EP8015
STEAM GENERATOR IRON
1. Safety/Filler Cap
2. Steam Ready Light (amber)
3. Steam ON/OFF Rocker Switch
4. Iron ON/OFF Rocker Switch
5. Water Tank/Steam Generator
6. Iron Rest
7. Steam Hose
8. Power Cord
9. Funnel
A. Iron Heat Indicator Light
B. Temperature Dial
C. Steam Button
D. Continuous Steam Button Lock
Technical features:
Total power: 1500/1780W, 110/120V 60Hz
Water capacity: 1liter/33.8 US fl. oz.
Working pressure: 3,5bar
3
STEAM GENERATOR
IMPORTANT SUPPLEMENTARY USER INFORMATION
Read all instructions before using the Steam Generator Iron and follow all instructions and
safeguards carefully.
IMPORTANT NOTES ON THE USE OF A STEAM GENERATOR:
DO NOT OPEN THE SAFETY/FILLER CAP (1) BEFORE ALL THE REMAINING STEAM IS
RELEASED (EMPTIED) FROM THE WATER TANK/STEAM GENERATOR (5) AND THE
GENERATOR HAS COOLED. TO RELEASE THE STEAM TURN THE STEAM ON/OFF
ROCKER SWITCH (3) TO THE “OFF” POSITION. PUSH THESTEAM BUTTON (C) UNTIL NO
MORE STEAM COMES OUT OF THE IRON, THEN OPEN SLOWLY THE SAFETY/FILLER
CAP (1).
1. A WORD ON WATER
For best results we recommend using 100% demineralized/distilled water.
The use of demineralized/distilled water will prolong the life of your generator and reduce the
frequency of required generator cleaning, as well as the possibility of staining due to
accumulated impurities.
DO NOT USE WATER PROCESSED THROUGH A HOME WATER SOFTENING SYSTEM
OR BOTTLED MINERAL WATER.
If you choose to use regular tap water, make sure that the chloride (CL) level of your local water
supply does not exceed 8mg/liter. In many areas, the chloride level exceeds 8mg/liter. Use of
tap water with high chloride levels will adversely affect the life expectancy of your steam
generator. Tap water can be mixed with demineralized/distilled water to lower the chloride level.
For best results make sure to use the right proportions to bring the chloride level to 8mg/liter or
less.
2. DO NOT OVERFILL THE STEAM GENERATOR
When empty, the water tank/steam generator (5) can be filled with 1 liter/33.8 US oz. of
demineralized/distilled water. Do NOT overfill. Overfilling the tank can cause water drops
coming out of the steam holes. See instructions on page 6.
3. DO NOT CLOSE THE SAFETY/FILLING CAP (1) TOO TIGHTLY
To close, turn the Safety/Filler Cap (1) clockwise until the point where you feel friction - do not
close too tightly. The Safety/Filler Cap (1) includes a gasket which can be flattened and
damaged if the cap is closed too tightly. If the gasket is damaged, steam may escape while
the generator is used, even when the Safety/Filler Cap (1) is closed. If your Safety/Filler Cap
(1) is damaged and steam is leaking, you may call Customer Service at
514-842-8691 to purchase a replacement Safety/Filler Cap (1).
4. FOR BEST RESULTS DO NOT LEAVE HOT IRON RESTING IDLE ON IRON REST (6)
FOR LONG PERIODS OF TIME
The life-span of your EP8015 will be reduced if the iron is left idle at high temperatures for
extended periods. If iron is not in use, reduce its temperature to the lowest temperature setting
on the Temperature Dial (B).
5. WARRANTED FOR REGULAR HOUEHOLD USE
While the EP8015 is a professional type ironing system, it is intended for and warranted only
for normal household use. Iron and/or steam generator should not be used for more than 15
hours per week in approximately 3 hour intervals.
4
INSTRUCTIONS FOR USE
Your new Ironing System offers the ultimate in modern ironing. Read carefully all the important
safeguards (page 1) and all the instructions in the user manual before using your Ironing
System. Follow all the instructions.
1. WARNINGS:
• Never leave the unit unattended while plugged in. Always disconnect from electrical power
source.
• You must always unplug (disconnect) the unit when you have finished using it and:
A) Before opening the Safety/Filler Cap (1).
B) Before any cleaning or maintenance.
C) Before filling and emptying the water tank/steam generator (5).
D) When you leave the room, even if only for a few minutes.
• Always place the iron on the iron rest (6) when not in use.
• Never use the ironing system if the iron or the steam generator have been dropped. To avoid risk of
electric shock, do not disassemble or attempt to repair the ironing system. Return the unit to EURO-PRO
Operating LLC (see warranty) for examination, repair or replacement.
• Do not stretch out the power cord (8) and/or steam hose (7) while ironing. Do not use the appliance if an
power cord (8) and/or steam hose (7) is damaged. If the power cord (8) or steam hose (7) show signs of
wear or damage, please return the unit to EURO-PRO Operating LLC (see warranty) for examination,
repair or
replacement.
• Read the “IMPORTANT SAFEGUARDS” listed on page 1 and all special instructions and follow carefully.
2. DRY IRONING:
1. Place your steam generator on a solid flat surface.
2. Plug in unit. Press the Iron ON/Off Rocker Switch (4) which lights up to indicate that the iron is “ON”.
3. Set the Temperature Dial (B) according to the garment label or use the temperature setting table
included in the user’s manual as a guide.
4. The Iron Heat Indicator Light (A) will go on and will turn off when the iron has reached the desired
temperature.
5. You may iron without steam at any temperature setting.
3. IRONING WITH STEAM:
1. Plug the appliance into a 110/120 V electrical outlet.
2. Press the Iron ON/Off Rocker Switch (4) to the “ON” position. Press the Steam ON/OFF Rocker
Switch (3) to activate steam generator.
3. When planning to use steam, make sure to set the Temperature Dial (B) in the area designated for
use with steam. i.e. between the two “” and three “” dots on the Temperature Dial (B). (See
temperature setting table included in the user’s manual as a guide.)
4. The Steam Ready Light (2) will come on in 8-10 minutes indicating steam is available. The Steam
Ready Light (2) will go on and off while the generator is in use.
5. Press Steam Button (C) to activate the steam release.
NOTE: Trying to use steam before the Steam Ready Light (2) is “ON” can cause water drops
in the stem coming out of the iron.
4. CONTINUOUS STEAM BUTTON:
If you need a steady steam supply, press the Continuous Steam Button (D) down and then push it
backwards to lock the Steam Button (C) in. To unlock, press the Continuous Steam Button (D) down
again and push it forwards.
NOTE: Before ironing, point iron away from table, press steam button (C) to clear initial condensation.
WARNING: Never direct steam from the iron at yourself or another person. Special care must be
taken when the iron is used in a vertical position. The steam is very hot and can cause burns.
5
5. STEAM:
IMPORTANT WARNING:
DO NOT OPEN THE SAFETY/FILLER CAP (1) BEFORE ALL THE REMAINING STEAM IS
RELEASED (EMPTIED) FROM THE WATER TANK/STEAM GENERATOR (5) AND THE
GENERATOR HAS COOLED.
A. TO EMPTY/RELEASE STEAM FROM THE GENERATOR:
1. Press “Iron On/Off Rocker Switch (4) into the “ON” position.
2. Press the “Steam On/Off Rocker Switch (3) into the “Off”
position.
3. Release all remaining steam in the steam generator by
pressing the “Steam Button” (C) on the iron.
4. Press the Iron ON/OFF Rocker Switch (4) into the “OFF”
position.
5. Unplug the appliance from the wall outlet. Allow it to cool a
minimum of 5 minutes. Make sure that both the Iron
ON/OFF Rocker Switch (4) and the Steam ON/OFF Rocker
Switch (3) are in the “OFF” position.
Steam ON/OFF
Switch
Steam Ready
Light
Iron ON/OFF
Switch
To unscrew the Safety/Filler Cap (1), push down slightly on the gray outside ring and turn the
cap counterclockwise, slowly. If any steam continues to escape, STOP. Repeat instructions
above for releasing steam from the generator.
B. FILLING WATER TANK/STEAM GENERATOR (5) :
1. Make sure that both Iron ON/OFF Rocker Switch (4) and Steam ON/OFF Rocker Switch (3)
are in the “OFF” position.
2. Make sure that your appliance is unplugged i.e. is not connected to an electrical power
source.
3. Make sure that any remaining steam in the Steam Generator has been released through the
iron as described in Section “A” above.
4. To unscrew the Safety/Filler Cap (1), push down and turn the cap counterclockwise, slowly.
If any steam continues to escape, stop and release the steam through the iron as in
Section “A” above.
5. Put the Funnel (9) into the filling pipe, under the Safety/Filler Cap (1)
6. Fill the tank with water (warm if possible), to the top of the filling pipe.
7. Remove the Funnel (9) from the filling pipe. You will notice that the water level dropped to
be approximately 2 inches below the top of the filling pipe.
8. DO NOT ADD ANY MORE WATER NOW. The automatic filling system makes sure that
when you follow the above instructions, the steam generator is full of water.
9. Replace the Safety/Filler Cap (1) turning clockwise until you get friction. DO NOT CLOSE
TOO TIGHTLY OR GASKET WILL BE FLATTENED.
IMPORTANT NOTE:
DO NOT ADD ANY MORE WATER TO THE TANK AFTER THE WATER LEVEL HAS
DROPPED. (SEE #7 ABOVE.)
ADDING MORE WATER TO THE TANK AT THIS POINT WILL CAUSE OVERFILLING AND
RESULT IN WATER DROPS IN THE STEAM.
6
C. WHEN TO REFILL THE WATER TANK/STEAM GENERATOR (5):
For best results, refill water tank/steam generator (5) to maximum before every usage and
when steam power is recognized lower while in use. Turn Iron ON/OFF Rocker Switch (4) and
Steam ON/OFF Rocker Switch (3) to “OFF” position and release all steam from generator as
described on page 6 Section A.
D. TEMPERATURE SETTINGS:
• Always read garment labels and follow directions.
• For maximum efficiency, iron garments requiring the lowest temperature settings first as the
iron heats up faster than it cools.
• If there are no instructions included with the garment, we suggest that you follow the table
above as a guide (except when any fabric has an applied finish, gloss, etc. where lower
temperatures might be required).
• Always iron blends (fabrics made of two or more types of fibers) using the heat setting
appropriate for the fabric requiring the lowest temperature setting.
6. IMPORTANT PRESSING TIPS:
A. USE STEAM INTERMITTENTLY:
Your Steam Generator Iron features a professional type iron with steam holes placed in the
front of the iron soleplate. Correct ironing procedure involves steaming the fabric with the front
end of the iron followed by pressing and drying with heat from the rear of the iron. For best
results, garments should be dry after pressing to avoid re-wrinkling due to lingering dampness.
Therefore, we recommend that you use steam as required, but not continuously.
B. PRESSING DIFFICULT NATURAL FIBERS (I.E. 100% COTTON DRESS SHIRTS, ETC.):
While your Steam Generator offers high quality professional type steam, some fabrics may
require additional moisture for best results. You may want to press cotton shirts while still
damp or spray with demineralized/distilled water, prior to ironing.
7
C. DRY STEAM V.S. HUMID STEAM:
Because steam is produced in a generator and not in the iron (as with regular household irons)
you can select dry or humid steam. The temperature of the iron setting determines the type of
steam. At high temperatures, the iron delivers very dry steam. Lower temperature settings
(within steam range) offer humid steam.
D. USER BENEFITS:
For best pressing results, you have the flexibility to choose the type of steam and not only the
iron temperature.
A balance should be maintained between the humidity (low iron
temperature) required to loosen fibers and the need for heat (higher iron temperature) to
flatten/shape and dry the fibers.
Instructions for specific iron temperature settings should be treated as guidelines only. We
recommend that you experiment with each fabric. The EP8015 can produce humid steam at
relatively low temperature settings where regular household irons would release water. Also,
the very dry steam produced at high iron temperature setting (3 dots “”) can be used on
some fabrics where normally the use of steam is prohibited.
8
STORAGE:
STORAGE/CLEANING AND MAINTENANCE
• Always unplug the power cord from the wall outlet when not in use.
• Always store in a dry place away from children’s reach.
• Always drain the Water Tank/Steam Generator (5) before storing.
• Always let your ironing system cool completely before putting away.
• Do not allow the electrical cord and steam hose to touch hot surfaces.
• Wrap the cord loosely around the ironing system when storing.
CLEANING/MAINTENANCE:
• The cord must be unplugged from the wall outlet before starting to clean any part of the
appliance.
• Make sure that the Iron and Steam Generator are COLD before starting to clean. Allow at
least four (4) hours for the unit to cool after it has been used.
• Make sure that all steam has been emptied (released from the steam generator) before
opening the Safety/Filler Cap. (Follow instructions on page 6 Section A for releasing
steam.)
IRON:
• Clean the steam iron only when it is cold.
• Never immerse the steam iron in water or any other liquids.
• Do not use scouring pads, abrasives or harsh cleaners.
• Prepare a paste using mild scouring powder and a little water. Apply a small amount of the
paste to the soleplate with a damp cloth. Rub the soiled area and then wipe clean with a
clean damp cloth.
• If using soleplate cleaners, make sure that you follow label instructions.
• Use a soft cloth dampened with water and mild household detergent to wipe the outer shell
of the iron.
• Dry soleplate and thoroughly after cleaning.
STEAM GENERATOR:
We strongly recommend using demineralized/distilled water to insure optimum performance
and maximize the life of your steam generator.
If you are using demineralized/distilled water, the steam generator should be cleaned once
every 6 to 12 months, depending on the frequency and duration of usage. If you use regular
tap water, the steam generator should be cleaned once a month.
1.
Make sure that there is no steam remaining in the steam generator. Follow the
instructions for emptying/releasing steam from the steam generator on page 6 Section A.
2. Make sure that the steam generator is cold.
3. Remove the Safety/Filler Cap (1), carefully following the instructions to make sure that the
unit is cold by slowly turning the cap to allow any remaining steam to escape. If any
steam is released, stop and follow instructions for emptying/releasing steam on page 6
Section A.
4. Fill the tank with water as per instructions on Page 6.
5. Plug in the unit. Switch on the system by pressing the Iron ON/OFF Rocker Switch (4)
and the Steam ON/OFF Rocker Switch (3). DO NOT LEAVE UNIT UNATTENDED.
6. Allow a few minutes until the water starts to boil without the Safety/Filler Cap (1) on. DO
NOT LEAVE UNIT UNATTENDED.
7. Put the Iron ON/OFF Rocker Switch (4) and the Steam ON/OFF Rocker Switch (3) in the
“OFF” position. Unplug the unit from the electrical outlet.
8. Allow the unit to cool completely.
9. Empty the water contained in the generator.
10. YOUR STEAM GENERATOR IS NOW CLEAN.
9
TROUBLESHOOTING
Do not operate the ironing system with a damaged cord, plug or if the iron or any other part of
the system has been dropped or damaged. To avoid the risk of electric shock, do not
disassemble or attempt to repair the ironing system. Return the appliance to EURO-PRO
Operating LLC (see Warranty) for examination and repair. Incorrect re-assembly or repair can
cause a risk of electric shock or injury to persons when the ironing system is used.
PROBLEM
POSSIBLE CAUSES
REMEDY
No steam is released
through the iron
1. Steam ON/OFF Rocker Switch is
not in the “ON” position.
2. Water Tank/Steam Generator is
empty.
3. Unit is not plugged in.
4. Steam is not visible because the
temperature of the soleplate is at
maximum & room temperature is
high.
5. Generator is NOT fully heated.
1. Turn Steam ON/OFF Rocker
Switch “ON” .
2. Fill with water as per instructions.
3. Make sure both Steam & Iron
ON/OFF Rocker Switches are in
the “OFF” position and plug unit
in.
4/5. The heating time for the generator
is approximately 8-10 minutes .
Watch for Steam Ready Light to
come on indicating that steam is
ready.
The soleplate remains
cold
1. Iron is not switched ON.
2. Temperature is set at “Minimum”.
1. Turn Iron ON/OFF Rocker Switch
“ON” .
2. Turn the temperature dial to the
appropriate setting.
Drops of water leak
from the iron soleplate
1. Soleplate temperature is too low
to iron with steam.
2. Generator is NOT fully heated.
1. Turn the temperature dial to the
marks between 2 and 3 dots. .
2. Wait for generator to be fully
heated.
Dirty or yellow steam is
coming out of the iron
1. Residue in water tank.
2. Not using demineralized/distilled
water.
1. Clean steam generator as per
instructions.
2. Use demineralized/distilled water
after cleaning the tank.
Steam leaking from cap
1. Gasket is broken because
Safety/Filler Cap (1) was closed
too tightly or cap was opened
while tank was full of steam and
gasket broke.
1. Order new Safety/Filler Cap (1)
from Customer Service at
(800) 798-7398
Top getting yellow near
Safety/Filler Cap
1. Steam leaking/iron left hot and
idle on the generator.
1. Order new Safety/Filler Cap (1). Do
not leave iron on iron rest (6) while
hot for extended periods of time.
Yellowing of generator
1. Yellowing occurs with normal
aging.
Excessive yellowing
1. Leaving iron idle on top of
generator at high temperature for
long periods of time.
10
LIMITED WARRANTY
Model EP8015
EURO-PRO OPERATING LLC warrants this EURO-PRO Operating LLC product to be free from defects in
material and workmanship for a period of ONE (1) year from the date of purchase when utilized for normal
household use by the original purchaser only. The attached Warranty Registration Card which must be filled
out and returned within 10 days of purchase. This is essential for your Warranty to be effective should any
problem arise with this product.
Should any defect covered by the terms of the limited warranty be discovered within ONE year, EURO-PRO
Operating LLC will repair or replace any defective part provided the unit is returned by the original purchaser,
freight prepaid, to EURO-PRO Operating LLC, 21 LAWRENCE PAQUETTE INDUSTRIAL DRIVE,
CHAMPLAIN, NY 12919. Proof of purchase date and $ 12.95 for handling and return packing/shipping charges
must be included.
The liability of EURO-PRO Operating LLC is limited solely to the cost of the replacement parts or the complete
unit at our option. LABOUR CHARGES ARE NOT INCLUDED.
This warranty does not cover normal wear of parts and apply to any unit that has been tampered with or used
for commercial purposes. This limited warranty does not cover damage caused by misuse, negligent handling
or damage due to faulty packaging or mishandling in transit (by any common courier).
This warranty is extended to the original purchaser of the unit and excludes all other legal and/or conventional
warranties. The responsibility of EURO-PRO Operating LLC , if any, is limited to the specific obligations
expressly assumed by it under the terms of the limited warranty. In no event is EURO-PRO Operating LLC
liable for incidental or consequential damages of any nature whatsoever. Some states do not permit the
exclusion or limitation of incidental or consequential damages, so the above may not apply to you.
This warranty gives you specific legal rights, and you may have other rights which vary from state to state.
PURCHASER
DATE OF PURCHASE
DEALER
IMPORTANT: Carefully pack item to avoid damage
----------------------------------------------------------------------------------------------------------------------------
OWNERS REGISTRATION CARD
Please complete and return within ten (10) days of purchase in order to validate the foregoing Limited Warranty. The registration
will enable us to contact you in the event a product defect is discovered. By returning this card, you acknowledge to have read and
understood the instructions for use and warnings set forth in the accompanying instructions.
RETURN TO: EURO-PRO OPERATING LLC
IN US:
21 LAWRENCE PAQUETTE IND. DR., CHAMPLAIN, NY 12919
IN CANADA: 4400 BOIS FRANC, ST. LAURENT, QUEBEC H4S 1A7
PURCHASER:
ADDRESS:
CITY:
STATE:
DATE OF PURCHASE:
MODEL:
NAME & ADDRESS OF DEALER: