1
ZOTAC ZBOX Blu-ray
ZOTAC ZBOX Blu-ray
User’s Manual
No part of this manual, including the products and software described in it,
may be reproduced, transmitted, transcribed, stored in a retrieval system, or
translated into any language in any form or by any means,except documentation kept by the purchaser for backup purposes, without the express written
permission of ZOTAC.
Products and corporate names mentioned in this manual may not be registered trademarks or copyrights of their respective companies, and are
XVHGIRULGHQWL¿FDWLRQSXUSRVHVRQO\$OOWUDGHPDUNVDUHWKHSURSHUW\RIWKHLU
respective owners.
Every effort has been made to ensure that the contents of this manual are correct and up to date. However, the manufacturer makes no guarantee regarding the accuracy of its contents, and reserves the right to make changes
without prior notice.
CAUTION:
Risk of explosion if the battery is replaced with an incorrect type. Batteries
should be recycled where possible. Disposal of used batteries must be in
accordance with local environmental regulations.
1
ZOTAC ZBOX Blu-ray
Table of Contents
3URGXFWVSHFL¿FDWLRQV -------------------------------------------------------------------------- 3
6DIHW\LQIRUPDWLRQ -------------------------------------------------------------------------------- 4
Setting up your system ----------------------------------------------------------------------- 4
Care during use -------------------------------------------------------------------------------- 4
:HOFRPH --------------------------------------------------------------------------------------------- 5
Package contents ------------------------------------------------------------------------------ 5
*HWWLQJWRNQRZ\RXU=27$&=%2;%OXUD\ --------------------------------------------- 6
Front view ---------------------------------------------------------------------------------------- 6
Rear view----------------------------------------------------------------------------------------- 7
/('LQGLFDWRU --------------------------------------------------------------------------------------- 8
LED indicator illustration --------------------------------------------------------------------- 8
How to disable the blue ring LED indicator ---------------------------------------------- 8
%OXUD\GLVF ----------------------------------------------------------------------------------------- 10
Ejecting a disc ---------------------------------------------------------------------------------- 10
Setting the region code for Blu-ray movie playback ----------------------------------- 10
&XVWRPL]LQJWKH=27$&=%2;%OXUD\ ---------------------------------------------------- 11
Removing a memory module --------------------------------------------------------------- 12
Installing a memory module ----------------------------------------------------------------- 13
Removing a hard disk ------------------------------------------------------------------------- 14
Installing a hard disk -------------------------------------------------------------------------- 15
Installing a Mini-PCIe card ------------------------------------------------------------------- 16
6HWWLQJXSWKH=27$&=%2;%OXUD\ ------------------------------------------------------- 17
3RVLWLRQLQJWKH=27$&=%2;%OXUD\------------------------------------------------------ 18
Mounting the ZOTAC ZBOX Blu-ray to a wall------------------------------------------- 18
,QVWDOOLQJGULYHUVDQGVRIWZDUH --------------------------------------------------------------- 20
Installing an operating system -------------------------------------------------------------- 20
Installing system drivers ---------------------------------------------------------------------- 20
8VLQJ\RXU=27$&=%2;%OXUD\------------------------------------------------------------ 21
&RQ¿JXULQJZLUHOHVVFRQQHFWLRQ ----------------------------------------------------------- 21
&RQ¿JXULQJZLUHGFRQQHFWLRQ --------------------------------------------------------------- 21
Using a static IP ---------------------------------------------------------------------------- 21
Using a dynamic IP (PPPoE connection) -------------------------------------------- 22
&RQ¿JXULQJDXGLRRXWSXWYLDDQ+'0,GHYLFH ------------------------------------------ 22
&RQ¿JXULQJWKH3&,HOLQNVWDWHSRZHUPDQDJHPHQW ---------------------------------- 23
Installing the PowerDVD for 3D movie --------------------------------------------------- 25
2
ZOTAC ZBOX Blu-ray
3roGuFt sSeFLÀFatLons
&KLSVHW
,QWHO® NM10 Express
3URGXFW'LPHQVLRQV
PP[PP[PPLQ[LQ[LQ
2QERDUG&38
,QWHO® AtomTM D525 (Dual-core, 1.8 GHz)
,QWHO® AtomTM D510 (Dual-core, 1.66 GHz) (Optional)
2QERDUGJUDSKLFV
1H[W*HQHUDWLRQ19,',$® ION GPU, CUDA cores up to 16
8SWR0%RI*''5YLGHRPHPRU\
'XDOOLQN'9,,+'0,RXWSXW9*$FRPSDWLEOHZLWKDGDSWHU
'XDOGLVSOD\UHDG\
6XSSRUWXSWR[UHVROXWLRQ
6XSSRUW%OXUD\'YLD+'0,WR'79ZLWK3RZHU'9'
0HPRU\VXSSRUW
7ZRSLQ62',00V''5
8SWR*%RIPHPRU\
86%SRUWV
2QH86%RQHFRPERH6$7$86%SRUWZDNHRQ86%VXSSRUWHG
7ZR86%SRUWV
6WRUDJHVXSSRUW
6$7$*EVWUDQVIHUUDWHV
6XSSRUWVRQHLQFK6$7$+''RU66'KHLJKWOLPLWPP
2QHFRPERH6$7$86%SRUW
1HWZRUNVXSSRUW
*LJDELW0ESV/$1
,(((FRPSDWLEOH
WiFi
EJQFRPSDWLEOH
(QKDQFHGZLUHOHVVVHFXULW\FRPSDWLEOH
Audio
FKDQQHOKLJKGH¿QLWLRQDXGLR
-DFNVHQVLQJFRPSDWLEOH
2SHUDWLQJ6\VWHPVXSSRUW
0LFURVRIW:LQGRZV®;3:LQGRZV®9LVWDDQG:LQGRZV
ELWDQGELWVXSSRUW
*UHHQ)XQFWLRQ
$&3,$GYDQFHG&RQ¿JXUDWLRQDQG3RZHU,QWHUIDFHFRPSDWLEOH
3
ZOTAC ZBOX Blu-ray
%OXUD\&RPER'ULYHU6XSSRUW
%'UHDGFRPSOLDQWPD[VSHHG;
'9'UHDGDQGZULWHFRPSOLDQWPD[VSHHG;
&'UHDGDQGZULWHFRPSOLDQWPD[VSHHG;
6XSSRUWVFPFPGLDPHWHU
6XSSRUWV60$57;6PDUW0RQLWRULQJ$GMXVWLQJ5HDGVSHHG7HFKQRORJ\IRU
eXtraction) and Seamless Link®6PDUW0RQLWRULQJ$GDSWLQJ5HFRUGLQJ
Technology for Burning) function
Safety information
Your ZOTAC ZBOX is designed and tested to meet the latest standards of safety for information technology equipment. However, to ensure your safety, it is important that you read
the following safety instructions.
Setting up your system
Read and follow all instructions in the documentation before you operate your system.
Do not use this product near water or a heat source such as a radiator.
Set up the system on a stable surface with the provided stand. Never use the system
alone without the stand.
Openings on the chassis are for ventilation. Do not block or cover these openings.
Make sure you leave plenty of space around the system for ventilation. Never insert
objects of any kind into the ventilation openings.
Use this product in environments with ambient temperatures between 0ć and 35ć.
,
If you use an extension cord, please use the UL listed cord and make sure that
the total ampere rating of the devices plugged into the extension cord does not
exceed its ampere rating.
Care during use
Do not walk on the power cord or allow anything to rest on it.
Do not spill water or any other liquids on your system.
:KHQWKHV\VWHPLVWXUQHGRIIDVPDOODPRXQWRIHOHFWULFDOFXUUHQWVWLOOÀRZV$OZD\V
unplug all power, modem, and network cables from the power outlets before cleaning
the system.
If you encounter the following technical problems with the product, unplug the power
FRUGDQGFRQWDFWDTXDOL¿HGVHUYLFHWHFKQLFLDQRU\RXUUHWDLOHU
¾ The power cord or plug is damaged.
¾ Liquid has been spilled into the system.
¾ The system does not function properly even if you follow the operating instructions.
¾ The system was dropped or the cabinet is damaged.
¾ The system performance changes.
4
ZOTAC ZBOX Blu-ray
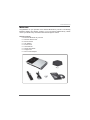
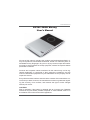
Welcome
Congratulations on your purchase of the ZOTAC ZBOX Blu-ray mini-PC. The following
illustration displays the package contents of your new ZOTAC ZBOX Blu-ray. Please
contact your retailer If any of the below items are damaged or missed.
3DFNDJHFRQWHQWV
[=27$&=%2;%OXUD\PLQL3&
[=27$&9(6$PRXQW
[0RXQWVFUHZV
[$&$GDSWHU
[3RZHU&RUG
[8VHU0DQXDO
[4XLFN6WDUW*XLGH
[6XSSRUW&'
['9,WR9*$DGDSWHU
5
ZOTAC ZBOX Blu-ray
Getting to know your ZOTAC ZBOX Blu-ray
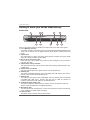
Front view
1
3 5
2
4
7
6
8
10
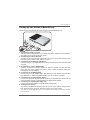
Refer to the diagram below to identify the components on this side of the system
LQ0HPRU\FDUGVORW
7KHEXLOWLQPHPRU\FDUGUHDGHUUHDGVDQGZULWHV00&6'6'+&06063UR['
cards used in devices such as digital cameras, MP3 players, mobile phones and
PDAs.
2SWLFDOGULYH
The optical drive is a slot-in type drive which supports compact discs (CD), digital
video discs (DVD) and Blu-ray discs (BD).
%OXUD\GULYHHPHUJHQF\HMHFW
Users can use a pin to insert into the Blu-ray drive emergency eject pin-hole to
manually eject disc.
2SWLFDOGULYHDFWLYLW\LQGLFDWRU
The optical drive activity indicator shows when data is being transferred by the optical disk drive.
2SWLFDOGULYHHMHFWEXWWRQ
The optical drive eject button ejects the disc from the optical drive.
86%SRUW
The USB (Universal Serial Bus) port is compatible with USB devices such as keyboards, mice, cameras and hard disk drives.
86%SRUW
The USB 3.0 port supports the SuperSpeed USB 3.0 devices and is backwards
FRPSDWLEOH ZLWK 86% GHYLFHV 8VH WKLV SRUW IRU 86% GHYLFHV IRU
maximum performance with USB 3.0 compatible devices.
+HDGSKRQH$XGLRRXWSXWMDFN
The stereo headphone jack (3.5mm) is used to connect the system’s audio out
VLJQDOWRDQDORJKHDGSKRQHVRUDPSOL¿HGVSHDNHUV
0LFURSKRQHMDFN
The microphone jack is designed to connect a microphone for video conferencing,
voice narrations or simple audio recordings.
3RZHUVZLWFK
The power switch turns the mini-PC ON and OFF.
6
ZOTAC ZBOX Blu-ray
Rear view
1
5
3
2
4
7
6
8
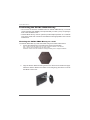
Refer to the diagram below to identify the components on this side of the system.
86%SRUW
The USB 3.0 port supports the SuperSpeed USB 3.0 devices and is backwards
FRPSDWLEOH ZLWK 86% GHYLFHV 8VH WKLV SRUW IRU 86% GHYLFHV IRU
maximum performance with USB 3.0 compatible devices
(WKHUQHWSRUW
7KHHLJKWSLQ5-/$1SRUWVXSSRUWVVWDQGDUG(WKHUQHWFDEOHIRUFRQQHFWLRQWRD
ORFDODUHDQHWZRUN/$1ZLWKVSHHGVRI0ESV
&RPERH6$7$*EV86%SRUW
7KHFRPERH6$7$*EV86%SRUWLVFRPSDWLEOHZLWKH6$7$GHYLFHVVXFK
as external hard drives, Blu-ray drives, and USB 2.0 devices.
'XDOOLQN'9,,RXWSXW
The dual-link DVI-I output supports digital displays with resolutions up to 2560x1600
and connection to analog VGA monitors with the included adapter (up to 2048x1536)
5. HDMI output
7KH +'0, +LJK 'H¿QLWLRQ 0XOWLPHGLD ,QWHUIDFH RXWSXW VXSSRUWV )XOO +' S
displays such as an HDTV or monitor.
2SWLFDO63',)RXWSXW
7KHRSWLFDO63',)RXWSXWHQDEOHVFRQQHFWLQJWKH=27$&=%2;%OXUD\WRGLJLWDO
audio receivers and speakers for crystal clear digital audio and surround sound
from compatible soundtracks.
6DIHW\ORFN
Connects to compatible Kensington Safety Locks.
3RZHULQSXW'&9
The supplied power adapter converts AC power to DC power for use with this jack.
Power supplied through this jack supplies power to the mini-PC. To prevent damage
to the mini-PC, always use the supplied power adapter.
1RWH7KHSRZHUDGDSWHUPD\EHFRPHZDUPWRKRWZKHQLQXVH'RQRWFRYHUWKHDGDSWHUDQGNHHSLW
away from your body.
1RWH'XHWRWKHVSHFLDOGHVLJQIRUHDV\XSJUDGHVRPHFRQQHFWRUVDUHSODFHGXSVLGHGRZQ
7
ZOTAC ZBOX Blu-ray
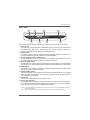
LED indicator
1
4
3
2
LED indicator illustration
%OXH5LQJ
LED is on
System is on
LED is off
System is off
/('ÀDVKHV
slowly
System is in
standby mode
1RWH7KHEOXHULQJ/('FDQEHGLVDEOHGLQ
BIOS setting. Refer to the next chapter for
more details.
:L)L6WDWXV,QGLFDWRU
+''6WDWXV,QGLFDWRU
3RZHU2Q2II,QGLFDWRU
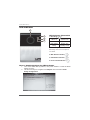
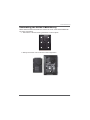
How to disable the blue ring LED indicator
1.
2.
8
Turn on the ZBOX Blu-ray mini-PC, then press <Delete> to enter the BIOS
SETUP UTILITY.
Use the arrow keys to navigate to the &KLSVHW menu and select 6RXWK
%ULGJH&RQ¿JXUDWLRQ.
ZOTAC ZBOX Blu-ray
3.
Press <Enter> to display the 6RXWK %ULGJH &KLSVHW &RQ¿JXUDWLRQ and
navigate to LOGO LED indicator.
4.
Press <Enter> and select 'LVDEOHG.
5.
3UHVV)WRVDYHWKHFRQ¿JXUDWLRQDQGH[LW7KH3&ZLOOUHERRt.
9
ZOTAC ZBOX Blu-ray
Blu-ray disc
The ZOTAC ZBOX Blu-ray features a Blu-ray combo drive that can read Blu-ray
GLVFVDQGUHDGZULWH'9'VDQG&'V
Ejecting a disc
There are two ways to get the disk to eject.
1. Right-click on the %OXUD\'ULYH in 0\&RPSXWHU and left-click on (MHFW.
2. Press the eject button.
Eject Button
Setting the region code for Blu-ray movie playback
The region code does not need to be set manually. The Blu-ray drive will recognise the
UHJLRQFRGHIURPWKH¿UVW%OXUD\PRYLHLQVHUWHGLQWRWKHGULYH7KHGULYHFDQFKDQJH
region codes up to 5 times. Once the region code has changed 5 times, it will lock to
the last detected region.
10
ZOTAC ZBOX Blu-ray
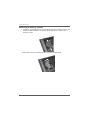
Customizing the ZOTAC ZBOX Blu-ray
Please follow the instructions below to remove the cover of the ZOTAC ZBOX Bluray before customizing.
1. Remove the 6 screws securing the bottom cover into place.
2. Gently remove the cover as shown on the image below.
11
ZOTAC ZBOX Blu-ray
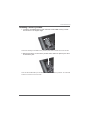
Removing a memory module
1. Locate the SO-DIMM memory slot and gently press the two arms securing the
memory module outwards, as shown in the image below, to release the
memory module.
2. Remove the memory module from the slot at a 45-degree angle.
12
ZOTAC ZBOX Blu-ray
Installing a memory module
1. Locate the SO-DIMM memory slots and insert a SO-DIMM memory module
into the slot at a 45 degree angle.
1RWH:KHQLQVWDOOLQJWZR62',00PHPRU\PRGXOHVSOHDVHLQVHUWDPRGXOHLQWRWKHORZHUVORW¿UVW
2. Gently press down on the memory module until it locks into place by the arms
of the memory slot.
1RWH7KLV=27$&=%2;%OXUD\DFFRPRGDWHVWZR''562',00PHPRU\PRGXOHV<RXPXVWLQVWDOO
at least one module in one of the two slots.
13
ZOTAC ZBOX Blu-ray
Removing a hard disk
1. Locate the hard disk bracket, remove the 4 screws, and remove the cover as
shown in the image below.
2. Gently slide the hard disk away from the connector and remove the hard disk.
14
ZOTAC ZBOX Blu-ray
Installing a hard disk
1. Locate the hard disk bracket, remove the 4 screws, and remove the hard disk
cover as shown in the image below.
2. Insert a 2.5-inch SATA hard disk into the socket and gently slide into the
connector.
3. Reinstall the cover and screws.
1RWH'XHWRWKHPPKHLJKWOLPLWRIWKHKDUGGLVNPPKHLJKWGULYHVDUHQRWVXSSRUWHGE\WKH
ZOTAC ZBOX Blu-ray.
15
ZOTAC ZBOX Blu-ray
Installing a Mini-PCIe card
1. Locate the Mini-PCIe slot and insert a Mini-PCIe card into the slot at a 45
degree angle.
*HQWO\SUHVVGRZQRQWKH0LQL3&,HFDUGZLWKRQH¿QJHUDQGVHFXUHWKH
screws.
3. &RQQHFWWKH:L)LZLUHVWRWKH0LQL3&,HFDUG
16
ZOTAC ZBOX Blu-ray
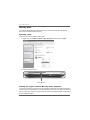
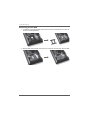
Setting up the ZOTAC ZBOX Blu-ray
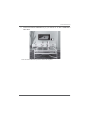
Please connect the peripherals before using the ZOTAC ZBOX Blu-ray.
1
2
3
4
4
5
6
7
8
1. &RQQHFWLQJWR86%GHYLFH
&RQQHFW86%GHYLFHVVXFKDVH[WHUQDOKDUGGULYHV66'VDQGÀDVKGULYHVWR
the USB 3.0 port on the system rear panel.
&RQQHFWLQJWRDKRPHQHWZRUN
Connect one end of a network cable to the LAN port on the system rear panel and
the other end to a network hub, switch or router.
&RQQHFWLQJWRDQH6$7$RU86%GHYLFH
&RQQHFWRQHHQGRIDQH6$7$GHYLFHRU86%GHYLFHWRWKHFRPERH6$7$86%
2.0 port.
&RQQHFWLQJWRD'9,RU9*$GLVSOD\
&RQQHFWRQHHQGRID'9,9*$FDEOHWRDQ+'79RUPRQLWRUDQGWKHRWKHUHQG
to the DVI port on the system rear panel. If using a VGA connection, please use
included DVI-to-VGA adapter.
&RQQHFWLQJWRDQ+'0,GLVSOD\
Connect one end of an HDMI cable to the HDMI port on the system rear panel and
the other end to a HDMI-compatible display such as an HDTV or monitor
&RQQHFWLQJWRDQRSWLFDO63',)GHYLFH
&RQQHFWWKH63',)RXWSXWIURPWKH=%2;%OXUD\WRD63',)LQSXWGHYLFHVXFKDV
a home theater receiver or digital speakers for digital audio transfer.
&RQQHFWLQJWRD.HQVLQJWRQVDIHW\ORFN
Connect Kensington Safety Lock to ZBOX Blu-ray and lock.
7XUQLQJRQWKHV\VWHP
Connect the supplied AC adapter to the DC IN jack on the system rear panel and
then press the power switch on the front panel to turn on the system.
1RWH:KHQ\RXU=27$&=%2;%OXUD\LVQRWLQXVHXQSOXJWKHSRZHUDGDSWHURUVZLWFKRIIWKH$&RXWOHW
to conserve power.
17
ZOTAC ZBOX Blu-ray
Positioning the ZOTAC ZBOX Blu-ray
'RQRWFRYHURUEORFNWKHYHQWLODWLRQKROHVRQ=27$&=%2;%OXUD\7RHQVXUH
proper operation and reliability, leave aproximately 4 inches (10 cm) of spacing in
front of the ventilation holes.
=27$&=%2;%OXUD\PLQL3&V\VWHPVSURYLGHDPSOHH[SDQVLRQLQDPLQLDWXUH
form factor, please use connectors and cables that are appropriate in size to avoid
interference.
Mounting the ZOTAC ZBOX Blu-ray to a wall
The ZOTAC ZBOX Blu-ray is wall-mountable using the included VESA mount.
1. Secure the VESA mount to the wall using screws (not included).
1RWH$OZD\VVHFXUHWKH9(6$PRXQWWRDVWXGRUVROLGZRRGVXUIDFHRUXVHDQFKRUV
1RWH'RQRWXVHWKHLQFOXGHGVFUHZVIRUZDOOPRXQWLQJ
'LVFODLPHU=27$&FDQQRWEHKHOGOLDEOHIRUGDPDJHVUHVXOWLQJIURPDQLPSURSHULQVWDOODWLRQ
2.
18
Align the ZOTAC ZBOX mounting holes to the VESA mount attachment pegs.
Attach the ZOTAC ZBOX to the VESA mount and gently press down to secure
the ZBOX to the mount.
ZOTAC ZBOX Blu-ray
&RQQHFWWKH=27$&=%2;%OXUD\WR\RXUPRQLWRURU79ZLWKD+'0,'9,,
VGA cable.
1RWH7KH=27$&=%2;%OXUD\PRXQWLV9(6$FRPSOLDQW
19
ZOTAC ZBOX Blu-ray
Installing drivers and software
Installing an operating system
The ZOTAC ZBOX Blu-ray does not ship with an operating system preinstalled. An
operating system must be installed before the ZOTAC ZBOX Blu-ray can be used.
7KHIROORZLQJRSHUDWLQJV\VWHPVDUHVXSSRUWHG
:LQGRZV® XP
:LQGRZV® Vista
:LQGRZV® 7
)ROORZWKHLQVWUXFWLRQVEHORZWRLQVWDOODQRSHUDWLQJV\VWHP
1. Insert disk for operating system into the optical drive.
2. :DLWIRUWKH=27$&=%2;%OXUD\WRERRWIURPWKHGLVN
3. Follow the onscreen directions to install the operating system.
4. Install system drivers to gain full functionality of the ZOTAC ZBOX Blu-ray
hardware and features.
Installing system drivers
Before you can use the full features of the ZOTAC ZBOX Blu-ray, the system drivers
must be installed. The following types of operating systems are supported by the
=27$&=%2;%OXUD\GULYHU&'
:LQGRZV® XP
:LQGRZV® Vista
:LQGRZV® 7
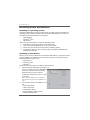
)ROORZWKHLQVWUXFWLRQVEHORZWRLQVWDOOWKHV\VWHPGULYHUV
1. Insert the ZOTAC ZBOX Blu-ray driver CD. If
autorun is enabled, the driver installation
main menu will show up automatically.
:LQGRZV9LVWDPD\DVNIRUIXUWKHU
FRQ¿UPDWLRQSOHDVHFOLFN³$OORZ´RU³2.´
to proceed.
1RWH,IDXWRUXQLVGLVDEOHG\RXFDQFOLFNWKH¿OH
Launch.EXE to bring up the driver installation main
menu.
2. The following drivers are available on the
&'
,QWHOFKLSVHW'ULYHU
+'$VRXQG'ULYHU
,21*UDSKLFV'ULYHU
5HQHVDV1(&86%'ULYHU
5HDOWHN1HWZRUN'ULYHU
20
ZOTAC ZBOX Blu-ray
5DOLQN$]XUH:DYH:LUHOHVVGULYHU
1RWHEach driver must be installed individually to ensure proper operation of the ZOTAC ZBOX
Blu-ray.
3.
4.
5.
Select the driver you want to install. The driver installer should launch.
Follow the onscreen instructions for the selected driver to install.
Restart the system.
Using your ZOTAC ZBOX Blu-ray
ConÀguring wireless connection
3OHDVHIROORZWKHLQVWUXFWLRQVEHORZWRFRQQHFWWRDZLUHOHVVQHWZRUN
1. Double-click the crossed wireless network icon (pic) in the
QRWL¿FDWLRQDUHD
2. Select the wireless network you want to connect to from the
list and click Connect.
$IWHUFRQQHFWLRQZDVHVWDEOLVKHG\RXZLOOVHH³&RQQHFWHG´
1RWH)RUVHFXULW\FRQFHUQV'R127FRQQHFWWRDQXQVHFXUHGQHWZRUN
otherwise, the transmitted information without encryption might be visible to
others.
1RWH(QWHUWKHQHWZRUNVHFXULW\NH\LIQHFHVVDU\
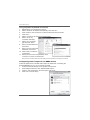
ConÀguring wired connection
8VLQJDVWDWLF,3
1. Right-click the network icon in the
QRWL¿FDWLRQDUHDDQGVHOHFW³2SHQ
1HWZRUN&RQQHFWLRQV´
5LJKWFOLFN³/RFDO$UHD&RQQHFWLRQ´DQG
VHOHFW³3URSHUWLHV´
+LJKOLJKW³,QWHUQHW3URWRFRO7&3,3´
DQGFOLFN³3URSHUWLHV´
6HOHFW³8VHWKHIROORZLQJ,3DGGUHVV´
5. Enter your IP address, subnet mask and
Default gateway.
6. Enter the preferred DNS server address if necessary.
$IWHUHQWHULQJDOORIWKHUHODWHGYDOXHVFOLFN³2.´WR¿QLVKWKHFRQ¿JXUDWLRQ
21
ZOTAC ZBOX Blu-ray
8VLQJDG\QDPLF,3333R(FRQQHFWLRQ
1. Repeat Step 1-3 in the previous section.
6HOHFW³2EWDLQDQ,3DGGUHVVDXWRPDWLFDOO\´DQGFOLFN³2.´
&OLFN³&UHDWHDQHZFRQQHFWLRQ´WRVWDUWWKH1(:&RQQHFWLRQ:L]DUG
&OLFN³1H[W´
6HOHFW³&RQQHFWWRWKH,QWHUQHW´DQGFOLFN³1H[W´
6HOHFW³6HWXSP\
FRQQHFWLRQPDQXDOO\´
7. Select your connection
W\SHDQGFOLFN³1H[W´
8. Enter your ISP Name and
FOLFN³1H[W´
(QWHU\RXU8VHUQDPHDQG
3DVVZRUG&OLFN³1H[W´
&OLFN³)LQLVK´WR¿QLVKWKH
FRQ¿JXUDWLRQ
11. Enter your user name and password. Click
³&RQQHFW´WRFRQQHFWWRWKHLQWHUQHW
1RWH&RQWDFW\RXULQWHUQHW6HUYLFH3URYLGHU,63LI\RXKDYHSUREOHPVFRQQHFWLQJWRWKHQHWZRUN
ConÀguring audio output via an HDMI device
Follow the steps below to enable audio output via HDMI when connecting the
ZOTAC ZBOX Blu-ray to a TV or receiver via HDMI.
1. Access the Sound settings via the system Control Panel.
2. 8QGHU3OD\EDFNGHYLFHVFOLFN³19,',$+'0,2XWSXW´
3. &OLFNWKH³6HWDV'HIDXOW´LQWKHORZHUULJKWKDQGFRUQHU
4. &OLFN³2.´WRH[LWWKHVHWXS
22
ZOTAC ZBOX Blu-ray
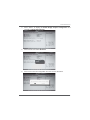
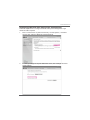
ConÀguring the PCIe link state power management
)ROORZWKHVWHSVEHORZWRFRQ¿JXUH3&,HOLQNVWDWHSRZHUPDQDJHPHQWWRJHW
maximum USB 3.0 speed.
(QWHU³&RQWURO3DQHO!6\VWHPDQG6HFXULW\!3RZHU2SWLRQV´DQGVHOHFW
³&KDQJHSODQVHWWLQJV´%DODQFHGUHFRPPHQGHG
,Q³&KDQJHVHWWLQJVIRUWKHSODQ%DODQFHG´PHQXFOLFN³&KDQJHDGYDQFHG
SRZHUVHWWLQJV´
23
ZOTAC ZBOX Blu-ray
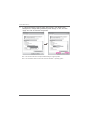
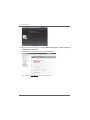
,Q³$GYDQFHGVHWWLQJV´ZLQGRZVHOHFW³3&,([SUHVV!/LQN6WDWH3RZHU
0DQDJHPHQW´FKDQJH6HWWLQJ³0RGHUDWHSRZHUVDYLQJV´WR³2II´DQGFOLFN
³$SSO\´DQG³2.´WR¿QLVKWKHFRQ¿JXUDWLRQ
1RWH:HUHFRPPHQGHGXVHUVWRNHHSWKHGHIDXOWVHWWLQJVIRUQRUPDORSHUDWLRQ
1RWH7KHVFUHHQVKRWVVKRZQLQWKLVVHFWLRQDUHIRUWKH:LQGRZV® 7 operating system.
24
ZOTAC ZBOX Blu-ray
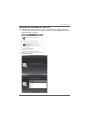
Installing the PowerDVD for 3D movie
The PowerDVD supports 3D movie. Follow the steps below to install PowerDVD.
,QVHUWWKHGULYHU3'9'LQWRWKHGULYHDQGWKHQFOLFN5XQ6HWXSH[Hwhen the
following interface displays.
2. Install PowerDVD.
25
ZOTAC ZBOX Blu-ray
3. Right-click on the windows, and select 19,',$&RQWURO3DQHO> Stereoscopic 3D
> Set up stereoscopic 3D.
4. Enable stereoscopic 3D as shown in the image below.
1RWH3OHDVHYLVLWwww.nvidia.com to search Supported 3D TVs.
26
ZOTAC ZBOX Blu-ray
27
ZOTAC ZBOX Blu-ray
28
0$