1
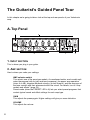
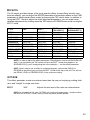
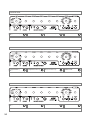
AD15VT-XL
AD30VT-XL
AD50VT-XL
AD100VT-XL
E
1
IMPORTANT SAFETY
INSTRUCTIONS
•
•
•
•
•
•
•
•
•
•
•
•
•
•
•
•
•
•
•
•
•
Read these instructions.
Keep these instructions.
Heed all warnings.
Follow all instructions.
Do not use this apparatus near water.
Mains powered apparatus shall not be exposed to dripping or
splashing and that no objects filled with liquids, such as vases, shall
be placed on the apparatus.
Clean only with dry cloth.
Do not block any ventilation openings. Install in accordance with the
manufacturer’s instructions.
Do not install near any heat sources such as radiators, heat registers,
stoves, or other apparatus (including amplifiers) that produce heat.
Do not defeat the safety purpose of the polarized or grounding-type
plug. A polarized plug has two blades with one wider than the other.
A grounding type plug has two blades and a third grounding prong.
The wide blade or the third prong are provided for your safety. If the
provided plug does not fit into your outlet, consult an electrician for
replacement of the obsolete outlet. (for USA and Canada)
Protect the power cord from being walked on or pinched particularly
at plugs, convenience receptacles, and the point where they exit
from the apparatus.
Only use attachments/accessories specified by the manufacturer.
Unplug this apparatus during lightning storms or when unused for
long periods of time.
Turning off the power switch does not completely isolate this product
from the power line so remove the plug from the socket if not using it
for extended periods of time.
Install this product near the wall socket and keep the power plug
easily accessible.
WARNING—This apparatus shall be connected to a mains socket
outlet with a protective earthing connection.
Refer all servicing to qualified service personnel. Servicing is required
when the apparatus has been damaged in any way, such as powersupply cord or plug is damaged, liquid has been spilled or objects
have fallen into the apparatus, the apparatus has been exposed to
rain or moisture, does not operate normally, or has been dropped.
Do not install this equipment on the far position from wall outlet and/
or convenience receptacle.
Do not install this equipment in a confined space such as a box for
the conveyance or similar unit.
Excessive sound pressure from earphones and headphones can
cause hearing loss.
Use only with the cart, stand, tripod, bracket, or table specified by
the manufacturer, or sold with the apparatus. When a cart is used,
use caution when moving the cart/apparatus combination to avoid
injury from tip-over.
The lightning flash with arrowhead symbol
within an equilateral triangle, is intended
to alert the user to the presence of
uninsulated "dangerous voltage" within
the product's enclosure that may be of
sufficient magnitude to constitute a risk of
electric shock to persons.
The exclamation point within an
equilateral triangle is intended to alert the
user to the presence of important
operating and maintenance (servicing)
instructions in the literature accompanying
the product.
THE FCC REGULATION WARNING (for USA)
This equipment has been tested and found to comply with
the limits for a Class B digital device, pursuant to Part 15 of
the FCC Rules. These limits are designed to provide
reasonable protection against harmful interference in a
residential installation. This equipment generates, uses, and
can radiate radio frequency energy and, if not installed and
used in accordance with the instructions, may cause
harmful interference to radio communications. However,
there is no guarantee that interference will not occur in a
particular installation. If this equipment does cause harmful
interference to radio or television reception, which can be
determined by turning the equipment off and on, the user is
encouraged to try to correct the interference by one or more
of the following measures:
• Reorient or relocate the receiving antenna.
• Increase the separation between the equipment and receiver.
• Connect the equipment into an outlet on a circuit different
from that to which the receiver is connected.
• Consult the dealer or an experienced radio/TV technician
for help.
Unauthorized changes or modification to this system can
void the user’s authority to operate this equipment.
Notice regarding disposal (for EU)
If this “crossed-out wheeled bin” symbol is
shown on the product or in the operating
manual, you must dispose of the product in an
appropriate way. Do not dispose of this product
along with your household trash. By disposing
of this product correctly, you can avoid
environmental harm or health risk. The correct
method of disposal will depend on your locality, so please
contact the appropriate local authorities for details.
* Company names, product names, and names of formats
etc. are the trademarks or registered trademarks of their
respective owners.
Table of Contents
Introduction....................................................................................... 4
Welcome aboard! ............................................................................ 4
Main features................................................................................... 4
Signal path ...................................................................................... 5
Valve Reactor Technology .............................................................. 5
Quick Start ........................................................................................ 6
Setup ............................................................................................... 6
Checking out the preset programs .................................................. 7
Switching between the channels of a program................................ 7
Creating your own sounds............................................................... 7
The Guitarist’s Guided Panel Tour ................................................. 8
A. Top Panel.............................................................................................. 8
B. Rear Panel .......................................................................................... 11
About the three operating modes ................................................. 13
Preset mode (selecting a preset program) .................................... 13
Channel Select mode (selecting a channel program) ................... 13
Manual mode................................................................................. 14
Creating and storing your own program...................................... 15
Creating your own program ........................................................... 15
Adjusting the noise reduction ........................................................ 16
Storing your program..................................................................... 17
Checking the settings of a program (original values) .................... 17
Restoring the factory settings ........................................................ 18
Using the VFS2 dual foot switch................................................... 19
Amp models and effects ................................................................ 20
XL Amp models ............................................................................. 20
Effects ........................................................................................... 25
Troubleshooting ............................................................................. 29
Specifications ................................................................................. 31
Programmer’s Cheat Sheet ........................................................... 32
3
Introduction
WELCOME ABOARD!
T
hanks for choosing the VOX AD15VT-XL, AD30VT-XL, AD50VT-XL or AD100VT-XL
Valvetronix amp. To ensure a long and trouble-free relationship with your new amp,
please read this manual carefully, use the amp as directed and keep the manual
for future reference.
MAIN FEATURES
•
•
•
•
•
•
•
•
•
4
The XL-series uses Valve Reactor technology, and feature a power amp circuit containing a 12AX7 (ECC83) dual triode valve (“vacuum tube”) that would normally be
used in a preamp. This allows the amp to produce the true sound and feel of a bona
fide all valve (tube) amp.
Sophisticated modeling technology is used to provide eleven different amps. They
range from classic vintage amps of the past to current expensive high-end valve
amps, and are accessible at the turn of a knob.
Eleven high-quality effects are built in and seven are multi effects that let you use two
effects simultaneously plus Noise Reduction.
You can store your favorite amp and effect settings as a program, which contain two different settings (CH1 and CH2). You can switch between these settings from the top
panel, or by using the optional VFS2 foot switch connected to the rear panel (Channel
Select mode). In addition, there’s one preset program for each amp type (Preset mode).
In Manual mode the sound you hear will reflect the physical settings of the knobs.
If you connect the optional VFS2 dual foot switch (sold separately), you can use it to
switch programs or bypass effects.
The power level control (The AD15VT-XL doesn’t have this feature.) lets you adjust the
output wattage of the power amp. This means that even when the master volume is
turned up to the max to drive the Valve Reactor power amp, you can adjust the volume
without losing any tone.
The external speaker out jack (AD50VT-XL / AD100VT-XL only) lets you connect a
guitar speaker cabinet (8 ohm) of your choice.
The effect send/return jacks (AD100VT-XL only) allow you to connect your external
effect processor in a loop connection.
SIGNAL PATH
Your guitar sound passes through the following sections.
(You can refer to “The Guitarist’s Guided Panel Tour” while you read the explanation that
follows.)
Power Amp model
Effect
Pre Amp model
OCTAVE / COMP
Choose one of 11 types
Effect
MODULATION
DELAY / REVERB
Master Vol
Speaker
Class A
Class AB
Determined by the
Pre Amp selection
VALVE REACTOR TECHNOLOGY
THE POWER (AMP) AND THE GLORY!
V
alve Reactor technology was first used on the VOX AD60VT & AD120VT Valvetronix amps.
Since conventional modeling effects for line recording are not used directly with a
speaker, they do not include a power amp circuit, output transformer, or speaker. In other
words, they only have a preamp circuit.
A real valve amp sound, however, is produced not just by the preamp, but also by the tone
and distortion of the power amp, and by the constant changes in impedance that are created by the power amp driving the speakers. The XL-series contains an actual low-wattage valve power amp circuit, a virtual output transformer (patent applied for) that uses
solid-state components to simulate an output transformer, and a dummy speaker circuit
that simulates the varying impedance of a real speaker. This means that although it’s lowpower, the power amps used in both the XL-series has the same circuit structure of an
actual all-valve (tube) amp.
While much of the tone creation and shaping carried out is done in the digital
domain, the Valve Reactor power amp is 100% analogue. The resulting journey your guitar’s signal takes through the analogue world of the power stage plays a major role in providing the all-important feel and tone of the original amps we modelled.
The Valve Reactor power stage is, to all intents and purposes, a bona fide valve (tube)
push-pull power amplifier, but in miniature. It utilizes a 12AX7 (ECC83) valve (a dual triode device — meaning “two valves in one”) and is equipped with an output transformer,
just like a “real” valve amp.
The power amp output signal is designed to “read” the constantly changing impedance
curve of the dummy speaker circuit system and feed this information back to the virtual
output transformer — just like an all valve amplifier does. This information permits the
behavior of the valve stage to vary with the speaker load (impedance), which is another
important part of “real world” valve tone.
5
Apart from the vital valve tone this ingenious power amp design provides, it also
allows us to replicate various “circuit characteristics” that are unique to the all-valve
power stages of the amps we’ve modelled. These “characteristics” include: Class A or
Class AB operation, Presence and Resonance (low end) control circuitry (both found in
the negative feedback circuit that some, but not all, valve power amps have) and power
output. Being able to match such vital characteristics helps ensure that each and every
one of our models is as tonally authentic as possible — as opposed to the usual “close
but no cigar” norm of digital modeling. And just so you know, this patented in USA power
amp technology is unique to VOX Valvetronix.
Quick Start
nce you’ve satisfied your primal urge to play, I’d like to urge you to give this manual a chance — it’s been written by a fellow guitar nut and this amp boasts some
killer bells ‘n’ whistles that warrant your interest. In short, it’ll be worth your while,
we promise. This said, here’s the “Quick Start” — enjoy! I look forward to taking you
through the amp in more detail once you’re done...
O
HINT: If you’re not sure of the location of a control or switch referred to in this Quick Start
section, you can refer to the illustrations in the section entitled “The Guitarist’s Guided
Panel Tour” (page 8).
SETUP
1. Turn the MASTER volume control on the amp all the way down.
2. Plug one end of the supplied power cord into the AC power connector on
the rear panel, and plug the other end into a wall outlet.
3. Plug your guitar into the INPUT jack on the top panel.
4. Turn on the POWER switch.
5. Slowly raise the MASTER volume to adjust the volume.
HINT: The rear panel POWER LEVEL control controls the output level of the power amp,
letting you adjust the volume while keeping that great-sounding power-amp distortion!
(The AD15VT-XL doesn’t have this feature.)
NOTE: You won’t hear any sound for a few seconds while the valves warm up. This isn’t a
malfunction, this is how a tube operates normally.
6
CHECKING OUT THE PRESET PROGRAMS
1. Press the top panel PRESET button.
The PRESET LED will light (this means you’re in Preset mode).
2. Turn the AMP selector to select an amp type.
For each amp type you select, a preset containing a typical sound for that type will
be selected; i.e., the GAIN, VOLUME, TREBLE, MIDDLE, BASS, and effect settings will be switched automatically. If you want to hear the amp without effects,
press the effect bypass button.
SWITCHING BETWEEN THE CHANNELS OF A PROGRAM
1. Press the top panel CH (Channel) button.
The CH1 or CH2 LED will light, and the program assigned to the corresponding
channel will be recalled (Channel Select mode).
2. CH1 and CH2 will alternate each time you press the CH button.
HINT: You can store your favorite settings in each channel of the program. For details,
see “Storing your program” (page 17).
CREATING YOUR OWN SOUNDS
1. Press the top panel MANUAL button.
The MANUAL LED will light (you’re in Manual mode).
HINT: You can also create your own sounds in Preset mode or Channel Select mode.
However, the process is a bit easier to understand in Manual mode, since the positions of
all knobs (except the EDIT 1 knob) are exactly what you’re hearing. In other words, what
you see is what you get!
2. Use the AMP selector to select an amp, and adjust the GAIN, VOLUME, TREBLE, MIDDLE, and BASS accordingly.
3. If you want to use an effect, use the EFFECTS selector to select an effect
type, and use the EDIT 1 knob to adjust the depth of the effect. For modulation-type effects like CHORUS or TREMOLO, or the DELAY/REVERB effect,
just press the TAP button twice to set the modulation speed or the delay/
reverb time to the corresponding interval — it doesn’t get much easier than
that!
If you don’t want to use an effect, press the BYPASS button. You can edit more
effect parameters but you’ll have to read the manual to find out how.
4. When you’ve come up with a sound you like, write it as described in “Storing your program” (page 17).
7
The Guitarist’s Guided Panel Tour
In this chapter we’re going to take a look at the top and rear panels of your Valvetronix
amp.
A. Top Panel
2
1
4
3
5
1. INPUT SECTION
This is where you plug in your guitar.
2. AMP SECTION
Here’s where you make your settings.
AMP selector switch
This selects one of the amp type models. As mentioned earlier, each model replicates the preamp (with its gain and tonal response), the power amp operation
(class A or AB), negative feedback circuitry (or lack thereof), and the response of
the tone controls and their placement within the circuit. For details, turn to “Amp
models and effects” (page 20).
Preset mode (when the PRESET LED is lit) lets you select preset programs that
contain typical sound and effect settings for each amp type.
GAIN
This adjusts the preamp gain. Higher settings will give you more distortion
VOLUME
This adjusts the volume.
8
TREBLE, MIDDLE, and BASS
This trio of knobs allow you to dial in the exact amount of high, mid, and low frequencies. Also, as you’d expect (and hope!), the exact manner in which each one
of these controls behaves and also interacts with the others is dependant on the
amp model selected. Turn to the “Amp models and effects” section (page 20) for
more information.
NOTE: In keeping with the originals, certain models will produce almost no sound if
all of these three tone controls are turned all the way down (counter-clockwise).
NOTE: Not all of the original amps that we modeled actually have all three of the Treble, Middle, and Bass controls. In such cases, we allow you to use all three knobs to
effectively increase the tonal range of the original. Turn to the “Amp models and
effects” section (page 20) for more information.
MASTER
This adjusts the volume that is output from the preamp to the Valve Reactor power
amp. This will vary the amount of distortion created by Valve Reactor.
NOTE: The MASTER volume control is NOT programmable.
NOTE: The GAIN control also affects the amount of distortion. For some settings,
there may be virtually no distortion.
3. EFFECT SECTION
Here you can make settings for effects and noise reduction. For details on each effect,
refer to “Amp models and effects” (page 20).
EFFECTS
Selects the type of effect. You can use the TAP button, EDIT 1 knob and Bypass
button to adjust the parameters of each effect. When you select an effect type, the
effect parameters will be initialized and Effect Bypass will be defeated.
EDIT 1
Use this to adjust the parameters of each effect. By using this knob in conjunction
with the TAP and BYPASS buttons as described below, you can adjust three different parameters. (That is, if the BYPASS LED is dark.)
• Turn EDIT 1 (without pressing a button) (EDIT 1)
• Turn EDIT 1 while pressing TAP (EDIT 2)
• Turn EDIT 1 while pressing BYPASS (EDIT 3)
If the BYPASS LED is lit (the effect is bypassed), you can hold down the TAP button and turn the EDIT 1 knob simultaneously to adjust the noise reduction sensitivity.
NOTE: You can’t adjust the effect parameters while the BYPASS LED is lit.
9
TAP (EDIT 2) and LED
This button enables you to set the speed of a modulation-type effect (such as
CHORUS or FLANGER) the delay time REVERB length; simply press the button
twice at the desired interval.
The LED blinks at the specified speed or time.
HINT: To set the time to exactly match the tempo of a song, press the TAP button several times along with the song.
HINT: You can also adjust the speed or time, by holding down the TAP button and
turning the EDIT 1 knob. (This is the EDIT 2 mode)
NOTE: If the BYPASS LED is lit, you won’t be able to use the TAP switch to set the
time. (The TAP LED will be dark.)
BYPASS (EDIT 3) and LED
If you don’t want to use an effect, press this button to turn the effect off (i.e.,
bypassed). If the effect is bypassed, this LED will be lit.
NOTE: You can’t adjust the effect parameters if the BYPASS LED is lit.
HINT: While the effect is bypassed, you can adjust the noise reduction sensitivity by
holding down the TAP button and turning the EDIT 1 knob.
HINT: The bypass setting is remembered even when you switch modes, switch programs, or turn off the power.
HINT: The Bypass button can be used to modify effect parameters (EDIT 3). Press
and hold Bypass and simultaneously turn the EDIT 1 knob. See the chart on page 25
for what parameters can be controlled.
4. PRESET/MANUAL/CHANNEL SECTION
PRESET and LED
This button puts your Valvetronix amp into Preset mode and you can use the AMP
selector to select a “typical” setting for each amp type. If the PRESET LED is lit,
you’re in Preset mode!
MANUAL and LED
This button puts your Valvetronix amp into Manual mode which means the physical position of each knob (except for the EDIT 1 knob) determines exactly what
you will hear. This means that the amp will operate just like a conventional guitar
amp. If the MANUAL LED is lit, you’re in Manual mode.
CH (Channel), CH1/CH2 LEDs
This button switches between the two channels and The LED of the selected
channel will light. In Preset or Manual mode, the CH1 and CH2 LEDs will be dark.
If from either of these modes you then press this CH button, you’ll switch to Channel Select mode, and the channel (1 or 2) that you selected most recently will
become active.
10
WRITE button
Use this button to save a new program into CH1 or CH2. Refer to “Storing your
program” (page 17).
5. POWER SWITCH
When the power is on, the indicator located above the switch will be lit.
B. Rear Panel
AD15VT-XL/AD30VT-XL/AD50VT-XL
AD30VT-XL/AD50VT-XL only
AD50VT-XL only
AD100VT-XL
AC power
This is where you connect the included power cord.
FOOT SW
You can connect the optional VFS2 dual foot switch (sold separately) here, and
use it to switch programs or bypass the effect while you perform.
POWER LEVEL
This adjusts the output wattage of the power amp.
AD30VT-XL: less than 0.1 W – 30 W
AD50VT-XL: less than 0.15 W – 50 W
AD100VT-XL: less than 0.2 W – 100 W
NOTE: The AD15VT-XL doesn’t have this control.
NOTE: The power level setting isn’t saved as part of the program.
11
This control lets you get that highly desirable, fat, warm sound of the Valvetronix
power stage being driven hard (a common trait of all great valve power amps), at
various levels. This will enable you to play comfortably in a small room or compromising your all-important tone.
LINE/PHONE
Use this jack if you’re plugging directly in to a mixer, recording device, or if you’re
using headphones. The output from this jack is taken from immediately before the
ValveReactor power amp, and the character of the guitar amp cabinet is applied to it.
NOTE: Connecting headphones to this jack will mute the internal speaker.
EXTERNAL SPEAKER OUT jack
You can connect a guitar speaker cabinet to this jack.
NOTE: Sound will not be output from the internal speaker if you use the
EXTERNAL SPEAKER OUT jack.
NOTE: The AD15VT-XL and AD30VT-XL don’t have this jack.
Important: To ensure that your system works correctly, you must observe the following points.
a) Don’t use an external speaker whose impedance is other than 8 ohms.
b) Don’t connect a speaker whose rated input capacity is less than 50 watts (100
watts for the AD100VT-XL). The speaker may be destroyed if you ignore this caution — not recommended!
c) You must use a speaker cable to connect an external speaker. Don’t use a
shielded cable like the one you use to connect a guitar to an amp.
d) You must turn off the power before connecting the cable. Connecting the cable
while the power is turned on may damage your amp.
LOOP SEND jack, RETURN jack
These are loop jacks that you can connect to your external effect processor. Connect the SEND jack to the input of your external effect processor. Connect the
RETURN jack to the output of your external effect processor.
NOTE: The AD100VT has these jacks.
12
About the three operating modes
T
he XL-series contains eleven “preset programs.” To select one of these, enter Preset mode (which simply means, press the PRESET button) and turn the AMP
selector.
There are also two rewritable “channel programs” which you can select by pressing the CH button or by using the optional VFS2 foot switch.
PRESET MODE (SELECTING A PRESET PROGRAM)
In Preset mode, simply turn the AMP selector to select a preset program that contains
“typical” settings for each amp type. The GAIN, VOLUME, TREBLE, MIDDLE, BASS, and
effect settings will switch automatically.
GETTING TO PRESET MODE
If the PRESET LED is dark, you’re not in Preset mode. Press the PRESET button to
make the PRESET LED light.
NOTE: If the CH1 or CH2 LED is blinking (i.e., when you’re in the middle of selecting a
writing-destination for the program) the PRESET LED won’t light when you press the
PRESET button the first time. In this case, just press the PRESET button once again.
SELECTING A PRESET PROGRAM
With the PRESET LED lit, turn the AMP selector and the preset program for each amp
type will be selected. (The physical settings of the top panel control knobs and EFFECTS
selector are ignored at this time.)
HINT: If you want to bypass the effect, press the BYPASS button. If the BYPASS LED is lit,
the effect is bypassed. Press the BYPASS button once again to cancel bypass and enable
the effect once again. The XL-series remembers the bypass setting even if you switch
modes or programs, or turn off the power.
CHANNEL SELECT MODE (SELECTING A CHANNEL PROGRAM)
In Channel Select mode you can press the CH button to recall the program saved in each
channel (CH1 and CH2), automatically switching all of the amp and effect parameters.
GETTING TO CHANNEL SELECT MODE
If the CH1 and CH2 LEDs are dark, you’re not in Channel Select mode. Press the CH
button. Either the CH1 or CH2 LED will light, and you’ll be in Channel Select mode.
NOTE: If the CH1 or CH2 LED is blinking (i.e., when you’re in the middle of selecting a
writing-destination for the program), the program won’t switch when you press the CH button the first time. In this case, press the TAP button to stop the blinking.
13
SWITCHING CHANNELS
With either the CH1 or CH2 LED lit, press the CH switch. The channel will change each
time you press the button, and the program stored in each channel will be recalled. (The
physical settings of the top panel selector knobs and control knobs are ignored at this
time.)
HINT: If the optional VFS2 dual foot switch is connected to the rear panel, you can
use it to switch programs. For details, refer to “Using the VSF2 dual foot switch”
(page 19).
HINT: If you want to bypass the effect, press the BYPASS button. If the BYPASS LED
is lit, there is no effect. To turn the effect on, press the BYPASS button once to turn off
the LED. The XL-series remember the bypass setting even if you switch modes or
programs, or turn off the power.
MANUAL MODE
When the XL-series is in Manual mode, it works just like a non-programmable guitar amp.
In other words, the positions of all top panel selectors and knobs (except for the EDIT 1
knob) indicate exactly what you’re hearing.
GETTING TO MANUAL MODE
If the MANUAL LED is dark, you’re not in Manual mode. Press the MANUAL button; the
MANUAL LED will light, and you’ll be in Manual mode.
NOTE: If the CH1 or CH2 LED is blinking (i.e., when you’re in the middle of selecting a
writing-destination for the program), the MANUAL LED won’t light when you press the
MANUAL button the first time. In this case, simply press the MANUAL button once again.
NOTE: In Manual mode when you edit parameters that aren’t defined by a knob setting
(i.e., effect parameters or noise reduction settings), those settings are saved automatically, and will be recalled the next time you enter Manual mode. However if the EFFECTS
selector is at a different position than it was when you were last in Manual mode, the
default settings for that effect type will be loaded.
HINT: If you want to bypass the effect, press the BYPASS button. If the BYPASS LED is
lit, there is no effect. To turn the effect on, press the BYPASS button once to turn off the
LED. The XL-series remembers the bypass setting even if you switch modes, programs,
or turn off the power.
14
Creating and storing your own
program
T
here are two ways you can do this; by tweaking an existing preset program that’s
close to what you have in mind, or by starting from scratch.
CREATING YOUR OWN PROGRAM
Let’s start from scratch.
1. Choose any program in Preset or Channel Select mode, or select Manual
mode.
HINT: Since we’re starting from scratch it doesn’t matter what program you choose.
2. Use the BYPASS button to bypass the effect. (The BYPASS LED is lit.) If you
want to use an effect, you can add it at the end of this process.
3. Use the AMP selector to select the amp you want to use.
HINT: For details on the amp types, refer to “Amp models and effects” (page 20).
4. Adjust the top panel GAIN, VOLUME, TREBLE, MIDDLE, and BASS knobs as
desired.
5. Hold down the TAP button and turn the EDIT 1 knob to adjust the noise
reduction. This setting is also saved as part of your program. For details,
refer to “Adjusting the noise reduction” (page 16)
HINT: Adjust the noise reduction so that you don’t hear noise when you’re not playing
your guitar.
6. If you want to use an effect, press the BYPASS switch once again to turn
bypass off (the BYPASS LED goes dark).
7. Select an effect, and make adjustments. For example if you want to add
delay, turn the EFFECT selector to “DELAY.” If the selector is already set to
“DELAY,” you’ll have to turn it to a different effect and then back to “DELAY.”
Use the TAP button or EDIT 1 knob to adjust the delay time and delay level (the
amount of delayed sound).
DELAY TIME:
DELAY LEVEL:
DELAY FEEDBACK:
Press the TAP button twice (at the desired interval), or hold
down the TAP button and turn EDIT 1.
Turn EDIT 1 (without pressing any button).
Turn EDIT 1 while holding down the BYPASS button.
15
HINT: For details on the effects, refer to “Amp models and effects” (page 20).
8. When you’ve come up with a sound you like, store the program.
NOTE: In Preset or Channel Select mode, the changes you made will be lost if you
switch to a different program or Manual mode or turn off the power without storing the
program first.
NOTE: The effect bypass setting isn’t stored as part of the program.
ADJUSTING THE NOISE REDUCTION
Here’s how to adjust the noise reduction.
NOTE: The noise reduction setting is part of each program. In Preset and Channel
Select modes, your setting will be lost if you switch to a different program or to Manual mode (or turn off the power) without storing your edited program first.
1. Press the BYPASS button to make the BYPASS LED light.
2. Hold down the TAP button and turn the EDIT 1 knob to adjust the noise
reduction sensitivity. Turning the knob toward the right will produce greater
noise reduction (less noise). If you turn the knob all the way to the left, noise
reduction will be off, and won’t do anything (more noise).
NOTE: Depending on the guitar you’re using, excessively high noise reduction settings may cause notes to be cut off in an unwanted manner!
3. If you want to use effects, press the BYPASS button to make the BYPASS
LED go dark and the effect(s) will be heard.
16
STORING YOUR PROGRAM
When you’ve come up with a sound you like, you should store (write) the program.
1. Press the WRITE button. The CH1 or CH2 LED will blink.
2. Press the CH button to select the channel in which you want to store your
program. The program will be stored in the channel whose indicator is blinking.
HINT: If, during this process, you decide that you really don’t want to store the program, you can press the TAP button to cancel at this point. The LED will stop blinking,
and you’ll return to the mode in which you were.
3. Press the WRITE button once again. Your program will be saved in the specified channel, and the LED of the destination channel will stop blinking and
remain lit.
NOTE: The program that was previously stored in that channel will be overwritten; in
other words, the settings that used to be stored in the channel you selected in step 2
will be erased.
NOTE: The effect bypass setting isn’t stored as part of the program.
NOTE: If you’re creating your sound in Preset or Channel Select mode, your changes
will disappear if you switch to a different program or to Manual mode before storing.
CHECKING THE SETTINGS OF A PROGRAM (ORIGINAL VALUES)
If you want to find out exactly what settings are saved in a preset or user program, you
can use the Original Value function.
When you’re turning a knob to adjust the value of a parameter, and the value at that
moment matches the value that is saved in the program (i.e., the “original value”), the
PRESET LED will blink if you’re in Preset mode, or the channel LED will blink if you’re in
Channel Select mode.
HINT: When you’ve found a program you like, and want to know just what settings it
contains, simply use this Original Value function!
NOTE: Since the top panel MASTER volume, the rear panel POWER LEVEL control
are not programmed, the original value display will not occur for these settings. Also,
the Original Value function doesn’t operate in manual mode.
17
RESTORING THE FACTORY SETTINGS
Here’s how you can restore the factory settings.
NOTE: If you do this, the programs you saved in the channels will be completely erased,
and will be reset to the factory settings.
NOTE: Effect and noise reduction settings made in the Manual mode will also be erased.
1. Turn the power off.
2. While holding down both the CH and WRITE buttons, turn the power on.
When the CH1 and CH2 LEDs begin blinking, release these two buttons.
HINT: If you decide to abort this operation, press the TAP switch at this point.
3. When you press the WRITE switch, the CH1 and CH2 LEDs will change from
blinking to lit. Initialization will be completed in a few seconds, and the amp
will switch to Preset mode.
NOTE: Never turn off the power while initialization is taking place.
18
Using the VFS2 dual foot switch
I
f the optional VFS2 dual foot switch (sold separately) is connected to the rear panel
FOOT SW jack, you can use it to switch programs or turn effect bypass on/off.
VFS2 left switch (switch 1): Switches channel programs
VFS2 right switch (switch 2): Switches bypass on/off, or turn
Manual mode on
SWITCHING THE CHANNEL PROGRAM (SWITCH 1)
Each time you press the VFS2’s left switch (switch 1), you’ll alternate between CH1 and
CH2.
NOTE: Switch 1 has the same function as the channel select switch on the top panel. If
you press switch 1 in Preset mode or Manual mode, you’ll change over to Channel Select
mode. Also, pressing switch 1 during the process of storing a program (the CH1 or CH2
LED is blinking) will change the store-destination.
TURNING EFFECT BYPASS ON/OFF (SWITCH 2)
Hold down the top panel BYPASS switch and press the VFS2’s right switch (switch 2).
This assigns the function of switch 2 as “bypass on/off.” Now when you press switch 2,
effect bypass will alternately be turned on/off.
HINT: The amp will remember the switch 2 assignment. This setting is remembered even
if you switch modes or programs, or turn off the power.
SWITCHING TO MANUAL MODE (SWITCH 2)
Hold down the top panel MANUAL switch and press the VFS2’s right switch (switch 2).
This assigns the function of switch 2 as “Manual mode.” Now when you press switch 2,
the amp will switch to Manual mode.
HINT: The amp will remember the switch 2 assignment. This setting is remembered even
if you switch modes or programs, or turn off the power.
19
Amp models and effects
In this section we’re going to talk about the eleven amp models and effects.
XL AMP MODELS
For the XL range of amplifiers, we wanted to design an amp with a selection of sounds
that would span the entire range of heavy music. We already had a truckload of great
amp models from the acclaimed "VT" or "Chrome" series, so we set to work brainstorming ways that we could modify these sounds for the heavy player, at times throwing out
the rule book entirely. We found ourselves asking things like "What would this British
head sound like if it were Class A rather than Class AB? What if we gave a Californiastyle EQ to a Bristish amp or vice versa? The results are some of the hottest hard rock
and metal sounds we've designed to date. And all of them are based on some of the
most legendary amps in history. So plug in an turn up. Extreme lead awaits!
CONTROLLING FACTORS
As already touched on in this manual “Guitarist’s Guide” although the top panel of your
Valvetronix amp houses controls for TREBLE, MIDDLE, BASS, GAIN, VOLUME, and
MASTER, not all of the amps we’ve modeled have as many controls. In such cases,
rather than leave you with knobs that do nothing, we’ve made full use of all five Valvetronix amp controls without compromising the accuracy of any of our models. This
means you’ll be able to mimic the full tonal spectrum of each and every one of the originals we’ve modeled ... and then some, thanks to the extra flexibility and additional control
the five Valvetronix amp controls give you.
For example, if an original doesn’t have a Gain Control (FUNCKED, CRUNCHED,
BUZZSAW), the Valvetronix’s GAIN control will mimic the original’s Volume control. This,
of course leaves you with three volume controls to use; VOLUME, GAIN, and MASTER.
As you already know, MASTER is a universal, non-programmable control that allows you
to set the overall volume of the amp. So, the programmable VOLUME control (the knob
right next to GAIN) effectively acts as a second “Master Volume,” allowing you to ensure
that the volume of each of your programs compliments the rest. Cool stuff, I’m sure you’ll
agree ...
Also, if an original amp doesn’t have a complete 3 band EQ network then we’ll set
up the “missing” tone controls on our model to be “neutral” (i.e. as the original) when set
at 12 o’clock — thus giving you extra tonal flexibility in those EQ areas, if you so wish.
Just so you know, the amps we modeled that don’t have individual controls for Treble,
Middle and Bass are:
20
Amp
Original tone controls
CRUNCHED (AC30TB)
Treble and Bass controls
TUBE TALK
Us Brits call ’em valves while our US cousins call ’em tubes ... as the saying goes:
England and America are merely two countries divided by a common language! Anyway,
call ’em what you will, these wondrous glass bottles lie at the tonal heart of each of our
11 models. As all the amps we’ve modeled hail from one of the two countries just mentioned, in honor of their heritage, the descriptions of all English amps will employ the
words “valve” and “valves,” while the American ones will be tubular!
QUESTION: What’s the difference between an ECC83 preamp
valve and a 12AX7 preamp tube?
ANSWER: Nothing! They’re the same exact thing — namely the
most popular preamp tube in ampland. ECC83 is the British name,
12AX7 (a.k.a. 7025) is the American.
POWER AMP ACCURACY
As already touched on a couple of times, what happens in the power stage of any good
tube amp is of paramount importance to the way the amp sounds, feels and behaves.
The way the power amp operates (Class A or Class AB), the power tubes used
(EL84s,EL34s, 6L6s), the exact nature of the negative feedback loop circuitry, and how
the power stage interacts (a relationship called damping) with the speaker(s) it is driving
— all these things play a vital role in the creation of tone. And, thanks to our patented in
USA Valve Reactor Technology all these important bases are faithfully and accurately
covered. For example: if you choose the amp model CRUNCHED — an amp with a Class
A power stage and no negative feedback — that’s exactly what your Valve Reactor power
amp reconfigures itself to emulate. And, as an added bonus, thanks to our rear panel
POWER LEVEL control you can adjust the output power (Wattage) to best suit the size of
the room you’re playing in. (The AD15VT-XL doesn’t have this feature.)
TURN IT UP!
Truly great, all-valve amps have one thing in common — they invariably sound at their
best when they’re cranked to the max! It’s got nothing to do with eardrum shattering decibels either; it’s just that when the power valves are driven hard, they definitely impart a
unique tone and width to the overall sound. Thanks to the awesome accuracy of our
Valve Reactor power amp, the same is also true of your Valvetronix combo. For this reason, we heartily recommend that you crank the sucker up as often as possible. And, as
already pointed out, thanks to our unique POWER LEVEL control (not provided on the
AD15VT-XL), you can adjust the output Wattage to suit every occasion — from bedroom,
to garage, to gig ... and all points in-between. So, what are you waiting for — select, crank
‘and’ enjoy!
This all said, let’s take a look at each of our amp models...
21
GLASS
For this amp type, we modeled the Clean channel of a very rare, very expensive
and respected 100 Watt head named the Overdrive Special. We auditioned several top-shelf boutique amps for this model but this amp was the clear winner. Its
beautifully rounded low-end, delightfully transient mid-range attack and sweet treble make it the perfect clean sound to complement the high gain destruction that
will ensue further down this sound list.
Original’s tube compliment: 3 x 12AX7s in preamp, 4 x 6L6s in power amp.
FUNKED
This dual channel, black-faced beauty is considered a “must- have” 2x12 combo
for many professionals. Its celebrated clean sound is very tight “n” twangy, with a
deep, taut, piano-like bass. This hot-rodded clean sound was inspired by the
glassy clean sounds used by a famous funk metal band. In keeping with the original, when pushed hard the bass tends to crumble so raise the MIDDLE and lower
the BASS. Because the EQ network of the FUNKED model lies before the main
gain stage of its preamp, pushing the mids results in a singing clean tone.
Original’s tube compliment: 4 x 12AX7s & 2 x 12AT7 (a.k.a. ECC81) in preamp,
4 x 6L6s in power amp.
BUZZSAW
Fire up the BUZZSAW! This sound was inspired by the pioneering sounds of '70s
hard rock and metal. Based on a British-made 50-watt head, this sound churns
out a dark, grinding tone perfect for any aspiring prince of darkness! To create this
sound, we started with the “High Treble” channel of a 1971, 50 Watt, four input, allvalve head then we cranked the gain and boosted all bands of the original's EQ.
As this amp has no master volume facility, the way to use it to its full potential is to
crank the Volume. To achieve the same response as the original, turn the VOLUME to maximum and use the Master Volume to set your desired volume level.
Wind the GAIN control all the way up and immerse yourself in an instantly recognizable, organic, driving overdrive.
Original’s valve compliment: 3 x ECC83s in preamp, 2 x EL34s in power amp.
CRUNCHED
This sound is based on a very rare modded VOX AC30/6TBX Top Boost combo
and adds hot-rodded gain levels and a completely twisted EQ to deliver deep,
crunchy guitar tones. GAIN, TREBLE and BASS mimic the original’s Volume, Treble and Bass controls.
The MIDDLE is an “extra” with 12 o’clock being its “neutral” position.
Our CRUNCHED AC30TB model produces rich overdrives that have a glorious, throaty
bark -just like those classic, “Class A” tones that have made the original a “must have”
in any serious player’s amp collection but taken to a whole new level in the XL range!
22
Original’s valve compliment: 5 x ECC83s & 1 x ECC82 in preamp, 1 x GZ34
rectifier, 4 x EL84s in power amp.
THRASHED
This is modeled on a 1983, all tube, single channel 100 Watt head that boasts a
Master Volume control - a wonderful feature that allows the user to dial in a great
crunch tone without having to max out the amp’s volume. Invariably played with its
Gain control cranked to the max, this amp was responsible for the fat, roaring
sound that dominated ’80s hard rock and heavy metal. In the 80’s this amp was
the only amp of choice...and, for many, still is!
Although UK ’80s amp on which THRASED is based was famous for its distinctive,
cranium-crushing crunch, when you roll back your guitar’s volume knob you’ll get
a bright, clean sound that will cut through any mix like a hot knife through butter.
For the XL range, we modded our original UK 80s model adding tons of gain, and
scooping the EQ for complete THRASHED destruction!
Original’s valve compliment: 3 x ECC83s in preamp, 4 x EL34s in power amp.
RAGED
This sound really needs no introduction! We started with our "UK Modern" model
which is modeled on the High Gain channel of a modern, all-tube 100 Watter. It
combines a toneful high gain preamp stage with the unmistakable, “snarling”
punch and girth the UK ’80s power stage offers. The result is a highly aggressive,
tone-breathing monster capable of mondo gain while retaining individual note definition. But that wasn't enough for the XL range. We wanted it to breathe fire! So
we added some mods to the original sound like boosted bass and mid frequencies, and we--of course--turned up the gain. With the GAIN control on full, RAGED
allows lead lines to soar into soulful feedback, while its low-end “chunk” remains
tight and punchy. Wimps beware!
Original’s valve compliment: 4 x ECC83s in preamp, 4 x EL34s in power amp.
MODERN
This model is an even HIGHER gain modification to the “Modern High Gain” channel of a brutal, 100 Watt, armour-plated beast. Its deep low-end, somewhat “fizzy”
top and Monster-like gain has made this amp a mainstay for many modern, metal
acts who either tune their guitars down low, or wield 7 -string axes. We scooped
the EQ so much we needed a bulldozer and, yes, we added more gain. Much
more. The result is devastating.
If you play slamming, “nu-metal” that’s tuned low, then MODERN could well be the
only way to go!
Original’s tube compliment: 5 x 12AX7s in preamp, 2 x 5U4G rectifier tubes, 4 x
6L6s in power amp.
23
FLUID
If fast, legato licks and thick saturated chunking is your thing, look no further.
Again, we started with our "UK Modern" model which is modeled on the High Gain
channel of a modern, all-tube 100 Watter. But this time we modded the mid-range
EQ to emphasize the almost vocal-like midrange favored by certain legato style
players known for using headless guitars and playing VERY fast. Of course, this
being the XL range, we dimed out the gain to the absolute max. Plug in and fly!
Original’s valve compliment: 4 x ECC83s in preamp, 4 x EL34s in power amp.
MOLTEN
This is modeled on the Overdrive Channel of an all-tube, 100 Watt head built in
1991 and covered in snakeskin! Last time around, we called this US HIGAIN but
our modded MOLTEN sound is capable of even more powerful, heavily saturated
sounds that combine an open low-end with compressed mids and highs. The
result is a tone that remains focused and well defined at even the most extreme
gain settings. Plug in and take cover!
NOTE: The Molten preset features our Octave effect. When the Octave effect is on,
we do not recommend playing chords unless you are going for an unusual effect!
Original’s tube compliment: 4 x 12AX7s in preamp, 4 x 6L6s in power amp.
BLACK
This sound was created when we were having some fun mutating our UK Modern
model. We wondered what this famous UK-made 100-watt hi-gain amp would
sound like if it operated in Class A, rather than Class AB. With this modification,
BLACK was born! Like the other XL sounds, it's tailor-made for hi-gain shred, and
it's a totally unique sound you can only find in the XL range!
Original’s valve compliment: 4 x ECC83s in preamp, 4 x EL34s in power amp.
DAMAGED
For the DAMAGED sound, we started with a US HI GAIN model and then pretty
much tossed out the rule book in our quest for gain. Not only did we crank the gain
to searing levels, but we completely re-voiced and modified the EQ of the original
model. DAMAGED is a thick, dark ultra hi-gain sound. Warn your neighbors and
get ready to shred!
Original’s tube compliment: 4 x 12AX7s in preamp, 4 x 6L6s in power amp.
24
EFFECTS
The XL-series provides eleven of the most popular effects (some effects actually combine two effects). you can adjust the SPEED parameter of modulation effects or the TIME
parameter of delay/reverb effects simply by pressing the TAP switch twice. In addition to
using the EDIT 1 knob to adjust the most important parameters, you can make more
detailed adjustments by holding down the TAP button or BYPASS button while turning the
EDIT 1 knob.
TYPE
OCTAVE
COMP
COMP+PHASER
COMP+CHORUS
CHORUS+DELAY
CHORUS+REVERB
FLANGER+REVERB
TREMOLO+REVERB
ROTARY+REVERB
DELAY
REVERB
TAP
EDIT 1
PHASER SPEED
CHORUS SPEED
DELAY TIME
CHORUS SPEED
FLANGER SPEED
TREMOLO SPEED
ROTARY SPEED
DELAY TIME
REVERB TIME
OCTAVE LEVEL
COMP SENS
COMP SENS
COMP SENS
DELAY LEVEL
REVERB LEVEL
REVERB LEVEL
REVERB LEVEL
REVERB LEVEL
DELAY LEVEL
REVERB LEVEL
EDIT 2
[TAP+EDIT 1]
EDIT 3
[BYPASS+EDIT 1]
COMP ATTACK
PHASER SPEED
CHORUS SPEED
DELAY TIME
CHORUS SPEED
FLANGER SPEED
TREMOLO SPEED
ROTARY SPEED
DELAY TIME
REVERB TIME
PHASER RESONANCE
CHORUS MIX
CHORUS MIX
CHORUS MIX
FLANGER RESONANCE
TREMOLO DEPTH
ROTARY SENS
DELAY FEEDBACK
REVERB HIDAMP
NOTE: In order to adjust the effect parameters, Effect Bypass must be off (BYPASS LED
dark). If you hold down the TAP switch and turn the EDIT 1 knob when bypass is on
(BYPASS LED lit), you’ll be adjusting the noise reduction — not the effect parameter.
HINT: If don’t want to use an effect in a channel program, select either DELAY or
REVERB as the effect type, and turn the EDIT 1 knob all the way to the left. This will set
the DELAY LEVEL or REVERB LEVEL to the minimum setting.
OCTAVE
This effect generates a note one octaves lower than the one you're playing, adding thickness and "weight" to single note lines.
EDIT1
“MIX”
Adjusts the mix level of the note one octave below.
HINT:Like all pedals of this type, OCTAVE only works with single notes...chords confuse
the heck out of it! NOT a fault - that's just the way these pedals operate.
25
COMP
Want to play a clean passage that needs to be nice, smooth, and even? Need a bit more
sustain on a lead line? Then look no further; COMP is the effect for you. It’s modeled on a
compressor pedal that is hugely popular due to the percussive clean sound it can produce — making it perfect for ’80s and ’90s pop and funk rhythm work. It can also add a
singing, mellow, sustain to lead lines — clean or dirty.
EDIT1
“SENS”
EDIT2
[TAP+EDIT 1]
“ATTACK”
Adjusts the sensitivity of the compressor. Turning
the knob toward the right will increase the amount of
compression and sustain. If you turn the knob all the
way to the left, the effect is OFF.
Adjusts the strength of the attack.
HINT: In the COMP+PHASER and COMP+CHORUS combination effects, the ATTACK
parameter is already set to the optimal value.
PHASER
A model of a much respected and popular analogue phaser, housed in a banana yellow
box!
TAP
“SPEED”
Sets the modulation speed in a range of 0.1...10 [Hz].
EDIT2
“SPEED”
This lets you use the knob to make fine adjustments
[TAP+EDIT 1]
to the parameter.
EDIT3
“RESONANCE” Adjusts the amount of resonance.
[BYPASS+EDIT 1]
CHORUS
This models the rich sound of an analog chorus unit.
TAP
EDIT2
[TAP+EDIT 1]
“SPEED”
“SPEED”
Sets the modulation speed in a range of 0.1...10 [Hz].
This lets you use the knob to make fine adjustments
to the parameter.
HINT: In the CHORUS+DELAY combination effect, the SPEED parameter is already set
to the optimal value.
EDIT3
“MIX”
[BYPASS+EDIT 1]
26
Adjusts the mix amount of the effect.
FLANGER
A model of a truly classic flanger that “unchained” a highly influential modern guitarist
who many hail as the “godfather of two-handed tapping.”
TAP
“SPEED”
Sets the modulation speed in a range of 0.1...10 [Hz].
EDIT2
“SPEED”
This lets you use the knob to make fine adjustments
[TAP+EDIT 1]
to the parameter.
EDIT3
“RESONANCE” Adjusts the amount of resonance.
[BYPASS+EDIT 1]
TREMOLO
This effect is based on the highly acclaimed tremolo circuit found in an amplifier modeled
for one of our amp models, “FUNKED.”
TAP
“SPEED”
EDIT2
“SPEED”
[TAP+EDIT 1]
EDIT3
“DEPTH”
[BYPASS+EDIT 1]
Sets the tremolo speed in a range of 2.5...10 [Hz].
This lets you use the knob to make fine adjustments
to the parameter.
Adjusts the tremolo depth.
ROTARY
This models a rotary speaker.
TAP
“SPEED”
EDIT2
“SPEED”
[TAP+EDIT 1]
EDIT3
“SENS”
[BYPASS+EDIT 1]
Sets the rotational speed of the speaker in a range of
0.8...10 [Hz].
This lets you use the knob to make fine adjustments
to the parameter.
By adjusting this parameter you can make the rotational speed change automatically in response to the
volume of your guitar. If you use this function, set the
SPEED to a slow setting.
27
DELAY
This is a model of one of the most respected analogue tape echo machines ever made.
In the original the “echo” is produced by a playback head and the exact “delay time” is set
by varying the motor speed. Many professionals prefer these “lo-fi” units because of the
warm, dark echoes they produce.
TAP
“TIME”
EDIT1
“MIX”
EDIT2
“TIME”
[TAP+EDIT 1]
EDIT3
“FEEDBACK”
[BYPASS+EDIT 1]
Sets the delay time in a range of 1...1486 [ms].
Adjust the mix amount of the delayed sound.
This lets you use the knob to make fine adjustments
to the parameter.
Adjusts the amount of feedback.
HINT: In the CHORUS+DELAY combination effect, the FEEDBACK parameter is already
set to the optimal value.
WARNING! If you crank up the FEEDBACK too much, an uncontrollable, cascading “runaway” of echoes will occur. So, use your ears and your common sense when setting this!
REVERB
A model of the most popular spring reverb system used in guitar amps.
TAP
“TIME”
EDIT1
“MIX”
EDIT2
“TIME”
[TAP+EDIT 1]
EDIT3
“HI DAMP”
[BYPASS+EDIT 1]
Sets the reverb time in a range of 0.8...8 [seconds].
Adjusts the mix amount of the reverb sound.
This lets you use the knob to adjust the reverb time.
Adjusts the dampening of the high-frequency range.
HINT: In combination effects, the TIME and HI DAMP parameters are already set to optimal values.
28
Troubleshooting
1.The amp isn’t powering up when the POWER switch is ON.
➢ Is the power cable plugged into the AC power connector on the rear panel of the
amp?
➢ Is the power cable plugged into an AC outlet?
➢ Is the AC outlet switched on and actually working?
➢ Does the power cable work?
2. There’s no sound coming from the amp
➢
➢
➢
➢
➢
➢
➢
➢
➢
Is your guitar turned up?
Are both ends of your guitar cable plugged into where they should be?
Is your guitar cable working?
Is the top panel MASTER volume turned up?
Do you have headphones or anything else plugged into the amp’s rear panel
LINE/PHONE jack? If “yes,” unplug!
(If you’re using the AD50VT-XL/AD100VT-XL) Could a cable be connected to the
rear panel [EXTERNAL SPEAKER OUT] jack?
Disconnect this jack if you’re not using an external speaker.
If you don’t hear sound from a connected external speaker, make sure that your
speaker cable and external speaker are not broken or malfunctioning.
Check the settings of the GAIN, VOLUME, TREBLE, MIDDLE and BASS. On certain amp types, if the TREBLE, MIDDLE, and BASS controls are all turned down,
there will be little or no sound coming from the amp due to the way the circuit of
the original works.
If you’re in Manual mode (the MANUAL LED lit), turn the following controls above
their minimum setting: GAIN, VOLUME, TREBLE, MIDDLE, and BASS.
(AD100VT-XL users) Could a cable be connected to only the LOOP [RETURN]
jack of the rear panel?
Connect the cable from the LOOP [SEND] jack to your external effect unit, and
connect the output of that effect unit to the LOOP [RETURN] jack.
Adjust the output level of your external effect unit to an appropriate volume.
3. The amp doesn’t seem very loud
➢ Is your guitar turned up?
➢ Is the amp’s MASTER volume turned down low?
➢ (If you’re using the AD30VT-XL/AD50VT-XL/AD100VT-XL) Is the POWER LEVEL
knob on the rear panel turned down?
29
➢ Check the settings of the GAIN, VOLUME, TREBLE, MIDDLE, and BASS controls. On certain amp types, if the TREBLE, MIDDLE, and BASS controls are all
turned down, there will be little or no sound coming from the amp due to the way
the circuit of the original works.
➢ If you’re in Manual mode (the MANUAL LED lit), turn the following controls above
their minimum setting: GAIN, VOLUME, TREBLE, MIDDLE, and BASS.
4. There’s no sound heard from the LINE/PHONE jack when you use it.
➢ Check that the top panel MASTER volume isn’t turned all the way down.
➢ Make sure sound is coming from the amp. IMPORTANT NOTE: You’ll need to
unplug your headphones or cable from the LINE/PHONE jack to do this, since
plugging something into this jack automatically mutes the amp’s speakers. If
there’s still no sound from the amp, go to page 29 “There’s no sound coming from
the amp.” If you do hear sound, check the headphones or cable you are hooking
up to this jack.
5. You can’t hear any effects.
➢ Check that the BYPASS LED isn’t lit. If it is lit, the effect is bypassed. Press the
BYPASS button to disengage it; the BYPASS LED will go off.
➢ Is the EDIT 1 knob turned down too low? Adjust the EDIT 1 knob.
30
Specifications
Number of amp types:
Number of effects:
Noise reduction:
11
11
1
Number of programs:
Input/output jacks
Top panel:
11 preset, 2 channel
Rear panel:
Power amp output
AD15VT-XL:
AD30VT-XL:
AD50VT-XL:
AD100VT-XL:
1 x INPUT
1 x FOOT SW jack, 1 x LINE/PHONE jack
(AD50VT-XL/AD100VT-XL only) EXTERNAL SPEAKER OUT jack x 1
(AD100VT-XL only) LOOP SEND jack x1, LOOP RETURN jack x 1
maximum 15W RMS @ 8 ohms
maximum 30W RMS @ 8 ohms
maximum 50W RMS @ 8 ohms
maximum 100W RMS @ 8 ohms
Speaker
AD15VT-XL:
AD30VT-XL:
AD50VT-XL:
AD100VT-XL:
Signal processing
A/D conversion:
D/A conversion:
Sampling frequency:
Power supply requirements:
Power consumption
1 x VOX original (10 inch 8 ohm)
1 x VOX original (12 inch 8 ohm)
VOX original (12 inch, 16 ohm) x 2
VOX original (12 inch, 16 ohm) x 2
24-bit
24-bit
44.1 kHz
AC, local voltage
AD15VT-XL: 23W
AD30VT-XL: 45W
AD50VT-XL: 52W
AD100VT-XL: 100W
Dimensions (W x D x H):
AD15VT-XL: 428 x 224 x 430 (mm)/16.85" x 8.82" x 16.93" (inches)
AD30VT-XL: 456 x 224 x 483 (mm)/17.95" x 8.82" x 19.02" (inches)
AD50VT-XL: 673 x 265 x 485 (mm)/26.50" x 10.43" x 19.95" (inches)
AD100VT-XL: 684 x 268 x 553 (mm)/26.93" x 10.55" x 21.77" (inches)
AD15VT-XL: 11 kg/24.25 lbs.
Weight
AD30VT-XL: 13.5 kg/29.76 lbs.
AD50VT-XL: 23 kg/50.71 lbs.
AD100VT-XL: 29 kg/63.93 lbs.
Included items:
Options (sold separately):
*
power cable
VFS2 dual foot switch
Appearance and specifications of this product are subject to change without notice.
URL = http://www.voxamps.co.uk
31
Programmer’s Cheat Sheet
Wanna remember how you set up your favourite programs? Well this is the place to do it!
Simply do as follows:
1.
Indicate where all the knobs are set by drawing a line in the empty circles.
2.
Indicate which MODULATION, DELAY & REVERB effects are being used by
colouring in the relevant LED
3.
Don't forget to make notes on NR, TAP TEMPO and POWER LEVEL in the
areas indicated!
WORD TO THE WISE: There’s only four panels you can fill out here so do
yourself a favor by photocopying it and then keep a blank “master” so
you can make more copies whenever you like
PROGRAM NAME:
EDIT2[TAP+EDIT 1]:
/TAP
EDIT3[BYPASS+EDIT 1]:
NR (NOISE REDUCTION):
POWER LEVEL
EDIT3[BYPASS+EDIT 1]:
NR (NOISE REDUCTION):
POWER LEVEL
NOTE:
PROGRAM NAME:
EDIT2[TAP+EDIT 1]:
/TAP
NOTE:
32
PROGRAM NAME:
EDIT2[TAP+EDIT 1]:
/TAP
EDIT3[BYPASS+EDIT 1]:
NR (NOISE REDUCTION):
POWER LEVEL
EDIT3[BYPASS+EDIT 1]:
NR (NOISE REDUCTION):
POWER LEVEL
EDIT3[BYPASS+EDIT 1]:
NR (NOISE REDUCTION):
POWER LEVEL
NOTE:
PROGRAM NAME:
EDIT2[TAP+EDIT 1]:
/TAP
NOTE:
PROGRAM NAME:
EDIT2[TAP+EDIT 1]:
/TAP
NOTE:
33
PROGRAM NAME:
EDIT2[TAP+EDIT 1]:
/TAP
EDIT3[BYPASS+EDIT 1]:
NR (NOISE REDUCTION):
POWER LEVEL
EDIT3[BYPASS+EDIT 1]:
NR (NOISE REDUCTION):
POWER LEVEL
EDIT3[BYPASS+EDIT 1]:
NR (NOISE REDUCTION):
POWER LEVEL
NOTE:
PROGRAM NAME:
EDIT2[TAP+EDIT 1]:
/TAP
NOTE:
PROGRAM NAME:
EDIT2[TAP+EDIT 1]:
/TAP
NOTE:
34
AD15VT-XL/AD30VT-XL/
AD50VT-XL/AD100VT-XL
IMPORTANT NOTICE TO CONSUMERS
This product has been manufactured according to strict specifications and
voltage requirements that are applicable in the country in which it is intended
that this product should be used. If you have purchased this product via the
internet, through mail order, and/or via a telephone sale, you must verify that this
product is intended to be used in the country in which you reside.
WARNING: Use of this product in any country other than that for which it is
intended could be dangerous and could invalidate the manufacturer's or
distributor's warranty.
Please also retain your receipt as proof of purchase otherwise your product may
be disqualified from the manufacturer's or distributor's warranty.
E 1
7