1
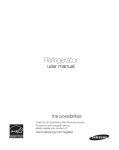
_ the possibilities
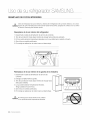
Thank you for purchasing
this Samsung product.
To receive more complete service,
please register your product at
www. samsu ng,co m/reg ister
Free Standing
Appliance
F atur
of y©ur
F ofrou r
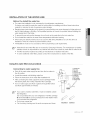
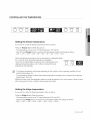
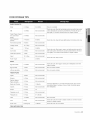
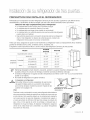
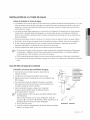
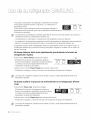
KEY FEATURES OF YOUR NEW REFRIGERATOR
Your Samsung
o
Refrigerator
Twin Cooling
comes equipped
with various innovative storage and energy-efficient
System
The Refrigerator and Freezer have separate evaporators.
the Freezer and Refrigerator cool more efficiently.
Additionally, this separate
other compartments.
o
features.
Due to this independent
air flow system prevents food odor of one compartment
cooling system,
from seeping
Bigger & Wider Space
The wide shelf area provides enough space for larger items.
The wide freezer drawer also provides enough space for 2-3 turkeys.
o
Secure Auto Close
The Secure Auto Close feature will automatically
o
Digital Display and Temperature
The easy-to-read Digital Display enhances
temperature control.
o
close a door that is slightly open.
Control
the look of your kitchen and allows you precise
Door Alarm
A helpful beeper alerts you if a door is ajar.
o
Easy Handle
Freezer door can be opened with less effort.
o
Energy Star
This Energy star labeled product
may save you money on your energy costs.
For easy future reference, write the model
and serial number down. You will find
Model #
your model number and serial number on
Serial #
the left side of the refrigerator.
2 Fea ures
into
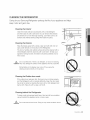
SAFETY INFORMATION
Before operating the appliance, please read this manual thoroughly and retain it for your reference.
Use this appliance only for its intended purpose as described in this instruction manual.
This appliance is not intended for use by persons (including children) with reduced physical, sensory
or mental capabilities, or lack of experience and knowledge, unless they have been given supervision
or instruction concerning use of the appliance by a person responsible for their safety.
This appliance is not intended for use by persons (including children) with reduced physical, sensory
or mental capabilities, or lack of experience and knowledge, unless they have been given supervision
or instruction concerning use of the appliance by a person responsible for their safety.
Because the following instruction covers various models, the characteristics of your Refrigerator may
differ slightly from the Refrigerator described in this manual. If you have any question, contact us at
1-800-SAMSUNG or find help and information online at www.samsung.com.
Important
WARNING
safety symbols
and precautions:
Hazards or unsafe practices that may result in severe
Hazards or unsafe practices that may result in minor
CAUTION
personal
personal
injury
injury
or death.
or property
damage.
Do NOT attempt.
Do NOT disassemble.
Do NOT touch.
Follow directions
carefully.
Unplug the power plug from the wall socket.
Make sure the machine
Call the contact
is grounded
to prevent electric shock.
center for help.
Note.
These warning signs are here to prevent injury to you and others.
Please follow them carefully.
After reading this section,
keep it in a safe place for future reference.
WARNING
SEVERE WARNING SIGNS FOR INSTALLATION
G
• Do not install the refrigerator
water.
- Deteriorated
in a damp
place
or place where
it may come in contact
with
insulation of electrical parts may cause an electric shock or fire.
• Do not place this refrigerator
heaters or other appliance.
in direct
sunlight
or expose
to the heat from
stoves,
room
Safety I-ffomr_a on 3
• Do not plug several appliances
into the same multiple power board. The refrigerator
should always be plugged into its own individual
electrical which has a voltage rating that
matched the rating plate.
- This provides the best performance and also prevents overloading house wiring circuits, which
could cause a fire hazard from overheated wires.
• If the wall socket is loose, do not insert the power
- There is a risk of electric shock of fire.
• Do not use a cord that shows
• Do not bend the power
cracks
or abrasion
cord excessively
plug.
damage
or place
along its length
heavy articles
or at either end.
on it.
• Never unplug your refrigerator
by pulling on the power cord. Always grip plug firmly
pull straight out from the outlet.
- Damage to the cord may cause a short-circuit, fire and/or electric shock.
• Do not use aerosols near the Refrigerator.
- Aerosols used near the Refrigerator may cause an explosion
This refrigerator
must be properly
before it is used.
installed
and located
and
or fire.
in accordance
with the manual
Connect the power plug in proper position with the cord hanging down.
- If you connect the power plug upside down, the wire can get cut off and cause a fire or electric
shock.
When moving the refrigerator,
- This constitutes a fire hazard.
Make sure that the power
refrigerator.
be careful
not to roll over or damage
plug is not squashed
or damaged
the power
cord.
by the back of the
Keep the packing materials out of reach of children.
- There is a risk of death from suffocation if children put them on their head.
The appliance
must
be positioned
so that the plug is accessible
The Refrigerator
must be safely grounded
- Always make sure that you have grounded
repair any part of the appliance.
Never use gas pipes,
ground.
telephone
the Refrigerator
after installation.
before attempting
to investigate
or
Power leakages can cause severe electric shock.
lines or other
potential
lightning
attractors
as an electrical
WARNING
- Improper use of the grounding plug can result in a risk of electric shock.
If it is necessary to use an extension cord, use only a 3-wire extension cord that has a 3-blade
grounding plug and a 3-slot receptacle that will accept the plug on the appliance. The marked
rating of the extension cord should be AC115-120 V, 10 A, or more. If a grounding adapter is
used, make sure the receptacle box is fully ground
If the power cord
service agent.
4 Safety Iqformaton
is damaged,
have it replaced
immediately
by the manufacturer
or its
CAUTIO.
CAUTION SIGNS FOR INSTALLATION
®
• Allow sufficient
space to install the refrigerator
on a flat surface.
- If your refrigerator is not level, the internal cooling system may not work correctly.
• Keep ventilation
obstruction.
,, Allow
opening
the appliance
in the appliance
enclosure
to stand for 2 hours
or mounting
structure
clear of
after installation.
WAR.I.GSEVERE WARNING SIGNS FOR USING
G
• Do not insert the power
• Do not store articles
plug with wet hands.
on the top of the appliance.
- When you open or close the door, the articles may fall and cause personal
material damage.
injury and/or
• Do not put a container
filled with water on the refrigerator.
- If spilled, there is a risk of fire or electric shock.
• Children
should
be supervised
to ensure
that they do not play with the appliance.
• Do not let children
hang on the door. A serious
• Do not let children
enter
injury may occur.
inside of the refrigerator.
There
is a risk of children
entrapment.
• Do not insert your hands into the bottom area under the appliance.
- Any sharp edges may cause personal injury.
• Do not let children step on drawer's cover.
- The drawer may break and cause them to slip.
• Do not overfill the refrigerator
with food.
- When you open the door, an item may fall out and cause personal injury or material damage.
• Do not touch
hands.
the inside walls
of the freezer
or products
stored
in the freezer
with wet
- This may cause frostbite.
,, Do not spray inflammable gas near the refrigerator.
- There is a risk of explosion or fire.
• Do not store volatile or flammable
substances
in the refrigerator.
- The storage of benzene, thinner, alcohol, ether, LP gas and other such products
explosions.
• Do not store pharmaceuticals
products,
products
in the refrigerator.
- Products that require strict temperature
scientific
controls
• Do not place or use an electrical appliance
recommended
by the manufacturer.
• Do not use mechanical
devices
other than those recommended
• Do not damage
the refrigerant
materials
or temperature
may cause
sensitive
must not be stored in the refrigerator.
inside
the refrigerator,
or any other means to accelerate
by the manufacturer.
unless
it is of a type
the defrosting
process,
circuit.
,, Do not disassemble
or repair the refrigerator
by yourself.
- You run risk of causing a fire, malfunction and/or personal injury.
Safety Information r5
WARNING
SEVERE WARNING SIGNS FOR USING
®
• Children
• Bottles
should
should
• This product
be supervised
be stored
to ensure
tightly
is intended
that they do not play with the appliance.
together
so that they do not fall out.
only for the storage
of food
in a domestic
environment.
• if a gas leak is detected,
avoid any naked flames or potential sources
the room in which the appliance
is standing for several minutes.
,,Pull the power plug out of the socket before
refrigerator.
- Otherwise, there is a risk of electric shock.
,, If the appliance
generates
a strange noise,
plug immediately
and contact your nearest
,, If you experience
difficulty
when
changing
,, If any dust or water is in Refrigerator,
Electronics
service center.
- Otherwise there is a risk of fire
changing
the interior
and air
lamps of the
a burning smell
service center.
or smoke,
the light, contact
service
pull out power
of ignition
unplug
the power
agents.
plug and contact
your Samsung
/k
CAUTION
CAUTION SIGNS FOR USING
o
Do not re-freeze
o
Do not place carbonated
frozen
foods
that have thawed
or fizzy drinks
completely.
in the freezer
compartment.
Do not put bottles
or
glass containers
in the freezer.
- When the contents freeze, the glass may break and cause personal injury.
,, Service warranty and Modification.
- Any changes or modifications performed by a 3rd party on this finished appliance is not
covered under Samsung warranty service, nor can Samsung be responsible for safety issues
that result from 3rd party modifications.
,, Do not block air holes.
- If the air holes are blocked, especially with a plastic bag, the refrigerator can be over cooled. If
this cooling period lasts too long, the water filter may break and cause water leakage.
• If the refrigerator
is disconnected
minutes before plugging it back.
from the power
supply,
you should
wait for at least five
,, If you have a long vacation planned or the refrigerator
is not to be used for a long period
of time, you must empty the refrigerator
and pull out the power plug.
- Deterioration in the insulation may cause fire.
,, Wipe excess moisture from the inside and leave the doors
- Otherwise, door and mold may develop.
open.
,, To get Best performance
of product,
- Do not place foods too closely in front of the vents at the rear of the appliance
obstruct free air circulation in the refrigerator compartment.
- Wrap the food up properly or place it in airtight containers
,, Fill water tank,
6 safety iqfomqa on
ice tray, water cubes
only with potable
as it can
before putting it into the refrigerator.
water.
cAu'no.CAUTION SIGNS FOR USING
• When the product is flooded,
make sure to contact
- There is a risk of electric shock or fire.
• Do not directly spray water inside or outside
- There is a risk of fire or electric shock.
®
your nearest
service
center.
the refrigerator.
,, Remove any foreign matter or dust from the power plug pins. Do not use a wet or damp
cloth when cleaning the plug, remove any foreign material or dust from the power plug
pins.
- Otherwise there is a risk of fire or electric shock.
• Unplug
the refrigerator
before
cleaning
and making
repairs.
WAR.I.GSEVERE WARNING SIGNS FOR DISPOSAL
®
DANGER : Risk of child
- Take off the doors.
entrapment.
Before
you throw
away your old refrigerator
or freezer:
- Leave the shelves in place so that children may not easily climb inside.
• Please dispose
manner.
of the packaging
material
for this product
in an environmentally
,, Leave the shelves in place so that children may not easily climb inside. Ensure
of the pipes on the back of the appliance are damaged prior to disposal.
,, When disposing
of this refrigerator,
remove the door/door
small children or animals cannot become trapped inside.
Children
should
,, Cyclopentane
be supervised
to ensure
is used as in the insulation.
friendly
that none
seals and door latch so that
that they do not play with the appliance.
The gases
in the insulation
material
require
a special disposal procedure.
Please contact your local authorities
in regard to the
environmentally
safe disposal of this product. Ensure that none of the pipes on the back
of the refrigerator
are damaged prior to disposal.
safetyiqfomqaon
7
nt nts
FRENCH
SETTING UP YOUR
DOOR REFRIGERATOR
09
Getting ready to install the refrigerator
10 Setting up the refrigerator
10 Removing the refrigerator doors
15 Adjusting the doors
16 Making minor adjustments between doors
17 Installation of the water line
OPERATING YOUR
SAMSUNG REFRIGERATOR
_4
TROUBLESHOOTING
WARRANTY
8_ contents
19 Parts and features
20
Using the control panel
21
Controlling the temperature
24
Storing food in the refrigerator
24
Storing food in the freezer drawer
25
Food storage tips
27
Removing the fridge accessories
28
Removing the freezer accessories
29
Cleaning the refrigerator
30
Changing the interior lights
31
Troubleshooting
32
Warranty
ur FrenchDoorF efrger or
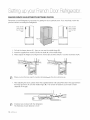
GETTING READY TO INSTALL THE REFRIGERATOR
Congratulations
on your purchase of this Samsung French Door Refrigerator. We hope you enjoy the state-of-art
features and efficiencies that this new appliance offers.
Selecting the best location
for the Refrigerator
• A location with easy access to the water supply.
• A location without direct exposure to sunlight.
• A location with level (or nearly level) flooring.
• A location with enough space for the Refrigerator doors to open easily.
• Allow sufficient space for air circulation of the internal cooling system. If the
Refrigerator does not have enough space, the internal cooling system may not
work properly.
2 i
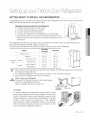
First thing! Make sure that you can easily move your Refrigerator to its final location by measuring
(both width and height), thresholds, ceilings, stairways, etc.
The following chart details the exact height and depth of Samsung French Door Refrigerator.
RF195AB
Model
17.8
19.7
32 1/4"
32 1/4"
without door (B)
24 3/8"
26 1/4"
with door (C)
30 1/2"
32 1/2"
without hinge (D)
68 5/8"
68 5/8"
with hinge (E)
69 3/4"
69 3/4"
Width (A)
Dimension
Depth
(inch)
Height
doorways
RF217AB
RF197AB
Capacity (cu.ft)
ncl
,, Allow clearance to the right, left, back and top when installing. This will help reduce power consumption
and keep your energy bills lower.
,, If you install the Refrigerator where is below 50°F (10°C), it may not function optimally.
,, Do not locate the refrigerator where the wet condition.
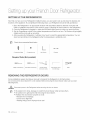
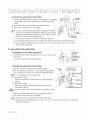
When moving your refrigerator
CAUT=ONTO prevent floor damage, be sure the front adjusting
are in the up position(above the floor).
Refer to 'Adjusting the doors' (on page 15).
legs
Flat-blade
FLOORI NG
Control Lever
screwdriver(-)
For proper installation, this refrigerator must be placed on a level
surface of hard material that is the same height as the rest of the
flooring. This surface should be strong enough to support a fully
loaded refrigerator, or approximately
2231bs(106kg). To protect
the finish of the flooring, cut a large section of the cardboard
carton and place under the refrigerator where you are working.
When moving the refrigerator, be sure to pull it straight out and
return it to position by pushing it straight in.
settng up 9
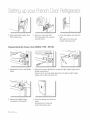
S tt
up your Fron
Door Refr erator
SETTING UP THE REFRIGERATOR
Now that you have your new Refrigerator
functions of the appliance. By completing
installed in place, you are ready to set up and enjoy the features and
the following steps, your Refrigerator should be fully operational.
1. Place the Refrigerator in an appropriate location with reasonable clearance between it and the wall.
Refer to installation instructions in this manual. (page 9, selecting the best location for the Refrigerator)
2. Once the Refrigerator is plugged in, make sure the interior light comes on when you open the doors.
3. Set the Temperature control to the coldest temperature and wait for an hour. The Freezer will get slightly
chilled and the motor will run smoothly.
4. After powering the Refrigerator, it will take a few hours to reach the appropriate temperature.
store food and drinks in the Refrigerator after the temperature is sufficiently cool.
®
Check the accessories
You can
listed below.
83
Compression fitting
Required
Hex Wrench
Compression nut
Fastener
Tools (Not provided)
w
Phillips screwdriver(+)
Socket Wrench
Flat-blade screwdriver(-)
(10mm) (for bolts)
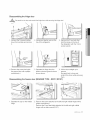
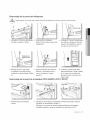
REMOVING
THE REFRIGERATOR
Hex Wrench (3/16")
(for Mid hinge)
Pliers
DOORS
Some installations require door/drawer
removal to transport the Refrigerator to its final location.
Do not remove the door/drawer
if it is not needed. Before removing the door/drawer
make sure you read
following items.
zL
WARNING
®
Disconnect power to the Refrigerator before removing the door or drawer.
o
Be careful not to drop, damage or scratch the door/drawer
o
Be careful not to get injured while removing the door/drawer.
Reattach the door/drawer
properly to avoid:
- Moisture from air leakage.
- Uneven door alignment.
o
- Wasting
10 sett]g up
energy due to improper
door seal.
while removing them.
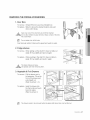
Disassembling
A
WARNING
the fridge
door
Be careful not to drop and scratch the fridge door while removing the fridge door!
Socket wrench
1. Remove the 3 screws holding
down the top table and remove
it.
2. Disconnect
electric wire on the
top of the refrigerator.
3. Remove the 3 hex bolts that
hold the hinge on the top of
the refrigerator with the 10mm
socket wrench,
ground
wire
4. Remove the screw that holds
the ground wire with a philips
screwdriver(+).
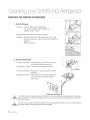
Disassembling
5. Separate
the hinge from the
electric wire and ground wire as
shown above.
6. Lift the door straight
remove.
up to
Be careful not to drop and
scratch the doors while removing
them.
the freezer door (DRAWER TYPE - RF217,RF197)
1. Separate the cap on the middle
hinge.
2. Remove the screw attached to the left and right middle hinges with a
philips screwdriver(+).
Remove the 2 hex head bolts attached to the left and right middle
hinges with an allen wrench(3!16").
settqg up 11
Door
3. After opening the Freezer door,
lift the drawer box.
4. Remove 4 hex head bolts
from both sides with a socket
wrench(10ram)
Disassembling
Be careful not to drop and
scratch the freezer door.
the freezer door (SWING TYPE - RF195)
1. Separate the Cap on the Middle
Hinge.
3. Remove the Middle Hinge
connected to the Freezer.
12 setting up
5. Lift up the freezer door from the
rails.
2. Remove the screw attached to the left and right middle hinges with a
philips screwdriver(+).
Remove the 2 hex head bolts attached to the left and right middle
hinges with an allen wrench(3!16").
4. Lift up the freezer door from the
hinge.
Be careful not to drop and
scratch the freezer door.
Reassembling
the fridge door
1. Insert and tighten the screw into
the left and right middle hinges
with a philips screwdriver(+).
4. Place the hole in the bottom of
the left door over the middle
hinge.
2. Insert and tighten the 2 hex head 3.
bolts into the left and right middle
hinges with an allen wrench(3!16").
5. Insert the left upper hinge shaft
into the hole on the corner of the
fridge door.
Replace the middle hinge cap.
6. Insert the upper hinges into the holes
at the top of the door.
Insert and tighten the 3 hex head
bolts into the left and right upper
hinges with a socket wrench.
7. Insert and tighten the ground
screw into the left and right
upper hinges with a philips
screwdriver(+).
8. Connect
the electronic
wire on
the top of the refrigerator.
9. Position the top table in place.
Insert and tighten the 3 screws
into the top table with a philips
screwdriver(+).
settng up 13
Reassembling
the freezer
door (DRAWER
1. Pull out the rails to the full length
on each sidle of the cabinet
TYPE - RF217,RF197)
2. Hang the freezer door front onto
open slot on the sides.
evenly.
3. With the 10mm wrench, reattach
4 bolts to connect the rail with
the door.
4. With the drawer pulled out fully,
insert the drawer box into the rail
system.
Reassembling
the freezer
1. Place the hole in the bottom
door (SWING TYPE - RF195)
of
the freezer door over the right
side low hinge.
2. Replace the middle hinge connected
4. Replace the cap on the middle hinge.
14 settiqg up
to the freezer.
3. Insert and tighten the screw into the left and right middle hinges with a
philips screwdriver(+). Insert and tighten the 2 hex head bolts into the
left and right middle hinges with an allen wrench(3!16").
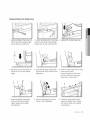
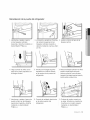
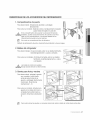
ADJUSTING
THE DOORS
Now that the doors are back on the Refrigerator, you want to make sure the Refrigerator
make final adjustments.
If the Refrigerator
is level so that you can
is not level, it will not be possible to get the doors perfectly even.
When the Left door is lower than the Right door,
Insert a flat-blade screwdriver
to level the left door.
into a notch on the left control lever, turn it clockwise
or counter-clockwise
r
I Lever
Screwdriver(-)
When the Left door is higher than the Right door.
Insert a flat-blade
screwdriver
into a notch on the right control lever, turn it clockwise
or counter-clockwise
to level the right door.
Control
Screwdriver(-)
Z_
Both control levers must be surely touching
CAUTION damage because of tipping.
the floor to avoid the possible personal injury or property
sett _g up 15
S tt
up your Fror
Door Refr erator
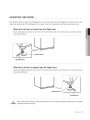
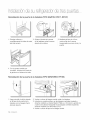
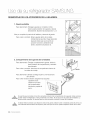
MAKING MINOR ADJUSTMENTS BETWEEN DOORS
Remember, a level Refrigerator is necessary for getting the doors perfectly even. If you need help, review the
previous section on leveling the Refrigerator.
When the left
door is lower
than the right
door.
When the left
door is higher
than the right
door.
1. Pull out the freezer drawer (1), then you can see the middle hinge (2).
2. Insert the supplied
hex wrench ( 3 ) into the shaft (4) of the middle hinge.
3. Please adjust the height by turning the hex wrench (3) clockwise
(
) or counter-clockwise
(
).
o,....
®
When you turn the hex wrench counter-clockwise(
), the door will move up.
1. After adjusting the doors, please insert the supplied fastener
( 5 ) using Pliers ( 6 ) in the gap between
the hinge-grommet
( 7 ) and the middle hinge ( 8 ). The number of fasteners you'll need to insert
depends on the gap.
2 fastener are enclosed with the refrigerator.
The thickness of each fastener is 0.04".
16 sett]g up
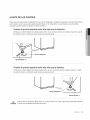
INSTALLATION
OF THE WATER LINE
Before You Install the water line
• The water line installation is not warranted by the refrigerator manufacturer.
So before you install the water line, read the whole steps for installing and follow these instructions
carefully to minimize the risk of expensive water damage.
,, Banging pipes (water banging in the pipes) in house plumbing can cause damage to fridge parts and
lead to water leakage or flooding. Call a qualified plumber to correct the problem before installing the
water supply line to the fridge.
• To prevent burns and product
damage, do not hook up the water line to the hot water line.
• Do not install the water line in areas where temperatures
fall below freezing.
• When using any electrical device (such as a power drill) during installation,
insulated or wired in a manner to prevent electric shock.
• All installations
®
must be in a accordance
with local plumbing
be sure the device is
code requirements.
• Water line Kit and water filter are not covered by Samsung's Warranty. The manufacturer (or dealer,
installer) of them is responsible for any defects and all the loss caused by water filter & water line kit.
• The filter should be replaced
• To order additional
according
to manufacturer
water filters, please contact
(or dealer)'s instruction.
the manufacturer
(or dealer) of the filter.
Using the water filter (not provided)
Connecting
to water supply
1. ColdWater line
line
2. Pipe Clamp.
3. Plastic line
• Shut off the main water supply line and turn the Ice maker to
4. CompressionNut
5. CompressionSleeve
6. PackingNut
7. ShutOffValve
the off position.
• Locate the nearest cold drinking water line.
• Follow the instructions in the water filter installation
kit.
6
• After connecting
the water supply line to the Cartridge
5 4
Holder
8. FilterCartridge
9. CartridgeHolder
inlet (insert plastic line in fully), install the Filter Cartridge.
• Turn on water supply and Flush 3 gallons through filter before
use (flush approximately 6 minutes)
®
If you want to install a water filter, it must be installed outside
o
o
the refrigerator.
It is not provided with your new refrigerator. The filter cartridge
(8) and holder (9) kit can be purchased from the retailer where
you purchased this refrigerator.
Do not use copper line.
Cut the tubing, making sure the ends are square and clean.
Incorrect
Correct
sett qr#up 17
Sortr
r
Door R fr orator
Connect
the water
line to the fddge
,, Connect
the plastic line on the back of your fridge to the cartridge
holder outlet (fully insert the plastic line to the cartridge
outlet).
,
Insert plastic clip to the cartridge
Cartridge
!H,_
holder
holder inlet and outlet.
You can purchase the necessary filter cartridge at the retailer
where you purchased this refrigerator. Make sure you buy the
SAMSUNG filter cartridge (Replacement cartridge No • DA29-
-
The water line must be connected
o
A compression
o
When pushing the Refrigerator
Iine(Icemaker supply line)
To use without
Connecting
with the unit and it is inside the fridge drawer.
back, make sure you don't roll over the power cord or water
the water filter
to the water supply
Locate the nearest cold water drinking
1. ColdWater line
2, Pipe Clamp.
line
I_ ---_1
_..._.'_2
7.._
the water
q-_l
nut through
the compression
6. Packing Nut.
(k/_/))/i \____Shut Off Valve
...L_j
_G
Copper tubing or Plastic tubing
(Not supplied)
(Not supplied)
- Slip the compression
shown.
Compression Nut
nut.
(1t4") (Purchased)
,, Using Copper Tubing
\
nut and ferrule on copper tubing as
(Purchased)
_,
Plastic Tubing I_-_
(Provided)
Using Plastic Tubing
Compression
fitting (Provided)
Compression Nut
- Insert the molded end(Bulb) of the plastic tubing into the
compression fitting.
Do not use without the molded end(Bulb) of the plastic tubing.
A
"_1
5 4
Household water line
the plastic tubing.
2) After inserting the compression nut into plastic tubing, tighten
the compression
nut onto 1/4" compression fitting(Provided).
,
/_-_J_
line to the fridge
1) Slip the compression
Do not overtighten
3. P.astic .ine
4. CompressionNut
5. CompressionSleeve
f..]---3
line.
[
6
Connect
I.._ a""ege
LC;;;s,;Zino
water only
, Shut off the main water supply line and turn the Ice maker to the
off position.
,
"$-. I
Filter
(Provided)
to drinkable
fitting and nut kit is supplied
cl't.._l.[_i,'
"_
\%1
00015A) to ensure the best performance.
o
lao,der
"___ii " I\'""
, Turn water on and check for any leakage.
o
:
(1/4)(Provided)
Refrigerator
CAUTION
3) Tighten the compression
nut onto the compression
fitting.
4) Turn water on and check for any leakage.
, Water line must be connected to drinkable water only.
, When pushing the Refrigerator back, make sure you don't roll over the power cord or water line
(Icemaker supply line).
18 settiqg up
©poratr
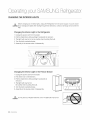
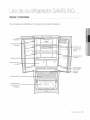
PARTS AND FEATURES
Use this page to become more familiar with the parts and features of the Refrigerator.
Fridge Light
Door Bin
j
Moving Tray
(Location
isadjustable)
Door Bin
Glass Shelf
Vegetable & Fruit
Drawer
Bottle Bin
I
Freezer Light
Pull Out Drawer
Freezer Drawer
Bin
Operati-_r#19
©porch
U G Ro rcjor tor
r
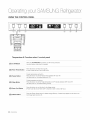
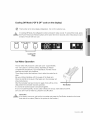
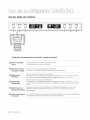
USING THE CONTROL PANEL
Temperature
& Function
select / control
panel
(_)
Ice Off Button
When the Ice Off Button is pressed, ice will not be produced.
Use this function only when it is needed.
(_}
Power Freeze Button
Press this button to freeze food quickly.
(Power Freeze will last 2 and a half hours.)
(_)
Freezer Button
Freezer temperature set button.
Press this button to set the Freezer temp between 8°F and -8°R
(At initial power on, the default setting is -2°R)
(_)
Fridge Button
Fridge temperature set button.
Press this button to set the Fridge temperature in 2°F intervals between 46°F and 34°R
(At initial power on, the default setting is 38°R)
(_)
Power Cool Button
Press this button to cool the food in the fridge quickly.
(Power Cool will shut off when 25°F is reached or after 2 and a half hours.
(_)
E.Saver Button
Press the Energy Saver button for better energy efficiency. If water drops appear on the doors, turn
the Energy Saver function off.
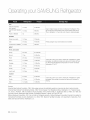
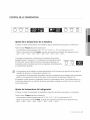
CONTROLLING THE TEMPERATURE
ice Off
Power Freeze
D
Freezer
Fridge
D
Q
-2'F is Recommended
Setting
the freezer
38°F
Power Cool
E.Saver
Q
iS Recommended
temperature
If you want to control the freezer temperature,
follow as below.
Press the Freezer
Button (Refer the picture)
- The temperature
can be set in 2°F interval between
-8°F and 8°R
- Each time the Freezer Button is pressed, the temperature setting will change as follows;
(_2OF-+ _4OF-+ _6OF-+ _8OF-+ 8OF -+ 6OF -+ 4OF -+ 2OF -+ 0OF -+ _2OF)
When selecting the temperature, the set temperature is displayed initially
for 5 seconds, then the actual temperature is displayed.
(There may be slight difference between the set temperature and
displayed actual temperature, but it will be corrected to the set
:'ower Freeze
Freezer
-2°F is Recommended
temperature
automatically.)
/
- The Freezer temperature will change depending
ambient temperature, etc.
on the number
- The temperature display will blink when freezer temperature
keeping warm food, etc.
of door openings,
increases
(Blinking will stop when the refrigerator reaches normal temperature.
after a long period of time, contact a Samsung service center.)
Setting
the fridge
- The temperature
due to frequent
of food,
door opening,
If for some reason it does not stop
temperature
If you want to control the fridge temperature,
Press the Fridge
quantity
follow as below.
Button (Refer the picture)
can be set in 2°F interval between 34°F and 46°R
- Each time the Fridge Button is pressed, the temperature setting will change as follows;
(38OF -+ 36OF -+ 34OF -+ 46OF -+ 44OF -+ 42OF -+ 40OF -+ 38OF)
Operati-_g 21
U G Fqof or
When selecting the fridge temperature, the set temperature is displayed
initially for 5 seconds, then the actual temperature is displayed.
(There may be slight difference between the set temperature and
displayed actual temperature,
but it will be corrected to the set
temperature
®
Fridge
38°F is Recommended
automatically.)
- The Fridge temperature will change
ambient temperature, etc.
- Temperature
depending
of each shelve or container
on the number of door openings,
is increases
(Blinking will stop when the refrigerator reaches normal temperature.
after a long period of time, contact a Samsung service center.)
Press the Power
to make
Freeze
ice faster
Button.
quantity of food,
in the fridge may be different.
- The temperature display will blink when fridge temperature
keeping warm food, etc.
If you want
(Controlling
due to frequent
Freeze
the Power
Freeze)
(Refer to the picture.)
Power Freeze
Freezer
Q
at the set freezer
again.
-2°F
--
- The Power Freeze function
of the set temperature.
up the cooling in the Fridge (Power Cool)
Press the Power Cool Button.
(Refer to the picture.)
- The Power cool light on the display goes on (see the arrow mark) and this function
regardless of the set fridge temperature.
Cool
is Recommended
/
operates for 2 and a half hours regardless
If you want to speed
Press the Power
begins to
Button again to cancel this
- The light goes off and it operates
temperature
door opening,
If for some reason it does not stop
- The power Freeze light on the display goes on (see the arrow mark) and this function
operate regardless of the set freezer temperature.
Press the Power
function.
Power
begins to operate
Button again to cancel this function.
- The light goes off and it operates
temperature again.
at the set fridge
Fr_dge PowerCoo_
[_
38"F is Recommended
- The Power Cool function
operates for 2 and a half hours regardless
of the set temperature.
Cooling Off Mode ("OF & OF" code on the display)
®
This function
is for store display refrigerators.
It is not for customer
In Cooling Off Mode, the refrigerator works but doesn't
CAUTION
use.
make cool air. To cancel this mode, press
the Power Freeze and Freezer buttons at the same time for 3 seconds
is heard. The unit will now cool.
I cs
until a "Ding-dong"
sound
-2°F is Recommended
I
38°F is
1
Cooling Off
mode
ice Maker
Operation
The ice maker will produce
8 cubes per cycle - approximately
100-130 cubes in a 24-hour period, depending on freezer
compartment
temperature, room temperature, number of door
openings and other use conditions.
Throw away the first few batches of ice to allow the water line to
clear.
Be sure nothing interferes with the sweep of the feeler arm.
When the bin fills to the level of the feeler arm, the icemaker will
stop producing ice.
After the icemaker has been turned on again, there will be a time
delay before the icemaker resumes operation.
Test Button
It is normal for several cubes to be joined together.
If ice is not used frequently, old ice cubes will become cloudy, taste stale and shrink.
So if you don't want to make ice, press the Ice Off button.
Test button
CAUTION If ice doesn't
come out, pull out the ice maker and press the Test Button located on the lower
front side of ice maker. (Refer to the picture for the location.)
Ope_ati_g 23
U G Roll,or
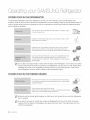
STORING FOOD IN THE REFRIGERATOR
The Samsung Refrigerator has been designed to provide you with maximum space saving features and
functions. Here are some of the customized compartments
we have created to keep your food fresher longer. In
order to further prevent odor from seeping
and as airtight as possible.
into the ice compartment,
stored food should be wrapped
Can be used to store small dairy items like butter or margarine, yogurt
or cream cheese bricks
securely
butter/cheese
Designed to handle large, bulky items such as gallons of milk or other
large bottles and containers.
Designed to be crack-resistant, the shelves can be used to store all
types of food and drinks. Circular marks on the glass surface are a
normal phenomenon and can usually be wiped clean with a damp cloth.
Used for preserving the freshness of your stored vegetables and fruits.
This drawer has been specifically designed to control the level of
humidity within the compartment. Keep vegetables and fruits separate
when possible.
®
Do not place any large articles of food under the lamp in the Refrigerator. An air sensor is located
near the lamp and if the sensor is blocked, your Refrigerator may become too cold. Please place
Vegetable and Fruits in the Vegetable and Fruits Drawers to avoid freezing them. If the food in
your Refrigerator becomes frozen, please set the temperature higher.
STORING FOOD IN THE FREEZER DRAWER
Best used to store meats or dry foods. Stored food should be placed
in a container or wrapped securely using plastic wrap or other suitable
wrapping materials.
Can be used to store meat and dry foods.
Stored food should be placed in a container or wrapped securely using
plastic wrap or other suitable wrapping materials.
[_
Bottles should be stored tightly together
door is opened.
so that they do not tip and fall out when the Refrigerator
If you plan to go away for a long time, empty the Refrigerator and turn it off. Wipe the excess
moisture from the inside of the appliance and leave the doors open. This helps keep odor and
mold from developing.
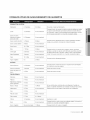
FOOD STORAGE TIPS
DAIRYPRODUCTS
Butter
2-3 Weeks
6-9 Months
Wrap or cover tightly.
Milk
1-2 Weeks
Not recommended
Check date code. Most milkand similar products are sold in date-coded
cartons that indicate a products's peak freshness. Re-sealwith cap or
wrap tightly. Do not return unused protions to oroginalcontainer.
2-4 Weeks
Not recommended
3-4 Months
6 Months
HardCheese (opened)
2 Months
Not recommended
Cottage Cheese
10-15 Days
Not recommended
Cream
7-10 Days
2 Months
Sour Cream
2 Weeks
Not recommended
Cream Dips (opened)
1 Week
Not recommended
Yogurt
10-14 Days
Not recommended
FrozenYogurt
n/a
2 Months
Eggs(uncooked)
3-4 Weeks
Not recommended
Check date code. Store eggs in coldest part of refrigeratorand in their
original container.
Eggs(cooked)
1 weeks
Not recommended
Store in covered container
Leftover egg dishes
3-4 Days
Not recommended
Store in covered container
Apples
1 Month
Not recommended
Bananas
2-4 Days
Not recommended
Peaches,Melons,
Pears,Avocados
3-5 Days
Not recommended
Berriesand Cherries
2-3 Days
12 Months
Apricots
3-5 Days
Not recommended
Grapes
2-5 Days
n/a
Pineapple(un-cut)
2-3 Days
Not recommended
Pineapple(cut)
5-7 Days
6-12 Months
Citrus
1-2 Weeks
Not recommended
Store uncovered.
Juice
6 Days
Not recommended
Check date code and re-seal inoriginal container. Do not return unused
portions to original container.
FrozenJuice
Thawing only
12 Months
Check date code. Do not re-freeze.
Cream Cheese, cheese
food, and cheese
spread
HardCheese (unopened)
Check date code. Keep all cheese tightly packed in moisture proof wrap
Check date code. Most yogurt, creams, and similar products are sold in
date-coded cartons that indicate a product's peak freshness. Re-sealor
cover tightly. Do not return unused portions to originalcontainer.
Check date code. Keep covered.
EGGS
FRESHFRUITS
Ifstoring in refrigerator,do not wash fruit before storing. Store in moisture resistantbags or containers. Wrap cut fruits. Some fruits darken
when refrigerated.
FISH AND SHELLFISh
Operati qg 25
r-
U G Rof gor
Fish
Fatty Fish (mackerel,
trout, salmon)
Lean Fish (cod, flounder,
etc)
1-2 Days
2-3 Months
1-2 Days
6 Months
n/a
3 Months
Shrimp (uncooked)
1-2 Days
12 Months
Crab
3-5 Days
10 Months
Cooked Fish or Shellfish
2-3 Days
3 Months
Chops
2-4 Days
6-12 Months
Ground
1 Day
3-4 Months
Roast
2-4 Days
6-12 Months
Bacon
1-2 Weeks
1-2 Months
Sausage
1-2 Days
1-2 Months
Steak
2-4 Days
6-9 Months
Poultry
1 Day
12 Months
Lunch meat
3-5 Days
1 Month
Meat
2-3 Days
2-3 Months
Poultry
2-3 Days
4-5 Months
Ham
1-2 weeks
1-2 Months
Frozenor Breaded
Keep in original wrapper and store in coldest part of refrigerator.Package in vapor-proof and moisture proof wrap for freezer. Freezeat 0°R
Thaw in refrigerator or Check date code. Freezein original packaging.
Sheflfish
Freezepackage in vapor and moisture-proof container.
Fresh, Uncooked
Check date code for use. Store in coldest part of refrigerator in original
packaging. Useadditional moisture and vapor-proof container for freezing. Recommended refrigeratortemperature 33°F to 36°F and freezer
temperature 0°F to 2°F
Cooked
Check date code for use. Store in coldest part of refrigerator in original
packaging. Place package in moisture and vapor-proof container for
freezing.
Sources:
American Meat Institute Foundation. 1994. Yellow pages: answers to predictable questions consumers ask about meat and poultry.
American Meat Institute Food Marketing Institute. 1999. The food keeper. Food Marketing Institute, Washington, D.C. Freeland-Graves,
J.H. and G.C. Peckham. 1996. Foundations of food preparation, 6th ed. Prentice-Hall, Inc. Englewood Cliffs, NJ. Hillers, V.N. 1993. Storing foods at home. Washington State University Cooperative Extension, Pullman, WA. Pubh EB 1205.
National Restaurant Association. 2001. Be cool-chill out! Refrigerate promptly. National Restaurant Association Education Foundationl/4s
International Food Safety Council, Washington, D.C. USDA. 1997. Basics for handling food safely. U.S. Department of Agriculture, Food
Safety and Inspection Service, Washington, D.C.
REMOVING THE FRIDGE ACCESSORIES
1. Door Bins
To remove - Simply lift the bin up and pull straight out.
To replace - Slide it in above the desired location and push
down until it stops.
Z_
Injury may occur if the door bins are not firmly inserted.
CAUTIONDO not allow children to play with bins. Sharp corners of the bins
may cause injury.
Do not adjust a bin full of foods.
Dust removal method
-Remove the guard and wash in water.
2. Fridge shelves
To remove - When pulling out the shelf, if it does not slide out
easily, lift it up slightly and pull out again.
To replace - When pushing
in the shelf, if it does not slide in
easily, lift it up slightly and push in again.
The Glass shelves are heaw.
CAUTIONUse special care when removing them.
3. Vegetable
& Fruit Drawers
To remove - Pull the drawer out to
full extension.
Tilt up the
front of the drawer and
f-
j
"---
1
pull straight out.
(Refer to picture 1-3)
To replace - Insert the drawer into
the frame rails and push
back into place.
3!
(Refer to picture 4)
\
The drawers need to be removed before the glass shelf above them can be lifted out.
Operati _g 27
©porch
r
U G Rol:rcjor tor
REMOVING THE FREEZER ACCESSORIES
1. Pull Out Drawer
To remove - Pull the drawer out to full extension.
Tilt up rear of drawer and lift straight out.
(Refer to picture 1 & 2)
Open the freezer door fully and remove the drawer.
To replace - Place the drawer onto the rails by tilting it up. Lower
the drawer into place until it is horizontal and slide the
drawer in.
(Refer to picture 3)
2. Freezer
Drawer
Bin
I
"1
To remove the drawer - Pull the drawer out fully. Tilt up the rear
of the bin and lift it out to remove.
To relocate the drawer - Place the bin into the rail assembly.
To remove the divider - Remove the 1 screw and pull the divider
i_-"_'_
Drawer
straight up.
To relocate the divider - Hook the top corners of the divider over
the hole of the bin. Insert and tighten
the 1 screw.
//_k.
Do not allow baby or children go inside the drawer bin. They could damage the Refrigerator and seriously
CAUTION injure themselves. Do not sit on the Freezer door. The door may break. Do not allow children to climb into
the Freezer basket.
Z_
If you remove the divider to clean the basket bin, you must reinstall the divider using 1 screw after cleaning
WARNINGto prevent children from getting trapped inside the basket.
CLEANING THE REFRIGERATOR
Caring for your Samsung Refrigerator prolongs the life of your appliance and helps
keep it odor and germ-free.
Cleaning the Interior
Clean the inside walls and accessories with a mild detergent
and then wipe dry with a soft cloth. You can remove the drawers
and shelves for a more thorough cleaning. Just make sure to dry
drawers and shelves before putting them back into place.
Cleaning the Exterior
Wipe the display panel with a damp, clean and soft cloth. Do not
spray water directly on the surface of the Refrigerator.
The doors, handles and cabinet surfaces should be cleaned with a
mild detergent and then wiped dry with a soft cloth. To keep your
appliance looking its best, the exterior should be polished once or
twice a year.
liy
panel
Z_
Do not use Benzene, Thinner, car detergent, or Clorox for cleaning.
CAUTIONThey may damage the surface of the appliance and may cause fire.
Printed letters on the display may come off if you spray the
cleaning products directly on the product.
Cleaning the Rubber door seals
If the rubber door seals are dirty, the doors may not close properly,
and the Refrigerator will not operate efficiently. Keep the door seals
free of grit or grime by cleaning the doors with a mild detergent and
damp cloth. Wipe dry with a clean, soft cloth.
Cleaning behind the Refrigerator
To keep cords and exposed parts free of dust and dirt accumulation,
vacuum behind the appliance once or twice a year.
Z_
Do not remove the back cover. Doing so may cause an electric shock.
CAUTION
Operati-_g _29
©porch
r
U
CHANGING THE INTERIOR LIGHTS
Before changing any of interior lights, unplug the Refrigerator from the power supply. If you are unsure
CAUTIONabout changing the lights after reading through these directions, contact a Samsung service center for
help.
Changing the Interior Light in the Refrigerator
1. Unplug the power cord from the outlet.
2. Pull the shield down while pushing it backwards to remove it.
3. The light bulb may be hot so be careful when touching the bulb.
4. Turn the bulb counterclockwise.
5. Assembly is the reverse order of disassembly.
Changing the Interior Light in the Freezer Drawer
1. Unplug the power cord from the outlet.
2. Pull drawer out to full extension.
3. Pull the shield down while pushing it backwards to
remove it.
4. The light bulb may be hot.
Be careful when touching the bulb.
5. Turn the bulb counterclockwise.
6. Assembly is the reverse order of disassembly.
Z_
CAUTION
Do not place your fingers inside the cover. The light bulb may be hot.
lr©ub o h©©t
Check that the power plug is properly connected.
Is the temperature control on the display panel set to the correct temperature?
Try setting it to a lower temperature.
Is the Refrigerator in direct sunlight or located near a heat source?
Is the back of the Refrigerator so close to the wall that air cannot keep circulating?
(Refer to page 10 for the best location.)
Is the temperature control on the display set to the correct temperature?
Try setting it to a warmer temperature.
Is the temperature in the room too low?
Did you store the food too close to the air vent at the back of the Refrigerator? Move the
food away from the air vent.
Check that the Refrigerator is level and stable.
Is the back of the Refrigerator too close to the wall and therefore keeping air from
circulating?
Was anything dropped behind or under the Refrigerator?
A "ticking" sound is heard from inside the Refrigerator. It is normal and occurs because
various accessories are contracting or expanding according to the temperature of the
Refrigerator interior.
Some heat is normal as anti-condensators are installed in the vertical hinged section of
the Refrigerator to prevent condensation.
Is the Refrigerator door ajar? Condensation can occur when you leave the door open for
a long time.
Did you wait for 12 hours after installation of the water supply line before making ice?
Is the water line connected and the shut-off valve opened?
Did you manually stop the ice making function?
Is the Freezer temperature too warm? Try setting the Freezer temperature lower.
This is normal. The bubbling comes from the Refrigerator coolant liquid circulating
through the Refrigerator.
Check for spoiled food.
Foods with strong odors(for example, fish) should be tightly covered.
Clean out your Freezer periodically and throw away any spoiled or suspicious food.
Is the air vent blocked? Remove any obstructions so air can circulate freely.
Allow sufficient space between the foods stored for efficient air circulation.
Is the Freezer drawer closed properly?
Is the water line connected and the shut-off valve opened?
Has the water supply line tubing been crushed or kinked?
Make sure the tubing is free and clear of any obstruction.
Is the water tank frozen because the Refrigerator temperature is too low?
Try selecting a warmer setting on the main display panel.
troubleshooting 31
\
SAMSUNG
REFRIGERATOR
LIMITED WARRANTY TO ORIGINAL PURCHASER
This Samsung brand product, as supplied and distributed by Samsung Electronics America, Inc. (Samsung)
and delivered new, in the original carton to the original consumer purchaser, is warranted by Samsung against
manufacturing
defects in materials and workmanship
for a limited warranty
period of:
One (1) year Parts and Labor on Refrigerator
Five (5) years Parts and Labor on sealed Refrigeration
(*Compressor,
evaporator, condenser,
drier, connecting
system
only*
tubing)
This limited warranty begins on the original date of purchase, and is valid only on products purchased and
used in the United States. To receive warranty service, the purchaser must contact Samsung for problem
determination and service procedures. Warranty service can only be performed by a Samsung authorized
service center. The original dated bill of sale must be presented upon request as proof of purchase to Samsung
or Samsung authorized service center.
Samsung
will repair or replace any part found to be defective,
at our option and at no charge as stipulated
herein, with new or reconditioned
parts during the limited warranty period specified above. All replaced parts
and products become the property of Samsung and must be returned to Samsung. Replacement parts and
products assume the remaining original warranty, or ninety (90) days, whichever is longer.
In-home service will be provided during the warranty labor period subject to availability within the contiguous
United States. In-home service is not available in all areas. To receive in-home service, the product must be
unobstructed and accessible from floor level to service personnel. If during in-home service repair cannot be
completed, it may be necessary to remove, repair and return the product. If in-home service is unavailable,
Samsung may elect, at our option, to provide for transportation
of our choice to and from a Samsung authorized
service center. Otherwise, transportation to and from the Samsung authorized service center is the responsibility
of the purchaser.
This limited warranty covers manufacturing defects in materials and workmanship
encountered in normal,
noncommercial
use of this product, and shall not apply to the following, including, but not limited to: damage
which occurs in shipment; delivery and installation; applications and uses for which this product was not
intended; altered product or serial numbers; cosmetic damage or exterior finish; accidents, abuse, neglect, fire,
water, lightning or other acts of nature; use of products, equipment, systems, utilities, services, parts, supplies,
accessories, applications, installations, repairs, external plumbing and leaks, external wiring, circuit breakers,
fuses or connectors not supplied and authorized by Samsung, or which damage this product or result in service
problems; incorrect electrical line voltage, fluctuations and surges; customer adjustments and failure to follow
operating instructions, cleaning, maintenance and environmental instructions that are covered and prescribed
the instruction book; loss of food due to spoilage; consumable items including filters and light bulbs.
in
THEREARENOEXPRESS
WARRANTIES
OTHERTHANTHOSELISTEDANDDESCRIBED
ABOVE,AND
NOWARRANTIES
WHETHEREXPRESSORIMPLIED,INCLUDING,
BUTNOTLIMITEDTO,ANYIMPLIED
WARRANTIES
OFMERCHANTABILITY
ORFITNESSFORA PARTICULAR
PURPOSE,
SHALLAPPLY
AFTERTHEEXPRESS
WARRANTYPERIODS
STATEDABOVE,ANDNOOTHEREXPRESS
WARRANTY
ORGUARANTYGIVENBYANYPERSON,FIRMORCORPORATION
WITHRESPECTTOTHISPRODUCT
SHALLBEBINDINGONSAMSUNG.SAMSUNGSHALLNOTBELIABLEFORLOSSOF REVENUE
OR
PROFITS,FAILURE
TO REALIZESAVINGSOROTHERBENEFITS,
ORANYOTHERSPECIAL,INCIDENTAL
ORCONSEQUENTIAL
DAMAGESCAUSEDBYTHEUSE,MISUSEORINABILITY
TO USETHISPRODUCT,
REGARDLESS
OFTHELEGALTHEORYONWHICHTHECLAIMIS BASED,ANDEVENIFSAMSUNG
HASBEENADVISEDOFTHEPOSSIBILITY
OFSUCHDAMAGES.NORSHALLRECOVERY
OFANYKIND
AGAINSTSAMSUNGBEGREATER
INAMOUNTTHANTHEPURCHASEPRICEOFTHEPRODUCTSOLDBY
SAMSUNGANDCAUSINGTHEALLEGEDDAMAGEWITHOUTLIMITINGTHEFOREGOING,
PURCHASER
ASSUMESALL RISKANDLIABILITYFORLOSS,DAMAGEORINJURYTO PURCHASER
ANDPURCHASER'S
PROPERTY
ANDTO OTHERSANDTHEIRPROPERTY
ARISINGOUTOFTHEUSE,MISUSEORINABILITY
TO
USETHISPRODUCTSOLDBYSAMSUNGNOTCAUSEDDIRECTLY
BYTHENEGLIGENCE
OFSAMSUNG.
THISLIMITEDWARRANTY
SHALLNOTEXTENDTOANYONEOTHERTHANTHEORIGINALPURCHASER
OF
THISPRODUCT,ISNONTRANSFERABLE
ANDSTATESYOUREXCLUSIVE
REMEDY.
Somestatesdo not allowlimitationson howlongan impliedwarrantylasts,or the exclusionor limitationof
incidentalor consequentialdamages,so the abovelimitationsor exclusionsmay notapplyto you.Thiswarranty
givesyouspecificlegalrights,andyou mayalsohaveotherrights,whichvaryfromstateto state.
Toobtainwarrantyservice,pleasecontactSamsungat:
SAMSUNGCUSTOMERCARECENTER
SamsungElectronicsAmerica,Inc.400 ValleyRoadSuite201 Mt.Arlington,NJ 07956
1-800-SAMSUNG
(1-800-726-7864)andwww.samsung.com
warranty 33
las posibilidades
Gracias por adquirir un producto
Samsung.
Para recibir un servicio mas completo,
registre su producto
en
www.samsung,com/register
Dispositivo
independiente
Ca actor:stcasdo s nuovorefrgorador
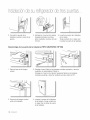
CARACTERISTICAS
Su refrigerador Samsung
eficiencia energ6tica,
o
Sistema
PRINCIPALES
est4 equipado
Espacio
con multitud
de caracteffsticas
de almacenamiento
mAs grande y ancho
La gaveta ancha de la heladera proporciona,
,, Cierre automAtico
El cierre autom_tico
para los artfculos de mayor tamaho.
asimismo,
espacio suficiente
para 2 6 3 pavos.
de seguridad
de seguridad
Pantalla de visualizaci6n
cerrar_ de forma autom_tica
y control
una puerta entreabierta.
de temperatura
digital
La pantalla digital de f_cil lectura realza el diseho de su cocina y le permite controlar
la temperatura
de un modo preciso.
o
Alarma de puerta
Una Otil alarma le avisa cuando
una puerta queda entreabierta.
,, Tirador simple
La puerta de la heladera puede abrirse con menos esfuerzo.
• Energy star
Este producto
electricidad.
etiquetado
con el sello Energy star puede ahorrarle dinero en su factura de
Para facilitar consultas futuras, anote
a continuaci6n el modelo y nOmero
de serie. Encontrara sus nOmeros de
modelo y de serie en el lateral izquierdo
del refrigerador.
2 Fea u es
y
la heladera disponen de evaporadores independientes.
Gracias a este sistema
la heladera y el refrigerador refrigeran de forma m_s eficiente. Adem_s, este
de aire independiente evita que los olores de los alimentos situados en uno de los
penetren en el resto.
La zona de balda ancha ofrece espacio suficiente
o
innovadoras
de doble refrigeraci6n
El refrigerador y
de enfriamiento,
sistema de flujo
compartimentos
o
DE SU NUEVO REFRIGERADOR
N° de modelo
N° de serie
/
INFORMACION
de segurctad
DE SEGURIDAD
Antesde ponerenmarchael ebctrodomestico,sirvaseleerintegramenteestemanualy guardarloparafuturasconsultas.
Useeste electrodomesticoexclusivamentecon la finalidadpara la que fue disenado,como describeeste manualde
instrucciones.Esteebctrodomesticonohasidodisenadoparasetusadopotpersonascon capacidadesfisicas,sensoriabs
o mentabsmermadas(ninosincluidos),o faltasde experienciao conocimientos,a menosque estenbajo supervisiono
dispongande instruccionesrelativasal uso del electrodomesticoproporcionadaspot una personaresponsablede su
seguridad.Esteelectrodomesticono hasidodisenadoparaset usadopot personascon capacidadesfisicas,sensoriabs
o mentabsmermadas(ninosincluidos),o faltasde experienciao conocimientos,a menosque estenbajo supervisiono
dispongande instruccionesrelativasal uso del electrodomesticoproporcionadaspot una personaresponsablede su
seguridad.Como lassiguientesinstruccionesde funcionamientoestandestinadasa variosmodelos,lascaracteristicas
de su refrigeradorpuedendiferirligeramentede las descritasen este manual.Si tiene cualquierpregunta,pOngaseen
contactocon nosotrosenel 1-800-SAMSUNGo busqueayudae informaciOn
onlineenwww.samsung.com.
Simbolos y medidas de seguridad importantes:
PELIGRO
.
PRECAUClON
Practicas peligrosas
peligro de muerte.
o inseguras
que pueden ocasionar
lesiones
fisicas
graves
o
Pr_cticas peligrosas
materiales.
o inseguras
que pueden ocasionar
lesiones
fisicas
leves o daSos
NO intentar.
NO desmontar.
NO tocar.
Siga atentamente
Desenchufar
Asegurarse
las instrucciones.
el cable de alimentaciOn
del tomacorriente.
de que la m_quina est_ conectada
POngase en contacto
a tierra para evitar choques
con el centro de asistencia
el6ctricos.
para obtener ayuda.
Nota:
Estas se5ales de advertencia
Sigalas atentamente.
Tras leer esta secci6n,
estan destinadas
a la prevencion
de lesiones personales
o a terceros.
guardela en lugar seguro para futuras consultas.
PE.GRO
SENALES IMPORTANTES DE ADVERTENCIA RELATIVAS A LA INSTALACION
G
,, No instale el refdgerador
con agua.
- Un aislamiento
incendio.
en lugares
deteriorado
,, No coloque este refrigerador
fuentes de calor procedentes
h_medos
o en los que pudiera
de las piezas el6ctricas
podria provocar
en lugares donde quede
de estufas, calefactores
ponerse
un choque
en contacto
el6ctrico
o
expuesto la luz directa del sol o a
u otros electrodom_sticos.
I'fformacOn de segu idad 3
form c n
• No enchufe
varios
de ecjurd d
electrodom_sticos
en el mismo
tomacorriente
mQItiple.
El refrigerador
siempre deberfa enchufarse
en su propia toma elOctrica que dispusiera
de un voltaje
coincidente
con el de la placa de clasificaci6n.
- Esto proporciona el mejor rendimiento y evita ademas la sobrecarga de los circuitos de
cableado de su hogar, que podr[a ser causa de incendio por el sobrecalentamiento
de los
cables.
• Si el tomacorriente
estuviera suelto, no enchufe
- Existe riesgo de choque elOctrico o incendio.
• No use un cable
• No doble
agrietado
excesivamente
• No desenchufe
tomacorriente
o con da_os
ni coloque
el cable de alimentaci6n.
abrasivos
articulos
en su Iongitud
pesados
o extremos.
sobre el cable
su refrigerador
tirando del cable de alimentaci6n.
firmemente
y tire de _1 para extraerlo de la pared.
- El daho en el cable puede ocasionar
un cortocircuito,
incendio o choque
• No use aerosoles cerca del refrigerador.
- El uso de aerosoles en las proximidades del refrigerador
incendio.
Este refrigerador
debe estar correctamente
de ponerlo en servicio.
puede provocar
instalado
y situado
de alimentaci6n.
Sujete
siempre
el
elOctrico.
una explosion
conforme
o un
al manual
antes
Conecte el cable de alimentaci6n
en posici6n correcta con el cable colgando
hacia abajo.
- Si conecta el cable de alimentaciOn al revOs, podria seccionarse provocando incendios o
choques elOctricos.
,, AI desplazar el refrigerador,
tenga cuidado
- Esto constituye riesgo de incendio.
• AsegQrese de que el tomacorriente
del refrigerador.
de no pisar ni da_ar el cable
no quede
aplastado
o da_ado
de alimentaci6n.
pot la parte
posterior
• Mantenga
los materiales de embalaje fuera del alcance de los ni_os.
- Existe peligro de muerte por asfixia en caso de que los nihos jueguen con ellos.
• El electrodom_stico
debe instalarse
tomacorriente
tras la instalaci6n.
de tal forma que resulte
sencillo
acceder
al
El refrigerador
debe ser conectado
a tierra por seguridad.
- AsegOrese siempre de haber conectado el refrigerador a tierra antes de intentar examinar
o reparar cualquier pieza del mismo. Las fugas de corriente pueden ocasionar choques
elOctricos graves.
No use nunca conductos
de gas, I[neas de telOfono
rayos como puesta a tierra.
u otros captadores
potenciales
de
PELIGRO
- Un uso incorrecto del conector
de puesta a tierra puede ocasionar
riesgo de choque
Si fuese necesario usar una alargadera, use Onicamente una de 3 cables que
un conector de 3 clavijas con toma de tierra y una toma elOctrica de 3 ranuras
conector del electrodomOstico.
El rOgimen indicado de la alargadera debe ser
de CA, 10 A o superior. Si se usa un adaptador de puesta a tierra, asegOrese
la toma elOctrica disponga de conexiOn completa a tierra
Si el cable
de alimentaci6n
estuviera
fabricante
o pot su tOcnico
de servicio.
4 hqfomqacOnde segu idad
da_ado,
hagalo
reemplazar
elOctrico.
disponga de
que acepte el
de 115 V-120 V
de que la caja de
inmediatamente
pot el
PRECAZ
SENALES
UO'ON DE PRECAUCI6N RELATIVAS A LA INSTALAClON
,, Deje espacio suficiente
para instalar el refrigerador
sobre una superficie
plan&
- Si su refdgerador no est_ nivelado, el sistema de refrigeraci6n interno puede fundonar
forma incorrect&
,, Mantenga
libre de obstrucciones
la abertura
electrodom6stico
o estructura
de montaje.
,, Deje reposar
el electrodom_stico
durante
de ventilaci6n
del cerramiento
de
del
2 horas tras la instalaci6n.
PE,IGRo
SENALES IMPORTANTES DE ADVERTENCIA RELATIVAS AL USO
Q
,, No enchufe
,, No almacene
el cable
de alimentaci6n
articulos
con las manos
sobre la parte
superior
h6medas.
del electrodom_stico.
- AI abrir o cerrar la puerta, dichos artfculos pueden caer, ocasionando
materiales.
lesiones fisicas o dahos
,, No introduzca
un recipiente
Ileno de agua en el refrigerador.
- Si se derrama, existe riesgo de incendio o choque el6ctrico.
,, Los niSos deben
electrodom6stico.
contar
con supervisi6n
,, No deje que los nifios se descuelguen
,, No permita que los nifios accedan
nifios queden atrapados.
adulta
para asegurar
de la puerta.
al interior
Podfia
del refrigerador.
que no juegan
ocasionar
Existe
con el
una lesi6n
riesgo
grave.
de que los
,, No introduzca
las manos en la parte inferior del electrodom6stico.
- Los bordes afilados podrfan ocasionar lesiones fisicas.
• No permita que los nifios se suban sobre la cubierta
- La gaveta podrfa romperse y que resbalasen.
• No sobrecargue
de comida el reffigerador.
- AI abrir la puerta, algOn artfculo podrfa caer provocando
• No toque las paredes intefiores
con las manos hQmedas.
de la heladera
de la gaveta.
lesiones fisicas o dahos materiales.
ni productos
almacenados
en la misma
- Podrfa ser causa de lesiones por congelaci6n.
• No pulvefice gases inflamables
en el entorno
- Existe riesgo de explosion o incendio.
pr6ximo
del refrigerador.
• No almacene sustancias
volatiles ni infiamables
en el reffigerador.
- El almacenaje de benceno, disolventes, alcohol, 6ter, gas licuado y otros productos
puede provocar explosiones.
similares
• No almacene en el reffigerador
productos
farmac6uticos,
material cientifico
o productos
sensibles a la temperatura.
- Los productos que precisan controles de temperatura estrictos no deben almacenarse en el
refrigerador.
,, No coloque ni use dispositivos
recomendado
por el fabricante.
el6ctricos
en el interior
del refrigerador,
,, No emplee dispositivos
mecanicos
u cualquier otro medio para acelerar
descongelaci6n,
a excepci6n
de los recomendados
por el fabricante.
,, No dafie el circuito
a menos
que est6
el proceso
de
del refrigerante.
,, No desmonte o repare el refrigerador
usted mismo.
- Corre el riesgo de provocar un incendio, averias o lesionarse.
IqfocmacOn de segu idad 5
PEUGRO
SENALES IMPORTANTES DE ADVERTENCIA RELATIVAS AL USO
,, Los niSos deben
electrodom_stico.
contar
con supervisi6n
,, Las botellas deben almacenarse
,, Este producto
ha sido diseSado
un entorno dom_stico.
adulta
para asegurar
que no juegan
unas junto a otras para evitar posibles
exclusivamente
para el almacenamiento
con el
caidas.
de comida
en
,, Si detecta una fuga de gas, evite las llamas abiertas o fuentes potenciales
de ignici6n y
airee durante varios minutos, la estancia en la que se encuentre
el electrodom6stico.
Desenchufe
el cable
de alimentaci6n
del tomacorriente
interiores del refrigerador.
- De Io contrario, existiria riesgo de choque
antes de cambiar
las luces
el6ctrico.
• Si el electrodom_stico
genera ruidos extraSos, olor a quemado o a humo, desenchufe
inmediatamente el cable de alimentaci6n y p6ngase en contacto con su centro se servicio m&s
cercano.
• Si tuviera alguna dificultad
al cambiar la luz, p6ngase en contacto
con un agente de servicio.
• Si advirtiese la presencia de polvo o agua en el refrigerador, desconecte
p6ngase en contacto con su centro de servicio Samsung Electronics.
- De Io contrario, existe riesgo de incendio.
el cable de alimentaci6n
y
PRE&I6N
SENALES DE PRECAUCION RELATIVAS AL USO
o
o
No vuelva a congelar alimentos
descongelados
por completo
previamente.
No introduzca
en el compartimento
de la heladera bebidas carbonatadas
o
efervescentes.
No introduzca
botellas o envases de cdstal en la heladera.
- AI congelarse
el contenido,
el cristal podria romperse
provocando
lesiones fisicas.
• Garantia de servicio y modificaci6n
- Cualquier cambio o modificaciOn realizada por terceros sobre este electrodomestico acabado, no esta
cubierta pot el servicio de garantia de Samsung ni seran responsabilidad de Samsung las cuestiones
relativas a la seguridad resultantes de dichas modificaciones realizadas pot terceros.
• No bloquee las aberturas de ventilaci6n.
- Si las aberturas de ventilaciOn fuesen bloqueadas, especialmente con bolsas de plastico, el refrigerador
puede sobrerefrigerarse. Si este periodo de refrigeraciOn durase demasiado, el filtro de agua podria
romperse provocando fugas de agua.
• Si desconectase el refrigerador del suministro el6ctrico, deber_, esperar al menos cinco minutos
para volver a enchufarlo.
• Si tiene planeado pasar un largo periodo de vacaciones o si no va a usar el refrigerador durante un
periodo de tiempo prolongado, debe vaciar el refrigerador y desconectar el cable de alimentaci6n.
- El deterioro del aislamiento podria ocasionar un incendio.
• Limpie el exceso de humedad del interior y deje las puertas abiertas.
- De Io contrario, podrian acumularse olores y moho.
• Para obtener el mejor rendimiento del producto:
- No coloque alimentos demasiado prOximos a los orificios de ventilaciOn situados en la parte posterior del
electrodomestico, ya que podrian impedir la libre circulaciOn de aire en el compartimento del refrigerador.
- Envuelva los alimentos de forma adecuada o colOquelos en recipientes hermeticos antes de introducirlos
en el refrigerador.
• Use Qnicamente agua potable para el dep6sito de agua, la bandeja de hielo y los cubitos de hielo.
6 IqformacOn de segu idad
PRE&I6N
SENALES DE PRECAUCION RELATIVAS AL USO
• Cuando este producto
quede
de servicio mas cercano.
- Existe riesgo de choque
anegado,
el6ctrico
asegQrese
de ponerse
en contacto
con su centro
o incendio.
,, No rode directamente
agua en el interior o exterior
- Existe riesgo de incendio o choque el6ctrico.
del refrigerador.
,, Elimine cualquier materia extrafia o polvo de las clavijas del enchufe de alimentaci6n.
No
use un patio hQmedo o mojado para limpiar el tomacorriente,
elimine cualquier
material
extrafio o polvo de las clavijas de este.
- De Io contrario existir_ riesgo de incendio o choque el6ctrico.
,, Desenchufe
el refrigerador
antes de realizar
labores
de limpieza
o reparaci6n.
PREoAZSENALES
uoI6N
DE ADVERTENCIA IMPORTANTES RELATIVAS AL DESECHO
®
PELIGRO: riesgo de que los nifios queden atrapados.
Antes de desechar
refrigerador
o heladera:
- Desmonte las puertas.
- Deje las baldas en su lugar a fin de dificultar la entrada de los nihos.
• Por favor, deseche
sensible.
el material
de embalaje
de este producto
de forma
su antiguo
ecol6gicamente
• Deje las baldas en su lugar a fin de dificultar la entrada de los nifios. AsegQrese de que
ninguno de los conductos
situados en la parte posterior del electrodom6stico
esta
dafiado antes de deshacerse
de _l.
• AI desechar 6ste refrigerador,
desmonte
nifios pequefios,
o animales, no puedan
Los nifios deben contar con supervisi6n
electrodom_stico.
la puerta, sellos y su cierre de tal forma que los
quedar atrapados
en su interior por accidente.
adulta para garantizar
que no juegan con el
• Se usa Ciclopentano
como aislante. Los gases del material aislante requieren un
procedimiento
especial de eliminaci6n.
Por favor, p6ngase en contacto
con autoridades
locales para conocer las instrucciones
de eliminaci6n
ecol6gica
de este producto.
AsegQrese
refrigerador
de que ninguno
est6n dafiados
de los conductos
situados
antes de desecharlo.
en la parte
posterior
del
IqfomqacOn de segu idad 7
INSTALACION
DE SU
FIEFFIIGERADOFI DE TFIES PUERTAS
09
Preparativos para instalar el refrigerador
10 Ajustes del refrigerador
10 Desmontaje de las puertas del refrigerador
15 Ajuste de las puertas
16 Realizaci6n de ajustes menores entre puertas
17 Instalaci6n de la toma de agua
REFRIGERADOFI
USO DE SU
SAMSUNG
Uso del panel de control
21
Control de la temperatura
24
Almacenamiento
de alimentos en el refrigerador
24
Almacenamiento
heladera
de alimentos en la gaveta de la
25
Consejos 0tiles de almacenamiento
27
Desmontaje de los accesorios del refrigerador
28
Desmontaje de los accesorios de la heladera
29
Limpieza del refrigerador
30
Reemplazo de las luces interiores
DE PROBLEMAS
31
Soluci6n de problemas
GARANT|A
32
Garantfa
_4
SOLUCION
,
8_ Contenido
19 Piezas y funciones
20
)
de alimentos
PREPARATIVOS
PARA INSTALAR EL REFRIGERADOR
Felicidades por la adquisiciOn de este refrigerador Samsung de tres puertas. Esperamos que disfrute de las
caracter[sticas y rendimiento de alta tecnoiog[a que este nuevo eiectrodomOstico
tiene que ofrecer.
SelectiOn dei mejor emplazamiento
para el refrigerador
,, UR emplazamiento de f_cil acceso para el suministro de agua.
• Un emplazamiento sin exposiciOn directa a la luz solar.
• Un emplazamiento que tenga el piso nivelado (o casi nivelado).
• Un emplazamiento con suficiente espacio para que las puertas del refrigerador
puedan abrirse con facilidad.
• Deje suficiente espacio para la circulaciOn del aire del sistema de refrigeraciOn
interno. Si el refrigerador no dispone de suficiente espacio, el sistema de
refrigeraciOn interna puede no funcionar correctamente.
Antes que nada: asegOrese de poder mover f_cilmente su refrigerador hasta su empiazamiento
final, midiendo
puertas de entrada (ancho y alto), umbraies, techos, escaieras, etc.
El siguiente cuadro especifica la aitura y ancho exactos dei refrigerador Samsung de tres puertas.
RF195AB
Modelo
RF197AB
17.8
19.7
32 1/4"
32 1/4"
sin puerta (B)
24 3/8"
26 1/4"
con puerta (O)
30 1/2"
32 1/2"
sin bisagra (D)
68 5/8"
68 5/8"
con bisagra (E)
69 3/4"
69 3/4"
Capacidad (pies c0bicos)
Ancho (A)
Dimensiones Profundidad
(pulgadas)
Altura
RF21 TAB
• Mantenga despejado el lado derecho, izquierdo, posterior y superior durante la instaiaciOn. Esto
ayudar_ a reducir ei consumo de energ[a y mantener una factura eiOctrica m_s baja.
= Si instaia ei refrigerador en lugares donde la temperatura sea inferior a 50 ° F (10 ° C), su funcionamiento
podrfa no ser 6ptimo.
= No instaie ei refrigerador en lugares hOmedos.
A
Ai despiazar ei refrigerador
PREC'=ONPara evitar daflos en el piso, aseg0rese de que los pies
de ajuste frontaies est_n en su posiciOn m_s eievada
(por encima dei piso). Examine la secciOn "Ajuste de las
puertas" (en la p_gina 15).
PISO
Destornillador
de
cabeza plana (-)
Para Ilevar a cabo una instalaciOn correcta, este refrigerador debe instalarse
sobre una superficie nivelada de material firme, situado a la misma cota que
el resto del piso. Esta superficie deberfa ser Io suficientemente resistente
como para soportar la carga del refrigerador completamente cargado o
un peso aproximado de 223 libras (106 kg). Para proteger el acabado del
piso, corte un trozo grande de carton de embalaje y colOquelo bajo el
refrigerador en el lugar de trabajo. AI desplazar el refrigerador, aseg0rese
de tirar de la unidad hacia fuera y devolverla a su posiciOn empuj_qndola
hacia dentro en Ifnea recta.
Pie de nivelaciOn
AJUSTES
DEL REFRIGERADOR
Ahora que tiene su nuevo refrigerador instalado y en su sitio, est_ preparado para ajustarlo y disfrutar de todas
las caracterfsticas y funciones de las que dispone. Completando los siguientes pasos, su refrigerador deber_
estar totalmente operativo.
1. Coloque el refrigerador en una situaci6n adecuada, dejando una distancia libre razonable entre el
mismo y la pared. Examine las instrucciones de instalaci6n de este manual. (P_gina 9, Selecci6n del
mejor emplazamiento
para el refrigerador)
2. Una vez enchufado el refrigerador, asegOrese de que el foco interior se ilumina al abrir las puertas.
3. Ajuste el control en la temperatura m_s frfa y espere una hora. La heladera deber_ enfriarse ligeramente
y el motor funcionar suavemente.
4. Tras poner en funcionamiento
el refrigerador, har_n falta varias horas para alcanzar la temperatura
asignada. Puede introducir
seasuficientemente
frfa.
Chequee
la siguiente
alimentos
y bebidas en el refrigerador
Herramientas
L
Tuerca de compresiOn
necesarias
Destornillador Philips (+)
Llave hexagonal
Fijador
(no incluidas)
Destornillador de
cabeza plana (-)
DESMONTAJE
la temperatura
lista de accesorios.
@
Racor de compresiOn
cuando
Llave de tubo (10mm)
(para pernos)
Llave hexagonal (3/16")
(para la bisagra central)
Alicates
DE LAS PUERTAS DEL REFRIGERADOR
Algunas instalaciones requieren el desmontaje de la puerta/gaveta
para poder transportar el refrigerador hasta
su emplazamiento final. No desmonte la puerta/gaveta si no es necesario. Antes de desmontar la puerta/
gaveta, asegOrese de haber Iddo los siguientes puntos.
PELIGRO
®
Desconecte el suministro del refrigerador antes de desmontar la puerta o la gaveta.
@
@
@
Tenga cuidado de no dejar caer, dahar o arahar la puerta/gaveta durante el proceso
Tenga cuidado de no lesionarse mientras desmonta la puerta/gaveta.
Vuelva a montar correctamente
la puerta/gaveta
para evitar:
- Humedad procedente de la fuga de aire.
- Una alineaci6n desigual de la puerta.
- Gastos de energia debido a un sellado incorrecto
10 I-_stalac0n
de la puerta.
de desmontaje.
Desmontaje
Z_
PELIGRO
de la puerta del refrigerador
Tenga cuidado de no dejar caer o ara_ar la puerta del refrigerador durante el proceso de desmontaje.
klave de tubo
1. Extraiga los 3 pernos que sujetan
el cuadro superior y ret[relo.
2. Desconecte
el6ctrico
el cableado
de la parte superior
del
refrigerador.
3. Extraiga los 3 pernos hexagonales
que sujetan la bisagra en la parte
superior del refrigerador usando
una Ilave de tubo de 10mm.
Cableado de
puesta a tierra
4. Extraiga el perno que sujeta
el cableado de puesta a tierra
mediante un destornillador Philips
(4.
Desmontaje
5. Separe la bisagra del cableado
el6ctrico y de puesta a tierra
como se indica en la parte
superior.
de la puerta de la heladera
1. Retire la tapa de la bisagra
central.
6. Levante la puerta hacia arriba
para desmontarla. Tenga cuidado
de no dejar caer ni aranar las
puertas durante el proceso de
desmontaje.
(TIPO GAVETA: RF217, RF197)
2. Extraiga el perno fijado alas bisagras centrales izquierda y derecha
mediante un destornillador
Philips (+).
Extraiga los 2 pernos de cabeza hexagonal fijados alas bisagras
centrales izquierda y derecha mediante una Ilave Allen (3/16").
IqstaadOn 11
3. Tras abrir la puerta de la
heladera, levante la cesta de la
gaveta.
4. Extraiga los 4 pernos de cabeza
hexagonal situados a ambos
lados mediante una Ilave de tubo
(10ram).
Desmontaje
de la puerta de la heladera
(TIPO GIRATORIO:
5. Levante la puerta de la heladera
de los rieles.
Tenga cuidado de no dejar caer
ni arahar la puerta de la heladera.
RF195)
al
1. Retire la tapa de la bisagra
central.
2. Extraiga el perno fijado alas bisagras centrales izquierda y derecha
mediante un destornillador
Philips (+).
Extraiga los 2 pernos de cabeza hexagonal fijados alas bisagras
centrales izquierda y derecha mediante una Ilave Allen (3/16").
3. Desmonte la bisagra central
unida a la heladera.
4. Levante la puerta de la heladera
12 InstaladOn
de la bisagra. Tenga cuidado de
no dejar caer ni arahar la puerta
de la heladera.
Reinstalaci6n
de la puerta del refrigerador
1. Introduzca y apriete el perno
en las bisagras centrales
izquierda y derecha mediante
destornillador Philips (+).
un
2. Introduzca y apriete los 2 pernos
de cabeza hexagonal en las
bisagras centrales izquierda y
derecha mediante una Ilave Allen
3. Vuelva a colocar la tapa de la
bisagra central.
(3/16").
4. Haga coincidir el orificio de la
base de la puerta izquierda con
la bisagra central.
5. Introduzca la bisagra superior
izquierda en el orificio situado
en la esquina de la puerta del
refrigerador.
7. Introduzca y apriete el perno de
puesta a tierra en las bisagras
superiores izquierda y derecha
mediante un destornillador
Philips (+).
8. Conecte
el cableado
en la parte superior
refrigerador.
6. Introduzca
lasbisagrassuperiores
en losorificios
situadosenla partesuperiordela puerta.
Introduzca
y aprietelos3 pernosde cabeza
hexagonal
enlasbisagrassuperiores
izquierda
y
derechamedianteunaIlavede tubo.
electrOnico
del
9. Coloque
el cuadro superior en
su lugar. Introduzca y apriete los
3 pernos en el cuadro superior
mediante un destornillador
Philips (+).
InstaladOn 13
Reinstalaci6n
de ia puerta de ia heiadera
(TIPO GAVETA: RF217, RF197)
"-
li ii
Iili
1. Extraiga uniforme y
compietamente
ios rieies de cada
lado dei armario.
2. Sujete el frontai de la puerta
de ia heladera sobre la ranura
abierta de los lados.
3. Mediante la Ilave de 10mm,
vuelva a fijar los 4 pernos
hexagonaies
puerta.
que unen ei riei y la
4. Con la gaveta extrafda por
completo, introduzca la cesta de
la gaveta en ei sistema de rieies.
Reinstalaci6n
de la puerta de la heiadera
1. Haga coincidir ei orificio situado
en la base de la puerta de la
heiadera con la bisagra inferior
del lado derecho.
14
nstaadOn
(TIPO GIRATORIO:
RF195)
2. Vueiva a colocar la bisagra central unida a la heiadera.
3. Introduzca y apriete ei perno en las bisagras centrales izquierda y
derecha mediante un destorniliador Philips (+). Introduzca y apriete los
2 pernos de cabeza hexagonal en las bisagras centraies izquierda y
derecha mediante una Ilave Ailen (3/16").
4. Vueiva a coiocar la tapa en la bisagra centrai.
AJUSTE
DE LAS PUERTAS
Ahora que las puertas estan instaladas de nuevo en el refrigerador, necesitar_ chequear que el electrodom6stico
est6 nivelado, para Io que puede realizar ajustes finales. Si el refrigerador no est_ nivelado, ser_ imposible
conseguir
que las puertas se igualen de forma uniforme.
Cuando
la puerta izquierda
Introduzca
un destornillador
est6 m&s baja que la derecha,
de cabeza plana dentro de una ranura del pie de nivelaci6n izquierdo y g[relo
en sentido horatio o antihorario
para nivelar la puerta izquierda.
Destornillador (-)
Cuando
la puerta izquierda
Introduzca
un destornillador
est6 m&s alta que la derecha,
de cabeza plana dentro de una ranura del pie de nivelaci6n derecho y g[relo
en sentido horatio o antihorario
para nivelar la puerta derecha.
Pie de
Destornillador
, Ambos pies de nivelaci6n deben estar en contacto
PRECAUC_ON
O dahos a la propiedad derivados del vuelco.
firme con el piso para evitar potenciales
(-)
lesiones
I_staaciOn 15
REALIZACION DE AJUSTES MENORES ENTRE PUERTAS
Recuerde que es necesario que el refrigerador est6 nivelado para Iograr que las puertas est6n igualadas de
forma uniforme. Si necesita ayuda, revise las secciones anteriores relativas a la nivelaci6n del refrigerador.
Cuando la
puerta izquierda
este m_s baja
que la derecha.
!
aju
Cuando
la puerta
izquierda este
m&.salta que la
derecha.
Piezade
Jste
1. Extraiga la gaveta de la heladera ( 1 ) y podr_ ver la bisagra central ( 2 ).
2. Introduzca
la Ilave hexagonal
incluida ( 3 ) dentro del eje ( 4 ) de la bisagra central.
3. Ajuste la altura girando la Ilave hexagonal
( 3 ) en sentido horario
(
) o antihorario
(
).
o.....
®
AI girar en sentido antihorario
1. Tras ajustar las puertas,
la Ilave hexagonal
(
), la puerta se desplazar_
hacia arriba.
inserte el fijador incluido ( 5 ) usando unos alicates ( 6 ) en el hueco entre
el anillo de la bisagra ( 7 ) y la bisagra central ( 8 ). El n0mero de fijadores a insertar, depender_
hueco.
Con el refrigerador se incluyen 2 fijadores.
El grosor de cada fijador es de 0,04" (1 ram).
16 I-_stalac0n
del
INSTALACION
DE LA TOMA DE AGUA
Antes de instalar
la toma de agua
• La instalaci6n de la toma de agua no se encuentra bajo la garanfia del fabricante del refrigerador. Pot Io que
antes de instalar la toma de agua, debe leer pot completo los pasos necesarios para Ilevar a cabo dicha
instalaciOn y cumplir meticulosamente estas instrucciones para minimizar el riesgo ante costosos da_os
ocasionados
pot el agua.
Los golpes de ariete (agua golpeando los conductos) en la instalaciOn de fontanerfa de su hogar pueden
causar da_os a diversas piezas del refrigerador y provocar fugas de agua o inundaciones. Solicite los
servicios de un fontanero profesional para corregir el problema antes de instalar la toma de suministro de
agua al refrigerador.
• Para evitar quemaduras y da_os al producto, no conecte la toma de agua al conducto
• No instale la toma de agua en lugares donde la temperatura
de agua caliente.
caiga pot debajo del punto de congelaciOn.
• AI usar cualquier aparato electrico (como un taladro) durante la instalaciOn, asegOrese de que dicho
dispositivo este aislado o conectado de modo que evite cortocircuitos.
• Todas las instalaciones deben cumplir las normativas locales de fontanerfa.
®
• El kit de toma de agua y el filtro de agua no estan cubiertos pot la garanfia de Samsung. El fabricante
(o distribuidor o instalador) de estos es el responsable de cualquier defecto y de todas las perdidas
ocasionadas pot el filtro de agua y el kit de la toma de agua.
• El filtro debera reemplazarse
segOn las instrucciones
• Para solicitar filtros de agua adicionales,
filtros.
proporcionadas
pot el fabricante (o distribuidor).
pOngase en contacto con el fabricante (o distribuidor) de dichos
Uso del filtro de agua (no incluido)
Conexi6n
a la toma de suministro
• Corte la toma de suministro
de agua
general y desconecte
la
m_quina de hielo.
• Localice la toma de agua frfa potable m_s cercana.
• Siga las instrucciones
filtro de agua.
contenidas
en el kit de instalaciOn del
5 4
1.Tomade aguafria
2.Abrazaderapara tubos
3.Tomade plastico
4.Tuercade compresion
5. Manguitodecompresbn
6.Tuercaprensaestopas
7.Wlvula de cierre
8. Cartuchodelfiltro
9. Soportedel flltro
• Tras conectar la toma de suministro de agua a la entrada
del soporte del cartucho (introducir la toma de pl_stico por
completo), instale el cartucho del filtro.
• Abra el suministro de agua y haga correr 3 galones
de agua a trav6s del filtro antes de utilizarlo (durante
aproximadamente
6 minutos).
o
Si desea instalar un filtro de agua, este debe instalarse fuera
del refrigerador.
Este no viene incluido con su nuevo refrigerador. El kit del
cartucho ( 8 ) y el soporte ( 9 ) del filtro pueden adquirirse en el
establecimiento
de compra de este refrigerador.
No use toma de cobre.
• Corte el conducto, asegur_ndose
limpios yen _ngulo recto.
de que los extremos
incorrecto
correcto
quedan
Iqstaac0n 17
Conecte la toma de agua al refrigerador
::::::::_::::::::
• Conecte la toma de pl_stico situada en la parte posterior de
S
r_del
Soporte
filtro
su refrigerador a la salida del soporte del cartucho (introduzca
completamente la toma de pl_tstico en la salida del soporte del cartucho).
• Introduzca el clip de pl_tstico a la entrada y salida del soporte del
cartucho.
"___ii " I\'""
cl't.._l,_,i,
• Abra el suministro de agua y realice una comprobaci6n en busca de
fugas.
\%/
-
,, Puede adquirir los cartuchos de filtro necesarios en el
establecimiento
de compra del refrigerador. AsegOrese de
comprar el cartucho del filtro SAMSUNG (cartucho de repuesto
n°: DA29- 00015A) para garantizar
o La toma de agua debe conectarse
$. I 1.o.
der'"t °
Li:: o L:gp,as,,co
(incluida)
el mejor rendimiento.
exclusivamente
al suministro
de agua potable.
o Con la unidad se incluyen un kit de racor y tuerca de compresi6n,
compartimento
del refrigerador.
o AI empujar el refrigerador
_Cartucho
que encontrar_
en el interior del
a su sitio, asegOrese de no pasar por encima del cable de alimentaci6n
de la toma de agua (toma de suministro
de la m_quina
ni
de hielo)
Uso sin filtro de agua
Conexi6n
de la toma de suministro
o Corte la toma de suministro
hielo.
1. Tomade aguafria
2,Abrazadera paratubos
de agua
general y desconecte
la m_quina
de
o Localice la toma de agua potable fr[a m_s cercana.
Conecte
r_ -t ----1
_._2
7...
-i
I
3
3, Toma de plastico
4, Tuerca de compresion
__[_"5. Manguitodecompresion
I I'J_-_"_///'_/_
6, Tuercaprensaestopas
"-/1 I
(( 4///)/\_..7. VAlvulade cbrre
la toma de agua al refrigerador
1) Pase la tuerca de compresi6n
a traves del tubo de pl_stico.
2) Tras introducir la tuerca de compresiOn
dentro del tubo de
plastico, apri6tela sobre el racor de compresi6n
de 1A"(incluido).
No fuerce la tuerca de compresi6n.
,, Uso de tubo de cobre
Toma
de agua
de la vivienda
Tubo de cobre o plastico
(Noincluido)
(Noincluido)
"
Tuercade
compresi6n (1/4")
_
. ! 0
(no incluida)
5_--'Bulb°
(rn:n_:,:;
uid
a)V
- Pase la tuerca de compresi6n
cobre, como se indic&
y la f6rula sobre el tubo de
compresi6n
(incluido)
Tuercade
,, Uso de tubo de pl_stico
- Introduzca
A
el extremo moldeado
en el racor de compresi6n.
, No usar sin el extremo moldeado
(bulbo) del tubo de pl_stico
compresi6n (1/4")
(incluida)
Refrigerador
(bulbo) del tubo de pl_stico.
PRECAUClON
3) Apriete la tuerca de compresi6n
4) Abra el suministro
sobre el racor de compresi6n.
de agua y realice un chequeo
en busca de fugas.
,, El conducto de agua debe conectarse exclusivamente a un suministro de agua potable.
,, AI empujar el refrigerador a su sitio, asegOrese de no pasar por encima del cable de alimentaci6n
de la toma de agua (toma de suministro de la m_quina de hielo).
18 IqstaladOn
ni
Uso de su refrger_dor
SU
PIEZAS Y FUNCIONES
Use esta p_gina para familiarizarse
con las piezas y funciones
del refrigerador.
Luz del
refrigerador
Compartimento
de puerta
Bandeja mOvil
(deemplazambnto
ajustable)
j
Compartimento
de puerta
Balda de cristal
Gaveta para fruta
y verdura
Compartimento
para botellas
I
Luz de la
heladera
Gaveta extrafble
Compartimento
de la gaveta de
la heladera
Fulcona;_ento
19
3U
USO DEL PANEL DE CONTROL
Selecci6n
(_)
Bot6n
de temperatura
Bot6n
/ panel de control
Ice Off (Hielo
AI pulsar el bot6n Ice off, cesar_, la elaboraci6n de hielo.
Use esta funci6n s61o cuando sea necesario.
Power Freeze
Pulse este bot6n para congelar alimentos rapidamente.
(La funci6n de Congelaci6n rapida funcionara durante 2 horas y media).
desac.}
(_)
y funci6n
(Congelaci6n
r_pida)
(_)
Bot6n Freezer
(Heladera}
Bot6n de ajuste de la temperatura de la heladera.
Pulse este bot6n para ajustar la temperatura de la heladera entre 8° F y -8 ° F (-13° C y -22 ° C) (AI
enchufar por primera vez el refrigerador, el ajuste predeterminado es de -2 ° F (-19° C)).
(_}
Bot6n Fridge
(Refrigerador)
Bot6n de ajuste de temperatura del refrigerador.
Pulse este bot6n para ajustar la temperatura del refrigerador entre 46 ° F y 34° F (8° C y 1° C) en
intervalos de 2° F. (AI enchufar por primera vez el refrigerador, el ajuste predeterminado es de 38 ° F
(3° C)).
(_)
Bot6n
Power cool
(Refrigeraci6n
(_}
r_pida)
Bot6n e.Saver (Ahorro
de energia}
20 Funcionam ento
Pulse este botOn para enfriar mas rapidamente los alimentos del refrigerador. (La funciOn de
RefrigeraciOn rapida se detendra al alcanzar los 25 ° F (-4° C) o tras dos horas y media de
funcionamiento).
Pulse el botOn Energy Saver para mejorar el rendimiento energetico. Si se produjese goteo de agua
en las puertas, desactive la funciOn Energy Saver (Ahorro de energfa).
CONTROL DE LA TEMPERATURA
Ice Off
Power Freeze
D
Freezer
Fridge
D
Q
-2'F is Recommended
Ajuste
de la temperatura
Si desea controlar la temperatura
Pulse el bot6n Freezer
- La temperatura
Power Cool
E.Saver
Q
38°F is Recommended
de la heladera
de la heladera, siga las indicaciones
expuestas
a continuaci6n.
(examine la ilustraci6n)
puede ajustarse
entre -8 ° F y 8 ° F (-22 ° C y -13 ° C) en intervalos de 2 ° R
-Cada vez que pulse el bot6n Freezer, el ajuste de temperatura cambiar_ de la siguiente forma;
(_2OF--> _4OF--> _6OF--> _8OF--> 8OF --> 6OF --> 4OF --> 2OF --> 0OF --> _2OF)
AI escoger la temperatura,
inicialmente se mostrar_ la temperatura
ajustada durante 5 segundos y, a continuaci6n, la temperatura actual.
(Podrfa existir una leve diferencia entre la temperatura ajustada y la
temperatura actual mostrada, pero 6sta se reajustar_ autom_ticamente
:'ower Freeze
Freezer
-2°F is Recommended
a la temperatura
ajustada).
/
- La temperatura de la heladera cambiar_ dependiendo
cantidad de alimentos, la temperatura ambiente, etc.
de la frecuencia
de apertura
de la puerta, la
- La visualizaci6n de temperatura parpadear_ cuando la temperatura de la heladera est6 aumentando
debido a una apertura frecuente de la puerta, a la introducciOn de alimentos calientes, etc.
(El parpadeo cesar_ cuando el refrigerador alcance su temperatura normal. Si por alguna raz6n, no
se detuviera despu6s de un per[odo de tiempo prolongado, p6ngase en contacto con un centro de
servicio
Ajuste
Samsung.)
de temperatura
Si desea controlar la temperatura
Pulse el bot6n Fridge
- La temperatura
del refrigerador
del refrigerador,
siga las indicaciones expuestas
a continuaci6n.
(examine la ilustraci6n)
puede ajustarse
entre 34 ° F y 46 ° F (1° C y 8 ° C) en intervalos de 2 ° R
-Cada vez que pulse el bot6n Fridge, el ajuste de temperatura cambiar_
(38OF --> 36OF --> 34OF --> 46OF --> 44OF --> 42OF --> 40OF --> 38OF)
de la siguiente forma;
Fulc ona n ento 21
Uso de su rof gorador
AI escoger la temperatura del refrigerador, inicialmente se mostrar_
la temperatura ajustada durante 5 segundos y, a continuaci6n, la
temperatura actual.
(Podrfa existir una leve diferencia entre la temperatura ajustada y la
temperatura actual mostrada,
la temperatura ajustada).
pero 6sta se reajustar_ autom_ticamente
- La temperatura del refrigerador cambiar_ dependiendo
cantidad de alimentos, la temperatura ambiente, etc.
- La temperatura
Fridge
en cada balda o compartimento
de la frecuencia
del refrigerador
Power
38°F is Recommended
a
de apertura
de la puerta, la
podr[a ser diferente.
- La visualizaci6n de temperatura parpadear_ cuando la temperatura del refrigerador est6 aumentando
debido a una apertura frecuente de la puerta, a la introducci6n de alimentos calientes, etc.
(El parpadeo cesar_ cuando el refrigerador alcance su temperatura normal. Si por alguna raz6n, no
se detuviera despu6s de un perbdo de tiempo prolongado, p6ngase en contacto con un centro de
servicio Samsung).
Si desea elaborar hielo rnas rapidarnente
Congelaci6n rapida)
Pulse el bot6n Power
Freeze.
(controlando
- El indicador
Si desea
Freeze
para cancelar
se apagar_ y volver_ a funcionar
- La funci6n de congelaci6n
temperatura ajustada.
acelerar
de
(Examine la imagen).
- El indicador de la funci6n de congelaci6n r_pida se
ilumina en la pantalla de visualizaci6n (examine la flecha)
y comienza a funcionar independientemente
de la
temperatura de ajuste de la heladera.
Pulse de nuevo el bot6n Power
la funci6n
r_pida funciona
el proceso
Power
Freeze
Freezer
-2°F
is Recommended
esta funci6n.
a la temperatura
de ajuste de la heladera.
durante 2 horas y media independientemente
de enfriarniento
en el refrigerador
de la
(Power
cool)
Pulse el bot6n Power
cool. (Examine la imagen).
- El indicador de la funci6n de refrigeraci6n
r_pida se
ilumina en la pantalla de visualizaci6n (examine la flecha)
y comienza a funcionar independientemente de la
temperatura de ajuste del refrigerador.
Pulse de nuevo el bot6n Power cool
para cancelar esta funci6n.
- El indicador se apagar_ y volver_ a funcionar
- La funci6n de refrigeraci6n
temperatura ajustada.
22 Fulc ona n enb
Power
38_FisRecommended
r_pida funciona
a la temperatura
de ajuste del refrigerador.
durante 2 horas y media independientemente
de la
Cool
Modo de refrigeraci6n
visualizaci6n)
desactivada
Esta funci6n se usa para refrigeradores
(c6digo "OF & OF" en la pantalla
de muestra
en tiendas.
de
No para uso dom6stico.
ECA_UCEn el modo de refrigeraci6n desactivada, el refrigerador funciona pero no enfrfa el aire. Para
PR
=6Ncancelar este modo, pulse al mismo tiempo los botones Power Freeze y Freezer durante 3
segundos hasta oft un "Ding-dong".
La unidad comenzar_ a enfriar.
Id
,mezo
-2°F is Recommended
I
38°F is
J
Modo de
refrigeraci6n
desactivada
Funcionamiento
La m_quina
de la m_quina
de hielo producir_
8 cubitos
de hielo
pot ciclo;
aproximadamente
de 1 O0 a 130 cubitos en un periodo de 24
horas, dependiendo de la temperatura del compartimento
de la
heladera, la temperatura ambiente, la frecuencia de apertura de las
puertas y otras condiciones de funcionamiento.
Deseche los primeros Iotes de hielo para permitir la limpieza de
la toma de agua. AsegOrese de que nada interfiera con el barrido
del brazo calibrador. Cuando el dep6sito se Nene hasta el nivel del
brazo calibrador, la m_quina de hielo cesar_ su producci6n.
Una vez vuelva a activarse la m_quina de hielo, habr_ un tiempo
de retraso antes de que reanude su funcionamiento.
Es normal
Bot6n de Prueba
que varios cubitos acaben unidos, formando uno solo. Si no usa
hielo con frecuencia, los cubitos antiguos perder_n su transparencia,
adquirir_n olores y sabores
desagradables
y se reducir_ su tamaho. Por Io que, si no desea elaborar hielo, pulse el bot6n Ice Off.
ECA_UCBot6n
de Prueba
PR
IONSi los cubitos
no salen, extraiga la maquina
de hielo y pulse el bot6n de prueba situado en
la parte inferior de la cara frontal de la m_quina
situaciOn).
de hielo. (Examine la imagen para obtener
la
FtJqcionam ento 23
Uso de su rof gorador
ALMACENAMIENTO DE ALIMENTOS EN EL REFRIGERADOR
El refrigerador Samsung ha sido diseflado para proporcionarle caracterfsticas y funciones de ahorro maximo de
espacio. Aquf tiene algunos de los compartimentos personalizados que hemos creado para mantener sus alimentos
frescos durante perfodos de tiempo mas largos. Para evitar la penetraciOn de olores en el interior del compartimento
del hielo, los alimentos almacenados
deberan ser envueltos adecuadamente,
tan hermeticos como sea posible.
Puede usarse para almacenar pequefios artfculos I_tcteos como
mantequilla o margarina, yogurt o dados de crema de queso.
mantequilla/queso
Disefiado para soportar artfculos grandes y voluminosos como galones
de leche u otras botellas o recipientes de grandes dimensiones.
Con disefio antirrotura, las baldas pueden usarse para almacenar todo
tipo de alimentos y bebidas. Las marcas circulates en la superficie de
cristal representan un fenomeno normal que puede limpiarse a menudo
con un pafio hOmedo.
Usado para mantener frescas sus frutas y verduras almacenadas.
Esta gaveta ha sido especfficamente disefiada para controlar el nivel
de humedad dentro del compartimento. Si es posible, mantenga
separadas verduras y frutas.
®
No coloque artfculos de grandes dimensiones bajo el foco del refrigerador. Hay un sensor situado
en las proximidades del foco y, si dicho sensor quedase bloqueado, su refrigerador podrfa enfriarse
demasiado. Coloque frutas y verduras en la gaveta que tienen asignada para evitar que se congelen.
Si los alimentos se congelasen en su refrigerador, aj0stelo a una temperatura mas alta.
ALMACENAMIENTO DE ALIMENTOS EN EL COMPARTIMENTO DE LA HELADERA
La mejor eleccion para almacenar carnes o alimentos secos. Los
alimentos almacenados deber_tn introducirse en un envase o envolverse
adecuadamente usando film pl_tstico u otros materiales adecuados.
Puede usarse para almacenar came y alimentos secos.
Los alimentos almacenados deberb.n introducirse en un envase o
envolverse adecuadamente usando film pl_tstico u otros materiales
adeouados
(_
Las botellas deberan almacenarse
puerta del refrigerador.
unas junto a otras para que no se golpeen y caigan al abrir la
Si tiene planeado ausentarse durante un peffodo de tiempo prolongado, vade el refrigerador
y ap_guelo. Limpie el exceso de humedad del interior del electrodom6stico
y deje las puertas
abiertas.
24 Fu qc ona _qento
Esto ayuda a evitar la proliferaciOn de olores y moho.
CONSEJOS OTILES DE ALMACENAMIENTO DE ALIMENTOS
PRODUOTOS LAOTEOS
Mantequilla
2-3 Semanas
6-9 Meses
Envuelvalao ta.pelahermeticamente.
Leche
1-2 Semanas
No recomendado
Queso en crema,
derivados del queso y
queso para untar
2-4 Semanas
No recomendado
Queso curado (sinabrir)
3-4 Meses
6 Meses
Queso curado (abierto)
2 Meses
No recomendado
Queso fresco
10-15 Dfas
No recomendado
Nata
7-10 Dfas
2 Meses
Crema agria
2 Semanas
No recomendado
Salsa Dip (abierta)
1 Semana
No recomendado
Yogur
10-14 Dfas
No recomendado
Yogur congelado
n/a
2 Meses
Huevos (frescos)
3-4 Semanas
No recomendado
Chequee la fecha. Guarde los huevos en la parte ma.sfffa del refrigeradot y dentro de su envase original.
Huevos (cocinados)
1 semanas
No recomendado
Guarde en envase con tapa.
Sobras de platos con
huevo
3-4 Dfas
No recomendado
Guarde en envase con tapa.
Manzanas
1 Meses
No recomendado
Pla.tanos
2-4 Dfas
No recomendado
Melocotones, melones,
peras, aguacates
3-5 Dfas
No recomendado
Bayasy cerezas
2-3 Dfas
12 Meses
Albaricoques
3-5 Dfas
No recomendado
Uvas
2-5 Dfas
n/a
Pina (sin cortar)
2-3 Dfas
No recomendado
Pina (cortada)
5-7 Dfas
6-12 Meses
Cftricos
1-2 Semanas
No recomendado
Gu&delos sin cubrir.
Zumo
6 Dfas
No recomendado
Chequee la fecha y vuelva a cerrar su recipiente original. No devuelva el
producto no consumido al recipiente original.
Zumo congelado
SOIoparadescongelar
12 Meses
Chequee la fecha. No vuelva a congelarlo.
Chequeela fecha. La mayoffade la lechey productos similaressevenden
en cajasde carton fechadas que indicanel peffodo de ma.ximafrescura
de un producto. Vuelvaa cerrar hermeticamentemediantetapa o envoltorio. No devuelvael producto no consumido al recipienteoriginal.
Chequee la fecha. Mantengatodos los quesos guardados hermeticamente en un envoltorio con protecciOncontra la humedad.
Chequee la fecha. La mayoffa de los yogures, cremas y productos
similaresse venden en cajas de carton fechadas que indicanel peffodo
de ma.ximafrescura de un producto. Vuelvaa cerrar o tapar hermeticamente. No devuelva el producto no consumido al recipiente original.
Chequee la fecha. Mantengalotapado.
HUEVOS
No lave lafruta antes de introducirla en el refrigerador.Gu&dela en
bolsas o recipientes resistentesa la humedad. Envuelvala fruta cortada.
Algunas frutas se ponen negras al introducirlas en el refrigerador.
Func ona n ento 25
rofrgor dor
z
PESCADOYMARISCO
Pescado
Pescados azules
(caballa,trucha, salmon)
Pescado blanco (bacalao, lenguado, etc.)
1-2 Dfas
2-3 Meses
1-2 Dfas
6 Meses
n/a
3 Meses
Gambas (crudas)
1-2 Dfas
12 Meses
Cangrejo
3-5 Dfas
10 Meses
Pescado o marisco
congelado
2-3 Dfas
3 Meses
Chuletas
2-4 Dfas
6-12 Meses
Picada
1 Dfa
3-4 Meses
Costillas
2-4 Dfas
6-12 Meses
Bacon
1-2 Semanas
1-2 Meses
Salchicha
1-2 Dfas
1-2 Meses
Bistec
2-4 Dfas
6-9 Meses
Aves
1 Dfa
12 Meses
Charcuteffa
3-5 Dfas
1 Meses
Came
2-3 Dfas
2-3 Meses
Aves
2-3 Dfas
4-5 Meses
Jam0n
1-2 semanas
1-2 Meses
Congelado o empanado
Mantengalo en su envoltorio original e introdLizcaloen la parte ma.sfffa
del refrigerador.IntrodLizcaloen pla.sticopara congelados con protecci0n contra elvapor y la humedad. Congelelo a 0° F (-18° C). Descongelelo en el refrigeradoro chequee lafecha. Congelelo en su envase
original.
Marisco
Congelar en un recipiente con protecci0n contra el vapor y la humedad.
CARNE
Fresca, cruda
Chequee lafecha para usarla. Gua.rdelaen la parte ma.sfffa del refrigerador, en su envase original. Use un recipiente con protecci0n contra
la humedad y el vapor para congelar.Temperatura recomendada para el
refrigeradorentre 33° F y 36° F (0,5° C a 2° C)y para la heladera entre0°
F y 2° F (-18°C y-17° C).
Cocinada
Chequee lafecha para usarla. Gu&dela en la parte ma.sfffa del refrigerador, en su envase original. Introduciren un recipiente con protecci0n
contra la humedad y el vapor para congelar.
Fuentes:
American Meat Institute Foundation. 1994. Paginasamarillas:respuestasalas preguntas mas frecuentes acerca de carnes y aves.
American Meat Institute Food Marketing Institute. 1999. The food keeper. Food Marketing Institute, Washington, D.C. Freeland-Graves,
J.H. and G.C. Peckham. 1996. Foundationsof food preparation, 6aed. Prentice-Hall, Inc. Englewood Cliffs, NJ. Hillers,V.N. 1993. Storing foods at home. Washington State UniversityCooperative Extension,Pullman,WA. Publ. EB 1205. National RestaurantAssociation.
2001. Be cool-chill out! Refrigeratepromptly. National RestaurantAssociation Education Foundationl/4sInternationalFood Safety Council, Washington, D.C. USDA. 1997. Basics for handlingfood safely. U.S. Department of Agriculture, Food Safetyand Inspection Service,
Washington, D.C.
26 Fuqc ona ;qento
DESMONTAJE DE LOS ACCESORIOS DEL REFRIGERADOR
1. Compartimentos
Para desmontarlo:
de puerta
Simplemente
directamente.
Para volver a montarlo:
lev_ntelo y extr_igalo
Desl[celo sobre el emplazamiento deseado
y pulse hasta encajarlo en posiciOn.
A
Si los compartimentos de la puerta no estuvieran firmemente
pREc_16Ninstalados, podrfan producirse lesiones. No permita a los ni_os
jugar con los compartimentos. Las esquinas afiladas de los
compartimentos pueden provocar lesiones.
No monte un compartimento Ileno de alimentos.
M6todo de eliminaciOn de polvo: desmonte
2. Baldas
la protecciOn
y lave en agua.
del refrigerador
Para desmontarlas:
AI sacar la balda, esta no se desliza f_cilmente,
lev_ntela ligeramente
Para volver a montarlas:
AI introducir
f_cilmente,
y vuelva a extraerla.
la balda, est_ no se desliza
lev_ntela ligeramente
y vuelva
a empujarla.
/_
Las baldas de cristal son pesadas.
pREC_16NPOngaespecial atenciOn al desmontarlas.
f-
3. Gaveta para fruta y verdura
j
"---
Para desmontarlo:
extraiga la gaveta
por completo. Incline hacia
arriba la parte frontal de la
gaveta y extr_igala directamente
hacia fuera. (Examine las
ilustraciones 1-3)
Para volver a montarlo:
introduzca
31
la
gaveta en los rieles del marco y
empOjela hacia atr_s hasta su
posiciOn. (Examine la ilustraciOn
4)
\
Para poder extraer las gavetas, es necesario desmontar antes la balda de cristal situada sobre elias.
Fuqcionam ento 27
3U
DESMONTAJE DE LOS ACCESORIOS DE LA HELADERA
1. Gaveta extraible
Para desmontarlo:
Extraiga la gaveta pot completo. Incline
hacia la parte posterior de la gaveta y elevela
directamente. (Examine las ilustraciones 1 y 2)
Abra por completo la puerta de la heladera y desmonte la gaveta.
Para volver a montarlo: SitOe la gaveta dentro de los deles
inclinandola hacia arriba. Haga descender
la gaveta hasta que se encuentre en
posiciOn horizontal y desl[cela hacia
dentro. (Examine la ilustraciOn 3).
2. Compartimento
de la gaveta
Para desmontarlo:
de la heladera
I
Extraiga completamente la gaveta. Incline la
parte posterior del compartimento y levantelo
para extraerlo.
Para volver a montarlo: Introduzca el compartimento
dentro de
los deles de montaje.
Para desmontar
,,J
i_"
Gaveta
la division: Extraiga el perno y tire hacia fuera
de la division.
Para volver montar la division: Enganche las esquinas
superiores de la
division en el hueco
del compartimento.
Introduzca y apriete el
perno.
permita
queellos
bebes ni los
niSos
accedan al
del No
compartimento
la gaveta.
Estas
acciones
PRECA_UCNO
IONpodrfan
danar
refrigerador
y herir
gravemente
a interior
los ninos.
los apoye en de
la puerta
de la
heladera.
La
puerta podrfa romperse. No permita que los niSos accedan al interior la cesta de la heladera.
Z_
Si decide retirar la division para limpiar la cesta de la gaveta, debera volver a instalarla usando el perno una
PELIGRO vez finalizadas dichas labores de limpieza, para evitar que los niSos queden atrapados dentro de la cesta.
28 Funcionam ento
LIMPIEZA DEL REFRIGERADOR
Los cuidados de su refrigerador Samsung prolongaran su vida c]tily ayudaran a mantenerlo Nbre
de olores y germenes,
Limpieza del interior
Limpie las paredes interiores y los accesorios con un detergente
suave y, a continuacbn, enjuague y seque con un patio suave.
Puede extraer las gavetas y las baldas para Ilevar a cabo una
limpieza minuciosa. Simplemente asegOrese de secar gavetas y
baldas antes de volverlas a colocar en su sitio.
Limpieza del exterior
Limpie el panel de visualizacbn con un patio hOmedo, limpio
y suave. No pulverice agua directamente sobre la superficie
del refrigerador. La superficie de las puertas, tiradores
y armario deberan limpiarse con un detergente suave y
secarse, a continuacbn, con un patio seco. Para mantener su
electrodomestico como el primer dfa, el exterior debera encerarse
una o dos veces al aflo.
useTMbenceno,
disolventes,
detergente
o del
• No
Clorox
para realizar
la limpieza.
Pueden para
danarvehfculos
la superficie
.....
e ecl:roc!omesl:lco y provocar un incendio.
PRECAUCION
Las letras impresas en la pantalla podrfan desprenderse si
pulveriza los productos de limpieza directamente sobre la unidad.
Limpieza de los sellos de goma de la puerta
......
adecuadamente y el refrigerador no funcionar de forma eficiente.
Mantenga las puertas libres de polvo y suciedad limpiandolas con
Si los sellos de goma estan sucios, las puertas podrfan no cerrar
detergente suave y un patio hOmedo. Sequela con un patio limpio y
suave.
Limpieza detr&s del refrigerador
Para mantener cables y partes expuestas libres de polvo
y acumulacbn de suciedad, aspire la parte de detras del
electrodomestico una o dos veces al aflo.
Z_
No desmonte la cubierta de atras. Hacerlo podrfa ocasionar un choque
PRECAUClON
electrico.
Fu-_donar;niento _29
Uso de su refrgerador
SU
REEMPLAZO DE FOCOS INTERIORES
//_
Antes de reemplazar las luces interiores, desenchufe el refrigerador del suministro electrico. Si no esta
pRE_I6Nseguro de c6mo reemplazar las luces tras leer estas instrucciones, pOngase en contacto con su centro
de servicio Samsung para obtener ayuda.
Reemplazo
de la luz interior del refrigerador
1. Desenchufe el cable de alimentaci6n
2. Tire de la protecci6n
de la toma de corriente.
hacia abajo mientras la empuja hacia atras para extraerla.
3. El foco podr[a alcanzar temperaturas
4. Gire el foco en sentido antihorario.
elevadas, pot Io que debe tenet cuidado al tocarlo.
5. El montaje se realizara en el orden inverso al desmontaje.
Reemplazo
de la luz interior de la gaveta de la heladera
1. Desenchufe el cable de alimentaci6n
de la toma de
corriente.
2. Extraiga completamente
3. Tire de la protecci6n
la gaveta.
hacia abajo mientras la empuja hacia
atras para extraerla.
4. La luz puede alcanzar temperaturas
elevadas.
Tenga cuidado al tocar el foco.
5. Gire el foco en sentido antihorario.
6. El montaje se realizara en el orden inverso al desmontaje.
Z_.
No introduzca los dedos dentro de la cubierta.
PRECAUCION
La luz podrfa alcanzar temperaturas elevadas.
30 Fu _cionam ento
i
/
de p ob em s
,, Chequee que la toma de alimentaci6n est6.correctamente conectada.
• bEst6,ajustado en la temperatura correcta el control de temperatura del panel de visualizaci6n?
Intente ajustarlo a una temperatura inferior.
,, bEst6,instalado el refrigerador bajo la luz directa del sol o junto a una fuente de calor?
,, bEst6,la parte posterior del refrigerador demasiado pr6xima a la pared y, por tanto, impidiendo
la circulaci6n del aire? (Examine la p6.gina10 para obtener informaci6n sobre el mejor
emplazamiento).
• bEst6,ajustado en la temperatura correcta el control de temperatura del panel de visualizaci6n?
Intente ajustarlo a una temperatura m6.salta.
" bEs muy baja la temperatura de la estancia?
,, blntrodujo los alimentos demasiado cerca del conducto de ventilaci6n de aire situado en la parte
posterior del refrigerador? Retire los alimentos del conducto de ventilaci6n de aire.
• Chequee que el refrigerador est@nivelado y sea estable.
,, bEst6,la parte posterior del refrigerador demasiado pr6xima a la pared y, por tanto, impidiendo la
circulaci6n del aire?
" bHa cddo algo en la parte de atr6.s o bajo el refrigerador?
,, Se oyen sonidos repetitivos procedentes del interior del refrigerador. Es normal y ocurre debido
a que varios accesorios se contraen y expanden en base a la temperatura del interior del
refrigerador.
• Es normal que se produzca algo de calor ya que los sistemas anticondensaci6n est6.n instalados
en la secci6n con bisagras vertical del refrigerador para evitar dicho fen6meno.
" bEsts,entreabierta la puerta del refrigerador? Puede producirse condensaci6n cuando la puerta
permanece abierta durante un perfodo de tiempo prolongado.
" bHa esperado las 12 horas posteriores a la instalaci6n de la toma de abastecimiento de agua
antes de elaborar hielo?
,, bEst6,conectada la toma de agua y la v6.1vulade corte abierta?
• bDetuvo manualmente el funcionamiento de la m6.quina de hielo?
" bEs demasiado alta la temperatura de la heladera? Intente ajustar una temperatura m6.sbaja en la
heladera.
Esto se considera normal. El borboteo procede de la circulaci6n del Ifquido de refrigeraci6n a
trav6s del refrigerador.
,, Chequee que no existen alimentos estropeados.
,, Los alimentos con un olor fuerte (por ejemplo, pescados) deben cubrirse herm_ticamente.
,, Limpie peri6dicamente su heladera chequeando y desechando alimentos en real estado o
sospechosos de estarlo.
o
bEst6,bloqueado el conducto de ventilaci6n? Eliminecualquier obstrucci6n para conseguir que el
aire circule libremente.
o
Disponga suficiente espacio entre los alimentos almacenados para Iograr una circulaci6n de aire
m6.seficiente.
o
bEst6,cerrada correctamente la puerta de la heladera?
o
bEst6,conectada la toma de agua y la v6.1vulade corte abierta?
bEst6,siendo aplastado o doblado el conducto de la toma de suministro de agua?
AsegOrese de que el conducto est_ libre y limpio de cualquier obstrucci6n.
bEst6,congelado el dep6sito de agua debido a que la temperatura del refrigerador es demasiado
baja? Intente escoger un ajuste de temperatura m6.salta en el panel de visualizaci6n principal.
o
o
SolucOn de problemas 31
REFRIGERADOR
SAMSUNG
GARANT[A LIMITADA AL COMPRADOR
Este producto
de marca Samsung,
ORIGINAL
suministrado
y distribuido
por Samsung
Electronics
America,
Inc. (Samsung)
y entregado nuevo, en su caja de carton original al comprador original, est_ garantizado por Samsung
defectos de fabricaciOn en materiales y mano de obra durante un peffodo de garantfa limitado a:
ante
Un (1) afro para piezas y mano de obra del refrigerador
Cinco (5) afros para piezas y mano de obra exclusivamente
del sistema hermOtico
refrigeraciOn.
(*Compresor, evaporador, condensador, deshumidificador, tuberfas de conexiOn)
Esta garantfa limitada comienza
en la fecha original de compra y sOlo es v_lido para productos
usados en los Estados Unidos.
Para recibir servicios bajo garantfa, el comprador
Samsung
para proceder
a la resoluciOn del problema
y al procedimiento
sOlo puede realizarse a travOs de un servicio tOcnico autorizado
de venta bajo solicitud
Samsung
de Samsung
reparar_ o reemplazar_
cualquier
pieza considerada
cargo, como queda estipulado
en este documento,
garantfa limitada anteriormente
especificado.
de Samsung,
debiendo
ser devueltos
defectuosa
con
la factura original
como prueba de compra.
a nuestra entera discreciOn y sin
por piezas nuevas o reparadas
Todas las piezas y productos
a Samsung.
y
El servicio de garantfa
Debe presentarse
Samsung,
adquiridos
debe ponerse en contacto
de reparaciOn.
Samsung.
o del servicio tOcnico autorizado
de
durante el peffodo de
reemplazados
Las piezas y productos
pasan a ser propiedad
de repuesto quedar_n
aOn bajo el
peffodo restante de garantfa original, o noventa (90) dfas, el que sea m_s extenso.
La prestaciOn de servicios en sitio sera proporcionada
a disponibilidad
disponible
dentro de los estados contiguos
durante el peffodo de garantfa de mano de obra, sujeta
de los EE.UU. La prestaciOn de servicios en sitio no esta
en todas las zonas. Para recibir prestaciOn
ser accesible
al nivel del piso por parte del personal
no pudiera completarse
producto.
de servicios
la reparaciOn, podffa ser necesario el traslado,
Si la prestaciOn de servicios en sitio no est_ disponible,
discreciOn, proporcionar
De Io contrario,
en sitio, el producto
de servicio. Si durante
transporte
el transporte
debe estar despejado
reparaciOn y devoluciOn posterior
Samsung
del
podffa escoger, a nuestra entera
a nuestra elecciOn hasta y desde un servicio tOcnico autorizado
hasta y desde el servicio tOcnico autorizado
y
la prestaciOn de servicios en sitio,
Samsung
Samsung.
corre por cuenta del
comprador.
Esta garantfa limitada cubre defectos
normal, no comercial,
dahos ocasionados
no fue disehado;
tubeffas
utilidades,
y sobretensiOn
instrucciones
en materiales y mano de obra bajo condiciones
dahos externos
incendio, agua, rayos u otros fenOmenos
servicios,
piezas, suministros,
externo,
o que dahen este producto
del suministro
manual de instrucciones;
iluminaciOn.
accesorios,
disyuntores,
u ocasionen
elOctrico; adaptaciones
de funcionamiento,
casos, incluidos,
entrega e instalaciOn; utilizaciones
o nOmeros de serie alterados;
externas y fugas, cableado
por Samsung
de fabricaciOn
y no se aplicar_ en los siguientes
durante el transporte;
producto
mal uso, negligencia,
sistemas,
del producto
exterior; accidentes,
uso de productos,
instalaciones,
fusibles o conectores
problemas
equipamiento,
reparaciones,
no suministrados
de servicio; voltaje incorrecto,
y autorizados
fluctuaciones
y fallas, por parte del cliente, en el cumplimiento
limpieza, mantenimiento
pOrdida de alimentos
naturales;
y de entorno
por descomposiciOn;
a:
y usos para los que el producto
o de acabado
aplicaciones,
de uso
aunque no limitados
que se incluyen y establecen
consumibles
incluyendo
de las
en el
filtros y focos de
NOEXISTEN
OTRASGARANT[AS
EXPL[CITAS
M,_,SQUELASRECOGIDAS
Y DESCRITAS
ANTERIORMENTE,
AS[COMOTAMPOCOEXlSTENOTRASGARANT[AS
EXPL[CITAS
O IMPL[CITAS,
INCLUYENDO
SIN
LIMITACION
TODASLASGARANT[AS
IMPL[CITAS
DECOMERCIABILIDAD
O IDONEIDAD
PARAUNFIN
CONCRETO
QUEPUDIERAN
RESULTAR
PERTINENTES
TRASLOSPER[ODOS
EXPL[CITOS
DEGARANT[A
INDICADOS
CONANTERIORIDAD.
TAMPOCOSERANLEGALMENTE
VINCULANTES
PARASAMSUNG
OTRASGARANT[AS
EXPL[CITAS
U OFRECIDAS
PORPERSONAS,
FIRMASO EMPRESAS
EN RELACION
A ESTEPRODUCTO.SAMSUNGNOSERALEGALMENTE
RESPONSABLE
DELA PERDIDADEINGRESOS
O BENEFICIOS,
LA NOMATERiALIZACION
DEAHORROSU OTROSBENEFICIOS,
O DECUALQUIER
DANORESULTANTE
ESPECIAL,
ACCIDENTAL
O INDIRECTO
OCASIONADO
POREL USO,ABUSOO
INCAPACIDAD
DEUSODEESTEPRODUCTO,INDEPENDIENTEMENTE
DELA TEOR[ALEGALSOBRELA
QUESEBASALA RECLAMACION,
INCLUSOSISAMSUNGHA SIDOADVERTIDO
DELA POSIBILIDAD
DE
TALESDANOS.IGUALMENTE,
CUALQUIER
TIPORECUPERACION
EXIGIDAA SAMSUNGNOSUPERARA
EL
PRECIODECOMPRADELPRODUCTO
VENDIDOPORSAMSUNGY QUEHAOCASIONADO
ELSUPUESTO
DANO.SINLIMITARLO INDICADO
ANTERIORMENTE,
ELCOMPRADOR
ASUMETODOELRIESGOY
RESPONSABILIDAD
DECUALQUIER
PERDIDA,DANOO LESIONPERSONAL
Y A SU PROPIEDAD,
AS[
COMOA TERCEROS
Y SUSPROPIEDADES,
OCASIONADAS
POREL USO,ABUSOO INCAPACIDAD
DE
USODEESTEPRODUCTO
VENDIDOPORSAMSUNGY NOPROVOCADAS
DIRECTAMENTE
PORLA
NEGLIGENCIA
DESAMSUNG.ESTAGARANT[A
LIMITADANOSERAVALIDAPARAPERSONASDISTINTAS
AL COMPRADOR
ORIGINALDEESTEPRODUCTO,
ESINTRANSFERIBLE
Y ESTIPULA
SU SOLUCION
EXCLUSIVA.
Ciertosestadosno permitenlimitacionesen relaci6na la duraci6nde unagarantfaimplfcitao la exclusi6no
limitaci6nde dahosaccidentaleso indirectos,de tal formaquelasmencionadaslimitacioneso excepciones
puedenno ser pertinentes.Estagarantfale otorgaunosderechoslegalesespedficos,e inclusopuedeconferirle
otrosderechos,distintosdependiendodelestadoenquese encuentre.
Paraobtenerserviciode garantfa,p6ngaseen contactoconSamsungen:
CENTRODEASISTENCIAAL CLIENTEDE SAMSUNG
SamsungElectronicsAmerica,inc.400 ValleyRoadSuite201 Mt.Arlington,NJ 07956
1-800-SAMSUNG(1-800-726-7864)y www.samsung.com
Garant a 33
QUESTIONS OR COMMENTS?
COUNTRY
U.S
CANADA
I
CALL
800-SAMSUNG
(800-726-7864)
800-SAMSUNG
(800-726-7864)
OR VISIT US ONLINE AT I
WRITE
www.samsung.com
Samsung Electronics America, Inc. 400 Valley
Road Suite 201 Mt. Arlington, NJ 07956
www.samsung.com/ca
Samsung Electronics Canada Inc. Customer
Service, 55 Standish Court Mississauga, Ontario
L5R 4B2 Canada
Code No. DA68-01845A
REV(0.3)