1
instruction
0
RAM/nwm
Manual
0
V
I
D
E
O
DIGITALAUDIO
www.samsung.com
AK68-01317A-01
Getting Started
tf this equipment does cause harmful interference to radio or
TO REDUCE THE RISK OF ELECTRIC
SHOCK,
DO NOT REMOVE THE COVER(OR BACK).
NO USER-SERVICEABLE
PARTS ARE INSIDE. REFER
SERVICING TO QUALIFIED SERVICE PERSONNEL.
television reception, which can be determined by turning the
equipment off and on, the user is encouraged to try to correct
the interference by one or more of the following measures:
• Reposition or relocate the receiving antenna.
• Increase the separation between the equipment and receiver.
• Connect the equipment into an outlet on a circuit different from
that to which the receiver is connected.
• Consult the dealer or an experienced radio/TV technician for help.
Caution: FCC regulations state that any unauthorized changes
or modifications to this equipment may void the user's
authority to operate it.
This symbol indicates that dangerous voltage
consisting a risk of electric shock is present
within this unit.
= This unit can be used oniy where the power supply
is AC 120V, 60Hz. It cannot be used elsewhere.
This DVD Recorder is designed and manufactured to
This symbol indicates that there are important
operating and maintenance instructions in the
literature accompanying this unit.
Do not install this equipment
a bookcase or similar unit.
respond to the Region Management Information.
If the Region number of a DVD disc does not correspond
to the Region number of this DVD Recorder, the DVD
Recorder cannot play the disc.
in a confined space such as
This device is protected by U.S. Patent Nos.4,631,60
3;4,577,216;4,819,098;4,907,093;
and 6,516,132.This
WARNING : To preventdamage which may result infire or electric
shock hazard,do not exposethis appliance to rain or moisture.
product incorporates copyright protection technology
that is protected by U.S. patents and other intellectual
property rights.Use of this copyright protection
technology must be authorized by Macrovision,and is
intended for home and other limited viewing uses only
CAUTION : DVD RECORDERS USEAN INVISIBLE LASER
BEAM WHICH CAN CAUSE HAZARDOUS RADIATION
EXPOSURE IF DIRECTED. BE SURE TO OPERATE THE
RECORDER CORRECTLY AS INSTRUCTED.
CAUTION
THIS PRODUCT
unless otherwise authorized by Macrovision.Reverse
engineering or disassembly is prohibited.
UTILIZES A LASER.
This product is covered by one or more of the
following U.S. patents:
5,060,220 5,457,669 5,561,649 5,705,762 5,987,417
6,043,912 6,222,983 6,272,096 6,377,524 6,377,531
USE OF CONTROLS ORADJUSTMENTS
OR
PERFORMANCE
OF PROCEDURES
OTHER THAN
THOSE SPECIFIED HEREIN MAY RESULT IN
HAZARDOUS RADIATION EXPOSURE.
DO NOT OPEN COVERS AND DO NOT REPAIR
YOURSELF. REFER SERVICING
PERSONNEL.
6,385,587
6,477,501
6,578,163
6,674,957
6,721,493
6,765,853
TO QUALIFIED
CAUTIONS
Caution: To prevent electric shock, match wide blade of plug
to wide slot, fully insert.
Attention: Pour eviter les chocs electriques, introduire ta lame
la plus Iarge de la fiche darts la borne correspondante de la
prise et pousser jusqu au fond.
This product satisfies FCC regulations when shielded
cables and connectors are used to connect the unit to other
equipment. To prevent electromagnetic interference with
electric appliances, such as radios and televisions, use
shielded cables and connectors for connections.
FCC NOTE (for U.S.A):
This equipment has been tested and found to comply with the
limits for a Qass B digital device, pursuant to Part I5 of the FCC
Rules. These limits are designed to provide reasonable protection
against harmful interference in a residential instaNation.
This equipment generates, uses and can radiate radio
frequency energy and, if not installed and used in accordance
with the instructions, may cause harmful interference to
6,389,570
6,480,829
6,594,208
6,687,455
6,728,474
6,765,853
6,408,408
6,556,520
6,631,110
6,697,307
6,741,535
6,771,890
6,466,532
6,556,521
6,658,588
6,707,985
6,744,713
6,771,891
6,473,736
6,556,522
6,674,697
6,721,243
6,744,972
6,775,465
6,778,755 6,788,629 6,788,630 6,795,637 6,810,201
6,862,256 6,868,054 6,894,963 6,937,552
f
DANGER
-
CAUTION
-
VISIBLE
VISIBLE AND INVISIBLE
LASER
AVOID EXPOSURE
TO BEAM.
ATTENTION
-
RAYONNEMENT LASER VISIBLE ET INVISIBLE EN CAS D'OUVERTURE.
EXPOSITION DANGEREUSE AU FAISCEAU.
ADVARSEL
-
SYNLIG
OG USYNLIG
UNDGA
UDS_ET_ELSE
AVOID
AND
DIRECT
INVISIBLE
VARO
-
AVAFrAESSA
OLET
LASERSATEILVLLE.
VARNING
-
SYNLIG
OCH
AR ORRNAD.
LASER
EXPOSURE
RADIATION
WHEN
OPEN.
WHEN
OPEN.
TO BEAM.
RADIATION
LASERSTRALING
VED _BNING.
FOR STRRLING.
AL_[IINA
NAKYVAA
JA N_,KYMATON
_,LA KATSO SATEESEEN.
OSYNLIG
LASERSTRALNING
BETRAKTA
N_,R DBNNA
DEL
EJ STR_,LEN.
ADVARSEL
-
SYNLIG
UNNGA
VORSIOHT
-
SICHTBARE UND UNSICHTBARE LASERSTRARLUNG, WENNABDBCKUNG
GEOFFNET NICHT DEM STRAHLAUSSBTZEN
_A
radio communications. However, there is no guarantee that
interference will not occur in a particular installation.
English - 2
OG USYNLIG
EKSPONERING
LASERSTR_,LING
FOR STRALEN.
NAR DSKSEL
_,PNES.
Exterior interference such as lightning and static
electricity can affect normal operation of this recorder.
If this occurs, turn the recorder off and on again with the
POWER button, or disconnect and then reconnect the
| important Safety instructions
AC power cord to theAC power outlet.
The recorder wilt operate normally.
• Be sure to remove the disc and turn off the recorder after use.
Read these operating instructions carefully before using
the unit. Follow all the safety instructions listed below.
Keep these operating instructions handy for future
reference.
• Disconnect the AC power cord from the AC outlet when you
don't intend to use the recorder for long periods of time.
• Clean the disc by wiping in a straight line from the inside
to the outside of the disc.
1) Read these instructions.
2) Keep these instructions.
3) Heed all warnings.
4)
5)
6)
7)
• Apparatus shall not be exposed to dripping or splashing
and no objects filled with liquids, such as vases, shall be
placed on the apparatus.
Follow all instructions.
Do not use this apparatus near water.
Clean only with a dry cloth.
Do not block any ventilation openings, Install in
accordance with the manufacturer's instructions.
• The Mains plug is used as a disconnect
stay readily operable at any time.
8) Do not install near any heat sources such as radiators,
heat registers, stoves, or other apparatus (including
amplifiers) that produce heat.
9) Do not defeat the safety purpose of the polarized or
grounding- type plug. A polarized plug has two blades
with one wider than the other. A groundingtype plug
has two blades and a third grounding prong. The wide
blade or the third prong is provided for your safety. If
the provided plug does not fit into your outlet, consult
an electrician for replacement of the obsolete outlet.
10) Protect the power cord from being walked on or
pinched particularly at plugs, convenience receptacles,
and the point where they exit from the apparatus.
11) Only use attachments/accessories
specified by the
manufacturer.
12) Use only with the cart, stand, tripod,
bracket, or table specified by the
manufacturer, or sold with the
apparatus. When a cart is used,
use caution when moving the cart/
apparatus combination to avoid injury
from tip-over.
13) Unplug this apparatus during lightning storms or when
unused for long periods of time.
14) Refer all servicing to qualified service personnel.
Service is required when the apparatus has been
damaged in any way, such as the power-supply cord
or plug is damaged, liquid has been spilled or objects
have fallen into the apparatus. Service is also required
if the apparatus has been exposed to rain or moisture,
does not operate normally, or has been dropped.
| Maintenance of Cabinet
For safety reasons, be sure to disconnect
cord from the AC outlet.
° Before connecting other components
sure to turn them all off.
to this recorder, be
* Do not move the recorder while a disc is being played, or
the disc may be scratched or broken, and the recorder's
internal parts may be damaged.
* Do not put a flower vase filled with water or any small
metal objects on the recorder.
* Be careful not to put your hand into the disc tray.
theAC power
• Do not use benzene, thinner, or other solvents for
cleaning.
• Wipe the cabinet with a soft cloth.
| Disc Handling
• Use discs with regular
shapes, tf an irregular disc
(a disc with a special shape)
is used, this DVD Recorder
may be damaged.
X
Holding discs
• Avoid touching the surface of a disc
where recording is performed.
DVD=RAM, DVD=RW and DVD=R
• Clean with an optional DVD-RAM/PD disc
cleaner. Do not use cleaners or cloths for
CDs to clean DVDRAM/
DVD-RW/DVD-R discs.
DVD-Video, Audio CD
• Wipe off dirt or contamination on the disc with a soft
cloth.
Cautions
| Handling Cautions
device and shall
on
handling
discs
• Do not write on the printed side with a ball-point pen or pencil.
• Do not use record cleaning sprays or antistatic. Also, do
not use volatile chemicals, such as benzene or thinner.
• Do not apply labels or stickers to discs. (Do not use discs fixed
with exposed tape adhesive or leftover peeled-off stickers.)
• Do not use scratch-proof protectors or covers.
• Do not use discs printed with label printers available on
the market.
• Do not load warped or cracked discs.
* Do not place anything other than the disc in the disc tray.
English - 3
• Using CD-R/-RW
• Use a 700MB(80 minutes) CD-PJ-RW disc. If possible,
do not use a 800MB(90 minutes) or above disc, as the
| Disc Storage
Be careful not to damage the disc because the data on
these discs are highly vulnerable to the environment.
• Do not keep under direct sunlight.
• Keep in a cool ventilated area.
disc may not play back.
• if the CD-R/-RW disc was not recorded as a closed
session, you may experience a delay in the early
playback time, and all recorded files may not play.
• Some CD-R/-RW discs may not be playable with this
unit, depending on the device which was used to burn
them.
• Store vertically.
. Keep in a clean protection jacket.
. If you move your DVD Recorder suddenly from a cold
place to a warm place, condensation may generate
on the operating parts including the tens and cause
abnormal disc playback. When this occurs, do not
connect the plug to the power outlet. Wait for two hours,
then insert the disc and try to playback again. It wilt work
properly when condensation has evaporated.
DVD=R
Disc
Playback and Recording
• Once a DVD-R recorded is finalized, it is playable in a
standard DVD player.
You can record onto the available space on the disc and
perform editing functions such as giving titles to discs
and programs and erasing programs before finalizing.
| Disc Specifications
DVD-Video
° A digital versatile disc (DVD) can contain up to
135-minutes of images, 8-1anguage audio and 32
subtitle languages. It is equipped with MPEG-2 picture
compression and Dolby 3D surround sound, allowing
• When programming is erased from a DVD-R, that space
does not become available. Once an area on a DVD-R
you to enjoy vivid and clear theater quality images in the
comfort of your own home.
. When switching from the first layer to the second layer
of a double-layered DVD Video disc, there may be
momentary distortion in the image and sound. This is not
a malfunction of the unit.
. Once a DVD-R/DVD-RW(V)
recorded is finalized, it is
playable in a standard DVD player.
Audio
• When recording from CDs for your personaI use to CDR/-RW discs, playability may vary depending on the
contents and discs.
CD
° An audio disc on which 44.1kHz PCM Audio is recorded
. Plays CD-DA format audio CD-R and CD-RW discs.
The unit may not be able to play some CD-R or CD-RW
discs due to the condition of the recording.
is recorded on, that area is no longer available for
recording, whether the recording is erased or not.
• It takes about 30 seconds for the unit to complete
recording management information after recording
finishes.
• This product optimizes the DVD-R for each recording.
Optimization occurs when you start recording after
inserting the disc or turning on the unit. Recording onto
the disc may become impossible if optimization is carried
out too many times.
• Playback may be impossible in some cases due to the
condition of recording.
• This unit can play back DVD-R discs recorded and
finalized with a Samsung DVD video recorder. It may
not be able to play some DVD-R discs depending on the
disc and the condition of the recording.
CD=R/=RW
DVD=RW
. Only CD-R discs with MP3 files recorded with ISO9660
or JOLIET format can be played back
. Only MP3 files with the ".mp3", ".MP3" extension can be
used.
• Recording and playback can be performed on DVD-RW
discs in both the Video and VR Modes.
• Once a DVD-RW is recorded in VR or Video mode is
. For MP3 files recorded with a VBR(Variable Bit Rates),
from 32 Kbps to 320 Kbps, the sound may cut in out.
. Playable bitrate range is from 56Kbps to 320Kbps.
. The unit can handle a maximum of 1000 files and
folders.
. DVD-RAM/DVD:I:RW/+R
disc recorded with MP3 files
JPEG CD-R/-RW
° Only JPEG files with the ".jpg", ".JPG" extension can be
used.
. The unit can handle a maximum of 1000 files and
folders.
. Maximum size of progressive JPEG is 3M pixels.
. MOTION JPEG is not supported.
. DVD-RAM/:I:RW/+R discs that contain JPEG files can be
played back.
finalized, you cannot perform additional recording.
• Once a DVD-RW is recorded in Video Mode and
finalized, it becomes a DVD-Video.
• In both modes, playback can be performed before and
after finalization, but additional recording, deleting and
editing can not be performed after finalization.
• If you want to record the disc in VR Mode and then
record in V Mode, be sure to first reformat the disc.
Please be aware that formatting will erase all of the discs
content.
can be played back.
•
Disc
Playback and Recording
_, IVlP3 CD-R/-RW
• When inserting an unused disc, a message will appear
asking whether to initialize the disc or not. tf you select
"YES", the disc wilt be formatted in VR mode.
• DVD-RW (MR mode)
- This is a format that is used for recording data on a
DVD-RW disc. You can record multiple titles, edit, delete,
partial delete, create a piaylist, etc.
- A disc that is recorded in this mode will not play in
standard DVD players.
English - 4
, DVD-RW (Video mode)
- This is a format that is used for recording data on a
DVD-RW or DVD-R disc. The disc can be played by an
existing DVD player once it has been finalized.
- If a disc that has been recorded in Video Mode by a
different manufacturer's recorder but has not been
Disc
use
the following
discs!
product. When these discs are played, either "No Disc."
or "The disc cannot be played. Please check the regional
code of the disc." will be displayed.
• If your DVD-RAM/DVD-RW/DVD-R
disc is an illegal
copy or is not in DVD video format, it may also not be
finalized, it cannot be played or recorded by this
recorder.
DVD-RAM
Do not
• LD, CD-G, CD-I, CD-ROM and DVD-ROM discs should
not be used in this product.
• Some commercia! discs and DVD discs purchased
outside your region may not be playable with this
Playback and Recording
° For cartridge type DVD-RAM discs, remove the cartridge
and use only the disc
* Ensure that the recording mode is set to VR mode.
Otherwise, this product will not be able to piay the
recording.
* You cannot play a DVD-RAM in most DVD players due
to compatibility issues.
*Oniy DVD-RAM standard Version 2.0 discs can be
played in this unit.
* DVD-RAM discs recorded on this unit may not work with
playable.
O Disc Compatibility
• Not atl brands of discs will be compatible
with this unit.
• The latest firmware upgrade to improve recording &
playback quality can be downloaded from our web site.
(Download Center at www.samsung.com)
• If disc compatibility problems continue, or there is an
issue upgrading your recorder, contact the Call Center at
1-8OO-SAMSUNG.
other DVD Players. To determine compatibility with these
DVD-RAM discs, refer to the user's manual for the player.
• Many DVD discs are encoded with copy protection.
Because of this, you should only connect your DVD
Recorder directly to your TV, not to a VCR.
Connecting your DVD recorder to a VCR results in a
distorted picture from copy-protected DVD discs.
• This product incorporates copyright protection
technology that is protected by methods claims of
certain U.S. patents and other intellectual property
rights owned by Macrovision Corporation and other
rights owners. Use of this copyright protection
technology must be authorized by Macrovision
Corporation, and is intended for home and other
limited viewing uses only unless otherwise authorized
by Macrovision Corporation.
Reverse engineering or disassembly is prohibited.
Protection
This DVD Recorder can allow you to protect the contents
of your discs, as described below.
* Program-protection:
See page 58 "Locking a Title"
* Disc-protection: See page 65 "Disc Protection"
_-_DVD-RAM/DVD-RW/DVD-R
discs that are incompatible
with the DVD-VIDEO format cannot be played with this
product.
_: For more information on DVD recording compatibility,
consult your DVD-RAM/DVD-RW/DVD-R
manufacturer.
:_:Use of poor quality DVD-RAM/DVD-RW/DVD-R
discs
may cause the following unexpected problems including,
recording failure, toss of recorded or edited materials or
damage to the recorder.
English - 5
mWarning
...................................................................
2
g Initial
Setup
..........................................................
25
OSD
Language
Setup
.............................................
25
mPrecaution
...............................................................
3
Important
Safety
Instructions
..................................
3
g Using
theSetup
Menu
.............................................
25
Handling
Cautions
...................................................
3
gSetting
UptheSystem
Options
...............................
26
Maintenance
ofCabinet
..........................................
3
CMSkip
Time
Setting
..............................................
26
Disc
Handling
..........................................................
3
EPMode
Time
Setting
............................................
27
Disc
Storage
............................................................
4
Automatic
Chapter
Creation
....................................
27
Disc
Specifications
..................................................
4
Quick
Recording
Setting
.........................................
28
mContents
..................................................................
6
Anynet+(HDMI-CEC)
...............................................
28
mGenera!
Features
....................................................
8
gClock
Set............................................................
29
mBefore
Reading
theInstruction
Manual
...................
9
g Language
Setting
....................................................
29
mHowtousetheDVD
Recorder
................................
9
gSetting
UptheAudio
Options
..................................
30
mUnpacking
...............................................................
10
gVideo(Display)
Setting
.............................................
31
Accessories
.............................................................
10
TVAspect
............................................................
31
Preparing
theRemote
Controt
................................
10
Input
Level
...........................................................
31
Tour
oftheRemote
Control
.....................................
12
Black
Level
..........................................................
31
3DNoise
Reduction
................................................
31
mDescription
..............................................................
13
HDMI/DVl
Resolution
..............................................
32
Front
Panel
..............................................................
13
g Parental
Control
.....................................................
32
Front
Panel
Display
.................................................
13
Rear
Panet
..............................................................
14
Setting
theRating
Level
..........................................
33
Changing
thePassword
..........................................
33
mStep1:Connecting
HDMI/DVI
toaTV...................
15
g Recordable
discs
....................................................
34
Connecting
toaTVwithanHDMI
Jack..................
15
Connecting
toaTVwithaDVlJack
........................
16
Compatibility
between
Samsung
andOther
manufacturer's
Recorders
.......................................
34
mStep2:Connecting
theVideo
Cable
......................
17
Connecting
toComponent
Video
Input
Jacks
g Recording
Formats
..................................................
35
(Y,PB,PR)
..................................................................
17
DVD-RW(Video
mode)/-R
.......................................
35
Connecting
toanS-Video
Input
Jack
.....................
18
DVD-RAM/-RW(VR
mode)
......................................
35
Connecting
toaVideo
Input
Jack...........................
19
g Recording
Mode
.....................................................
35
mStep3:Connecting
theAudio
Cable
......................
20
g Unrecordable
Video
.................................................
36
Connecting
toyourTV............................................
20
About
theINFO
Button
............................................
37
Connecting
toaStereo
Amplifier
withAnalog
Input
g Recording
fromExterna!
Equipment
.......................
38
Jacks
.......................................................................
21
gCopying
fromaCamcorder
.....................................
39
Connecting
toanAVAmplifier
withaDigital
Input
Jack
.........................................................................
22
g Making
aOneTouch
Recording
(OTR)
...................
40
mStep
4 :Connecting
External
Devices
.....................
23
gSetting
aTimer
Recording
.......................................
41
Connecting
aVCR,
SetTopBox(STB)
orDVD
Player g Flexible
Recording
(forTimer
Recording
only)
........
42
totheAV1INorS-VIDEO
INjacks........................
23
g Editing
theScheduled
Record
List..........................
42
Connecting
aCamcorder
........................................
24
g Deleting
theScheduled
Record
List........................
43
g Recording
theScheduled
Record
List.....................
43
g EZREC
MODE
......................................................
44
English
-6
mRegion
code
(DVD-Video
only)
...............................
45
gTroubleshooting
......................................................
68
mLogos
ofDiscs
thatcanbeplayed
..........................
45
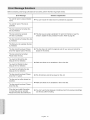
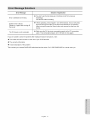
g Error
Message
Solutions
.........................................
70
mDisctypes
thatcanbeplayed
.................................
45
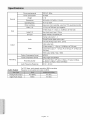
gSpecifications
........................................................
72
Discs
ThatCannot
bePlayed
..................................
46
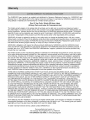
gWarranty
.............................................................
73
mPlaying
aDisc
..........................................................
46
Using
theDiscMenu
&TitleMenu
..........................
47
Using
thePlayback
Related
Buttons
.......................
47
Slow
Motion
Play
.....................................................
48
StepMotion
Play
.....................................................
48
Using
theANYKEY
Button
......................................
49
mPlaying
anAudio
CD/MP3
.......................................
53
Playing
anAudio
CD(CD-DA)
.................................
53
Playing
anMP3Disc
...............................................
54
Playing
Repeatedly
.................................................
54
mPlaying
aPicture
CD...............................................
55
mPlaying
theTitleList................................................
56
mBasic
Editing
(Title
List)
...........................................
57
Renaming
(Labeling)
aTitle....................................
57
Locking
(Protecting)
aTitle
......................................
58
Deleting
aTitle........................................................
58
Deleting
aSection
ofaTitle....................................
59
mAdvanced
Editing
(Playtist)
......................................
60
Creating
aPlaylist
...................................................
60
Playing
Entries
inthePlaylist
..................................
60
Renaming
aPlaylist
Entry
.......................................
61
Editing
aScene
forthePtaylist
...............................
61
Copying
aPlaylist
Entry
tothePlaytist
....................
64
Deleting
aPlaylist
Entry
from
thePtaytist
................
64
mDiscManager
..........................................................
64
Editing
theDiscName
.............................................
64
Disc
Protection
........................................................
65
Formatting
aDisc
....................................................
65
Finalizing
aDisc
......................................................
66
Unfinalizing
aDisc(V/VR
mode)
.............................
66
Delete
AllTitleLists
.................................................
67
English
-7
A variety
TheDVD-R155
allows
youtorecord
andplayhighquality
digital
video
onDVD-RAM/DVD-RW/DVD-R
discs.
High quality digital audio and video recording and
playback
You can record up to approximately 16-hours of video on
a double side 9.4 GB DVD-RAM disc,up to 15-hours on a
dual-layer 8.5GB DVD-R disc, and up to 8-hours on a 4.7
GB DVD-RAM/DVD-RW/DVD-R
disc, depending on the
of functions
with an easy-to-use
user interface
The integrated menu system and the messaging function
allows you to perform desired operations both easily and
conveniently. With a DVD-RAM or DVD-RW (VR mode)
disc, you can edit recorded images, create a playtist,
and edit videos in a specific sequence according
requirements.
HDMI (High Definition
Multimedia
to your
Interface)
HDMI reduces picture noise by allowing a pure digital
video/audio
signal path from the DVD Recorder to your TV.
recording mode.
Selectable
Record
l-lili:::3iri3
|
Mode
You can set your recorder to one of five different recording
speeds, each varying in recording quality and length. EP
mode yields the most recording time, LP & SP modes
provide less recording time with higher quality recording,
and XP mode gives you the highest quality recording.
There's also the FR (Flexible Recording) mode that lets
you record with the best picture quality possible for the
Simp leyHD
Tunerless DVD Recorder
The DVD-R155 does not have a TV tuner. Recording TV
broadcasts is possible via Connection to Cable/Satellite
boxes and Multi Channel Video Services.
recording time and remaining space on the disc in timer
recording.
EZ RED MODE
This function allows you initialize and Finalize a disc
automatically.
Automated
Quality Adjustment
for Timer Recording
If FR mode is selected, the video quality is adjusted
automatically so that all video for the scheduled time can
be recorded onto the free disc space. (See pages 41 ~42)
Create a DVD video title using
a DVD-RW/DVD-R
disc
With the DVD-R155, you can create your own DVD video
title on 4.7 GB DVD-RW/DVD-R or 8.5GB DVD-R discs.
Copying data from a digital camcorder
using
a DV
input jack
Record digital camcorder video onto DVD-RAM, DVD-RW
or DVD-R discs using the DV input jack (IEEE 1394-4pin).
(See page 39.)
High quality
Progressive
free video.
progressive
scan
scanning provides high resolution
and flicker
The 10-bit 54-MHz DAC and 2D Y/C Separating Circuitry
provides the highest video ptayback and recording quality.
(See page 17.)
English - 8
(See page 44.)
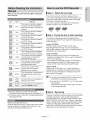
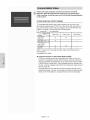
Make sure to check the following
user's
| Step I : Select the disc type
before reading the
manual
Icon
This unit can record on the following types of discs.
Term
If you want to repeatedly record on the same disc or you
want to edit the disc after recording, select a rewritable
DVD-RW or DVD-RAM type disc.
If you want to save the recording without making any
Definition
This involves a function available
DVD
RAM
-RW
RAM
This involves a function available
with DVD-RAM discs.
+RW
This involves a function available
with DVD+RW discs.
+R
This involves a function available
with DVD+R discs.
Using a DVD-RAM
This type of disc can be formatted in DVD-Video
Recording format (VR mode). You can edit recorded
video, create a playlist or edit video in a specific sequence
according to your requirements.
with a data CD (CD-R or CD-RW).
JPEG
MP3
This involves a function available
with CD-R/-RW or DVD-RAM/
DVD±RW/DVD±R discs.
Using a DVD-RW
• When an unused DVD-RW disc is first inserted, the
message "Uninitialized Disc. Do you want to initialize this
disc?" will be displayed.
If you select Yes, initializing will begin. A DVD-RW disc
can be formatted in either DVD-Video format (Video
mode) or DVD-Video Recording format (VR mode)
This involves a case where a
function does not operate or
settings may be cancelled.
This involves tips or instructions on
the page that help each function
Using a DVD-R
When using a DVD-R disc, only V mode recording is
possible and no initialization is needed to play it on this
recorder. However, finalization is necessary to piay this
disc on other DVD players.
operate.
One-
Touch
button
ANYKEY
button
g You can only use either the VR or Video mode on
A function that can be operated by
using only one button.
a DVD-RW, but not both at the same time.
g You can format a DVD-RW to V or VR mode using
disc manager.
It should be noted that the disc's data wilt be lost
A function that can be operated by
using the ANYKI=y button.
1) Be sure to familiarize yourself with the Safety
Instructions before using this product. (See pages 2 ~ 5)
2) If a problem occurs, check the Troubleshooting section.
(See pages 68 ~69)
@2007 Samsung Electronics Co.
All rights reserved; No part or whole of this user's manual
may be reproduced or copied without the prior written
permission
R
The recorder automatically starts formatting when an
unused disc is inserted. This is required for the preparation
of disc recording.
This involves a function available
This involves a function available
with CD-R/-RW or DVD-RAM/
DVD+RW/DVD±R discs.
NOTE
RW
with DVD-RW discs.
This involves a function available
with DVD-R discs.
Caution
DVD-R.
| Step 2 : Format the disc to start recording
This involves a function available
-R
CD
changes, choose a non-rewritable
with DVD or DVD-R/DVD-RW(V)
discs that have been recorded and
finalized.
of Samsung
Electronics Co.
when changing formats.
| Step 3 : Recording
There are two different recording methods. Direct Recording
(recording a program you are currently watching) and
Timer Recording. Timer recording is determined as a Date :
MM/DD, MON-FRI, Every SAT, etc.. There are 5 recording
modes : XP(high quality mode), SP(standard quality mode),
LP(long recording mode), EP(extended mode) and FR
mode. When using FR mode to record, the picture quality is
determined by the remaining time on the disc.
English - 9
| Step 4 : Playing
To start playback select the title you want to play from the
Title list.
A DVD consists of sections called titles, and sub sections
called chapters.
During recording, a title is created between two points
where you start and stop recording. Chapters will be
created automatically when you finalize recording on
DVD-R/DVD-RW discs in Video mode.
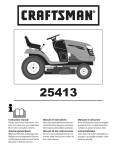
| Accessories
Check for the supplied accessories
below.
| Step 5 : Editing a recorded disc
Editing a DVD disc is easier than editing on conventional
video tapes. The recorder supports many different editing
Video/AudioCable
(AC39-00073A)
Remote Control
(AK59-00061 B)
functions, possible only with DVDs.
O
With a simple and easy edit menu, you can perform
various editing functions, such as delete, copy, rename,
lock, etc., on a recorded title.
Batteriesfor Remote
Control(AAASize)
(AC43-12002H)
With this recorder, you can create playlists using a DVDRAM/DVD-RW in VR mode. Once a playtist is created you
can create/edit a new playlist on the same disc without
changing the original recording.
Quick
8tep
: Finalizing & Playing on other
DVD 6
components
To play your DVD on other DVD components,
instruction Manual
(AK68-01317A)
Guide
(AKS8-01319A)
finalizing
may be necessary. First, finish all editing and recording
operations, then finalize the disc.
When using a DVD-RW disc in VR Mode
Although finalizing is generally unnecessary when playing
the disc on a VR Mode compatible component, a finalized
disc should be used for playback.
When using
a DVD-RW disc in Video
Mode
The disc should be finalized first to enable playback on
other DVD players. No more editing or recording can be
made on the disc once it has been finalized.
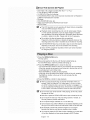
| Preparing the Remote Control
install
Batteries
in the Remote Control
• Open the battery cover on the back of the remote.
• Insert two AAA batteries. Make sure that the polarities
(+ and -) are aligned correctly.
• Replace the battery cover.
When using a DVD-R disc
The disc should be finalized first to enable playback on
if the remote control does not operate properly:
• Check the polarity + - of the batteries.
• Check if the batteries are drained.
other DVD players. No more editing or recording can be
made on the disc once it has been finalized.
• Check if the remote sensor is blocked by obstacles.
• Check if there is any fluorescent lighting nearby.
g You can finalize automatically
using the EZ REC
Dispose of the batteries according to local environmental
regulations. Do not put them in the household trash.
MODE. (See page 44)
English - 10
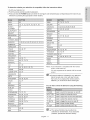
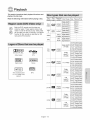
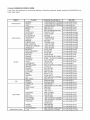
To determine
whether your
television
is compatible,
follow the instructions
below.
1. S\,vitch your television on.
2. Point the remote control towards the television.
3. Press and hold the POWER button and enter the two-figure
television
by pressing the appropriate
code simultaneously
corresponding
to the brand of your
number buttons.
AIWA
82
SABA
57, 72, 73, 74, 75
ANAM
10, 11, 12, 13, 14, 15, 16, 17, 18
SALORA
74
BANG &
OLUFSEN
57
SAMSUNG
01,02,03,04,05,06,07,08,09
SANYO
41,42,
BLAUPUNKT
71
SCHNEIDER
06
BRANDT
73
SELECO
74
BRIONVEGA
57
SHARP
36, 37, 38, 39, 48
CGE
52
SIEMENS
71
SINGER
57
SINUDYNE
57
SONY
35, 48
TELEAVA
73
TELEFUNKEN
67, 73, 75, 76
THOMSON
72, 73, 75
THOMSON ASIA
80, 81
CONTINENTAL
EDISON75
43, 44, 48
DAEWOO
19,20,2& 24, 25,26 27,28,29, 30+31,32,33,34
EMERSON
64
FERGUSON
73
FINLUX
06, 49, 57
FORMENTI
57
FUJITSU
84
GRADIENTE
70
TOSHIBA
47, 48, 49, 50, 51, 52
GRUNDIG
49, 52, 71
WEGA
57
HITACHI
60, 72, 73, 75
YOKO
06
IMPERIAL
52
ZENITH
63
JVC
61, 79
LG
06, 19, 20, 21,22,
78
Result: If your television is compatible
with the remote
control, it will switch off.
LOEWE
06, 69
LOEWE OPTA
06, 57
MAGNAVOX
40
METZ
57
MITSUBISHI
06, 48, 62, 65
MIVAR
52, 77
NEC
83
NEWSAN
68
NOBLEX
66
NOKIA
74
NORDMENDE
72, 73, 75
POWER
Used to switch the television on and off.
53, 54, 74, 75
INPUT SEL.
Used to select an external source.
PHILIPS
06, 55, 56, 57
TV VOL +/-
Used to adjust the volume of the television.
PHONOLA
06, 56, 57
TV CH
Used to select the desired channel.
PIONEER
58, 59, 73, 74
TV MUTE
Used to toggle the sound on and off.
RADIOLA
06, 56
0~9
Used to input number directly.
RADIOMARELLI
57
TV 100+
Used to select channels over 100.
RCA
45, 46
REX
74
PANASONIC
It is now programmed
control.
to operate with the remote
g If several codes are indicated for your television
brand, try each one in turn until you find one
that works. If you replace the remote control's
batteries, you must set the brand code again.
You can then control the television
buttons.
using the following
g The various functions may be able to be
controlled
problems,
English - 11
on all televisions. If you encounter
operate the television directly.
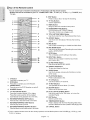
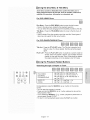
| Tour of the Remote Control
You can contro! part of another manufacturer's
TV functions with this remote control.
• Buttons that can be controlled
on your TV: POWER, INPUT SEL., TV VOL (+/-), TV CH (^ Iv),
TV 100+.
TV MUTE, 0~9,
9. STOP Button
17
Press to stop a disc or to stop the recording.
1
2
18
10. TV VOL Buttons
3
19
11. MENU Button
Volume adjustment.
--
20
Brings up the DVD recorder's
12. ENTER/DIRECTION
setup menu.
Buttons
(UP/DOWN and LEFT/RIGHT Buttons)
This button functions as a toggle switch.
21
13. TITLE MST/DISC
MENU Button
Use this to enter the View Recording
6
14. ANYKEY
list/Disc menu.
Button
--
8
--
22
--
23
15. REC Button
--
24
16. REC MODE Button
--
25
Use this to view the status of the disc that is being
played.
Use to make a recording on writabte/rewritable
11--
Use this to set the desired Recording
12
discs.
time and picture
quality. (XP/SP/LP/EP)
17. INFO Button
This will display current setting or disc status.
13-14-15
--
26
27
28
16--
--
29
18. INPUT SEL. Button
Selects line input signal in external input mode.
(AVl, AV2 or DV)
19. EZ REC MODE Button
Use this to set the EZ REC MODE.
20. OPEN/CLOSE
Button
To open and ctose the disc tray.
21. AUDIO Button
Use this to access various audio functions on a disc.
(DVD mode)
22. PLAY/PAUSE
1.
Button
Press to play/pause
TV Button
2.
Press this to operate your TV.
DVD Button
Press this to operate your DVD Recoder.
POWER Button
24. TV MUTE Button
3.
Press to power the DVD Recorder on and off.
25. RETURN Button
4.
NUMBER
5.
TV 100+/CM SKiP Button
This operates as Sound Mute. (TV mode)
Buttons
Returns to the previous menu.
2B. PLAY MST/TITLE
Press this to select channel 100 or higher.
Press this to skip a portion of the program
automatically during playback of a DVD disc.
B.
REVERSE/FORWARD
SKIP Buttons
Press to skip a disc backwards or forwards.
7.
REVERSE/FORWARD
recorded
Playlist.
27. EXIT Button
Exit the current menu.
28. TIMER/MARKER
STEP Buttons
REVERSE/FORWARD
SEARCH Buttons
Press to search a disc backwards or forwards.
MENU Button
Use this to return to the Title menu, or to view the
Button
Press to directly enter the Timer Recording Mode menu.
Use this to Bookmark or mark a position while playing a disc.
Press to play frame by frame.
8.
a disc.
23. TV CH Buttons
Use this to select a TV channel.
29. CANCEL
Button
÷ This is a special remote control for the visually impaired, and has Braille points on the POWER( @ ), STOP( @ ) and
PLAY( @ ) buttons.
English - 12
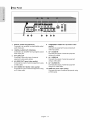
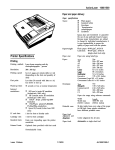
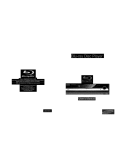
| Front Panel
0
0
1.
0
0
O
POWER Button
00@
8.
Selects line input signal in external mode.
(AVl, AV2, or DV)
AV21N
9.
Connects external equipment.
3.
11. STOP Button
RSCAN
Stops disc playback.
Button
OPEN/CLOSE
scan mode.
12. PLAY/PAUSE
Button
Plays a disc or pauses playback.
Button
Opens and closes the disc tray.
7.
10. REC Button
Starts recording.
Selects the progressive
6.
Uses this to set the desired Recording time and
picture quality. (XP/SP/LP/EP)
DiSC TRAY
Opens to accept a disc.
5.
REC MODE Button
DV-IN
Connects external digital equipment with a DV
jack. (such as a camcorder)
4.
®®
iNPUT SEL. Button
Turns the recorder on and off.
2.
o
0
13. SKiP Buttons
Goes to the next title/chapter/track,
to the previous title/chapter/track.
DISPLAY
Displays the playing status, time, etc.
or go back
| Front Panel Display
1.
2.
3.
Lights when a disc is loaded.
Lights in the record mode.
Lights to indicate the timer record mode.
4.
Lights when a DVD-RAM/DVD+RW/DVD:I:R
disc is loaded.
5.
Alpha/Numeric
6.
Lights in the progressive
English - 13
display.
scan mode.
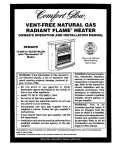
| Rear Panel
@
1.
DIGITALAUDIO
OUT(OPTICAL)
Connects to an amplifier having a digita! optica!
audio input jack.
2.
DiGiTAL AUDIO OUT (COAXIAL)
Connects to an amplifier having a digital coaxial
audio input jack.
3.
AVAUDIO
5.
COMPONENT VIDEO OUT (excellent video
quality)
Connects to equipment having Component
video input jacks.
7.
AV 1AUDIO
IN
Connects the output of external equipment
using audio cabtes
OUT
8.
Connects to the audio input of external
equipment using audio cables.
4.
6.
AV 1 VIDEO IN
Connects the output of external equipment
using a video cabie.
AV VIDEO OUT (good video quality)
Connects the input of external equipment
a Video cable.
using
AV S-VIDEO OUT (better video quality)
Connects the input of external equipment
an S-Video cable.
using
9.
AV 1 S-VIDEO iN
Connects the output of external equipment
using an S-Video cable.
10. HDMI OUT (best video
quality)
Connects the input of externa! equipment
a HDMI cable.
English - 14
using
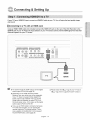
If your TVhas a HDMI/DVI input, connect an HDMI/DVI cable to your TV You will enjoy the best quality image
and sound.
| Connecting to a TV with an HDIVll Jack
Using an HDMI- HDMI cable (not included) connect
the HDMI OUT jack on the rear of the DVD Recorder
to the
HDMI IN jack of your TV Press the input selector on your TV remote control until the HDMI signal from the DVD
Recorder appears on your TV screen.
J
_z
ii_!i!
iii
To watch through the HDMI output, set the digital
audio output to PCM.(See page 30)
Depending on the HDMI device(TV/HDMI
Receiver) you use, audio may not be supported.
If your TV does not support Dolby digita!/DTS,
Audio output is not available when you set the
Digital output to Bitstream or select DTS On in
the Audio setup menu. In this case, set the digital
audio output to PCM or DTS Off.
If you use an HDMt cable to connect a Samsung
TV to the DVD recorder, you can operate the
recorder using the TV's remote control. (This is
only available with SAMSUNG TVs that support
Anynet+(HDMI-CEC).)
(See page 28)
English - 15
g Please check the _y,,,t ÷ logo (If your TV has an
._4_z,_r*logo, then it supports Anynet+ function.)
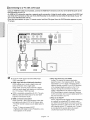
| Connecting to a TV with a DVl Jack
Using an HDMkDVI cable (not included),
connect the HDMI OUT terminal on the rear of the DVD Recorder to the
DVI iN terminal of your TV.
An HDMI to DVl connection requires a separate audio connection. Using the audio cables, connect the AUDIO (red
and white) OUT terminals on the rear of the DVD Recorder to the AUDIO (red and white) IN terminals of your TV.
Turn on the DVD Recorder and TV.
Press the input selector
TV screen.
on your TV remote
control until the DVl signal
from the DVD Recorder appears
on your
!
To set the HDMI output resotution(480p/720p/
1080i), see page 32.
HDMI (High Definition Multimedia
g Why does Samsung use HDMI?
Analog TVs require an analog video/audio
interface)
HDMI enables you to make a digital video and
audio connection with a single cable.
Using HDMI, the DVD player transmits a digital
video and audio signal and displays a vivid picture
on a TV having an HDMI input jack.
HDMI is completely compatible with DV!. The only
difference between HDMI and DVl is that HDMI
supports multi-channel
audio.
quality is degraded due to noise and signal loss.
HDMI technology is superior because it requires
no D/A conversion and is a pure digita! signa! from
the DVD recorder to your TV.
g What is the HDCP?
HDMI connection description
HDMI connector - Both uncompressed video data
and digital audio data (LPCM or Bit Stream data).
- The DVD recorder outputs a pure digita! signal to
the TV.
- If your TV does not support HDCP
(Highbandwidth Digital Content Protection),
noise appears on the screen.
signal.However, when playing a DVD, the data
transmitted to a TV is digital. Therefore either a
digital-to-analog converter (in the DVD Recorder)
or an analog-to-digital converter (in the TV) is
required. During this conversion, the picture
snow
English - 16
HDCP (High-bandwidth
Digital Content Protection)
is a system for protecting DVD content output
via HDMI from being copied, tt provides a secure
digital link between a video source (PC, DVD. etc)
and a display device (TV, projector, etc). Content
is encrypted at the source device to prevent
unauthorized copies from being made.
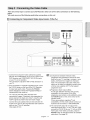
There are several ways to connect
your DVD Recorder. Select one of the video connections
pages.
You must use one of the following
audio/video
| Connecting to Component
connections
on this unit.
Video input Jacks (Y, PB,PR)
_
1. Connect the Component video cables(not supplied)
between the COMPONENT OUT(Y, PB,PR)jacks on the
DVD Recorder and COMPONENT IN(Y, PB,PR)jacks
on your TV (or AV amplifier).
This connection outputs the 480i or 480p resolution
your TV.
_
to
2. If the connected TV supports Progressive Scan, press
the RSCAN button on the front of the DVD Recorder
to enjoy best quality video. Pressing the P.SCAN
button alternately switches the Progressive(480p)
Intertace(480i) scan mode on.
or
* You witl enjoy the best quality accurate color
reproduction images. Component video separates the
picture element into black and white(Y), blue(PB) and
red(PR) signals to present ctear and dean images.
* Connect the audio cables(white
on the following
and red) between the
AUDIO OUT jacks on the DVD Recorder and AUDIO IN
jacks on your TV(or AV amplifier).
(See pages 20~22)
Compared
to standard interlaced video,
progressive scan doubles the amount of video
lines fed to your TV, resulting in a clearer, more
stable, and flicker free image than interlaced
video. The component output jack of the DVD
player can be used for progressive output mode,
which is only available with TVs that support
progressive scan.
Progressive Scan Output (480p).
Not all high definition television sets are fully
compatible with this product, tf the 480p
progressive scan picture is not satisfactory, press
the P.SCAN button on the unit to switch to the
Interlace mode.
If there are questions regarding TV set
compatibility with this modet, please contact our
customer service center at 1-8O0-SAMSUNG.
The Component jacks will not output video
resolutions above 480p. To view 720p and 1080i,
connect the DVD-R155 to your TV with an HDMIHDMI cable. With HDMI connected, press the
P.SCAN button to alternate between ait available
resolutions.
English - 17
Component
Cable
no_suo_Jeo=
(See page 32)
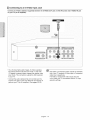
| Connecting to an S=Video input Jack
Connect an S-Video cable(not supplied)
on your TV (or AV amplifier),
between the S-VIDEO
OUT jack on DVD Recorder
and S-VIDEO iN jack
S-VIDEO
&.Video
Cable
_not
. You will enjoy high quality images. S-Video separates
the picture etement into black and white (Y) and color
(C) signals to present clearer images than regular video
input mode. This connection outputs the 480i resolution
to your TV.
. Connect the audio cables(white and red) between the
AUDIO OUT jacks on the DVD Recorder and AUDIO IN
jacks on your TV(or AV amplifier).
(See pages 20~22)
English - 18
SuDr31_ed_
g S-Video or Component video outputs are available
only if your TV supports S-Video input or Component
video input, respectively.
If S-Video or Component video output does not
work, check your TV connections
selection settings.
and the TV input
| Connecting to a Video input Jack
Connect a video(yellow) cable between the VIDEO(yellow)
on the TV (or AV amplifier).
--
AUDIO_
OUT jack on DVD Recorder
VIDEO
R
Red'Whir
__Yeilow
AudioNJdeo
Cable
* You will enjoy normal quality images. This connection
outputs the 480i resolution to your TV.
* Connect the audio cables(white and red) between the
AUDIO OUT jacks on the DVD Recorder and AUDIO IN
jacks on your TV(or AV amplifier). (See pages 20~22)
English - 19
end V/DEO(yellow)
IN jack
Select one of the Audio connections on the following pages.
| Connecting to your TV
This connection will use your TV's speakers.
Audio
Cab;e
Vhlte
_AUDIO
ir114r
Engiish - 20
Ow
VIDEO
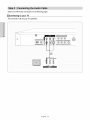
| Connecting to a Stereo Amplifier with Analog input Jacks
If your stereo amplifier
only has AUDIO INPUTjacks(L
and R), use the AUDIO OUT jacks.
_
--os
Audio
Cable
ANALOGAU_O
English - 21
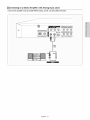
| Connecting to an AV Amplifier with a Digital input Jack
if your AV amplifier has e Dolby Digital or DTS decoder and e digital input jack, use this connection. To enjoy
Dolby Digital or DTS sound, you will need to set up the audio settings. (See page 30)
m
Optical Cable
(not suppled)
r-or--_
Coaxial Cable
(not suppled)
AVamplifier
3u_w0det
Cente_
/S ......
%
Manufactured under license from Dolby Laboratories.
"Dolby" and the double-D symbol are trademarks of
Dolby Laboratories.
', .............................................................................................................
English - 22
,,J
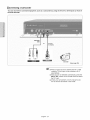
This allows you to connect your DVD Recorder
to other externa! devices and view or record their outputs.
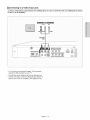
| Connecting a VCR, Set Top Box(STB) or DVD Player to the AV 1 IN or S-VIDEO IN jacks
Connect the VCR or external device to the AV 1 IN jacks of the DVD Recorder.
You can record from the connected equipment (VCR, STB or DVD Player).
m
Audio/Video
S-Video Cable
Cable
•_-_
(not supplied)
or _
VCR
STB
g The DVD-R155
does not have a TV tuner.
Recording TV broadcasts is possible via
Connection to Cable/Satellite boxes and Multi
Channel Video Services.
English - 23
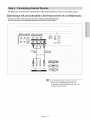
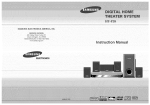
| Connecting a Camcorder
You can record from connected equipment,
the DVD Recorder.
such as a cemcorder
by using the AV 2 iN or DV IN jacks on front of
Audio/Video
Cable
DV Cable
R
"
VIDEO
is'"
_AU_O _
Camcorder
(See page 39)
_g
When an Input source is inserted into AV 2 while
watching TV, the input wilt be switched to AV 2
automatically.
g If the input is not selected automatically, press the
iNPUT SEL. button on the remote control to select
the DV Input.
g Check your camcorder's owner's manual to see
how to use the camcorder in this mode.
English - 24
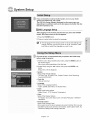
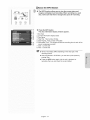
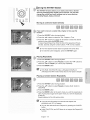
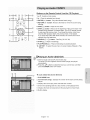
System Setup
If you connected an external Audio System, turn on your Audio
System and select AUX, CD or DVD.
The OSD (On-Screen Display) displayed on the screen may vary
depending on conditions such as the disc type and whether the disc
has been inserted or not.
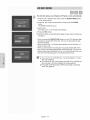
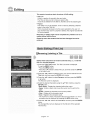
| OSD Language Setup
After piugging in the recorder, the first time you press the POWER
button, the screen shown to the left appears.
1. Press the POWER button.
2. Press a number button to select the language.
= If the language for the startup screen is not set, the settings may
change whenever you turn the power on or off. Therefore, make
sure that you select the language you want to use.
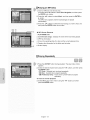
For ease of use, we recommend
before using the product.
that you perform
the initial setup
1. With the unit in Stop mode/No Disc mode, press the MENU button on
the remote control.
Menu items differ depending
on the disc type.
2. Select Setup using the A T buttons, then press the ENTER or
button.
Setup menu will be displayed.
, System
Setup of the General Options.
- CM Skip Time, EP Mode Time, Chapter Creator, Quick Recording,
Anynet+(HDMI-CEC)
• Clock Set
- Manual Clock Set
• Language
Setup of the Language Options.
-Audio, Subtitle, Disc Menu, On-Screen
Menu
.Audio
Setup of the Audio Options
- Digital Output,
DTS, Dynamic Compression
• Video
Setup of the Display Options.
- TV Aspect, Input Levet, Black Level, 3D Noise Reduction, HDMI/DVI
Resolution
- Parental Control
Setup of the Parental Levet
Attows users to set the level necessary to prevent children from viewing
unsuitable movies such as those with violence, adult subject matter, etc.
- Password, Rating Level,Change Password
English - 25
i iiiiiii;iiii_ii_i!_i
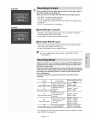
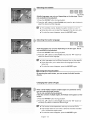
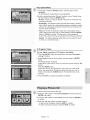
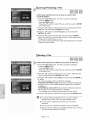
| ClVl Skip Time Setting
When a program recorded on a DVD-RAM, a DVD-RW, DVD-VlDEO or
a DVD-R is played, the unit can be set to automatically
akip a portion
of the program corresponding
to a CM(commercial)
Skip Time set by
the user.
1. With a disc inserted and the unit in Stop mode, press the MENU button
on the remote control.
2. Select Setup using the A T buttons, then press the ENTER or
button.
You can't use the Setup functions while playing a disc.
3. Select System
button.
using the ,&T buttons, then press the ENTER or
System menu will be displayed.
4. Select CM Skip Time using the A _' buttons, then press the ENTER or
button.
CM Skip Time will be displayed.
iiiiii%_i!iiiiiiiiiiiiiii_ii_ii!,!i_!!i_iii
5. Select the desired time using the A T buttons, then press the ENTER
or _- button.
iiiiiiiiiiiiiiiiiiiiiiiiiiiii!iiiii_iiii_iiiiili_i
6. If you press the CM SKIP button during playback, the section
corresponding to the set time is skipped, and then the next section is
played.
iiiiiiiiiiiiiiiiiiiiiiiiiiiiiiiiii i ! ! ! ;ii
g CM Skip can be performed
only during normal playback.
g When the time set is less than the remaining time of a current
title: The next title is played from the beginning.
g When the time set is less than the remaining
next scene is played.
time of a piaytist, the
g CM Skip does not work in still picture mode.
g When a set time is less than the remaining time of a scene, last
title, or last track that is currently displayed, a prohibition mark
appears.
g CM Skip releases Repeat (including Repeat A-B, Chapter, and Title).
g CM Skip may not operate with some DVD-Video discs.
g DVD+R/DVD+RW
English - 26
discs do not support this function.
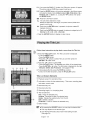
| EP Mode Time Setting
You can set the EP (Extended
Play) mode's
time to 6 or 8 hours.
1. With a disc inserted and the unit in Stop mode, press the MENU button
on the remote control.
2. Select Setup using the A v" buttons, then press the ENTER or
button.
You can't use the Setup functions while piaying a disc.
3, Select System
button.
using the A v buttons, then press the ENTER or
4, Select desired
or _ button.
option using the A _' buttons, then press the ENTER
EP Mode Time will be displayed.
5. Select the desired menu using the A T buttons, then press the ENTER
or _ button.
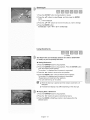
| Automatic
Chapter Creation
This function works
for DVD-RW (Video) and DVD-R discs only.
1. With a disc inserted and the unit in Stop mode, press the MENU button
on the remote control.
2. Select Setup using the & v buttons, then press the ENTER or
button.
You can't use the Setup functions while playing a disc.
3, Select System
button.
using the A v buttons, then press the ENTER or
System menu will be displayed.
4, Select Chapter
or _ button.
Creator
using the & T buttons, then press the ENTER
Chapter Creator items wilt be displayed.
5. Select On using the ,& T buttons, then press the ENTER button.
• Off : Select this option when you do not want to create chapters.
• On : Select this option when you want to create chapters.
g Set the chapter creator to on and then start recording. Stopping
the recording will automatically create a chapter menu.
g This function only works for normal recording.
- After the recording has begun, the "Do you want to create the
chapter menu after this recording?" message appears for 10
seconds. Select Yes or No.
- Selecting Yes will create a new chapter menu while selecting No
will not.
- A new chapter is created according to the selected recording
mode. A chapter will be about 5 minutes long in XP and SP, and
about 15 minutes long in LP and EP mode.
g To display the created chapters and finalize the disc, press the
DISC MENU button. The chapters menu appears.
g The Automatic
Chapter Creation function does not work during
Timer Recording or when you turn the power off.
English - 27
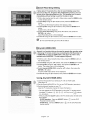
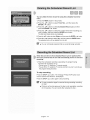
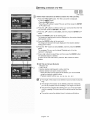
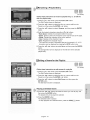
| Quick Recording Setting
It takes about 10 seconds for s disc to load (initialize) every time
you turn on the unit. To bypass this initialization process, you can
set the Quick Recording feature to On. This enab/es you to record
immediately without having to wait for the disc to load.
1. With a disc inserted and the unit in Stop mode, press the MENU button
on the remote control.
2. Select Setup using the A _' buttons, then press the ENTER or
button.
You can't use the Setup functions while playing a disc.
3, Select System using the A _' buttons, then press the ENTER or
button.
System menu will be displayed.
4, Select Quick Recording
using the A T buttons, then press the
ENTER or _ button.
Quick Recording menu witl be displayed.
5. Setect On using the A 'v buttons, then press the ENTER or _ button.
i iiiiiiiiii:i_ii_i!_i
g The Quick Recording
is set to Off as default.
iiiiii%_i!iiiiiiiiiiiiiii_ii_ii!,!i_!!i_iii
iiiiiiiiiii_X_i_i_i_ii.i_iii!_i!i!!,ii!
iiiiiiiiiiiiiiiiiiiiiiiiiiiii!iiiiiii_ii_iiiiilil
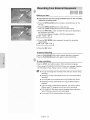
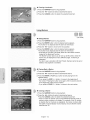
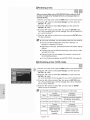
| Anynet+(HDMI-CEC)
iiiiiiiiiiiiiiiiiiiiiiiiiiiiiiiiii i ! ! ! ;ii
Anynet+ is a function that can be used to operate the recorder using
a Ssmsung TVremote control, by connecting the DVD Recorder to
a SAMSUNG TVusing an HDMI Cable. (see page 15) (This is only
available with SAMSUNG
TVs that support Anynet+.)
1. With the unit in Stop mode/No Disc mode, press the MENU button on
the remote control.
2. Select Setup using the A v buttons, then press the ENTER or _,, button.
3. Select System using the ,A T buttons, then press the ENTER or
button. The system menu will be displayed.
4. Setect Anynet+(HDMI-CEC)
ENTER or _. button.
Anynet+(HDMI-CEC)
using the A T buttons, then press the
items witl be displayed.
5. Setect On using the A 'v buttons, then press the ENTER or _ button.
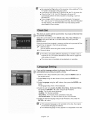
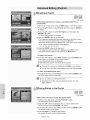
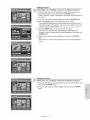
Using Anynet+(HDMl-CEC)
t. Connect the recorder to a Samsung TV with an HDMI cabte.
(See page 15)
2. Set the Anynet+(HDMI-CEC) to "On" on your DVD Recorder. (see above)
3. Set the Anynet+ function on your TV.
(See the TV instruction manual for more information.)
• You can operate the DVD Recorder by using the TV remote control.
(Available TV buttons: Q, _, O, (_, _
and _ _ buttons,
@ ~ G button)
• When you press the Anyaet+ button on the TV's remote control, the OSD to the
TV Menu
left will appear.
- DVDR Operation : Same as ANYKEY button ( _" ) on the DVD
Recorder remote control.
- DVDR Menu : Same as MENU button ( _ ) on the DVD Recorder
remote control.
English - 28
Bypressing
thePlaybutton
oftherecorder
while
watching
TV,the
TVscreen
willchange
totheptayscreen.
IfyouplayaDVD
when
theTVpower
isoff,theTVwiltpower
On.
IfyouturntheTVoff,theDVD
Recorder
willpower
off
automatically.(When
theDVD
recorder
isrecording,
itcan'tbe
powered
off.)
! Ifyouchange
HDMI
toother
sources(Composite,
Component,
RF...
etc)onyour
TVwhile
playing
aDVD
disc,theDVDRecorder
wiltstopplaying.
TheDVDRecorder
maykeep
playing
certain
discs
based
ontheircontent.
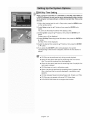
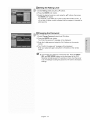
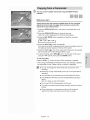
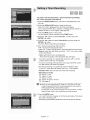
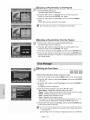
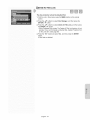
This menu is used to set the current time. You must set the time first
to use timer recording.
Select the current date and time (Month,
Day, Year, Hour, Minute and
AM/PM) using the A T _1 _ or number buttons and then press the
ENTER button.
When the current time is stored in memory and the set is powered off, the
current time will appear in the front panel display.
A _' : Sets the value
You can set the value using the number (0~9) buttons.
_, : Moves to items
_ The Menus are slightly different depending on whether
a disc is
inserted or not. The menus described on the next few pages are
with no disc in the unit.
g The menus are not available during playback or recording.
If you set the language
' automatically
options in advance,
they will come up
every time you watch a movie.
1. With the unit in Stop mode/No
the remote control.
Disc mode, press the MENU button on
2. Select Setup using the A T buttons, then press the ENTER or
button.
3. Select Language
button.
using the A v" buttons, then press the ENTER or
The language setup menu will be displayed.
4. Select the sub menu(Audio,
Subtitle, Disc Menu, On-Screen
and press the ENTER or !_ button using the A T buttons.
Menu)
• Audio : For the disc audio language.
• Subtitle : For the disc subtitles.
• Disc Menu : For the disc menu contained on the disc.
• On-Screen
Menu : For the unit menu of your DVD recorder.
5. Select the desired language using the A T buttons, then press the
ENTER or _ button.
m If the selected language is not recorded on the disc, the original
pre-recorded
language is selected.
m The selected language will only appear if it is supported on the disc.
English - 29
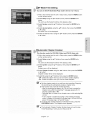
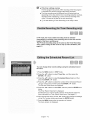
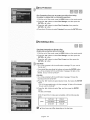
You can connect the DVD-Rf55
' Home Theater system.
to an external
audio amplifier or a
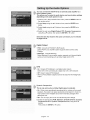
This allows you to setup the audio device and sound status settings
depending on the audio system in use.
1. With the unit in Stop mode/No Disc mode, press the MENU button on
the remote control.
2. Setect Setup using the ,& v buttons, then press the ENTER or
button.
3. Select Audio
button.
using the A T buttons, then press the ENTER or m,,
4. Select the sub menu(Digital
Output, DTS, Dynamic Compression)
using the ,& T buttons, then press the ENTER or m,,button.
Select the item that matches
on pages 20-22.
the audio connection
you've
selected
i iiiiiiiiiii_ii_i!_i
iiiiii%_i!iiiiiiiiiiiiiii_ii_ii!,!i_!!i_iii
iiiiiiiiiiiiiiiiiiiiiiiiiiiii!iiiii_iiii_iiiiili_i
iiiiiiiiiiiiiiiiiiiiiiiiiiiiiiiiii i ! ! ! ;ii
Digital Output
• PCM : Converts to PCM(2CH) 48kHz audio.
Select PCM if your amplifier system supports stereo and/or Dolby
Protogic.
• Bitstream : Outputs Bitstream.
Select Bitstream if your amplifier system supports multi channet digitat
audio surround decoding such as Dotby Digita! and/or DTS.
DT8
• On : Outputs DTS bitstream. (via Digitat Audio Output)
Select DTS when connecting to a digital amp with a DTS decoder.
• Off : Doesn't output DTS bitstream.
• When a DTS soundtrack is played, sound is not output from the Analog Audio
Output.
Dynamic Compression
This is only active when a Dolby Digital signal is detected.
• On : When movie soundtracks are played at low volume or from small
speakers, the system can apply appropriate compression to make lowtevel content more intelligible
getting too toud.
and prevent dramatic passages
from
• Off : You can enjoy the movie with standard Dynamic Range.
5. Select the desired item(PCM, Bitstream, DTS=Off, DTS-On, Dynamic
Compression=Off
or Dynamic Compression-On)
using the A _'
buttons
Then press the ENTER or m,,button.
English - 30
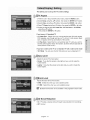
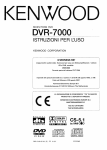
This allows you to set up the TV screen settings.
| TV Aspect
1. With the unit in Stop mode/No Disc mode, press the MENU button.
2. Select Setup using the J, T buttons, then press the ENTER or D,, button.
3. Select Video using the A v' buttons, then press the ENTER or _- button.
4. Select TV Aspect using the A v' buttons, then press the ENTER or _. button.
5. Select the desired item(4:3 Letter Box, 4:3 Pan-Scan
using the ,& T buttons.
Then press the ENTER or _ button.
If you have a 4:3 standard
or 16:9 Wide)
TV
• 4:3 Letter Box : Select when you want to see the total 16:9 ratio screen
DVD supplies, even though you have a TV with a 4:3 ratio screen. Black
bars wilt appear at the top and bottom of the screen.
• 4:3 Pan-Scan : Select this for a conventional size TV when you want to
see the central portion of the 16:9 screen. (Extreme left and right side of
movie picture will be cut off.)
If you have a wide screen TV or 4:3 standard TV with a wide-screen mode
• 16:9 Wide : You can view the full 16:9 picture on your widescreen
TV.
,| Input Level
Adjusts the level of the input signal.
• Darker : If you feel the screen is too light and you want to make the
screen darker.
• Lighter : If you feet the screen is too dark and you want to make the
screen lighter.
| Black Level
Adjusts the black level of the screen.
• 0 IRE : Select this when you want a darker screen.
• 7.5 iRE : Select this when you want a lighter screen.
m Black level function
is not available in the progressive
scan mode.
| 3D Noise Reduction
• On : Provides a cleaner picture through noise reduction (for recording).
• Off : Normal
English - 31
i iiiiiii;illi_ii_i!_i
| HDIVlI/DVI Resolution
This setting is used when the unit is connected
Display devices (TV, projector,
etc).
by HDMI or DVI to
• 480p : 720 x 480
• 720p : 1280 x 720
,, 1080i : 1920 x 1080
• Connect the DVD-R155
to HDMI or DVI.
to your TV via HDMI or DVI. Set your TV's input
Press the P.SCAN button while the unit is in stop mode to select the
output resolution.
- If your TV is connected the HDMI or DVt cable, the output resolution
mode changes in the following sequence each time you press the
P.SCAN button:
[-Y480p --> 720p -> 1O8Oi. 7
- If the DVD Recorder
is connected
to your TV with Component
cables(no HDMI/DVl cable connected),
toggles between 480p/480i.
the output resolution
mode
iiiiii%_i!iiiiiiiiiiiiiii_ii_ii!,!i_!!i_iii
iiiiiiiiiiiiiiiiiiiiiiiiiiiii!iiiiiii_ii_iiiiilil
iiiiiiiiiiiiiiiiiiiiiiiiiiiiiiiiii i ! ! ! ;ii
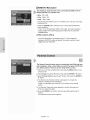
The Parental Control function works in conjunction
with DVDs that have
been assigned a rating - which helps you control the types of DVDs that
your family watches.
There are up to 8 rating levels on a disc.
1. With the unit in Stop mode/No Disc mode, press the MENU button on the
remote controI.
2. Select Setup using the A V buttons, then press the ENTER or !_ button.
3. Select Parental Control
button.
using the A V buttons, then press the ENTER or
4. The first time the Parental Control is accessed, the 'Create the
Password' message will be displayed.
Create a 4-digit password using the 0 to 9 buttons on the remote
control.
5. The Re-enter Password screen appears to confirm the password.
Enter your password again.
6. Press the ENTER or _ button, and then select On using the ,A '_'
buttons.
The Parenta! Control screen appears.
English - 32
| Setting the Rating Level
t. Select Rating Level using the ,L T buttons.
2. Press the ENTER or _* button.
3. Select the desired Level you want using the A _ buttons, then press
the ENTER or _ button.
For example, if you select up to Levet 6, discs that contain Level 7, 8
will not play. A higher number indicates that the program is intended for
adult use only.
| Changing the Password
1. Setect Change
Password
using the A _' buttons.
2. Press the ENTER or _ button.
The "Enter the password" message wilt be displayed.
3. Enter the 4-digit password
control.
using the 0 to 9 buttons on the remote
4. The "Confirm the password" message will be displayed.
Enter your password again using the 0 to 9 buttons on the remote
control.
g If you forgot your password,
remove the disc. Press the INPUT
SEL. and REC MODE buttons on the front panel of the DVD
Recorder simultaneously for 5 seconds or more when the power
is on. All settings including the password wilt revert to the factory
settings.
English - 33
This section explains various DVD recording methods.
This unit can record on various types of discs. Before recording,
read the following instructions
and select the disc type according
your preference.
to
This recorder can record on the following discs.
DVD-RAM
RAM
• DVD-RWs and DVD-RAMs
• DVD-Rs are non-rewritable
DVD-RW
DVD-R
RW
R
are rewritable.
| Compatibility
betweenSamsungandOthermanufacturer's
Recorders
Disc
Recording
Recording
Types
format
Device
DVDRAM
VRMode
Samsung
Other Company
Samsung
VR Mode
Other Company
DVD-RW
Samsung
V Mode
Other Company
Samsung
DVD-R
VMode
Other Company
Finalizing
X
Additional
Recording
in
Samsung Recorder
Recordable
X
Recordable
finalized
Not recordable
not finalized
Recordable
finalized
Not recordabte
not finalizea
Recordabte
finalized
Not recordabte
not finalizea
Recordabte
finalized
Not recordable
not finalizea
Not recordabte
finalized
Not recordabte
not finalizea
Recordabte
finalized
Not recordabte
not finalizea
Not recordable
g Finalize
- This closes the DVD-R/-RW
done.
and no additional
recording can be
g Unfinatize
- This allows additional recording on a DVD-RW disc originally
recorded on the DVD-R155.
- A DVD-RW disc that has been recorded by DAO(Disc At once) in
a PC cannot be unfinalized.
- A DVD-RW disc that has been recorded in Video Mode of
another manufacturer's recorder cannot be unfinalized.
- A DVD-R disc cannot be unfinatized.
English - 34
DVD-RAM
iil;ii
Since available functions
differ depending
on the disc type, select s
disc that best fits your preferences.
When you insert an unused disc, the following message
appears.
• DVD-RAM : Use after formatting the disc.
• DVD-RW : Use after initializing the disc.
You can change the mode of DVD-RW disc. Refer to Formatting
a Disc
on page 65.
• DVD-R : Formatting disc is unnecessary.
DVD-RW
| DVD-RW(Video mode)/-R
• Chapters will be created automatically when you finalize recording on
DVD-R/DVD-RW discs in Video mode.
• Simple editing (erasing titles/changing
title name).
| DVD-RAM/-RW(VR mode)
• This mode involves multiple editing functions (such as deletion of the
whole title, partial deletion of a title, etc.).
• Various editing options using a created Playlist.
• You can initialize discs automatically using EZ REC MODE.
(See page 44)
Select one of four record modes by pressing the REC MODE button
repeatedly for the desired recording time and picture quality while
the unit is in Stop mode.
in general, picture quality improves as the recording time decreases.
In FR mode, the most suitable record mode is selected automatically
according to the remaining time on the disc and the length of the
timer recording set.
You can select only one mode from XP, SP, LP and EP for timer
recording.
Mode
Characteristic
XP
(high quality mode)
Select when the video
quality is important,
Select to record in
standard
SP
Recording Times Data
Rates
(standard quality mode) quality,
LP
(tong recording mode)
EP
(extended mode)
FR
(Flexible Recording)
Approx. 2 hours
about 4 Mbps
Select when a long
recording time is
required,
Approx. 4 hours
about 2 Mbps
Select when a longer
recording time is
required,
Approx. 6
about 1.2
Approx. 8
about 0.8
For timer recording
only see page 42.
Approx 1 to 8 hours
Approx 0.8 to 8Mbps
• The dual layer DVD-Rs have approximately
layer DVD-Rs. (See page 45.)
English - 35
Approx. 1 hour
about 8 Mbps
hours/
Mbps
hours/
Mbps
double the capacity of single
Videos with copy protection cannot be recorded on this DVD
Recorder. When the DVD Recorder receives a copy guard signal
while recording, recording stops and the following message appears
on the screen.
Concerning Copy Control Signals
TV broadcasts that contain copy control signals may have one of the
following three signal types, COPY-Free, Copy-Once and Copy-Never.
If
you want to record a copy-once type program, use a DVD-RW disc with
CPRM in VR Mode. You can also use DVD-RAM discs.
( 'O' : supported,
'-' : not supported
DVD-RAM
(Ver.2.0)
)
Copy-Free
Copy-Once
O
O*
DVD-RW (Ver. 1.1 )
DVD-RW (Ver. 1.1)
with CPRM
VR mode
O
DVD-R
O
O
Copy-Never
O*
When a "Copy Once" recording has been made, recording cannot be
done anymore.
*compatible
with CPRM.
•
Protection
Content
for Recordable
Media (CPRM)
CPRM is a mechanism that ties a recording to the media on which it is
recorded. It is supported by some DVD recorders, but not by many DVD
players. Each blank recordable DVD has a unique 64-bit media ID etched
in the BCA(Burst Cutting Area). When protected content is recorded onto
the disc, it can be encrypted with a 56-bit C2 (Cryptomeria) cipher derived
from the media ID.
During playback, the ID is read from the BCA and used to generate a key to
decrypt the contents of the disc. If the contents of the disc are copied to other
media, the tD will be absent or wrong and the data will not be decryptable.
English - 36
| About the INFO Button
•
_FLFC_
NFO
NPUT
The INFO function allows
you to view the current status
and
SEL
progress of playback and recording.
When recording on a used
disc, make sure that there is enough disc space for recording.
o i°® 0
© @ ®
®
•
Press
the INFO button.
The disc information
-C
-@
-@
-@
display
window appears.
1 .Disc Type
2. Current information display status
3. Disc Name
4. Total Title : Total number of titles
5. Total Playlist : Total number of Playlists
6. Recordable Time : The longest continuous
record modes(approximate)
7. Date : Current date
recording time in each of the
8. Time : Current time
g Items in the display differ depending
on the disc type or the
recording format.
g With DVD-RAMs or DVD-RWs, you can free up disc space by
erasing titles.
g Press the INFO button again with the unit in playback or
recording, then you can check the current status.
English - 37
iiiiiiiiiiiiiii;iiii!_;ii:ii:i!!!i!i!i_iii:iil;
Before you start
•
Check that the disc has enough available
Adjust the recording mode.
1. Press the OPEN/CLOSE
disc tray.
button and place a recordable
disc on the
2. Press the OPEN/CLOSE button to close disc tray.
Wait until "LOAD" disappears from the front panel display
3. Press the INPUT SEL. button to select the input source according to
the connection you made.
The front panel display changes in the following sequence:
AV1 -->AV2 --> DV ]
4. Press the REC MODE button repeatedly, to select the recording
speed(quality).
sP÷ Lp-,EP-,XP
l
5. Press the REC button.
To pause recording
Press the PLAY/PAUSE (O) button to pause recording in progress.
Press the PLAY/PAUSE (Q) button again to resume recording.
iiiili_i_i_i_i_i_i_!_i!i!i!i!i!i!i!iiii_iiiiiii!!ii'
iiiiiiiiiiiiiiiii!!i!_i_iiiiiiii
space for the recording.
To
stop recording
Press the STOP ((_)
button to stop or finish recording in progress.
• When using DVD-RAM/DVD-RW/DVD-R
the information
discs, the message
'Updating
of disc. Please wait for a moment.' is displayed.
g You can not change the recording mode and input source during
recording.
g Recording
recording.
wilt stop automatically
if there is no free space left for
g Up to 99 titles can be recorded onto a DVD-RAM/-RW/-R
g Recording
selected.
wilt stop automatically
disc.
if a copy protected image is
g If you are using a Cabie Box(no antenna), you cannot watch a
different cable TV program from the one you're recording.
g DVD-RAM/DVD-RW
discs must be formatted before starting to
record. Most new discs are sold unformatted.
g Do not use DVD-R authoring discs with this unit.
English - 38
You may control a Digital Camcorder using the IEEE1394 (DV)
interface.
Before you start
Check that the disc has enough available space for the recording.
Adjust the record mode. See page 24 to see how to connect the
camcorder to your DVD recorder.
1. Press the OPEN/CLOSE
disc tray.
button, and ptace a recordable disc on the
2. Press the OPEN/CLOSE
button to close the disc tray.
Wait until "LOAD" disappears from the front panel disptay.
3. Press the RED MODE button repeatedly
speed(quality).
to setect the recording
_SP÷LP÷EP->XP_
4. Press the iNPUT SEL. button to select DV.
If the input is set to DV, a playback/record menu that enables control of
the digital camcorder appears on the top of the screen.
5. Select the PLAY ( _ ) icon on the upper part of the screen to ptayback
the camcorder and find the starting position to copy.
6. To start recording, select REC(_)
icon in the top side of the screen
using the ,,q _ buttons, then press the ENTER button.
To stop recording
Press the STOP ( Q ) button to stop or finish recording in progress.
• When using DVD-RAM/DVD-RW/DVD-R
discs, the message 'Updating
the information of disc. Please wait for a moment' is displayed.
g You can not change the record mode and input source while
recording.
g Recording
wilt stop automatically
if there is no free space left for
recording.
g Up to 99 titles can be recorded onto a DVD-RAM/-RW/-R
disc.
g DVD-RAM/DVD-RW
discs must be formatted before starting to
record.
Most new discs are sold unformatted.
g Do not use DVD-R authoring discs with this unit.
g To access on-screen controls during recording, press the _ or m,,
buttons.
g When copying from a camcorder
and the end of the tape is
reached (no Video), the screen may turn blue or purple.
Engtish - 39
iiiiiiiiiiiiiii;iiii!_;ii:ii:i!!!i!i!i_iii:iil;
You can set the DVD Recorder to record in preset
pressing the REC button repeatedly.
increments
by
1. If you want to record from a connected external component, press the
iNPUT SEL. button to setect an appropriate external input(AV1, AV 2 or
DV).
2. Press the REO button to start recording.
3, Press the REO button to adjust the recording time.
__0:30
÷ 1:00 ÷ 1:30 ÷ 2:00 -> 3:00 -> 4:00 -> off=-=
J
m The timer counter decreases
to 0:00, then the DVD Recorder
stops recording.
After finishing recording, the DVD Recorder will turn off
automatically.
To stop recording
Press the STOP((_) button. The message "Press STOP button once
more to cancel Timer Record." is displayed.
Press the STOP( Q ) button again to stop recording.
iiiiiiiiiiiiiiiii!!i!_i_iiiiiiii
English - 40
You need to set the Clock (Setup - Clock Set) before proceeding
with a timer recording. (See page 29)
1. Press the OPEN/CLOSE
disc tray.
button, and place a recordable disc on the
2. Press the OPEN/CLOSE button to close the disc tray.
Wait until "LOAD" disappears from the front panel display.
If an unused DVD-RW disc is inserted, a message asking whether to
initialize the disc or not will appear. (See page 35)
3, Press the MENU button in Stop mode.
You can also set a timer recording via the TIMER button.
4, Press the A T buttons to select Timer
ENTER or _ button.
Rec., and then press the
5. Press the A T buttons to select Timer
ENTER or m,,button.
Record,
and then press the
The Timer Record Input items are displayed.
6. Fill in the items using the A T _1 _ buttons.
4 _ : Moves to the previous/next item,
,_ Tor 0~9 : To set or change items in the Scheduled Record List Menu.
,, Source: Select the video input source (AV 1, AV 2) you want to make
a timer recording of.
,, Date: Date that the timer recording starts
- There are three options when setting the date. see below:
OtTo make a recording on a specific date, press the A T or number
buttons until the date you want appears.
(bTo make a recording at the same time every day (MON-FRt),
the _, T buttons until MON-FRI appears.
G_Tomake a recording on a specific day of the week(Every
Every SAT), press the A T buttons until Sun's....Sat's
press
SUN -
appears.
,, Start/End Time: Start and end time of the timer recording
,, Mode (Record mode)
XP : Approx. 1 hour
SP : Approx. 2 hours
LP : Approx. 4 hours
EP : Approx. 6 hours or 8 hours
FR : See page 42.
g When you are recording at EP mode on a DVD-RW(V)/-R
disc,
it may not record the full 6 or 8 hours because the unit uses the
VBR(Variable Bit Rate) ENCODING system.
For example, if you record a Program with a tot of action, it uses a
higher bit rate which in turn consumes more disc memory.
ii'
7. Press the ENTER button.
• ( Q ) and Timer Set will appear on the front panel display. This means
that a timer recording is set.
• Recording is automatically performed when the set time is reached.
English - 41
= If the
timer settings
overlap
The first program has priority. After recording of the first program
is complete, the second program starts being recorded.
= The timer recording may be different from the actual set time
depending on the disc and the timer recording status(for example,
recording times overlapping, or if the previous recording ends
within 3 minutes of the start of the next recording.).
Qwitl
start blinking if Timer Recording
is not ready to start.
In FR mode, the most suitable recording mode is selected
automatically, according to the remaining time on the disc and the
length of the timer recording set.
The FR mode recording setup is the same as the Timer Recording
setup. When setting the Rec mode in step 6, select FR Mode. (See
page 41)
You can change timer record settings using the scheduled record
list menu.
1. Press the MENU button in STOP mode.
2. Press the ,A T buttons to select Timer
ENTER or _ button.
Rec., and then press the
3, Press the A T buttons to select Scheduled
press the ENTER or _ button.
Record
List, and then
4, Press the A T buttons to select the number of the Scheduled
Record
List you want to edit, and then press the ENTER or _ button.
The Edit and Delete items are displayed.
5. Press the A V buttons to select Edit, and then press the ENTER or
button.
The Timer Record input item is displayed.
Edit the items you want to modify. See the Timer Record section for
more information
on Timer Record input items. (See page 41 )
6. Move through the items with the _1 !_ buttons and change the settings
with A V or number buttons and press the ENTER button.
7, Press the MENU button after the operation is finished.
The menu screen wilt disappear.
i I
!
iiii
_i_i i il iii
!_i ii
iiiiiiiiiiiiiiiiiiiiiiiiiiiiiiiiiiiiii
i
_
English - 42
You can delete the timer record
menu.
list using the scheduled record
list
1. Press the MENU button in Stop mode.
2. Press the A _' buttons to select Timer
ENTER or I_ button.
Rea., and then press the
3, Press the A T buttons to select Scheduled
Record
List, and then
press the ENTER or _ button.
4, Press the A T buttons to select the number of the timer recording you
want to delete, and then press the ENTER or _ button.
The Edit and Delete items are displayed.
5. Press the • '_ buttons to select Delete, and then press the ENTER or _ button.
6, Press the 4 I_ buttons to select Yes, and then press the ENTER button.
The selected entry wilt be deleted from the list.
• You can not delete programs that are currently being recorded.
When the start time in the Scheduled
' the unit is powered
Record
List is reached
off, the unit will automatically
while
power on and start
recording.
1. When the scheduled recording is operating, the program being
recorded will not disptay on TV.
• Power on the TV using the TV remote control.
• Power off the TV using the TV remote control if you don't want to see
the program being recorded.
To
stop recording
Press the STOP ( Q ) button. The message "Press STOP button once
more to cancel Timer Record." is displayed.
Press the STOP ( Q ) button again to stop recording.
g If a copy protection signal is received during recording,
recording
will stop.
g If there is no free disc space or the disc is not recordable, recording
will not operate. (You can record after replacing the disc.)
English - 43
iiiiiiiiiiiiiii;iiii!_;ii:ii:i!!!i!i!i_iii:iil;
iiiili_i_i_i_i_i_i_!_i!i!i!i!i!i!i!iiii_iiii:ii!ii'
iiiiiiiiiiii!i!i!ii!!i!_i_iiiiiiii
/_
This function sl/ows you initialize
_
and Finalize a disc automatically.
1. With the unit in Stop/No Disc mode, press the EZ RED MODE button
on the remote control.
2. Press the ,,q _ buttons to select On, and then press the ENTER
button.
The EZ REC MODE is set up.
3. Insert a disc.
If the disc is new, it will initialize automatica!ly.
4. Press the REC button.
5. EZ REC MODE wilt Automatically
conditions.
Finalize the disc under the following
- When you press the OPEN/CLOSE button on your DVD Recorder after
recording on at least 30% of the disc. The tray will open after the disc
has been finalized.
- When the disc is full, it wilt finalize automatically and the Recorder will
remain in stop mode.
- When you make a timer recording and it occupies at least 30% of the
disc, the disc witt finalize automatically and the Recorder wilt power off.
Please note that auto finalization witl not work if the Recorder has more
than one Timer Recording
set in the Scheduled
Record List.
g If you insert a new DVD-RW disc, it will be formatted
in V mode
after auto initializing.
g If you select off, you must initialize (see page 35) and finalize the
disc manually in the Disc Manager menu.(see page 66)
g The length of the Recording is different according to recording
mode. (see page 35)
English - 44
Playback
This section introduces
playback
Read the following
(_
basic playback
functions
end
by disc type.
information
before playing
e disc.
Disc
Types
Disc
Logo
Max. Playing Time
Singlesided(5")
240min
DVD- _
VIDEO
Doublesided(5")
480min
VIDEO _
AUDIO
Singlesided(3.5")
80min
Doublesided(3.5")
160min
Singlesided(5")
74min
Singlesided(3.5")
20min
coded
Both the
by DVD
region.
recorder
These and
regional
the discs
codesaremust
match in order for the disc to play. If the codes
AUDIO
do not match, the disc will not play. The Region
Number for this recorder is described on the
JPEG
rear panel of the recorder.
Recorded
content Disc Shape
MP3
JPEG
Singlesided(5")
Images
Singlesided(3.5")
MP3
Singlesided(5")
Audio
Singlesided(3.5")
lhr (XP:Excellent
Quality)
Singlesided(5") 2hrs(SP:StandardQualit
(4.7GB)
4hrs(LP:LongPlayback)
13Dr -c
D I G I T A L
Dolby Digital
DVD- _
RAM
.._
6or 8hrs(EP:Extended)
VIDEO
AUDIO
2hr(XP:Excellent
Quality)
Double
DigitalOut
aided(5")
(9.4GB)
DTS
4hrs(SP:StandardQualit
8hrs(LP:LongPlayback)
12or 16hrs(EP:Extended)
DIGITAL
SOUND
DigitalAudio
l hr(XP:ExcellentQuality)
STEREO
Stereo
DVD-RW
VIDEO
AUDIO
5" (4.7GB)
2hrs(SP:StandardQualit
4hrs(LP:LongPlayback)
6 or 8hrs(EP:Extended)
["Tscl
NTSCbroadcastsystem
inU.S.A,Canada,Korea,
Japan,etc.
l hr(XP:ExcellentQuality)
Single
Layer(5")
(4.7GB)
MP3
DVD-R
VIDEO
AUDIO
2hrs(SP:StandardQualit
4hrs(LP:LongPlayback)
6 or 8hrs(EP:Extended)
2hr(XP:ExcellentQuality)
Dual
Layer(5")
(8.5GB)
4hrs(SP:StandardQualit
8hrs(LP:LongPlayback)
11or 15hrs(EP:Extended)
l hr(XP:ExcellentQuality)
DVD+RW
_
VIDEO
.................
AUDIO
2hrs(SP:StandardQualit
5" (4.7GB) 4hrs(LP:LongPlayback)
6 or 8hrs(EP:Extended)
lhr (XP:Excellent
Quality)
Single
Layer(5")
(4.7GB)
DVD+R_
.....
2hrs(SP:StandardQualit
4hrs(LP:LongPlayback)
6 or 8hrs(EP:Extended)
VIDEO
AUDIO
2hr(XP:Excellent
Quality)
Dual
Layer(5")
(8.5GB)
4hrs(SP:StandardQualit
8hrs(LP:LongPlayback)
11or 15hrs(EP:Extended)
English - 45
| Discs That Cannot be Played
- DVD-Video with a region number other than "1" or "ALL"
• 5" 2.6 GB and 5.2 GB DVD-RAM
- 3.9 GB DVD-R Disc for Authoring.
• A DVD+R/DVD-RW(V)
disc which has been recorded and not finalized in
a different manufacturer's recorder.
• PALdiscs
• DVD-ROM/PD/MV-Disc,
etc.
• Video CD/CVD/SVCD/CD-ROM/CDV/CD-G/CDd
• MPEG4 Discs.
m This DVD recorder can only operate with discs that are compatible
with DVD-RAM Standard Version 2.0.
Playback and/or recording may not work for some types of discs,
or when specific operations, such as angle change and aspect
ratio adjustment, are being performed. Information about the discs
is written in detail on the box. Please refer to this if necessary.
Do not allow the disc to become dirty or scratched.
Fingerprints, dirt,dust,scratches or deposits of cigarette smoke on the
recording surface may make it impossible to use the disc for recording.
DVD-RAM/+RW/+R discs may not be able to play on some DVD players,
depending on the player, disc and the condition of the recording.
g Discs with PAL programs
on using this product.
1. Press the OPEN/CLOSE
recorded on them can not be recorded
button.
The tray opens.
2. Place a disc gently into the tray with the disc's label facing up.
For DVD-RAM discs, insert the printed side facing up.
3, Press the OPEN/CLOSE
button to close the disc tray.
• Your DVD Recorder closes the disc tray and loads the disc automatically.
• When the recorder is powered on and a disc is in the tray, the unit will
be activated and wait in Stop mode.
• Press the PLAY((_)
button to start playback.
• When the unit is powered off and there is a disc in the unit, pressing
the PLAY( O ) button wilt power on the unit and play the disc
automatically.
4. Press the STOP((_)
button to stop playback.
g When you stop playing the disc, the recorder remembers where you
stopped. When you press the PLAY button again, it will pick up where
you left off. (Unless the disc is removed, the recorder is unplugged, or if
you do not press the STOP button twice.) This function is only applicable
to DVD-VlDEO, DVD-RAM, DVD+RW, DVD+R or audio CDs (CD-DA).
g Do not move your DVD recorder while playing, as this may cause
damage to the disc.
g Make sure to press the OPEN/CLOSE button to open or close the disc tray.
g Do not push the disc tray while it is being opened or closed, as
this may cause a product malfunction.
g Do not place foreign materials on or in the disc tray.
g Some functions may perform differently or be disabled depending on the
disc type. tf this occurs, refer to the instructions written on the disc case.
g Be especially careful that children's fingers are not caught
between the disc tray and the tray chassis when it closes.
g You must only insert one DVD disc at a time. Inserting two or more discs
will not allow playback and may cause damage to the DVD player.
English - 46
| Using the Disc Menu & Title Menu
Some discs contain a dedicated menu system that allow you to
select special functions for the title, such as chapters, audio track,
subtitles, film previews, information on characters, etc.
For DVD-VIDEO Discs
Disc Menu : Press the DiSC MENU button to enter the disc's menu.
• Move to the setup menu related to the playback operation.
• You can select the audio language and the subtitles provided by the disc.
Title Menu : Press the TITLE MENU button to move to the title menu of
the disc.
• Use this button if the disc contains more than one title. Some types of
discs may not support the title menu function.
For DVD-RAM/DVD+RW/=+R Discs
Title List : Press the TITLE LIST button. The Title List is simply a list of
titles on a disc. If a title is deleted, that title cannot be played
again.
PLAY LiST : Press the PLAY LiST button. A playlist is a custom-made list
of titles. When one playlist is played, only the titles within the
playlist wilt play and then stop. Even if that playlist is deleted,
the original recording will not be deleted. (only VR mode)
| Using the Playback Related Buttons
Searching through a Chapter or Track
®®®@
®®@®
DVD-VIDEO/
DVD-RAM/
DVD+RW/DVD±R
Fast
_-_ Fast
Fast
_¢- Fast
1(X
3(X
5(X
1(X
2) -> _,_ Fast 2(X 4) ->
8) -.-> M,. Fast 4(X16) -.->
32) --->_ Fast 6(X128) --->
2)
AUDIO CD
_
(CDDA)
_,- Fast x8 -> _-Fast
Fast x2 --> _-_ Fast x4 -->
During playback, press the SEARCH(
control.
(_ (_)
x2
button on the remote
• You can scan the program in reverse.
• Press and hold the SEARCH( _ (_)) button, playback is done at the
default speed of fast 2.
• tf you release the SEARCH( _ (_) button, playback is performed at a
normal speed.(Except CD-DA)
• To return to normal playback speed, press the PLAY((_)
button.
English - 47
g Nosound
isheard
during
Scan(Search)
mode
except
fast
playback
(1.7X
speed)
mode.
g ForCD(CD-DA),
Youcanhear
sound
during
Scan
mode.
g Thespeed
marked
while
scanning
maybedifferent
fromthe
actual
playback
speed.
Searching Chapters or Tracks
During playback, press the SKIP( Q (_)
button on the remote control.
• tf you press the SKIP( _ ) button, it moves to the beginning of the
chapter or track or marker (DVD-RAM,DVD-RW(VR
mode).)
Pressing the button once again within 3 seconds returns to the
beginning of the previous chapter or track or marker (DVD-RAM,
DVD-RW(VR mode).)
• tf you press the SKIP( _ ) button, it moves to the next chapter or title or
marker (DVD-RAM,DVD-RW
(VR mode).)
| Slow Motion Play
In Pause mode, press the SEARCH((_)
button on the remote control.
,, if you press the SEARCH((_)
button,
pIIl_ Slow 1 ..->II_ Slow 2 --> II1_Slow 3
q
[
• if you press the SEARCH( _ ) button,
[_ll
Slow 1 --> 41 Slow 2 --> _qSIow 3 ---]
- Press and hold the SEARCH( _ ) button during pause, and the disc
will play slowly at a 1/2 speed. If the button is released, the pause
operation will resume.
• To return to normal speed playback,
press the PLAY((_)
button.
g The speed marked in this function may be different from the
actual playback speed.
| Step Motion Play
Press the STEP( @ @ ) button on the remote control in still mode.
• Each time the button is pressed, a new frame will appear.
If you press the STEP( G ) button, the previous frame will be activated.
If you press the STEP( Q ) button,
• To return to normal speed playback,
English - 48
the next frame will be activated.
press the PLAY( G ) button.
| Using the ANYKEY Button
The ANYKEY
function allows
you to easily search for a desired
scene by accessing title, chapter, track, and time. You can also
change the subtide and audio settings and set some features
including Repeat, Angle, and Zoom.
Moving to a Desired Scene Directly
If you want to move to e certain
function.
1. Press the ANYKEY
title, chapter
or time use this
button during playback.
2. Press the A T buttons to select the Title, Chapter or Time.
3, Press the _ _ buttons or number (0~9) buttons to select the desired
scene and then press the ENTER button.
In case of searching a time, Enter the time in the sequence of hours,
minutes, seconds using the number buttons. 4 m,,are not available.
g The Time Search function does not operate with some discs.
g To make the screen disappear, press the ANYKEY
, Playing
again.
Repeatedly
1. Press the ANYKEY
button during playback.
2. Press the A _' buttons to select Repeat and press the _1 _ buttons to
select the Title or Chapter
you want to play repeatedly.
3, Press the ENTER button.
g DVD-RAM, DVD-RW(VR mode), unfinalized DVD+R and
unfinalized DVD-RW (Video mode) discs do not repeat a chapter.
Playing a Certain Section Repeatedly
1. Press the ANYKEY
button during playback.
2. Press the A _' buttons to select Repeat and press the _ button to
select A-B.
3, Press the ENTER button.
4, Press the ENTER button at the point where you want the repeat play to
start (A) and press it again at the point where you want the repeat play
to stop (B).
Repeat playback of the A-B section starts.
g If you set point (B) before five seconds has elapsed, the
prohibition
mark (_)
wilt appear.
g You can also activate Normal Playback by pressing the CANCEL
button.
g Audio CDs(CD-DA)
function.
English - 49
and MP3 discs do not support the Repeat A-B
Selecting the Subtitle
(VRmode)
Subtitle languages may not work depending
only available during playback.
1. Press the ANYKEY
on the disc type. This is
button during playback.
2. Press the A v buttons to select Subtitle
select the desired subtitle language.
and press the _ _ buttons to
g If the subtitles overlap, disable the caption function on your TV.
g Some discs anew you to select the language for the disc menu only.
g To make the screen disappear, press the ANYKEY
again.
8electing the Audio language
(VR mode)
Audio languages may not work depending
only available during playback.
1. Press the ANYKEY
button during playback.
2. Press the A T buttons to select Audio
select the desired audio language.
@
on the disc type. This is
g Audio languages
and press the _ _ buttons to
may be different because they are disc-specific.
g Some discs allow you to setect the audio language for the disc
menu onty.
g To make the screen disappear, press the ANYKEY
......
ilililili!iiiiiiiiiiiiiiiiiiiiii!ii!
iiiiiiiiiiiiiiiiiY!_iiiii_ii
Using
again.
One Touch button
By pressing the audio button, you can access the Audio function
directly.
iiiiiiiiiiiiii{777777777777!;ii_;!!
iiiiiiiiiiiiiiiiiiiiii'iYiYiiiiiiiii_i_7!i,!il
Changing the Camera Angle
When a DVD-V/DEO contains multiple angles of a particular scene,
you can select the Angle function.
This is only available during playback.
If the disc contains multiple angles, the ANGLE mark appears on the
screen.
1. Press the ANYKEY button during playback.
2. Press the & _' buttons to setect Angle and press the _ _ buttons or
number(O~9) buttons to select the desired angle.
O
g This function is disc-dependent,
and may not work all DVDs.
g This function does not work when a DVD has not been recorded
with a multicamera
angle system.
g To make the screen disappear, press the ANYKEY
English - 50
again.
Zooming-In
N,N
1. Press
the ANYKEY button
;....
during playback
or pause.
2. Press the A V' buttons to select Zoom, and then press the ENTER
button.
( ¢, ) will be displayed.
3, Press the A '_",_ m,,buttons to move to the area you want to enlarge.
4, Press the ENTER button.
normal size --> 2X --> 4X --> 2X --> normal size
Using Bookmarks
(V mode)
This feature lets you bookmark sections
(V mode), so you can quickly find them.
Setting
ofa DVD or DVD-R/-RW
Bookmarks
1. Press the MARKER
button during playback.
2. Press the MARKER button during playback.
when the desired scene appears.
Press the ENTER button
The number 1 is displayed and the scene is memorized.
3, Press the ,,q _ button to move to the next position.
4, Press the ENTER button when the desired scene appears.
The number 2 is displayed and the scene is memorized.
• Repeat above to bookmark other positions.
• You can bookmark up to 10 scenes.
g When the disc tray is opened and then closed, bookmarks wilt
disappear.
g The Bookmark display may differ depending on the disc type.
•
Playing Back a Bookmark
1. Press the MARKER
button during playback.
2. Press the ,,q _ buttons to select a bookmarked
scene.
3, Press the ENTER or PLAY(@ ) button to start ptaying from the
selected scene.
English - 51
• Clearing
abookmark
1.Press
theMARKER
button
during
playback
2.Press
the_11_buttons
toselect
a bookmarked scene.
3. Press the CANCEL
button to delete the selected bookmark.
Using Markers
•
(VR mode)
Setting Markers
1. Press the MARKER
button during playback.
2. Press the ENTER button when the desired scene appears.
The number 01 is displayed and the scene is memorized.
3. Press the _1 _ button to move to the next position.
4, Press the ENTER button when the desired scene appears.
The number 02 is displayed and the scene is memorized.
• DVD-RAM or DVD-RW (VR Mode) discs have the Marker function
instead of the Bookmark function.
The Marker function allows you to mark up to 99 scenes. Since the
scenes may be displayed as many different pages, numbering is
necessary.
If a disc in use is encoded with Disc Protect, Markers cannot be set or
deleted. Only playback is available.
......
ilililili!iiiiiiiiiiiiiiiiiiiiii!ii!
iiiiiiiiiiiiiiiiiiii!_iiiii_ii
•
Playing Back a Marker
1. Press the MARKER button during playback.
2. Press the _ _ buttons to select a bookmarked
3, Press the ENTER or PLAY(C)
iiiiiiiiiiiiiiii;iiiiiiiiiiiiii_!!ii_;!!
scene.
) button to start playing from the
selected scene.
• If you press the SKIP( Q ) button, it moves to the beginning of
the marker. Pressing the button once again within 3 seconds returns
to the beginning of the previous marker.
iiiiiiiiiiiiiiiiiiiiii'ii_i!iiiiiiiiiiiiiiii_i_i!i!i!i,!il
• If you press the SKIP( ® ) button, it moves to the next marker.
•
Clearing
a Marker
g playback.
2. Press the ,e _ buttons to select a bookmarked scene.
Press the CANCEL button to delete the setected bookmark.
• When a marker is cleared while a DVD-RAM/DVD-RW(VR
mode) is
playing, marker numbers will change. For example, if the 7th marker
is cleared after ten markers are registered, the marker numbers after
the eighth will automatically move ahead by one and the 8th marker
becomes the 7th.
English - 52
Buttons
--®
$_,Ol
r?
m®
m®
®--
on the
Used
for
CD
Playback
2. _ : Plays the selected track (song).
3. ENTER( _
) button
4. RETURN(
belongs.
© } button:
) button
: Plays the selected track (song).
Moves to the folder to which the current song
: Plays the next track.
6. SKIP((_)
button : Returns to the beginning of the current track when
pressed during playback, tf pressed again, your DVD recorder moves
--(2D
d)
Control
1. _, V : Selects a track (song).
5. SKIP( _
nO
Remote
to and plays the previous track. If you press this button within three
seconds after playback starts, the previous track wilt be played.
If you press this button after three seconds, the current track wilt be
replayed from the beginning.
m®
7. SEARCH(O
8. STOP((_)
/ (_)
button
: Fast Play (X2, X4, X8)
: Stops a track(song).
9. PLAY/PAUSE((_)
10. ANYKEY
Option).
: Plays a track(song)
or pauses playback.
: To select the sub menu on screen display (Repeat or Play
| Playing an Audio CD(CD-DA)
1. Insert an audio CD (CD-DA) into the disc tray.
The audio CD menu appears and the tracks (songs) are played
automatically.
2. Press the A T buttons to select the track you want to hear, and then
press the ENTER button or m,,button.
©
•
Audio
CD(CD-DA)
Screen
Elements
1. PLAY MODE icon
2. Current
played.
track (song)
: Displays the number of the track currently being
3. Displays the current play index and total track number.
4. Shows the operating state of a disc and the current playback time.
5. Displays the track list (song list) and the ptaying time of each track.
6. Button display.
English - 53
| Playing an IVIP3 Disc
1. Insert an MP3 disc into the disc tray.
And press the ,_ 'V buttons to select Disc Navigation,
the ENTER or m,.button.
2. Press the A •
button.
and then press
buttons to select Music, and then press the ENTER or
The MP3 menu appears and the tracks(songs)
automatically.
are played
3. Press the A T buttons to select the track (song) you want to hear, and
then press the ENTER button or _ button.
©@ @
-C
•
MP3 Screen Elements
1. PLAY MODE icon
2. Current
track (song)
: Displays the name of the track being played.
3. MP3 file information.
4. Shows the operating state of a disc and the current playback time.
5. Displays the information
=_
for the folder and its tracks.
6. Button display.
| Playing Repeatedly
U
1. Press
the ANYKEY button
during playback.
The play mode window
appears.
2. Select the desired repeat
the ENTER button.
mode using the 41 _ buttons,
and then press
• ¢-O Track : Selected track is played repeatedly.
• r_ Disc : Inserted disc is played repeatedly.
• ¢_=-JFolder(rap3 only) : Tracks in the current folder are ptayed
repeatedly.
To return to normal playback
3. Select Off in play mode window using the 4 m,,buttons, and then
press the ENTER button.
English - 54
Play Option Mode
iYiiii_
1, During Stop, Press the ANYKEY
highlighted.
• During Playback,
button. The Play option will be
Repeat Mode will be highlighted.
2. Select a desired ptay option (Normal, Random, Intro or Ptaytist) using
the _1 _ buttons. Press the ENTER button.
,, Normal : Tracks on a disc are played in the order in which they were
recorded on the disc.
,, Random[R]
: The Random option plays the disc's tracks in random
order. After a random list is generated and played completely, another
random list is generated and played. Random Play is continued until
the play option is changed.
,, Intro[ I ] : The first 10 seconds of each track will be played. If you
want to listen to the music that you have selected, press the ENTER
button or PLAY(_) ) button. The play option will be changed to
Norma! Play. When Intro Play is completed, Normal Play is performed.
,, Playlist : The Piaytist playback option allows you to select the order
in which you want tracks to play.
To Program Tracks
You can register
a maximum
1. Press the ANYKEY
using ,&T buttons.
of 30 tracks in the playlist.
button during playback, then select Play option
2. Select Playlist using the ,_ _ buttons, and then press the ENTER
button.
The Playlist screen will appear.
Select tracks in the order in which you want them to play using the A T
buttons.
Press the ENTER button.
If there is a track on your playlist you wish to remove. Press the _.
button, then press the A v buttons to select the track you wish to
remove, then press the CANCEL button. The selected track will be
removed.
3. Press the PLAY( Q ) button to ptayback the ptaytist.
1. Insert an JPEG disc into the disc tray.
'
2. Press the A T buttons to select Disc Navigation,
ENTER or _ button.
and then press the
3, Press the A '_' buttons to select Photo, and then press the ENTER or
button.
4. Press the ,& T ,,_ I_, buttons to select a picture.
• To see the next 8 pictures, press the SKIP( Q ) button.
• To see the previous 8 pictures, press the SKIP( G )button.
English - 55
5-1.Ifyoupress
thePLAY((_))
button,
theSlide
show
screen
willappear.
Thepicture
interval
(Slide
show
speed)
must
beset.
5-2.Press
theENTER
button
withapicture
selected
intheAlbum
screen
andselect
adisplay
mode
(Album
screen
(_), Slideshow(_ ),
Rotation
(_) orZoom(& ))using
the__,-buttons,
thenpress
theENTER
button.
:Returns
totheAIbum
screen.
:Theunitenters
slideshow
mode.
Before
theslide
show
canbegin,
thepicture
interval
(Slide
show
speed)
must
beset.
:Each
timetheENTER
button
ispressed,
thepicture
rotates
90
degrees
clockwise.
:Each
time
theENTER
button
ispressed,
thepicture
isenlarged
upto4X.
(Normal
-->2X-->4X--)2X--)Normal)
•Press
theANYKEY
button
todisplay
orclear
menus.
Follow these instructions
to play back a scene from the Title List.
1. Press the TITLE LIST button. The Title List screen is displayed.
Or use the MENU button.
• Press the MENU button.
• Press the _, _' buttons to select Title List, and then press the
ENTER or _ button twice.
2. Press the A T buttons to select Title.
@
®
• Press the PLAY button. The selected entry (title) will be played back.
• Press the ENTER or _, button. The Edit menu is displayed on the right.
(Rename, Delete, Edit, Protection : See pages 57~59)
3. To stop playing the title, press the STOP((_)
button.
To return to the title list screen, press the TITLE LiST button.
Title List Screen Elements
(i) Playback screen for recorded entries
(_ Information window for the selected entry : Title name, recording date,
lock status, record mode
@ Recorded entry No.
®
@ Recorded entry title
@ Recording
length (i.e., the playing time)
@ Title list edit items
Play : Plays the selected entry.
Rename : Renames the title of a selected entry.
Delete : Deletes the selected entry from the list.
Edit : Deletes a section.
Protection
: Locks or unlocks the selected entry.
Q Button display
O
g By pressing the ANYKEY
button, you can play the desired title.
g This may depend on the the disc type.
g DVD-R/DVD-RW(Video)
(See page 36)
English - 56
discs have limited editing function.
This section introduces
basic functions
of DVD editing.
, Title List
A titie is a section of recorded video and audio.
The Title List shows a list to help you select a titie.
If one title is deleted from the title list, that title cannot be played again.
• Playlist
This refers to a unit of playback, which is made by selecting a desired
scene in the entire Title List.
When one playlist is ptayed, only the scene selected by the user witl
play and then stop. Even if a playtist is deleted, the original recorded titte
will not be deleted.
Recording or editing might not be completed if a problem
sudden power failure occurs.
Please be aware that material
retrieved.
that has been damaged
| Renaming (Labeling)
a Title
Follow these instructions
to rename
title of a recorded program.
such as s
cannot be
a title list entry, Le., to edit the
1. Press the TITLE LiST button. The Titte List screen is displayed.
Or use the MENU button.
• Press the MENU button.
• Press the A v buttons to select Title List, and then press the ENTER
or _, button twice.
2. Press the A T buttons to select an entry you want to rename from the
Title List, and then press the ENTER or _,- button.
3. Press the A T buttons to select Rename,
or B.-button.
and then press the ENTER
The Rename screen is displayed.
4. Select the desired characters
ENTER button.
using the A T ,_ _. buttons, press the
• Back Space : Deletes the character before the cursor.
• Space : Enters a blank and moves the cursor one forward (to the
right).
•
•
•
•
Delete : Deletes the character at the cursor position.
Clear : Deletes all the character inputs.
Save : Registers the character inputs.
The maximum number of characters that can be entered is 31. All 31
characters
can be displayed
by pressing the INFO button twice.
5. Press the A T ,_ _. buttons to setect Save, and then press the ENTER
button.
The changed title name is displayed on the title item of the selected
Title tist entry.
English - 57
| Locking (Protecting)
Follow these instructions
accidental deletion.
a Title
to lock an entry to protect
it from
1. Press the TITLE LIST button. The Title List screen is displayed.
Or use the MENU button.
• Press the MENU button.
• Press the h, T buttons to select Title List, and then press the ENTER
or _ button twice.
2. Press the A • buttons to select an entry you want to protect from the
Title List, and then press the ENTER or D,-button.
3. Press the A T buttons to select Protection,
ENTER or m,-button.
and then press the
4. Press the _ !_ buttons to select On, and then press the ENTER
button. The lock icon on the information window for the selected entry
changes to the locked status. ( =_-> ,, )
tf you want to uniock the title entry, select the protected title and set the
Protection function to Off.
| Deleting a Title
Follow
these instructions
to delete an entry from the Title List.
1. Press the TITLE LIST button. The Title List screen is displayed.
Or use the MENU button.
• Press the MENU button.
• Press the A T buttons to select Title List, and then press the ENTER
or _ button twice.
2. Press the A v" buttons to select an entry you want to delete from the
Titte List, and then press the ENTER or _ button.
3. Press the A T buttons to select Delete, and then press the ENTER or
_. button.
You will be prompted with the confirmation message.
DVD-RAM, DVD-RW(VR mode): Since there is a Playlist present, the
iiiiiiii!iiiiiiiiiiiii{!!!_!_iiiii!ii!!i_ill
message "Do you want to detete?(Retated playtists may be deleted.)"
is displayed.
DVD-RW(Video mode), DVD-R: Since there is a Playlist not present,
the message "Do you want to delete?" is displayed.
° The message may be different depending on the type of disc.
iiiiiiiiiiiiiiiiiiiWiiiiiii
4. Press the _ _ buttons to select Yes, and then press the ENTER button.
iiiiiiiiii;'@ii_!!!!!!i!i!
m You cannot delete a protected entry. If you want to delete a
protected entry, select "Off" in the Title Protection menu.
m Once an entry is deleted from the Title List, it cannot be
recovered.
g Once a DVD-R or DVD-RW is finalized, it cannot be deleted.
g With DVD-R discs, titles are only deleted from the menu, however,
the Title remains physically on the disc.
English - 58
| Deleting a Section of a Title
(VR mode)
Follow
these instructions
to delete e section of a Title List entry.
1. Press the TITLE LiST button. The Title List screen is displayed.
Or use the MENU button.
• Press the MENU button.
• Press the A T buttons to select Title List, and then press the ENTER
or _ button twice.
2. Press the A T buttons to setect an entry you want to edit from the Title
List, and then press the ENTER or _ button.
3. Press the A T buttons to select Edit, and then press the ENTER or
button.
4. Press the ENTER button at the starting point.
The image and starting point time are displayed
starting point window.
on the section deletion
5. Press the ENTER button at the end point.
The image and end point time are displayed in the Section deletion
ending point window.
6. Press the _ _ buttons to select Delete, and then press the ENTER
button.
The message "Do you want to detete?(Deteted
restored)" is displayed.
part will not be
7. Press < _- buttons to setect Yes, and then press the ENTER button.
The selected section is deleted.
To return to the Title List screen, press the _ _ buttons to select
Return.
®
•
Edit Title List Screen Elements
1 Playback bar
2 Title List No.
3 Section deletion starting point window and time
4 Section deletion end point window and time
• Select the start and end points of the section you want to delete
using the playback retated buttons.
• Playback related buttons (_,
O,_
,G
, _,
_).
g The length of the section to be deleted must be at least 5 seconds
long.
g If the length of the section to be deteted is less than 5 seconds,
you witl be prompted with the message "The range is too short."
g If the end time precedes the starting point, you will be prompted
with the message "End point cannot be marked earlier than start
point".
g The section cannot be deleted when it includes a stilt picture.
English - 59
,| Creating a Playlist
U
Follow these instructions
recorded title.
to create a new playlist
(VR mode)
entry from a
1. With the unit in Stop mode, press the MENU button on the remote control.
2. Press the ,A T buttons to select Playlist,
I_ button.
and then press the ENTER or
3. Press the A _' buttons to select New Playlist, and then press the
ENTER or _ button.
The Make Scene screen is displayed.
4. Press the ENTER button at the start point.
• The image and starting point time are displayed on the Start window.
• The yellow-colored selection bar moves to the End item.
• Select the starting point of the section from which you want to create
a new scene using the playback related buttons
5. Press the ENTER button at the end point.
• The image and end point time are displayed on the End window.
• The yellow-colored selection bar moves to the Make button.
- To make a new playlist 6. Press the _ _ buttons to select Make, and then press the ENTER button.
A new Scene wilt be added to the current Playlist.
A new Make Scene screen is displayed.
Repeat the above steps 4~6 to create further scenes.
g If you want to make a new playlist, go to MENU -.->new playlist.
g You can check and see all the scenes on the Edit Ptaytist screen.
- To return to the Edit Playlist menu 7. Press the 4 _ buttons to select Return, and then press the ENTER button.
The Edit Ptaytist screen is displayed.
g You can create up to 99 playlist entries.
g Depending
on the disc type, the displayed screen may took
slightly different.
,| Playing Entries in the Playlist
(VR mode)
Follow
these instructions
to play the plsylist
entries.
1. With the unit in stop mode, press the PLAYLIST
The Edit Ptaytist screen is displayed.
button.
2. Press the A T buttons to select the title you want to edit from the
Playlist, and then press the ENTER or _- button.
i _ii/i
i
i IIII:I:
i
ii
ii
ii
: : : : : : : : : : : : : : i i_
ii
ii
iii
ii
iii
ii
ii
ii
iii
ii
3. Press the A _' buttons to select Play, and then select the ENTER button.
The playlist entries will be played.
iii
4. Press the STOP((_)
button to stop playing.
The screen returns to the Edit Ptaylist screen.
English - 60
| Renaming a Playlist Entry
(VR mode)
Follow these instructions
title ors playlist entry.
to rename
a playlist
entry, i.e. to edit the
1. With the unit in stop mode, press the PLAY LiST button.
The Edit Ptaylist screen is displayed.
2. Press the A V" buttons to select the title you want to edit from the
Ptaylist, and then press the ENTER or I_ button.
3, Press the A _' buttons to select
button.
Rename,
and then press the ENTER
4, Enter the desired characters using the A T ,41!_ buttons.
• Back Space: Deletes the character before the cursor.
• Space: Enters a blank and moves the cursor one forward (to the right).
• Delete: Deletes the character at the cursor position.
• Clear: Deletes atl the character inputs.
• Save: Registers the character inputs.
• The maximum number of characters that can be entered is 31. Alt 31
characters
can be displayed by pressing the INFO button twice.
5. Press the A _' ,_ _,- buttons to select Save, and then press the ENTER
button.
The changed title name is displayed on the title item of the selected
playlist entry.
| Editing a Scene for the Playlist
(VR mode)
Follow
these instructions
to edit scenes for s plsylist
t. With the unit in stop mode, press the PLAY LiST button.
The Edit Ptaylist screen is displayed.
2. Press the A T buttons to select the title you want to edit from the
Ptaylist, and then press the ENTER or I_ button.
3, Press the A T buttons to select Edit Scene, and then press the
ENTER button.
The Edit Scene screen is displayed.
Playing
a Selected
Scene
4, Press the A _' _ I_ buttons to select the scene you want to play, and
then press the ENTER button.
The playlist entry to be played is selected.
5, Press the ENTER button.
The selected scene is played.
• To stop playback of a selected scene, press the STOP((_)
English - 61
button.
Modifying
a Scene
(Replacing a Scene)
Follow steps I to 3 of Editing a Scene for the P/aylist on page 61.
4, Press the A T .,_ _ buttons to select the scene you want to modify,
and then press the ENTER button.
5. Press the ,A '_' buttons to select Modify,
button.
and then press the ENTER
6, Press the ENTER button at the start point of the scene.
• The image and starting point time are displayed on the Start window.
• Select the starting or ending point of the section you want to modify
using the playback related buttons ( (_, _,
(_,
G,
(_ , G,
G ).
7, Press the ENTER button at the end point of the scene.
• The image and ending point time are displayed on the End window.
8, Press the _1 _ buttons to select Change,
button.
and then press the ENTER
• The scene you want to modify is changed with the selected section.
Moving
a Scene
FoHow steps
(Changing
1 to 3 of Editing
the Position
of a
a Scene for the Playlist
Scene)
on page 61.
4. Press the A 'V 4 _ buttons to select the scene you want to move
(change the position), and then press the ENTER button.
5. Press the A T buttons to select Move, then press the ENTER button.
* A yellow selection window is displayed
on the scene to be moved.
6, Press the A T ,,q m,,buttons to select the position to which you want to
move the selected scene, and then select the ENTER button.
oThe selected scene is moved to the selected position.
g Depending
different.
English - 62
on the disc type, the displayed screen may took
Adding
a Scene
Fo#ow steps
I to 3 of Editing
a Scene for the PIsyfist on page 61.
4. Press the A T .,4 _ buttons to select the scene that will have a new
scene inserted before it, and then press the ENTER button.
A yellow selection window is displayed on the scene to be added as the
new scene.
5. Press the A V buttons to select Add, then press the ENTER button.
6, Press the ENTER button at the starting point of the scene.
• The image and starting point time are displayed on the Start window.
• Select the end point of the section where you want to add the new scene
using the playback related buttons ( (_,
(_) , (_ , (_, {_ , (_ , Q ).
7. Press the ENTER button at the end point of the scene.
• The image and end point time are displayed in the End window.
• To cancel, press the ,_ _buttons to select Cancel and then press the
ENTER button.
8. Press the _1 _ buttons to select Add, and then press the ENTER
button.
• The section you want to add is inserted prior to the scene selected in
step 4.
Deleting a Scene
i Foflow steps 1 to 3 of Editing a Scene for the Plsyfist on page 61.
4. Press the A '_',_ _. buttons to select the scene you want to delete, and
then press the ENTER button.
5. Press the ,A'_' buttons to select Delete, and then press the ENTER
button.
English - 63
| Copying a Playlist Entry to the Playlist
t. Press the PLAY LiST button.
The Edit Piaylist screen is displayed.
2. Press the A T buttons to select the title you want to copy to the
Ptaylist, and then press the ENTER or _, button.
3. Press the A T buttons to select Copy, and then press the ENTER
button.
Ptaylist that has been selected will be copied.
g The playlist can contain up to 99 ptaytist entries (titles).
| Deleting a Playlist Entry from the Playlist
1. With the unit in Stop mode, press the PLAY LiST button.
The Edit Ptaylist screen is displayed.
2. Press the A T buttons to select the title you want to edit from the
Piaylist, and then press the ENTER or _,- button.
3. Press the A _' buttons to select Delete, and then press the ENTER button.
4. Press the 4 _ buttons to select Yes, and then press the ENTER button.
After the delete operation
Edit Playlist screen.
is complete,
it will automatically
return to the
| Editing the Disc Name
Follow
these instructions
to give s name to a disc.
1. With the unit in Stop mode, press the MENU button on the remote control.
2. Press the A v buttons to select Disc Manager, then press the ENTER
or _ button.
3. Press the A T buttons to select Disc Name, then press the ENTER or
button.
The Rename screen is displayed.
4. Enter the desired characters using the ,L T _ _ buttons.
• Back Space : Deletes the character before the cursor.
• Space : Enters a blank and moves the cursor one forward (to the right).
• Delete : Deletes the character at the cursor position.
• Clear : Deletes all the character inputs.
• Save : Registers the character inputs.
• The maximum number of characters that can be entered is 31. Alt 31
characters
can be displayed by pressing the INFO button twice.
5. Press the J, 't 41 _, buttons to seiect Save, and then press the ENTER button.
A disc name is given to the disc.
g You may need to disable disc protection
before beginning editing.
(see page 65.)
g Depending on the kind of disc, the displayed screen may be different,
English - 64
| Disc Protection
DNc Protection allows you to protect your discs from being
formatted or deleted due to unintended operations
1. With the unit in Stop mode, press the MENU button on the remote control.
2. Press the A T buttons to select Disc Manager,
ENTER or _ button.
and then press the
3, Press the A T buttons to select Disc Protection,
ENTER or _ button.
then press the
4. Press the A v' buttons to select Protected,
then press the ENTER button.
| Formatting a Disc
@
Use these instructions to format a disc.
Disable disc protection before formatting.
1. With the unit in Stop mode, press the MENU button on the remote control.
2. Press the A T buttons to select Disc Manager,
ENTER or _ button.
DVD-RAM
3. Press the A T buttons to select Disc Format,
ENTER or _ button.
and then press the
and then press the
DVD-RAM
• You witl be prompted with the confirmation
format disc?".
message "Do you want to
• tf you select Yes using the_ _ buttons and press the ENTER button,
you will be prompted with the confirmation message "Alt data wilt be
deleted. Do you want to continue?".
DVD-RW
• You witl be prompted with the confirmation
DVD-RW
message "Choose the
recording format for DVD-RW"
4, Press the _ _ buttons to select desired mode, then press the ENTER
button.
• You will be prompted again with the message "Alt data wilt be deleted.
Do you want to continue?"
5. Press the _ _ buttons to select Yes, and then press the ENTER
button.
The disc is formatted.
DVD-VR and DVD-V modes are compatible
with the following disc
types.
DISC
DVD-VR
DVD-V
DVD-RAM
DVD-RW
DVD-RW
DVD-R
g Menu items may differ depending on the disc type.
English - 65
| Finalizing a Disc
After you record titles onto e DVD-RW/DVD-R disc with your DVD
recorder, it needs to be finalized before it can be played back on
external devices.
1. With the unit in Stop mode, press the MENU button on the remote control.
2. Press the A T buttons to select Disc Manager,
ENTER or _ button.
3. Press the A T buttons to setect Disc Finalize,
ENTER or _ button.
and then press the
and then press the
4. Press the ,,_ _ buttons to select Yes, then press the ENTER button.
You will be prompted again with the message "Disc will be finalized. Do
you want to continue?".
5. Press the 4! ),, buttons to select Yes, and then press the ENTER button.
The disc is finalized.
g Once a disc is finalized, you cannot delete entries from the record list.
g Once a DVD-R/DVD-RW(video
mode) disc is finalized, it is
playable in a standard DVD player.
g Depending
different.
on disc type, the displayed
screen may appear slightly
g Finalizing time may be different depending
recorded on the disc.
on the amount of data
g Data on the disc will be damaged if the recorder is powered off
during finalizing process.
g You can finalize automatically using EZ REC MODE. (See page 44)
| Unfinalizing a Disc (V/VR mode)
1. With the unit in Stop mode, press the MENU button on the remote control.
2. Press the A T buttons to select Disc Manager,
ENTER or _ button.
and then press the
3, Press the A v button to select Disc Unfinalize,
ENTER or _- button.
and then press the
You will be prompted with the message "Do you want to unfinalize disc?".
4, Press the _ _- buttons to select Yes, then press the ENTER button.
You will be prompted again with the message "Disc will be unfinalized.
Do you want to continue?".
5. Press the _1 _ buttons to select Yes, and then press the ENTER
button.The disc is unfinalized.
g A DVD-RW can be finalized or unfinalized
Finalize
Mark
DVD-Video(RW)
Operation
Same as DVD-Video
Unfinalize
DVD-RW(V)
Additiona) recording, protection
and deletion are possible.
g A DVD-RW can be finalized or unfinalized
Mark
Operation
English - 66
in Video mode.
in VR mode.
Finalize
Unfinalize
DVD-RW(VR:F)
DVD-RW(VR)
Additional recording,
deletion, editing, and
protection are
impossible.
Additional recording,
deletion, editing, and
protection are possible.
| Delete All Title Lists
The disc protection
should
be disabled first.
1. With the unit in Stop mode, press the MENU button on the remote
control.
2. Press the A T buttons to select Disc Manager,
ENTER or _ button.
and then press the
3, Press the A T buttons to select Delete All Title Lists, and then press
the ENTER or !_ button.
• When Protected Entry exists: The Delete All Title List function will not
operate. If you want to delete a protected title, disable Protection for it
on the Lock item. (See page 58)
4, Press the _ _ buttons to select Yes, and then press the ENTER
button.
All title lists are deleted.
English - 67
Play mode settings are different from the settings
configured in the Settings menu.
If your product malfunctions, go through the
checkpoints below before contacting a Samsung
authorized service center.
The disc does not support all selected
functions. In this case, some settings
configured in the settings menu may
not work properly.
| Power
The input is displayed
turned on.
for a while when the power is
Cannot change the aspect ratio.
The aspect ratio is fixed for DVD discs.
The DVD recorder requires some time
(See page 31 .)
to initialize and the input wilt be
displayed for approx. 10 seconds after
it is turned on.
The angle operation
DVD disc.
does not work while playing
a
The angle operation is available only when
the disc contains images captured from
different angles.
| Recording
Cannot record TV programs.
The selected
Check whether the power cord is
securely plugged into the power outlet.
audio and/or subtitle language is not
played.
Audio and subtitle languages are disc
specific.
Only the sound and subtitle languages
contained on the DVD disc are available
Check the free space on your
DVD-RAM/DVD-RW/DVD-R
discs.
and displayed in the disc menu.
I pressed
the REC button but there is no response.
Recording is possible for
DVD-RAM/DVD-RW/DVD-R
discs
only. If a program is copy protected, it
cannot be recorded.
| Video
The disc revolves, but no image or bad quality
images are displayed.
Check whether there is damage to or any
foreign material on your disc.
| Playback
Cannot play
the disc.
Check whether
Some low quality discs may not play
properly.
the disc is inserted
correctly with the label facing up.
If scenes change from dark to bright
Check the regional code of the DVD disc.
This DVD recorder cannot play some
types of discs. (See pages 5, 46.)
Q
icon appears
on the screen.
You cannot use this operation or function
due to one of the following reasons:
(1) Your DVD disc restricts it.
(2) Your DVD disc does not support this
feature (for example: angles)
(3) The feature is not available at the
moment.
(4) You've requested a title, chapter, or
scan time that is out of range.
English-68
suddenly, the screen may shake vertically
temporarily. This dose not mean that the
unit is defective.
Abnormal
| Sound
HDMI output screen.
If snow noise appears on the screen,
No sound.
Are you watching
mode?
it means that the TV does not support
HDCP (High-bandwidth Digital Content
Protection).
a program in scan
If you are playing a program at a speed
other than normal and fast1 speed, the
sound will not be heard.
HDMI output Jitter
Check if your TV system is setup correctly.
Check the connections
and settings.
Screen Jitter may occur when the frame
rate is converted from 50Hz to 60Hz
Check whether the disc is damaged.
Clean the disc, if necessary.
Check whether
for 720p/1080i HDMI (High Definition
Multimedia Interface)
Output.
the disc is inserted
correctly with the label facing up.
Please refer to the user's manual of your TV.
No audio output.
Check whether you have selected
the correct digital output options in
the Audio Output Options menu.
(See page 30.)
| Remote Control Unit
The remote control
doesn't work.
Point the remote control at the remote
control sensor on your DVD recorder.
Allow for proper distance. Remove
| Timer Recording
obstacles between your DVD recorder and
the remote control.
Timer lamp flickers.
Check whether the batteries are empty.
Check if there is enough space in the
disc for recording.
Check whether the current disc is
recordable or not.
Make sure to check before the start
| Other
I forgot my password
time of recording.
for parental
supervision.
Remove the disc. Press the iNPUT SEL.
and REC MODE buttons on the front panel
of the DVD Recorder simultaneously for 5
Timer recording does not work properly.
Re-check the recording time and the
end time settings again.
seconds or more when the power is on.
All settings including the password will
revert to the factory settings. Do not use
this unless absolutely necessary.
(Note that this function is possible only
Recording wilt be cancelled, if the
power is disconnected due to a
power failure or other similar reason,
when no disc is inserted.)
while recording.
Is it possible
to change a subtitle and an audio
signal on a recorded
| HDIVll
disc?
A recorded disc is played with onty
the subtitle and the audio signal
which were selected during recording.
No HDMI output.
Check to see that the Video output is HDMI
enabled.
Other problems.
Check the connection
between the TV and
the HDMI jack of the DVD Recorder.
See if your TV supports this 480p/720p/
1080i DVD Recorder.
Read the tabte of contents and then find
and read the section describing your
problem, and follow the instructions given.
Turn your DVD recorder off and on.
If the problem still persists, contact a
nearby Samsung service center.
English-69
Before contacting
a Samsung authorized
service center, perform the following simple checks.
Error Message
Solution
You cannot record a copy protected
movie.
/ Explanation
•
You can't record the video since it is protected by copyright.
•
The disc you are using is protected. To record on this disc or use this
function, disable the disc protection function. Refer to page 65.
You cannot record. This disc is
protected.
This disc cannot be formatted (the
disc is protected).
This disc cannot be renamed
(the disc is protected).
The disc cannot be finalized
is protected).
(the disc
This [Menu] is not available (the disc
is protected).
The disc cannot be played, Please
check the regional code of the disc.
_ The disc does not match the regional code for your area and cannot be
played on this device.
This disc cannot be formatted.
Please check the disc.
You could not format the disc
because of error detection.
Make sure there are no scratches
or dirt on the disc.
You could not finalize the disc
because of error detection.
You could not unfinalize the disc
because of error detection.
The disc cannot be played, Please
check the TV system.
•
PAL format discs cannot be played on this unit.
•
Make sure there are no scratches
The disc can be neither played nor
recorded.
or dirt on the disc.
The disc cannot be played, Please
check the disc.
If the disc has invalid information,
no more titles can be recorded.
Please format the disc beforehand.
_ You can't use the disc because it contains errors from previous recordings.
Use the disc after formatting.
English-70
Error Message
Solution / E×planation
•
Error is detected
on the disc.
System error is found.
Please try it again after turning off
the power,
The DV device is not connected.
You can't use the disc because it contains errors from previous
recordings.
Use the disc after formatting.
When operating, errors happen. Turn off the device. (To turn off, press
and hold the power button on the front of the device for 10 seconds.)
After turning off, press the Open button and remove the disc from the
device.
Make sure the DV device is connected properly to the DV connection
Jack. If it is connected properly, turn it off and on once again.
If you are unable to solve the problem after reading the above instructions,
•
The model and serial number on the rear of your DVD Recorder
•
The warranty information
•
A clear description
note:
of the problem
Then contact your nearest SAMSUNG
authorized
service center. Call 1-800-SAMSUNG
English-
71
for a center near you.
Power requirements
120V AC, 60Hz
Power consumption
19 Watts
5.1 tb
Weight
General
Dimensions
Operating
16.9 in(W) x 8.5 in(D) x 1.9 in(H)
+41°F to +95°F
temp.
Other conditions
Keep level when operating. Less than 75% operating humidity
Video (1,2)
1.0 V p-p at 750 toad, sync negative
S-Video
input (Y: 1.0Vp-p, C: 0.286Vp-p
at 75£2 toad)
input
Audio(1,2)
Max.Audio Input Level : 2Vrms
DV input
IEEE 1394(4p) compatible jack
Analog output jacks 1, 2
Audio
Optical/Coaxial
digital audio output
Full scale Analog output level : 2Vrms
Video output jack
Output
S-Video output (Y : 1.0Vp-p, C:0.286Vp-p
Video
at 750 toad)
Component output (Y : 1.0Vp-p, Pb: 0.70Vp-p,
750 load)
Pr: 0.70Vp-p at
HDMI output (480p, 720p, 1080i)
Picture Compression
format
MPEG-II
Audio Compression
format
Dotby Digital 2ch/256kbps
Recording
Recording
Audio Frequency
Quality
Response
XP (about 8 Mbps), SP (about 4 Mbps), LP (about 2 Mbps),
EP (about 1.2 Mbps or about 0.8 Mbps)
20 Hz ~ 20 kHz
For DVD discs, audio signals recorded at 96kHz sampling
Audio
Output
frequency
Ana!°g
Audi°Digital
Audio OutputOUtput
are converted and output at 48kHz.
48 z48kHz
t 96kH
44.ikHz441kHz
English-72
This SAMSUNGbrand product,as suppliedand distributedby SamsungElectronicsAmerica,Inc. (SAMSUNG)and
deliverednew, in the originalcartonto the originalconsumerpurchaser,is warrantedby SAMSUNGagainstmanufacturingdefectsin materialsandworkmanshipfor a limitedwarrantyperiodof:
One (1) Year Parts / Ninety (90) days Labor
(90 days Partsand Labor for Commercial Use)
This limitedwarrantybeginson the originaldateof purchase,and is validonlyon productspurchasedand usedin
the UnitedStates.Toreceivewarrantyservice,the purchasermustcontactSAMSUNGfor problemdeterminationand
serviceprocedures.Warrantyservicecanonlybe performedby a SAMSUNGauthorizedservicecenter.The original
datedbill of salemust be presentedupon requestas proofof purchaseto SAMSUNGor SAMSUNG'sauthorizedservicecenter.Transportation
of the productto andfrom theservicecenteris the responsibilityof the purchaser.
SAMSUNGwill repairor replacethis product,at our optionand at no chargeas stipulatedherein,with new or reconditionedpartsor productsif foundto be defectiveduringthelimitedwarrantyperiodspecifiedabove.All replacedparts
and productsbecomethe propertyof SAMSUNGand mustbe returnedto SAMSUNG.Replacementpartsand productsassumetheremainingoriginalwarranty,or ninety(90) days,whicheveris longer.
SAMSUNGis obligationswith respectto softwareproductsdistributedby SAMSUNGunderthe SAMSUNGbrand
nameare setforth in the applicableend userlicenseagreement.Non-SAMSUNGhardwareand softwareproducts,if
provided,are on an "ASIS" basis.Non-SAMSUNGmanufacturers,suppliers,publishers,and serviceprovidersmay
providetheirownwarranties.
This limitedwarrantycoversmanufacturingdefectsin materialsandworkmanshipencounteredin normal,and except
to theextentotherwiseexpresslyprovidedfor in this statement,noncommercialuse of this product,and shallnotapply
to thefollowing,including,but not limitedto: damagewhichoccursin shipment;deliveryand installation;applications
and usesfor whichthis productwas not intended;alteredproductor serialnumbers;cosmeticdamageor exteriorfinish;accidents,abuse,neglect,fire,water,lightningor otheractsof nature;useof products,equipment,systems,utilities,
services,parts,supplies,accessories,applications,installations,repairs,externalwiringor connectorsnotsuppliedand
authorizedby SAMSUNG,or whichdamagethis productor resultin serviceproblems;incorrectelectricallinevoltage,
fluctuationsandsurges;customeradjustmentsandfailuretofollow operatinginstructions,cleaning,maintenanceand
environmentalinstructionsthat are coveredand prescribedin the instructionbook;productremovalor reinstallation;
receptionproblemsand distortionrelatedto noise,echo,interferenceor othersignaltransmissionand deliveryproblems.SAMSUNGdoesnot warrantuninterruptedor error-freeoperationof the product.
THEREARENOEXPRESS
WARRANTIES
OTHERTHANTHOSELISTEDANDDESCRIBED
ABOVE,ANDNO
WARRANTIES
WHETHEREXPRESSORIMPLIED,INCLUDING,
BUTNOTLIMITEDTO,ANYIMPLIEDWARRANTIES
OF
MERCHANTABILITY
OR FITNESSFORA PARTICULAR
PURPOSE,
SHALLAPPLYAFTERTHEEXPRESS
WARRANTY
PERIODSSTATED
ABOVE,ANDNOOTHEREXPRESS
WARRANTY
ORGUARANTY
GIVENBYANYPERSON,FIRM
ORCORPORATION
WITHRESPECT
TOTHISPRODUCTSHALLBE BINDINGONSAMSUNG.SAMSUNG
SHALL
NOTBE LIABLEFORLOSSOFREVENUEORPROFITS,
FAILURETOREALIZESAVINGSOROTHERBENEFITS,
OR
ANYOTHERSPECIAL,INCIDENTAL
ORCONSEQUENTIAL
DAMAGES
CAUSEDBYTHEUSE,MISUSEORINABILITY
TOUSETHISPRODUCT,
REGARDLESS
OFTHELEGALTHEORYONWHICHTHECLAIMIS BASED,ANDEVEN
IF SAMSUNG
HASBEENADVISEDOFTHE POSSIBILITY
OFSUCHDAMAGES.NORSHALLRECOVERY
OFANY
KINDAGAINSTSAMSUNG
BE GREATER
INAMOUNTTHANTHEPURCHASE
PRICEOFTHE PRODUCTSOLDBY
SAMSUNG
ANDCAUSINGTHEALLEGEDDAMAGE.WITHOUTLIMITING
THEFOREGOING,
PURCHASERASSUMES
ALL RISKANDLIABILITY
FORLOSS,DAMAGEORINJURYTOPURCHASER
AND PURCHASERiS
PROPERTY
ANDTO
OTHERS
ANDTHEIRPROPERTY
ARISINGOUTOFTHEUSE,MISUSEORINABILITY
TO USETHISPRODUCTSOLD
BYSAMSUNGNOTCAUSEDDIRECTLY
BYTHENEGLIGENCE
OFSAMSUNG.THISLIMITEDWARRANTYSHALLNOT
EXTENDTOANYONEOTHERTHANTHEORIGINALPURCHASER
OFTHISPRODUCT,
ISNONTRANSFERABLE
AND
STATES
YOUREXCLUSIVE
REMEDY.
Somestatesdo notallowlimitationson how longan impliedwarrantylasts,or the exclusionor limitationof incidentalor
consequentialdamages,so theabovelimitationsor exclusionsmay notapplyto you. Thiswarrantygivesyouspecific
legalrights,and you mayalsohaveotherrightswhichvaryfrom stateto state.
Toobtainwarrantyhardwareservice,pleasecontactSAMSUNGat:
Samsung Electronics America, Inc.
105 Challenger Road Ridgef]eld Park, NJ 07660-0511
1-800-SAMSUNG (726-7864) and www.samsung.oom
ContactSAMSUNG
WORLDWiDE
Ifyouhaveanyquestions
orcomments
relating
toSamsung
products,
please
contact
theSAMSUNG
customercarecenter.
Region
North America
Country
CANADA
MEXICO
U.S.A
Europe
CIS
Asia Pacific
Middle East & Africa
Care Center
1-800-SAMSUNG (7267864)
01-8O0-SAMSUNG (7267864)
1-800-SAMSUNG (7267864
0800-333-3733
0800-124-421
Web Site
www.samsung.com/ca
www.samsung.com/mx
800-726-7864(SAMSUNG)
0-800-507-7267
1-800-10-7267
www.samsung.com
www.samsung.com/ar
www.samsung.com/br
www.samsung.com/ct
www.samsung.com/tatin
www.samsung.com/latin
EL SALVADOR
GUATEMALA
JAMAICA
PANAMA
PUERTO RICO
800-6225
1-800-299-0013
1-800-234-7267
800-7267
1-800-682-3180
www.samsung.com/latin
www.samsung.com/tatin
www.samsung.com/tatin
www.samsung.com/latin
www.samsung.com/tatin
RER DOMINICA
TRINIDAD & TOBAGO
1-800-751-2676
1-800-7267-864
www.samsung.com/tatin
www.samsung.com/tatin
VENEZUELA
BELGIUM
CZECH REPUBLIC
DENMARK
1-800-100-5303
02 201 2418
844 000 844
38 322 887
www.samsung.com/tatin
www.samsung.com/be
www.samsung.com/cz
FINLAND
09 693 79 554
www.samsung.com/dk
www.samsung.com/fi
FRANCE
GERMANY
HUNGARY
08 25 08 65 65 (€ 0,15/Min)
www.samsung.com/fr
01805 - 121213 (€ 0,t4/Min)
06 40 985 985
www.samsung.de
www.samsung.com/hu
ITALIA
LUXEMBURG
NETHERLANDS
NORWAY
POLAND
199 153 153
02 261 03 710
www.samsung.com/it
www.samsung.lu
www.samsung.com/nl
www.samsung.com/no
PORTUGAL
SLOVAKIA
SPAIN
80 8 200 128
0850 123 989
902 10 11 30
SWEDEN
U.K
RER Ireland
08 585 367 87
RUSSIA
UKRAINE
AUSTRALIA
CHINA
8-800-200-0400
8-800-502-0000
1300 362 603
ARGENTINE
BRAZIL
CHILE
COSTA RICA
ECUADOR
Latin America
Customer
0900 20 200 88 (€ 0.10/Min)
231 627 22
0 801 801 881
0870 SAMSUNG
0818 717 100
(7267864)
www.samsung.com/pl
www.samsung.com/pt
www.samsung.com/sk
www.samsung.com/es
www.samsung.com/se
www.samsung.com/uk
www.samsunq.com/uk
www.samsung.ru
HONG KONG
INDIA
800-810-5858, 010- 6475 1880
2862 6001
3030 8282
1600 1100 11
INDONESIA
JAPAN
MALAYSIA
0800-112-8888
0120-327-527
1800-88-9999
www.samsun 9.com/ur
www.samsung.com/au
www.samsung.com.cn
www.samsung.com/hk
www.samsung.com/in
PHILIPPINES
SINGAPORE
THAILAND
www.samsun,q.com/id
www.samsun,q.com/jp
www.samsun.cj.com/my
1800-10-SAMSUNG (7267864) www.samsun,q.com/ph
1800-SAMSUNG (7267864)
www.samsung.com/s,.cj
1800-29-3232
www.samsung.com/th
TAIWAN
02-689-3232
0800-329-999
VIETNAM
1 800 588 889
SOUTH AFRICA
U.A.E
0860 7267864 (SAMSUNG)
www.samsun 9.com/vn
www.samsung.com/za
800SAMSUNG
www.samsung.com/mea
www.samsung.com/tw
(7267864)
HEADQUARTE
RS
105
Challenger
Road,
Ridgefield
Park,
N.J.07660-0511
TEL:
1-800-SAMSUNG
SERVICE
DIVISION
400Valley
Road,
Suite
201
Mount
Arlington,
NJ07856
1-800-SAMSUNG
(726-7864)
www.samsung.com
AK68-01317A-01