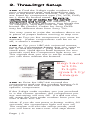
1
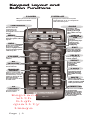
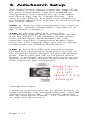
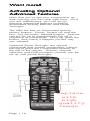
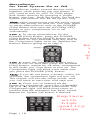
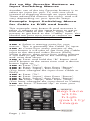
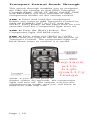
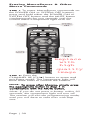
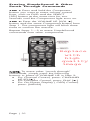
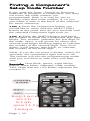
URC-A6
RemoteControl
Owner’s Manual
Replace
with
high
quality
image
Place URC
logo here.
Congratulations!
With your new URC-A6 universal remote,
you now have the power to control your
home entertainment system with just one
easy-to-use control. Thousands of audio and
video component codes have already been
programmed into the remote for you, making
it a breeze to set up. Be sure to install the
included batteries first. See page 5 for
instructions.
Quick Set-up
Note: Selecting the proper Component
button is a key to your success. If you have
a combination component that includes a
DVD or Blu-Ray player, use the DVD button
regardless of other functions, so that the DVD
transport controls will work properly. Select
SAT/CABLE for your cable box so the Menu,
Guide, Info and Exit buttons work correctly.
Set-up one component at a time, and you’ll
move quickly through your system.
STEP1: Turn on the component you want to
activate. (Other components can be on or
off, it doesn’t matter.)
STEP2:Point your new URC-A6 universal
remote toward the component and press the
appropriately labeled Component button (TV
for TV, DVD for DVD, etc.) While holding
this button down, press the numeric keys one
at a time sequentially (1, 2, 3, etc.) until the
component turns off.
STEP3:Release the Component button to
save the code. The component light will
blink three times to confirm that the code has
been stored.
Check your work before you move to the
next component. Press the POWER [ON]
button to turn the component back on.
Next, test the VOLUME and CHANNEL
buttons (or PLAY and STOP buttons for VCR
and DVD). Repeat Steps 1-3 to activate up
to six components.
Didn’t work for one of your components?
See other set-up options starting on page 7.
Page | 1
Keypad Layout and
Button Functions
POWER
Allows you to turn the selected
component on and off.
COMPONENTS
Used to select the
component you
want to operate
and signals remote control
activity.
MENU
Displays the Applications
Menu through the Cable Set
Top Box.
INFO
Displays information about
the program currently
playing or highlighted in the
Program Guide through the
Cable Set Top Box.
VOLUME
Raises or lowers the sound
volume.
MY
FAVORITES
Custom-programmable Favorite
Channel Buttons
TRANSPORT
CONTROLS
Perform standard VCR and
DVD functions when in VCR
and DVD mode, or VOD
(Video-On-Demand) and
DVR (Digital Video
Recorder) functions when
in Cable mode.
PIP
CONTROLS
Controls Picture-InPicture actions.
Replace
with
high
quality
image
Page | 2
SYSTEM OFF
Designed to send Power On/Off
commands for up to six components
with one button press.
GUIDE
Displays the
Program Guide
listings through
the Cable Set Top
Box.
CURSOR
NAVIGATION
PAD
Used for
programming steps
and on-screen
navigation and
highlighting.
EXIT
Exits from current
screen through the
Cable Set Top Box.
SELECT
Selects highlighted
screen options.
INPUT
Selects the video
source from
available
components.
LAST
Returns to the
previously tuned
channel through
the Cable Set Top
Box.
MUTE
Silences the Audio.
Press to activate. Press
again to restore sound
to the previous level.
NUMBER PAD
Use to enter code numbers
for programming
components and to enter
channel numbers to tune
in channels. Also used to
make numeric entries on
on-screen menus.
Table of Contents
Quick Set-up ..............................1
Keypad Layout & Button Functions..
................................................2
Getting Started – Overview
• Battery Installation..................5
• Activation Overview ..............5
• Using Component Buttons ......6
• Learning Capability................6
• Low Battery Warning..............6
• Couch Mode ........................6
Get Started with the Basics ........7
• Quick Set-Up ........................8
• Three-Digit Set-up .............9-10
• Auto-Search Set-up .........11-12
• Set-up Using the
Learning Method..............13-15
Activating Optional
Advanced Features...............16-17
• MacroPower™ Total System
On/Off ............................18
• “My Favorites”.................19-22
Activating Push Throughs ..........22
• SimpleSound™ Total System
Volume Control ....................23
• Channel Control
Punch Through ....................24
• Transport Control
Punch Through ....................25
• OSD (On-Screen Display)
Control Punch Through ..........26
Page | 3
Erasing Commands Overview ................................27
• Erasing a Single Learned
Command ..........................28
• Erasing All Learned Commands
from One Component ..........29
• Erasing MacroPower & Other
Macro Commands ..............30
• Erasing SimpleSound & Other
“Punch Through”
Commands..31
• Factory Reset ......................32
Finding a Component’s Set-Up
Code Number ..........................33
Pre-Programmed
Code Tables ..........................34
•
•
•
•
•
•
Cable/Sat ..........................35
TV..................................36-37
DVD/DVR. ..........................38
AUDIO ..............................39
AUX ..................................40
LIGHTS ..............................41
FAQs ....................................42
Warranty ................................43
Specifications ..........................43
Information to the user ..............44
Warnings ................................44
Page | 4
Getting Started - Overview
BatteryInstallation
Press the tab and remove the cover of the
battery compartment located in the back of
your remote. Insert the two AAA Alkaline
batteries (included in the package) making
sure to match the positive (+) and negative (-)
symbols as shown in the diagram. Place the
cover back over the battery compartment.
Replace
with
high
quality
image
Activationoverviewcontrolup
tosixcomponents
Your URC-A6 Universal remote control is
designed to operate virtually all brands of
AUDIO, TV, DVD, CD, SAT/CABLE, Lights,
and AUX (Music Server, games, etc.)
components.
ComponentButtons
Be sure to match your component to the
proper Component button on the top of the
remote.
If your component is a combination device
that includes a DVD option, program the
DVD or AUX button so that the transport
controls will work properly.
The AUX (Auxiliary) button is designed to
operate a 6th audio/video component that
you may have in your system… such as a
TIVO, a second VCR or DVD, or an
additional audio component.
Replace
with
high
quality
image
Page | 5
UsingComponentButtons
Once you have activated the URC-A6 remote
for all of your components, you can simply
press a Component button at the top of the
remote, and the buttons on the URC-A6 will
work with that component.
Each time you press a button on the remote,
the Component button light will turn on,
indicating which component you are
controlling.
LearningCapability
The URC-A6 has the ability to learn functions
from the original remote controls of other
manufacturers, even if they are not in our
pre-programmed database. See page 13 for
instructions.
LowBatteryWarning
When the batteries are low and need to be
replaced, the component light will quickly
blink three times when you press the POWER
ON button.
CouchMode
We’re watching out for your batteries. Your
URC-A6 remote is designed to automatically
turn itself off if a button is pressed for more
than 30 seconds. This prevents battery
power from being depleted if the remote
accidentally slips between the couch
cushions.
We love to help!
PLEASE CONTACT OUR TECHNICAL
SUPPORT CENTER.
E-MAIL: [email protected]
Phone: 1-800-901-0800 (9:00AM - 6:00PM
EST Monday - Friday)
PLEASE DO NOT RETURN
THIS PRODUCT TO THE STORE
Page | 6
Three ways to get started
There are three ways you can activate your
new URC-A6 universal remote control using
its pre-programmed codes.
1. Quick Set-Up (page 8)
2. Three-Digit Code Set-up (page 9)
3. Auto—Search Set-up (page 11)
Component Buttons
Selecting the proper Component button is a
key to your success. If you have a
combination component that includes a DVD
or Blu-Ray player, use the DVD button
regardless of other functions, so that the DVD
transport controls will work properly. Select
SAT/CABLE for your cable box so the Menu,
Guide, Info and Exit buttons work correctly.
In addition to activating the pre-programmed
codes, the URC-A6 universal remote has the
capacity to learn from your component
remote. See instructions on page 13.
AUX Component Button
While most component buttons are selfexplanatory, the AUX Component button is
designed for components such as Xbox ,
PS2 or PC media centers. Simply program
the AUX button in the same manner as any
other component using Quick Set-Up, the 3Digit Set-up or Auto-Search Set-up.
The AUX button can also be used for other
components such as a second TV, DVD, or
any other audio/video component that you
may have in your system. You may need to
activate the key as a Macro if you are
connecting a second DVD or VCR. See
page 16 for more information on automated
activity macros.
Page | 7
1. Quick Set-up
Set-up one component at a time, and you’ll
move quickly through your system.
Step1: Turn on the component you want to
activate. (Other components can be on or
off, it doesn’t matter.)
Step2: Point your new URC-A6 universal
remote toward the component and press the
appropriately labeled Component button (TV
for TV, DVD for DVD, etc.) While holding
this button down, press the numeric keys one
at a time sequentially (1, 2, 3, …) until the
component turns off.
Step3: Release the component button to
save the code. The component light will
blink three times to confirm that the code has
been stored.
Replace
with
high
quality
image
Check your work Press the POWER [ON]
button to turn the component back on.
Next, test the VOLUME and CHANNEL
buttons (or PLAY and STOP buttons for VCR
and DVD) to make sure they all work.
Repeat steps one through three until all your
components are set up properly.
Page | 8
2. Three-Digit Set-up
STEP1: Find the 3-digit code numbers for
your component type and brand from the
lists in the back of this manual. The codes
are listed by component type (TV, VCR, DVD,
etc.), then by brand name. Be sure to
identify the list of codes for the correct
component and brand. For instance, if you
would have a Sony television, first locate the
TV category, and then look for the Sony
brand. Be careful. Codes for Sony DVDs
may be different than from Sony TVs.
You may want to write the numbers down on
a piece of paper before moving to step two.
STEP2: Turn on the component you want to
activate. (Other components can be on or
off, it doesn’t matter.)
STEP3: On your URC-A6 universal remote,
press the Component button that you want to
set up and the SELECT [SEL] button at the
same time. Hold down both buttons for two
seconds until the Component light turns on.
This signals that you are in set-up mode, and
you can then release the buttons.
Replace
with
high
quality
image
STEP4:Point the URC-A6 toward the
component and use the number buttons 0-9
to punch in the first 3-digit code for that
specific component.
If the 3-digit code number you just punched
in is the correct number, the component you
are activating will turn off. If it did not turn
off, enter the next code number from your list
until it does turn off.
Note: If you do not press a button within 30
seconds, the component light will turn off.
The remote will exit the set-up mode, and
you will have to start over with step three.
Page | 9
STEP5: Check your work. Once you’ve
entered the code number and the component
has turned off, press the POWER [ON]
button to turn the component back on.
Next, test the VOLUME and CHANNEL
buttons (or PLAY and STOP buttons for VCR
and DVD) to make sure they all work.
For example, perhaps your TV turned off
with code number 147, but the volume
controls did not work properly. In this case,
try the next code number listed for that
component.
Repeat Steps 4 and 5 until you find a
perfect match.
STEP6: Save your work. Once you’ve
entered a correct code that turns off your
component, you must save it. Press the
Component button you just activated one
more time to save the code number. The
Component light will blink three times to
confirm that the code was successfully
stored.
IMPORTANT: If you have tried all the setup
codes in the list and the component still did
not turn off, either the Auto-Search Set-up
(page 11) or the Learning Method (page
13) will help you activate your component.
If you need assistance, contact our technical
support center at 1-800-901-0800 or
[email protected], and we’ll
be glad to walk you through it.
We love to talk!
PLEASE CONTACT OUR TECHNICAL
SUPPORT CENTER.
E-MAIL: [email protected]
Phone: 1-800-901-0800 (9:00AM - 6:00PM
EST Monday - Friday)
PLEASE DO NOT RETURN
THIS PRODUCT TO THE STORE
Page | 10
3. Auto-Search Set-up
The Auto-Search Set-up scans through all of
the codes in the table to find the right code
for your component. Use this method for
components you cannot set up with either
the Quick Set- Up or 3-Digit Set-up. This
step is not difficult, but tests your patience,
as it takes about five minutes to work through
the entire table.
STEP1: Turn on the component you want to
activate. (Other components can be on or
off, it doesn’t matter.)
STEP2: On the URC-A6, press the
Component button that you want to set up
and the SELECT [SEL] button at the same
time. Hold down both buttons for two
seconds until the Component button light
turns on. This signals that you are in set-up
mode and can release the buttons.
STEP3: Point the URC-A6 remote control
toward the component and press the UP or
the DOWN arrow button on the navigation
pad. Each time the UP or DOWN arrow
button is pressed, the code will count up (or
down) one code number and send a Power
OFF signal to the component.
Replace
with
high
quality
image
Navigation Pad
Continue pressing the up or down button, in
approximately one second intervals, until the
component turns off. (DO NOT alternate
the up and down button. You want to move
in only one direction.)
Page | 11
STEP4: Once the component has turned off,
check your work. Press the POWER ON
button on the URC-A6 remote to turn the
component back on.
Next, test the VOLUME and CHANNEL
buttons (or PLAY and STOP buttons for VCR
and DVD) to make sure they all work. If the
buttons do not work properly, you need to
find a new code. Continue pressing the UP
(or DOWN) arrow button until you find a
new code that turns off the component and
makes the VOLUME or PLAY buttons respond
correctly.
STEP5:Save your work. Once you have
found the right code, you must save it. Press
the component button you just activated one
more time to save the code number. The
component light will blink three times to
confirm that the code was successfully
stored.
Note: It may take up to five minutes to work
your way through the entire preprogrammed table. If you cannot find the
right code after 5 minutes of trying the AutoSearch Method, try the Learning Method
(page 13)
Page | 12
Set-up using the
Learning Method
STEP1: Line up the URC-A6 to the remote
control you want to “learn” from, head—to—
head as shown below. Start with the two
remotes’ infrared (IR) windows touching, or
nearly touching.
Replace
with
high
quality
image
STEP2: On the URC-A6, press the
Component button that you want to program
and the ENTER button at the same time.
Hold down both buttons for two seconds
until the Component button light turns on.
This signals that you are in programming
mode.
Replace
with
high
quality
image
STEP3: Press any button on the URC-A6 that
you want to teach a command to. For
example, if you want to teach the MUTE
button on the URC-A6 the TV Mute
command from the other remote, first press
the MUTE button on the URC-A6. The TV
Component button light will blink once
indicating that the URC-A6 is ready to learn
the command.
STEP4:Press and hold the appropriate
button on the other remote until the
component button light on the URC-A6 blinks
twice. This indicates the URC-A6 has learned
the command from your other remote.
Didn’t work? Tap and release the button on
your old remote instead of pressing and
holding the button down. See other tips on
page 15.
Page | 13
Step5: You can continue learning all other
buttons from your old remote by pressing the
next button on the URC-A6 and repeating
this step.
Note: The component light will blink five
times if there was an error in the learning
process. In this case, please repeat Steps 3
and 4.
STEP6: Save your work. Once the URC-A6
has learned all the buttons for the selected
component, press and hold the Component
button and ENTER buttons at the same time
to save the learned functions. The component
light will blink three times to confirm the setup.
Replace
with
high
quality
image
Check your work. Test all the buttons to
make sure they learned correctly. Repeat
Steps 1-5 to program any other component
modes.
We love to e-mail!
PLEASE CONTACT OUR TECHNICAL
SUPPORT CENTER.
E-MAIL: [email protected]
Phone: 1-800-901-0800 (9:00AM - 6:00PM
EST Monday - Friday)
PLEASE DO NOT RETURN
THIS PRODUCT TO THE STORE
Page | 14
If the Learning Method does not work, here
are a few suggestions:
● Infrared (IR) beams on all remotes are
sensitive to light, and can be impacted
several ways. Here are some things to
look out for:
- If you have a Plasma TV, move
farther away from it or to another
room while working with the
remotes.
- Avoid programming under
fluorescent light or direct sunlight.
Close your curtains during the day.
- If you have a glass top or metal
table, put a cloth between the table
and the remotes to reduce
reflections. It’s a great use for your
black t-shirts.
● Put new batteries in the old remote.
● Gradually vary the distance between the
two remote controls.
● Adjust the angles of the remotes (i.e.,
keep the URC-A6 on a flat surface while
holding the other remote in hand and
angling it down toward the URC-A6)
● Tap and release the button on your old
remote instead of pressing and holding
the button down
Here are some additional facts regarding
the learning process:
● Learned functions override any existing
preprogrammed functions on the remote
control
● Learned functions are automatically
erased when a new function is learned
on the same button
● Learned functions are retained even after
a different set-up code number is
programmed into the remote control
● To return to an original pre-programmed
function, a learned function must be
erased. See page 27.
Page | 15
Want more?
Activating Optional
Advanced Features
Now that you’ve got your components up
and running, you can stop right here. Or if
you are adventurous, you can set up
optional advanced features including
Automated Activity Macros and Punch
Throughs.
The URC-A6 has six Automated Activity
Macro buttons: Power, System off and the
four “My Favorites” lettered buttons. Macros
can be set up to automatically fire off a
sequence of commands. Set it up, press the
button, and watch it happen just the way
you wanted.
Optional Punch Throughs are special
commands that control components without
having to press the Component buttons at
the top of the remote. Volume, channel
selection and DVD transport controls can be
set up with punch throughs.
Replace
with
high
quality
image
Page | 16
Whattoknowbeforeyoustart:
● You can program up to 20 sequential
commands on a Macro button.
● You can program delays in between
commands by pressing the [PAUSE]
button on the transport control.
- Each press adds a one-half second
delay.
- If you add the delay time as the first
step of Macro commands, the remote
will not send the Macro unless the
button is held for two seconds.
● You can set up program macro
commands in layers by pressing the
[STOP] button in between commands.
This will allow you to rotate commands,
and is typically used to program channel
lists. For example, when working the
“My Favorites” button, if you press
[009], [STOP], [035], [STOP], [365],
[STOP] the remote will send out 009 at
the first press of the selected [My
Favorites] button, and then send out 035
at the second press, etc.
● You cannot set-up the [CH ▲▼] or
[PAUSE ║] buttons with macros.
Page | 17
MacroPower™
forTotalSystemOnorOff
MacroPower makes several devices work
together while pressing just one button. If
you want to turn on your TV, DVD player
and audio receiver by pressing a single
button, you can. Both the Power On and the
System Off buttons can be set up this way.
Note: Most components use the same signal
to turn the power on and off. You may want
to set-up MacroPower only in the POWER
[ON] button and save the [SYSTEM OFF]
button to turn components on or off
individually.
STEP1:To set-up MacroPower for the
POWER [ON] button, press the POWER
[ON] button and the [MUTE] button at the
same time for two seconds until any one of
the Component lights turns on. Release the
buttons before going on to step 2.
Re
w
h
qu
im
STEP2: Press the component button you
want to turn on and then press the POWER
[ON] button; repeat for all other components
in the order you want them to turn on. The
Component light will blink once each time
you press the POWER [ON] button.
Note: If you do not press a button within 30
seconds, the component light will turn off.
The remote will exit the set-up mode, and
you will have to start over with step one.
STEP3: Once you’ve entered all the
Power On commands, press the CHANNEL
Up [CH ▲] button to save commands. The
Component light will blink three times to
confirm that the activation has been saved.
Repeat for System Off button if desired.
Replace
with
high
quality
image
Page | 18
MyFavoritesButtons
The four MY FAVORITES buttons (A, B, C
and D) can be set up as dedicated Favorite
Channel buttons or lists, or you can give
them the power of Macro commands.
Set up a dedicated Favorite Channel:
STEP1: Press the CABLE/SAT button
STEP2: Press one of the MY FAVORITES
buttons and the MUTE button at the same
time for two seconds until the CABLE/SAT
Component light turns on.
lace
th
gh
lity
ge
STEP3: Using the Number Pad, punch in the
Channel number that you want to store in
the My Favorites button.
STEP4: Press the CHANNEL UP [CH▲]
button to store the commands entered. The
CABLE/SAT Component light will blink three
times to confirm the set-up.
Set up a Top 5 “My Favorites” List:
Each of the four “My Favorite” buttons can
be set up to surf/rotate through up to five
channels. Set up lists for family members or
category lists such as music or sports.
STEP1:Press the CABLE/SAT button
STEP2: Press one of the MY FAVORITES
buttons and the MUTE button at the same
time for two seconds until the CABLE/SAT
Component light turns on.
STEP3:Write down the list of channels, and
punch them in sequentially, pressing the stop
button between each channel. For example,
if you press [009], [STOP], [035], [STOP],
[365], [STOP] the remote will send out 009
at the first press of the selected “My
Favorites” button, and then send out 035 at
the second press, etc.
lace
th
gh
lity
ge
Page | 19
STEP4: Save your work. After you have
input your five channels, Press the
CHANNEL UP [CH▲] button to store the
commands entered. The CABLE/SAT
Component light will blink three times to
confirm the set-up.
Set up “My Favorite” buttons as Automated
Activity Macros
If you don’t want to program every Favorite
button as a favorite channel or list, you can
set up remaining buttons to send a series of
commands to the components that you
already set up. Our favorite macro is
turning “My Favorite” button D into a
“Watch a Loud Movie” command, so that
you can press one button to turn on the
DVD, TV and Audio system. Then all you
have to do is put in the DVD, hit play, and
turn up the volume. No more juggling
multiple remotes and trying to remember all
the commands.
Here’s how you can set that up.
STEP1:Write down the sequence of events
you desire on a piece of paper. For
instance: Turn off Cable/Sat, Turn on TV,
Set TV Input to DVD, Turn on DVD, Turn on
AUD, set AUD Input to DVD. (Your steps may
vary up to a maximum of 20 activities). You
might want to do a dry run to make sure you
have all the activities in order.
STEP2: Press and hold the button D.
STEP3: Press and hold the MUTE button for
three seconds.
STEP4:Input all steps of the actions that
you wrote down in step one. For instance,
press Cable/Sat, press power off, press TV,
press power on, change TV input to DVD,
press AUD, press power on, etc.
STEP 5: Save your work. After you have
input your commands, Press the CHANNEL
UP [CH▲] button to store this series of
commands as an automated activity macro.
The [DVD] Component light will blink three
times to confirm the set-up.
TV input button not working right? You may
want to teach your new URC-A6 remote from
your TV remote. See page 13 for the
Learning Method.
Page | 20
Setup“MyFavoriteButtonsas
InputSwitchingMacros
Another use of the My Favorite buttons is to
select an input for your TV with one click
instead of toggling through an input button.
These advanced macros are tricky, and will
vary depending on your specific setup.
ExampleInputSwitchingMacro
forCabletoDVDandback.
This example uses button B and assumes it
takes 2 presses of the input button to get to
from the Cable to the “DVD” input, and 3
presses to get back to the “Cable” input. You
should use your own count to reduce or
increase steps with “Input, Pause”
commands.
STEP1: Select a starting point for your
macro. This is generally the Cable TV input.
STEP2:Count how many presses of the
input button it will take to get from the Cable
input to the desired video source (DVD),
Write it down, then count how many presses
it will take to get back to the starting point
and write that down.
STEP3: Press and hold the “B” button and
MUTE button at the same time until a device
button lights up.
STEP4: Press “TV”.
STEP5: Press “Input”, then Press “Pause”.
STEP6:Press “Input”, then Press “Stop”.
(You have changed the input from Cable to
DVD)
STEP7: Press “TV”.
STEP8: Press “Input”, then Press “Pause”.
STEP9: Press “Input”, then Press “Pause”.
STEP10: Press “Input”, then Press “Stop”.
(You have changed the input back to Cable)
STEP11: Press “Channel Up” to save your
new macro.
Replace
with
high
quality
image
Page | 21
Pressing “Pause” in between input
commands adds a delay to assure that all
commands get sent properly. Pressing the
“Stop” button allows you to start a new
macro. Now you can toggle from Cable TV
input to DVD and back again using your
“My Favorite” B button.
Note: Remember, always switch back to the
default starting point. This way it sets up the
next macro on another “My Favorites” button
to execute properly.
SettingUpOptional
PunchThroughs
Punch Throughs are special commands that
control components without having to press
the Component buttons at the top of the
remote.
If you find yourself switching to a particular
component mode frequently to access a
particular control, (TV Volume up or down,
for example) consider setting up a Punch
Through.
Page | 22
SimpleSound™ TotalSystem
VolumeControlPunchThrough
SimpleSound gives you total volume control
over ALL the components in your system,
even those that do not have built—in volume
control, such as TIVO, DVD and VCR. It
saves you the hassle of switching between
component modes just to control volume.
STEP1: Identify which device in your system
will be used to deliver sound. In a basic
system, the sound may come from your TV
speaker. In a more advanced system, the
sound may come from your audio
components (such as a Surround Sound
Receiver or Home Theatre system).
STEP2:Press and hold the Component
button that corresponds to the Component
you want to add volume control to (such as
a DVD) and the SELECT (SEL) button at the
same time for about three seconds until the
component light turns on. Release the
buttons.
STEP3: Press the VOLUME UP [VOL▲]
button and then press either the TV or
AUDIO Component button that you want to
use for volume. The Component light will
blink three times to confirm that it is saved.
This sets up three buttons (Volume Up,
Volume Down and MUTE) as a group for
that component. Repeat Steps 1-2 for all
other components.
Replace
with
high
quality
image
Note: If you do not press a button within 30
seconds, the component light will turn off.
The remote will exit the programming mode,
and you will have to start over with step
one.
Page | 23
ChannelControlPunchThrough
This punch through lets you set up the URCA6 remote so that either the Cable or TV
Channel Controls (CHANNEL UP, DOWN,
LAST, CHANNEL NUMBERS 0-9, +10 and
ENTER) will operate in other component
modes on the remote control.
STEP1: Press and hold the component
button you want to add channel control to,
such as [DVD] or [VCR], and the SELECT
[SEL] button at the same time for two
seconds until the Component light turns on.
Release the buttons.
STEP2: Press the CHANNEL UP [CH▲]
button. The component LED light will blink
once.
STEP3: Press either the [TV] or CABLE/SAT]
button that you want to use as the source of
channel control. The component light will
blink three times to confirm it is saved.
Replace
with
high
quality
image
Note: If you do not press a button within 30
seconds, the component light will turn off.
The remote will exit the programming mode,
and you will have to start over with step
one.
Page | 24
TransportControlPunchThrough
This punch through enables you to program
the URC-A6 remote so that DVD Transport
Controls (PLAY, STOP, FF, REW, PAUSE, SKIP
and RECORD) will also operate in other
component modes on the remote control.
STEP1: Press and hold the component
button you want to add Transport Control to,
such as [CABLE/SAT] or [TV], and the
SELECT [SEL] button at the same time for two
seconds until the Component light turns on.
STEP2: Press the [PLAY] button. The
Component light will blink once.
STEP3: Press either the [DVD] or [VCR]
button that you want to use as the source of
Transport Control. The component light will
blink three times to confirm it is saved.
Replace
with
high
quality
image
Note: If you do not press a
button within 30 seconds, the component
light will turn off. The remote will exit the
programming mode, and you will have to
start over with step one.
Page | 25
OSD(On-ScreenDisplay)Control
PunchThrough
This “punch through” enables you to
program the URC-A6 so that CBL or DVD
OSD Controls (MENU, GUIDE, INFO, EXIT,
SEL and 4 Cursor Controls) will also operate
in other component modes on the remote
control.
STEP1: Press and hold the component
button you want to add OSD Control to,
such as [TV] or [VCR], and the SELECT [SEL]
button at the same time for two seconds until
the Component LED light turns on.
STEP2: Press the [MENU] button. The
component LED will blink once.
Note: If you do not press a button within 30
seconds, the component light will turn off.
The remote will exit the programming mode,
and you will have to start over with step
one.
STEP3: Press either the [CABLE/SAT] or
[DVD] button that you want to use as the
source of OSD Control. The component LED
will blink three times to confirm it is saved.
Replace
with
high
quality
image
On Screen Display (OSD)
Page | 26
Erasing Commands Overview
If you have set up your macros and punch
throughs, you should be able to put all your
other controls away for safe keeping.
However, you may find one pesky control
you want to change or get rid of. The URCA6 allows you to erase commands easily.
You can erase a single learned command,
all learned commands in each component
mode, SimpleSound programming,
MacroPower commands, or re—set the
remote to original factory default settings.
These next few pages walk you through the
process.
Page | 27
ErasingaSingleLearned
CommandfromOneComponent
STEP1: Press the component button where
the learned command is stored and the
[ENTER] button at the same time for two
seconds until the component light turns on.
Replace
with
high
quality
image
STEP2: Press and hold the button you want
to erase for two seconds. The component
light will blink twice to confirm the erasure.
Note: If you do not press a button within 30
seconds, the component light will turn off.
The remote will exit the programming mode,
and you will have to start over with step
one.
STEP3:Repeat Step 2 to erase any other
buttons in the selected component mode.
STEP4:To exit Erase mode, press and hold
both the component button and the [ENTER]
button at the same time until the component
light blinks three times.
Page | 28
ErasingAllLearnedCommands
fromOneComponent
This function allows you to erase all the
learned commands from one component.
For example, if you want to erase all learned
commands on the TV component button
because you bought a new TV, the process
is very simple.
STEP1: Press the component button where
all the learned commands are stored and the
[ENTER] button at the same time for two
seconds until the component light turns on.
STEP2: Press and hold both the component
button you want to erase and the [PAUSE]
button at the same time for two seconds,
until the component light blinks twice to
confirm the erasure.
Replace
with
high
quality
image
Note: If you do not press a button within 30
seconds, the component light will turn off.
The remote will exit the programming mode,
and you will have to start over with step
one.
STEP3: To exit Erase mode, press and hold
both the component button and the [ENTER]
button at the same time until the component
light blinks three times.
Page | 29
ErasingMacroPower&Other
MacroCommands
STEP1: To erase MacroPower commands on
the POWER ON or SYSTEM OFF buttons,
press and hold either the POWER ON or
SYSTEM OFF button and the MUTE button
simultaneously for two seconds until the
current status Component light turns on.
Replace
with
high
quality
image
STEP2:Press the
CHANNEL UP [CH▲] button to erase and
exit Erase mode. The component light will
blink three times to confirm the erasure.
NOTE:To erase other Macros, simply press
the appropriate button in Step 1 in
combination with the MUTE button.
Note: If you do not press a button within 30
seconds, the component light will turn off.
The remote will exit the programming mode,
and you will have to start over with step
one.
Page | 30
ErasingSimpleSound&Other
PunchThroughCommands
STEP1: Press and hold the Component
button you want to erase volume control
from, such as DVD and the SELECT
[SEL] button at the same time for two
seconds until the Component light turns on.
STEP2: Press the VOLUME UP [VOL ▲]
button and the same Component button from
Step 1. The component light will blink three
times to confirm the erasure.
Repeat Steps 1—2 to erase SimpleSound
commands from other components.
Replace
with
high
quality
image
NOTE: To erase other “punch through”
commands, simply press the following
buttons in place of VOLUME UP in Step 2:
● For Channel Control, press: CHANNEL
UP [CH▲]
● For Transport Control, press: PLAY [►]
● For On-Screen Display ( OSD) Control,
press: [MENU]
Page | 31
Factory Reset
You can reset your URC-A6 remote to the
original factory default settings.
Press and hold both the [TV] and RECORD
[REC] buttons for about five seconds until the
[CABLE/SAT] Component light blinks five
times. All programming and set-up codes
that you have entered into the remote will be
erased and the URC-A6 will return to the
original factory default settings.
Replace
with
high
quality
image
Warning
This procedure will erase all programming
and set-up codes that you have entered into
the remote.
Page | 32
Finding a Component’s
Set-up Code Number
If you used the Auto—Search or Learning
Methods to program a component, you may
not know the code number you
programmed. Here is a way for you to
identify what that code number is, so you
can make a note in the back of this Manual
for future reference.
STEP1: Press the component button you
would like to verify and the SELECT [SEL]
button at the same time for two seconds until
the selected Component light turns on.
STEP2: Press the [INFO] button and count
the number of times the Component LED light
blinks. This number indicates the first digit of
the code. Next, it will pause for about one
second and begin blinking again to indicate
the number of the second digit. Then once
again it will pause, then blink, to indicate
the number of the third digit.
Note: If you do not press a button within 30
seconds, the component light will turn off.
The remote will exit the programming mode,
and you will have to start over with step
one.
Example: One blink, pause, eight blinks,
pause, three blinks indicates code number
183. Note that ten (10) blinks represent the
number 0.
Replace
with
high
quality
image
Page | 33
Pre-Programmed
Code Tables
The URC-A6 Pre-Programmed code library is
classified by category (Audio, CD,
VCR/DVR, etc.). Within each category, the
code numbers are listed in rows by brand
(Sony, Panasonic, B & K, etc.). Some brands
have more than one three digit code.
Circle the correct row and refer to it while
you perform setup operations.
CABLE/
SAT
Cable Set Top Boxes
& Satellite Receivers
TV
TVs, Plasmas,
Projectors &
Monitors
DVD
DVD Players &
Recorders, DVRs, and
Combo Units
38
AUDIO
Amps, Preamps &
A/V Receivers
39
AUX
iPod, Media PC,
Gaming System,
40
Lights
Lighting Controls
41
35
36-37
Ohsung
Insert
codes
Page 34
Cable/Sat
(insert codes from original doc)
Ohsung
Insert
codes
Page 35
TV
(insert codes from original doc)
Ohsung
Insert
codes
Page 36
TV
(insert codes from original doc)
Ohsung
Insert
codes
Page 37
DVD/DVR/VCR
(insert codes from original doc)
Ohsung
Insert
codes
Page 38
Audio
(insert codes from original doc)
Ohsung
Insert
codes
Page 39
AUX
(insert codes from original doc)
Ohsung
Insert
codes
Page 40
Lights
(insert codes from original doc)
Ohsung
Insert
codes
Page 41
Frequently Asked
Questions
If the batteries run out, will I lose my
settings?
No. The URC-A6 stores all of your settings in
nonvolatile FLASH memory. You could
remove the batteries for months, replace
them at your convenience, and the URC-A6
would still remember your settings.
What about my Blu-Ray player?
Treat your Blu-Ray player just like a DVD.
You can set it up using the DVD button, or
you can take another unused button(AUX)
and set it up using a Macro command. See
page18.
My code number isn’t listed in your manual.
Is there anywhere else I can find it?
Many codes are listed online in the
manufacturer’s website. Use your favorite
search engine to search the brand,
component, and code. For example
“Westinghouse TV code”
What if my remote control no longer works
from a distance?
Replace the batteries with new Alkaline
batteries.
Who can I contact for more answers?
The Universal Remote Control technical
support and customer service staff are ready
to answer any questions you might have.
E-Mail us at
[email protected]
Visit our website www.universalremote.com
Call us at (914) 835-4484
Monday - Friday, 9AM to 6PM (EST)
Page | 42
USA Limited Warranty
UNIVERSAL REMOTE CONTROL, INC.
warrants this product against defects in
material or workmanship for a period of one
(1) year and as set forth below. Universal
Remote Control will, at its sole option, repair
the product using new or comparable rebuilt
parts, or exchange the product for a
comparable new or rebuilt product.
This warranty not does apply to the
following:
● Units purchased from unauthorized
resellers.
● Units purchased second-hand (used).
● Units installed or deployed for rental or
commercial use.
● Damage caused by misuse, neglect, or
acts of nature.
● Products that have been modified or
incorporated into other products.
● Products purchased more than 12 months
ago.
Specifications
Learning Capability
IR frequencies (15kHz to 100kHz)
Macro Capability
6 Macros of up to 20 steps each
IR Range (Line of Sight via Infrared)
30—50 feet, depending on operational
environmental conditions
Weight .........6.9 oz. (with batteries)
Size ...............2 1/8”W x 8 3/4”H x 1
1/8”D
Batteries......Two AAA Alkaline batteries
(included)
Page | 43
This Owner’s Manual is designed to assist
you in programming your URC-A6 remote to
work with your components by guiding you
through an easy step-by-step process.
Everything you need to know about
programming the URC-A6 is contained in
this Manual.
Information to the User
This equipment has been tested and found to
comply with the limits for a Class B digital
device, pursuant to part 15 of the FCC
Rules.
These limits are designed to provide
reasonable protection against harmful
interference in a residential installation. This
equipment generates, uses and can radiate
radio frequency energy and, if not installed
and used in accordance with the
instructions, may cause harmful interference
to radio communications.
However, there is no guarantee that
interference will not occur in a particular
installation. If this equipment does cause
harmful interference to radio or television
reception, which can be determined by
turning the equipment off and on, the user is
encouraged to try to correct the interference
by one more of the following measures:
● Reorient or relocate the receiving
antenna.
● Increase the separation between the
equipment and receiver.
● Connect the equipment into an outlet on
a circuit different from that to which the
receiver is connected.
● Consult the dealer or an experienced
radio/TV technician for help.
Warning
Changes or modifications not expressly
approved by the manufacturer could void the
user’s authority to operate the equipment.
Note: The manufacturer is not responsible for
any Radio or TV interference caused by
unauthorized modifications to this
equipment. Such modifications could void
the user’s authority to operate the
equipment.
Page | 44
URC-A6Owner’sManual
© 2011UniversalRemoteControl,Inc.
This document is protected by the copyright
laws of the United States and internationally
by the Berne Convention. No part of this
manual may be reproduced in any form
without the express written consent of
Universal Remote Control, Inc. Although
reasonable care has been taken to assure
the accuracy of the information herein
contained, Universal Remote Control, Inc. is
not responsible for operational, technical or
editorial errors or omissions. The
specifications and information in this manual
may be subject to change without notice.
MacroPower™ and SimpleSound™ are
trademarks of Universal Remote Control, Inc.
Entertainment Made Simple® is a registered
trademark of Universal Remote Control, Inc.
All other brand or product names are
trademarks or registered trademarks of their
respective owners.
500 Mamaroneck Avenue, Harrison, NY 10528
Phone: (914) 835-4484 Fax: (914) 835-4532
Page | 45
The Pioneer in Control Technology
500 Mamaroneck Avenue, Harrison, NY 10528
Phone: (914) 835-4484 Fax: (914) 835-4532
www.universalremote.com
OCE-0085A Rev 06


![DECT方式デジタルコードレス電話機[DECT3280]](http://vs1.manualzilla.com/store/data/006600010_2-2b99aaf0090061f3bc7f3d80f38cef6a-150x150.png)