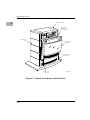
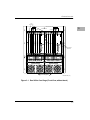
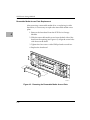
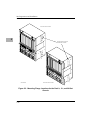
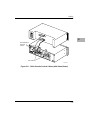
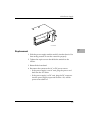
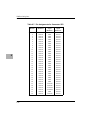
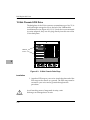
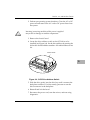
1
XR Series System
Chassis Reference Guide
XRCHASA/IH1
Notice
While reasonable efforts have been made to assure the accuracy of this document,
Motorola, Inc. assumes no liability resulting from any omissions in this document,
or from the use of the information obtained therein. Motorola reserves the right to
revise this document and to make changes from time to time in the content hereof
without obligation of Motorola to notify any person of such revision or changes.
No part of this material may be reproduced or copied in any tangible medium, or
stored in a retrieval system, or transmitted in any form, or by any means, radio,
electronic, mechanical, photocopying, recording or facsimile, or otherwise,
without the prior written permission of Motorola, Inc.
It is possible that this publication may contain reference to, or information about
Motorola products (machines and programs), programming, or services that are
not announced in your country. Such references or information must not be
construed to mean that Motorola intends to announce such Motorola products,
programming, or services in your country.
Restricted Rights Legend
If the documentation contained herein is supplied, directly or indirectly, to the U.S.
Government, the following notice shall apply unless otherwise agreed to in
writing by Motorola, Inc.
Use, duplication, or disclosure by the Government is subject to restrictions as set
forth in subparagraph (c)(1)(ii) of the Rights in Technical Data and Computer
Software clause at DFARS 252.227-7013.
Motorola, Inc.
Computer Group
2900 South Diablo Way
Tempe, Arizona 85282
Preface
The XR Series System Reference Guide is written for the person who needs
advanced operational information about the XR system. The manual presents a
technical discussion of all the major components of the computer system.
Motorola® and the Motorola symbol are registered trademarks of Motorola, Inc.
PowerPC™ is a trademark of IBM, and is used by Motorola with permission.
All other products mentioned in this document are trademarks or registered
trademarks of their respective holders.
© Copyright Motorola 1997
All Rights Reserved
Printed in the United States of America
January 1998
Safety Summary
Safety Depends On You
The following general safety precautions must be observed during all phases of operation, service, and
repair of this equipment. Failure to comply with these precautions or with specific warnings elsewhere in
this manual violates safety standards of design, manufacture, and intended use of the equipment.
Motorola, Inc. assumes no liability for the customer's failure to comply with these requirements.
The safety precautions listed below represent warnings of certain dangers of which Motorola is aware. You,
as the user of the product, should follow these warnings and all other safety precautions necessary for the
safe operation of the equipment in your operating environment.
Ground the Instrument.
To minimize shock hazard, the equipment chassis and enclosure must be connected to an electrical ground.
Both AC and DC versions of this equipment require a three-conductor power cable. A supplementary
chassis ground is also provided. AC power cables must be plugged into an approved three-contact
electrical outlet. The power jack and mating plug of the power cable must meet International
Electrotechnical Commission (IEC) safety standards.
Do Not Operate in an Explosive Atmosphere.
Do not operate the equipment in the presence of flammable gases or fumes. Operation of any electrical
equipment in such an environment constitutes a definite safety hazard.
Keep Away From Live Circuits.
Operating personnel must not remove equipment covers. Only Factory Authorized Service Personnel or
other qualified maintenance personnel may remove equipment covers for internal subassembly or
component replacement or any internal adjustment. Do not replace components with power cable
connected. Under certain conditions, dangerous voltages may exist even with the power cable removed. To
avoid injuries, always disconnect power and discharge circuits before touching them.
Do Not Service or Adjust Alone.
Do not attempt internal service or adjustment unless another person capable of rendering first aid and
resuscitation is present.
Use Caution When Exposing or Handling the CRT.
Breakage of the Cathode-Ray Tube (CRT) causes a high-velocity scattering of glass fragments (implosion).
To prevent CRT implosion, avoid rough handling or jarring of the equipment. Handling of the CRT should
be done only by qualified maintenance personnel using approved safety mask and gloves.
Do Not Substitute Parts or Modify Equipment.
Because of the danger of introducing additional hazards, do not install substitute parts or perform any
unauthorized modification of the equipment. Contact your local Motorola representative for service and
repair to ensure that safety features are maintained.
Dangerous Procedure Warnings.
Warnings, such as the example below, precede potentially dangerous procedures throughout this manual.
Instructions contained in the warnings must be followed. You should also employ all other safety
precautions which you deem necessary for the operation of the equipment in your operating environment.
!
WARNING
Dangerous voltages, capable of causing death, are present in
this equipment. Use extreme caution when handling, testing,
and adjusting.
!
WARNING
This equipment has been tested and found to comply with the
limits for a Class A digital device, pursuant to part 15 of the FCC
Rules. These limits are designed to provide reasonable
protection against harmful interference when the equipment is
operated in a commercial environment. This equipment
generates, uses, and can radiate radio frequency energy, and if
not installed and used in accordance with the instruction
manual, may cause harmful interference to radio
communications. Operation of this equipment in a residential
area is likely to cause harmful interference, in which case the
user will be required to correct the interference at his own
expense.
Changes or modifications not expressly approved by Motorola
Computer Group could void the user’s authority to operate the
equipment.
Addition of any user-installed electronics or cabling could be
constituted as a modification of the equipment and could limit
the user’s authority to operate the equipment without
additional qualification.
This digital apparatus does not exceed the Class A limits for
radio noise emissions from digital apparatus as set out in the
radio interference regulations of the Canadian Department of
Communications.
Le présent appareil numérique n’émet pas de bruits
radioélectriques dépassant les limites applicables aux appareils
numériques de Classe “A” prescrites dans le règlement sur le
brouillage radioélectrique édicté par le Ministère des
Communications du Canada.
CE Notice (European Community)
Marking a system with the “
“ symbol indicates compliance of that
Motorola system to the EMC and Low Voltage directives of the
European Community. A system with the CE marking meets or exceeds
the following technical standards:
EN 55022 “Limits and methods of measurement of radio interference
characteristics of information technology equipment.”
EN 50082-1 “Electromagnetic compatibility - Generic immunity
standard Part 1: Residential, commercial, and light industry.”
IEC 801-2 “Electromagnetic compatibility for industrial process
measurement and control equipment Part 2: Electrostatic discharge
requirements.”
IEC 801-3 ”Electromagnetic compatibility for industrial-process
measurement and control equipment Part 3: Radiated
electromagnetic field requirements.”
IEC 801-4 “Electromagnetic compatibility for industrial - process
measurement and control equipment Part 4: Electrical fast transient/
burst requirements.”
EN 60950 “Safety of information technology equipment, including
electrical business equipment.”
In accordance with European Community directives, a “Declaration of
Conformity” has been made and is on file at Motorola, Inc. - Computer
Group, 27 Market Street, Maidenhead, United Kingdom, SL6 8AE.
In addition to the above standards, this system has also met the
requirements of the following European standards:
EN 60555-2 “Disturbances in supply systems caused by household
appliances and similar electrical equipment Part 2: Harmonics.”
EN 60555-3 “Disturbances in supply systems caused by household
appliances and similar electrical equipment Part 3: Voltage
fluctuations.”
WARNING
This is a Class A product. In a domestic environment, this product may
cause radio interference in which case the user may be required to take
adequate measures.
Contents
Chapter 1
Introduction
About the XR Series Systems..............................................................................1-1
About this Guide ..................................................................................................1-3
The System Platforms ...................................................................................1-3
Related Documentation.......................................................................................1-4
Chapter 2
Original XR Chassis
Chassis Overview.................................................................................................2-1
3-Slot System ..................................................................................................2-1
Dual 9-slot System .........................................................................................2-2
12-slot System.................................................................................................2-5
20-slot System.................................................................................................2-7
Chassis Specifications ..........................................................................................2-9
3-Slot Chassis..................................................................................................2-9
Dual 9-, 12-, and 20-Slot Chassis................................................................2-10
Chassis Use..........................................................................................................2-12
Front Bezel Removal ...................................................................................2-12
Front Bezel Replacement ............................................................................2-14
Side Panel/Pedestal Cover Removal and Replacement ........................2-15
Side Panel Removal ..............................................................................2-17
Side Panel Replacement .......................................................................2-19
Pedestal Cover Removal and Replacement.......................................2-19
Chapter 3
Extended XR Chassis
Chassis Overview.................................................................................................3-1
Dual 9-slot System .........................................................................................3-2
20-slot System.................................................................................................3-4
Chassis Specifications ..........................................................................................3-6
Chassis Use............................................................................................................3-8
Front Bezel Removal .....................................................................................3-8
Front Bezel Replacement ............................................................................ 3-11
vii
Chapter 4
SCSI Device Storage Module
Overview............................................................................................................... 4-1
Backplanes ...................................................................................................... 4-1
Chassis Options ............................................................................................. 4-1
Power Supply................................................................................................. 4-2
Drive Carriers................................................................................................. 4-2
Environmental Monitoring .......................................................................... 4-3
Specifications ........................................................................................................ 4-4
Original Chassis............................................................................................. 4-4
Extended Chassis........................................................................................... 4-5
Power Supply................................................................................................. 4-6
Backplane........................................................................................................ 4-7
SCSI Device Storage Module Procedures ......................................................... 4-8
Front Bezel Removal and Replacement (Original Chassis)..................... 4-8
Removal.................................................................................................... 4-8
Replacement ............................................................................................ 4-8
Front Bezel Removal and Replacement (Extended Chassis)................. 4-10
Removal.................................................................................................. 4-10
Replacement .......................................................................................... 4-10
Removable Media Access Plate Removal.......................................... 4-11
Removable Media Access Plate Replacement .................................. 4-12
SCSI Device Storage Module Removal and Replacement..................... 4-13
Module Removal................................................................................... 4-13
Module Replacement............................................................................ 4-14
SCSI Drive Removal and Replacement .................................................... 4-16
Drive Removal....................................................................................... 4-16
Drive Replacement ............................................................................... 4-16
Power Supply Removal and Replacement .............................................. 4-18
Removal.................................................................................................. 4-18
Replacement .......................................................................................... 4-19
Cooling Fan Removal and Replacement.................................................. 4-20
Removal.................................................................................................. 4-20
Replacement .......................................................................................... 4-20
Chapter 5
Site Preparation and Installation
Placement Recommendations ............................................................................ 5-1
Weight Distribution....................................................................................... 5-2
viii
Power Requirements............................................................................................5-2
Guidelines for Using Branch Circuits .........................................................5-2
Power Circuit Protection ..............................................................................5-3
Circuit Breakers and Receptacles ................................................................5-4
Electro-Static Discharge ................................................................................5-4
Installation Options .............................................................................................5-6
Pedestal Installation ......................................................................................5-6
Rack System Installation...............................................................................5-8
Cabling.................................................................................................................5-13
Cables ............................................................................................................5-13
Power Cords ..........................................................................................5-15
ElectroMagnetic Compatibility Guidelines.......................................5-15
3-Slot Chassis Cabling.................................................................................5-16
Data/Control Cables (without Alarm Board)...................................5-16
Data/Control Cables (with Alarm Board).........................................5-18
Environmental Monitor Cables...........................................................5-20
Power Cables (AC system) ..................................................................5-20
Power Cables (DC system) ..................................................................5-20
Power Supply Limit Considerations ..................................................5-22
Dual 9-, 12-, and 20-Slot Chassis Cabling.................................................5-23
Control Cables (12- and 20-Slot Systems without Alarm Board)...5-23
Control Cables (12- and 20-Slot Systems with Alarm Board).........5-25
Control Cables (Dual 9-Slot System without Alarm Board) ...........5-27
Control Cables (Dual 9-Slot System with Alarm Board).................5-28
Power Cables (AC Chassis) .................................................................5-29
Power Cables (DC Chassis) .................................................................5-30
Chapter 6
Chassis Operations
Controls and Indicators .......................................................................................6-1
Key Switch Control........................................................................................6-2
3-Slot Indicators .............................................................................................6-3
Dual 9-, 12-, and 20-slot Indicators..............................................................6-3
Power On/Off Procedures..................................................................................6-4
Recommended Power-On Procedure .........................................................6-4
Recommended Power-Off Procedure .........................................................6-7
Emergency Power Removal .........................................................................6-7
Chassis Cooling ....................................................................................................6-7
3-Slot Chassis..................................................................................................6-7
ix
Dual 9-, 12-, and 20-slot Chassis.................................................................. 6-9
Environmental Monitoring............................................................................... 6-12
Assemblies Monitored ................................................................................ 6-12
Temperature Monitoring Function ........................................................... 6-13
Power Supply and Card Cage............................................................. 6-13
SCSI Enclosure ...................................................................................... 6-14
Voltage Monitoring Function..................................................................... 6-14
Overtemperature Warning LED ................................................................ 6-15
Recovery ....................................................................................................... 6-15
Chapter 7
Power Supplies
3-Slot Power Supply ............................................................................................ 7-1
Removal .......................................................................................................... 7-2
Replacement ................................................................................................... 7-3
Dual 9-, 12-, and 20-Slot Power Supply ............................................................ 7-4
Load Sharing ................................................................................................ 7-12
Removal and Replacement ........................................................................ 7-13
Dual 9-Slot/Single Power Supply Replacement .............................. 7-13
12- and 20-Slot Hot Swap Replacement............................................. 7-14
12- and 20-Slot Hot Add ...................................................................... 7-16
Chapter 8
VMEbus Backplane
Description............................................................................................................ 8-1
3-Slot Backplane............................................................................................. 8-1
VMEbus Interface Signals...................................................................... 8-3
Dual 9-, 12-, and 20-Slot Backplane ............................................................ 8-7
Specifications ......................................................................................... 8-11
VMEbus Interface Signals.................................................................... 8-11
Features ............................................................................................................... 8-15
Signal Line Termination ............................................................................. 8-15
Autojumpering ............................................................................................ 8-15
VMEbus Interconnectivity ......................................................................... 8-16
Backplane Power ......................................................................................... 8-16
Chapter 9
Field Replacable Units
3-Slot Chassis ........................................................................................................ 9-1
x
Cooling Fan.....................................................................................................9-1
Removal....................................................................................................9-1
Replacement.............................................................................................9-2
3 1/2-Inch Drive Module..............................................................................9-3
Removal....................................................................................................9-3
Replacement.............................................................................................9-4
Dual 9-, 12-, and 20-Slot Chassis ........................................................................9-5
Control Board .................................................................................................9-5
Removal....................................................................................................9-5
Replacement.............................................................................................9-6
Fan Tray Removal/Replacement.................................................................9-8
Removal....................................................................................................9-8
Replacement.............................................................................................9-8
12-Slot Chassis SCSI Drive .........................................................................9-10
Installation..............................................................................................9-10
Removal..................................................................................................9-12
xi
xii
FIGURES
Figure 2-1.
Figure 2-2.
Figure 2-3.
Figure 2-4.
Figure 2-5.
Model XR9103 (Front View) ...........................................................2-2
Dual 9-Slot Card Cage (Front View, without bezel) ...................2-4
12-Slot Card Cage (Front View, without bezel) ...........................2-6
20-Slot Card Cage (Front View, without bezel) ...........................2-8
Removing the Front Bezel
(Dual 9-, 12-, and 20-Slot Systems)..............................................2-13
Figure 2-6. Removing the Front Bezel (3-Slot System).................................2-14
Figure 2-7. Pedestal Cover, Bezels, and Side Panels.....................................2-16
Figure 2-8. Side Panel Removal .......................................................................2-18
Figure 3-1. Dual 9-Slot Card Cage (Front View, without bezel) ...................3-3
Figure 3-2. 20-Slot Card Cage (Front View, without bezel) ...........................3-5
Figure 3-3. Removing the 9U Front Bezel ........................................................3-9
Figure 3-4. Removing the 3U Front Bezel (Power Supply Bezel) ...............3-10
Figure 4-1. Bezel Removal .................................................................................4-9
Figure 4-2. SCSI Device Storage Module Front Bezel Removal.................. 4-11
Figure 4-3. Removing the Removable Media Access Plate..........................4-12
Figure 4-4. Removing SCSI Device Storage Module (System Powered) ...4-14
Figure 4-5. Drive Module Release Latches ....................................................4-17
Figure 4-6. Power Supply Removal ................................................................4-19
Figure 5-1. Pedestal Configuration System......................................................5-7
Figure 5-2. Mounting Flange Location for the 3-Slot Chassis .......................5-9
Figure 5-3. Mounting Flange Locations for the
Dual 9-, 12-, and 20-Slot Chassis..................................................5-10
Figure 5-4. Rack Configuration System..........................................................5-12
Figure 5-5. 3-Slot Chassis Control Cables ......................................................5-17
Figure 5-6. 3-Slot Chassis Control Cables (with Alarm Board)...................5-19
Figure 5-7. SCSI and Environmental Monitor Connections ........................5-24
Figure 5-8. 12- and 20-Slot Chassis Control Cables (with Alarm Board)...5-26
Figure 5-9. Dual 9-Slot Chassis Control Cables (with Alarm Board) .........5-29
Figure 5-10. DC Terminal Block .......................................................................5-31
Figure 6-1. Internal View of System (Side View) ..........................................6-10
Figure 7-1. MC1000K-AC700A / MC1000K-DC700A (New)
Front Panel......................................................................................7-18
Figure 7-2. MC1000K-AC700 / MC1000K-DC700 (Original)
Front Panel......................................................................................7-18
xiii
Figure 7-3.
Figure 8-1.
Figure 8-2.
Figure 8-3.
Figure 8-4.
Figure 9-1.
Figure 9-2.
Figure 9-3.
Figure 9-4.
Power Supply Locations ...............................................................7-19
Backplane Connectors (Front View) .............................................8-2
9-Slot Backplane Connectors (Front View) ..................................8-8
12-Slot Backplane Connectors (Front View) ...............................8-9
20-Slot Backplane Connectors (Front View) .............................8-10
Control Board Removal ..................................................................9-7
Fans and Power Supply ..................................................................9-9
12-Slot Chassis Drive Bays ...........................................................9-10
SCSI Drive Address Switch .......................................................... 9-11
xiv
TABLES
Table 2-1. Enclosure Specifications ....................................................................2-9
Table 2-2. Chassis Specifications ......................................................................2-10
Table 3-1. Chassis Specifications ........................................................................3-6
Table 4-1. SCSI Device Storage Module Specifications ...................................4-4
Table 4-2. SCSI Device Storage Module Specifications ...................................4-5
Table 4-3. Power Supply Specifications.............................................................4-6
Table 4-4. SCSI Backplane Specifications ..........................................................4-7
Table 5-1. Environmental Monitor Cabling ....................................................5-20
Table 6-1. 3-Slot System Controls and Indicators ............................................6-1
Table 6-2. Dual 9-, 12-, and 20-Slot System Controls and Indicators ............6-2
Table 6-3. Total Current Consumption Limit ...................................................6-5
Table 7-1. 3-Slot Power Supply Specifications..................................................7-1
Table 7-2. Power Supply Specifications.............................................................7-4
Table 7-3. 700 Watt AC Power Supply Specifications......................................7-5
Table 7-4. 700 Watt DC Power Supply Specifications .....................................7-9
Table 8-1. Pin Assignments for VMEbus Connector J1/P1 ............................8-4
Table 8-2. Pin Assignments for VMEbus Connector J2/P2 ............................8-5
Table 8-3. Pin Assignments for Connector XP2................................................8-6
Table 8-4. Backplane Specifications.................................................................. 8-11
Table 8-5. Pin Assignments for VMEbus Connector J1/P1 ..........................8-12
Table 8-6. Pin Assignments for VMEbus Connector J2/P2 ..........................8-13
Table 8-7. Pin Assignments for Connector XP2..............................................8-14
xv
xvi
1Introduction
1
About the XR Series Systems
The XR Series Systems are based on the VMEbus backplane
architecture and the Modular Chassis family of enclosures, power
supplies, and SCSI storage subsystems.
❏
Modular Implementation
The XR family includes 3-slot, dual 9-slot, 12-slot, and 20-slot
systems. Each system is designed as a set of modular building
blocks that can be readily adapted and recombined to meet
the needs of technical, industrial, and telecommunications
applications.
The dual 9-slot, 12-slot, and 20-slot systems offer freestanding
pedestal, frame or rack mount options. The 3-slot system is
designed for either frame or rack mount options.
This building-block approach is designed to provide OEMs
and system integrators with the maximum amount of
packaging flexibility.
❏
Simplified Design
The design minimizes screws, wires, and cables necessary for
building a system while maximizing maintainability and
reliability for the end user. It removes the necessity for
adapter cards and cables between the transition modules and
the backplane.
❏
Resilient Implementation
The XR family of systems is designed to comply with
telecommunications industry requirements. The dual 9-slot
system offers the ability to create redundant systems in a
single chassis.
1-1
1
Introduction
❏
Ease-of-Maintenance
The XR family of systems provides:
– Easy access to all major components for removal and
replacement.
– Front access to VMEmodules, fans, mass storage drives,
and power supplies for easy maintenance and reconfiguration
– Rear access for cabling and transition module connections
– Environmental/power supply monitoring for early
detection of developing temperature or power supply
problems.
– Autojumpering backplane, eliminating manual jumpering
of VMEbus signals.
1-2
About this Guide
About this Guide
This guide is directed toward the person who needs advanced
system operational information. The guide presents a technical
discussion of all the major chassis components of the XR family
computer system.
This guide discusses the following topics:
❏
Chapter 2, Original Chassis
❏
Chapter 3, Extended Chassis
❏
Chapter 4, SCSI Device Storage Module
❏
Chapter 5, Site Preparation and Information
❏
Chapter 6, Chassis Operations
❏
Chapter 7, Power Supplies
❏
Chapter 8, VMEbus Backplane
❏
Chapter 9, Field Replaceable Units
The System Platforms
This guide describes the following XR system platforms:
❏
3-slot Original Chassis Platform
❏
Dual 9-slot Original Chassis Platform
❏
12-slot Original Chassis Platform
❏
20-slot Original Chassis Platform
❏
Dual 9-slot Extended Chassis Platform
❏
20-slot Extended Chassis Platform
❏
SCSI Device Storage Module
1-3
1
1
Introduction
Related Documentation
Hardware components are described in the following manuals. If
not shipped with this product, they may be purchased by
contacting your local Motorola sales office.
Note
Although not shown in the following list, each
Motorola MCG manual publication number is suffixed
with characters which represent the revision level of
the document, such as /D2 or /UM2 (the second
revision of a manual); a supplement bears the same
number as the manual but has a suffix such as /A1 (the
first supplement to the manual).
Document Title
Motorola
Publication
Number
XR PowerPC VMEmodule Reference Manual
XRPPCA/IH
XR 900 Series VMEmodule Reference Manual
XR900A/IH
MVME1603/MVME1604 Single Board Computer Installation and
Use
V1600-1A/IH
MVME1603/MVME1604 Single Board Computer Programmer’s
Reference Guide
V1600-1A/PG
MVME2600 Series Single Board Computer Installation and Use
V2600A/IH
MVME2600 Series Single Board Computer Programmer’s Reference
Guide
V2600A/PG
MVME3600 Series Single Board Computer Installation and Use
V3600A/IH
MVME3600/4600 Series Processor Modules Programmer’s
Reference Guide
V3600A/PG
MVME4600 Series VME Processor Module Installation and Use
V4600A/IH
PM603/PM604 Processor/Memory Mezzanine Module and
RAM104 DRAM Memory Module User’s Manual
PM603A/UM
PPCBug Debugging Package User’s Manual (Parts 1 and 2)
PPCBUGA1/UM
PPCBUGA2/UM
1-4
Related Documentation
Document Title
Motorola
Publication
Number
PPC1Bug Diagnostics Manual
PPC1DIAA/UM
MVME332XT Intelligent Communication Controller User’s Manual
MVME332XT
MVME332XT Intelligent Communication Controller Support
Information
SIMVME332XT
MVME332XT Serial Intelligent Peripheral Controller Firmware
User’s Manual
MVME332XTFW
MVME376 Ethernet Communications Controller User’s Manual
MVME376
MVME710B 8-Channel Serial I/O Distribution Module User’s
Manual
MVME710B
MVME385-120 High Performance FDDI Node Processor User’s
Manual
MVME385-120
PowerCom Installation and Use
VMEPCOMA/IH
MVME762 Transition Module User’s Manual
VME762A/UM
MPMC101 PMC SCSI-2 Adapter User’s Manual
PMC101A/UM
XR342 (T1) Technical Description
800-0800-001
XR343 (E1) Technical Description
800-0801-001
Site Planning Guide for Motorola Computer Systems
SITEGD
1-5
1
1
Introduction
1-6
2Original XR Chassis
2
Chassis Overview
The original style of the XR system chassis is available in the
following configurations:
❏
3-Slot
❏
Dual 9-Slot
❏
12-Slot
❏
20-Slot
3-Slot System
The Model XR9103 3-slot system (see Figure 2-1 on page 2-2) has a
front-loading 3-slot VME card cage with a rear-loading transition
card cage. The VME backplane accepts standard 6U 32-bit VME
modules from the front, and MVME700 series plug-in transition
modules from the rear. The system accommodates up to two 31/2inch, half-height, fixed- or removable-media drives. The drives
plug into the backplane above the VMEmodule connection area. A
sheet-metal insert separates them from the modules in the VME
card cage.
The system is available with either an AC or a DC power supply.
A DC-powered fan provides forced-air cooling for the
VMEmodules, drives, and power supply. Convection cooling is
used for the rear-mounted transition modules. Cooling air for the
VME card cage is drawn in at the front of the fan module, forced
past the VMEmodules, drives, and power supply, and vented
through the right rear panel of the system.
2-1
Original XR Chassis
2
11304.00 9601 (1-2)
Figure 2-1. Model XR9103 (Front View)
Dual 9-slot System
The Model XR9209 dual 9-slot system (see Figure 2-2 on page 2-4)
is designed for telecom applications requiring dual, independent 9slot VME systems with up to 34GB of disk storage capacity per
system. The Model XR9109 is configured with one 9-slot VME
system, but it may be upgraded to a dual XR9209 configuration.
A Model XR9109 or XR9209 system typically uses a VME drive
module for the initial 3 1/2-inch disk and tape. Additional drives
are added using a SCSI Device Storage Module (see Chapter 4). Up
to four Storage Modules can be added to each system. Each Storage
Module contains up to four half-height drive bays. Two of these
bays can contain removable media devices. Each system can
support up to 18 SCSI drives.
The XR Series offers a -48±10% (-36 to -72 with the MC1000KDC700A—see Chapter 7) VDC power module for telecom exchange
office applications as well as a 90 to 264 VAC autoranging power
2-2
Chassis Overview
module for industrial and commercial environments. Each system
in a Model XR9109 or XR9209 is configured with its own power
module.
The enclosure contains 10 transition module panels per side for
supporting a variety of connectivity and expansion options, such as
additional Ethernet, SCSI, and communications interfaces.
The XR Series includes a VME module and transition module pair
keying feature which prevents potential module damage caused by
the incorrect insertion of VME or transition modules.
2-3
2
Original XR Chassis
2
CPUs
INSTALLED
MODULAR CARD CAGE
ESD BOND POINT
SYSTEM B
SYSTEM A
CABLES
CABLES
CABLES
EXPANSION
EXPANSION
EXPANSION
EXPANSION
CPU
EXPANSION
EXPANSION
EXPANSION
EXPANSION
EXPANSION
CPU
EXPANSION
CABLES
FAN
DISK
DISK
FAN
FAN
DISK DRIVES
INSTALLED
FAN
11028.00 9407 (2-3)
Figure 2-2. Dual 9-Slot Card Cage (Front View, without bezel)
2-4
Chassis Overview
12-slot System
2
The Model XR9112 12-slot system (see Figure 2-3 on page 2-6) is
designed for telecom applications requiring 12 VME slots and up to
72GB of disk storage capacity.
When support for more than five SCSI devices are required, up to
eight SCSI Device Storage Modules can be added to the system.
Each Storage Module contains up to four half-height drive bays.
Two of these bays can contain removable media devices. The
system can support up to 37 SCSI drives.
The XR Series offers a -48±10% (-36 to -72 with the MC1000KDC700A—see Chapter 7) VDC power module for telecom exchange
office applications as well as a 90 to 264 VAC autoranging power
module for industrial and commercial environments. The XR9112
supports either single or dual power module configurations. When
dual power modules are configured, they run in load sharing
mode. In load sharing mode, the system can continue normal
operation if one of the power module fails. For more information
about load sharing, refer to Load Sharing on page 7-12.
The XR9112 enclosure contains 13 transition module slots for
supporting a variety of connectivity and expansion options, such as
additional Ethernet, SCSI, and communications interfaces.
The XR Series includes a VME module and transition module pair
keying feature which prevents potential module damage caused by
the incorrect insertion of VME or transition modules.
2-5
Original XR Chassis
2
CPU
INSTALLED
MODULAR CARD CAGE
ESD BOND POINT
CABLES
DISK/TAPE
DRIVES
INSTALLED
CABLES
EXPANSION
EXPANSION
EXPANSION
EXPANSION
Power Supply
EXPANSION
FAN
EXPANSION
EXPANSION
EXPANSION
EXPANSION
EXPANSION
CPU
EXPANSION
FAN
FAN
11028.00 9407(3-3)
Figure 2-3. 12-Slot Card Cage (Front View, without bezel)
2-6
Chassis Overview
20-slot System
2
The Model XR9120 20-slot system (see Figure 2-4 on page 2-8) is
designed for telecom applications requiring 20 VME slots and up to
100GB of disk storage capacity.
A Model XR9120 system typically uses a VME drive module for the
initial 3 1/2-inch disk and tape. Additional drives are added using
a SCSI Device Storage Module (see Chapter 4). Up to 13 Storage
Modules can be added to each system. Each Storage Module
contains up to four half-height drive bays. Two of these bays can
contain removable media devices. Each system can support up to
52 SCSI drives.
The XR Series offers a -48±10% (-36 to -72 with the MC1000KDC700A—see Chapter 7) VDC power module for telecom exchange
office applications, as well as a 90 to 264 VAC autoranging power
module for industrial and commercial environments. The XR9120
supports either single or dual power module configurations. When
dual power modules are configured, they run in load sharing
mode. In load sharing mode, the system can continue normal
operation if a power module fails. For more information about load
sharing, refer to Load Sharing on page 7-12.
The XR9120 enclosure contains 21 transition module slots for
supporting a variety of connectivity and expansion options, such as
additional Ethernet, SCSI, and communications interfaces.
The XR Series includes a unique VME and transition module pair
keying feature which prevents potential module damage caused by
the incorrect insertion of VME or transition modules.
2-7
Original XR Chassis
MODULAR CARD CAGE
2
ESD BOND POINT
CABLES
CABLES
EXPANSION
EXPANSION
EXPANSION
EXPANSION
EXPANSION
EXPANSION
EXPANSION
EXPANSION
EXPANSION
EXPANSION
EXPANSION
EXPANSION
EXPANSION
EXPANSION
EXPANSION
11028.00 9407 (1-3)
Power Supply
FAN
FAN
FAN
EXPANSION
EXPANSION
EXPANSION
CPU
EXPANSION
CABLES
2-8
CABLES
CPU INSTALLED
Figure 2-4. 20-Slot Card Cage (Front View, without bezel)
Chassis Specifications
Chassis Specifications
2
The following sections list physical, environmental, and electrical
specifications for the base system, the power supplies, and the VMEbus
backplane.
3-Slot Chassis
Table 2-1. Enclosure Specifications
Characteristics
Physical characteristics
Height
Width
Depth
Weight (fully loaded)
Specifications
5.2 in. (132 mm)
19.0 in. (483 mm) w/o flange extensions
23.0 in. (584 mm) with flange extensions
14.0 in. (356 mm) with bezel
25 lb. (11.4 kg)
Temperature
Operating
Storage and transit
0˚ to 50˚ C (32˚ to 122˚ F)
−40˚C to 70˚ C (−40˚ to 158˚ F)
Relative humidity
Operating
Storage and transit
20% to 80% noncondensing
10% to 95% noncondensing
Altitude
Operating
Storage and transit
0 to 10,000 feet (3048 m)
0 to 30,000 feet (9144 m)
Shock
Operating
Non-operating
0.5 g
15 g
Note
Temperature and humidity limits are determined
primarily by the type of mass storage media that you
expect to install.
2-9
Original XR Chassis
2
Dual 9-, 12-, and 20-Slot Chassis
Table 2-2. Chassis Specifications
Characteristics
Physical Dimensions
(with front bezel)
-- System Chassis
Specifications
Width: 18.97 in. (481.8 mm)
Depth: 13.5 in. (342.9 mm)
Height: 20.94 in (531.9 mm)
Weight: 60.0 lb. (27.3 kg) (fully loaded)
Input Voltage
-48Vdc or 115 Vac/230 Vac, 50 Hz/60 Hz
Acoustic Noise Level
50 dBA maximum
Temperature
Operating
Non-operating
0° to 50° C (32° to 122° F)
-40° to 70°C (-40° to 158° F)
Relative humidity
Operating
Non-operating
20% to 80% noncondensing
10% to 95% noncondensing
Altitude
Operating
Non-operating
0 to 10,000 feet (3048 m)
0 to 30,000 feet (9144 m)
Emissions
FCC Part 15, Sub-Part J, Class B
VDE 0871/6.78, Class B
Electrostatic Discharge
5,000 volts: No observable effect
12,000 volts: No operator-perceived errors
24,000 volts: No permanent equipment damage
Equipment Grounding
NEBS 4.7
Earthquake
NEBS zone 4
Flammability and Flame Spread
NEBS 4.3.1
Office Vibration
NEBS Section 4.5.3 (5-200Hz @ 1G,
0.25G/octave)
2-10
Chassis Specifications
Table 2-2. Chassis Specifications (Continued)
Characteristics
Safety
(Standards for safety of
information technology
equipment, including electrical
business equipment)
UL1950
CSA C22.2/950
VDE 0805
IEC 950
Transportation
Packaging and shipping containers comply with
ASTM 4169 Level 1. and NEBS 4.4.1/4.4.2.
Note
2
Specifications
Temperature and humidity limits are determined
primarily by the type of tape and disk media that you
expect to install.
2-11
Original XR Chassis
2
Chassis Use
Front Bezel Removal
The front bezel is a requirement for complete RFI shielding. The
bezel is latched on both sides. Screwdriver-operated locks at the
upper corners prevent the latches from being arbitrarily
disengaged. The latches are to be opened by trained service
personnel only.
The 9U bezels for the dual 9-, 12-, and 20-slot card cage and OEM
equipment enclosure are mounted on ball studs at the bottom and
latched at the top; the 3U bezels used elsewhere are simply latched.
Refer to Figure 2-5 on page 2-13 and Figure 2-6 on page 2-14 while
performing this procedure.
1. Unlock the bezel latches by rotating the locks a quarter-turn
inward from the “locked” icon to the “unlocked” icon with a
Phillips screwdriver (clockwise on the left side,
counterclockwise on the right).
!
Caution
To avoid damaging the keyswitch assembly when you
remove card cage bezels, make sure that the key is
removed before you unlatch the bezel.
2. Unlatch the bezel from the enclosure by pressing the latch
buttons at either side of the bezel and pulling straight out
until the bezel latches are clear of the chassis. (If it is a 3U
bezel, removal is complete at this point.)
3. (For 9U bezels): Release the bottom of the bezel from the ball
studs by firmly grasping the lower edge and pulling straight
up.
2-12
Chassis Use
2
3
2
1
11049.00 9408
Figure 2-5. Removing the Front Bezel (Dual 9-, 12-, and 20-Slot Systems)
2-13
Original XR Chassis
2
11304.00 9601(2-2)
FRONT BEZEL
Figure 2-6. Removing the Front Bezel (3-Slot System)
Front Bezel Replacement
1. (For 9U bezels): Position the ball stud catches at the lower
corners of the bezel over the ball studs on the enclosure and
press firmly until the catches are fully engaged.
2. Press the sides of the bezel against the enclosure until the
latches at the sides snap into place.
3. Lock the bezel latches by rotating the locks a quarter-turn
outward from the “unlocked” icon to the “locked” icon with
a Phillips screwdriver.
2-14
Chassis Use
Side Panel/Pedestal Cover Removal and Replacement
2
The pedestal configuration incorporates side panels for the various
system enclosures (card cage, power supplies, SCSI device storage
module, OEM equipment enclosure) and a pedestal cover. The
inner surfaces of the panels and cover are molded with slots that
engage slide hooks mounted on the enclosure. The side panels are
fitted with latching mechanisms.
The side panels may be ganged together by means of inner stacking
brackets. If so, each set of panels is installed as a unit.
Note
!
The pedestal configuration is available for the Dual 9-,
12-, and 20-slot Original Chassis configuration only. It
is not available for the 3-slot configuration or for the
Extended Chassis.
To maintain electromagnetic compatibility compliance,
the front bezel must be firmly in place and locked.
Caution
2-15
Original XR Chassis
2
PEDESTAL TOP COVER
MODULAR DRIVE
ENCLOSURE
(BEZEL REMOVED)
PEDESTAL SIDE
PANEL
MODULAR CARD
CAGE BEZEL
MODULAR POWER
SUPPLY BEZEL
BEZEL LOCKS
(1 EACH SIDE)
Figure 2-7. Pedestal Cover, Bezels, and Side Panels
2-16
11049.00 9408
Chassis Use
Side Panel Removal
2
The suggested procedure for removing pedestal side panel
assemblies is as follows:
1. Remove the front bezel.
2. Unlock the side panel assembly by squeezing the inner latch
levers at the forward edge with one hand and simultaneously
slide the assembly backward approximately an inch until it
clears the slide hooks on the chassis.
!
Hand clearance in the latch area is limited. Work
carefully to avoid injury to fingers.
Caution
3. Lift the assembly off the chassis.
4. Repeat steps 2 and 3 at the opposite side of the chassis.
2-17
Original XR Chassis
2
11064.00 9409
Figure 2-8. Side Panel Removal
2-18
Chassis Use
Side Panel Replacement
2
The suggested procedure for replacing pedestal side panel
assemblies is as follows:
1. Engage the slots of the panel assembly with the slide hooks
on the enclosure and slide the panel assembly forward until
the latch snaps into place.
2. Repeat step 1 at the opposite side of the chassis.
3. Reinstall the front bezel.
Pedestal Cover Removal and Replacement
The pedestal cover is mounted with the same type of hardware as
the side panels, but no latch is used. Instead, two screws on the back
edge near the corners hold the cover in place. The removal
procedure consists of simply removing the screws, then sliding the
cover backward and disengaging it from the slide hooks.
Replacement is the reverse.
2-19
Original XR Chassis
2
2-20
3Extended XR Chassis
3
Chassis Overview
The Extended Chassis is based on the Original Chassis design. It
uses the same backplane, power supplies, and fan trays. The main
differences are the dimensions and the bezels.
The front VME card cage has been extended outwards
approximately 2 inches (approx. 5 cm) to accomodate the Extended
Injector/Ejector (VME64) handles on the VMEmodules.
The front bezel design was changed from a rounded, plastic bezel
to a flat, metal bezel to accomodate embedding these systems in
cabinets and to facilitate customization efforts (such as custom
colors, logos, etc.).
The Extended Chassis also contains the following features:
❏
Stiffened backplane support for multi-slot VME single board
computers (such as 2-slot CPUs plus 2-slot PMCspan).
❏
Rails for the large VME64 handles to facilitate insertion and
extraction of multi-slot VME single board computer "bricks".
❏
New card cage with new guides for the new handle
keying/locking mechanism.
❏
The front panels contain louvers for airflow, and accomodate
replaceable air filters, locking mechanisms, handles to
facilitate removal and attachment, and holes for the key
switch(es) and LED indicators.
The Extended Chassis is available in either a dual 9-slot or a 20-slot
configuration.
3-1
Extended XR Chassis
Dual 9-slot System
The Model XR9209A dual 9-slot system (see Figure 3-1 on page 3-3)
is designed for telecom applications requiring dual, independent 9slot VME systems with up to 34GB of disk storage capacity per
system. The Model XR9109A is configured with one 9-slot VME
system, but it may be upgraded to a dual XR9209A configuration.
3
A Model XR9109A or XR9209A system typically uses a VME drive
module for the initial 3 1/2-inch disk and tape. Additional drives
are added using a SCSI Device Storage Module (see Chapter 4). Up
to four Storage Modules can be added to each system. Each Storage
Module contains up to four half-height drive bays. Two of these
bays can contain removable media devices. Each system can
support up to 18 SCSI drives.
The XR Series offers a -36 to -72 VDC power module for telecom
exchange office applications as well as a 90 to 264 VAC autoranging
power module for industrial and commercial environments. Each
system in a Model XR9109A or XR9209A is configured with its own
power module.
The enclosure contains 10 transition module panels per side for
supporting a variety of connectivity and expansion options, such as
additional Ethernet, SCSI, and communications interfaces.
The XR Series includes a VME module and transition module pair
keying feature which prevents potential module damage caused by
the incorrect insertion of VME or transition modules.
3-2
Chassis Overview
CPUs
INSTALLED
MODULAR CARD CAGE
3
ESD BOND POINT
SYSTEM B
SYSTEM A
CABLES
CABLES
CABLES
EXPANSION
EXPANSION
EXPANSION
EXPANSION
CPU
EXPANSION
EXPANSION
EXPANSION
EXPANSION
EXPANSION
CPU
EXPANSION
CABLES
FAN
DISK
DISK
FAN
FAN
Power Supplies
DISK DRIVES
INSTALLED
FAN
11028.00 9407 (2-3)
Figure 3-1. Dual 9-Slot Card Cage (Front View, without bezel)
3-3
Extended XR Chassis
20-slot System
The Model XR9120A 20-slot system (see Figure 3-2 on page 3-5) is
designed for telecom applications requiring 20 VME slots and up to
100GB of disk storage capacity.
3
A Model XR9120A system typically uses a VME drive module for
the initial 3 1/2-inch disk and tape. Additional drives are added
using a SCSI Device Storage Module (see Chapter 4). Up to 13
Storage Modules can be added to each system. Each Storage
Module contains up to four half-height drive bays. Two of these
bays can contain removable media devices. Each system can
support up to 52 SCSI drives.
The XR Series offers a -36 to -72 VDC power module for telecom
exchange office applications as well as a 90 to 264 VAC autoranging
power module for industrial and commercial environments. The
XR9120A supports either single or dual power module
configurations. When dual power modules are configured, they
run in load sharing mode. In load sharing mode, the system will
continue normal operation if a power module fails.
The XR9120A enclosure contains 21 transition module slots for
supporting a variety of connectivity and expansion options, such as
additional Ethernet, SCSI, and communications interfaces.
The XR Series includes a unique VME and transition module pair
keying feature which prevents potential module damage caused by
the incorrect insertion of VME or transition modules.
3-4
Chassis Overview
ESD BOND POINT
MODULAR CARD CAGE
3
CABLES
CABLES
CPU INSTALLED
CABLES
EXPANSION
EXPANSION
EXPANSION
EXPANSION
EXPANSION
EXPANSION
EXPANSION
EXPANSION
EXPANSION
EXPANSION
EXPANSION
EXPANSION
EXPANSION
EXPANSION
EXPANSION
EXPANSION
EXPANSION
EXPANSION
CPU
EXPANSION
CABLES
11028.00 9407 (1-3)
Power Supply
FAN
FAN
FAN
Figure 3-2. 20-Slot Card Cage (Front View, without bezel)
3-5
Extended XR Chassis
Chassis Specifications
Table 3-1. Chassis Specifications
3
Characteristics
Physical Dimensions
(with front bezel)
-- System Chassis
Specifications
Width: 18.96 in. (481.58 mm)
Depth: 13.16 in. (334.19 mm)
Height: 20.94 in (531.95 mm)
Weight: 60.0 lb. (27.3 kg) (fully loaded)
Input Voltage
-48Vdc or 115 Vac/230 Vac, 50 Hz/60 Hz
Acoustic Noise Level
50 dBA maximum
Temperature
Operating
Non-operating
0° to 50° C (32° to 122° F)
-40° to 70°C (-40° to 158° F)
Relative humidity
Operating
Non-operating
20% to 80% noncondensing
10% to 95% noncondensing
Altitude
Operating
Non-operating
0 to 10,000 feet (3048 m)
0 to 30,000 feet (9144 m)
Emissions
FCC Part 15, Sub-Part J, Class B
VDE 0871/6.78, Class B
Electrostatic Discharge
5,000 volts: No observable effect
12,000 volts: No operator-perceived errors
24,000 volts: No permanent equipment damage
Equipment Grounding
NEBS 4.7
Earthquake
NEBS zone 4
Flammability and Flame Spread
NEBS 4.3.1
Office Vibration
NEBS Section 4.5.3 (5-200Hz @ 1G,
0.25G/octave)
3-6
Chassis Specifications
Table 3-1. Chassis Specifications (Continued)
Characteristics
Specifications
Safety
(Standards for safety of
information technology
equipment, including electrical
business equipment)
UL1950
CSA C22.2/950
VDE 0805
IEC 950
Transportation
Packaging and shipping containers comply with
ASTM 4169 Level 1. and NEBS 4.4.1/4.4.2.
3
3-7
Extended XR Chassis
Chassis Use
3
Note
You will need a 4mm Allen wrench to perform these
procedures.
Front Bezel Removal
The front bezel is a requirement for complete RFI shielding. Allen
wrench-operated locks at the upper corners fasten the bezel in
place. The bezels are to be removed by trained service personnel
only.
The 9U bezels for the dual 9- and 20-slot card cage and OEM
equipment enclosure are mounted on guides at the bottom and lock
at the top; the 3U bezels used for the power supply are simply
locked.
Refer to Figure 3-3 on page 3-9 and Figure 3-4 on page 3-10 while
performing this procedure.
1. Unlock the bezel by rotating the locks a quarter-turn inward
from the “locked” position to the “unlocked” position with a
4mm Allen wrench (clockwise on the left side,
counterclockwise on the right).
!
Caution
To avoid damaging the keyswitch assembly when you
remove card cage bezels, make sure that the key is
removed before you unlatch the bezel.
2. Pull the bezel straight out. (If it is a 3U bezel, removal is
complete at this point.)
3. (For 9U bezels): Release the bottom of the bezel from the
guides by firmly pulling the bezel straight up.
3-8
Chassis Use
3
2119 9711
Figure 3-3. Removing the 9U Front Bezel
3-9
Extended XR Chassis
3
2121 9711
Figure 3-4. Removing the 3U Front Bezel (Power Supply Bezel)
3-10
Chassis Use
Front Bezel Replacement
1. (For 9U bezels): Slide the guide catches at the lower corners of
the bezel over the guides on the enclosure and seat the bezel
firmly.
2. Press the sides of the bezel against the enclosure until the
bezel is flush with the enclosure.
3. Lock the bezel by rotating the locks a quarter-turn outward
from the “unlocked” position to the “locked” position with a
4mm Allen wrench.
3-11
3
Extended XR Chassis
3
3-12
4SCSI Device Storage Module
4
This chapter provides a brief overview of the SCSI Device Storage
module. For more information about this device, please refer to the
XR900 Series Mass Storage Subsystem User’s Manual (available
through your local Motorola sales representative).
Overview
The SCSI Device Storage Module has room for up to four SCSI
devices. It contains four half-height peripheral bays. Two of the
bays accommodate 3 1/2-inch hard disk drives, and the other two
bays accommodate either 3 1/2-inch hard disk drives or 5 1/4-inch
removable media devices.
Backplanes
The SCSI Device Storage Module has two backplane options:
differential and single-ended. The differential backplane only
supports differential SCSI drives, and the single-ended backplane
only supports single-ended SCSI drives.
The backplane provides support for the four SCSI drives, all drive
power connections, and the SCSI signal lines for the installed
devices.
Chassis Options
The SCSI Device Storage Module has two chassis options: Original
and Extended. The Original Chassis option is compatible with and
installs on the Original style of XR chassis. The Extended Chassis
option is compatible with and installs on the Extended style of XR
chassis. Both chassis options support the differential and singleended backplanes.
4-1
SCSI Device Storage Module
Power Supply
The power is supplied to the SCSI Device Storage Module in one of
three ways:
4
❏
System Power
❏
AC Power Supply Module
❏
DC Power Supply Module
System power is provided through an optional connector on the
bottom of the storage module (see Figure 4-4 on page 4-14). It plugs
into a receiver on the top of the XR system, and power is supplied
directly from the system’s backplane.
DC power to the module’s drives and fan assembly can also come
from a UL/CSA/VDE-approved 100W autoranging power supply
module. Power supply modules are available in both -48Vdc- and
115/230Vac-compatible versions, each providing +5Vdc and
+12Vdc to the enclosure. The power supply module is installed next
to the drives and is cooled by the air drawn through the module
chassis. Input power is provided to the power supply by the AC
power cord or DC wire assembly through the rear of the chassis.
The power supply distributes the power to the mass storage drives
through the backplane.
Drive Carriers
Injection-molded plastic cradles hold the drive and an adapter
board assembly. The cradle slides in from the front of the SCSI
Device Storage Module, plugs into the backplane and latches into
place. Two types of drive carrier assemblies are used.
The bottom device mounting holes are used for 5 1/4-inch
removable devices. A single high bezel filler panel is removed
when this assembly is installed. The assembly for 3 1/2- inch nonremovable media devices fits in either side of the SCSI enclosure.
SCSI addresses are selectable via a rotary switch soldered to the
adapter board.
4-2
Overview
Environmental Monitoring
The SCSI Device Storage Module is equipped with an
environmental monitoring function. This functions monitors the
internal temperature of the module.
Two overtemperature levels are used by this function:
4
❏
When the first overtemperature level is reached, an
Overtemperature LED (located next to the SCSI connectors
on the back panel of the module) turns on. At that point,
Motorola-supported SCSI devices are approaching their
upper temperature limits, but are not in danger of immediate
damage. At this point, corrective action, such as lowering the
ambient temperature or removing blockages to the airflow,
can reverse the condition and allow normal operations to
continue. If the overtemperature condition is due to a failed
fan, the system should be shut down and the failed unit
replaced.
❏
When the second overtemperature level is reached, the SCSI
Device Storage Module is shut down. To recover from this,
the system should be shut down, corrective action taken
(decrease ambient temperature, remove any airflow
blockages, or replace failed units), and the system restarted.
After restarting the system, test the drive units in the storage
module to verify that they were not damaged by the
overtemperature condition.
An RJ-45 connector/cable links the module’s environmental
monitoring function with the system’s environmental monitoring
functions. If the system is equipped with an optional alarm board,
audible and remote environmental alarm reporting for both the
system and the SCSI Device Storage Module is possible.
4-3
SCSI Device Storage Module
Specifications
The following tables provide the specifications for the various
components of the SCSI Device Storage Module.
4
Original Chassis
Table 4-1. SCSI Device Storage Module Specifications
Characteristics
Specifications
Physical Characteristics:
5.25 in. (133 mm)
Height
Width
19.0 in. (483 mm) w/o flange extensions
23.0 in. (584 mm) with flange extensions
Depth
13.5 in. (343 mm) with bezel
Weight (fully loaded) 25 lb. (11.4 kg)
Temperature:
Operating
0˚ to 50˚ C (32˚ to 122˚ F)
Storage and transit
−40˚C to 70˚C (−40˚ to 158˚ F)
Relative Humidity:
Operating
20% to 80% noncondensing
Storage and transit
10% to 95% noncondensing
Altitude:
Operating
0 to 10,000 feet (3048 m)
Storage and transit
0 to 30,000 feet (9144 m)
4-4
Specifications
Extended Chassis
Table 4-2. SCSI Device Storage Module Specifications
Characteristics
Specifications
Physical Characteristics:
Height
5.25 in. (133 mm)
Width
19.0 in. (483 mm) w/o flange extensions
23.0 in. (584 mm) with flange extensions
Depth
13.5 in. (343 mm) with bezel
Weight (fully loaded) 25 lb. (11.4 kg)
Temperature:
Operating
0˚ to 50˚ C (32˚ to 122˚ F)
Storage and transit
−40˚C to 70˚C (−40˚ to 158˚ F)
Relative Humidity:
Operating
20% to 80% noncondensing
Storage and transit
10% to 95% noncondensing
Altitude:
Operating
0 to 10,000 feet (3048 m)
Storage and transit
0 to 30,000 feet (9144 m)
4
4-5
SCSI Device Storage Module
Power Supply
Table 4-3. Power Supply Specifications
Characteristics
Physical Characteristics:
Height
Width
Length
Temperature:
Operating
Storage and transit
Relative humidity
Altitude:
Operating
Storage and transit
Power Ratings:
Input voltage (DC)
Input voltage (AC)
4
4-6
Specifications
4.0 in. (102 mm)
2.4 in. (61 mm)
9.0 in. (229 mm)
0˚ to 50˚ C (32˚ to 122˚ F)
−55˚ to 85˚ C (−67˚ to 185˚F)
0% to 90% noncondensing
0 to 10,000 feet (3048 m)
0 to 30,000 feet (9144 m)
−48±10%Vdc
90-132Vac, 190-260Vac, 47-63Hz
Output voltages
+5Vdc @ 5A
+12Vdc @ 8A (10A peak)
Output power
100W maximum (total from all
outputs)
Specifications
Backplane
The following table provides the specifications for both the singleended and the differential SCSI backplane options.
Table 4-4. SCSI Backplane Specifications
Characteristics
Physical Characteristics:
Height
Width
Thickness
Temperature:
Operating
Storage and transit
Relative Humidity
Power Consumption
(without drive modules)
SCSI Sockets
4
Specifications
4.1 inches (104mm)
11.6 inches (295mm)
0.062 inches (1.58mm) typical
0˚C to 55˚C (32˚F to 131˚F)
−55˚C to +85˚C (−67˚F to 185˚F)
0% to 90% noncondensing
1W (0.2A at +5V)
DIN 64CSB, 96-pin. Socket
spacing (center to center) 0.1 inch.
4-7
SCSI Device Storage Module
SCSI Device Storage Module Procedures
Notes The Rack/Mast and Pedestal mounting procedures are
the same as those for the 3-slot chassis. Refer to Chapter
5: Site Preparation and Installation for this information.
4
The Pedestal Cover and Side Panel installation
procedures are the same as those for the 3-slot chassis.
Refer to Chapter 2: Original XR Chassis for this
information.
Front Bezel Removal and Replacement (Original Chassis)
The module’s front bezel can be used in both pedestal and
rack/mast chassis configurations. The bezel is required to complete
RFI shielding in either configuration.
Removal
1. Unlatch the bezel from the enclosure by pressing the latch
buttons at either side of the bezel and pulling straight out (see
Figure 4-1 on page 4-9).
Replacement
1. Press the sides of the bezel against the enclosure until the
latches at the sides snap into place.
4-8
SCSI Device Storage Module Procedures
LATCH BUTTONS
(1 EACH SIDE)
4
11051.00 9408
Figure 4-1. Bezel Removal
4-9
SCSI Device Storage Module
Front Bezel Removal and Replacement (Extended Chassis)
The bezel is required for complete RFI shielding.
Note
4
You need a 4mm Allen wrench to complete these
procedures.
Removal
Refer to figure Figure 4-2 on page 4-11 while performing this
procedure.
1. Unlock the bezel by rotating the locks a quarter-turn inward
from the “locked” position to the “unlocked” position with a
4mm Allen wrench (clockwise on the left side,
counterclockwise on the right).
2. Pull the bezel straight out.
Replacement
1. Press the sides of the bezel against the enclosure until the
bezel is flush with the enclosure.
2. Lock the bezel by rotating the locks a quarter-turn outward
from the “unlocked” position to the “locked” position with a
4mm Allen wrench.
4-10
SCSI Device Storage Module Procedures
4
2118 9711
Figure 4-2. SCSI Device Storage Module Front Bezel Removal
Removable Media Access Plate Removal
If you have removable media in one or both of the 5 1/4-inch drive
bays, you should remove the access plate from the bezel to give you
access to your media without having to remove the bezel each time.
1. Remove the bezel from the SCSI Device Storage Module.
2. On the back side of the bezel, remove the four screws holding
the access plate in place (see figure Figure 4-3 on page 4-12).
3. Push the face of the plate from the front side of the bezel to
slide the plate back and out.
4. Replace the bezel.
4-11
SCSI Device Storage Module
Removable Media Access Plate Replacement
After removing a removable media drive, or replacing it with a
hard drive, it is necessary to replace the removable media access
plate.
1. Remove the front bezel from the SCSI Device Storage
Module.
4
2. Slide the removable media access from the back side of the
bezel into the opening (see Figure 4-3). Align the screw holes
with those on the bezel.
3. Tighten the four screws with a Phillips-head screwdriver.
4. Replace the front bezel.
2120 9711
Figure 4-3. Removing the Removable Media Access Plate
4-12
SCSI Device Storage Module Procedures
SCSI Device Storage Module Removal and Replacement
The SCSI Device Storage Module, if present, is mounted on guide
pins directly atop the chassis. It receives power from the VME card
cage through a connector at the top of the chassis. SCSI signals pass
through an external cable at the back of the system.
4
Module Removal
1. Switch all chassis power to STANDBY and disconnect the
power cord(s) from the AC or DC power source:
– If the power supply is an AC unit, unplug the power cord
from the AC outlet.
– If the power supply is a DC unit, turn off the -48Vdc power
source and unclamp the DC leads from the terminal block
on the power supply.
2. Disconnect the SCSI cable from the back of the card cage and
the expansion chassis.
3. If a front bezel is installed over the expansion chassis, remove
the bezel.
4. Depending on your configuration, proceed as necessary to
gain access to the top of the expansion chassis:
– If the system is in a pedestal configuration, remove the
pedestal cover, side panels and brackets, and any units
stacked above the expansion chassis.
– If the system is in a rack/mast configuration, take the unit
down from its mounting location.
5. Remove the five flat-head screws that secure the top cover to
the expansion chassis and remove the cover.
6. Remove the four screws from the inside corners of the
expansion chassis (these secure the expansion chassis to the
VME card cage).
7. Lift the expansion chassis straight up off the VME card cage.
4-13
SCSI Device Storage Module
EXPANSION CHASSIS
4
CARD CAGE
11050.00 9408
Figure 4-4. Removing SCSI Device Storage Module (System Powered)
Module Replacement
1. Ensure that all chassis power is set to STANDBY and the chassis
is disconnected from the AC or DC power source.
4-14
SCSI Device Storage Module Procedures
2. Using the guide pins on the bottom of the peripheral
expansion chassis for alignment, lower the expansion chassis
onto the VME card cage.
3. Reinstall the four screws removed in step 6, above, at the
inside corners of the expansion chassis.
4. Reinstall the top cover on the expansion chassis with the five
screws provided.
5. Install the chassis in accordance with the system
configuration:
– If the chassis was in a pedestal configuration, reinstall the
pedestal cover, side panel brackets, and side panels on the
reassembled stack.
– If the chassis was in a rack/mast configuration, return it to
its mounting location.
6. Reinstall the front bezel on the expansion chassis.
7. Reconnect the SCSI cable to the back of the card cage and the
storage chassis.
8. Reconnect the system to the AC or DC power source.
4-15
4
SCSI Device Storage Module
SCSI Drive Removal and Replacement
The SCSI peripheral storage enclosure contains up to four halfheight storage devices. Two bays accommodate 3 1/2-inch devices
only. The other two bays accommodate either 3 1/2-inch devices,
when mounted in carrier adapters, or 5 1/4-inch devices.
4
The suggested procedure for removal and replacement of 3 1/2inch or 5 1/4-inch drive modules is described next.
Drive Removal
1. Switch the power supply of the system to STANDBY and
disconnect the system from the AC or DC power source:
– If the power supply is an AC unit, unplug the power cord
from the AC outlet.
– If the power supply is a DC unit, turn off the -48Vdc power
source and unclamp the DC leads from the terminal block on
the power supply.
2. Remove the front bezel, if installed.
3. While pressing the latch at the side of the drive carrier, move the
module back and forth slightly to loosen the backplane
connection. Then carefully remove the module from the chassis
by pulling straight out.
Drive Replacement
1. Ensure that power to the system is set to STANDBY and the power
cord is disconnected from the AC or DC power source.
2. Note the device address setting on the drive you are replacing,
and set the address switch on the new drive to the same device
number.
3. Slide the replacement drive module gently into the drive bay
until it contacts the backplane connector.
4. Use firm steady pressure to seat the drive connector in the
backplane.
4-16
SCSI Device Storage Module Procedures
5. Reinstall the front bezel, if the installation includes one.
6. Reconnect the system to the AC or DC power source.
4
Figure 4-5. Drive Module Release Latches
4-17
SCSI Device Storage Module
Power Supply Removal and Replacement
The power supply module (Figure 4-6 on page 4-19) is installed at
the right side of the drive bays in the module’s chassis. The power
supply receives –48Vdc or 115/230Vac input power directly
through its back panel. The power supply outputs are cabled to the
cooling fan and to a backplane connector, which applies operating
voltages from the power supply to the mass storage modules.
4
!
Caution
Removal of a power supply module involves exposure
to high voltages. Avoid touching the connectors. Allow
one minute for the capacitors in the power supply to
discharge.
The suggested procedure for removal and replacement of the
module’s power supply module is as follows:
Removal
1. Switch the power supply of the host system to STANDBY.
2. Disconnect the input power source from the module’s
chassis:
– If the power supply is an AC unit, unplug the power cord
from the AC outlet (the other end of the cord disconnects
automatically when you remove the module from the
chassis).
– If the power supply is a DC unit, turn off the –48Vdc
power source and unplug the DC connector from the
power supply input.
3. After waiting for the power to fully discharge from the
supply, remove the module’s bezel, if installed.
4. At the upper right corner of the power supply module, loosen
the captive screw that holds the module in the chassis.
4-18
SCSI Device Storage Module Procedures
5. Slide the module out.
4
11276.00 9503 (1-2)
Figure 4-6. Power Supply Removal
Replacement
1. Slide the power supply module carefully into the chassis. Use
firm steady pressure to seat the connector properly.
2. Tighten the captive screw that holds the module in the
chassis.
3. Reinstall the module’s bezel, if the installation includes one.
4. Reconnect the module to the AC or DC power source:
– If the power supply is an AC unit, plug the power cord
back into the module and the AC outlet.
– If the power supply is a DC unit, plug the DC connector
into the power supply input and turn the –48Vdc power
source back on.
4-19
SCSI Device Storage Module
Cooling Fan Removal and Replacement
The DC-powered fan mounted on the power supply module
provides forced-air cooling for the power supply and the mass
storage drives.
The suggested procedure for removal and replacement of the
cooling fan is as follows:
4
Removal
1. Remove the power supply module as described in the
previous section.
2. Using a flat-tipped screwdriver, remove the three screws that
secure the fan and finger guard to the power supply
assembly.
3. While still keeping the power supply assembly and fan
together, move the fan aside far enough to reach in and
unplug the fan connector from its mating connector on the
side of the power supply assembly.
4. Remove the fan.
Replacement
1. Plug the fan wire connector into its mating connector on the
side of the power supply assembly.
2. Attach the new fan and finger guard to the power supply
assembly with the hardware removed in step 2 above.
3. Reinstall the power supply module as described in the
previous section.
4-20
5Site Preparation and Installation
5
Setting up the proper working environment for computer
equipment can greatly increase its reliability and utility. This next
section provides guidelines for site preparation before installation
of the computer.
Placement Recommendations
To ensure that the computer runs at its maximum efficiency, it is
important that it is positioned correctly. A computer is an
environment-sensitive piece of equipment, so it is crucial to its
performance to install it in the best place possible.
The following are a few guidelines that should be followed when
deciding where to place the computer chassis.
❏
The system is in a stable area, free of excess movement and
jarring.
❏
The system is located where it can be easily serviced.
❏
The system is installed safely; cables and cords are out of the
way.
❏
The set-up is comfortable for users.
❏
There is room for proper air flow for cooling.
❏
The area is free of excess heat, dust, smoke, and Electro-Static
Discharge (ESD).
5-1
Site Preparation and Installation
Weight Distribution
To avoid hazards arising from uneven mechanical loading of the
rack, plan the installation so that (within the limitations of
equipment and cabling) the weight of the equipment is evenly
distributed across the width of the rack. The heaviest units should
be located towards the bottom.
5
Power Requirements
The computer system should be connected to branch circuits
specifically and totally dedicated for the computer system. Do not
plug other electrical items (that are not part of the entire computer
system) into an outlet that is connected to the circuit breaker
serving the computer. Making the computer share a circuit with
other electrical equipment is an invitation to losing data if the
circuit is overloaded and the breaker is tripped. The computer is
equipped with a separate power cord and should be placed within
six feet of the electric receptacle.
For protection of data in the computer, disable all other outlets not
used by the computer that are on the same branch circuit. It is
suggested that adhesive labels be placed over outlets in order to
prevent their use.
Guidelines for Using Branch Circuits
All branch circuits for the computer system must come from the
same circuit breaker panel. Failure to do this can cause power to
flow in the data cables interconnecting various devices of the
system.
Branch circuits must not be overloaded. Check the manual and/or
rating plate of all devices and verify that the sum of the ampere
ratings do not exceed two-thirds of the branch rating.
5-2
Power Requirements
Laser printers and some other devices cause periodic short
duration heavy loads that are not reflected in their ampere ratings.
Connect laser printers on a separate branch circuit from the
computer enclosure.
Using power strips with separate circuit breakers does not add
additional protection and may cause unwanted power
interruption. Ensure that all power strips or extension cords used
are not too long and are at least #16 (the best choice is #14 AWG or
larger) with ground.
The use of surge/transient suppressors is not recommended
without careful and expert power system analysis. Most
surge/transient suppressors can cause system damage from
transients if used in the typical manner.
All branch circuits must have a “third wire” type ground for the
branch circuit that only goes to the circuit breaker panel. Conduit
ground is unacceptable for any portion of the system. It is better if
“orange” insulated ground outlets are used for the computer
system where conduit is present. Do not connect the ground wire to
the conduit or the outlet box when using insulated ground outlets.
Blinking lights or fluctuating intensity from lighting at the
computer site are an indication of poor power. This may be a cause
of possible system hang ups. Investigate the electrical installation to
ensure proper system operation.
Power Circuit Protection
Ideally, the power circuit should be protected by an electrical line
filter that prevents voltage spikes caused by unusual outside forces
from reaching the computer. The most desirable means is to use a
“no-break” UPS (uninterruptible power supply) to furnish power
to your system's processor enclosure. A no-break (also known as
“online”) UPS makes the central processor less susceptible to the
voltage fluctuations, spikes, and frequency aberrations inherent in
most power systems.
5-3
5
Site Preparation and Installation
A second type of UPS is called a “standby” UPS, or SPS. This device
switches to a battery system if power fails. SPS units usually lack
protective circuitry and power conditioning capability; as a result,
they are more susceptible to input power fluctuations than nobreak/online UPS units. If you opt for an SPS, be sure to get one
that has a switchover time of 5 milliseconds or less. Some SPS units
provide enough power to shut the system down in the event of a
power failure; others furnish enough for the system to continue
operating for a specified period of time during the power failure.
5
The UPS or SPS must have receptacles to furnish power to both the
processor enclosure and the console terminal.
Circuit Breakers and Receptacles
Circuit breakers furnishing power to any portion of the system
must be of the correct size to protect the equipment. Receptacles
must be wired according to the three-wire power distribution
scheme (line, neutral, and ground).
All power receptacles servicing any equipment that is directly
cable-connected to the system (modem/terminal server and fiber
optic connections excluded) must have a single, common
grounding point. The ground wire must be at true ground potential
with a resistance (measured at the power panel bus) of five ohms or
less between the bus bar and earth. The ground wire must be of the
“third wire” type, not conduit ground.
Electro-Static Discharge
Motorola computer systems are designed to withstand up to 5 kV1
(Kilovolts) of ESD with no observable effect, up to 12 kV without
system interference, and up to 24 kV without damage to the
equipment.
1. Several times the ESD potential that you are likely to accumulate by walking across a carpeted floor.
5-4
Power Requirements
The system is designed to operate in an area with 10% to 80% noncondensing relative humidity. A dry area (below 20% relative
humidity) is conducive to ESD problems.
5
5-5
Site Preparation and Installation
Installation Options
A system can be either rack-mounted or set up in a floor-standing
pedestal configuration (dual 9-, 12-, and 20-slot, Original Chassis
style only). The pedestal configuration requires base and crown
components as well as bezels and side panels. The chassis
components interconnect vertically with a latching mechanism.
5
Pedestal Installation
The pedestal configuration requires base and cap components as
well as bezels and side panels. It is available for the Dual 9-, 12-, and
20-slot Original Chassis only.
Figure 5-1 on page 5-7 shows a representative front view of the
system in a pedestal configuration that includes a SCSI Device
Storage Module.
5-6
Installation Options
PEDESTAL TOP COVER
PEDESTAL SIDE
PANEL
MODULAR DRIVE
ENCLOSURE
5
9U MODULAR
CHASSIS
MODULAR POWER
SUPPLY
11034.00 9407
PEDESTAL BASE
WITH REMOVABLE WINGS
Figure 5-1. Pedestal Configuration System
5-7
Site Preparation and Installation
Rack System Installation
The rack system can be installed in any standard 19-inch or 23-inch
rack. The advantage of a rack system is better utilization of floor
space. Figure 5-4 on page 5-12 shows a representative front view of
the system in a rack configuration
The system can be installed without modification in a standard 19inch RETMA (or equivalent) equipment rack. With minor
modifications, it can also be installed on a 19-inch mast (as in
telecommunications installations), or in a 23-inch rack or mast. The
procedure is the same in all cases.
5
1. Remove the blank bezel from the desired rack mounting
location, if a bezel is installed.
2. Remove the bezel from the system.
3. Determine the width of the rack or mast and, if necessary,
attach a pair of mounting flanges (supplied in kit form) to
each side of the chassis in the appropriate location. Flanges
for the right and left sides are identical.
For 19-inch rack mounting, use the existing flanges formed in
the sheet metal at the forward corners of the chassis.
For a 19-inch mast installation, mount a set of flanges at the
center, narrow side out.
For a 23-inch rack or mast installation, mount the flanges
wide side out (at the forward corners for a rack, at the center
for a mast).
4. Remove the side and back panels of the rack as necessary to
gain access to the interior for chassis installation.
5-8
Installation Options
OPTIONAL CENTER LOCATION
FOR MOUNTING FLANGES
5
11304.00 9601 (3-1)
Figure 5-2. Mounting Flange Location for the 3-Slot Chassis
5-9
Site Preparation and Installation
FOR 19-INCH INSTALLATIONS
5
OPTIONAL CENTER LOCATION
FOR MOUNTING FLANGES
11029.00 9407
FOR 23-INCH INSTALLATIONS
Figure 5-3. Mounting Flange Locations for the Dual 9-, 12-, and 20-Slot
Chassis
5-10
Installation Options
The next two steps are a two-person operation. It may be desirable to
remove the power supply module beforehand to make the chassis as
light as possible.
5. Position the chassis in the selected rack bay or mast location and
align the slots in the chassis flanges with the corresponding holes
in the frame rails of the rack or mast.
6. Install screws at those locations to secure the chassis in position.
5
7. Reinstall the front bezel.
5-11
Site Preparation and Installation
3U FILLER
PANELS
5
3U MODULAR
DRIVE ENCLOSURE
9U MODULAR
CARD CAGE
3U MODULAR
POWER SUPPLY
11035.00 9407
Figure 5-4. Rack Configuration System
5-12
Cabling
Cabling
After you have completed the rack installation or otherwise
situated the system and associated equipment, proceed as follows
to cable the hardware together.
Note
All rack cabling should be contained within the rack
bay. Cabling to external peripheral equipment should
be routed through the rear panel of the rack.
5
Cables
The system console, printers, and some other peripherals use
EIA-232-D cables. Although EIA-232-D shielded cables can be
successfully used over extended distances, reliable communication
over cables longer than 50 feet depends on the absence of electrical
noise, correct ground potentials at termination points, and other
variables. For this reason, error-free communication cannot be
guaranteed on EIA-232-D cables longer than 50 feet. An alternative
solution to extending cables is to use “short-haul” modems for
devices further than 50 feet from the computer processor.
Two types of cables are commonly found in local area networks:
standard and thin. Some installations may have fiber optic or
twisted pair cables. Standard cabling, the thicker and more
insulated of the two, generally serves as the backbone of the
network. Thinnet cabling usually links individual devices, such as
terminals, to the network, but can be used as the main cabling
device as well.
The standard type of Ethernet cable has the following
characteristics:
❏
A maximum length of 1640 feet (500 m). Shorter segments of
384 feet (117 m), 230 feet (70 m), and 77 feet (23 m) are also
available.
5-13
Site Preparation and Installation
❏
Provision for up to 100 transceivers (depending on cable
length), via annular rings spaced at intervals of 2.5 m
(approximately eight feet) along the cable.
❏
Termination at both ends by N-series 50-ohm terminators.
The network must have a single ground connection.
The thinnet type of Ethernet cable has the following characteristics:
5
❏
A maximum length of 167 m (547 feet)
❏
Provision for up to 30 transceivers, regardless of cable length.
Transceivers can be spaced at any desired interval.
❏
Termination at both ends by BNC 50-ohm terminators. As
with standard cabling, the network must have a single
ground connection.
Thinnet cable is less costly than standard Ethernet cable, and is
easier to install due to its greater flexibility. Computing devices that
are equipped with built-in transceivers can be coupled to the
network without external transceivers and transceiver cabling if the
LAN backbone is formed by thinnet rather than standard cable.
Standard cable is heavily insulated and shielded against
electromagnetic interference.
To achieve maximum reliability, use the following cautions when
planning the installation of cables.
5-14
❏
Do not run signal cables parallel to AC power cables if they
are within four inches of each other.
❏
Do not install signal cables close to electric motors, power line
regulators, relays, or power supplies.
❏
Avoid laying signal cables close to air conditioners, copy
machines, water coolers, and other similar equipment that
generates power line “noise.”
❏
Do not run signal cables near equipment that generates radio
frequency interference (for example, radio transmitters).
Cabling
❏
Do not lay signal cables outside buildings without protection
from lightning and weather.
❏
Use the shortest possible cable between the processor unit
and peripherals.
❏
To ensure that maximum protection for the equipment and
operators is achieved, check the protective grounds at each
power outlet for adequacy.
5
!
Caution
To avoid the possibility of damage to equipment or
components during cabling, unplug all other devices in
the system before you begin with the installation of any
additional units.
Power Cords
Motorola system enclosures (except for the equipment racks that
house rack-mounted systems) have separable power cords
pluggable at both the wall socket and the equipment. System
enclosures should be placed within six feet of their electric
receptacles. The use of extension cords is strongly discouraged.
Motorola computers configured for 115 Vac United States domestic
use are shipped with a three-prong NEMA type 5-15P (or, in the
case of the 20-slot enclosure, NEMA type 5-20P) plug on the power
cable. For 230 Vac domestic applications, the 20-slot enclosure
receives a NEMA type 6-15P plug; rack systems are equipped with
a NEMA L6-30P plug.
ElectroMagnetic Compatibility Guidelines
To ensure continued ElectroMagnetic Compatibility (EMC)
compliance, the following guidelines must be adhered to:
❏
Use well-shielded high quality cable to interface all active
ports on the device.
5-15
Site Preparation and Installation
5
❏
Firmly secure all interface cable connectors by tightening all
associated hardware.
❏
Install and lock the front bezel as described in the Front Bezel
Removal and Replacement section of Chapter 2.
❏
Do not install or attach any additional cables to the front
facing circuit cards.
3-Slot Chassis Cabling
Data/Control Cables (without Alarm Board)
Refer to Figure 5-5 on page 5-17 while following these procedures.
1. Plug the end of an EIA-232-D cable into the host port of the
terminal to be used as the system console.
2. Plug the other end of the cable into the transition module
connector marked CONSOLE or SERIAL PORT 1 on the back of
the system.
3. If a SCSI peripheral expansion enclosure is present, connect it
to the system as follows:
Attach one end of an SCSI cable to one of the 68-pin
connectors labeled SCSI on the back of the peripheral
expansion enclosure.
Select a transition module connector labeled SCSI IN or OUT on
the back of the system. Remove the terminator block and plug
the other end of the SCSI cable into the connector. Move the
terminator block to the unused connector on the peripheral
expansion enclosure.
4. Cable all other associated equipment (terminals, printers,
SCSI expansion peripherals, etc.) to the system as described
in the installation guides for those peripherals.
5-16
Cabling
5
ENVIRONMENTAL
MONITOR
CABLE
SCSI CABLE
11408.00 9602
Figure 5-5. 3-Slot Chassis Control Cables
5-17
Site Preparation and Installation
Data/Control Cables (with Alarm Board)
Refer to Figure 5-6 on page 5-19 while following these procedures.
1. Plug the end of an EIA-232-D cable into the host port of the
terminal to be used as the system console.
2. Plug the other end of the cable into the transition module
connector marked CONSOLE or SERIAL PORT 1 on the back of
the system.
5
3. If a SCSI Device Storage Module is present, connect it to the
system as follows:
– Attach one end of a SCSI cable to one of the 68-pin
connectors labeled SCSI on the back of the Storage Module.
– Select a transition module connector labeled SCSI IN or OUT
on theback of the system. Remove the terminator block
and plug the other end of the SCSI cable into the
connector. Move the terminator block to the unused
connector on the Storage Module.
4. Cable all other associated equipment (terminals, printers,
SCSI expansion peripherals, etc.) to the system as described
in the installation guides for those peripherals.
5-18
Cabling
5
ENVIRONMENTAL
MONITOR
CABLES
SCSI CABLES
2071 9706
Figure 5-6. 3-Slot Chassis Control Cables (with Alarm Board)
5-19
Site Preparation and Installation
Environmental Monitor Cables
Depending on whether your installation includes a SCSI Device
Storage Module and/or an optional alarm board, install the RJ45
cabling for the Environmental Monitor circuitry as described in the
following table.
Table 5-1. Environmental Monitor Cabling
5
SCSI Enclosure
Present?
Alarm Board Install RJ45 Cables as Follows
Present?
Yes
Yes
System power supply to SCSI enclosure. SCSI
enclosure to alarm board.
No
System power supply to SCSI enclosure.
Yes
System power supply to alarm board.
No
No Environmental Monitor cabling necessary.
No
Power Cables (AC system)
1. Plug the socket end of the system’s power cord into the AC
power inlet located on the lower back panel.
2. If you intend to use a console terminal, plug the socket end of
the console terminal’s power cord into the AC power inlet on
the back of the terminal.
3. Attach power cords to all other associated equipment.
4. Plug the power cords into appropriate electrical outlets (if
any of the equipment is rack-mounted, the rack may be
equipped with power distribution modules).
Power Cables (DC system)
1. Power down the –24/–48Vdc supply.
!
Caution
5-20
Use a –24/–48Vdc supply source that is electrically
isolated from the main DC source. The –24/–48Vdc
source is to be reliably connected to ground.
Cabling
2. Guide the free end of a DC power cable, with about 1/2 inch of
insulation stripped from the wires, to the terminal block
supplied with the DC system. Clamp the DC leads (positive,
negative, and ground) to the terminal block.
!
Caution
The connection to DC power consists of three wire leads
(no larger than #12 AWG, fine strand or solid, but
capable of handling at least 10 Amps of current). To
avoid grounds or shorts, exercise care when securing
the wires to the connector.
Note
5
For additional protection if the conditions of the site
call for it, you may wish to also use the chassis ground
point on the rear wall of the unit (the GND connection
with a 1/4 x 20 thread located in the lower right corner
of the back panel, as viewed from the rear). This
ground point is to be connected to the equipment rack
or other reliable path to ground.
.
+24/+48VDC
−24/−48VDC
GROUND
11302.00 9503
3. Assemble the clam-shell connector housing around the wires
as shown in the diagram above. Secure a length of Tyrap
around the housing to reinforce the assembly.
5-21
Site Preparation and Installation
4. Plug the assembled connector into the DC power inlet located
on the back panel of the system.
5. If there is other equipment requiring DC power, cable those
devices to the DC source as described in the associated
installation guides.
6. For AC equipment such as the system console, plug the
socket end of the unit's power cord into the AC power inlet
on the back of the unit.
5
7. Plug the power cord of the console terminal (and any other
AC equipment) into an electrical outlet.
8. Turn the DC power on.
Power Supply Limit Considerations
The system can be equipped with a power supply module
accepting either –24/–48Vdc or 115/230Vac inputs. The +5Vdc
output is rated at 20A. The +12Vdc output is rated at 5A. The –
12Vdc output is rated at 1A.
!
Caution
The system integrator must ensure that the installed
peripheral devices do not exceed the power supply
rating.
The current rating for the individual outputs must not be exceeded,
and the total power supply output power must not exceed 170W.
When calculating the 5Vdc current, remember to include the
backplane termination resistors.
5-22
Cabling
Dual 9-, 12-, and 20-Slot Chassis Cabling
Control Cables (12- and 20-Slot Systems without Alarm Board)
Use the following instructions to install the control cables.
1. Plug the end of an EIA-232-D cable into the host port of the
terminal to be used as the system console.
2. Plug the other end of the cable into the transition module
connector marked CONSOLE or SERIAL PORT 1 on the back of
the system.
3. If an SCSI peripheral expansion enclosure is present, connect
it to the system as follows:
– Attach one end of an SCSI cable to one of the 68-pin
connectors labeled SCSI on the back of the peripheral
expansion enclosure (Figure 5-7).
– Select a transition module connector labeled SCSI or SCSI
OUT on the back of the system. Remove the terminator
block and plug the other end of the SCSI cable into the
connector. Move the terminator block to the unused
connector on the peripheral expansion enclosure.
– If you have the Environmental Monitor option, install an
RJ45 cable between the connector on the back of the
system (identified with a “no telephone” graphic) and
either of the RJ45 connectors on the back of the peripheral
expansion enclosure.
4. Cable all other associated equipment (terminals, printers,
SCSI expansion peripherals, and so on) to the system as
described in the installation guides for those peripherals.
5-23
5
Site Preparation and Installation
5
11063.00 9409
Figure 5-7. SCSI and Environmental Monitor Connections
5-24
Cabling
Control Cables (12- and 20-Slot Systems with Alarm Board)
Refer to Figure 5-8 on page 5-26 while following these instructions.
1. If the chassis is equipped with a SCSI Device Storage Module,
connect an RJ-45 cable between the SCSI ENV port on the
Alarm Board and the storage module’s RJ-45 connector
(identified by a “no telephone” graphic).
2. Plug one end of an an RJ-45 cable into the VME ENV port on the
Alarm Board.
3. Plug the other end of the cable into the control board’s RJ-45
connector (identified by a “no telephone” graphic.
4. Attach one end of a SCSI cable to the Alarm Board’s SCSI
connector (labeled Narrow SCSI).
5. Attach the other end of the SCSI cable to the Storage Module’s
lower SCSI connector.
6. Terminate the Storage Module’s upper SCSI connector.
7. Cable all other associated equipment (terminals, printers,
SCSI expansion peripherals, and so on) to the system as
described in the installation guides for those peripherals.
5-25
5
Site Preparation and Installation
5
2070 9706
Figure 5-8. 12- and 20-Slot Chassis Control Cables (with Alarm Board)
5-26
Cabling
Control Cables (Dual 9-Slot System without Alarm Board)
Use the following instructions to install the control cables.
1. Plug the end of an EIA-232-D cable into the host port of the
terminal to be used as the system console for System A.
2. Plug the other end of the cable into the transition module
connector marked CONSOLE or SERIAL PORT 1 on the back of
the system on the System A side.
3. Cable all other associated equipment (terminals, printers,
SCSI expansion peripherals, and so on) to System A as
described in the installation guides for those peripherals.
4. Repeat steps 1 through 3 for System B.
5. If an SCSI device storage module is present, connect it to
System A or B as follows:
– Attach one end of an SCSI cable to one of the 68-pin
connectors labeled SCSI on the back of the SCSI storage
module.
– Select a transition module connector labeled SCSI or SCSI
OUT on the back of the system. Remove the terminator
block and plug the other end of the SCSI cable into the
connector. Move the terminator block to the unused
connector on the SCSI storage module.
– If you have the Environmental Monitor option, install an
RJ45 cable between the connector on the back of the
system (identified with a “no telephone” graphic) and
either of the RJ45 connectors on the back of the SCSI
storage module.
5-27
5
Site Preparation and Installation
Control Cables (Dual 9-Slot System with Alarm Board)
Refer to Figure 5-9 on page 5-29 while following these preocedures.
1. If the chassis is equipped with a SCSI Device Storage Module,
connect an RJ-45 cable between the SCSI ENV port on the
Alarm Board and the storage module’s RJ-45 connector
(identified by a “no telephone” graphic).
2. Plug one end of an an RJ-45 cable into the VME ENV port on the
Alarm Board.
5
3. Plug the other end of the cable into the control board’s RJ-45
connector (identified by a “no telephone” graphic). Make
sure it is the control board for the side of the chassis (system
A or B) in which the Alarm Board is installed.
4. Attach one end of a SCSI cable to the Alarm Board’s SCSI
connector (labeled Narrow SCSI).
5. Attach the other end of the SCSI cable to the Storage Module’s
lower SCSI connector.
6. Terminate the Storage Module’s upper SCSI connector.
7. Cable all other associated equipment (terminals, printers,
SCSI expansion peripherals, and so on) to the system as
described in the installation guides for those peripherals.
5-28
Cabling
SYST
EM B
SYST
5
EM A
2076 9707
Figure 5-9. Dual 9-Slot Chassis Control Cables (with Alarm Board)
Power Cables (AC Chassis)
Use the following instructions to install the power cables.
1. Plug the female end of the system’s power cord into the AC
power connector located on the lower back panel.
2. Plug the end of the console terminal’s power cord into the
connector on the back of the terminal.
3. Attach power cords to all other associated equipment.
5-29
Site Preparation and Installation
4. Plug the power cords into appropriate electrical outlets (if
any of the equipment is rack-mounted, the rack may be
equipped with power distribution modules).
Power Cables (DC Chassis)
5
!
Caution
Connect the equipment to a -48 Vdc supply source that
is electrically isolated from the DC source. The -48 Vdc
source is to be reliably connected to earth.
1. Remove the power to the -48Vdc wires to be connected to the
system.
2. To connect the system the DC power source, guide the free
end of a DC power wire, with about one-quarter inch of
insulation stripped from the wires, to the terminal block
labeled -48VDC INPUT on the back of the chassis corner. Clamp
the leads to the terminal block (see Figure 5-10). The
following describes the standard color convention used for
the wiring. Your site may differ:
– Brown to +48V
– Blue to -48V
– Green/yellow to the ground connection
3. For dual 9-slot systems, or 12- and 20-slot systems with dual
power supplies, repeat steps 1 and 2 for the second power
supply.
!
Caution
5-30
For each system, the connection to DC power consists of
three #10 AWG wire leads. To avoid grounds or shorts,
exercise care when securing these wires to the terminal
block(s) of the system.
Cabling
GROUND
48V
+|Insert
Wires
Here
Clamping
Screws
5
Figure 5-10. DC Terminal Block
Note
For additional protection if the conditions of the site
call for it, you may wish to also use the chassis ground
point on the rear wall of the unit (the GND connection
with a 1/4 x 20 thread located to the upper left of the ESD
bond point). This ground point is to be connected to
the equipment rack or other reliable path to earth
ground.
4. If there is other equipment requiring DC power, cable those
devices to the DC source as described in the associated
installation guides.
5. For AC equipment, such as the system console, plug the
socket end of the unit's power cord into the connector on the
back of the unit.
6. Plug the power cord of the console terminal (and any other
AC equipment) into an electrical outlet.
7. Reapply the DC power to the wires connected to the system.
5-31
Site Preparation and Installation
5
5-32
6Chassis Operations
6
This chapter describes the controls, indicators, and operating
procedures for the system chassis. Only those controls and
indicators that are part of the base system (i.e. the chassis) are
described here; many of the individual VMEmodules used in the
system are equipped with their own controls and indicators. For
information about the controls and indicators on the individual
VMEmodules, refer to the user’s manual for that module (see
Related Documentation in Chapter 1).
Controls and Indicators
The system is equipped with a key switch (two key switches in the
case of a dual 9-slot system) and three indicator lights to control and
monitor power to the card cage and fan. These controls, their
placement, and their functions are listed in the tables below.
Table 6-1. 3-Slot System Controls and Indicators
Control
Location
Function
Power/
Reset
key switch
Power supply
module, front
Turns the DC power to the system off and on.
Incorporates a Reset function to reset the system in
the event of a malfunction.
Removing the key locks the associated system in its
current state, either on or off.
Settings are Standby ( ), Power On (|), and Reset
(▲).
Status
LEDs
Power supply
module, front
Display the status of input power, operating voltages, and
enclosure temperature.
(Green, normally on) = −24/−48Vdc or 115/230Vac
(Green, normally on) = +5/+12/−12Vdc.
(Yellow, normally off) = Cooling failure.
6-1
Chassis Operations
Table 6-2. Dual 9-, 12-, and 20-Slot System Controls and Indicators
6
Control
Location
Function
Three-position
key switch
Front of enclosure, Provides a convenient means of turning the
upper left or right system power off (STANDBY) and on (RUN), or
of resetting the unit in the event of a
malfunction (RESET).
Removing the key locks the associated system
in its current state, either on or off.
System power
fault indicator
Above key
switch, right side
Illuminates when one of the power supplies in
a 12- or 20-slot chassis with two power supplies
fails.
Overtemperature Above key
indicator
switch, left side
Illuminates in the event of excessive heat
buildup within the chassis.
Input power
indicator
Illuminates as long as the power supply is
connected to a -48Vdc or 115/230Vac input
power source.
Front of power
supply module
(not visible with
power supply
bezel installed)
Key Switch Control
A three-position key switch turns the power supply outputs on or
off. The | position is “on”; the
position is “off” or Standby. The
key can be removed in either position to lock the switch in that
setting. If the key switch is in the | position when the system is
plugged in or power is restored, the power supply cycles on
immediately.
Note
6-2
With the switch in the
position, power to the card
cage is removed but the primary side of the power
supply remains energized.
Controls and Indicators
The Reset (▲) position supplies a SYSRESET signal to the backplane
to reset the system in the event of a malfunction. Reset (▲) is a
momentary-contact setting that is available only when the key is
inserted in the switch.
3-Slot Indicators
Indicators to display the status of input power, operating voltages,
and interior temperatures are located on the front panel of the
power supply module.
❏
The Input Power LED ( ) indicates the presence of input
power to the power supply. Under normal conditions, the
Input Power LED is illuminated. If the LED is off, and input
power is applied, the power supply may be defective or the
input power may be too low.
❏
The System Power Status LED ( ) monitors the operating
voltages at the chassis backplane. Under normal conditions,
the LED is illuminated. If the LED is off, the power supply
may be defective or the system power has strayed from the
acceptable range.
❏
The Overtemperature LED ( ) indicates the presence of
excessive operating temperatures within the power supply,
the card cage (if an optional backplane thermal sensor is
installed), or the SCSI peripheral expansion enclosure (if
installed).
Dual 9-, 12-, and 20-slot Indicators
Several indicators to display the status of input power, operating
voltages, and interior temperatures are located on the front panel of
the card cage and power supply.
❏
The system power fault LED (on the front of the bezel -designated with a broken lightbulb symbol) indicates a defect
in the +5Vdc, +12Vdc, or -12Vdc operating voltages at the
6-3
6
Chassis Operations
chassis backplane, which distributes power to the fans, mass
storage drives, and VME card cage.
❏
The input power LED (on the front of the power supply -visible with the power supply bezel removed) indicates the
presence of -48Vdc or 115/230Vac input power (depending
on the type of power supply installed) at the power supply
inputs.
To verify that the +5Vdc/+12Vdc/-12Vdc operating voltages
are present when the power supply bezel is in place, check
the status LEDs on the front panel of the processor board. If
the input power LED is off with input power applied, the
power supply is defective.
6
❏
The overtemperature LED (on the front of the bezel -designated with a thermometer symbol) indicates the
presence of excessive operating temperatures within the
power supply, the card cage (if an optional backplane
thermal sensor is installed), or the SCSI device storage
module (if installed).
Power On/Off Procedures
The following procedures are the recommended methods for
powering-on and -off the XR Chassis.
Recommended Power-On Procedure
1. Verify that all system modules, and associated data/control
cabling are properly configured and installed. If the system is
rack-mounted, also check that all required external cabling
(to non-rack-mounted equipment) is correctly installed.
!
Caution
6-4
The integrator is responsible for ensuring that current
loads to not exceed the power supply's limits. The
maximum current loads per VME slot should not exceed
Power On/Off Procedures
the the limits documented in the IEE Standard for a
Versitile Backplane Bus: VME Bus. The maximum current
loads per pin for transition modules is the same as for
VME modules. Note that thermal considerations are
also necessary when integrating high power modules.
The individual thermal profile of modules requires the
integrator to understand the particular requirements of
the modules and to test where there is any question.
The maximum current load on the system depends
upon the configuration of the system and can be
determined from the following table:
6
Table 6-3. Total Current Consumption Limit
Power Supplies
System
MC1000K-AC700
MC1000K-DC700
MC1000K-AC700A
MC1000K-DC700A
9-Slot (Per Side)*
100A@5V,
20A@+12V,
10A@-12V
120A@5V,
20A@+12V,
10A@-12V
Single Power Supply
100A@5 V,
20A@+12V,
10A @-12V
120A@5 V,
20A@+12V,
10A@-12V
Dual Power Supply
(Redundant
Operation)
100A@5 V,
20A@+12V,
10A @-12V
120A@5 V,
20A@+12V,
10A@-12V
Dual Power Supply
(Load Sharing)
180A@5 V,
20A@+12V,
10A @-12V
2100A@5 V,
32A@+12V,
16A@-12V
12- and 20- Slot
*Power is not shared between between the sides on a 9-slot system -- the power
supplies operate independently.
6-5
Chassis Operations
2. On the system, verify that the power switch is set to the
position (Standby, or “off”).
Note
If the power switch is set to the | position (“on”) when
the line cord is connected to a power source, the
outputs of the associated power supply cycle on
immediately.
3. Verify that the system is connected to the Vac or Vdc input
power source (as appropriate to the installation and system
configuration).
6
!
Caution
The voltage on the rating label adjacent to the power
receptacle must agree with the type of line cord and the
applied voltage.
4. Insert the key and turn the power switch to the | position (on).
The fan runs while power is on. The System Power LED
illuminates as long as the key is in the “on” position. The
Input Power LED on the front panel illuminates as long as the
power supply remains connected to power source and is free
of defects.
!
Caution
To ensure adequate cooling, the fan in the system must
be running. If the fan does not run, shut the system
down and correct the problem before continuing.
5. When the system is operating correctly, remove the key to
prevent tampering with the power switch.
Note
6-6
Locking the system is not required, but is
recommended to prevent accidental resetting or
powering off.
Chassis Cooling
Recommended Power-Off Procedure
Note
Ensure that proper software shutdown procedures
have been followed before you continue.
1. Insert the key and turn the power switch to the
position
(Standby, or “off”). The power supply cycles down, but the
power status LED on the power supply remains on,
indicating that primary power is still present.
2. If the system incorporates a dual 9-slot chassis, repeat step 1
for System B.
3. If the chassis is to be powered down for a long time or will be
left unattended, remove the key to prevent tampering with
the power switch.
Emergency Power Removal
In the event of an emergency:
❏
For an AC powered system, remove the power cable from the
rear of the enclosure.
❏
For a DC powered system, trip the circuit breaker for the
wires supplying DC power to the system (there are no useraccessible circuit breakers on the system).
Chassis Cooling
3-Slot Chassis
It is essential that all of the equipment used in the rack system be
properly cooled. The system is designed for an input air
temperature below 50° C (122° F). The system’s DC-powered fan
provides forced-air cooling for the power supply module as well as
6-7
6
Chassis Operations
the VMEmodules and the drives in the VME card cage. Cooling air
is drawn in at the front of the fan module, forced past the
VMEmodules, drives, and power supply, and vented through the
right rear panel of the chassis.
The internal fan provides airflow sufficient for most installations,
but some high-density, high-power VMEmodules may require
additional cooling. When integrating VMEmodules that are known
to run hot, testing is advisable to confirm that these modules are
properly cooled.
Note also that for tape storage media, a maximum safe temperature
of 50° C (122° F) is specified. Since the operating temperatures
within the chassis will always be greater than the air inlet
temperature, avoid using tapes if the inlet temperature exceeds
40° C (104° F).
6
To ensure adequate cooling:
❏
The air space behind the rack must not be blocked, and the
fan inlet screens must be clean.
❏
The air inlet temperature must not exceed 50° C/122° F (or
40° C/104° F if storage tapes are used). When the system is
installed in a rack with other chassis, be sure that each unit in
the rack is provided with its own supply of cooling air. Do not
use air heated by one chassis to “cool” another chassis.
❏
The side and back panels of the rack must be in place.
❏
All unused VMEmodule slots must be covered.
❏
All front bezels must be in place.
❏
All unoccupied rack mount locations must be covered with
blank bezels.
The system is designed for use in a relatively clean (office or lab)
environment. To assure reliable operation in an industrial
environment, you may need to provide protection against airborne
particles and other contaminants, especially for the disk or tape
drives and their associated media.
6-8
Chassis Cooling
Dual 9-, 12-, and 20-slot Chassis
The VME card cage is cooled by a front plug-in fan module
providing front to rear airflow. Dual fan modules are available for
the dual 9-slot configuration. The individual fan modules are
replaceable without interrupting power to the companion system.
The system is designed for an input air temperature below 50° C
(122° F). Three DC-powered fans (four fans in the dual 9-slot
chassis) provide forced-air cooling for the VMEmodules and mass
storage drives in the VME card cage. Power supply modules have
a separate set of fans; convection cooling is used for the rearmounted transition modules. For the VME card cage, the direction
of airflow is in at the front of the fan tray, up past the VMEmodules
and mass storage drives, and out the upper back of the chassis. For
the power supplies, cooling air is drawn in the front of each module
and vented out through the lower back panel of the chassis.
6-9
6
Chassis Operations
Airflow (in)
Airflow (out)
Plug-in Drives
Drive Enclosure
VME
Card Cage
Transition
Optional External 68-pin mini to
68-pin mini SCSI Cable
6
DC Power Connection
Airflow (in)
Airflow (out)
Power Supply
Plug-in Power Supply
Airflow (in)
Base
Figure 6-1. Internal View of System (Side View)
To ensure adequate cooling:
6-10
❏
The air space behind the rack must not be blocked
❏
The side and back panels of the rack must be in place
❏
All unused VMEmodule slots must be covered
❏
All front bezels must be in place
❏
All unoccupied rack mount locations must be covered with
blank bezels
Chassis Cooling
The system is designed for use in a relatively clean (office or lab)
environment. To assure reliable operation in an industrial
environment, you may need to provide protection against airborne
particles and other contaminants, especially for the disk or tape
drives and their associated media.
The internal fans provide airflow sufficient for most installations,
but some high-density, high-power VMEmodules may require
additional cooling. When integrating VMEmodules that are known
to run hot, testing is advisable to confirm that these modules are
properly cooled.
Note also that for tape storage media, a maximum safe temperature
of 50° C (122° F) is specified. Since the operating temperatures
within the chassis will always be greater than the air inlet
temperature, avoid using tapes if the inlet temperature exceeds 40°
C (104° F).
No forced-air cooling is provided for the rear-mounted modules.
The rear-mounted modules are typically transition boards with few
active components, and cooling is generally not required.
6-11
6
Chassis Operations
Environmental Monitoring
An environmental monitoring function to track enclosure
temperatures and operating voltages is incorporated into the
chassis design. The environmental monitor provides:
❏
Overtemperature Reporting -- the temperature in the chassis,
power supply, or optional SCSI Device Storage Module
exceeds maximum safe termperature (without regard to
which one of the actual sensors causes the activation).
❏
Power Supply Defective Reporting -- the AC or DC input
voltages to the power supply stray out of range.
6
Assemblies Monitored
In the CPU enclosure, power supply outputs and temperatures are
always monitored.
Note
In the 3-slot chassis, enclosure temperature is
monitored through the power supply, since the air is
drawn from the enclosure, through the power supply,
and out of the chassis.
In the dual 9-, 12-, and 20-slot chassis, enclosure
temperature is monitored through sensors mounted on
the backplane.
The SCSI peripheral expansion enclosure has no power supply
monitoring, but is equipped with a backplane temperature sensor.
As long as the RJ45 cabling is installed, SCSI enclosure
temperatures are monitored along with the power supply
voltages/temperatures in the CPU enclosure.
6-12
Environmental Monitoring
Temperature Monitoring Function
The overtemperature LED on the front panel of the system indicates
the presence of excessive operating temperatures within one or
more of the following subassemblies:
❏
The power supply
❏
The card cage
❏
The standalone SCSI peripheral expansion enclosure (if
installed)
The SCSI enclosure also drives an overtemperature LED of its own
on the back panel.
Power Supply and Card Cage
Two temperature thresholds exist in a system power supply. In the
event of a heat buildup beyond the lower threshold within a
monitored power supply, thermal protection circuitry illuminates
the overtemperature LED on the front panel of the system.
Note
If the SCSI peripheral expansion enclosure is the
location of the overtemperature condition, its
overtemperature LED also illuminates.
If temperatures climb further, beyond the higher threshold of
maximum safe ratings, an ACFAIL signal is placed on the VMEbus
and the affected power supply is shut down automatically.
At the lower threshold, Motorola-supported devices and most
other devices in the system enclosure are approaching their upper
temperature limits but are not in danger of immediate damage.
In other parts of the system, temperature sensors provide only the
lower threshold warning. As with power supplies, a heat buildup
beyond the first threshold within a monitored subassembly
illuminates the warning LED on the front of the chassis. If
temperatures climb further, however, no power shutdown occurs.
6-13
6
Chassis Operations
Several conditions can trigger the alarm:
❏
A failed fan in a warm environment
❏
Blocked airflow in or out of the enclosure
❏
An ambient temperature near the specified limits of the
enclosure (50˚ C/122˚ F)
The overtemperature LED turns off when the cooling problem is
corrected if the correction is made before the power supply sensor
warms another 5˚ F to system shutdown. Powering down to correct
a problem may not be necessary, because many failures are caused
by nothing more than inadvertent blockages of the airflow. Prompt
removal of a blockage allows recovery without a shutdown of
system power. In general, power should not be removed from the
system until a normal system shutdown is completed.
6
SCSI Enclosure
The power supply in the SCSI peripheral expansion enclosure is
monitored in the same way as that of the main chassis. A heat
buildup beyond the first threshold within a monitored SCSI
enclosure illuminates the warning LED.
If temperatures climb further, however, no power shutdown
occurs.
Voltage Monitoring Function
Overvoltage protection circuitry monitors the power supply inputs
and outputs. If the power inputs of a monitored power supply go
out of range, or if the +5Vdc output strays out of tolerance and
remains so, the power supply of the affected chassis is shut down
automatically.
The voltage monitoring function is confined to the system itself; it
does not extend to the SCSI Device Storage Module.
6-14
Environmental Monitoring
Overtemperature Warning LED
The system thermal warning LED, designated with a thermometer
symbol, can be activated by:
❏
The power supply’s first threshold
❏
High temperature alert from the SCSI peripheral expansion
enclosure.
If disk subsystem is present, signal is available through the
cable from the enclosure’s RJ-45 connector to the back of
control board.
❏
6
High temperature on the backplane thermal sensors
Backplane sensors (dual 9-, 12-, and 20-slot chassis) are
optional and may not be installed. Backplane sensors are
resistor programmed with plug-in resistors, and therefore the
level could be changed by changing the resistor components.
The sole result of a thermal alarm is that the LED lights.
An optional alarm board is available for use in conjunction with the
environmental monitoring system. The alarm board amplifies
signals from the environmental monitor to make them usable as
inputs to the proprietary alarm systems found at some customer
installations.
Recovery
The surest way to reset the power distribution system after a
shutdown triggered by the environmental monitor is to cycle the
primary power (remove and reconnect the -48Vdc or 115/230Vac
input power).
In systems with a redundant power supply, setting the key switch
to STANDBY and back to RUN after a thermal or undervoltage failure
restarts the power supply, but requires that the operating system
first be shut down.
6-15
Chassis Operations
6
6-16
7Power Supplies
7
3-Slot Power Supply
DC power for the backplane, fan, and drives is furnished by a
UL/CSA/VDE-approved 170W autoranging power supply
module. Power supply modules are available in both –24/–48Vdcand 115/230Vac-compatible versions, each providing +5Vdc,
+12Vdc, and –12Vdc to the system (with power factor correction in
the AC version). The power supply module is installed next to the
VMEmodule card cage. The power supply receives forced-air
cooling together with the VMEmodules and mass storage drives.
Table 7-1. 3-Slot Power Supply Specifications
Characteristics
Physical characteristics
Height
Width
Length
Temperature
Operating
Storage and transit
Relative humidity
Altitude
Operating
Storage and transit
Power ratings
Input voltage (DC)
Input voltage (AC)
Specifications
5.7 in. (145 mm)
3.4 in. (86 mm)
14.0 in. (356 mm)
0˚ to 50˚ C (32˚ to 122˚ F)
-55˚ to 85˚ C (-67˚ to 185˚F)
0% to 90% noncondensing
0 to 10,000 feet (3048 m)
0 to 30,000 feet (9144 m)
-18Vdc to -76Vdc
90-132Vac, 180-264Vac, 47-63Hz
Output voltages
+5Vdc @ 20A
+12Vdc @ 5A
-12Vdc @ 1A
Output power
170W maximum (total from all outputs)
7-1
Power Supplies
The power supply is mounted in a module next to the card cage. If
the power supply fails, the module is replaced as a unit. The power
supply receives –24/–48Vdc or 115/230Vac input power directly
through the back panel of the system. The power supply plugs into
a backplane connector, which applies operating voltages from the
power supply to the VME card cage, the cooling fan, and (if
installed) the drive modules.
Removal
!
7
Warning
Removal of a power supply module involves exposure
to high voltages. Avoid touching the connectors. Allow
one minute for the capacitors in the power supply to
discharge.
1. Switch the power supply of the system to the
position
(Standby) and disconnect the system from the AC or DC
power source:
– If the power supply is an AC unit, unplug the power cord
from the AC outlet.
– If the power supply is a DC unit, turn off the –24/–48Vdc
power source and unplug the DC connector from the
power supply input.
2. After waiting for the capacitors in the power supply to
discharge (at least one minute), remove the front bezel.
3. At the upper left side of the power supply module, loosen the
captive screw that holds the module in the chassis.
4. Slide the module out.
7-2
3-Slot Power Supply
11315.00 9505
7
Replacement
1. Slide the power supply module carefully into the chassis. Use
firm steady pressure to seat the connector properly.
2. Tighten the captive screw that holds the module in the
chassis.
3. Reinstall the front bezel.
4. Reconnect the system to the AC or DC power source:
– If the power supply is an AC unit, plug the power cord
back into the AC outlet.
– If the power supply is a DC unit, plug the DC connector
into the power supply input and turn the –24/–48Vdc
power source back on.
7-3
Power Supplies
Dual 9-, 12-, and 20-Slot Power Supply
DC power for the backplane, fans, and drives is furnished by a
UL/CSA/VDE-approved 700W autoranging power supply
module. Both -48Vdc- and 115/230Vac-compatible versions are
available, each providing +5 Vdc, +12 Vdc, and -12 Vdc to the
system (with power factor correction in the AC version). The power
supply modules are installed below the VMEmodule card cage.
Each has its own set of fans to supply forced-air cooling separate
from the VMEmodules and mass storage drives.
The power supply modules are not adjustable when they are
installed in the system. If you suspect that a power supply may be
out of adjustment, replace it.
7
Table 7-2. Power Supply Specifications
Characteristics
Physical characteristics
Width
Height
Length
Temperature
Operating
Storage and transit
Relative humidity
Maximum altitude
Operating
Shipping
Power ratings
Input voltage (DC)
Input voltage (AC)
Output voltages
Output power
7-4
Specifications
7.8 inches (198mm)
5.0 inches (127mm)
10.6 inches (269mm)
0° to 50° C (32° to 122° F)
-55° to 85°C (-67° to 185° F)
0% to 90% noncondensing
10,000 feet
30,000 feet
-36Vdc to -72Vdc
90-132Vac, 180-264Vac, 47-63Hz
+5Vdc @ 100A
+12Vdc @ 20A (27A peak)
-12Vdc @ 10A
700W maximum (total from all
outputs)
Dual 9-, 12-, and 20-Slot Power Supply
All specifications are applicable under any specified combination of
input, output, and environmental conditions. All measurements
are with respect to terminals on the power supply.
The following tables, Table 7-3 and Table 7-4, provide more
detailed information about the power supplies.
Table 7-3. 700 Watt AC Power Supply Specifications
AC Voltage:
90 Vac to 132 Vac and 180 Vac to 264 Vac
Power supply accepts all input voltages without mechanical
changes
Surge Withstand Capability
Test
The following power line transient pulse parameters, per
ANSI/IEEE C37.90.1-1974 shall not adversely affect the power
supply’s operation.
Width: less than 200 microseconds
7
Risetime: 20 nanoseconds maximum
Rate: 120 transients per second
Phasing: any phase with respect to AC power
Amplitude: up to 2.5Kv with no component damage or system
interruption
AC Frequency:
47 Hz to 63 Hz
Turn-on Surge Current:
75 Amps at 110 Vac maximum
Isolation Voltage:
1500 Vac or DC equivalent minimum input to frame or as required
by IEC specification
Leakage Current:
Not to exceed 3.0 mA @ 250 Vac 60 Hz
Power Factor:
Minimum 0.98 with full load and nominal line.
Surges:
Withstands surges of 20% for 1/2 cycle at nominal line.
Surge Voltages in LowVoltage AC Power Circuits
Test
The power supply is able to withstand a Category A “ringwave”
with the following parameters, per ANSI/IEEE C62.41-1980 with
no effect on the power supply’s operation.
Waveform: 0.5 microseconds at 100 KHz
Current: 200 amps
Phasing: any phase with respect to AC power
Amplitude: up to 6Kv with no component damage or system
interruption.
7-5
Power Supplies
Table 7-3. 700 Watt AC Power Supply Specifications (Continued)
7
Fast Transient Test
The following power Fast transient pulse parameters, per EN55101-4 does not
adversely affect the power supply’s operation.
Voltage, -/+ 4000 V
tBurst, 15 msec
fBurst, 2.5 KHz
tRep, 300 ms
Injection, Asynchronous, Coupling, On L1, L2 and E
Duration, 1 minute
Output Power
700 watts total continuous from all outputs. 850 watts, 30 seconds peak for 300 mS at
10% maximum duty cycle
Output Isolation
There is a common +5, -12 and +12 volt return.
Output Noise
Total periodic and random deviation (PARD) noise found on the outputs of the power
supply is a maximum of 100 mV P-P, or 1.0% from 0 to 10 MHz, whichever is less, when
measured with any resistive load within the power supply’s operating range.
Power Fail Signal
This signal is Low True. The Power Fail signal indicates the loss of AC power by
switching to a standard TTL logic low (0) at least 5 milliseconds prior to the loss of
regulation (+5 volt output at least at 4.75 volts) with supply operation at Vac = 90 and
the load = 680 TO 700 watts, or Vac = 178 at the same DC load. It must sink at least 48
mA at no more than 0.6v.
Overload Protection
All DC outputs have a method to protect the power supply from overloads. The output
attempts to recover when the Enable is cycled Off then On. Cycling of the AC input Off
then On may cause the power supply to attempt recovery. The power supply also
attempts recovery when the overload condition is removed.
Short Protection
All DC outputs must have a method to protect the power supply from shorts between
the + and - terminals of each output and also protect itself from a short between the +
terminal of the +12v output and the - terminal of the -12v output. The output attempts
to recover when the Enable is cycled Off then On. Cycling of the AC input Off then On
may cause the power supply to attempt recovery. The power supply may also attempt
recovery when the short condition is removed.
7-6
Dual 9-, 12-, and 20-Slot Power Supply
Table 7-3. 700 Watt AC Power Supply Specifications (Continued)
AC/DC Power Supply Operation
When one each of an AC input and a DC input supply are installed together, they
operate with the following characteristics.
1). When adding the second power supply to the system, AC or DC, it can be plugged
into a backplane of a running system before the input power cord is attached and not
cause the running power supply to fault.
2). When one of each of an AC input and a DC input supply are installed in a system,
and each has appropriate input power and is enabled, the AC input supply operates
and provides 100 percent of the output load, and the DC input supply is in standby
mode, providing no output power.
3). If input power is then removed from the AC input supply, the DC input supply exits
standby mode and enters operating mode, and provides 100 percent of the output
loads. If input power is subsequently re-applied to the AC input supply, it starts and
again provides 100 percent of the output load. The DC input supply simultaneously
exits operating mode and enters standby mode, providing no output power. These
conditions do not cause an output voltage fault.
4). If input power is instead removed from the DC input supply, the AC input supply
continues operating normally, and this does not cause an output voltage fault.
Remote Sensing
Remote sensing of output #1 load is able to automatically compensate for a voltage drop
of 0.25 Vdc minimum. If parallel supplies both - sense wires tied to common.
Overshoot
Overshoot does not exceed 2.0% of any output voltage, power failure, enabled,
disabled, and AC input cycle on or off.
Load Change Transient Response
Any DC voltage returns to 1% within 2 mS in response to a 25% load step. Any DC
output does not vary more than 3% in response to a 25% load step.
Undershoot/Reverse Voltage
With respect to its normal zero reference voltage, no output voltage does, under any
normal condition become a polarity opposite to its normal operation polarity.
(Excluding applying an external reverse voltage.)
7-7
7
Power Supplies
Table 7-3. 700 Watt AC Power Supply Specifications (Continued)
7
+5 Volt Risetime
The +5 volt output transitions from +2 volts to +4.75 Volts in less than 20 mS.
The +5 volt output has a monotonic rise time.
The maximum allowable overshoot is 2%.
The above conditions is over the complete load range from minimum to maximum load,
with a capacitive load from zero (0) to 2000 ufd.
The above conditions are over the complete input range of the power supply.
Output Disable
The output voltage is disabled when an AC power fail condition exists and the DC main
output has dropped 0.5v +/- 0.25 volts out of regulation.
The outputs are re-enabled when the AC input recovers.
Power Supply Enable
The power supply enable is a system controlled signal that allows the supply to output
DC power. The signal sense is LOW = no output, HIGH = DC output. This signal line
from the power supply may float up to 15 volts when not connected. This line does not
output more than 10 ma when externally connected to ground. The power supply must
remain off if this signal is less than 0.6 volts.
Holdover Storage
Output voltage stays within regulation limits for at least 20 mS from the last peak of the
line voltage cycle after input power is removed. Measured with 90 Vac input and 700
watts of output power.
OverVoltage Protection
+5 volt output limits voltage at 6.3 Vdc +/- 3% under any single fault condition.
+12 volt outputs does not exceed +15.0 Vdc under any single fault condition. Power
supply latches off and cycling the AC power restarts.
Overtemperature Protection
The power supply shuts down when the internal temperature exceeds maximum safe
rating. Power supply latches off and cycling enable restarts.
7-8
Dual 9-, 12-, and 20-Slot Power Supply
Table 7-4. 700 Watt DC Power Supply Specifications
DC Voltage:
Isolation Voltage:
Leakage Current:
Power Factor:
Surges:
Surge Withstand
Capability Test
Surge Voltages in
Low-Voltage AC
Power Circuits Test
Fast Transient Test
36 Vdc to 72 Vdc
1500 Vac or DC equivalent minimum input to frame or as
required by IEC specification
Not to exceed 3.0 mA @ 250 Vac 60 Hz
Minimum 0.98 with full load and nominal line.
Withstands surges of 20% for 1/2 cycle at nominal line.
The following power line transient pulse parameters, per
ANSI/IEEE C37.90.1-1974 des not adversely affect the power
supply’s operation.
Width: less than 200 microseconds
Risetime: 20 nanoseconds maximum
Rate: 120 transients per second
Phasing: any phase with respect to AC power
Amplitude: up to 2.5Kv with no component damage or system
interruption
The power supply is able to withstand a Category A “ringwave”
with the following parameters, per ANSI/IEEE C62.41-1980
with no effect on the power supply’s operation.
Waveform: 0.5 microseconds at 100 KHz
Current: 200 amps
Phasing: any phase with respect to AC power
Amplitude: up to 6Kv with no component damage or system
interruption.
The following power Fast transient pulse parameters, per
EN55101-4 does not adversely affect the power supply’s
operation.
Voltage, -/+ 4000 V
tBurst, 15 msec
fBurst, 2.5 KHz
tRep, 300 ms
Injection, Asynchronous, Coupling, On L1, L2 and E
Duration, 1 minute
7-9
7
Power Supplies
Table 7-4. 700 Watt DC Power Supply Specifications (Continued)
7
Output Power
700 watts total continuous from all outputs. 850 watts, 30 seconds peak for 300 mS at
10% maximum duty cycle
Output Isolation
There is a common +5, -12 and +12 volt return.
Output Noise
Total periodic and random deviation (PARD) noise found on the outputs of the power
supply is a maximum of 100 mV P-P, or 1.0% from 0 to 10 MHz, whichever is less, when
measured with any resistive load within the power supply’s operating range.
Power Fail Signal
This signal is Low True. The Power Fail signal indicates the loss of DC power by
switching to a standard TTL logic low (0) at least 5 milliseconds prior to the loss of
regulation (+5 volt output at least at 4.75 volts) with supply operation at Vac = 90 and
the load = 680 TO 700 watts, or Vac = 178 at the same DC load. It must sink at least
48 mA at no more than 0.6v.
Overload Protection
All DC outputs must have a method to protect the power supply from overloads. The
output attempts to recover when the Enable is cycled Off then On. Cycling of the AC
input Off then On may cause the power supply to attempt recovery. The power supply
may also attempt recovery when the overload condition is removed.
Short Protection
All DC outputs must have a method to protect the power supply from shorts between
the + and - terminals of each output and also protect itself from a short between the +
terminal of the +12v output and the - terminal of the -12v output. The output attempts
to recover when the Enable is cycled Off then On. Cycling of the AC input Off then On
may cause the power supply to attempt recovery. The power supply may also attempt
recovery when the short condition is removed.
AC/DC Power Supply Operation
When one each of an AC input and a DC input supply are installed together, they
operate with the following characteristics.
1). When adding the second power supply to the system, AC or DC, it can be plugged
into a backplane of a running system before the input power cord is attached and not
cause the running power supply to fault.
7-10
Dual 9-, 12-, and 20-Slot Power Supply
Table 7-4. 700 Watt DC Power Supply Specifications (Continued)
2). When one of each of an AC input and a DC input supply are installed in a system,
and each has appropriate input power and is enabled, the AC input supply operates
and provides 100 percent of the output load, and the DC input supply is in standby
mode, providing no output power.
3). If input power is then removed from the AC input supply, the DC input supply exits
standby mode and enters operating mode, and provides 100 percent of the output
loads. If input power is subsequently re-applied to the AC input supply, it starts and
again provides 100 percent of the output load. The DC input supply simultaneously
exits operating mode and enters standby mode, providing no output power. These
conditions do not cause an output voltage fault.
4). If input power is instead removed from the DC input supply, the AC input supply
continues operating normally, and this does not cause an output voltage fault.
Remote Sensing
Remote sensing of output #1 load automatically compensates for a voltage drop of 0.25
Vdc minimum. If parallel supplies both - sense wires tied to common.
Overshoot
Overshoot does not exceed 2.0% of any output voltage, power failure, enabled,
disabled, and AC input cycle on or off.
Load Change Transient Response
Any DC voltage returns to 1% within 2 mS in response to a 25% load step. Any DC
output does not vary more than 3% in response to a 25% load step.
Undershoot/Reverse Voltage
With respect to its normal zero reference voltage, no output voltage shall, under any
normal condition become a polarity opposite to its normal operation polarity.
(Excluding applying an external reverse voltage.)
+5 Volt Risetime
The +5 volt output transitions from +2 volts to +4.75 Volts in less than 20 mS.
The +5 volt output has a monotonic rise time.
The maximum allowable overshoot is 2%.
The above conditions is over the complete load range from minimum to maximum
load, with a capacitive load from zero (0) to 2000 ufd.
The above conditions is over the complete input range of the power supply.
Output Disable
The output voltage disables when a DC power fail condition exists and the DC main
output drops 0.5v +/- 0.25 volts out of regulation.
The outputs are re-enabled when the DC input recovers.
7-11
7
Power Supplies
Table 7-4. 700 Watt DC Power Supply Specifications (Continued)
7
Power Supply Enable
The power supply enable is a system controlled signal that allows the supply to output
DC power. The signal sense is LOW = no output, HIGH = DC output. This signal line
from the power supply may float up to 15 volts when not connected. This line does not
output more than 10 ma when externally connected to ground. The power supply must
remain off if this signal is less than 0.6 volts.
Holdover Storage
Output voltage stays within regulation limits for at least 20 mS from the last peak of the
line voltage cycle after input power is removed. Measured with 36Vdc input and 700
watts of output power.
OverVoltage Protection
+5 volt output shall limit voltage at 6.3 Vdc +/- 3% under any single fault condition.
+12 volt outputs shall not exceed +15.0 Vdc under any single fault condition. Power
supply latches off and cycling the AC power restarts.
Overtemperature Protection
The power supply shuts down when the internal temperature exceeds maximum safe
rating. Power supply latches off and cycling enable restarts.
Load Sharing
The 12- and 20-slot chassis are capable of providing load sharing
functions amongst the power supplies. With load sharing, each
power supply provides part of the load requirements for the
system. If one power supply fails in such a configuration, the other
will assume the entire load.
For the load-sharing capabilities of the system to function properly,
the following three criteria must be met:
1. Each power supply must independently supply a minimum
of 5 Amps at 5 Volts.
2. The system must supply a minimum of 12 Amps. In this case,
each power supply will contribute 50% +/- 10%.
3. Power must be AC/AC or DC/DC (not AC/DC).
7-12
Dual 9-, 12-, and 20-Slot Power Supply
Removal and Replacement
The flexibility of the XR system allows a variety of power supply
configurations. Use the following list to determine the best
installation method for your system’s configuration.
❏
To replace the power supply in a dual 9-slot system or in a
system configured with a single power supply, follow the
instructions in Dual 9-Slot/Single Power Supply Replacement on
page 7-13.
❏
To replace a power supply in a 12- or 20-slot system
configured with dual power supplies, follow the instructions
in 12- and 20-Slot Hot Swap Replacement on page 7-14.
❏
To add a power supply to a 12- or 20-slot system configured
with a single power supply, follow the instructions in 12- and
20-Slot Hot Add on page 7-16.
Dual 9-Slot/Single Power Supply Replacement
1. Shut down the operating system and switch the power
supply to STANDBY.
Note
On the dual 9-slot system, be sure to shut down the side
being replaced.
2. Disconnect the input power source from the power supply
being changed:
– If the power supply is an AC unit, unplug the power cord
from the AC outlet and from the back of the XR chassis.
– If the power supply is a DC unit, turn off the -48Vdc power
source and unscrew the clamping contacts to release the
DC leads from the terminal block on the power supply.
7-13
7
Power Supplies
GROUND
48V
+|-
Clamping Contact
Screws
3. Remove the power supply bezel.
4. Loosen the two yellow, captive screws in the upper corners of
the power supply (see Figure 7-1 or Figure 7-2 on page 7-18).
5. Slide the power supply straight out of the chassis (see Figure
7-3 on page 7-19).
7
6. Slide the replacement power supply carefully into the
chassis. Use a firm, steady pressure to seat the connectors
properly.
7. Tighten the two yellow, captive screws in the upper corners
of the power supply.
8. Reinstall the power supply bezel.
9. Reconnect the power supply to the AC or DC power source:
– If the power supply is an AC unit, plug the power cord
back into the module in the rear of the XR chassis, then
into the AC outlet.
– If the power supply is a DC unit, clamp the DC leads to the
terminal block on the module and turn the -48Vdc power
source back on.
12- and 20-Slot Hot Swap Replacement
1. Remove the power supply bezel.
2. Disconnect the input power source from the power supply
being changed:
7-14
Dual 9-, 12-, and 20-Slot Power Supply
– If the power supply is an AC unit, unplug the power cord
from the AC outlet and from the back of the XR chassis.
– If the power supply is a DC unit, turn off the -48Vdc power
source and unscrew the clamping contacts to release the
DC leads from the terminal block on the power supply.
GROUND
48V
+|-
Clamping Contact
Screws
3. Remove the power supply bezel.
7
4. Loosen the two yellow, captive screws in the upper corners of
the power supply (see Figure 7-1 or Figure 7-2 on page 7-18).
5. Slide the power supply straight out of the chassis (see Figure
7-3 on page 7-19).
6. Slide the replacement power supply SLOWLY into the
chassis until the Charging Hot Swap LED lights, then STOP.
The LED will remain lit until the power supply is charged.
Note
The original power supplies (MC1000K-AC700 and
MC1000K-DC700) are not equipped with a Charging
Hot Swap LED. Slide the power supply in until you feel
the first connectors contact the receiver, then wait one
full minute before proceeding to Step 7.
7-15
Power Supplies
7. When the LED goes out, use a firm, steady pressure to seat
the power supply properly.
!
Caution
If the power supply does not seat smoothly, use a gentle
rocking motion to seat it. DO NOT back the unit out. If
you do back the unit out, restart this procedure from
step 6 to avoid resetting the system.
8. Tighten the two yellow, captive screws in the upper corners
of the power supply.
9. Reinstall the power supply bezel.
10. Connect the power supply to the AC or DC power source:
7
– If the power supply is an AC unit, plug the power cord
back into the module in the rear of the XR chassis, then
into the AC outlet.
– If the power supply is a DC unit, clamp the DC leads to the
terminal block on the module and turn the -48Vdc power
source on.
12- and 20-Slot Hot Add
1. Remove the power supply bezel.
2. Slide the replacement power supply SLOWLY into the
chassis until the Charging Hot Swap LED lights, then STOP
(see Figure 7-3 on page 7-19).
The LED will remain lit until the power supply is charged.
Note
7-16
The original power supplies (MC1000K-AC700 and
MC1000K-DC700) are not equipped with a Charging
Hot Swap LED. Slide the power supply in until you feel
the first connectors contact the receiver, then wait one
full minute before proceeding to Step 3.
Dual 9-, 12-, and 20-Slot Power Supply
3. When the LED goes out, use a firm, steady pressure to seat
the power supply properly.
!
Caution
If the power supply does not seat smoothly, use a gentle
rocking motion to seat it. DO NOT back the unit out. If
you do back the unit out, restart this procedure from
step 2 to avoid resetting the system.
4. Tighten the two yellow, captive screws in the upper corners
of the power supply (see Figure 7-1 on page 7-18).
5. Reinstall the power supply bezel.
6. Connect the power supply to the AC or DC power source:
– If the power supply is an AC unit, plug the power cord
back into the module in the rear of the XR chassis, then
into the AC outlet.
– If the power supply is a DC unit, clamp the DC leads to the
terminal block on the module and turn the -48Vdc power
source on.
GROUND
48V
+|-
Clamping Contact
Screws
7-17
7
Power Supplies
Captive
Screws
Hot Swap
CHARGING
HOT SWAP
LED
POWER
GOOD
2091 9708
7
Figure 7-1. MC1000K-AC700A / MC1000K-DC700A (New) Front Panel
Captive
Screws
Input
Power
Indicator
2090 9708
Figure 7-2. MC1000K-AC700 / MC1000K-DC700 (Original) Front Panel
7-18
Dual 9-, 12-, and 20-Slot Power Supply
EXPANSION
EXPANSION
EXPANSION
EXPANSION
EXPANSION
EXPANSION
EXPANSION
EXPANSION
EXPANSION
EXPANSION
CPU
Modular Card Cage
GND
EXPANSION
CABLES
EXPANSION
EXPANSION
CPU
SYSTEM B
SYSTEM A
EXPANSION
EXPANSION
EXPANSION
EXPANSION
CPU
EXPANSION
CABLES
EXPANSION
EXPANSION
EXPANSION
EXPANSION
CPU
EXPANSION
CABLES
DISK
DISK
FAN
FAN
FAN
FAN
EXPANSION
EXPANSION
EXPANSION
EXPANSION
EXPANSION
EXPANSION
EXPANSION
EXPANSION
EXPANSION
EXPANSION
EXPANSION
EXPANSION
EXPANSION
EXPANSION
EXPANSION
EXPANSION
EXPANSION
CABLES
12-Slot Chassis
20-Slot Chassis
FAN
FAN
FAN
FAN
FAN
FAN
Modular Card Cage
GND
Modular Card Cage
GND
7
Power Supplies
Dual 9-Slot Chassis
Power Supplies
Figure 7-3. Power Supply Locations
7-19
Power Supplies
7
7-20
8VMEbus Backplane
8
This chapter provides information about the VME backplane
installed in the system. The backplane performs these two functions
❏
Interconnects VMEmodules and transition modules
❏
Distributes operating voltages from the power supply
modules to the cooling fans and (if installed) mass storage
modules
Description
3-Slot Backplane
The backplane (see Figure 8-1 on page 8-2)is fully assembled with
connectors and terminators. The front side has three connectors on
the right side to receive connector P1 of the VMEmodules and
another set of 3 connectors on the left side to receive VMEmodule
expansion connector P2. In addition, the front side has a pair or
connectors at the top to support two drive modules. Thus, the
backplane can accommodate up to three double-high 6U
VMEmodules containing both P1 and P2 connectors, as well as a
pair of mass storage modules. An autojumpering feature eliminates
the need for daisy-chain jumpering between connector sockets.
The P2 connectors are duplicated on the reverse side of the
backplane to accommodate MVME700 series plug-in transition
modules. Two transition module connectors, designated XP1A and
XP1B, are provided for the CPU module.
8-1
VMEbus Backplane
1
9
10
18
J1
POWER
SUPPLY
P1/2
P1/3
P2/1
P2/2
P2/3
SP1
P1/1
SP2
8
J2
FAN
1
9
10
18
Figure 8-1. Backplane Connectors (Front View)
8-2
11380.00 9511
Description
VMEbus Interface Signals
The signals and pin assignments for VMEbus connectors J1/P1 and
J2/P2 are listed in Table 8-1 on page 8-4 and Table 8-2 on page 8-5.
The signals and pin assignments for the “XP” VMEbus connectors
(the transition module connectors) are listed in Table 8-3 on page
8-6.
8
8-3
VMEbus Backplane
Table 8-1. Pin Assignments for VMEbus Connector J1/P1
Pin
Number
8
8-4
Row A Signal
Mnemonic
Row B
Signal
Mnemonic
Row C
Signal
Mnemonic
1
D00
BBSY*
2
D01
BCLR*
D08
D09
3
D02
ACFAIL*
D10
4
D03
BG0IN*
D11
5
D04
BG0OUT*
D12
6
D05
BG1IN*
D13
7
D06
BG1OUT*
D14
8
D07
BG2IN*
D15
9
GND
BG2OUT*
GND
10
SYSCLK
BG3IN*
SYSFAIL*
11
GND
BG3OUT*
BERR*
12
DS1*
BR0*
SYSRESET*
13
DS0*
BR1*
LWORD*
14
WRITE*
BR2*
AM5
15
GND
BR3*
A23
16
DTACK
AM0
A22
17
GND
AM1
A21
18
AS*
AM2
A20
19
GND
AM3
A19
20
IACK*
GND
A18
21
IACKIN*
SERCLK
A17
22
IACKOUT*
SERDAT
A16
23
AM4
GND
A15
24
A07
IRQ7*
A14
25
A06
IRQ6*
A13
26
A05
IRQ5*
A12
27
A04
IRQ4*
A11
28
A03
IRQ3*
A10
29
A02
IRQ2*
A09
30
A01
IRQ1*
A08
31
-12V
+5V STBY
+12V
32
+5V
+5V
+5V
Description
Table 8-2. Pin Assignments for VMEbus Connector J2/P2
Pin
Number
1
2
3
4
5
6
7
8
9
10
11
12
13
14
15
16
17
18
19
20
21
22
23
24
25
26
27
28
29
30
31
32
Row A Signal
Mnemonic
User I/O
User I/O
User I/O
User I/O
User I/O
User I/O
User I/O
User I/O
User I/O
User I/O
User I/O
User I/O
User I/O
User I/O
User I/O
User I/O
User I/O
User I/O
User I/O
User I/O
User I/O
User I/O
User I/O
User I/O
User I/O
User I/O
User I/O
User I/O
User I/O
User I/O
User I/O
User I/O
Row B
Signal
Mnemonic
Row C
Signal
Mnemonic
+5 VOLTS
GND
RESERVED
A24
A25
A26
A27
A28
A29
A30
A31
GND
+5 VOLTS
D16
D17
D18
D19
D20
D21
D22
D23
GND
D24
D25
D26
D27
D28
D29
D30
D31
GND
+5 VOLTS
User I/O
User I/O
User I/O
User I/O
User I/O
User I/O
User I/O
User I/O
User I/O
User I/O
User I/O
User I/O
User I/O
User I/O
User I/O
User I/O
User I/O
User I/O
User I/O
User I/O
User I/O
User I/O
User I/O
User I/O
User I/O
User I/O
User I/O
User I/O
User I/O
User I/O
User I/O
User I/O
8
8-5
VMEbus Backplane
Table 8-3. Pin Assignments for Connector XP2
Pin
Number
1
2
3
4
5
6
7
8
9
10
11
12
13
14
15
16
17
18
19
20
21
22
23
24
25
26
27
28
29
30
31
32
8
8-6
Row A Signal
Mnemonic
User I/O
User I/O
User I/O
User I/O
User I/O
User I/O
User I/O
User I/O
User I/O
User I/O
User I/O
User I/O
User I/O
User I/O
User I/O
User I/O
User I/O
User I/O
User I/O
User I/O
User I/O
User I/O
User I/O
User I/O
User I/O
User I/O
User I/O
User I/O
User I/O
User I/O
User I/O
User I/O
Row B
Signal
Mnemonic
Row C
Signal
Mnemonic
GND
GND
GND
GND
GND
GND
GND
GND
GND
GND
GND
GND
GND
GND
GND
GND
GND
GND
GND
GND
GND
GND
GND
GND
GND
GND
+5 VOLTS
+5 VOLTS
-12 VOLTS
+12 VOLTS
GND
+5 VOLTS
User I/O
User I/O
User I/O
User I/O
User I/O
User I/O
User I/O
User I/O
User I/O
User I/O
User I/O
User I/O
User I/O
User I/O
User I/O
User I/O
User I/O
User I/O
User I/O
User I/O
User I/O
User I/O
User I/O
User I/O
User I/O
User I/O
User I/O
User I/O
User I/O
User I/O
User I/O
User I/O
Description
Dual 9-, 12-, and 20-Slot Backplane
The system chassis contains a 20-slot (see Figure 8-2 on page 8-8),
12-slot (see Figure 8-3 on page 8-9), or dual 9-slot (see Figure 8-4 on
page 8-10) full 32-bit VMEbus backplane mounted between the
VMEmodule and transition module areas. The features of the
backplane include:
❏
Accommodation for up to 20, 12, or 18 (dual 9-slot system)
VMEmodules per system, depending on the composition of
the payload
❏
All signal and power line connections for VMEbus
connectors P1 and P2
❏
P2 connections for transition modules
❏
VMEbus termination resistor networks
❏
Autojumpering feature for daisy-chain lines
8
Depending on the backplane, the front side has from 9 to 20
connectors on the top row to receive connector P1 of the
VMEmodules and another set of 9 to 20 connectors on the bottom
row to receive VMEmodule expansion connector P2. The backplane
can accommodate from 9 to 20 double-high 6U VMEmodules
containing both P1 and P2 connectors. An autojumpering feature
eliminates the need for daisy-chain jumpering between connector
sockets.
The P2 connectors on the reverse side of the backplane
accommodate MVME700 series plug-in transition modules. There
are two transition module connectors, designated XP1 and XP2,
provided for the CPU VMEmodule slot. There is one transition
module P2 connector for each of the remaining VMEmodule slots.
Please note that while Row A and Row C signals are duplicated
between the VME P2 and the transition module P2 connectors, the
Row B signals are not.
The backplane contains pass-thru openings for each VMEmodule
slot that accomodate the VMEmodule/transition module optional
pair keying kit.
8-7
VMEbus Backplane
P1\1
P1\2
P1\3
P1\4
P1\5
P1\6
P1\7
P1\8
P1\9
P2\1
P2\2
P2\3
P2\4
P2\5
P2\6
P2\7
P2\8
P2\9
8
FAN1
FAN2
PWR1
11032.00 9407
Figure 8-2. 9-Slot Backplane Connectors (Front View)
8-8
Description
SP1
SP2
P1\1
P1\2
P1\3
P1\4
P1\5
P1\6
P1\7
P1\8
P1\9
P1\10
P1\11
P1\12
SP3
SP4
8
SP5
P2\1
P2\2
P2\3
P2\4
P2\5
FAN1
PWR2
P2\6
P2\7
FAN2
P2\8
P2\9
P2\10
P2\11
P2\12
FAN3
PWR1
11030.00 9407
Figure 8-3. 12-Slot Backplane Connectors (Front View)
8-9
VMEbus Backplane
P1\ 1
P1\ 2
P1\ 3
P1\ 4
P1\ 5
P1\ 6
P1\ 7
P1\ 8
P1\ 9
P1\10
P1\11
P1\12
P1\13
P1\14
P1\15
P1\16
P1\17
P1\18
P1\19
P1\20
P2\ 1
P2\ 2
P2\ 3
P2\ 4
P2\ 5
P2\ 6
P2\ 7
P2\ 8
P2\ 9
P2\10
P2\11
P2\12
P2\13
P2\14
P2\15
P2\16
P2\17
P2\18
P2\19
P2\20
8
FAN1
PWR2
FAN2
FAN3
PWR1
10968.00 9405
Figure 8-4. 20-Slot Backplane Connectors (Front View)
8-10
Description
Specifications
Table 8-4. Backplane Specifications
Characteristics
Specifications
Physical
characteristics Width
(20-slot)
Width (12-slot)
Width (9-slot)
Height
Thickness
16.7 inches (405 mm)
16.7 inches (405 mm)
7.9 inches (141 mm)
16.5 inches (262 mm)
0.112 inches (2.845 mm) typical
Temperature
Operating
Storage and transit
0° to 55° C (32° to 131° F)
-55° to 85°C (-67° to 185° F)
Relative humidity
0% to 90% noncondensing
Power consumption
(without
VMEmodules)
6 W (1.2 A at +5V), required by terminator
resistor networks
Connectors
VMEbus sockets
Bus termination
8
DIN 41612, type C, 96-pin. Socket spacing
(center to center) 0.8 inch.
Permanently mounted 330/470 ohm
resistor networks and discrete resistors
VMEbus Interface Signals
The signals and pin assignments for VMEbus connectors J1/P1 and
J2/P2 are listed in Table 8-5 and Table 8-6 on page 8-13. The signals
and pin assignments for VMEbus connector XP2 (the transition
module connector) are listed in Table 8-7 on page 8-14.
8-11
VMEbus Backplane
Table 8-5. Pin Assignments for VMEbus Connector J1/P1
8
8-12
Pin
Number
Row A Signal
Mnemonic
Row B
Signal
Mnemonic
Row C
Signal
Mnemonic
1
D00
BBSY*
D08
2
D01
BCLR*
D09
3
D02
ACFAIL*
D10
4
D03
BG0IN*
D11
5
D04
BG0OUT*
D12
6
D05
BG1IN*
D13
7
D06
BG1OUT*
D14
8
D07
BG2IN*
D15
9
GND
BG2OUT*
GND
10
SYSCLK
BG3IN*
SYSFAIL*
11
GND
BG3OUT*
BERR*
12
DS1*
BR0*
SYSRESET*
13
DS0*
BR1*
LWORD*
14
WRITE*
BR2*
AM5
15
GND
BR3*
A23
16
DTACK
AM0
A22
17
GND
AM1
A21
18
AS*
AM2
A20
A19
19
GND
AM3
20
IACK*
GND
A18
21
IACKIN*
SERCLK
A17
22
IACKOUT*
SERDAT
A16
23
AM4
GND
A15
24
A07
IRQ7*
A14
25
A06
IRQ6*
A13
26
A05
IRQ5*
A12
27
A04
IRQ4*
A11
28
A03
IRQ3*
A10
29
A02
IRQ2*
A09
30
A01
IRQ1*
A08
31
-12V
+5V STBY
+12V
32
+5V
+5V
+5V
Description
Table 8-6. Pin Assignments for VMEbus Connector J2/P2
Pin
Number
Row A Signal
Mnemonic
Row B
Signal
Mnemonic
Row C
Signal
Mnemonic
1
User I/O
+5 VOLTS
User I/O
2
User I/O
GND
User I/O
3
User I/O
RESERVED
User I/O
4
User I/O
A24
User I/O
5
User I/O
A25
User I/O
6
User I/O
A26
User I/O
7
User I/O
A27
User I/O
8
User I/O
A28
User I/O
9
User I/O
A29
User I/O
10
User I/O
A30
User I/O
11
User I/O
A31
User I/O
12
User I/O
GND
User I/O
13
User I/O
+5 VOLTS
User I/O
14
User I/O
D16
User I/O
15
User I/O
D17
User I/O
16
User I/O
D18
User I/O
17
User I/O
D19
User I/O
18
User I/O
D20
User I/O
19
User I/O
D21
User I/O
20
User I/O
D22
User I/O
21
User I/O
D23
User I/O
22
User I/O
GND
User I/O
23
User I/O
D24
User I/O
24
User I/O
D25
User I/O
25
User I/O
D26
User I/O
26
User I/O
D27
User I/O
27
User I/O
D28
User I/O
28
User I/O
D29
User I/O
29
User I/O
D30
User I/O
30
User I/O
D31
User I/O
31
User I/O
GND
User I/O
32
User I/O
+5 VOLTS
User I/O
8
8-13
VMEbus Backplane
Table 8-7. Pin Assignments for Connector XP2
8
8-14
Pin
Number
Row A Signal
Mnemonic
Row B
Signal
Mnemonic
Row C
Signal
Mnemonic
1
User I/O
GND
User I/O
2
User I/O
GND
User I/O
3
User I/O
GND
User I/O
4
User I/O
GND
User I/O
5
User I/O
GND
User I/O
6
User I/O
GND
User I/O
7
User I/O
GND
User I/O
8
User I/O
GND
User I/O
9
User I/O
GND
User I/O
10
User I/O
GND
User I/O
11
User I/O
GND
User I/O
12
User I/O
GND
User I/O
13
User I/O
GND
User I/O
14
User I/O
GND
User I/O
15
User I/O
GND
User I/O
16
User I/O
GND
User I/O
17
User I/O
GND
User I/O
18
User I/O
GND
User I/O
19
User I/O
GND
User I/O
20
User I/O
GND
User I/O
21
User I/O
GND
User I/O
22
User I/O
GND
User I/O
23
User I/O
GND
User I/O
24
User I/O
GND
User I/O
25
User I/O
GND
User I/O
26
User I/O
GND
User I/O
27
User I/O
+5 VOLTS
User I/O
28
User I/O
+5 VOLTS
User I/O
29
User I/O
-12 VOLTS
User I/O
30
User I/O
+12 VOLTS
User I/O
31
User I/O
GND
User I/O
32
User I/O
+5 VOLTS
User I/O
Features
Features
Signal Line Termination
To prevent signal reflections, most signal lines not autojumpered
are terminated with 470-ohm (pull down) and 330-ohm (pull up)
resistors (a few lines have specialized terminators, depending on
the nature of the signals they carry). These resistors are arranged in
networks. They are permanently installed on the front of the
backplane. For J1, the networks are located at opposite ends of the
backplane adjacent to the first and last upper row (J1) connectors.
For J2, the networks are located at opposite ends of the backplane
adjacent to the first and last lower row (J2) connectors.
In addition to the VME specification termination noted above,
selected signals on some backplane boards have additional signalenhancing components (such as on the DTACK and BERR bus
lines).
Autojumpering
For propagation of the Bus Grant and Interrupt Acknowledge
daisy-chain signals, VMEbus protocol requires that all empty slots
(and all slots containing VMEmodules whose artwork does not
provide for propagation of the daisy-chain) have a means of
shorting daisy-chain inputs to outputs at the connector socket.
In many VME backplanes, the daisy-chain lines of the VMEbus are
manually shorted with removable jumpers. However, the
Exchange Ready chassis backplanes have an autojumpering feature
that detects unoccupied connector sockets and determines whether
the VMEmodules installed are capable of daisy-chain signal
propagation. If the slot is unoccupied, or if the signal is not passed
on via the VMEmodule, the signal is propogated through a buffer
on the backplane.
8-15
8
VMEbus Backplane
VMEbus Interconnectivity
The slots of the backplane are interconnected in accordance with
the VME specification, with exception of the autojumpering and
active termination.
All rows of the J1 bus connectors (A, B, C) are interconnected across
all backplane slots, providing the required signals for A24/D16
operation. The center row (B) of the J2 bus connectors is
interconnected across all slots, providing the required signals for
extended operation (A32/D32). Rows A and C of the J2 bus
connectors are not interconnected, but are available to the user for
I/O functions or expansion bus operation.
Backplane Power
VMEmodules that plug into the backplane may require voltages of
+5Vdc, +12Vdc, and –12Vdc for operation. The power supply’s
output connector plugs directly into the backplane, which
distributes the power directly to the VMEmodules.
8
The backplane also distributes DC power to one optional SCSI
Device Storage Module (as well as the system’s VMEmodule disk
or tape drives).
The backplane of the 3-slot system accommodates up to two 31/2inch half-height storage devices above the VMEmodule installation
area.
The backplane of the 12-slot chassis accommodates up to five 5 1/4inch half-height storage devices to the left of the VMEmodule
installation area.
The 20- and dual 9-slot chassis use VME mass storage modules
(consisting of two 3 1/2-inch half-height drives — a hard disk drive
together with an optional diskette, data cassette, or DAT drive —
mounted on a VME board), which plug into the VME backplane. If
installed, the VME drive modules occupy three slot positions each.
8-16
9Field Replacable Units
9
This chapter contains procedures for replacing the various Field
Replacable Units (FRUs) in the XR series chassis.
For the 3-slot chassis, procedures are given for:
❏
Cooling Fan Removal and Replacement
❏
3 1/2-inch Drive Removal and Replacement
For the Dual 9-, 12-, and 20-slot chassis, procedures are given for:
❏
Control Board Removal and Replacement
❏
Fan Tray Removal and Replacement
❏
12-Slot Chassis SCSI Drive
3-Slot Chassis
Cooling Fan
A DC-powered fan provides forced-air cooling for the
VMEmodules and mass storage drives in the card cage. The fan is
mounted in a module next to the card cage. If the fan fails, the
module is replaced as a unit.
Removal
1. Switch the power supply of the system to the
position
(Standby) and disconnect the system from the AC or DC
power source:
– If the power supply is an AC unit, unplug the power cord
from the AC outlet.
9-1
Field Replacable Units
– If the power supply is a DC unit, turn off the –24/–48Vdc
power source and unplug the DC connector from the
power supply input.
2. Remove the front bezel.
3. At the upper right side of the fan module, loosen the captive
screw that holds the module in the chassis.
4. Slide the module out.
9
11314.00 9601
Replacement
1. Slide the fan module back into the chassis. Use firm, steady
pressure to seat the connector properly in the backplane.
2. Tighten the captive screw that holds the module in the
chassis.
3. Reinstall the front bezel.
4. Reconnect the system to the AC or DC power source:
– If the power supply is an AC unit, plug the power cord
back into the AC outlet.
– If the power supply is a DC unit, plug the DC connector
into the power supply input and turn the –24/–48Vdc
power source back on.
9-2
3-Slot Chassis
3 1/2-Inch Drive Module
The backplane of the system accommodates up to two 31/2-inch
half-height storage devices in the drive bays located above the
VMEmodule installation area.
Removal
1. Switch the power supply of the system to the
position
(Standby) and disconnect the system from the AC or DC
power source:
– If the power supply is an AC unit, unplug the power cord
from the AC outlet.
– If the power supply is a DC unit, turn off the –24/–48Vdc
power source and unplug the DC connector from the
power supply input.
2. Remove the front bezel.
3. While pressing the latch at the side of the drive carrier, move
the module back and forth slightly to loosen the backplane
connection. Then carefully remove the module from the
chassis by pulling straight out.
11383.00 9511
9-3
9
Field Replacable Units
Replacement
1. Ensure that power to the system is set to the
position
(Standby) and that the system is disconnected from the AC or
DC power source.
2. Note the device address setting on the drive you are
replacing, and set the address switch on the new drive to the
same device number.
3. Slide the replacement drive module gently into the drive bay
until it contacts the backplane connector.
4. Use firm steady pressure to seat the drive connector in the
backplane.
5. Reinstall the front bezel.
6. Reconnect the system to the AC or DC power source:
– If the power supply is an AC unit, plug the power cord
back into the AC outlet.
– If the power supply is a DC unit, plug the DC connector
into the power supply input and turn the –24/–48Vdc
power source back on.
9
9-4
Dual 9-, 12-, and 20-Slot Chassis
Dual 9-, 12-, and 20-Slot Chassis
Control Board
The control board assembly controls the application of power to the
VME backplane and the routing of alarm signals from the
environmental monitoring system. The assembly consists of the
control board, switch bracket, and keyswitch. It is held in the
chassis by spring-loaded tabs on the switch bracket. 12- and 20-slot
chassis are equipped with a single control board assembly; dual 9slot chassis have two of them.
The suggested procedure for the removal and replacement of the
control board assembly is as follows:
Removal
1. Switch the power supply of the affected system to STANDBY
and disconnect the system from the AC or DC power source:
– If the power supply is an AC unit, unplug the power cord
from the AC outlet.
– If the power supply is a DC unit, turn off the -48Vdc power
source and unclamp the DC leads from the terminal block
on the power supply.
!
Caution
Removing a control board without disconnecting the
power will cause the system to power up even when set
to STANDBY.
2. Remove the front bezel, if installed.
3. Unclip the control board assembly (Figure 5-3) from the card
cage by firmly grasping the switch bracket and pulling
straight out.
4. Carefully remove the assembly from the chassis by
continuing to pull straight out.
9-5
9
Field Replacable Units
Replacement
1. Ensure that the affected system is disconnected from the AC
or DC power source.
!
Caution
To ensure a good connection to the backplane circuitry,
check that the exposed connector pins on the side of the
control board (J3) are straight before you install the
board.
2. Slide the replacement control board assembly gently into the
card guides until the pins of J3 (Figure 9-1 on page 9-7) touch
the backplane connector.
3. Use firm steady pressure to start the pins into the connector
and seat the spring clips on the switch bracket.
4. Reinstall the front bezel, if the installation includes one.
5. Reconnect the system to the AC or DC power source.
9
9-6
Dual 9-, 12-, and 20-Slot Chassis
J3
11041.00 9408
9
11059.00 9409
Figure 9-1. Control Board Removal
9-7
Field Replacable Units
Fan Tray Removal/Replacement
Three DC-powered fans (four fans in the dual 9-slot chassis)
provide forced-air cooling for the VMEmodules and mass storage
drives in the VME card cage. The fans (Figure 5-4) are mounted in
a tray below the card cage. If a failure occurs in any of the fans, the
tray is replaced as a unit.
The suggested procedure for removal and replacement of the
cooling fan tray is as follows:
Removal
1. Switch the power supply of the affected system to STANDBY
and disconnect the system from the AC or DC power source:
– If the power supply is an AC unit, unplug the power cord
from the AC outlet.
– If the power supply is a DC unit, turn off the -48Vdc power
source and unclamp the DC leads from the terminal block
on the power supply.
9
2. Remove the front bezel, if installed.
3. At the front corners of the fan tray, loosen the two quarterturn fasteners that hold the tray in the chassis.
4. Slide the fan tray out.
Replacement
1. Slide the fan tray back into the chassis. Use firm steady
pressure to seat the connectors properly.
2. Tighten the two quarter-turn fasteners that hold the tray in
the chassis.
3. Reinstall the front bezel, if the installation includes one.
4. Reconnect the system to the AC or DC power source.
9-8
Dual 9-, 12-, and 20-Slot Chassis
MODULAR CARD CAGE
ESD BOND POINT
CABLES
EXPANSION
EXPANSION
EXPANSION
EXPANSION
EXPANSION
EXPANSION
EXPANSION
EXPANSION
EXPANSION
EXPANSION
EXPANSION
EXPANSION
EXPANSION
EXPANSION
EXPANSION
EXPANSION
EXPANSION
EXPANSION
CPU
EXPANSION
CABLES
9
FAN TRAY
POWER SUPPLY
11028.00 9407 (1-3)
Figure 9-2. Fans and Power Supply
9-9
Field Replacable Units
12-Slot Chassis SCSI Drive
The backplane of the 12-slot system accommodates up to five 5 1/4inch half-height storage devices to the left of the VMEmodule
installation area (see Figure 9-3). If 3 1/2-inch devices are mounted
in carrier adaptors, they can also plug directly into this area of the
12-slot backplane.
Modular Card Cage
GND
EXPANSION
EXPANSION
EXPANSION
EXPANSION
EXPANSION
EXPANSION
EXPANSION
EXPANSION
EXPANSION
FAN
EXPANSION
CPU
FAN
EXPANSION
CABLES
DRIVE
BAYS
FAN
9
Figure 9-3. 12-Slot Chassis Drive Bays
Installation
1. Attach an ESD strap to your wrist. Attach the other end of the
ESD strap to the chassis as a ground. The ESD strap must be
secured to your wrist and to ground throughout the
procedure.
!
Caution
9-10
Avoid touching areas of integrated circuitry; static
discharge can damage these circuits.
Dual 9-, 12-, and 20-Slot Chassis
2. Perform an operating system shutdown. Turn the AC or DC
power off and remove the AC cord or DC power lines from
the system.
!
Inserting/removing modules while power is applied
may result in damage to module components.
Caution
3. Remove the chassis’ bezel.
4. Locate the drive address switch on the SCSI drive to be
installed (see Figure 9-4). Set the drive address by turning the
dial to the desired address number. Allowable addresses are
0-6.
Address Switch
9
Figure 9-4. SCSI Drive Address Switch
5. Slide the drive gently into the drive bay until it contacts the
backplane connector. Use firm steady pressure to seat the
drive connector in the backplane.
6. Reinstall and lock the bezel.
7. Reconnect the power cord, turn the unit on, and test using
diagnostics.
9-11
Field Replacable Units
Removal
1. Attach an ESD strap to your wrist. Attach the other end of the
ESD strap to the chassis as a ground. The ESD strap must be
secured to your wrist and to ground throughout the
procedure.
!
Avoid touching areas of integrated circuitry; static
discharge can damage these circuits.
Caution
2. Perform an operating system shutdown. Turn the AC or DC
power off and remove the AC cord or DC power lines from
the system.
!
Inserting/removing modules while power is applied
may result in damage to module components.
Caution
3. Remove the chassis’ bezel.
9
4. Pull the drive firmly until it disconnects from the backplane
connector. It may be necessary to rock the drive from side to
side in order to loosen the connection. Slide the drive the rest
of the way out of the drive bay.
5. Reinstall and lock the bezel.
6. Reconnect the power cord, turn the unit on, and test using
diagnostics.
9-12
Index
Numerics
12-slot System
Original XR Chassis 2-5
20-Slot System
Extended XR Chassis 3-4
Original XR Chassis 2-7
3-Slot System
Original XR Chassis 2-1
A
About this Guide 1-3
The System Platforms 1-3
topics 1-3
AC power supply specifications 7-5
airflow
blockages 6-14
alarm board 5-20, 6-15
ampere ratings 5-2
autojumpering 8-15
chassis grounding 5-21
Chassis Specifications
Original XR Chassis 2-9
circuit breakers 5-4
circuit grounding 5-4
control cables 5-23
9-slot system 5-27
control panel 9-5
controls and indicators 6-1
cooling 6-6, 6-7, 6-9, 6-13, 7-1
guidelines 6-10
system 6-11
system enclosure 6-9
cooling fan 4-20
cords
AC power 5-15
D
backplane 4-18, 7-2
bus connectors 8-16
connectors 8-7
specifications 8-11
thermal sensors 6-15
VMEbus 8-7
backplanes 8-1
branch circuits 5-2
DC
connections 5-21
connector assembly 5-21
DC power supply specifications 7-9
drive bays 4-1
drive carriers 4-2
drive modules 2-1
Dual 9-slot System
Extended XR Chassis 3-2
Original XR Chassis 2-2
dual 9-slot system 2-2, 2-7, 3-2
C
E
cable installation
guidelines 5-14
cables
monitor 5-20
power 5-20
cabling procedure 5-13
card cage
12-slot system 2-6
20-slot system 2-8, 3-5
dual 9-slot system 2-4, 3-3
EIA-232-D cables 5-13
electrical guidelines 5-2
electrical requirements 7-5
electromagnetic compatibility compliance 5-15
EMC compliance 5-15
emergency power removal 6-7
environmental monitor 5-20
modes of operation 6-12
ethernet cable 5-13
B
IN-1
Index
Extended XR Chassis 3-1
20-Slot System 3-4
Chassis Specifications 3-6
Dual 9-Slot System 3-2
Front Bezel Removal 3-8
Front Bezel Replacement 3-11
Overview 3-1
F
fan 4-20
fan modules 6-9
fans
system 6-9
features 1-1, 1-3
fiber optic cable 5-13
flanges, mounting 5-8
Front Bezel Removal
Extended XR Chassis 3-8
Original XR Chassis 2-12
Front Bezel Replacement
Extended XR Chassis 3-11
Original XR Chassis 2-14
G
grounding 5-21
I
indicator lights 6-1
indicators 6-3
Input power indicator 6-2
installation 5-1
system 5-6
internal fans
system 6-11
K
key switch 6-1, 6-2
I
N
D
E
X
L
LEDs 6-3
Load Sharing 7-12
M
manual
summary 1-3
manuals 1-4
IN-2
mass storage modules 8-16
Model XR9109 2-2
Model XR9109A 3-2
Model XR9112 2-5
Model XR9120 2-7
Model XR9120A 3-4
Model XR9209 2-2
Model XR9209A 3-2
monitoring
temperature 6-13
O
operating temperature 6-3, 6-8
Original XR Chassis 2-1
12-slot System 2-5
20-slot System 2-7
3-Slot System 2-1
Dual 9-slot System 2-2
Overview 2-1
Specifications 2-9
overtemperature indicator 6-2
P
P2 connectors 8-7
pedestal configuration
system 5-6
pedestal cover
removal and replacement 2-19
placement
system 5-1
power cables 5-20
AC Chassis 5-29
DC Chassis 5-30
power circuit protection 5-3
power cords 5-15
power off 6-2
power receptacles 5-4
power requirements
system 5-2
power strips 5-3
power supply
3-slot specifications 7-1
dual 9-, 12, and 20-slot specifications 7-4
load sharing 7-12
specifications 7-5
power supply limits 5-22
Index
power supply module 4-18, 7-1, 7-2, 7-4
publications
related 1-4
R
rack configuration
system 5-8
rack mounting
procedures 5-8
rack system
cooling 6-7
radio-frequency interference (RFI) 2-12, 3-8,
4-8, 4-10
rating label, voltage 6-6
related publications 1-4
removal/replacement
control board 9-5
cooling fan 4-20
fans 9-8
key switch 9-5
power supply 4-18, 7-2
resetting the system 6-3
S
SCSI
backplane 4-18
peripheral expansion chassis 5-16
termination 5-16
SCSI and environmental monitor cabling 5-24
SCSI device storage module 2-2, 2-5, 2-7, 3-2,
3-4
side panels
removal and replacement 2-15
signal line termination 8-15
specifications 2-10, 3-6
3-slot 2-9
chassis 2-9
dual 9-, 12-, and 20-slot chassis 2-10
Extended XR Chassis 3-6
power supply 7-1
surge/transient suppressors 5-3
switches and indicators 9-5
system
dual 9-slot 2-2, 2-7, 3-2
system cabling 5-23
system chassis controls 6-2
system placement
guidelines 5-1
system recovery 6-15
system reset 6-3
T
tape storage media
temperature 6-11
temperature
monitoring 6-13
thresholds 6-13
termination
SCSI 5-16
VMEbus 8-15
thermal LED 6-15
thinnet cable 5-13
twisted pair cable 5-13
U
uninterruptible power supply (UPS) 5-3
V
VME drive module 2-2, 2-7, 3-2, 3-4
VMEbus
signals 8-3, 8-11
termination 8-15
VMEmodules 8-1
voltage monitoring 6-14
W
weight distribution
system 5-2
working environment 5-1
I
N
D
E
X
IN-3
Index
I
N
D
E
X
IN-4
Cover
34 pages
1/8” spine
36 - 84 pages
3/16” & 1/4” spine
XR Series System
Chassis Reference Guide
®
™
®
™
86 - 100 pages
5/16” spine
102 - 180 pages
3/8” - 1/2” spine
182 - 308 pages
5/8” - 1 1/8” spine
2 lines allowed
XR Series System Chassis Reference Guide
®
™