1
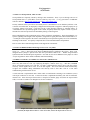
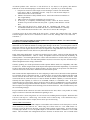
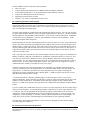
Themis System & Board FAQ
At Themis Computer we strive to keep all documentation complete, accurate, and up-to-date. For the
purpose of gathering documentation metrics and helping to improve overall documentation quality, we would
be interested to hear from you if any of these FAQ’s help to solve a problem you have encountered.
Comments or corrections are also appreciated. Please send notification to [email protected].
Thank you.
SCSI FAQ Topics
Q1. What is a good on-line reference for lots of SCSI topics and FAQs?
A1. http://scsifaq.paralan.com, reference used with permission.
Q2. What default SCSI identification settings does Solaris expect during installation?
A2. Primary (boot) hard disk should be ID 0, CD-ROM should be ID 6, avoid using ID 7 since that’s
normally the SCSI host controller ID. Other devices can use IDs 1 through 5.
Q3. I see SCSI parity error messages, what should I do?
A3. Verify proper SCSI bus termination and proper SCSI cable length. Also, make sure there aren’t too
many devices on the SCSI bus. For details refer to Appendix A, sections A1.3, A1.4, and A1.5.
Q4. What can cause an assortment of unexpected SCSI warnings like “command timeout” or “SCSI
transport failure”?
A4. Out-of-spec SCSI cables can cause these errors, and so can improper bus termination. Intermittent loss
of power (i.e. – power connector integrity) to the SCSI device is another cause. For details refer to Appendix
A, sections A1.2, A1.3, A1.4, A1.5, and A1.7.
Q5. I have the latest fast SCSI disk (or other SCSI device), why do I see information messages telling
me that the SCSI bus controller has negotiated a slower data rate? What can be done?
A5. There could be a variety of reasons. A) The SCSI controller chip on the host computer may not be as
new as your SCSI disk; for instance a new LVD device installed on an older SE bus. B) Make sure SCSI bus
termination matches the capability of the host SCSI controller. C) Make sure you have high-quality SCSI
cabling. For details refer to Appendix A, sections A1.3, A1.4, and A1.5.
Q6. It appears that the SCSI controller can’t “see” my SCSI device, how can I check for sure?
A6. Use the OBP command “probe-scsi-all”. If your device is not listed then check cabling, bus
termination, and power connectors. For details refer to Appendix A, section A1.6. Sections A1.3, A1.4, and
A1.5 may also apply.
Q7. Does my Themis computer card have a “wide” SCSI bus, or “narrow”?
A7. Probably wide. Themis products introduced since 1998 have two wide SCSI buses. One way to know
for sure is to check the signal count. 50 wires indicate a narrow SCSI bus, 68 wires mean a wide SCSI bus.
(Of course wide and narrow are logical descriptions, not physical.) For details refer to Appendix A, section
A1.2.
Q8. Can I attach a narrow SCSI device to a Themis computer card or system?
A8. Yes. For details refer to Appendix A, sections A1.2 and A1.3.
Q9a. My system is not working right with an IBM SCSI disk drive attached, any ideas?
A9a. This is usually cured by placing a jumper on DIS TI SY. Refer to Appendix A, section A1.1.
Q9b. My system is not working right with a Seagate Cheetah SCSI disk drive attached, any ideas?
A9b. This is often cured by placing a jumper on Force Single Ended. Refer to Appendix A, section
A1.3. (Note: This is not necessary if you are sure every SCSI device on your system is LVD capable –
including the host SCSI controller – and your SCSI bus is running in LVD mode.)
Q10. Why can’t my Themis USPIIe card “see” the disk drive attached via P2 paddle adapter?
A10. The USPIIe family of cards utilize an LVD SCSI controller. If you are trying to attach an SE device
then you should install jumper JP1801 to force the host SCSI controller into SE mode. In fact, this is
required if you are using the 3-row P2 transition paddle adapter to make connection with the SCSI device.
Q11. Many of the answers in this section mention SCSI cabling and termination, but what are some
other items to consider?
A11. Check for damaged jumpers that are used to specify SCSI identification or to enable/disable SCSI
device features, also make absolutely sure the jumpers are the correct size – 2mm and 0.10” are visually
similar but are not compatible; refer to photos in the Appendix. Check power connectors, make sure the
metal to metal connections are not loose. Check for short circuits between system chassis and SCSI cable
caused by small breaks in the insulation. Try to test the SCSI device on another “known good” system if one
is available. Once in a while the SCSI device itself has a malfunction. Refer to Appendix A, section A1.7.
VME FAQ Topics
Q12. What is the difference between VME64 and VME64x?
A12. VME64 Extensions (VME64x) is a set of extra features added to the VME64 specification. Nearly all
of the new features are optional, only two must be implemented to claim VME64x compatibility. Refer to
Appendix B, section B2.1 and B2.2.
Q13. How can I tell if my Themis VME card is VME64 or VME64x?
A13. Check the hardware manual to find out for sure. But all Themis VME cards since 1998 are at least
VME64. The newer models are VME64x, indicated by the extra conductor “fingers” located on the outside
of the VME connector shells. Refer to Appendix B, section B2.1 and B2.2.
Q14. Should I plug my Themis VME card into a 3-row or 5-row backplane?
A14. Either one will work, they are both forward and backward compatible. However, putting a 5-row card
in a 3-row chassis will result in losing special features (if any) provided by the two extra rows. Refer to
Appendix B, section B2.1 and B2.2.
Q15. Some VME signals are “bussed”, some are “daisy-chained”, and some are neither. Should I
care?
A15. A bussed VME signal makes connection to every slot in the VME backplane. A daisy-chained signal
only connects two adjacent slots. Some signals don’t connect to anything (e.g. – user-defined pins on P2/J2
connector). Generally these signals don’t need any special attention, except perhaps for the daisy-chained
signals in a non-auto-jumpering chassis. Refer to Appendix B, section B2.3.
Q16. What does it mean if a VME chassis is “auto-jumpering”? Or not “auto-jumpering”? How can I
tell which one my chassis is?
A16. An auto-jumpering VME backplane will automatically take care of propagating the 5 daisy-chained
VME signals across a vacant VME slot. (This is also called automatic daisy-chaining.) If the backplane is
not auto-jumpering then the user must manually propagate the 5 daisy-chained signals across vacant VME
slots. Refer to Appendix B, section B2.3.
An auto-jumpering backplane usually has an IC chip or two adjacent to each J1 connector that implements
the auto-jumpering capability, but not always. The IC chip(s) can be on the front or the back of the
backplane. Refer to Appendix B, section B2.3 for additional details.
Q17. Is “SYSCON” the same thing as “Master” or “Bus Master”?
A17. No, system controller (SYSCON) is an entirely separate concept from bus master. On any given VME
backplane there must be exactly one SYSCON, normally occupying the left-most slot. The SYSCON
assumes system controller duties at the power-up event and must maintain these duties until power-off. In
contrast, any VME board installed on the backplane can become a bus master (assuming it has bus master
capability), it can “own” the bus for a period of time to perform read and/or write cycles. Then it
relinquishes bus ownership so that a different board can have its turn as bus master. At any given instant
there can be either zero or one bus master.
Q18. More than one card is reporting to be the SYSCON, what’s wrong?
A18. All Themis VME cards can be configured to automatically detect if they should be the SYSCON. This
“auto-SYSCON” function is common in many other VME cards as well. But some boards must be manually
configured to enable or disable their SYSCON capability. If more than one card is reporting that it has
assumed SYSCON duty then perhaps one of them is an incorrectly configured “manual” SYSCON board.
Also, you may encounter multiple SYSCON boards if the BG3IN*/BG3OUT* daisy-chained signal is not
propagated down the backplane (automatic SYSCON capability is implemented using the BG3IN* signal).
Refer to Appendix B, section B2.4 for additional information.
Q19. No cards are booting up as SYSCON, what’s wrong?
A19. Themis VME cards have an optional jumper that inhibits SYSCON function. Make sure this jumper is
not installed. Other VME cards often have a jumper that does the same thing, verify their configuration.
One other possibility is that something is wrong with the BG3IN*/BG3OUT* daisy-chained signal. An
“auto-SYSCON” VME card samples BG3IN* shortly after power-up to determine whether or not it should
be the SYSCON. If BG3IN* is low then it becomes SYSCON and drives BG3OUT* high to prevent any
other card from becoming SYSCON. If the BG3IN* pull-down resistor is damaged there could be a
problem, or if the left-most slot is unoccupied and BG3IN* is not jumpered to BG3OUT* then that could
also cause a problem.
Q20. Can I have SYSCON in the middle of several VME cards, or over on the far right?
A20. No, SYSCON must be the left-most card in the chassis, normally occupying slot #1. Refer to Appendix
B, section B2.4 for additional details.
Q21. Sanity check: Can I conveniently test a few VME read or write cycles with OBP commands?
A21. Yes, consult your Themis VME hardware manual for an example. (Other examples are in work and
will be placed in Appendix B at a future date.)
Q22. Sanity check: Can I conveniently test a few VME read or write cycles with Solaris commands?
A22. Yes. Refer to example program vme_rw included with the Themis VME nexus driver. (Other
examples are in work and will be placed in Appendix B at a future date.)
OBP FAQ Topics
Q23. What is “OBP”? Is it like a “BIOS” on a standard desktop PC system?
A23. OBP is Sun’s OpenBoot firmware, normally stored in a PROM device of some kind. The OpenBoot
PROM, or OBP (also sometimes called OpenBoot Program), boots the computer board and loads the
operating system, typically Solaris. This is similar to how BIOS firmware on a PC system boots Windows or
Linux.
OpenBoot is based on IEEE Standard 1275-1994, Standard For Boot Firmware. OBP is capable of booting
the operating system from a variety of different sources: SCSI disk or CD-ROM, Ethernet, IDE disk or CDROM. OBP also provides many different commands to perform basic hardware detection and testing, as well
as a Forth language interpreter.
Q24. Where can I get reference material for the OBP in my Themis board or system?
A24. For all recent Themis products, Sun’s “OpenBoot 4.x Command Reference Manual” applies, document
number 816-1177-10. For older Themis products, Sun’s “OpenBoot 3.x Command Reference Manual”
applies, document number 806-1377-10. The boot-up banner will identify the core OpenBoot as 3.x or 4.x.
The hardware and software manual for your specific model of Themis product will include additional
commands and variables added to the standard Sun OBP to accommodate special features of the Themis
hardware (e.g. - the Universe II VME interface chip).
Q25. Are there any OBP behaviors that I can enable, disable, or otherwise control?
A25. Yes, there are many. You can even extend OBP functionality with an NVRAMRC script. (Example in
work, to be included in Appendix C at a future date.)
Q26. How can I view OBP variables?
A26. Use the OBP “printenv” command.
Q27. How can I change OBP variables?
A27. Use the OBP “setenv” command.
Q28. I once used an OBP command, but now I can’t remember its name. What can I do?
A28. If you can remember at least a portion of the command, you can use the OBP “sifting” command to
get a list of matching Forth command words. For example, suppose you used the “test-nets” command
some time ago and now you can’t remember anything except “test”. Type “sifting test” for a listing of
all Forth vocabulary entries that have any match on “test”. The list should jog your memory enough to
recognize the “test-nets” command.
Q29. What is the meaning of some Themis-specific OBP variables?
A29. Details can be found in the software manual for your particular Themis product. Some common
variables:
vme32-slave-base – the 32-bit VME base address of the Themis VME card. A read or write cycle to this
VME address will cause the Themis card to respond as slave. A mapping between this VME address
and a Solaris process’s address space can be established using sample program vme_dvma, which is
included with the Themis VME nexus driver. This allows a VME master to effectively write to or read
from the address space of a Solaris process.
vme32-slave-size – the size, in bytes, of the address window starting at vme32-slave-base.
vme32-master-base – the starting 32-bit address of a VME memory window that is mapped to a
corresponding PCI address window on the Themis VME card. When the UltraSPARC CPU reads or
writes to that PCI window, the cycle is propagated to the VME bus as a master cycle. A mapping
between a Solaris process’s address space and this VME address can be established using sample
program vme_rw (standard Unix file I/O) or vme_mmap (much faster access using mmap system call),
both of which are included with the Themis VME nexus driver. This allows a Solaris process to easily
read from or write to VME addresses.
vme32-master-size – the size, in bytes, of the address window starting at vme32-master-base.
Q30. Can I update my OBP to a newer version?
A30. Yes, depending on which Themis VME card you have, you can use the OBP “flash-update” or
“flat-update” command. The Themis VME card hardware manual has instructions. (Examples are in
work and will be placed in Appendix C at a future date.)
Q31. What is the device node tree? Should I care about it?
A31. At every power-up event the OBP probes all hardware devices and uses the information to create a data
structure called a device node tree. The device node tree represents the hardware detected by OBP, and it is
passed to the operating system during the boot process.
For a properly working system the end-user normally isn’t concerned with the device node tree. However, if
there is a device that Solaris cannot detect or configure then it is often useful to reboot the machine to the
OBP “ok” prompt and see if the device is properly added to the device node tree. (Example in work and will
be placed in Appendix C at a future date.)
Q32. What is a “device alias”?
A32. A device alias is a convenient reference for a device node’s rather complicated name. Refer to question
about device node tree above. Some device aliases are already set up and you can also create your own, see
OpenBoot 4.x Command Reference Manual. Use OBP command “devalias” to see device aliases on your
system.
Q33. Is there anything I should know about the Universe II VME to PCI bridge device?
A33. Under normal circumstances the Themis VME nexus driver will handle all details of the Universe II
bridge chip, no detailed knowledge is required to make use of the VME interface.
If you are technically inclined, however, you can review the Tundra Universe II User’s Manual to learn about
the register settings. In the OBP, Themis has added a “show-universe-regs” command that allows you to
view all current register values. In this way it is possible to get a clearer idea of the underlying workings of
the VME interface. (Avoid writing software that tinkers with the register settings – the Themis VME nexus
driver expects to be the only software that modifies the Universe II registers.)
Q34. Are there any caveats or warnings that I should be aware of?
A34. Yes there are several potential OBP “gotcha’s”.
nvramrc Script:
The user-defined “nvramrc script”, which is optional, can influence the sequence of OBP initialization. It is
necessary to understand these details if the nvramrc script is to be used. Refer to paragraph “Using nvramrc”
starting on page 41 of “OpenBoot 4.x Command Reference Manual” (Sun part number 816-1177-10), or
starting at the bottom of page 36 in “OpenBoot 3.x Command Reference Manual” (Sun part number 8061377-10).
Changing Default input-device or output-device:
Under normal circumstances the OBP default input-device and output-device are keyboard and
screen, respectively. (If there is no keyboard or graphics buffer then these I/O devices will automatically
fall back to serial port A, also called ttya or TTYA.) If you need to change the defaults to ttya or ttyb, first
make sure you have the proper serial cable and a working terminal connection. Otherwise, following the
change, you will be unable to communicate with the computer which also means you won’t be able to undo
the change.
OBP Version Update or OBP Variable Corruption:
If you plan to update your OBP version make sure you have a hard copy of all the current OBP variable
settings. OBP updates have the potential to overwrite some or all variable settings, this is especially true if
new OBP variables are introduced in the new version. (The variable list can become offset, effectively
causing values to “shift over” to the adjacent variable, in which case the enumerated values could be
inconsistent or meaningless.)
If the OBP variables are corrupted or accidentally set to values that prevent the computer from booting then
remove the battery for 5 minutes – making sure to observe industry-standard ESD precautions! Reinstall the
battery and power-up the machine. OBP default values should automatically be restored and the computer
should boot up successfully. The Ethernet address and host ID will be lost when the battery is removed;
contact Themis Technical Support for assistance in restoring the proper values.
Auto Boot:
If auto-boot? is set to true then make sure the boot-device is available and ready to boot the computer.
(Sometimes this occurs involuntarily when the OBP is updated, since certain variable settings can be
overwritten. Refer to previous paragraphs.) If the boot device is net and the network has not been
configured to boot the machine, then “ARP/RARP” packet messages will be displayed repeatedly. This
particular state usually cannot be broken with a STOP-A (or CTRL-Break) keystroke. It will be necessary to
reboot the board and issue a STOP-A (or CTRL-Break) before the network boot attempts resume.
Solaris FAQ Topics
Q35. How can I view or change OBP variables from Solaris?
A35. Use the eeprom command. You must be logged in as root to use this command. For instance, suppose
you wanted to view values of input-device and output-device:
# eeprom | fgrep put-device
output-device=screen
input-device=keyboard
#
Then you could change output-device if you needed to:
#eeprom output-device=ttya
#
Q36. What are some often-used Solaris commands?
A36. Aside from very basic commands like ls, cd, pwd, cat, cp, mv, etc., here is a list of some typical
Solaris commands useful during set up of a Themis computer system. There are also collections available on
the Internet and in countless books, such as “A Practical Guide to Solaris” by Mark G. Sobell.
psrinfo -v
dmesg
sysdef
hostid
hostname
uname -i
ifconfig -a
xman &
stty erase ^H
stty rows 25
Shows 2 or 3 lines of processor information text
Recent system diagnostic & hardware identification messages
Lots of system definition/configuration information
Displays numeric host identification number
Displays host name
Displays platform name (type)
Displays IP and Ethernet address info
Launch graphical man pages (need graphics display to do this)
Sets proper function of Backspace key (^H is entered as CTRL-H keystroke)
Set number of lines for your terminal, you may need a value other than 25
(note: the correct value for rows is very important if you plan to use vi)
env
Shows current environment variables and their settings
TERM=vt100
Sets TERM symbol to VT-100, a common terminal
export TERM
Exports TERM symbol to environment (e.g. – try running env before and after
both TERM=vt100 and export TERM)
isainfo -vk
Identifies what kernel is running (beginning with Solaris 7 it is possible to
run a 32-bit kernel or a 64-bit kernel)
csh
Runs the C shell. The following commands are useful (automatic if put in .cshrc):
set history = 50
alias ls ‘ls -CF’
set filec
setenv TERM vt100
stty erase ^H
The alias command causes a trailing ‘/’ character when directories are listed, and a
trailing ‘@’ character for links. The set filec commands allows name auto-completion with
the ESCAPE key (try “cd /pla” and press ESCAPE, it should auto-complete to “cd
/platform”). The stty command sets proper backspace function (usually) for dumb
terminals such as HyperTerminal. The ^H is a backspace control character, not caret-H.
To enter a control character in vi simply precede it with ctrl-v. In other words, in vi the
line would be entered “stty erase {ctrl-v}{backspace}”, where {ctrl-v} is CTRL-V and
{backspace} is a backspace keystroke.
cat /etc/release
Identify exactly what Solaris release you are running (e.g. – Solaris 7 11/99).
dmesg|grep SunOS Identify exactly what version of SunOS you are running.
catman -w
Create database of words from the man pages (run command from root account).
man -k word
Keyword search of database created with catman command, this example searches for “word”.
useradd -m -d /export/home/nancy nancy
passwd nancy
Create a new user account called “nancy”, add a password for her (this command & previous)
Q37. I have attached speakers (or headphones), how about a basic audio sanity check?
A37.
cd /usr/demo/SOUND/sounds
{for Solaris 7 and earlier}
cd /usr/dt/appconfig/sounds/C
{for Solaris 8, 9}
audioplay –v 75 –p line ring.au {“–p line” may not be necessary}
You should hear a telephone ringing sound effect. If you are using Solaris 10 or later, the ring.au file
could be in a different directory.
Q38. How can I change the host name and/or the IP address?
A38. Locate and edit as appropriate:
/etc/hosts
/etc/nodename
/etc/hostname.*
/etc/ethers
/etc/net/ticlts/hosts
/etc/net/ticots/hosts
/etc/net/ticotsord/hosts
Some of the files listed may not be present on your machine; this is not a problem. Reboot following file
updates.
Q39. How can I use the second Ethernet port on my computer?
A39. There are several different ways to configure multiple Ethernet ports. Here is one of the simplest:
1. Go to the /etc directory and locate the primary Ethernet hostname file, typically hostname.hme0,
hostname.eri0, or hostname.bge0. Copy the file for the next Ethernet port, for example:
cp hostname.eri0 hostname.eri1
2. Edit the new file (hostname.eri1 in this case) and change the hostname so that it is different than the
original. The change can be minor, just a character or two, or major such as a completely different name.
3. Edit the hosts file and add a new line with a new IP address, and use the new hostname you created in
step 2.
4. Reboot. (You can manually plumb the new interface without rebooting, but if you reboot then it will be
automatic.)
FAQ Appenix A
SCSI Details
A1. There are SCSI problems, what can I do?
SCSI problems are frequently caused by cabling or bus termination. Thus, if you are having some sort of
SCSI problem there’s a good chance it will be relatively easy to fix. A very good source of additional
reference material is http://scsifaq.paralan.com or http://www.paralan.com.
In many situations if the system boots successfully then it is assumed there are no hardware problems. This
is not the case with SCSI! An improperly configured SCSI subsystem can appear to function properly for up
to an hour, perhaps even longer. Long after boot-up, system messages warning of “transport failure” or
“command time-out” mysteriously appear on the console, frequently followed by a panic or crash. If you are
fortunate the SCSI error presents itself immediately during or following boot.
Insist on high-quality SCSI components such as cables, terminators, and adapters. The SCSI standard is very
specific regarding cable lengths, cable impedance, assignment of signal placement within round bundles (i.e.
– twisted-pair control signals in the interior surrounded by twisted pair data signals), active bus termination,
and things of this nature. Low-quality components have caused untold headaches and problems.
Here are some other common things Themis Tech Support has encountered:
A1.1 I have an IBM SCSI disk, and strange errors occur…any ideas?
This is one of the few items not caused by cabling or termination problems. Themis has encountered some
errors (e.g. – “trap 3”, others) that occur when an IBM SCSI disk is attached to the system. These errors
disappear when a jumper is placed on the disk drive pins labeled “DIS TI SY” – Disable Target Initiated
Synchronous Data Transfer Request Negotiation. Note that on some newer IBM drives the jumper is called
“TI sync negotiation” and it enables TI-SDTR, rather than disabling.
A1.2 What is a wide bus? Is it similar to a narrow bus? Should I care?
Most modern SCSI bus implementations are “wide”, that is, they carry 16 data bits at a time. “Narrow” SCSI
buses carry data 8 bits at a time. By employing an adapter, a narrow device (e.g. – disk drive, CD-ROM
drive) can function properly on a wide bus. In such a configuration the narrow device will drive all the
necessary control signals and 8 of the 16 of the data signals. The SCSI controller should automatically
recognize this condition during initialization and correctly read or write data 8 bits at a time when
communicating with the narrow device.
A wide SCSI bus is implemented with a ribbon cable or round bundle consisting of 68 conductors (wires)
with 68-pin connectors at each end. A narrow SCSI bus is implemented similarly, but with 50 conductors
instead of 68. Often the 68-pin ribbon cable is composed of smaller gauge wires than the 50-pin ribbon
cable, so overall it is smaller even though it has 18 more conductors.
68-pin SCSI ribbon cables left & center, and 50-pin SCSI ribbon cable right
(Ironically the 68-pin ribbon cable is a “wide” SCSI cable, whereas the 50-pin cable is “narrow”)
All Themis products since 1998 have a wide SCSI bus (or two buses) as the primary disk interface.
Problems can occur when attempting to connect narrow devices. If possible, try to do the following:
1. Keep the bus wide for its entire length, avoid converting it to narrow at an intermediate
point using a “high 9” terminating converter. Only use a wide-to-narrow adapter to
attach narrow devices to the (wide) bus.
2. Minimize the number of daisy-chained devices. Each cable connection contributes to
loss of signal fidelity.
3. Make sure the bus is properly terminated (refer to section 1.4).
4. If necessary, as a temporary troubleshooting measure, remove all devices from the
SCSI bus except for the one that boots the system – typically a hard disk drive at SCSI
ID 0.
5. Verify that each device has a unique SCSI ID. Beginning with Solaris 7 the
recommended default ID for a bootable disk drive is 0, the CD-ROM drive is normally
ID 6, and the host SCSI controller is ID 7. Other devices can use IDs 1 through 5.
A wide bus can be SE or LVD, details in the next section. A narrow bus is almost always SE. (Themis
Technical Support staff has never encountered a narrow LVD bus, although such a bus could exist …
somewhere.)
A1.3 What kind of SCSI signaling do Themis products use, SE, LVD, or HVD? Can I attach an older
SCSI device to a Themis computer board?
For background purposes a brief description of LVD and SE is provided. “Single-ended” and “low-voltage
differential” are two different methods of sending signals through a SCSI cable. For each signal in a wide or
narrow bus, SE uses one wire driven against ground; the signal is the voltage difference between that wire
and ground. For each signal LVD uses two wires; the signal is the voltage difference between the two wires.
LVD is an improvement over SE, and can carry data much faster than SE.
HVD, “high voltage differential”, is similar to LVD but uses more voltage. HVD is an older and much less
common SCSI implementation. HVD is entirely incompatible with LVD and SE and, incidentally, all
Themis products. Avoid mixing HVD devices or buses with LVD/SE devices or buses unless you are using a
specially designed converter. Note that HVD predates LVD, thus at one time it may have been known by a
different designation such as simply “differential”.
Generally speaking, new SCSI specifications include optional fallback modes for compatibility with older
SCSI devices. Themis designs include SCSI chipsets that implement backward compatibility, so you should
be able to attach older SCSI devices to Themis products. Be aware, however, the presence of an older device
will force faster devices on the bus to fallback to lower data transfer speeds.
Most current SCSI bus implementations are auto configuring to either LVD or SE based on what capabilities
are reported by devices connected to the bus. A single SE device on an LVD bus populated with other LVD
devices will cause the entire bus to run in SE mode. SE modes are usually slower than LVD modes. Most
current SCSI devices (1999 and newer) are LVD, but include SE fallback capability to work with SE buses.
Normally this dual capability is referred to as LVD/MSE, LVD/SE, or “multimode LVD”. If the autonegotiation does not work properly, many LVD devices such as disks or CD-ROM drives can cause problems
(error or warning messages) when connected to SE buses. In such a situation look for a jumper on the device
that can skip the auto-negotiation mode and simply force SE mode all the time. This will almost always cure
the error/warning messages.
Keep in mind that SCSI connectors used with LVD and SE are the same, thus it is not possible to visually
inspect a connector to determine which method of signaling is used.
An SE bus can be 3 meters long if there are 4 or fewer devices including the host computer. With more than
4 devices it can only be 1.5 meters long. An LVD bus can be 12 meters long. If an LVD bus has only 2
devices, a host and one disk for example, then it can be up to 25 meters long.
Themis USPIIe Considerations
The Themis USPIIe family of VME computer cards includes SCSI connectors on the front panel, as well as
SCSI connectivity at the VME P2 site. When using one of these cards in a 3-row VME chassis it is
necessary to force the host to use SE mode. To do this, install a jumper on pins JP1801. It is also necessary
to install jumper JP1801 if a 3-row P2 paddle adapter is used when the USPIIe is installed in a 5-row VME
chassis. This will disable auto configuration and force SCSI bus A into SE mode. SE or LVD/SE SCSI
devices should be used in this case. The only situations where it is appropriate to remove JP1801 is a) only
the front panel SCSI connection will be used, or b) a 5-row P2 paddle adapter is used when the USPIIe is
installed in a 5-row VME chassis.
A1.4 Could bus termination be causing problems? What should I know about termination?
Question: Why terminate?
Answer: A pulse propagating along the SCSI bus will partially ‘reflect’ from any part of the bus that is
electrically different from the rest of it. (In this case “electrically different” means “imperfectly matched
impedance”.) These reflections add and subtract in odd combinations and cause the original pulse to be
distorted and corrupted, thereby causing data loss. To prevent or minimize reflections from the ends of the
bus, terminators are added to “absorb” the energy from the pulses.
Improper bus termination is probably the most common SCSI error encountered by Themis Technical
Support (followed closely by improper cabling). A SCSI bus must be terminated at both ends. This means
exactly two terminating devices, no more and no less. The host system usually terminates one end of the bus,
and the other end is typically terminated by a terminator block or by a SCSI device that is capable of bus
termination. Note that the SCSI specification does not allow newer LVD devices to terminate the bus; thus
only SE devices have bus termination capability, often implemented with a TE (termination enable) jumper
on the device or by optional installation of resistor packs on the device. An active LVD terminator must be
used to terminate an LVD bus since an LVD device cannot terminate. Conveniently, there are LVD/SE
terminators available that are capable of auto configuration to terminate either an LVD bus or an SE bus.
These LVD/SE terminator blocks often have an LED that illuminates either red or green depending which
kind of bus signals are being terminated. The terminator block itself is a small object two or three inches
long, usually encased in plastic, and normally plugs into the last available SCSI connection.
Typical LVD/SE SCSI Bus Terminator
Also note that the termination must be at the physical end of the bus, it is not permissible to have a
terminating device at an arbitrary location along the length of the SCSI bus. It is required to be at the end of
the bus, preferably at the very end of the physical wires – but some SCSI ribbon cables have two connectors
at the very end, one male and one female connector. If the terminator block doesn’t match the gender of the
end connector, it is permissible to use the other connector right next to the end provided that a) the signal
wires extend no more than two or three inches beyond the terminator and b) no SCSI device is attached to the
connector at the very end.
SE buses can be passively or actively terminated, whereas LVD buses must be actively terminated. A
passive terminator uses resistor networks driven by the “term power” supply found on the bus. An active
terminator uses resistor networks driven by voltage regulators inside the terminator. All LVD terminators
can be assumed to be active since that is the requirement. The advantage of active termination is that
fluctuations in TERMPWR voltage will not affect quality of bus termination. In addition, active termination
generally results in more reliable operation of SE buses.
On a wide SCSI bus, termination power is present on 4 of the 68 signals. These signals are called
TERMPWR. Usually the host computer system provides term power. Other SCSI devices on the bus are
allowed to drive TERMPWR too. In theory this should not cause any problems but in practice it can. It is
recommended that you disable TERMPWR supply on all SCSI devices and let the host computer system be
the only provider of term power. Don’t be confused by termination power and bus termination. An LVD
device can supply bus termination power, but it cannot provide bus termination. A “TPE” jumper
(termination power enable) is not the same thing as a “TE” jumper (termination enable)!
There are several different kinds of SE bus implementation: Slow SCSI, Fast SCSI, SCSI-2, Ultra SCSI,
Fast-20, etc. Actually, some of these terms are different names for the same SCSI spec. Make absolutely
sure the terminator you are using will work for the kind of SCSI bus you have – some terminators can handle
different kinds of SE bus signals and speeds, others are designed to work with only one kind of SCSI
signal/speed.
Themis Product Family
Type of SCSI
================================================================
USP-2
SE, Wide, SCSI-2 (also called Fast SCSI)
USPIIi-1v
SE, Wide, Ultra SCSI (also called Fast-20)
USPIIi-3v
SE, Wide, Ultra SCSI (also called Fast-20)
USPIIe
LVD (SE compatibility mode), Wide, Ultra 2 (a.k.a. Fast-40)
USPIIe-USB
LVD (SE compatibility mode), Wide, Ultra 2 (a.k.a. Fast-40)
USPIIe-cPCI
LVD (SE compatibility mode), Wide, Ultra 2 (a.k.a. Fast-40)
USPIIe-GB
LVD (SE compatibility mode), Wide, Ultra160
USPIIIi
LVD (SE compatibility mode), Wide, Ultra160
A1.5 I need a custom SCSI cable, should I build my own?
Themis recommends avoiding building your own custom SCSI cable(s) unless you are completely familiar
with SCSI requirements for cables. This includes clear understanding of impedance matching, specific signal
placement within round bundles or on ribbon cables, proper spacing of connectors on a multi-drop ribbon
cable, proper ground signal count and placement, shielding issues, etc.
Anecdotal evidence collected over the years by Themis Technical Support suggests that custom cables
assembled by inexperienced personnel are virtually always out of spec. Common symptoms of out of spec
cables include parity errors and/or auto-negotiation down to slower (older) SCSI speed specifications. The
system boot process and subsequent system operation can be sprinkled with dozens of these warning or error
messages.
If a custom SCSI cable is needed, we suggest contacting a reputable company that specializes in SCSI cables.
Note that Themis Technical Support has encountered “bad” custom SCSI cables acquired from a well-known
cable company that “specializes” in all sorts of custom computer cables. Instead we recommend looking for
a company that is focused on SCSI, not a company for which SCSI cables are a niche item.
A1.6 What can I do for a simple SCSI sanity check?
A good sanity check for SCSI operation is the “probe-scsi-all” command available at the OBP “ok”
prompt. Here’s an example:
.
.
.
Themis USPIIe-USB (ver 2.4) (UltraSPARC-IIe 650MHz), No Keyboard
OpenBoot 4.0, 1024 MB memory installed, Serial #131187.
Ethernet address 0:80:b6:1:91:92, Host ID: 80020073.
FLASH backup of NVRAM contents is present.
Type nvflashhelp for more information.
Initializing Memory .....
ok
ok
ok probe-scsi-all
/pci@1f,0/pci@2/scsi@4,1
/pci@1f,0/pci@2/scsi@4
Target 0
Unit 0
Disk
QUANTUM VIKING II 4.5WSE5520
Target 1
Unit 0
Disk
IBM
DDRS-39130
S97B
Target 6
Unit 0
Removable Read Only device
PLEXTOR CD-ROM PX-12TS
ok
1.02
Don’t forget, as noted before, that it is possible to have a SCSI problem that takes up to an hour to exhibit
any symptoms. If the “probe-scsi-all” command produces nominal results similar to above then there’s
a reasonable chance that the SCSI bus is working properly; but it’s not a 100% guarantee!
A1.7 What other kind of “unlikely” SCSI problems should I be aware of?
Jumpers used on SCSI devices are typically 2mm, which is smaller than ordinary 0.10” jumpers found on
many computer boards. These 2mm jumpers often have a very low profile. They are easy to lose because of
their absurdly small size, about the size of a grain of rice, and they are almost impossible to replace – most
computer stores do not have them in stock. During investigation of the IBM disk drive anomaly, refer to
section A1.1, it was discovered that one of the jumpers had lost the interior conducting metal insert. Thus it
was nothing but a piece of plastic! Make sure the jumpers you are using on a SCSI device are the correct
size and have the metal insert required to conduct between the jumper pins. (This particular little gem took
more than a day to discover.)
Jumpers: Typical low-profile 0.10” (left), Regular 2mm (center), Low-profile 2mm (right)
Most SCSI devices are powered by ordinary 4-wire power connectors, usually with a pair of black ground
wires in the middle and a yellow (+12v) and red (+5v) wire on the left & right sides. These connectors
deliver reliable power and ground connections nearly 100% of the time, but not always. Themis Technical
Support encountered a situation in which a system would boot and run normally for several hours. Then, for
no apparent reason, SCSI command time-out warnings appeared on the system console followed by
subsequent system failure. Eventually the cause was traced to intermittent loss of connection to the +5v
power lead. When troubleshooting a SCSI problem we recommend a) visual inspection of power leads to
make sure they have not become bent or loose fitting, and/or b) using two or three different power connectors
over the course of the effort.
Verify Power Connection, Metal Power Leads Must Make Snug Connection
High-density SCSI ribbon cables have small gauge wire conductors. It is possible to have a break in the
insulator that is virtually undetectable by the naked eye. Themis Technical Support once found a ribbon
cable with an exposed conductor, the break in the insulator was so small that it was almost invisible; certainly
less than 0.2mm. Subsequent inspection under optical magnification, a binocular microscope in this case,
revealed two more breaks in the insulation that were even smaller than the first, these two smaller breaks
were invisible to the naked eye. One of these three insulation breaks was apparently touching a sharp metal
edge of the system chassis, effectively shorting the signal to ground. Replacement of the cable cured the
SCSI problem. When troubleshooting a SCSI problem we recommend inspecting the SCSI cable under
optical magnification or (temporarily) switching the cable out with a known-good cable. Although once
installed in a system the SCSI cable might not be easily observed or inspected, try to make sure the cable is
not strained or pinched or pressed against any metal structure.
FAQ Appenix B
VME Details
B2. VME Topics
B2.1 What is a 3-Row backplane? And is it “VME” or “VME64” or “VME64x” or what?
When discussing VME backplanes or cards, the term “3-row” refers to the number of rows of conductors
found on the backplane connector(s). The standard VME connector is a 3-row IEC 603-2 Style C connector,
it has 96 conductors in a 3 x 32 array – hence the term “3-row”. The pin conductors on the VME card plug
into corresponding sockets on the VME backplane. A 6U VME card has two such connectors designated P1
and P2, thus a 6U VME card with 3-row connectors has a total of 192 electrical signal connections to the
VME backplane.
3-row VME64 Connectors
A rectangular shell surrounds each set of 96 pins on the VME card. The shell serves the purpose of helping
to prevent bent pins when the card is not installed in the chassis, and helping to guide the pins into the socket
mounted on the backplane during installation in the chassis.
Note that the 3-row connectors are part of the VME64 specification (ANSI/VITA 1-1994), and they are
completely forward compatible with the 5-row VME64x specification (ANSI/VITA 1.1-1997). In other
words a 3-row VME64 card can be installed in a 5-row VME64x chassis, and it will maintain its full VME64
functionality. Also, a 5-row VME64x card can be installed in a 3-row VME64 chassis and it will function
properly with the exception of losing extra features (if any) supplied by the extra connectors of VME64x.
Now to the secondary question about VME and VME64 and VME64x: The VME bus contains address
signals, data signals, and control signals. A VME read or write cycle begins with the address phase in which
a VME master drives the address signals and a VME slaves latches (reads) the address. In the next phase,
called the data phase, the VME master drives the data signals and the VME slave latches the data. Or, if it is
a read cycle instead of a write cycle, the VME slave drives the data signals and the VME master latches the
data. The timing for the read or write cycle is orchestrated by the control signals.
There are 32 address signals and 32 data signals. (Technically, there are 31 address signals but DS0* and
DS1* effectively combine to form the remaining address bit. Conceptually, there are 32 address signals.)
The VME bus is a byte-oriented bus, a byte is the basic data unit. The 32 data signals can transport up to 4
bytes at a time. It is also possible to transmit (read or write) 16 data bits at a time, in which case the other 16
data lines are not defined. It is also possible to transmit 8 data bits at a time, in which case the other 24 data
lines are not defined. The “data width” of a particular read or write cycle is indicated by some of the control
signals. Similarly, the address can be 16 bits or 24 bits or 32 bits. (There’s even a 40-bit address mode, but
it is generally intended for 3U VME systems and often it is not implemented.) Again, the “address width” or
“address space” of a read or write cycle is indicated by some of the control signals. A data transaction (read
or write) that has 16 address bits and 32 data bits is called A16D32. The meaning of other modes, such as
A24D16 or A32D32, can be deduced.
The fundamental operation of the VME bus as described in the preceding paragraph is generally referred to
as either VME or “VME32”. The fundamental operation of the VME bus is accomplished using all 96
signals from the P1 connector and 32 signals from the P2 connector. (The other 64 signals on the P2
connector are user-defined.) Thus a 3-row VME backplane is adequate to implement “VME32”.
Consider an ordinary A32D32 data transaction: during the address phase the data signals are unused, and
during the subsequent data phase the address signals are unused. What if the data signals are put to use
during the address phase? You could have an additional 32 bits of address, for a total of 64 address bits.
Such a 64-bit addressing mode could be called A64. Likewise, you could use the address signals during the
data phase to provide an extra 32-bits of data. Such a 64-bit data mode could be called D64. Put them
together and you have A64D64.
This was done in ANSI/VITA 1-1994, the specification is also known as VME64. There are other modes
besides A64D64, for instance there is A32D64. All these new modes of VME bus operation are
accomplished using all 96 signals from the P1 connector and 32 signals from the P2 connector. This is
exactly the same set of signals that implements “VME32”. Thus a 3-row VME backplane is adequate to
implement VME64. A commonly held misunderstanding is that VME64 operation requires a 5-row
backplane. It doesn’t. A logical question at this point might be, “But how can a VME slave device know
when an address is ‘spread’ across all the address and data lines, or vice-versa?” Simple, during the address
phase only address information is present on the address lines and (optionally) on the data lines. And during
the data phase only data information is present on the data lines and (optionally) on the address lines. New
combinations of values for the control signals identify the exact width of the address and the data. The new
combinations are possible because previously reserved modes of the VME32 spec have now been defined for
VME64. Conveniently, all VME32 cycles are a subset of VME64. This means that VME64 is backward
compatible with VME32 – any VME64 master can also issue older VME32 cycles to VME cards that are not
VME64 compliant.
A 3-row backplane cannot implement VME64x, only a 5-row backplane can do this. Details are presented in
the next section.
B2.2 What is a 5-Row backplane? Is it VME64 or VME64x?
When discussing VME backplanes or cards, the term “5-row” refers to the number of rows of conductors
found on the backplane connector(s). The standard VME64x connector is a 5-row IEC 61076-4-113
connector, it has 160 conductors in a 5 x 32 array – hence the term “5-row”. The pin & edge conductors on
the VME64x card plug into corresponding sockets on the VME64x backplane. A 6U VME64x card has two
such connectors designated P1 and P2, thus a 6U VME64x card with 5-row connectors has a total of 320
electrical signal connections to the VME64x backplane.
5-row VME64x Connectors
(Note optional J0 connector, between J1 and J2 on backplane above, has
potential to interfere with capacitors on USPIIe-USB shown here.)
The rectangular shell surrounding each set of 96 pins on the VME64x card has 32 conductors along the edge
of both sides. The shell serves the purpose of helping to prevent bent pins when the card is not installed in
the chassis, and serves as a physical mounting surface for 64 additional conductors – 32 on each side.
Note that the 5-row connectors are part of the VME64x specification (ANSI/VITA 1.1-1997), and they are
backward compatible with the 3-row VME64 specification (ANSI/VITA 1-1994). In other words a 5-row
VME64x card can be installed in a 3-row VME64 chassis, and it will function properly with the exception of
losing extra features (if any) supplied by the extra connectors of VME64x. Also, a 3-row VME64 card can
be installed in a 5-row VME64x chassis and it will maintain its full VME64 functionality.
VME64x is an extension of the VME64 standard. In fact “VME64x” is the more popular abbreviated name,
ANSI/VITA 1.1-1997 calls it “VME64 Extenstions” on the title page. VME64x defines a set of features that
can be added to VME and VME64 boards, backplanes and subracks. These features include a 160-pin
connector, a P0 connector, geographical addressing, voltage pins for 3.3V, a test and maintenance bus, and
EMI, ESD, and front panel keying per IEEE 1101.10. (From title page abstract, ANSI/VITA 1.1-1997, Oct.
7, 1998.)
IMPORTANT NOTE:
The VME64x specification identifies numerous new capabilities and features. However, conformance to the
VME64x specification requires only the following:
a)
Use of the IEC61076-4-113 160-pin connectors for both the P1 and P2 connectors.
b)
Connect all assigned connector ground pins in rows z, a, b, and c to the board’s ground plane (row d
ground pins are optional).
All other features defined in VME64x are optional.
Notable VME64x features not already mentioned include:
• More +5V power
• 35 more signal ground returns between VME64x boards and VME64x backplane
• 95 user-defined signals plus 19 (or 38) ground signals on optional P0/J0 connector
• 46 more user-defined pins on the P2/J2 connector
• Supporting specifications for hot swap
• 2eVME – a set of fast two edged data read/write cycles
B2.3 Jumpering the Daisy-chained Signals
Some VME bus signals connect to every slot, these are “bussed” signals such as the data and address signals.
Other signals connect to no other slots, for example the user-defined pins on P2. There are five “daisychained” signals that connect two adjacent slots. Four of them are bus grant signals numbered 0 to 3, the
other is an interrupt acknowledge signal.
The daisy-chained signals are implemented with complementing pairs at each slot. There are four incoming
bus grant signals, BG0IN*..BG3IN*, and four outgoing signals, BG0OUT*..BG3OUT*. The daisy-chained
interrupt signals are called IACKIN* and IACKOUT*. As an example, consider VME slot #3. Its BG0IN*
is connected to slot #2’s BG0OUT*. Likewise, slot #3 BG0OUT* connects to slot #4 BG0IN*. All the
daisy-chained signals follow this pattern.
Much information traverses the VME backplane from one card to any other (or to every card) via the bussed
signals. But certain information is propagated down the VME bus from one slot to the next using the daisychained signals. Consider again slot #3. If the VME card in slot #2 sends a bit of information along one of
the daisy-chained signals, then the VME card in slot #3 relays it along to slot #4 and so on. But if slot #3 is
empty then the chain would be broken and the card in slot #2 would be unable to send a signal to the other
cards in slot #4 and beyond.
This is why empty slots must have the daisy-chained signals connected. So the empty slot #3 should have its
BG0IN* connected (“jumpered”) to its BG0OUT*, and BG1IN* connected to BG1OUT*, and so on. This
will effectively cause slot #2’s BG0OUT* to drive slot #4’s BG0IN*, and likewise with the other daisychained signals. The “out” daisy-chained signals from slot #2 go straight through the connections at slot #3
and arrive at the “in” daisy-chained signal inputs at slot #4. The empty slot #3 is “skipped over” and the
VME bus functions normally even though one of its slots is empty.
Often the propagation of the daisy-chained signals is accomplished by a) installing small jumper blocks
(“jumpers”) on special pins on the backplane itself, or b) inserting a VME “blank” card, also called a “slot
bypass board”. A VME slot bypass has no electronic components, only five jumpers connecting the
appropriate P1 pins that implement the daisy-chained signals. A VME slot bypass card also acts as an air
dam that usually enhances chassis cooling.
A convenient alternative to manually installing jumpers or VME slot bypass cards is to use an autojumpering backplane. Such a backplane typically has IC circuits on it that can automatically detect a vacant
VME slot. In this situation the IC components will electronically propagate the daisy-chained signals.
However, if a VME card is present at power-up then the IC components do not propagate the daisy-chained
signals.
If you are working with a VME chassis and you’re not sure if it’s auto-jumpering or not then visually inspect
both sides of the backplane. An auto-jumpering backplane usually has one or two IC chips adjacent to each
J1 connector. But in some backplanes the auto-jumpering capability is built right into the J1 connector,
making them visually indistinguishable from a non-auto-jumpering backplane. Look for words like “auto
configuring” or “auto jumpering” or “auto daisy-chaining” silkscreened somewhere on the backplane. Or
simply check for the presence of manual jumper pins which indicate no auto-jumpering capability.
Note that with a manual jumpered backplane, it is not necessary to propagate the daisy-chained signals
beyond the right-most VME card.
B2.4 SYSCON and Auto-SYSCON Detection
A VME backplane requires exactly one system controller, or SYSCON, at all times. Normally SYSCON is
the board located in slot #1, if slot #1 is vacant (an atypical situation) then SYSCON should be the card in the
left-most slot.
SYSCON must drive the system clock signal (a utility signal), originate the IACK daisy-chain, implement a
bus timer to create bus time-out events, and arbitrate VME bus ownership. An optional SYSCON feature is
power monitoring.
Most VME cards with SYSCON capability can sample BG3IN* at power-up to automatically determine if
they should assume SYSCON duties. Under normal circumstances the left-most card will detect BG3IN*
low, then immediately enable its SYSCON module and drive BG3OUT* high so that no other cards will
detect their BG3IN* signal low. The SYSCON is required to maintain SYSCON duties until power-off; it
cannot transfer SYSCON duties to another card.
Cards that are manually configured to be SYSCON don’t check BG3IN* at power-up, they simply have their
SYSCON module enabled the whole time. They do, however, drive BG3OUT* high at power-up which
prevents other cards with auto-SYSCON detection from enabling their own SYSCON module.
A common misunderstanding is that “bus master” and SYSCON are the same thing. A bus master “owns”
the VME bus to initiate and complete various read and/or write cycles. Following these cycles the master
relinquishes bus ownership so that some other card can become the next bus master. The moment it releases
the bus it is no longer bus master, so for a brief time there are no bus masters. If multiple cards are
requesting bus ownership when the bus becomes available, then it is SYSCON that arbitrates (decides) which
card will be the next master. (Actually, it’s a combination of board position and SYSCON arbitration. There
are four “bus request” signals and SYSCON decides which signal will be granted bus ownership. If there are
multiple cards requesting the bus via the same bus request line, then the card in the lowest numbered slot will
get the bus. Thus boards in the left side of the chassis enjoy a higher priority than boards further to the right.)
There can be one bus master or zero bus masters. More than one bus master is an error condition that will
result in bus contention with multiple boards driving the same signal(s) – usually control and address signals.
In such a situation the card with more powerful bus drivers can damage or destroy the other card’s bus
drivers.
In a large VME chassis it is possible to install two separate backplanes. For example, a 20-slot VME chassis
can have a pair of 10-slot backplanes side by side that are independent of each other. Or perhaps there could
be an 8-slot backplane and two 6-slot backplanes. For situations like these, each backplane must have its
own SYSCON because we are really talking about two or three separate VME busses (backplanes) that are
housed in the same chassis.