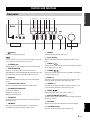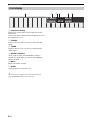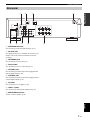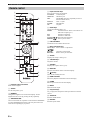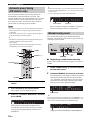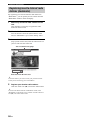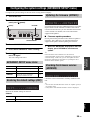
1
AB Network Receiver OWNER’S MANUAL English Caution: Read this before operating your unit. Caution: Read this before operating your unit. 1 To assure the finest performance, please read this manual carefully. Keep it in a safe place for future reference. 2 Install this sound system in a well ventilated, cool, dry, clean place – away from direct sunlight, heat sources, vibration, dust, moisture, and/or cold. For proper ventilation, allow the following minimum clearances. Top: 30 cm (11-3/4 in) Rear: 20 cm (7-7/8 in) Sides: 20 cm (7-7/8 in) 3 Locate this unit away from other electrical appliances, motors, or transformers to avoid humming sounds. 4 Do not expose this unit to sudden temperature changes from cold to hot, and do not locate this unit in an environment with high humidity (i.e. a room with a humidifier) to prevent condensation inside this unit, which may cause an electrical shock, fire, damage to this unit, and/or personal injury. 5 Avoid installing this unit where foreign objects may fall onto this unit and/or this unit may be exposed to liquid dripping or splashing. On the top of this unit, do not place: – Other components, as they may cause damage and/or discoloration on the surface of this unit. – Burning objects (i.e. candles), as they may cause fire, damage to this unit, and/or personal injury. – Containers with liquid in them, as they may fall and liquid may cause electrical shock to the user and/or damage to this unit. 6 Do not cover this unit with a newspaper, tablecloth, curtain, etc. in order not to obstruct heat radiation. If the temperature inside this unit rises, it may cause fire, damage to this unit, and/or personal injury. 7 Do not plug in this unit to a wall outlet until all connections are complete. 8 Do not operate this unit upside-down. It may overheat, possibly causing damage. 9 Do not use force on switches, knobs and/or cords. 10 When disconnecting the power cable from the wall outlet, grasp the plug; do not pull the cable. 11 Do not clean this unit with chemical solvents; this might damage the finish. Use a clean, dry cloth. 12 Only voltage specified on this unit must be used. Using this unit with a higher voltage than specified is dangerous and may cause fire, damage to this unit, and/or personal injury. Yamaha will not be held responsible for any damage resulting from use of this unit with a voltage other than specified. 13 To prevent damage by lightning, keep the power cord disconnected from a wall outlet or the unit during a lightning storm. 14 Do not attempt to modify or fix this unit. Contact qualified Yamaha service personnel when any service is needed. The cabinet should never be opened for any reasons. 15 When not planning to use this unit for long periods of time (i.e. vacation), disconnect the AC power plug from the wall outlet. 16 Be sure to read the “Troubleshooting” section in the owner’s manual on common operating errors before concluding that this unit is faulty. 17 Before moving this unit, press A downward to turn off this unit and then disconnect the AC power plug from the AC wall outlet. i En 18 19 20 21 22 Condensation will form when the surrounding temperature changes suddenly. Disconnect the power cable from the outlet, then leave this unit alone. When using this unit for a long time, this unit may become warm. Turn the system off, then leave this unit alone for cooling. Install this unit near the wall outlet and where the AC power plug can be reached easily. The batteries shall not be exposed to excessive heat such as sunshine, fire or the like. When you dispose of batteries, follow your regional regulations. Excessive sound pressure from earphones and headphones can cause hearing loss. As long as this unit is connected to the AC wall outlet, it is not disconnected from the AC power source even if you set this unit to standby mode by A. In this state, this unit is designed to consume a very small quantity of power. WARNING TO REDUCE THE RISK OF FIRE OR ELECTRIC SHOCK, DO NOT EXPOSE THIS UNIT TO RAIN OR MOISTURE. CAUTION Danger of explosion if battery is incorrectly replaced. Replace only with the same or equivalent type. This label is required to be attached to a product of which the temperature of the top cover may be hot during operation. Contents What you can do with this unit ................................. 2 Sources that can be played back on this unit ................. 2 Devices that can control this unit................................... 3 Operations from your mobile device ............................. 3 Supplied accessories ................................................... 4 Controls and functions ............................................... 5 PREPARATION Connections ............................................................... 10 BASIC OPERATION Playback .................................................................... 15 Listening to FM/AM radio....................................... 17 FM/AM tuning............................................................. 17 Automatic preset tuning (FM stations only)................ 18 Manual tuning preset ................................................... 18 Recalling a preset station ............................................. 19 Clearing a preset station............................................... 19 Radio Data System tuning ........................................... 20 Setup menu items......................................................... 36 Network Setup ............................................................. 37 Tone Control................................................................ 38 Balance ........................................................................ 38 Max Volume ................................................................ 38 Initial Volume.............................................................. 38 DC OUT ...................................................................... 38 Configuring the system settings (ADVANCED SETUP menu)...............................39 ADVANCED SETUP menu items .............................. 39 Restoring the default settings (INIT)........................... 39 Updating the firmware (UPDATE) ............................. 39 Checking the firmware version (VERSION)............... 39 Updating the unit’s firmware via the network .......40 ADDITIONAL INFORMATION Troubleshooting.........................................................41 Error indications on the front display.....................46 Trademarks ...............................................................47 Specifications .............................................................48 Index ...........................................................................49 (at the end of this manual) Information about third party software licenses ... i ADDITIONAL INFORMATION Using the Spotify service .......................................... 21 Playing back music stored on media servers (PCs/NAS) ............................................................. 22 ADVANCED OPERATION Playing a source........................................................... 15 Using the sleep timer ................................................... 16 Option menu items....................................................... 34 Configuring various functions (Setup menu) .........36 BASIC OPERATION Connecting speakers and source components.............. 10 Connecting the speakers .............................................. 11 Connecting the FM and AM antennas ......................... 12 Connecting to a network.............................................. 13 Connecting power cable .............................................. 13 Setup of your network devices .................................... 14 Configuring playback settings for different playback sources (Option menu) .........................34 PREPARATION Front panel ..................................................................... 5 Front display .................................................................. 6 Rear panel ...................................................................... 7 Remote control............................................................... 8 Using the remote controls.............................................. 9 ADVANCED OPERATION INTRODUCTION INTRODUCTION Setting the media sharing of music files...................... 22 Playback of PC music contents.................................... 23 Listening to Internet radio....................................... 25 Registering favorite Internet radio stations (bookmarks)............................................................. 26 Playing back iPod/iTunes music via a network (AirPlay) ................................................................ 27 Playback of iPod/iTunes music contents ..................... 27 Listening to Pandora® .............................................. 29 Account setup for Pandora........................................... 29 Creating Pandora stations ............................................ 30 Playback of Pandora stations ....................................... 31 Deleting Pandora stations ............................................ 32 Editing the Pandora accounts....................................... 32 Switching information on the front display ........... 33 1 En English • y indicates a tip for your operation. • This manual explains operations using the supplied remote control. • This manual describes all the “iPod”, “iPhone” and “iPad” as the “iPod”. “iPod” refers to “iPod”, “iPhone” and “iPad”, unless otherwise specified. INTRODUCTION What you can do with this unit What you can do with this unit This unit is a network receiver, on which you can enjoy playing back music files stored on your media server (PC or NAS), audio contents on the Internet radio, Spotify, AirPlay devices (iPod/iTunes) , Pandora by connecting the unit to your home network (DLNA) and audio system on the same network. Sources that can be played back on this unit 8 FM/AM 1 Internet radio 2 Pandora service Modem STANDBY/ON DISPLAY FM MODE MEMORY FM/AM PRESET TUNING VOLUME SELECT BASS PHONES Broadband router* TREBLE INPUT PUSH - ENTER SPEAKERS A B RETURN 3 PC This unit (R-N301) 4 NAS 5 iPod (AirPlay)* 6 iPod/Android (Spotify)* 7 CD player etc. * You need a commercially available Wi-Fi broadband router when you use an iPod/Android. 1 Play back the Internet radio (p.25) 5 Play back your iPod with AirPlay (p.27) 2 Play back the Pandora service (p.29) 6 Play back the Spotify service (p.21) 3 Play back music files stored on your PC (p.22) 7 Play back your external component (p.10) 4 Play back music files stored on your NAS (p.22) 8 Listening to FM/AM radio (p.17) y For details on connecting the devices, see “Connections” (p.10). 2 En What you can do with this unit Devices that can control this unit INTRODUCTION STANDBY/ON DISPLAY FM MODE MEMORY FM/AM PRESET TUNING VOLUME SELECT BASS PHONES TREBLE INPUT PUSH - ENTER SPEAKERS A B RETURN Broadband router* A B Mobile device* (iPod, Android) Remote control * You need a commercially available Wi-Fi broadband router when you use a mobile device. A Control this unit using your mobile devices (p.3). B Control this unit using the remote control. Operations from your mobile device Once you install the app “NETWORK PLAYER CONTROLLER” in your mobile device, you can operate the unit with the mobile device. Features • • • • Power-on/off or other basic operation Changing the music source Selecting, playing back, and stopping songs Playing back songs stored in devices For downloading the app or the latest information, access to the App Store or Google Play and search “NETWORK PLAYER CONTROLLER.” English 3 En Supplied accessories Supplied accessories Check that the following accessories are supplied with the product. Remote control DIMMER AM antenna FM antenna Batteries (x2) (AAA, R03, UM-4) SLEEP A B SPEAKERS COAXIAL OPTICAL NET LINE 1 LINE 2 LINE 3 MODE TUNER CD FM TUNING AM POP-UP MENU PRESET HOME NOW PLAYING ENTER SETUP RETURN MUTE VOLUME OPTION DISPLAY REPEAT SHUFFLE ■ Notes on remote controls and batteries • • • • • • • • • • • • • • Do not spill water or other liquids on the remote control. Do not drop the remote control. Do not leave or store the remote control in the following conditions: – places of high humidity, such as near a bath – places of high temperatures, such as near a heater or stove – places of extremely low temperatures – dusty places Insert batteries according to the polarity markings (+ and -). Change all batteries if you notice the operation range of the remote control narrows. If the batteries run out, immediately remove them from the remote control to prevent an explosion or acid leak. If you find leaking batteries, discard the batteries immediately, taking care not to touch the leaked material. If the leaked material comes into contact with your skin or gets into your eyes or mouth, rinse it away immediately and consult a doctor. Clean the battery compartment thoroughly before installing new batteries. Do not use old batteries together with new ones. This may shorten the life of the new batteries or cause old batteries to leak. Do not use different types of batteries (such as alkaline and manganese batteries) together. Read the packaging carefully as these different types of batteries may have the same shape and color. Before inserting new batteries, wipe the battery compartment clean. Keep the batteries in a location out of reach of children. Batteries can be dangerous if a child were to put in his or her mouth. If the batteries grow old, the effective operation range of the remote control decreases considerably. If this happens, replace the batteries with new one as soon as possible. If you plan not to use the unit for a long period of time, remove the batteries from the unit. Otherwise, the batteries will wear out, possibly resulting in a leakage of battery liquid that may damage the unit. Do not throw away batteries with general house waste. Dispose of them correctly in accordance with your local regulations. 4 En Controls and functions Controls and functions 1 2 3 4 5 67 8 9 : A INTRODUCTION Front panel B STANDBY/ON DISPLAY FM MODE MEMORY FM/AM PRESET TUNING VOLUME SELECT BASS PHONES TREBLE INPUT PUSH - ENTER SPEAKERS A B RETURN C D E F G H 1 A (power) Turns on/off (standby) the unit. 9 FM/AM Switch between FM and AM (p.17). Note 0 Front display Shows information about the operational status of this unit. In standby mode, this unit consumes a small amount of power to receive infrared signals from the remote control. 2 PHONES jack Outputs audio to your headphones for private listening. 3 SPEAKERS A/B Turns on or off the speaker set connected to the SPEAKERS A and/or SPEAKERS B terminals on the rear panel each time the corresponding button is pressed. A PRESET j / i Selects a preset FM/AM station when TUNER is selected as the input source (p.19). B TUNING jj / ii Selects the tuning frequency when TUNER is selected as the input source (p.17). 4 DISPLAY Selects the information displayed on the front display (p.33). C BASS +/– Increases or decreases the low frequency response. The center position produces a flat response (p.16). 5 Remote control sensor Receives infrared signals from the remote control. D TREBLE +/– Increases or decreases the high frequency response. The center position produces a flat response (p.16). 6 STANDBY/ON indicator Lights up as follows: Brightly lit: Power is on Dimly lit: Standby mode 7 FM MODE Set the FM band reception mode to automatic stereo or monaural (p.17). F SELECT/ENTER (jog dial) Turn the dial to select a numeric value or setting, and press the dial to confirm. G RETURN Returns to the previous indication of the front display. H VOLUME control Increases or decreases the sound output level. 5 En English 8 MEMORY Stores the current FM/AM station as a preset when TUNER is selected as the input source (p.18). E INPUT l / h Selects the input source you want to listen to. Controls and functions Front display 1 2 3 4 5 6 STEREO SP A MUTE TUNED SP B SLEEP 1 Information display Displays the current status (such as input name sound mode name). You can switch the information that is displayed when you press DISPLAY (p.33). 2 STEREO Lights up when the unit is receiving a stereo FM radio signal. 3 TUNED Lights up when the unit is receiving an FM/AM radio station signal. 4 Speaker indicators “SP A” lights up when the SPEAKERS A output is enabled and “SP B” lights up when the SPEAKERS B output is enabled. 5 MUTE Blinks when audio is muted. 6 SLEEP Lights up when the sleep timer is on. y You can change the brightness level of the front display by pressing DIMMER on the remote control (p.8). 6 En Controls and functions Rear panel 3 DC OUT 5V 0.5A DIGITAL 4 NETWORK ANTENNA AM FM 75 Ω INTRODUCTION 2 1 SPEAKERS OPTICAL CD A LINE PB REC COAXIAL B 1 5 6 7 2 3 8 9 1 ANTENNA terminals For connecting to FM and AM antennas (p.12). 2 DC OUT jack For supplying power to a Yamaha AV accessory. For details, refer to the instruction manual of the AV accessory. 3 NETWORK jack For connecting to a network (p.13). 4 Power cable For connecting to an AC wall outlet (p.13). 5 OPTICAL jack For connecting to audio components equipped with optical digital output (p.10). 6 COAXIAL jack For connecting to audio components equipped with a coaxial digital output (p.10). 7 CD jacks For connecting to a CD player (p.10). 8 LINE 1-3 jacks For connecting to analog audio components (p.10). 9 SPEAKERS terminals Used to connect speakers (p.11). English 7 En Controls and functions Remote control 5 Input selection keys 1 2 DIMMER 3 SLEEP 4 B SPEAKERS 5 6 COAXIAL OPTICAL NET LINE 1 LINE 2 LINE 3 MODE TUNER CD FM POP-UP MENU 6 Radio keys Operate the FM/AM radio (p.17). MODE Switches between “Stereo” and “Mono” for FM radio reception (p.17). FM Switches to FM radio. AM Switches to AM radio. TUNING jj / ii Select the radio frequency. PRESET j / i Select a preset station. TUNING AM 7 C A PRESET HOME NOW PLAYING Select an input source for playback. COAXIAL COAXIAL jack OPTICAL OPTICAL jack NET NETWORK jack (press repeatedly to select a desired network source) LINE 1-3 LINE 1-3 jacks TUNER FM/AM tuner CD CD jacks D E 7 POP-UP MENU This button is not available for this unit. 8 Menu operation keys 8 9 Cursor keys (B/C/D/E) ENTER RETURN ENTER SETUP Select a menu or a parameter. Confirms a selected item. Returns to the previous state. RETURN 9 SETUP MUTE : VOLUME F Displays the “Setup” menu (p.36). 0 VOLUME keys Adjust the volume. G A B OPTION A OPTION Displays the “Option” menu (p.34). B DISPLAY Switches information shown in the front display. DISPLAY REPEAT SHUFFLE H C A (power) I Turns on/off (standby) the unit. D NOW PLAYING Shows the playback information in the front display. E HOME 1 Infrared signal transmitter Sends infrared signals. 2 SLEEP Sets the sleep timer (p.16). Shows top-level menu in the front display. F MUTE Mutes the audio output. G Playback keys 3 DIMMER Let you play back and perform other operations for network sources. Changes the brightness level of the front display. Choose brightness from 5 levels by pressing this key repeatedly. H SHUFFLE 4 SPEAKERS A/B Turns on and off the set of speakers connected to the SPEAKERS A and/or SPEAKERS B terminals on the rear panel of this unit when the corresponding key is pressed. 8 En Switches shuffle modes. I REPEAT Switches repeat modes. Controls and functions Using the remote controls ■ Installing batteries INTRODUCTION 1 3 2 Notes • Change all batteries if the operation range of the remote control narrows. • Before inserting new batteries, wipe the compartment clean. ■ Operation range The remote controls transmit a directional infrared beam. Be sure to aim the remote controls directly at the remote control sensor on the front panel of this unit. Approximately 6 m (20 ft) 30° 30° Remote control English 9 En PREPARATION Connections Connecting speakers and source components CAUTION • Do not connect this unit or other components to the main power until all connections between components are complete. • All connections must be correct: L (left) to L, R (right) to R, “+” to “+” and “–” to “–”. If the connections are faulty, no sound will be heard from the speakers, and if the polarity of the speaker connections is incorrect, the sound will be unnatural and lack bass. Refer to the owner’s manual for each of your components. • Do not let bare speaker wires touch each other or any metal part of this unit. This could damage this unit and/or the speakers. TV etc. Speakers A O Audio output (digital optical) DC OUT 5V 0.5A DIGITAL NETWORK ANTENNA AM FM 75 Ω SPEAKERS OPTICAL CD A LINE PB REC COAXIAL B 1 Audio output (digital coaxial) C BD/DVD player, etc. Audio output CD player Audio output 2 3 Audio input CD recorder, etc. Speakers B Connecting recording devices You can connect audio recording devices to the LINE 3 (REC) jacks. This jack outputs the selected input signals (from COAXIAL, OPTICAL, LINE 1-2, TUNER and CD). Notes • Be sure to use the LINE 3 (REC) jacks only for connecting recording devices. • If you select LINE 3 as the input source, the audio output of the LINE 3 (REC) jacks will be muted. 10 En Connections Connecting the speakers ■ Connecting speaker cables Speaker cables have two wires. One is for connecting the negative (-) terminal of the unit and the speaker, and the other is for the positive (+) terminal. If the wires are colored to prevent confusion, connect the black wire to the negative and the other wire to the positive terminal. a Remove approximately 10 mm (3/8”) of insulation from the ends of the speaker cable and twist the bare wires of the cable firmly together. ■ Bi-wire connection Bi-wire connection separates the woofer from the combined midrange and tweeter section. A bi-wire compatible speaker has four binding post terminals. These two sets of terminals allow the speaker to be split into two independent sections. With these connections, the mid and high frequency drivers are connected to one set of terminals and the low frequency driver to another set of terminals. This unit SPEA b Loosen the speaker terminal. Speaker c Insert the bare wires of the cable into the gap on the side (upper right or bottom left) of the terminal. PREPARATION A d Tighten the terminal. B 10 mm (3/8") a b c d ■ Connecting via banana plug (Australia model only) Tighten the knob and then insert the banana plug into the end of the corresponding terminal. Connect the other speaker to the other set of terminals in the same way. Note When making bi-wire connections, remove the shorting bridges or cables on the speaker. Refer to the speakers’ instruction manuals for more information. y Banana plug To use the bi-wire connections, press SPEAKERS A and SPEAKERS B on the front panel or on the remote control so that both SP A and B light up on the front display. STANDBY/ON DISPLAY FM MODE MEMORY FM/AM PRESET TUNING VOLUME SELECT BASS PHONES TREBLE INPUT PUSH - ENTER SPEAKERS A B RETURN SPEAKERS A/B DIMMER SLEEP A B SPEAKERS COAXIAL OPTICAL NET LINE 1 LINE 2 LINE 3 SPEAKERS A/B English 11 En Connections Connecting the FM and AM antennas The antennas for receiving FM and AM broadcasts are included with this unit. In general, these antennas should provide sufficient signal strength. Connect each antenna correctly to the designated terminals. Note If you experience poor reception quality, install an outdoor antenna. Consult the nearest authorized Yamaha dealer or service center about outdoor antennas. Outdoor FM antenna AM antenna (included) FM antenna (included) • The AM antenna should always be connected, even if an outdoor AM antenna is connected to this unit. • The AM antenna should be placed away from this unit. Outdoor AM antenna Use 5 to 10 m of vinyl-covered wire extended outdoors from a window. DC OUT 5V 0.5A DIGITAL ANTENNA AM FM 75 Ω OPTICAL CD LINE PB REC COAXIAL 1 2 3 ■ Assembling the supplied AM antenna 12 En ■ Connecting the wires of the AM antenna Connections Connecting to a network You can enjoy Internet radio or music files stored on media servers, such as PCs and Network Attached Storage (NAS), on the unit. Connect the unit to your router with a commercially-available STP network cable (CAT-5 or higher straight cable). Network Attached Storage (NAS) Internet WAN LAN PREPARATION Modem PC Router Network cable Mobile device (such as iPhone) DC OUT 5V 0.5A DIGITAL NETWORK ANTENNA AM FM 75 Ω SPEAKERS OPTICAL CD A LINE PB REC COAXIAL B 1 2 3 The unit (rear) y • If you are using a router that supports DHCP, you do not need to configure any network settings for the unit, as the network parameters (such as the IP address) will be assigned automatically to it. You only need to configure the network settings if your router does not support DHCP or if you want to configure the network parameters manually (p.37). • You can check whether the network parameters (such as IP address) are properly assigned to the unit in “Information” (p.37) in the “Setup” menu. Connecting power cable After all the connections are complete, plug in the power cable. To an AC wall outlet Notes • Some security software installed on your PC or the firewall settings of network devices (such as a router) may block the access of the unit to the network devices or the Internet. In these cases, configure the security software or firewall settings appropriately. • Each server must be connected to the same subnet as the unit. • To use the service via the Internet, broadband connection is strongly recommended. English 13 En Connections Setup of your network devices Configure your devices connected to the network to play back music files stored on the devices, or configure your mobile device to control this unit. Use the following configurations to suit your needs. y For details on Internet connection, please refer to the manual of your network devices. ❚ If you want to play the music files stored on your PC You need to configure the media sharing setting of your PC. Configure the media sharing setting of music files on Windows Media Player 12. For details on sharing setting, please refer to “Setting the media sharing of music files” (p.22). y You can operate from your PC using Windows Media Player. For details, refer to Windows Media Player help. ❚ If you want to play music files stored on your NAS You need to configure the media sharing settings of your NAS. Setup operations differ depending on your NAS. Refer to the NAS manual. y • If you want to configure the network parameters manually, check that you are using an IP address which is not used by other network devices in your network. • In case that you use DHCP and automatically obtain necessary information for network, such as IP address. We recommend that DHCP for the NAS normally be enabled. ❚ If you want to play iPod/iTunes with AirPlay Select this unit from your iPod or from iTunes (p.27). Check that the router being accessed by the iPod/iTunes is connected to the same network as this unit. ❚ If you want to operate this unit with your mobile device You need to download the dedicated application, and install it (p.3). y • If you want to configure the network parameters manually, check that you are using an IP address which is not used by other network devices in your network. • In case that you use DHCP and automatically obtain necessary information for network, such as IP address. We recommend that DHCP for the mobile device normally be enabled. 14 En BASIC OPERATION Playback Playing a source A (power) 4 Play the source. 5 Rotate the VOLUME control on the front panel (or press VOLUME +/– on the remote control) to adjust the sound output level. STANDBY/ON DISPLAY FM MODE MEMORY FM/AM PRESET TUNING VOLUME SELECT BASS PHONES TREBLE INPUT PUSH - ENTER SPEAKERS A B RETURN INPUT l / h SPEAKERS A/B DIMMER SLEEP Press A (power) again to finish using this unit and set it to standby mode. NET LINE 1 LINE 2 LINE 3 MODE TUNER CD BASIC OPERATION SPEAKERS A/B OPTICAL AM 6 B SPEAKERS FM • You can adjust the tonal quality by using the BASS, TREBLE, controls on the front panel. • You can adjust the speaker balance in the “Setup” menu (p.16). A (power) A COAXIAL VOLUME y Input selection keys TUNING PRESET SETUP RETURN MUTE VOLUME VOLUME 1 Press A (power) to turn on this unit. 2 Press the INPUT l / h selector on the front panel (or press one of the input selection keys on the remote control) to select the input source you want to listen to. 3 Press SPEAKERS A and/or SPEAKERS B on the front panel or on the remote control to select speakers A and/or speakers B. When speaker set A or speaker set B are turned on, SP A or SP B is displayed on the front display accordingly (p.6). Notes • When one set of speakers is connected using bi-wire connections, or when using two sets of speakers simultaneously (A and B), make sure SP A and SP B are displayed on the front display. • When listening with headphones, turn off the speakers. English 15 En Playback ■ Adjusting the BASS and TREBLE controls STANDBY/ON DISPLAY FM MODE MEMORY FM/AM PRESET 3 Press D/E to adjust speaker balance. Control range: L+10 to R+10 4 To exit from the “Setup” menu, press SETUP again. TUNING VOLUME SELECT BASS PHONES TREBLE INPUT PUSH - ENTER SPEAKERS A B RETURN Using the sleep timer TREBLE BASS The BASS +/– and TREBLE +/– adjust high and low frequency response. When you adjust to “0”, produces a flat response. Use this feature to automatically set this unit to standby mode after a certain amount of time. The sleep timer is useful when you are going to sleep while this unit is playing or recording a source. BASS Increases or decreases the low frequency response. Control range: –10 to +10 (20 Hz) DIMMER SLEEP A A (power) B SPEAKERS TREBLE Increases or decreases the high frequency response. Control range: –10 to +10 (20 kHz) COAXIAL OPTICAL NET LINE 1 LINE 2 LINE 3 MODE TUNER CD SLEEP y BASS and TREBLE can be adjusted in the “Setup” menu (p.36). ■ Adjusting the speaker balance The sound output balance of the left and right speakers to compensate for sound imbalance caused by speaker locations or listening room conditions. To adjust the speaker balance, perform the following steps. POP-UP MENU Cursor keys B/C/D/E ENTER HOME Note The sleep timer can only be set with the remote control. 1 NOW PLAYING ENTER SETUP Press SLEEP repeatedly to set the amount of time before this unit is set to standby mode. Each time you press SLEEP, the front display changes as shown below. The SLEEP indicator blinks while setting the amount of time for the sleep timer. RETURN SETUP SP PA MUTE SLEEP VOLUME Sleep¡120min. n. 1 Press SETUP on the remote control. The “Setup” menu shown on the front display. Setup ¡Network¡Setup SP A 2 Press B/C to select “Balance” and press ENTER. Balance ¡L------------R› SP A 16 En If the sleep timer is set, the SLEEP indicator on the front display lights up. y • To disable the sleep timer, select “Sleep Off”. • The sleep timer setting can also be canceled by pressing A (power) to set this unit to standby mode. Listening to FM/AM radio ■ Improving FM reception FM/AM tuning If the signal from the station is weak and the sound quality is not good, set the FM band reception mode to monaural mode to improve reception. DIMMER SLEEP A 1 B SPEAKERS COAXIAL OPTICAL NET LINE 1 LINE 2 LINE 3 MODE TUNER CD MODE TUNER FM TUNING FM AM POP-UP MENU TUNING jj / ii PRESET AM HOME NOW PLAYING Press TUNER to select “TUNER” as the input source. 2 Press FM or AM to select the reception band (FM or AM). 3 Press and hold TUNING jj / ii for more than 1 second to begin tuning. Press ii to tune in to a higher frequency. Press jj to tune in to a lower frequency. Note The STEREO indicator on the front panel lights up while listening to a station in stereo mode. BASIC OPERATION 1 Press MODE repeatedly to select “Stereo” (automatic stereo mode) or “Mono” (monaural mode) when this unit is tuned in to an FM radio station. When Mono is selected, FM broadcasts will be heard in monaural sound. The frequency of the received station is shown in the front display. If a broadcast is being received, “TUNED” indicator on the front display will be lit. If a stereo broadcast is being received, the “STEREO” indicator will also lit. STEREO SP A TUNED ¡¡¡¡FM¡98.50MHz Frequency If the tuning search does not stop at the desired station because the station signals are weak, use the following keys to set a frequency. y When the signal reception for an FM radio station is unstable, switching to monaural may improve it. English 17 En Listening to FM/AM radio y Automatic preset tuning (FM stations only) You can use the automatic preset tuning function to automatically register FM stations as presets. This function enables this unit to automatically tune in to FM stations that have a strong signal and store up to 40 of those stations in order. You can then easily recall any preset station by selecting its preset number. • Before scanning begins, you can specify the first preset number to be used by pressing PRESET j / i or cursor key (B/C) on the remote control. • To cancel scanning, press FM, AM or RETURN. Ready ¡01:FM¡87.50MHz SP A Preset number When scanning is complete, “FINISH” is displayed and then the display returns to original state. Notes • If a station is registered to a preset number that already has a station registered to it, the previously registered station is overwritten. • If the station you want to store is weak in signal strength, try using the manual preset tuning method. y • FM stations registered as presets using the automatic preset registration feature will be heard in stereo. • (U.K. model) Only Radio Data System broadcasting stations are stored automatically by the Auto Preset function. Frequency Manual tuning preset You can manually register up to 40 FM/AM stations (40 total). You can then easily recall any preset station by selecting its preset number. STANDBY/ON DISPLAY FM MODE MEMORY FM/AM PRESET TUNING VOLUME SELECT BASS PHONES TUNER TREBLE INPUT PUSH - ENTER SPEAKERS A MODE B RETURN CD TUNER FM TUNING FM AM PRESET AM POP-UP MENU HOME PRESET j / i MEMORY PRESET j / i NOW PLAYING ■ Registering a radio station manually Cursor keys B / C ENTER Select a radio station manually and register it to a preset number. ENTER SETUP RETURN RETURN 1 Follow “FM/AM tuning” (p.17) to tune into the desired radio station. 2 Hold down MEMORY for more than 2 seconds. The first time that you do register a station, the selected radio station will be registered to the preset number “01”. Thereafter, each radio station you select will be registered to the next empty (unused) preset number after the most recently registered number. MUTE VOLUME OPTION OPTION 1 Press TUNER to select “TUNER” as the input source. 2 Press OPTION on the remote control. The “Option” menu is displayed (p.34). 3 Press B / C to select “Auto Preset”, and then press ENTER. Option ¡Auto¡Preset SP A This unit starts scanning the FM band about 5 seconds later from the lowest frequency upwards. To begin scanning immediately, hold down the ENTER key. 18 En ¡98.50 01¡:FM¡98.50MHz STEREO SP A TUNED Preset number y To select a preset number for registering, press MEMORY once after tuning into the desired radio station, press PRESET j / i to select a preset number, and then press MEMORY again. ¡98.50 02¡:Empty STEREO SP A TUNED “Empty” (not in use) or the frequency currently registered Listening to FM/AM radio Recalling a preset station You can recall preset stations that were registered using automatic station preset or manual station preset. Clearing a preset station Clear radio stations registered to the preset numbers. MODE TUNER CD TUNER FM DIMMER TUNING SLEEP AM A PRESET B SPEAKERS POP-UP MENU COAXIAL OPTICAL NET LINE 1 LINE 2 LINE 3 MODE TUNER CD TUNER FM Cursor keys B / C ENTER HOME ENTER TUNING SETUP AM POP-UP MENU NOW PLAYING PRESET HOME RETURN PRESET j / i MUTE VOLUME NOW PLAYING OPTION 2 Press TUNER to select “TUNER” as the input source. Press PRESET j / i to select a preset number. y • Preset numbers to which no stations are registered are skipped. • “No Presets” is displayed if no stations are registered. 1 Press TUNER to select “TUNER” as the input source. 2 Press OPTION. 3 Use the cursor keys to select “Clear Preset” and press ENTER. BASIC OPERATION 1 OPTION Option ¡Clear¡Preset 4 Use the cursor keys (B / C) to select a preset station to be cleared and press ENTER. Clear 01¡:FM¡98.50MHz STEREO SP A TUNED Preset station to be cleared If the preset station is cleared, “Cleared” appears and then the next in-use preset number is displayed. Clear 01¡:Cleared Repeat step 4 until all desired preset stations are cleared. 6 To exit from the “Option” menu, press OPTION. English 5 19 En Listening to FM/AM radio Radio Data System tuning (U.K. model only) Radio Data System is a data transmission system used by FM stations in many countries. The unit can receive various types of Radio Data System data, such as “Program Service”, “Program Type,” “Radio Text” and “Clock Time”, when it is tuned into a Radio Data System broadcasting station. ■ Receiving traffic information automatically When “TUNER” is selected as the input source, the unit automatically receives traffic information. To enable this function, follow the procedure below to set the traffic information station. MODE TUNER CD TUNER FM TUNING AM ■ Displaying the Radio Data System information POP-UP MENU PRESET HOME NOW PLAYING VOLUME Cursor keys B / C ENTER OPTION ENTER SETUP RETURN RETURN DISPLAY REPEAT SHUFFLE MUTE DISPLAY VOLUME OPTION OPTION 1 Tune into the desired Radio Data System broadcasting station. 1 When “TUNER” is selected as the input source, press OPTION. We recommend using “Auto Preset” to tune into the Radio Data System broadcasting stations (p.18). 2 Use the cursor keys to select “TrafficProgram” and press ENTER. The traffic information station search will start in 5 seconds. Press ENTER again to start the search immediately. y 2 Press DISPLAY. Each time you press the key, the displayed item changes. Info Program¡Type Item name About 3 seconds later, the corresponding information for the displayed item appears. ¡98.50 ¡¡¡CLASSICS y • To search upward/downward from the current frequency, press the cursor keys (q/w) while “READY” is displayed. • To cancel the search, press RETURN. • Texts in parentheses denote indicators on the front display. The following screen appears for about 3 seconds when the search finishes. Finish ¡TP¡FM101.30MHz Information Program Service Program service name Program Type Current program type Radio Text Information on the current program Clock Time Current time Frequency Frequency Note “Program Service”, “Program Type”, “Radio Text”, and “Clock Time” are not displayed if the radio station does not provide the Radio Data System service. 20 En Traffic information station (frequency) Note “TP Not Found” appears for about 3 seconds when no traffic information stations are found. Using the Spotify service Spotify gives you instant access to millions of songs on your mobile devices. Just hit play to stream anything you like. The Spotify Connect feature lets you choose music on your Spotify app and listen on your Yamaha home entertainment system. See Spotify.com for service area information. 1 Connect your device to your home Wi-Fi network. Connect the unit and your mobile or tablet to your home Wi-Fi network as shown in the illustration below. All devices need to be on the same network. 3 Playback of Spotify contents. Start Spotify app on your mobile or tablet device, log in to Spotify and start playing a track. 1 Tap on the Now Playing bar to reveal extra controls and tap the Speaker icon. 2 Select the unit (network name of the unit) as the audio output device. Network connection (example) Spotify app (example) Internet 1 Wireless router BASIC OPERATION Modem 2 This unit (R-N301) R-N301 XXXXXX Mobile or tablet device* * iOS/Android™ apps are available as of August 2014. For more details, visit Spotify.com y To use this function, this unit and your mobile or tablet must be connected to the Internet. For detail on connections and network settings, refer to “Owner’s Manual”. 2 Get Spotify app and premium free trial. Download the Spotify app for your mobile or tablet from your app store, and take the Premium free trial. y • The playback screen is displayed on the front display. • You can adjust the unit’s volume from the Spotify app during playback. Caution • When you use Spotify app controls to adjust volume, the volume may be unexpectedly loud. This could result in damage to the unit or speakers. If the volume suddenly increases during playback, stop playback on the Spotify app immediately. The Spotify app and Premium account are required. Visit spotify.com for details. www.spotify.com/connect Spotify and Spotify logo are registered trademarks of the Spotify Group. English 21 En Playing back music stored on media servers (PCs/NAS) You can play back music files stored on your PC or DLNA-compatible NAS on the unit. Notes • To use this function, the unit and your PC must be connected to the same router (p.13). You can check whether the network parameters (such as the IP address) are properly assigned to the unit in “Information” (p.37) in the “Setup” menu. • The unit supports playback of WAV (PCM format only), MP3, WMA, MPEG-4 AAC and FLAC files. • The unit is compatible with sampling rates of up to 192 kHz for WAV and FLAC files, and 48 kHz for other files. • To play back FLAC files, you need to install server software that supports sharing of FLAC files via DLNA on your PC or use a NAS that supports FLAC files. Setting the media sharing of music files 4 Select “Allowed” from the drop-down list next to “R-N301”. 5 Click “OK” to exit. To play back music files in your computer with this unit, you need to make the media sharing setting between the unit and computer (Windows Media Player 11 or later). In here, setting with Windows Media Player in Windows 7 is taken as an example. 1 Start Windows Media Player 12 on your PC. 2 Select “Stream”, then “Turn on media streaming.” The control panel window of your PC is shown. (Example of English version) y For details on media sharing settings, refer to Windows Media Player help. • For Windows Media Player 11 a Start the Windows Media Player 11 on your PC. b Select “Library” then “Media Sharing”. 3 c Check the “Share my media to” box, select the “R-N301” icon, Click “Turn on media streaming.” and click “Allow”. d Click “OK” to exit. • For a PC or a NAS with other DLNA server software installed Refer to the user’s manual of your device or software and configure the media sharing settings. 22 En Playing back music stored on media servers (PCs/NAS) The following icons are displayed on the front panel display. Playback of PC music contents Follow the procedure below to operate the PC music contents and start playback. Icon Displayed an audio contents can be selected. Note “_” (underscore) will be displayed for characters not supported by the unit. Displayed when there is upper level in the current folder. 1 Displayed when a not supported music file is selected. Displayed when there is lower level in the current folder. 2 SLEEP DIMMER A Content B SPEAKERS COAXIAL OPTICAL y NET If playback of a music file selected from the unit is ongoing on your PC, the playback information is displayed. NET LINE 1 LINE 2 LINE 3 MODE TUNER CD FM 2 Use the cursor keys (B / C) to select a music server and press ENTER. 3 Use the cursor keys to select an item and press ENTER. If a song is selected, playback starts and the playback information is displayed. TUNING AM PRESET HOME POP-UP MENU NOW PLAYING Cursor keys B/C/D/E ENTER ENTER SETUP Server ¡Song01 RETURN RETURN MUTE VOLUME BASIC OPERATION NOW PLAYING HOME y Playback keys OPTION OPTION DISPLAY DISPLAY REPEAT • To return to the previous state, press RETURN. • If you press the DISPLAY repeatedly, you can switch the playback information on the front display (p.33). SHUFFLE SHUFFLE REPEAT Use the following remote control keys to control playback. Keys 1 Press NET repeatedly to select “Server” as the input source. Playback keys SP A Music server name 2 p Resumes playback from pause. s Stops playback. e Stops playback temporarily. b Server ¡NAS¡A¡¡¡¡¡¡¡¡› 1 Function a Skips forward/backward. HOME Displays the root directory of the music server. NOW PLAYING Displays information about the song that’s playing. y You can also use a DLNA-compatible Digital Media Controller (DMC) to control playback. For details, see “DMC Control” (p.37). English 23 En Playing back music stored on media servers (PCs/NAS) ■ Repeat/shuffle settings You can configure the repeat/shuffle settings for the playback of PC music content. 1 When the input source is “Server,” press REPEAT or SHUFFLE repeatedly to select the playback method. Item Repeat Shuffle Setting Function Off Turns off the repeat function. One Plays back the current song repeatedly. All Plays back all songs in the current album (folder) repeatedly. Off Turns off the shuffle function. On Plays back songs in the current album (folder) in random order. y Repeat/shuffle can also be specified in the “Option” menu (p.34). 24 En Listening to Internet radio You can listen to Internet radio stations from all over the world. Notes • To use this function, the unit must be connected to the Internet (p.13). You can check whether the network parameters (such as the IP address) are properly assigned to the unit in “Information” (p.37) in the “Setup” menu. • You may not be able to receive some Internet radio stations. • The unit uses the vTuner Internet radio station database service. • This service may be discontinued without notice. DIMMER 2 NetRadio ¡JazzST B SPEAKERS COAXIAL OPTICAL NET LINE 1 LINE 2 LINE 3 MODE TUNER CD y NET TUNING AM POP-UP MENU • To return to the previous state, press RETURN. • If you press the DISPLAY repeatedly, you can switch the playback information on the front display (p.33). • Use the Playback keys (s) to stop playback. • Some information may not be available depending on the station. PRESET HOME NOW PLAYING NOW PLAYING HOME Cursor keys B/C/D/E ENTER BASIC OPERATION FM SP A If you want to display the station list during playback, press HOME. To return the playback information, press NOW PLAYING. SLEEP A Use the cursor keys to select an item and press ENTER. If an Internet radio station is selected, playback starts and the playback information is displayed. ENTER SETUP RETURN MUTE VOLUME OPTION DISPLAY REPEAT SHUFFLE DISPLAY 1 Press NET repeatedly to select “NetRadio” as the input source. The station list appears on the front display. NetRadio ¡Bookmarks¡¡¡¡› SP A 1 2 The following icons are shown on the front panel display. Content 1 Displayed when an Internet radio station can be selected. 2 Displayed when there is lower level in the current folder. English Icon 25 En Listening to Internet radio Registering favorite Internet radio stations (bookmarks) By registering your favorite Internet radio stations to “Bookmarks”, you can quickly access to them from the “Bookmarks” folder in the front display. 1 Select any of Internet radio stations on the unit. This operation is necessary to register the radio station for the first time. 2 Check the vTuner ID of the unit. You can find the vTuner ID (MAC address of the unit) in “Information” (p.37) in the “Setup” menu. 3 Access the vTuner website (http://yradio.vtuner.com/) with the web browser on your PC and enter the vTuner ID. You can switch the language. Enter the vTuner ID in this area. y To use this feature, you need to create your personal account. Create your account using your e-mail address. 4 Register your favorite radio stations. Click the “Add” icon (❤+) next to the station name. y To remove the station from the “Bookmarks” folder, select “Bookmarks” in the Home screen, and then click the “Remove” icon (❤–) next to the station name. 26 En Playing back iPod/iTunes music via a network (AirPlay) The AirPlay function allows you to play back iPod/iTunes music on the unit via network. 2 On the iPod/iTunes, click (tap) the AirPlay icon and select the unit (network name of the unit) as the audio output device. PC iTunes Example on iTunes Example on iOS The unit Starts playback on iTunes or iPod Router Playback starts iPod Note AirPlay works with iPhone, iPad, and iPod touch with iOS 4.3.3 or later, Mac with OS X Mountain Lion, and Mac and PC with iTunes 10.2.2 or later. (as of August 2014) Playback of iPod/iTunes music contents Follow the procedure below to play back iPod/iTunes music contents on the unit. 3 Select a song and start playback. The unit automatically selects “AirPlay” as the input source and starts playback. The playback information is displayed on the front display. y • If you press the DISPLAY repeatedly, you can switch the playback information on the front display (p.33). • You can turn on the unit automatically when starting playback on iTunes or iPod by setting “Net Standby” (p.37) in the “Setup” menu to “On”. • You can edit the network name (the unit’s name on the network) displayed on iPod/iTunes in “Network Name” (p.38) in the “Setup” menu. • If you select the other input source on the unit during playback, playback on the iPod/iTunes stops automatically. • You can adjust the unit’s volume from the iPod/iTunes during playback. BASIC OPERATION To use this function, the unit and your PC or iPod must be connected to the same router (p.13). You can check whether the network parameters (such as the IP address) are properly assigned to the unit in “Information” (p.37) in the “Setup” menu. Network name of the unit Caution 1 Turn on the unit, and start iTunes on the PC or display the playback screen on the iPod. If the iPod/iTunes recognizes the unit, the AirPlay icon ( ) appears. • When you use iPod/iTunes controls to adjust volume, the volume may be unexpectedly loud. This could result in damage to the unit or speakers. If the volume suddenly increases during playback, stop playback on the iPod/iTunes immediately. y For iPods using iOS 7, AirPlay is displayed in Control Center. To access Control Center, swipe up from the bottom of the screen. Example on iTunes Example on iOS6 Example on iOS7 English Note If the icon does not appear, check whether the unit and PC/iPod are connected to the router properly. 27 En Playing back iPod/iTunes music via a network (AirPlay) Use the following remote control keys to control playback. Playback keys p Resumes playback from pause. s Stops playback. e Stops playback temporarily. b a Skips forward/backward. REPEAT Changes the Repeat settings SHUFFLE Changes the Shuffle settings Note To control iTunes playback with the remote control of the unit, you need to configure the iTunes preferences to enable iTunes control from remote speakers in advance. iTunes (example of English version) Check this box 28 En Listening to Pandora® (Australia model only) The Pandora service is available in the U.S.A, Australia, New Zealand only. If you have not set up your Pandora account on the unit yet, “Sign in” appears on the front display. Pandora ¡Sign¡in SP A 1 2 Icon Content Displayed an menu item can be selected. 1 Displayed when the setting/editing item can be selected. Displayed when the setting/editing item can be selected. 2 2 If you have a Pandora account, press ENTER. If you do not have a Pandora account, use the cursor keys to select “Activation” and press ENTER. 3 Perform the following procedure. Notes • To use this function, the unit must be connected to the Internet. For detail on connections and network settings (p.13). • If any error message appears on the front display, see “Error indications on the front display” (p.46). Press NET repeatedly to select “Pandora” as the input source. BASIC OPERATION Pandora is a free, personalized internet radio service that plays only the music you love. Enter a favorite artist, track or genre and Pandora will do the rest, bringing an effortless personalized soundtrack into your living room. Rate tracks with thumbs-up and thumbs-down as they play, and Pandora will adapt stations to your feedback on the spot. Since all Pandora accounts are portable, you can always access your own personalized Pandora stations from any computer or device in the United States, Australia and New Zealand that support Pandora. Pandora is currently only available within these countries due to licensing restrictions. Pandora is always free, with the option to upgrade to Pandora One which is completely free of all advertising and comes with additional features. For more information, http://www.pandora.com 1 If you select “Sign in” in Step 2 a Use the cursor keys to enter your Pandora account Account setup for Pandora e-mail address. b Press ENTER to enter password entry. If you have not set up your Pandora account yet, the account setup display appears when you select “Pandora”. To start using the Pandora service on the unit, follow the procedure below to set up your Pandora account. c Use the cursor keys to enter your Pandora password. y If “Create” appears on the front display, you can create Pandora stations. Refer to step 4 in “Creating Pandora stations” (p.30) for details. You can register up to eight Pandora accounts on the unit. For details, see “Editing the Pandora accounts” (p.32). COAXIAL OPTICAL NET NET LINE 1 LINE 2 LINE 3 MODE TUNER CD FM y • If you want to delete characters, press PRESET j. • If you want to insert characters, press PRESET i. • Rotate SELECT/ENTER on the front panel, you can change characters quickly. PRESET HOME PRESET j / i NOW PLAYING ENTER SETUP RETURN MUTE VOLUME Notes When login goes failed, “Login Failed” appears on front display. – If you want to retry same password, use cursor key to select “Retry” and press ENTER. – If you want to reset the password, select the “Forgot” and press ENTER twice. An e-mail message containing a link to reset your password will be sent to your e-mail address that you entered in step a. Please check your mail and click it. Password ¡[Retry]Forgot SP A 29 En English Cursor keys B/C/D/E ENTER If you have successfully logged into your account, “Login OK” appears on the front display. TUNING AM POP-UP MENU d Press ENTER to access your account. Listening to Pandora® If you select “Activation” in Step 2 a Write down the URL and active code shown in the 1 front display. URL http://www.pando SP A b Use a web browser on your PC to access the URL Pandora ¡Shuffle and follow the on-screen instruction to register for a Pandora account. c After activation, press ENTER to log in with your new Pandora account. If “Create” appears on the front display, you can create Pandora stations. Refer to step 4 in “Creating Pandora stations” (p.30) for details. Creating Pandora stations Pandora lets you create up to 100 custom radio stations that play only music you love. Just type in your favorite track or artist and Pandora will create a station that plays similar music. Press NET repeatedly to select “Pandora” as the input source. The station list appears on the front display. If HOME is pressed, the station list can be displayed at any time. When a station list is not displayed, perform the following operations after press HOME. SP A station list 2 Press OPTION. 3 Use the cursor keys (B / C) to select “Create Station” and press ENTER. 4 Use the cursor keys to enter the name of an artist or a track (all or part of the name) and press ENTER. y y • If there are no Pandora stations in your account, the “Create” appears automatically. In this case, proceed to Step 4 and create Pandora stations. • When the maximum number of Pandora stations have be been created, “Max Stations” appears on the front display. • If you want to delete characters, press PRESET j. • If you want to insert characters, press PRESET i. 5 Perform the following procedure. If both artists and tracks are found COAXIAL OPTICAL NET LINE 1 LINE 2 LINE 3 MODE TUNER CD NET FM SP A TUNING AM POP-UP MENU Create ¡[Artist]Track a Use the cursor keys to select “Artist” or “Track” PRESET HOME and press ENTER. PRESET j / i b Use the cursor keys to select a desired item and NOW PLAYING HOME Cursor keys B/C/D/E ENTER RETURN press ENTER. The selected item is added to your Pandora stations. The playback starts automatically and the playback information is displayed. ENTER SETUP If either artists or tracks are found Use the cursor keys to select a desired item and press ENTER. The selected item is added to your Pandora stations. The playback starts automatically and the playback information is displayed. RETURN MUTE VOLUME OPTION OPTION If only one item is found In this case, the item found is automatically added to your Pandora stations. The playback starts automatically and the playback information is displayed. If no items are found “No content” appears on front display. Press ENTER and repeat Step 4 to try another keyword. y To return to the previous state, press RETURN. 30 En Listening to Pandora® Playback of Pandora stations 2 If you have created Pandora stations, follow the procedure below to select a Pandora station to be played. COAXIAL OPTICAL NET LINE 1 LINE 2 LINE 3 MODE TUNER CD NET FM POP-UP MENU PRESET HOME NOW PLAYING ENTER SETUP SP A y NOW PLAYING HOME Cursor keys B/C/D/E ENTER RETURN Pandora ¡¡Concerto TUNING AM Use the cursor keys (B / C) to select a Pandora station and press ENTER. Playback of the selected station starts and the playback information is displayed. If NOW PLAYING is pressed during a playback, the playback information can be displayed at any time. • If you press the DISPLAY repeatedly, you can switch the playback information on the front display (p.33). • You can also use the playback keys (p, s, e, a) on the remote control to control playback. 3 RETURN Perform the following procedure if you needed. If you want to set a rating of track MUTE VOLUME OPTION. b Use the cursor keys (B / C) to select Playback keys OPTION “RateThisTrack” and press ENTER. OPTION DISPLAY REPEAT SHUFFLE DISPLAY 1 Pandora ¡I¡like¡it Press NET repeatedly to select “Pandora” as the input source. The station list appears on the front display. When a station list is not displayed, perform the following operations after press HOME. Pandora ¡Shuffle icon Icon SP A BASIC OPERATION a When the playback information is displayed, press c Use the cursor keys (B / C) to select rating and press ENTER. I like it Gives positive feedback (thumbs up) for the current track. (thumbs up) is displayed in the track name. I dont like it Gives negative feedback (thumbs down) for the current track and skip to the next track. If you can not skip at skip limit, (thumbs down) is displayed in the track name. Tired of it Requests not to playback the current track for a month and skip to the next track. SP A station list Content If you want to bookmark current track Displayed when an Pandora station can be selected. a When the playback information is displayed, press OPTION. Displayed when the station list during playback. b Use the cursor keys (B / C) to select “Bookmark” y and press ENTER. “This Track” appears on the front display. c Press ENTER again. Adds the current track to your bookmarks on your Pandora profile page at “http://www.pandora.com”. If playback of any Pandora station is ongoing, the playback information is displayed. If you want to confirm why you have to play a When the playback information is displayed, press OPTION. English b Use the cursor keys (B / C) to select “WhyThisTrack?” and press ENTER. c Return to previous state, press RETURN. y Some functions are not available during advertisement broadcast. 31 En Listening to Pandora® Deleting Pandora stations The created Pandora station can be deleting in the following procedures. AM Editing the Pandora accounts You can register up to 8 Pandora accounts on the unit. Follow the procedure below to add or remove Pandora accounts, or switch to another Pandora account. PRESET POP-UP MENU POP-UP MENU HOME HOME NOW PLAYING NOW PLAYING HOME HOME Cursor keys B/C/D/E ENTER Cursor keys B/C/D/E ENTER ENTER ENTER SETUP SETUP RETURN RETURN RETURN MUTE MUTE VOLUME VOLUME OPTION OPTION OPTION OPTION DISPLAY REPEAT SHUFFLE 1 Press HOME to display the station list. 1 Press HOME to display the station list. 2 Press OPTION. 2 Use the cursor keys (B / C) to select Pandora station to be delete. 3 Use the cursor keys (B / C) to select “Pandora Account” and press ENTER. 3 Press OPTION. 4 Perform the following procedure. 4 Use the cursor keys (B / C) to select “Delete station” and press ENTER. To add a new Pandora account Use the cursor keys (D / E) to select “OK” and press ENTER. b Follow from Step 3 of “Account setup for 5 a Use the cursor keys (B / C) to select “Add Account” and press ENTER. Pandora” (p.29). y Note When you delete a Pandora station, that station is deleted from your Pandora account and all associated listening devices. When the Pandora account is created to the maximum, “Max account” appears on the front display. To remove a Pandora account a Use the cursor keys (B / C) to select “Remove Account” and press ENTER. b Use the cursor keys to select a Pandora account to be removed and press ENTER. c Use the cursor keys to select “OK” and press ENTER. d Return to previous state, press RETURN. To switch to another Pandora account a Use the cursor keys (B / C) to select “Switch User” and press ENTER. b Use the cursor keys to select a Pandora account to be used and press ENTER. Pandora, the Pandora logo, and the Pandora trade dress are trademarks or registered trademarks of Pandora Media, Inc. Used with permission. 32 En Switching information on the front display When you select a network source as the input source, you can switch playback information on the front display. VOLUME OPTION DISPLAY REPEAT SHUFFLE DISPLAY 1 Press DISPLAY. Each time you press the key, the displayed item changes. Info Song SP A BASIC OPERATION › About 3 seconds later, the corresponding information for the displayed item appears. Server Track¡#1 Input source SP A Item Server AirPlay Song (song title), Artist (artist name), Album (album name), Time Net Radio Song (song title), Album (album name), Station (station name), Time Spotify Song (song title), Artist (artist name), Album (album name) Pandora * Track (track name and artist name), Station (station name), Album (album name), Time * Australia model only English 33 En ADVANCED OPERATION Configuring playback settings for different playback sources (Option menu) You can configure separate playback settings for different playback sources. This menu allows you to easily configure settings during playback. FM POP-UP MENU Option menu items TUNING AM PRESET HOME y NOW PLAYING Available items vary depending on the selected input source. Item Function Page Input Trim Corrects volume differences between input sources. 34 Signal Info Displays information about the audio signal. 35 Auto Preset Automatically registers FM radio stations with strong signals as presets. 18 Clear Preset Clear radio stations registered to preset numbers. 19 TrafficProgram *1 Automatically searches for a traffic information station. 20 Repeat Configures the repeat setting for the media server. 24 Shuffle Configures the shuffle setting for the media server. 24 AutoPowerStdby Sets the amount of time for the autostandby function to each input. 35 Option ¡Input¡Trim PandoraAccount *2 Create Station *2 Delete Station *2 (While the Pandora station list is displayed) 30, 32 Configures the Pandora accounts and create/delete Pandora stations. Use the cursor keys to select an item and press ENTER. RateThisTrack *2 Bookmark *2 WhyThisTrack? *2 (While the Pandora playback information is displayed) Configures the track rating, bookmark, etc. Cursor keys B/C/D/E ENTER ENTER SETUP RETURN RETURN MUTE VOLUME OPTION OPTION DISPLAY 1 REPEAT SHUFFLE Press OPTION. SP A 2 y To return to the previous state during menu operations, press RETURN. 3 Use the cursor keys (D / E) to select a setting. 4 To exit from the menu, press OPTION. *1 *2 U.K. model only Australia model only ■ Input Trim Corrects volume differences between input sources. If you are bothered by volume differences when switching between input sources, use this function to correct it. y This setting is applied separately to each input source. Setting range -10 to +10 (1.0 dB increments) Default 0 34 En 31 Configuring playback settings for different playback sources (Option menu) ■ Signal Info Displays information about audio signal. Choices Format Audio format of the input signal Sampling The number of samples per second of the input digital signal y To switch the information on the front display, press the cursor keys (B / C) repeatedly. ■ AutoPowerStdby Sets the amount of time for the auto-standby function to each input. If you do not operate the unit for the specified time, the unit will automatically go into standby mode. Off*¹ Does not set the unit to standby mode automatically. For network sources (Spotify, Server, Net Radio, AirPlay or 20 minutes*², Pandora) Sets the unit to standby mode when you have not 2 hours, operated the unit for the specified time while audio 4 hours, contents are stopped/paused. 8 hours*², 12 hours For other music sources When you have not operated the unit for the specified time, the unit switches to standby mode. ADVANCED OPERATION *1 (Australia model) All input has been set to Off by default. *2 (U.K. model) Spotify, Server, Net Radio, AirPlay, Pandora has been set to 20 minutes by default. Other input has been set to 8hours by default. y Before the unit enters standby mode, “AutoPowerStdby” appears, then a 30-second countdown starts in the front display. English 35 En Configuring various functions (Setup menu) You can configure the unit’s various functions. POP-UP MENU HOME Setup menu items NOW PLAYING Menu item Cursor keys B/C/D/E ENTER SETUP Information Displays the network information on the unit. 37 IP Address Configures the network parameters (such as IP address). 37 MAC Filter Filter Sets the MAC address filter to limit access to the unit from other network devices. 37 Selects whether to allow a DLNA-compatible Digital Media Controller (DMC) to control playback. 37 Net Standby Selects whether to enable/ disable the function that turns on the unit from other network devices. 37 Network Name Edits the network name (the unit’s name on the network) displayed on other network devices. 38 Update Updates the firmware via the network. 38 Tone Control Adjusting the high and low frequency response. 38 Balance Adjusting the sound output balance of the left and right speakers. 38 Max Volume Sets the maximum volume to prevent excessive loudness. 38 Initial Volume Sets the initial volume for when this receiver is turned on. 38 DC OUT Selects how to supply power through the DC OUT jack. 38 RETURN MUTE VOLUME Press SETUP. Setup ¡Network¡Setup SP A 2 Network DMC Control Setup Use the cursor keys (B / C) to select a menu. Setup ¡Max¡Volume SP A 3 Press ENTER. Max Vol ¡¡ •••••Max SP A 4 Use the cursor keys (D / E) to select a setting and press ENTER. y To return to the previous state during menu operations, press RETURN. 5 Exit from the menu, press SETUP. 36 En Page RETURN SETUP 1 Function ENTER Configuring various functions (Setup menu) Network Setup 4 Use the Cursor keys (B / C) to change a value. 5 To exit from the menu, press SETUP. Configures the network settings. ■ Information Displays the network information on the unit. NewFwAvailable Appears if an update for this unit’s firmware is available (p.40). Status The connection status of the NETWORK jack MAC MAC address IP IP address Subnet Subnet mask Gateway The IP address of the default gateway DNS(P) The IP address of the primary DNS server DNS(S) The IP address of the secondary DNS server vTunerID The ID of the Internet radio (vTuner) ■ MAC Filter Sets the MAC address filter to limit access to the unit from other network devices. Filter Enables/disables the MAC address filter. ■ IP Address Off (default) Disables the MAC address filter. On Enables the MAC address filter. In “MAC Address 01–10”, specify the MAC addresses of the network devices that will be permitted access to the unit. MAC address filter settings 1 Set “Filter” to “On”. DHCP Select whether to use a DHCP server. 2 Use the cursor keys (B / C) to select an MAC address number (01 to 10). 3 Use the cursor keys (D / E) to move the edit position and the cursor keys (B / C) to select a value. Manual network settings 4 To exit from the menu, press SETUP. 1 Set “DHCP” to “Off”. y 2 Use the cursor keys (B / C) to select a parameter type. Off Does not use a DHCP server. Configure the network parameters manually. For details, see “Manual network settings”. On (default) Uses a DHCP server to automatically obtain the unit’s network parameters (such as IP address). Address Specifies an IP address. Subnet Mask Specifies a subnet mask. Default Gateway Specifies the IP address of the default gateway. DNS Server(P) Specifies the IP address of the primary DNS server. DNS Server(S) Specifies the IP address of the secondary DNS server. 3 When using “AirPlay” (p.27) and “DMC Control” (p.37), you cannot limit access from network devices regardless of the MAC address filter. ADVANCED OPERATION Configures the network parameters (such as IP address). ■ DMC Control Selects whether to allow DLNA-compatible Digital Media Controller (DMC) to control playback. Use the cursor keys (D / E) to select the edit position. Does not allow DMCs to control playback. Enable (default) Allows DMCs to control playback. y A Digital Media Controller (DMC) is a device that can control other network devices through the network. When this function is enabled, you can control playback of the unit from DMCs (such as Windows Media Player 12) on the same network. ■ Net Standby Selects whether the unit can be turned on from other network devices (network standby). Off (default) Disables the network standby function. On Enables the network standby function. (The unit consumes more power than when “Off” is selected.) (Example: IP address setting) Use the cursor keys (D / E) to switch between segments (Address1, Address2...) of the address. 37 En English Network ¡ Address1••192› SP A Disable Configuring various functions (Setup menu) ■ Network Name Edits the network name (the unit’s name on the network) displayed on other network devices. 1 Select “Network Name”. Network ¡ Network Name Tone Control Adjusting the high and low frequency response. Bass When you feel there is not enough bass (low frequency sound). Control range: –10 to +10 (20 Hz) Treble When you feel there is not enough treble (high frequency sound). Control range: –10 to +10 (20 kHz) SP A 2 Press ENTER to enter the name edit display. Network R-N301 XXXXX Balance SP A Network name 3 Adjusting the sound output balance of the left and right speakers to compensate for sound imbalance caused by speaker locations or listening room conditions. Control range L+10 to R+10 Use the cursor keys (D / E) to move the edit position and the cursor keys (B / C) to select a character. Network R-N301 XXXXX› SP A y For details, refer to the “Adjusting the speaker balance” (p.16). Max Volume Sets the maximum volume to prevent excessive loudness. Setting range 1 to 99 (1 step increments), Max 4 To confirm the new name, press ENTER. 5 To exit from the menu, press SETUP. ■ Update Updates the firmware via the network. Perform Update Starts the process to update the unit’s firmware. For details, see “Updating the unit’s firmware via the network” (p.40). Version Displays the version of the firmware installed on the unit. ID Displays the system ID number. Default Max Initial Volume Sets the initial volume when the receiver is turned on. Setting range Off, Mute, 1 to 99 (1 step increments), Max Default Off DC OUT Configures the DC OUT jack setting. PowerMode Selects how to supply power to the Yamaha AV accessory connected to the DC OUT jack. 38 En Con (default) Supplies power through the DC OUT jack continuously regardless of the power state (on/ standby) of the unit. Sync Supplies power through the DC OUT jack only when the unit is turned on. Configuring the system settings (ADVANCED SETUP menu) Configure the system settings of the unit while viewing the front display. Updating the firmware (UPDATE) 1 Turn off the unit. 2 While holding down RETURN on the front panel, press A (power). UPDATE•••NETWORK New firmware that provides additional features or product improvements will be released as needed. If the unit is connected to the Internet, you can download the firmware via the network. For details, refer to the information supplied with updates. RETURN A (power) STANDBY/ON DISPLAY FM MODE MEMORY FM/AM PRESET TUNING VOLUME SELECT BASS PHONES TREBLE INPUT PUSH - ENTER SPEAKERS A B RETURN ■ Firmware update procedure Do not perform this procedure unless firmware update is necessary. Also, make sure you read the information supplied with updates before updating the firmware. SELECT/ENTER 3 Rotate SELECT/ENTER to select an item. 4 Press SELECT/ENTER to select a setting. 5 Press A (power) to set the unit to turn off and turn it on again. The new settings take effect. 1 Item Function Page Restores the default settings. 39 UPDATE Updates the firmware. 39 VERSION Checks the version of firmware currently installed on the unit. 39 INIT Restoring the default settings (INIT) y If the unit detects newer firmware over the network, “NewFwAvailable” appears as the “Information” menu item in “Network Setup”. In this case, you can also update the unit’s firmware by following the procedure in “Updating the unit’s firmware via the network” (p.40). Checking the firmware version (VERSION) ADVANCED OPERATION ADVANCED SETUP menu items When the “NETWORK” displayed on the front display, press RETURN to start firmware update. VERSION••••xx.xx Check the version of firmware currently installed on the unit. y INIT••••••CANCEL • You can also check the firmware version in “Update” (p.38) in the “Setup” menu. • It may take a while until the firmware version is displayed. Restores the default settings for the unit. Choices ALL Restores the default settings for the unit. CANCEL Does not perform an initialization. English 39 En Updating the unit’s firmware via the network New firmware that provides additional features or product improvements will be released as needed. When new firmware is available, “New Firm” is displayed for a while when the unit is turned on. Follow the steps below to update the firmware. New Firm Please Update! Note Do not operate the unit or disconnect the power cable or network cable during firmware update. Firmware update takes about 20 minutes or more (depending on your Internet connection speed). POP-UP MENU Cursor keys B/C ENTER HOME NOW PLAYING 7 The firmware update is complete. ENTER SETUP RETURN SETUP MUTE VOLUME 1 Press SETUP. 2 Use the cursor keys to select “Network Setup” and press ENTER. 3 Use the cursor keys to select “Information” and press ENTER. If new firmware is available, “NewFwAvailable” appears on the front display. Firmware ¡NewFwAvailable SP A 4 Press RETURN to return the previous state. 5 Use the cursor keys to select “Update” and press ENTER. Network ¡Perform¡Update SP A 6 To start the firmware update, press ENTER. The unit to restart and the firmware update starts. y To cancel the operation without updating the firmware, press SETUP. 40 En If “UPDATE SUCCESS” appears on the front display, press A (power) on the front panel. ADDITIONAL INFORMATION Troubleshooting Refer to the chart below if this unit does not function properly. If the problem you are experiencing is not listed below or if the instructions below do not help, set this unit to standby mode, disconnect the power cable, and contact the nearest authorized Yamaha dealer or service center. ■ General Problem See page Cause Remedy The protection circuitry has been activated three times consecutively. If the unit is in this condition, the standby indicator on the unit blinks when you try to turn on the power. As a safety precaution, capability to turn on the power is disabled. Contact your nearest Yamaha dealer or service center to request repair. The power cable is not connected or the plug is not completely inserted. Connect the power cable firmly. The protection circuitry has been activated because of a short circuit, etc. Check that the speaker wires are not touching each other and then turn the power of this unit back on. 10 This unit has been exposed to a strong external electric shock (such as lightning or strong static electricity). Set this unit to standby mode, disconnect the power cable, plug it back in after 30 seconds, then use it normally. — The power does not turn off. The internal microcomputer has frozen, due to an external electric shock (such as lightning or excessive static electricity) or to a drop in the power supply voltage. Hold down A (power) on the front panel for more than 15 seconds to initialize and reboot the unit. (If the problem persists, disconnect the power cable from the AC wall outlet and plug it again.) — No sound Incorrect input or output cable connections. Connect the cables properly. If the problem persists, the cables may be defective. 10 No appropriate input source has been selected. Select an appropriate input source with the INPUT selector on the front panel (or one of the input selection key on the remote control). 15 The SPEAKERS A/B switches are not set properly. Turn on the corresponding SPEAKERS A or SPEAKERS B. 15 Speaker connections are not secure. Secure the connections. 10 Output has been muted. Turn off the mute. 8 The Max volume or Initial volume setting is set too low. Set the setting to a higher value. The component corresponding to the selected input source is turned off or is not playing. Turn the component on and make sure it is playing. The audio output of a device connected to a digital audio input (COAXIAL/OPTICAL jacks) is set to other than PCM. Set the audio output of the connected device to PCM. The protection circuitry has been activated because of a short circuit, etc. Set the speaker impedance to match your speakers. 11 Check that the speaker wires are not touching each other and then turn the power of this unit back on. 10 This unit has become too hot. Make sure the openings on the top panel are not blocked. — The auto power standby function has turned this unit off. Change the auto power standby (“AutoPowerStdby” in the “Option” menu) to a longer setting or turn off. 35 Incorrect cable connections. Connect the cables properly. If the problem persists, the cables may be defective. 10 Incorrect setting for the speaker balance. Set the speaker balance to the appropriate position in the “Setup” menu. 16 The power does not turn on. 38 — — 41 En English Only the speaker on one side can be heard. — ADDITIONAL INFORMATION The sound suddenly goes off. — Troubleshooting Problem Cause Remedy See page There is a lack of bass and no ambience. The + and – wires are connected in reverse at the amplifier or the speakers. Connect the speaker wires to the correct + and – phase. 10 A “humming” sound can be heard. Incorrect cable connections. Connect the audio plugs firmly. If the problem persists, the cables may be defective. 10 No connection from the turntable to the GND terminal. Make the GND connection between the turntable and this unit. 10 The power of this unit is turned off, or this unit is set to standby mode. Turn on the power of this unit. The sound is degraded when listening with the headphones connected to the CD player or the tape deck connected to this unit. 42 En 15 Troubleshooting ■ Tuner Problem FM FM/ AM AM Cause Remedy See page FM stereo reception is noisy. The particular characteristics of the FM stereo broadcasts being received may cause this problem when the transmitter is too far away or the antenna input is poor. Check the antenna connections. Try using a high-quality directional FM antenna. 12 Switch to monaural mode. 17 There is distortion, and clear reception cannot be obtained even with a good FM antenna. There is multipath interference. Adjust the antenna position to eliminate the multipath interference. The desired station cannot be tuned in with the automatic tuning method. The signal is too weak. NO PRESETS is displayed. No preset stations are registered. Register stations you want to listen to as preset stations before operation. 18 The desired station cannot be tuned in with the automatic tuning method. The signal is weak or the antenna connections are loose. Tighten the AM antenna connections and orient it for the best reception. — Automatic station preset does not work. Automatic station preset is not available for AM stations. Use manual station preset. There are continuous crackling and hissing noises. The noises may result from lightning, fluorescent lamps, motors, thermostats or other electrical equipment. Try using an outdoor antenna and a ground wire. This will help somewhat, but it is difficult to eliminate all noise. There are buzzing and whining noises. A TV set is being used nearby. Move this unit away from the TV set. — Try using a high-quality directional FM antenna. 12 Try using the manual tuning method. 17 Try using the manual tuning method. 17 18 — — ADDITIONAL INFORMATION English 43 En Troubleshooting ■ Network Cause Remedy See page The network parameters (IP address) have not been obtained properly. Enable the DHCP server function on your router and set “DHCP” in the “Setup” menu to “On” on the unit. If you want to configure the network parameters manually, check that you are using an IP address which is not used by other network devices in your network. 37 The media sharing setting is not correct. Configure the sharing setting and select the unit as a device to which music contents are shared. — Some security software installed on your PC is blocking the access of the unit to your PC. Check the settings of security software installed on your PC. The unit and PC are not in the same network. Check the network connections and your router settings, and then connect the unit and the PC to the same network. 13 The MAC address filter is enabled on the unit. In “MAC Filter” in the “Setup” menu, disable the MAC address filter or specify the MAC address of your PC to allow it to access to the unit. 37 The files in the PC cannot be viewed or played back. The files are not supported by the unit or the media server. Use the file format supported by both the unit and the media server. For information about the file formats supported by the unit, see “Playing back music stored on media servers (PCs/NAS)”. 22 The Internet radio cannot be played. The selected Internet radio station is currently not available. There may be a network problem at the radio station, or the service may have been stopped. Try the station later or select another station. — The selected Internet radio station is currently broadcasting silence. Some Internet radio stations broadcast silence at certain of times of the day. Try the station later or select another station. — Access to the network is restricted by the firewall settings of your network devices (such as the router). Check the firewall settings of your network devices. The Internet radio can be played only when it passes through the port designated by each radio station. The port number varies depending on the radio station. — The MAC address filter is enabled on the unit. In “MAC Filter” in the “Network Setup”, disable the MAC address filter or specify the MAC address of your smartphone/tablet to allow it to access to the unit. 37 The unit and smartphone/tablet are not in the same network. Check the network connections and your router settings, and then connect the unit and smartphone/ tablet to the same network. — It may not be possible depending on the condition of the network. Update the firmware via the network again. Problem The network feature does not function. The unit does not detect the PC. The application for smartphone/tablet “Network Player Controller” does not detect the unit. Firmware update via the network is failed. 44 En — 39 Troubleshooting ■ Remote control Problem The remote control does not work nor function properly. Remedy See page The remote control will function within a maximum range of 6 m (20 ft) and no more than 30 degrees offaxis from the front panel. 9 Cause Wrong distance or angle. Direct sunlight or lighting (from an inverter type of fluorescent lamp, etc.) is striking the remote control sensor of this unit. Reposition this unit. The batteries are weak. Replace all batteries. Even if the remote control code is correctly set, there are some models that do not respond to the remote control. Use the supplied remote control for the components. You did not press the input selection key corresponding to the component you are trying to control. Press the input selection key corresponding to the component you are trying to control, and then press the desired remote control key(s). — — — — ADDITIONAL INFORMATION English 45 En Error indications on the front display Message Cause Remedy Access denied Access to the PC is denied. Configure the sharing settings and select the unit as a device to which music contents are shared (p.22). Access error There is a problem with the signal path from the network to the unit. Make sure your router and modem are turned on. Check SP Wires The speaker cables short circuit. Twist the bare wires of the cables firmly and connect to the unit and speakers properly. Licensing err * Access from the outside of the region for Pandora service. Access from the inside of the region for Pandora service. No content There are no playable files in the selected folder. Select a folder that contains files supported by the unit. Not signed in * The unit is not signed in to the Pandora service. Sign in the Pandora service. Please wait The unit is preparing for connecting to the network. Wait until the message disappears. If the message stays more than 3 minutes, turn off the unit and turn it on again. Suspended acct * The Pandora service account is unusable. Try another account. Unable to play The unit cannot play back the songs stored on the iPod for some reason. Check the song data. If it cannot be played on the iPod itself, the song data or storage area may be defective. The unit cannot play back the songs stored on the PC for some reason. Check if the format of files you are trying to play is supported by the unit. For information about the formats supported by the unit, see “Playing back music stored on media servers (PCs/NAS)” (p.22). If the unit supports the file format, but still cannot play back any files, the network may be overloaded with heavy traffic. Firmware update is failed. Update the firmware again. Version error * Australia 46 En model only Check the connection between the unit and your router (or hub) (p.13). Trademarks AirPlay works with iPhone, iPad, and iPod touch with iOS 4.3.3 or later, Mac with OS X Mountain Lion, and Mac and PC with iTunes 10.2.2 or later. AirPlay, iPad, iPhone, iPod touch, iTunes and Retina are trademarks of Apple Inc., registered in the U.S. and other countries. iPad Air and iPad mini are trade marks of Apple Inc. MPEG Layer-3 audio coding technology licensed from Fraunhofer IIS and Thomson. DLNA™ and DLNA CERTIFIED™ are trademarks or registered trademarks of Digital Living Network Alliance. All rights reserved. Unauthorized use is strictly prohibited. Windows™ Windows is a registered trademark of Microsoft Corporation in the United States and other countries. Internet Explorer, Windows Media Audio and Windows Media Player are either registered trademarks or trademarks of Microsoft Corporation in the United States and/or other countries. Android™ Android is a trademark of Google Inc. This receiver supports network connections. ADDITIONAL INFORMATION English 47 En Specifications AUDIO SECTION FM SECTION • Minimum RMS Output Power (40 Hz to 20 kHz, 0.2% THD, 8 ) [U.S.A, Canada, General, Korea, Australia, U.K, Europe models] ............................................................................ 100 W + 100 W [Asia model] ............................................................. 85 W + 85 W • Dynamic power per channel (IHF) (8/6/4/2 ) ............................................................................ 125/150/165/180 W • Maximum power per channel [Europe model only] (1 kHz, 0.7% THD, 4 ).......................................................115 W • IEC power [Europe model only] (1 kHz, 0.2% THD, 8 ).......................................................110 W • Damping factor (SPEAKERS A) 1 kHz, 8 ....................................................................120 or more • Maximum effective output power (JEITA) (1 kHz, 10% THD, 8 ) [General model] ...................................................... 140 W or more [Asia model]............................................................ 125 W or more • Input sensitivity/Input impedance CD, etc. .................................................................. 500 mV/47 k • Maximum input signal CD, etc. (1 kHz, 0.5% THD).....................................2.2 V or more • Output level/Output impedance CD, etc. (Input 1 kHz, 500 mV) REC OUT............................................................ 500 mV/2.2 k PHONES (8 load)............................................. 470 mV/470 • Frequency response CD, etc. (20 Hz to 20 kHz) ........................................... 0 ± 0.5 dB CD, etc. (10 Hz to 100 kHz) ...................................0 +0.5/-3.0 dB • Total harmonic distortion CD, etc. to SPEAKERS (20 Hz to 20 kHz, 50.0 W, 8 ) ...............................0.2% or less • Signal to Noise Ratio (IHF-A Network) CD, etc. (input shorted, 500 mV)........................... 100 dB or more • Residual noise (IHF-A network) ............................................. 70 µV • Channel separation CD, etc. (5.1 k input shorted, 1/10 kHz) .......... 65/50 dB or more • Tone control characteristics BASS Boost/Cut (50 Hz) .......................................................... ± 10 dB TREBLE Boost/Cut (20 kHz) ........................................................ ± 10 dB • Digital input OPTICAL COAXIAL Support audio sample rate........... 32/44.1/48/88.2/96/176.4/192 kHz • Tuning range [U.S.A. and Canada models] ........................... 87.5 to 107.9 MHz [Asia and General models] ........ 87.5/87.50 to 108.0/108.00 MHz [U.K., Europe, Korea, Australia models] .... 87.50 to 108.00 MHz • 50 dB quieting sensitivity (IHF, 1 kHz, 100% MOD.) Mono .................................................................. 3.0 µV (20.8 dBf) • Signal to noise ratio (IHF) Mono/Stereo .............................................................. 72 dB/70 dB • Harmonic distortion (1 kHz) Mono/Stereo ................................................................. 0.3%/0.5% Antenna input ...................................................... 75 unbalanced 48 En AM SECTION • Tuning range [U.S.A. and Canada models] ............................... 530 to 1710 kHz [Asia and General models] .................. 530/531 to 1710/1611 kHz [U.K, Europe, Korea, Australia models] .............. 531 to 1611 kHz GENERAL • Power supply [U.S.A. and Canada models] .............................. AC 120 V, 60 Hz [General model] ....................... AC 110-120/220-240 V, 50/60 Hz [Korea model]....................................................... AC 220 V, 60Hz [Australia model] ................................................ AC 240 V, 50 Hz [U.K. and Europe models] .................................. AC 230 V, 50 Hz [Asia model] .......................................... AC 220-240 V, 50/60 Hz • Power consumption [U.S.A, Canada, General, Korea, Australia, U.K. and Europe models] ........................................................................................... 200 W [Asia model] ........................................................................ 165 W • Standby power consumption .................................................. 0.1 W Network standby on.................................................................. 2.0 W • Dimensions (W H D) ................................ 435 141 333 mm (17-1/8” 5-1/2” 13-1/8”) • Weight.................................................................... 6.95 kg (15.3 lbs) * Specifications are subject to change without notice. Index Index A G ADVANCED SETUP menu.......................................... 39 AirPlay........................................................................... 27 AM antenna connection ................................................. 12 AM radio listening ......................................................... 17 Audio device connection ............................................... 10 Audio file format (PC/NAS).......................................... 22 AUDIO jack............................................................... 7, 10 Auto Power Standby (Option menu) ............................. 34 Auto Preset (FM radio, Option menu) ........................... 18 Automatic station preset (FM radio).............................. 18 AutoPowerStdby (Option menu) ................................... 34 Gateway ......................................................................... 37 B Balance (Setup menu).............................................. 16, 38 Banana plug ................................................................... 11 Basic playback operation ............................................... 15 BASS (Tone Control) .................................................... 16 Batteries ........................................................................... 9 Bi-Amp (Speaker connection) ....................................... 11 Bi-wire (Speaker connection) ........................................ 11 Bookmark (Internet Radio)............................................ 25 C CAT-5 cable................................................................... 13 Clear Preset (FM/AM radio, Option menu)................... 19 Clock Time (Radio Data System).................................. 20 COAXIAL jack.......................................................... 7, 10 D E Error indication .............................................................. 46 F I ID (Network Setup, Setup menu)................................... 38 Indicator (part names and functions) ............................... 6 Information (Network Setup, Setup menu).................... 37 Information display (front display) .................................. 6 Information switching (front display) ............................ 33 INIT (ADVANCED SETUP menu) .............................. 39 Initial Volume (Setup menu).......................................... 38 Input selection key ........................................................... 8 Input Trim (Option menu).............................................. 34 Internet radio listening ................................................... 25 IP Address (Information, Setup menu) .......................... 37 IP Address (Network Setup, Setup menu) ..................... 37 iPod content playback (AirPlay) .................................... 27 iTunes content playback (AirPlay) ................................ 27 M MAC Address (Information, Setup menu)..................... 37 MAC Address (MAC Filter, Setup menu) ..................... 37 MAC Filter (Network Setup, Setup menu) .................... 37 Manual station preset (FM/AM radio) ........................... 18 Max Volume (Setup menu)............................................ 38 Media sharing setup ....................................................... 22 MODE key ....................................................................... 8 Monaural reception (FM radio)...................................... 17 MUTE key........................................................................ 8 N NAS (Network Attached Storage) connection............... 13 NAS content playback ................................................... 22 Net Standby (Network Setup, Setup menu) ................... 37 Network cable ................................................................ 13 Network connection ....................................................... 13 Network information...................................................... 37 Network Name (Network Setup, Setup menu) .............. 38 Network Setup (Setup menu) ......................................... 37 Network Update (Network Setup, Setup menu) ............ 38 NewFwAvailable ........................................................... 40 NOW PLAYING key (Internet radio) ........................... 25 NOW PLAYING key (PC/NAS) ................................... 23 O OPTICAL jack ................................................................. 7 OPTION key .................................................................... 8 Option menu................................................................... 34 P Pandora service account........................................... 29, 32 49 En English Filter (MAC Filter, Setup menu) ................................... 37 Firmware update ............................................................ 40 Firmware update (network) ..................................... 39, 40 Firmware version check........................................... 38, 39 FM antenna connection.................................................. 12 FM radio listening.......................................................... 17 FM/AM radio tuning...................................................... 17 Format (Signal Info, Option menu) ............................... 35 Headphones ...................................................................... 5 HOME key (Internet radio)............................................ 25 HOME key (Pandora) .................................................... 30 HOME key (PC/NAS) ................................................... 23 ADDITIONAL INFORMATION DC OUT (Setup menu) .................................................. 38 DC OUT jack ................................................................... 7 Default Gateway (Information, Setup menu) ................ 37 Default Gateway (IP Address, Setup menu).................. 37 DHCP (IP Address, Setup menu) .................................. 37 Digital Media Controller (DMC)................................... 37 DIMMER key (Front display) ......................................... 6 DISPLAY key........................................................ 5, 8, 33 DLNA ............................................................................ 22 DMC Control (Network Setup, Setup menu) ................ 37 DNS Server (Information, Setup menu) ........................ 37 DNS Server (IP Address, Setup menu).......................... 37 H Index Pandora service listening............................................... 29 Pandora service playback .............................................. 31 Pandora station .............................................................. 30 Pandora station editing .................................................. 32 PC connection................................................................ 13 PC content playback ...................................................... 22 Perform Update (Network Setup, Setup menu)............. 38 PHONES jack.................................................................. 5 Playback device connection .......................................... 10 Power cable connection................................................. 13 Power indicator (front panel)........................................... 5 Power Mode (DC OUT, Setup menu) ........................... 38 Preset station selection (FM/AM radio) ........................ 19 Program Service (Radio Data System).......................... 20 Program Type (Radio Data System).............................. 20 R Radio Data System (FM radio)...................................... 20 Radio Data System information .................................... 20 Radio Data System tuning ............................................. 20 Radio Text (Radio Data System)................................... 20 Rear panel (part names and functions) ............................ 7 REC (REC OUT) jack ................................................... 10 Recording device connection ........................................ 10 Remote control (part names and functions)..................... 8 Remote control range ...................................................... 9 Remote control signal transmitter (remote control) ........ 8 Rename (network name)................................................ 38 Repeat (PC/NAS) .......................................................... 24 Router connection.......................................................... 13 S Sampling (Signal Info, Option menu) ........................... 35 SETUP key ...................................................................... 8 Setup menu .................................................................... 36 Shuffle (PC/NAS).......................................................... 24 Signal Info (Option menu)............................................. 35 Signal information ......................................................... 35 SLEEP key .................................................................... 16 Sleep timer..................................................................... 16 Speaker cable connection .............................................. 11 Speaker indicator (front display) ..................................... 6 Spotify ........................................................................... 21 Station preset (FM/AM radio) ....................................... 18 Status (Information, Setup menu).................................. 37 STP network cable......................................................... 13 Subnet Mask (Information, Setup menu) ...................... 37 Subnet Mask (IP Address, Setup menu)........................ 37 T TONE CONTROL......................................................... TP (Traffic Program)..................................................... Traffic information (Radio Data System)...................... Traffic Program (FM radio, Option menu).................... TREBLE (Tone Control)............................................... 16 20 20 20 16 U UPDATE (ADVANCED SETUP menu) ...................... 39 Update (Network Setup)................................................ 38 50 En V VERSION (ADVANCED SETUP menu)..................... Version (Network Setup, Setup menu) .......................... Volume trim (Option menu) .......................................... vTuner ID (Information, Setup menu)........................... 39 38 34 37 ❚ Information about third party software licenses This product incorporates the following third party software. For information (copyright, etc) about each software, please read the terms and conditions stated below. By using this product, you will be deemed to have accepted the terms and conditions. ■ About ASN.1 object dumping code ASN.1 object dumping code, copyright Peter Gutmann <[email protected]>, based on ASN.1 dump program by David Kemp <[email protected]>, with contributions from various people including Matthew Hamrick <[email protected]>, Bruno Couillard <[email protected]>, Hallvard Furuseth <[email protected]>, Geoff Thorpe <[email protected]>, David Boyce <[email protected]>, John Hughes <[email protected]>, Life is hard, and then you die <[email protected]>, Hans-Olof Hermansson <[email protected]>, Tor Rustad <[email protected]>, Kjetil Barvik <[email protected]>, James Sweeny <[email protected]>, and several other people whose names I’ve misplaced. This code grew slowly over time without much design or planning, with features being tacked on as required. It’s not representative of my normal coding style. ■ About FLAC codec Library Copyright © 2000,2001,2002,2003,2004,2005,2006,2007, 2008,2009 Josh Coalson Redistribution and use in source and binary forms, with or without modification, are permitted provided that the following conditions are met: Redistributions of source code must retain the above copyright notice, this list of conditions and the following disclaimer. Redistributions in binary form must reproduce the above copyright notice, this list of conditions and the following disclaimer in the documentation and/or other materials provided with the distribution. Neither the name of the Xiph.org Foundation nor the names of its contributors may be used to endorse or promote products derived from this software without specific prior written permission. THIS SOFTWARE IS PROVIDED BY THE COPYRIGHT HOLDERS AND CONTRIBUTORS “AS IS” AND ANY EXPRESS OR IMPLIED WARRANTIES, INCLUDING, BUT NOT LIMITED TO, THE IMPLIED WARRANTIES OF MERCHANTABILITY AND FITNESS FOR A PARTICULAR PURPOSE ARE DISCLAIMED. IN NO EVENT SHALL THE FOUNDATION OR CONTRIBUTORS BE LIABLE FOR ANY DIRECT, INDIRECT, INCIDENTAL, SPECIAL, EXEMPLARY, OR CONSEQUENTIAL DAMAGES (INCLUDING, BUT NOT LIMITED TO, PROCUREMENT OF SUBSTITUTE GOODS OR SERVICES; LOSS OF USE, DATA, OR PROFITS; OR BUSINESS INTERRUPTION) HOWEVER CAUSED AND ON ANY THEORY OF LIABILITY, WHETHER IN CONTRACT, STRICT LIABILITY, OR TORT (INCLUDING NEGLIGENCE OR OTHERWISE) ARISING IN ANY WAY OUT OF THE USE OF THIS SOFTWARE, EVEN IF ADVISED OF THE POSSIBILITY OF SUCH DAMAGE. ■ About libexpat Copyright © 1998, 1999, 2000 Thai Open Source Software Center Ltd and Clark Cooper Copyright © 2001, 2002, 2003, 2004, 2005, 2006 Expat maintainers. Permission is hereby granted, free of charge, to any person obtaining a copy of this software and associated documentation files (the “Software”), to deal in the Software without restriction, including without limitation the rights to use, copy, modify, merge, publish, distribute, sublicense, and/or sell copies of the Software, and to permit persons to whom the Software is furnished to do so, subject to the following conditions: The above copyright notice and this permission notice shall be included in all copies or substantial portions of the Software. THE SOFTWARE IS PROVIDED “AS IS”, WITHOUT WARRANTY OF ANY KIND, EXPRESS OR IMPLIED, INCLUDING BUT NOT LIMITED TO THE WARRANTIES OF MERCHANTABILITY, FITNESS FOR A PARTICULAR PURPOSE AND NONINFRINGEMENT. IN NO EVENT SHALL THE AUTHORS OR COPYRIGHT HOLDERS BE LIABLE FOR ANY CLAIM, DAMAGES OR OTHER LIABILITY, WHETHER IN AN ACTION OF CONTRACT, TORT OR OTHERWISE, ARISING FROM, OUT OF OR IN CONNECTION WITH THE SOFTWARE OR THE USE OR OTHER DEALINGS IN THE SOFTWARE. ■ About The Independent JPEG Group’s JPEG software The Independent JPEG Group’s JPEG software Copyright © 1991-2010, Thomas G. Lane, Guido i Vollbeding. All Rights Reserved except as specified below. The authors make NO WARRANTY or representation, either express or implied, with respect to this software, its quality, accuracy, merchantability, or fitness for a particular purpose. This software is provided “AS IS”, and you, its user, assume the entire risk as to its quality and accuracy. Permission is hereby granted to use, copy, modify, and distribute this software (or portions thereof) for any purpose, without fee, subject to these conditions: (1) If any part of the source code for this software is distributed, then this README file must be included, with this copyright and no-warranty notice unaltered; and any additions, deletions, or changes to the original files must be clearly indicated in accompanying documentation. The above copyright notice and this permission notice shall be included in all copies or substantial portions of the Software. THE SOFTWARE IS PROVIDED “AS IS”, WITHOUT WARRANTY OF ANY KIND, EXPRESS OR IMPLIED, INCLUDING BUT NOT LIMITED TO THE WARRANTIES OF MERCHANTABILITY, FITNESS FOR A PARTICULAR PURPOSE AND NONINFRINGEMENT. IN NO EVENT SHALL THE AUTHORS OR COPYRIGHT HOLDERS BE LIABLE FOR ANY CLAIM, DAMAGES OR OTHER LIABILITY, WHETHER IN AN ACTION OF CONTRACT, TORT OR OTHERWISE, ARISING FROM, OUT OF OR IN CONNECTION WITH THE SOFTWARE OR THE USE OR OTHER DEALINGS IN THE SOFTWARE. ■ About Network Copyright © 1988 Stephen Deering. (2) If only executable code is distributed, then the accompanying documentation must state that “this software is based in part on the work of the Independent JPEG Group”. Copyright © 1992, 1993 (3) Permission for use of this software is granted only if the user accepts full responsibility for any undesirable consequences; the authors accept NO LIABILITY for damages of any kind. Copyright © 1985, 1986, 1993 These conditions apply to any software derived from or based on the IJG code, not just to the unmodified library. If you use our work, you ought to acknowledge us. Redistribution and use in source and binary forms, with or without modification, are permitted provided that the following conditions are met: Permission is NOT granted for the use of any IJG author’s name or company name in advertising or publicity relating to this software or products derived from it. This software may be referred to only as “the Independent JPEG Group’s software”. 1. Redistributions of source code must retain the above copyright notice, this list of conditions and the following disclaimer. We specifically permit and encourage the use of this software as the basis of commercial products, provided that all warranty or liability claims are assumed by the product vendor. ■ About JsonCpp The Regents of the University of California. All rights reserved. The Regents of the University of California. All rights reserved. 2. Redistributions in binary form must reproduce the above copyright notice, this list of conditions and the following disclaimer in the documentation and/or other materials provided with the distribution. 3. All advertising materials mentioning features or use of this software must display the following acknowledgement: Copyright © 2007-2010 Baptiste Lepilleur Permission is hereby granted, free of charge, to any person obtaining a copy of this software and associated documentation files (the “Software”), to deal in the Software without restriction, including without limitation the rights to use, copy, modify, merge, publish, distribute, sublicense, and/or sell copies of the Software, and to permit persons to whom the Software is furnished to do so, subject to the following conditions: ii This product includes software developed by the University of California, Berkeley and its contributors. 4. Neither the name of the University nor the names of its contributors may be used to endorse or promote products derived from this software without specific prior written permission. THIS SOFTWARE IS PROVIDED BY THE REGENTS AND CONTRIBUTORS “AS IS” AND ANY EXPRESS OR IMPLIED WARRANTIES, INCLUDING, BUT NOT LIMITED TO, THE IMPLIED WARRANTIES OF MERCHANTABILITY AND FITNESS FOR A PARTICULAR PURPOSE ARE DISCLAIMED. IN NO EVENT SHALL THE REGENTS OR CONTRIBUTORS BE LIABLE FOR ANY DIRECT, INDIRECT, INCIDENTAL, SPECIAL, EXEMPLARY, OR CONSEQUENTIAL DAMAGES (INCLUDING, BUT NOT LIMITED TO, PROCUREMENT OF SUBSTITUTE GOODS OR SERVICES; LOSS OF USE, DATA, OR PROFITS; OR BUSINESS INTERRUPTION) HOWEVER CAUSED AND ON ANY THEORY OF LIABILITY, WHETHER IN CONTRACT, STRICT LIABILITY, OR TORT (INCLUDING NEGLIGENCE OR OTHERWISE) ARISING IN ANY WAY OUT OF THE USE OF THIS SOFTWARE, EVEN IF ADVISED OF THE POSSIBILITY OF SUCH DAMAGE. Copyright © 1982, 1986 Regents of the University of California. All rights reserved. Copyright © 1982, 1986, 1988 Regents of the University of California. All rights reserved. Redistribution and use in source and binary forms are permitted provided that the above copyright notice and this paragraph are duplicated in all such forms and that any documentation, advertising materials, and other materials related to such distribution and use acknowledge that the software was developed by the University of California, Berkeley. The name of the University may not be used to endorse or promote products derived from this software without specific prior written permission. THIS SOFTWARE IS PROVIDED “AS IS” AND WITHOUT ANY EXPRESS OR IMPLIED WARRANTIES, INCLUDING, WITHOUT LIMITATION, THE IMPLIED WARRANTIES OF MERCHANTIBILITY AND FITNESS FOR A PARTICULAR PURPOSE. ■ About PNG Reference Library ibpng versions 1.2.6, August 15, 2004, through 1.4.5, December 9, 2010, are Copyright © 2004, 2006-2010 Glenn Randers-Pehrson, and are distributed according to the same disclaimer and license as libpng-1.2.5 with the following individual added to the list of Contributing Authors Cosmin Truta libpng versions 1.0.7, July 1, 2000, through 1.2.5 October 3, 2002, are Copyright © 2000-2002 Glenn Randers-Pehrson, and are distributed according to the same disclaimer and license as libpng-1.0.6 with the following individuals added to the list of Contributing Authors Simon-Pierre Cadieux Eric S. Raymond Gilles Vollant and with the following additions to the disclaimer: There is no warranty against interference with your enjoyment of the library or against infringement. There is no warranty that our efforts or the library will fulfill any of your particular purposes or needs. This library is provided with all faults, and the entire risk of satisfactory quality, performance, accuracy, and effort is with the user. libpng versions 0.97, January 1998, through 1.0.6, March 20, 2000, are Copyright © 1998, 1999 Glenn RandersPehrson, and are distributed according to the same disclaimer and license as libpng-0.96, with the following individuals added to the list of Contributing Authors: Tom Lane Glenn Randers-Pehrson Willem van Schaik libpng versions 0.89, June 1996, through 0.96, May 1997, are Copyright © 1996, 1997 Andreas Dilger Distributed according to the same disclaimer and license as libpng-0.88, with the following individuals added to the list of Contributing Authors: John Bowler Kevin Bracey Sam Bushell Magnus Holmgren Greg Roelofs Tom Tanner libpng versions 0.5, May 1995, through 0.88, January 1996, are Copyright © 1995, 1996 Guy Eric Schalnat, Group 42, Inc. For the purposes of this copyright and license, “Contributing Authors” is defined as the following set of individuals: Andreas Dilger Dave Martindale Guy Eric Schalnat Paul Schmidt Tim Wegner The PNG Reference Library is supplied “AS IS”. The Contributing Authors and Group 42, Inc. disclaim all warranties, expressed or implied, including, without limitation, the warranties of merchantability and of fitness for any purpose. The Contributing Authors and Group 42, Inc. assume no liability for direct, indirect, incidental, special, exemplary, or consequential damages, which may iii result from the use of the PNG Reference Library, even if advised of the possibility of such damage. Permission is hereby granted to use, copy, modify, and distribute this source code, or portions hereof, for any purpose, without fee, subject to the following restrictions: 1. The origin of this source code must not be misrepresented. 2. Altered versions must be plainly marked as such and must not be misrepresented as being the original source. 3. This Copyright notice may not be removed or altered from any source or altered source distribution. The Contributing Authors and Group 42, Inc. specifically permit, without fee, and encourage the use of this source code as a component to supporting the PNG file format in commercial products. If you use this source code in a product, acknowledgment is not required but would be appreciated. ■ About RC4 Algorithm Copyright Mocana Corp 2003-2005. All Rights Reserved. MERCHANTABILITY AND FITNESS FOR A PARTICULAR PURPOSE ARE DISCLAIMED. IN NO EVENT SHALL THE COPYRIGHT OWNER OR CONTRIBUTORS BE LIABLE FOR ANY DIRECT, INDIRECT, INCIDENTAL, SPECIAL, EXEMPLARY, OR CONSEQUENTIAL DAMAGES (INCLUDING, BUT NOT LIMITED TO, PROCUREMENT OF SUBSTITUTE GOODS OR SERVICES; LOSS OF USE, DATA, OR PROFITS; OR BUSINESS INTERRUPTION) HOWEVER CAUSED AND ON ANY THEORY OF LIABILITY, WHETHER IN CONTRACT, STRICT LIABILITY, OR TORT (INCLUDING NEGLIGENCE OR OTHERWISE) ARISING IN ANY WAY OUT OF THE USE OF THIS SOFTWARE, EVEN IF ADVISED OF THE POSSIBILITY OF SUCH DAMAGE. ■ About zlib Library Copyright notice: © 1995-2010 Jean-loup Gailly and Mark Adler This software is provided ‘as-is’, without any express or implied warranty. In no event will the authors be held liable for any damages arising from the use of this software. Proprietary and Confidential Material. ■ About WPA Supplicant Copyright © 2003-2008, Jouni Malinen <[email protected]> and contributors Permission is granted to anyone to use this software for any purpose, including commercial applications, and to alter it and redistribute it freely, subject to the following restrictions: Redistribution and use in source and binary forms, with or without modification, are permitted provided that the following conditions are met: 1. The origin of this software must not be misrepresented; you must not claim that you wrote the original software. If you use this software in a product, an acknowledgment in the product documentation would be appreciated but is not required. 1. Redistributions of source code must retain the above copyright notice, this list of conditions and the following disclaimer. 2. Altered source versions must be plainly marked as such, and must not be misrepresented as being the original software. 2. Redistributions in binary form must reproduce the above copyright notice, this list of conditions and the following disclaimer in the documentation and/or other materials provided with the distribution. 3. This notice may not be removed or altered from any source distribution. All Rights Reserved. ■ About Apple Lossless Audio Codec Copyright © 2011 Apple Inc. All rights reserved. 3. Neither the name(s) of the above-listed copyright holder(s) nor the names of its contributors may be used to endorse or promote products derived from this software without specific prior written permission. THIS SOFTWARE IS PROVIDED BY THE COPYRIGHT HOLDERS AND CONTRIBUTORS “AS IS” AND ANY EXPRESS OR IMPLIED WARRANTIES, INCLUDING, BUT NOT LIMITED TO, THE IMPLIED WARRANTIES OF iv Licensed under the Apache License, Version 2.0 (the “License”); you may not use this file except in compliance with the License. You may obtain a copy of the License at http://www.apache.org/licenses/LICENSE-2.0 Unless required by applicable law or agreed to in writing, software distributed under the License is distributed on an “AS IS” BASIS, WITHOUT WARRANTIES OR CONDITIONS OF ANY KIND, either express or implied. See the License for the specific language governing permissions and limitations under the License. ■ Boost http://www.boost.org/ Boost Software License - Version 1.0 - August 17th, 2003 Permission is hereby granted, free of charge, to any person or organization obtaining a copy of the software and accompanying documentation covered by this license (the “Software”) to use, reproduce, display, distribute, execute, and transmit the Software, and to prepare derivative works of the Software, and to permit third-parties to whom the Software is furnished to do so, all subject to the following: The copyright notices in the Software and this entire statement, including the above license grant, this restriction and the following disclaimer, must be included in all copies of the Software, in whole or in part, and all derivative works of the Software, unless such copies or derivative works are solely in the form of machineexecutable object code generated by a source language processor. THE SOFTWARE IS PROVIDED “AS IS”, WITHOUT WARRANTY OF ANY KIND, EXPRESS OR IMPLIED, INCLUDING BUT NOT LIMITED TO THE WARRANTIES OF MERCHANTABILITY, FITNESS FOR A PARTICULAR PURPOSE, TITLE AND NONINFRINGEMENT. IN NO EVENT SHALL THE COPYRIGHT HOLDERS OR ANYONE DISTRIBUTING THE SOFTWARE BE LIABLE FOR ANY DAMAGES OR OTHER LIABILITY, WHETHER IN CONTRACT, TORT OR OTHERWISE, ARISING FROM, OUT OF OR IN CONNECTION WITH THE SOFTWARE OR THE USE OR OTHER DEALINGS IN THE SOFTWARE. ■ Expat http://www.jclark.com/xml/expat.html Expat License. Copyright © 1998, 1999, 2000 Thai Open Source Software Center Ltd Permission is hereby granted, free of charge, to any person obtaining a copy of this software and associated documentation files (the “Software”), to deal in the Software without restriction, including without limitation the rights to use, copy, modify, merge, publish, distribute, sublicense, and/or sell copies of the Software, and to permit persons to whom the Software is furnished to do so, subject to the following conditions: The above copyright notice and this permission notice shall be included in all copies or substantial portions of the Software. THE SOFTWARE IS PROVIDED “AS IS”, WITHOUT WARRANTY OF ANY KIND, EXPRESS OR IMPLIED, INCLUDING BUT NOT LIMITED TO THE WARRANTIES OF MERCHANTABILITY, FITNESS FOR A PARTICULAR PURPOSE AND NONINFRINGEMENT. IN NO EVENT SHALL THE AUTHORS OR COPYRIGHT HOLDERS BE LIABLE FOR ANY CLAIM, DAMAGES OR OTHER LIABILITY, WHETHER IN AN ACTION OF CONTRACT, TORT OR OTHERWISE, ARISING FROM, OUT OF OR IN CONNECTION WITH THE SOFTWARE OR THE USE OR OTHER DEALINGS IN THE SOFTWARE. ■ FastDelegate http://www.codeproject.com/KB/cpp/FastDelegate.aspx THE WORK (AS DEFINED BELOW) IS PROVIDED UNDER THE TERMS OF THIS CODE PROJECT OPEN LICENSE (“LICENSE”). THE WORK IS PROTECTED BY COPYRIGHT AND/OR OTHER APPLICABLE LAW. ANY USE OF THE WORK OTHER THAN AS AUTHORIZED UNDER THIS LICENSE OR COPYRIGHT LAW IS PROHIBITED. BY EXERCISING ANY RIGHTS TO THE WORK PROVIDED HEREIN, YOU ACCEPT AND AGREE TO BE BOUND BY THE TERMS OF THIS LICENSE. THE AUTHOR GRANTS YOU THE RIGHTS CONTAINED HEREIN IN CONSIDERATION OF YOUR ACCEPTANCE OF SUCH TERMS AND CONDITIONS. IF YOU DO NOT AGREE TO ACCEPT AND BE BOUND BY THE TERMS OF THIS LICENSE, YOU CANNOT MAKE ANY USE OF THE WORK. 1. Definitions. a. “Articles” means, collectively, all articles written by Author which describes how the Source Code and Executable Files for the Work may be used by a user. b. “Author” means the individual or entity that offers the Work under the terms of this License. c. “Derivative Work” means a work based upon the Work or upon the Work and other pre-existing works. d. “Executable Files” refer to the executables, binary files, configuration and any required data files included in the Work. e. “Publisher” means the provider of the website, magazine, CD-ROM, DVD or other medium from or by which the Work is obtained by You. f. “Source Code” refers to the collection of source code and configuration files used to create the Executable Files. g. “Standard Version” refers to such a Work if it has not been modified, or has been modified in accordance with the consent of the Author, such consent being in the full discretion of the Author. v h. “Work” refers to the collection of files distributed by the Publisher, including the Source Code, Executable Files, binaries, data files, documentation, whitepapers and the Articles. i. “You” is you, an individual or entity wishing to use the Work and exercise your rights under this License. 2. Fair Use/Fair Use Rights. Nothing in this License is intended to reduce, limit, or restrict any rights arising from fair use, fair dealing, first sale or other limitations on the exclusive rights of the copyright owner under copyright law or other applicable laws. 3. License Grant. Subject to the terms and conditions of this License, the Author hereby grants You a worldwide, royalty-free, non-exclusive, perpetual (for the duration of the applicable copyright) license to exercise the rights in the Work as stated below: a. You may use the standard version of the Source Code or Executable Files in Your own applications. b. You may apply bug fixes, portability fixes and other modifications obtained from the Public Domain or from the Author. A Work modified in such a way shall still be considered the standard version and will be subject to this License. c. You may otherwise modify Your copy of this Work (excluding the Articles) in any way to create a Derivative Work, provided that You insert a prominent notice in each changed file stating how, when and where You changed that file. d. You may distribute the standard version of the Executable Files and Source Code or Derivative Work in aggregate with other (possibly commercial) programs as part of a larger (possibly commercial) software distribution. e. The Articles discussing the Work published in any form by the author may not be distributed or republished without the Author’s consent. The author retains copyright to any such Articles. You may use the Executable Files and Source Code pursuant to this License but you may not repost or republish or otherwise distribute or make available the Articles, without the prior written consent of the Author. Any subroutines or modules supplied by You and linked into the Source Code or Executable Files this Work shall not be considered part of this Work and will not be subject to the terms of this License. 4. Patent License. Subject to the terms and conditions of this License, each Author hereby grants to You a perpetual, worldwide, non-exclusive, no-charge, royalty-free, irrevocable (except as stated in this section) patent license to make, have made, use, import, and otherwise transfer the Work. vi 5. Restrictions. The license granted in Section 3 above is expressly made subject to and limited by the following restrictions: a. You agree not to remove any of the original copyright, patent, trademark, and attribution notices and associated disclaimers that may appear in the Source Code or Executable Files. b. You agree not to advertise or in any way imply that this Work is a product of Your own. c. The name of the Author may not be used to endorse or promote products derived from the Work without the prior written consent of the Author. d. You agree not to sell, lease, or rent any part of the Work. This does not restrict you from including the Work or any part of the Work inside a larger software distribution that itself is being sold. The Work by itself, though, cannot be sold, leased or rented. e. You may distribute the Executable Files and Source Code only under the terms of this License, and You must include a copy of, or the Uniform Resource Identifier for, this License with every copy of the Executable Files or Source Code You distribute and ensure that anyone receiving such Executable Files and Source Code agrees that the terms of this License apply to such Executable Files and/or Source Code. You may not offer or impose any terms on the Work that alter or restrict the terms of this License or the recipients’ exercise of the rights granted hereunder. You may not sublicense the Work. You must keep intact all notices that refer to this License and to the disclaimer of warranties. You may not distribute the Executable Files or Source Code with any technological measures that control access or use of the Work in a manner inconsistent with the terms of this License. f. You agree not to use the Work for illegal, immoral or improper purposes, or on pages containing illegal, immoral or improper material. The Work is subject to applicable export laws. You agree to comply with all such laws and regulations that may apply to the Work after Your receipt of the Work. 6. Representations, Warranties and Disclaimer. THIS WORK IS PROVIDED “AS IS”, “WHERE IS” AND “AS AVAILABLE”, WITHOUT ANY EXPRESS OR IMPLIED WARRANTIES OR CONDITIONS OR GUARANTEES. YOU, THE USER, ASSUME ALL RISK IN ITS USE, INCLUDING COPYRIGHT INFRINGEMENT, PATENT INFRINGEMENT, SUITABILITY, ETC. AUTHOR EXPRESSLY DISCLAIMS ALL EXPRESS, IMPLIED OR STATUTORY WARRANTIES OR CONDITIONS, INCLUDING WITHOUT LIMITATION, WARRANTIES OR CONDITIONS OF MERCHANTABILITY, MERCHANTABLE QUALITY OR FITNESS FOR A PARTICULAR PURPOSE, OR ANY WARRANTY OF TITLE OR NON-INFRINGEMENT, OR THAT THE WORK (OR ANY PORTION THEREOF) IS CORRECT, USEFUL, BUG-FREE OR FREE OF VIRUSES. YOU MUST PASS THIS DISCLAIMER ON WHENEVER YOU DISTRIBUTE THE WORK OR DERIVATIVE WORKS. 7. Indemnity. You agree to defend, indemnify and hold harmless the Author and the Publisher from and against any claims, suits, losses, damages, liabilities, costs, and expenses (including reasonable legal or attorneys’ fees) resulting from or relating to any use of the Work by You. 8. Limitation on Liability. EXCEPT TO THE EXTENT REQUIRED BY APPLICABLE LAW, IN NO EVENT WILL THE AUTHOR OR THE PUBLISHER BE LIABLE TO YOU ON ANY LEGAL THEORY FOR ANY SPECIAL, INCIDENTAL, CONSEQUENTIAL, PUNITIVE OR EXEMPLARY DAMAGES ARISING OUT OF THIS LICENSE OR THE USE OF THE WORK OR OTHERWISE, EVEN IF THE AUTHOR OR THE PUBLISHER HAS BEEN ADVISED OF THE POSSIBILITY OF SUCH DAMAGES. 9. Termination. a. This License and the rights granted hereunder will terminate automatically upon any breach by You of any term of this License. Individuals or entities who have received Derivative Works from You under this License, however, will not have their licenses terminated provided such individuals or entities remain in full compliance with those licenses. Sections 1, 2, 6, 7, 8, 9, 10 and 11 will survive any termination of this License. b. If You bring a copyright, trademark, patent or any other infringement claim against any contributor over infringements You claim are made by the Work, your License from such contributor to the Work ends automatically. c. Subject to the above terms and conditions, this License is perpetual (for the duration of the applicable copyright in the Work). Notwithstanding the above, the Author reserves the right to release the Work under different license terms or to stop distributing the Work at any time; provided, however that any such election will not serve to withdraw this License (or any other license that has been, or is required to be, granted under the terms of this License), and this License will continue in full force and effect unless terminated as stated above. 10. Publisher. The parties hereby confirm that the Publisher shall not, under any circumstances, be responsible for and shall not have any liability in respect of the subject matter of this License. The Publisher makes no warranty whatsoever in connection with the Work and shall not be liable to You or any party on any legal theory for any damages whatsoever, including without limitation any general, special, incidental or consequential damages arising in connection to this license. The Publisher reserves the right to cease making the Work available to You at any time without notice 11. Miscellaneous. a. This License shall be governed by the laws of the location of the head office of the Author or if the Author is an individual, the laws of location of the principal place of residence of the Author. b. If any provision of this License is invalid or unenforceable under applicable law, it shall not affect the validity or enforceability of the remainder of the terms of this License, and without further action by the parties to this License, such provision shall be reformed to the minimum extent necessary to make such provision valid and enforceable. c. No term or provision of this License shall be deemed waived and no breach consented to unless such waiver or consent shall be in writing and signed by the party to be charged with such waiver or consent. d. This License constitutes the entire agreement between the parties with respect to the Work licensed herein. There are no understandings, agreements or representations with respect to the Work not specified herein. The Author shall not be bound by any additional provisions that may appear in any communication from You. This License may not be modified without the mutual written agreement of the Author and You ■ libogg http://www.xiph.org/ogg/ Copyright © 2002, Xiph.org Foundation Redistribution and use in source and binary forms, with or without modification, are permitted provided that the following conditions are met: • Redistributions of source code must retain the above copyright notice, this list of conditions and the following disclaimer. • Redistributions in binary form must reproduce the above copyright notice, this list of conditions and the following disclaimer in the documentation and/or other materials provided with the distribution. • Neither the name of the Xiph.org Foundation nor the names of its contributors may be used to endorse or promote products derived from this software without specific prior written permission. THIS SOFTWARE IS PROVIDED BY THE COPYRIGHT HOLDERS AND CONTRIBUTORS “AS IS” AND ANY EXPRESS OR IMPLIED WARRANTIES, INCLUDING, BUT NOT LIMITED TO, THE IMPLIED WARRANTIES OF MERCHANTABILITY AND FITNESS FOR A PARTICULAR PURPOSE ARE DISCLAIMED. IN NO vii EVENT SHALL THE FOUNDATION OR CONTRIBUTORS BE LIABLE FOR ANY DIRECT, INDIRECT, INCIDENTAL, SPECIAL, EXEMPLARY, OR CONSEQUENTIAL DAMAGES (INCLUDING, BUT NOT LIMITED TO, PROCUREMENT OF SUBSTITUTE GOODS OR SERVICES; LOSS OF USE, DATA, OR PROFITS; OR BUSINESS INTERRUPTION) HOWEVER CAUSED AND ON ANY THEORY OF LIABILITY, WHETHER IN CONTRACT, STRICT LIABILITY, OR TORT (INCLUDING NEGLIGENCE OR OTHERWISE) ARISING IN ANY WAY OUT OF THE USE OF THIS SOFTWARE, EVEN IF ADVISED OF THE POSSIBILITY OF SUCH DAMAGE. ■ libvorbis http://www.xiph.org/vorbis/ Copyright © 2002-2004 Xiph.org Foundation Redistribution and use in source and binary forms, with or without modification, are permitted provided that the following conditions are met: • Redistributions of source code must retain the above copyright notice, this list of conditions and the following disclaimer. • Redistributions in binary form must reproduce the above copyright notice, this list of conditions and the following disclaimer in the documentation and/or other materials provided with the distribution. • Neither the name of the Xiph.org Foundation nor the names of its contributors may be used to endorse or promote products derived from this software without specific prior written permission. THIS SOFTWARE IS PROVIDED BY THE COPYRIGHT HOLDERS AND CONTRIBUTORS “AS IS” AND ANY EXPRESS OR IMPLIED WARRANTIES, INCLUDING, BUT NOT LIMITED TO, THE IMPLIED WARRANTIES OF MERCHANTABILITY AND FITNESS FOR A PARTICULAR PURPOSE ARE DISCLAIMED. IN NO EVENT SHALL THE FOUNDATION OR CONTRIBUTORS BE LIABLE FOR ANY DIRECT, INDIRECT, INCIDENTAL, SPECIAL, EXEMPLARY, OR CONSEQUENTIAL DAMAGES (INCLUDING, BUT NOT LIMITED TO, PROCUREMENT OF SUBSTITUTE GOODS OR SERVICES; LOSS OF USE, DATA, OR PROFITS; OR BUSINESS INTERRUPTION) HOWEVER CAUSED AND ON ANY THEORY OF LIABILITY, WHETHER IN CONTRACT, STRICT LIABILITY, OR TORT (INCLUDING NEGLIGENCE OR OTHERWISE) ARISING IN ANY WAY OUT OF THE USE OF THIS SOFTWARE, EVEN IF ADVISED OF THE POSSIBILITY OF SUCH DAMAGE. viii ■ Tremolo http://wss.co.uk/pinknoise/tremolo Copyright © 2002-2009 Xiph.org Foundation Changes Copyright © 2009-2010 Robin Watts for Pinknoise Productions Ltd Redistribution and use in source and binary forms, with or without modification, are permitted provided that the following conditions are met: – Redistributions of source code must retain the above copyright notice, this list of conditions and the following disclaimer. – Redistributions in binary form must reproduce the above copyright notice, this list of conditions and the following disclaimer in the documentation and/or other materials provided with the distribution. – Neither the name of the Xiph.org Foundation nor the names of its contributors may be used to endorse or promote products derived from this software without specific prior written permission. THIS SOFTWARE IS PROVIDED BY THE COPYRIGHT HOLDERS AND CONTRIBUTORS “AS IS” AND ANY EXPRESS OR IMPLIED WARRANTIES, INCLUDING, BUT NOT LIMITED TO, THE IMPLIED WARRANTIES OF MERCHANTABILITY AND FITNESS FOR A PARTICULAR PURPOSE ARE DISCLAIMED. IN NO EVENT SHALL THE FOUNDATION OR CONTRIBUTORS BE LIABLE FOR ANY DIRECT, INDIRECT, INCIDENTAL, SPECIAL, EXEMPLARY, OR CONSEQUENTIAL DAMAGES (INCLUDING, BUT NOT LIMITED TO, PROCUREMENT OF SUBSTITUTE GOODS OR SERVICES; LOSS OF USE, DATA, OR PROFITS; OR BUSINESS INTERRUPTION) HOWEVER CAUSED AND ON ANY THEORY OF LIABILITY, WHETHER IN CONTRACT, STRICT LIABILITY, OR TORT (INCLUDING NEGLIGENCE OR OTHERWISE) ARISING IN ANY WAY OUT OF THE USE OF THIS SOFTWARE, EVEN IF ADVISED OF THE POSSIBILITY OF SUCH DAMAGE. ■ Tremor http://wiki.xiph.org/index.php/Tremor Copyright © 2002, Xiph.org Foundation Redistribution and use in source and binary forms, with or without modification, are permitted provided that the following conditions are met: – Redistributions of source code must retain the above copyright notice, this list of conditions and the following disclaimer. – Redistributions in binary form must reproduce the above copyright notice, this list of conditions and the following disclaimer in the documentation and/or other materials provided with the distribution. – Neither the name of the Xiph.org Foundation nor the names of its contributors may be used to endorse or promote products derived from this software without specific prior written permission. THIS SOFTWARE IS PROVIDED BY THE COPYRIGHT HOLDERS AND CONTRIBUTORS “AS IS” AND ANY EXPRESS OR IMPLIED WARRANTIES, INCLUDING, BUT NOT LIMITED TO, THE IMPLIED WARRANTIES OF MERCHANTABILITY AND FITNESS FOR A PARTICULAR PURPOSE ARE DISCLAIMED. IN NO EVENT SHALL THE FOUNDATION OR CONTRIBUTORS BE LIABLE FOR ANY DIRECT, INDIRECT, INCIDENTAL, SPECIAL, EXEMPLARY, OR CONSEQUENTIAL DAMAGES (INCLUDING, BUT NOT LIMITED TO, PROCUREMENT OF SUBSTITUTE GOODS OR SERVICES; LOSS OF USE, DATA, OR PROFITS; OR BUSINESS INTERRUPTION) HOWEVER CAUSED AND ON ANY THEORY OF LIABILITY, WHETHER IN CONTRACT, STRICT LIABILITY, OR TORT (INCLUDING NEGLIGENCE OR OTHERWISE) ARISING IN ANY WAY OUT OF THE USE OF THIS SOFTWARE, EVEN IF ADVISED OF THE POSSIBILITY OF SUCH DAMAGE. ■ Mersenne Twister http://www.math.sci.hiroshima-u.ac.jp/~m-mat/MT/ MT2002/CODES/mt19937ar.c Copyright © 1997 - 2002, Makoto Matsumoto and Takuji Nishimura, All rights reserved. PARTICULAR PURPOSE ARE DISCLAIMED. IN NO EVENT SHALL THE COPYRIGHT OWNER OR CONTRIBUTORS BE LIABLE FOR ANY DIRECT, INDIRECT, INCIDENTAL, SPECIAL, EXEMPLARY, OR CONSEQUENTIAL DAMAGES (INCLUDING, BUT NOT LIMITED TO, PROCUREMENT OF SUBSTITUTE GOODS OR SERVICES; LOSS OF USE, DATA, OR PROFITS; OR BUSINESS INTERRUPTION) HOWEVER CAUSED AND ON ANY THEORY OF LIABILITY, WHETHER IN CONTRACT, STRICT LIABILITY, OR TORT (INCLUDING NEGLIGENCE OR OTHERWISE) ARISING IN ANY WAY OUT OF THE USE OF THIS SOFTWARE, EVEN IF ADVISED OF THE POSSIBILITY OF SUCH DAMAGE. ■ zlib http://www.zlib.net/ zlib.h -- interface of the ‘zlib’ general purpose compression library version 1.2.3, July 18th, 2005 Copyright © 1995-2004 Jean-loup Gailly and Mark Adler This software is provided ‘as-is’, without any express or implied warranty. In no event will the authors be held liable for any damages arising from the use of this software. Permission is granted to anyone to use this software for any purpose, including commercial applications, and to alter it and redistribute it freely, subject to the following restrictions: The origin of this software must not be misrepresented; you must not claim that you wrote the original software. If you use this software in a product, an acknowledgment in the product documentation would be appreciated but is not required. Redistribution and use in source and binary forms, with or without modification, are permitted provided that the following conditions are met: 1. Altered source versions must be plainly marked as such, and must not be misrepresented as being the original software. 1. Redistributions of source code must retain the above copyright notice, this list of conditions and the following disclaimer. 2. This notice may not be removed or altered from any source distribution. 2. Redistributions in binary form must reproduce the above copyright notice, this list of conditions and the following disclaimer in the documentation and/or other materials provided with the distribution. ■ cURL 3. The names of its contributors may not be used to endorse or promote products derived from this software without specific prior written permission. THIS SOFTWARE IS PROVIDED BY THE COPYRIGHT HOLDERS AND CONTRIBUTORS “AS IS” AND ANY EXPRESS OR IMPLIED WARRANTIES, INCLUDING, BUT NOT LIMITED TO, THE IMPLIED WARRANTIES OF MERCHANTABILITY AND FITNESS FOR A Jean-loup Gailly [email protected], Mark Adler [email protected] http://curl.haxx.se COPYRIGHT AND PERMISSION NOTICE Copyright © 1996 - 2011, Daniel Stenberg, <[email protected]>. All rights reserved. Permission to use, copy, modify, and distribute this software for any purpose with or without fee is hereby ix granted, provided that the above copyright notice and this permission notice appear in all copies. THE SOFTWARE IS PROVIDED “AS IS”, WITHOUT WARRANTY OF ANY KIND, EXPRESS OR IMPLIED, INCLUDING BUT NOT LIMITED TO THE WARRANTIES OF MERCHANTABILITY, FITNESS FOR A PARTICULAR PURPOSE AND NONINFRINGEMENT OF THIRD PARTY RIGHTS. IN NO EVENT SHALL THE AUTHORS OR COPYRIGHT HOLDERS BE LIABLE FOR ANY CLAIM, DAMAGES OR OTHER LIABILITY, WHETHER IN AN ACTION OF CONTRACT, TORT OR OTHERWISE, ARISING FROM, OUT OF OR IN CONNECTION WITH THE SOFTWARE OR THE USE OR OTHER DEALINGS IN THE SOFTWARE. Except as contained in this notice, the name of a copyright holder shall not be used in advertising or otherwise to promote the sale, use or other dealings in this Software without prior written authorization of the copyright holder. ■ c-ares http://c-ares.haxx.se Copyright 1998 by the Massachusetts Institute of Technology. Permission to use, copy, modify, and distribute this software and its documentation for any purpose and without fee is hereby granted, provided that the above copyright notice appear in all copies and that both that copyright notice and this permission notice appear in supporting documentation, and that the name of M.I.T. not be used in advertising or publicity pertaining to distribution of the software without specific, written prior permission. M.I.T. makes no representations about the suitability of this software for any purpose. It is provided “as is” without express or implied warranty. Do not disassemble, decompile, or reverse engineer the software included in Yamaha AV products. x Information for Users on Collection and Disposal of Old Equipment and Used Batteries These symbols on the products, packaging, and/or accompanying documents mean that used electrical and electronic products and batteries should not be mixed with general household waste. For proper treatment, recovery and recycling of old products and used batteries, please take them to applicable collection points, in accordance with your national legislation and the Directives 2002/96/EC and 2006/66/EC. By disposing of these products and batteries correctly, you will help to save valuable resources and prevent any potential negative effects on human health and the environment which could otherwise arise from inappropriate waste handling. For more information about collection and recycling of old products and batteries, please contact your local municipality, your waste disposal service or the point of sale where you purchased the items. [Information on Disposal in other Countries outside the European Union] These symbols are only valid in the European Union. If you wish to discard these items, please contact your local authorities or dealer and ask for the correct method of disposal. Note for the battery symbol (bottom two symbol examples): This symbol might be used in combination with a chemical symbol. In this case it complies with the requirement set by the Directive for the chemical involved. ■ For U.K. customers If the socket outlets in the home are not suitable for the plug supplied with this appliance, it should be cut off and an appropriate 3 pin plug fitted. For details, refer to the instructions described below. The plug severed from the mains lead must be destroyed, as a plug with bared flexible cord is hazardous if engaged in a live socket outlet. ■ Special Instructions for U.K. Model IMPORTANT THE WIRES IN MAINS LEAD ARE COLOURED IN ACCORDANCE WITH THE FOLLOWING CODE: Blue: NEUTRAL Brown: LIVE As the colours of the wires in the mains lead of this apparatus may not correspond with the coloured markings identifying the terminals in your plug, proceed as follows: The wire which is coloured BLUE must be connected to the terminal which is marked with the letter N or coloured BLACK. The wire which is coloured BROWN must be connected to the terminal which is marked with the letter L or coloured RED. Make sure that neither core is connected to the earth terminal of the three pin plug. xi © 2014 Yamaha Corporation Printed in Malaysia ZN43960-1