1
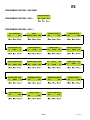
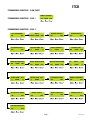
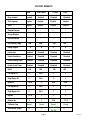
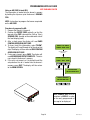
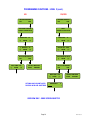
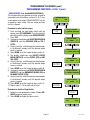
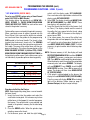
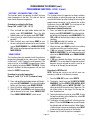
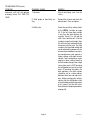
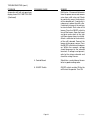
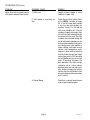
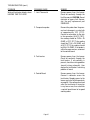
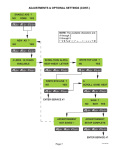
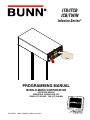
ITB/ITCB
ICB/TWIN
Infusion Series®
PROGRAMMING MANUAL
BUNN-O-MATIC CORPORATION
POST OFFICE BOX 3227
SPRINGFIELD, ILLINOIS 62708-3227
PHONE: (217) 529-6601 FAX: (217) 529-6644
41581.0002A
09/09 ©2009 Bunn-O-Matic Corporation
BUNN-O-MATIC COMMERCIAL PRODUCT WARRANTY
Bunn-O-Matic Corp. (“BUNN”) warrants equipment manufactured by it as follows:
1) All equipment other than as specified below: 2 years parts and 1 year labor.
2) Electronic circuit and/or control boards: parts and labor for 3 years.
3) Compressors on refrigeration equipment: 5 years parts and 1 year labor.
4) Grinding burrs on coffee grinding equipment to grind coffee to meet original factory screen sieve analysis:
parts and labor for 3 years or 30,000 pounds of coffee, whichever comes first.
These warranty periods run from the date of installation BUNN warrants that the equipment manufactured by
it will be commercially free of defects in material and workmanship existing at the time of manufacture and
appearing within the applicable warranty period. This warranty does not apply to any equipment, component or
part that was not manufactured by BUNN or that, in BUNN’s judgment, has been affected by misuse, neglect,
alteration, improper installation or operation, improper maintenance or repair, damage or casualty. This warranty is
conditioned on the Buyer 1) giving BUNN prompt notice of any claim to be made under this warranty by telephone
at (217) 529-6601 or by writing to Post Office Box 3227, Springfield, Illinois 62708-3227; 2) if requested by
BUNN, shipping the defective equipment prepaid to an authorized BUNN service location; and 3) receiving prior
authorization from BUNN that the defective equipment is under warranty.
THE FOREGOING WARRANTY IS EXCLUSIVE AND IS IN LIEU OF ANY OTHER WARRANTY, WRITTEN OR
ORAL, EXPRESS OR IMPLIED, INCLUDING, BUT NOT LIMITED TO, ANY IMPLIED WARRANTY OF EITHER
MERCHANTABILITY OR FITNESS FOR A PARTICULAR PURPOSE. The agents, dealers or employees of BUNN
are not authorized to make modifications to this warranty or to make additional warranties that are binding on
BUNN. Accordingly, statements by such individuals, whether oral or written, do not constitute warranties and
should not be relied upon.
If BUNN determines in its sole discretion that the equipment does not conform to the warranty, BUNN, at its
exclusive option while the equipment is under warranty, shall either 1) provide at no charge replacement parts
and/or labor (during the applicable parts and labor warranty periods specified above) to repair the defective
components, provided that this repair is done by a BUNN Authorized Service Representative; or 2) shall replace
the equipment or refund the purchase price for the equipment.
THE BUYER’S REMEDY AGAINST BUNN FOR THE BREACH OF ANY OBLIGATION ARISING OUT OF THE SALE OF
THIS EQUIPMENT, WHETHER DERIVED FROM WARRANTY OR OTHERWISE, SHALL BE LIMITED, AT BUNN’S
SOLE OPTION AS SPECIFIED HEREIN, TO REPAIR, REPLACEMENT OR REFUND.
In no event shall BUNN be liable for any other damage or loss, including, but not limited to, lost profits, lost sales,
loss of use of equipment, claims of Buyer’s customers, cost of capital, cost of down time, cost of substitute
equipment, facilities or services, or any other special, incidental or consequential damages.
BrewWISE, BrewLOGIC, BrewMETER, BrewWIZARD, Bunn Gourmet, BUNN Gourmet Ice, BUNN Pour-O-Matic,
BUNN, Bunn-OMatic, Bunn-O-Matic, BUNNlink, BUNNserve, BUNNSERVE, BUNN Espress, Cool Froth, DBC, Dr.
Brew, Dual, EasyClear, EasyGard, Easy Pour, FlavorGard, Gourmet Ice, Gourmet Juice, High Intensity, IMIX, Infusion Series, Intellisteam, Quality Beverage Equipment Worldwide, The Mark of Quality in Beverage Equipment
Worldwide, My Café, PowerLogic, Safety-Fresh, Scale-Pro, Silver Series, Single, Smart Funnel, Smart Hopper,
SmartWAVE, Soft Heat, SplashGard, System III, ThermoFresh, 392, AutoPOD, AXIOM, Beverage Profit Calculator, Beverage Bar Creator, BUNNsource, Coffee At Its Best, Digital Brewer Control, Nothing Brews Like a BUNN,
Pouring Profits, Pulse Wave, Signature Series, Smart Heat, Tea At Its Best, The Horizontal Red Line, Titan, Ultra,
are either trademarks or registered trademarks of Bunn-O-Matic Corporation.
Page 2
41581.2 012609
ITB
INTRODUCTION
This equipment will brew tea into an awaiting dispenser or reservoir. It is only for indoor use on a sturdy counter or
shelf.
The ITB uses recipe settings to brew tea. It has an LCD for digital readout and programming. The user is able to select
regular or quick brew for tea programming. Other features include Pre-Infusion and Pulse Brew, quick and standard brew,
Energy Savings mode, BUNNLink compatible, Freshness Timer, Sanitation Alert, and brew counters. Available in low profile,
dual dilution and sweetener models.
ITCB
This equipment will brew either tea or coffee into an awaiting dispenser or reservoir. It can be easily configured for
120V 15 amp, 120/208V 20 amp or 120/240V 20 amp. The brewer may have an auxiliary hot water faucet. It is only for
indoor use on a sturdy counter or shelf.
The Infusion Series combines BrewWISE, CDBC and Tea Brewers into one. ITCB is able to brew both tea and coffee
with recipe settings. It has an LCD for digital readout and programming along with the Smart Funnel options for coffee. The
user is able to select regular or quick brew for tea programming. Other features include: Pre-Infusion, Pulse Brew, quick
and standard brew, and BrewWISE, Energy Savings mode, BUNNLink compatible, Smart Reader compatible, Freshness
Timer, Sanitation Alert, and sweetener with low product detection.
CONTENTS
Warranty..............................................................................................................2
Introduction.........................................................................................................3
Programming Flow Chart-ICB..............................................................................4
Programming Flow Chart-ICB Twin......................................................................5
Programming Flow Chart-ITB..............................................................................6
Programming Flow Chart-ITCB............................................................................7
Factory Defaults...................................................................................................8
Programming With Recipe Card..........................................................................9
Programming With Ad Card...............................................................................10
Programming.....................................................................................................11
Troubleshooting.................................................................................................29
Page 3
41581.2 091609
ICB
PROGRAMMING THE BREWER
PROGRAMMING FUNCTIONS - FLOW CHART
BREW LOCKOUT?
PROGRAMMING FUNCTIONS - LEVEL I
NO
DONE YES
PROGRAMMING FUNCTIONS - LEVEL 2
SET LANGUAGE?
NO
YES
SET NEW RECIPE?
NO
YES
ENABLE SANITATION
NO
DONE
YES
SPRAY OZ/M: XX.X
(-)
DONE
(+)
ENTER ASSET #
NO
YES
REVIEW RECIPES
UNITS
METRIC DONE
ENG
NO
DONE
(+)
(-)
ENABL ENERGYSAVR
NO
DONE
DONE
YES
NO
(+)
ENTER SERVICE #
NO
DONE
(+)
ENABLE FRESH TIMER
BYPASS OZ/M: XX.X
(-)
NO
READY DEGREE 5°
SET TEMP 200°
(-)
YES
ASSIGN RECIPE
DONE
YES
DONE
YES
XX
REFILL
XXX
(-)
DONE
(+)
BREW COUNTERS?
NO
NO
NO
Page 4
ENABLE ADS?
NO
CALIBRATE FLOW?
YES
SERVICE TOOLS
YES
YES
YES
YES
FACTORY DEFAULTS
NO
YES
41581.2 091609
ICB TWIN
PROGRAMMING THE BREWER (cont.)
PROGRAMMING FUNCTIONS - FLOW CHART
BREW LOCKOUT?
PROGRAMMING FUNCTIONS - LEVEL I
NO
DONE YES
PROGRAMMING FUNCTIONS - LEVEL 2
SET LANGUAGE?
NO
YES
METRIC DONE
SET NEW RECIPE?
NO
YES
ENABLE SANITATION
NO
DONE
YES
REVIEW RECIPES
UNITS
ENG
NO
DONE
(+)
(-)
ENABL ENERGYSAVR
NO
DONE
NO
READY DEGREE 5°
SET TEMP 200°
(-)
YES
ASSIGN RECIPE
DONE
(+)
ENABLE FRESH TIMER
YES
NO
DONE
YES
YES
ENABLE ADS?
NO
DONE
YES
XX
REFILL
XXX
(-)
DONE
(+)
L SPRY OZ/M: XX.X
R SPRY OZ/M: XX.X
L BYPS OZ/M: XX.X
R BYPS OZ/M: XX.X
(-)
(-)
(-)
(-)
DONE
(+)
DONE
(+)
CALIBRATE FLOW?
BREW COUNTERS?
NO
NO
YES
SERVICE TOOLS
NO
YES
DONE
(+)
ENTER ASSET #
NO
YES
YES
DONE
(+)
ENTER SERVICE #
NO
YES
FACTORY DEFAULTS
NO
YES
Page 5
41581.2 091609
ITB
PROGRAMMING FUNCTIONS - FLOW CHART
BREW LOCKOUT?
PROGRAMMING FUNCTIONS - LEVEL I
NO
DONE YES
PROGRAMMING FUNCTIONS - LEVEL 2
SET LANGUAGE?
NO
YES
REVIEW RECIPES
UNITS
METRIC DONE
ENG
MASTER TEMP 205°
READY DEGREE 5°
(-)
(-)
DONE
(+)
ENABL ENERGYSAVR
NO
DONE
YES
DONE
NO
NO
DONE
YES
DONE
YES
XX
REFILL
XXX
(-)
DONE
(+)
DILUTE OZ/M: XX.X
CALIBRATE FLOW?
BREW COUNTERS?
(-)
NO
NO
DONE
(+)
ENTER SERVICE #
NO
YES
YES
YES
YES
NO
DONE
YES
SPRAY OZ/M: XX.X
(-)
DONE
(+)
ENTER ASSET #
NO
YES
FACTORY DEFAULTS
SERVICE TOOLS
NO
NO
ENABLE SANITATION
ENABLE ADS?
(+)
ENABLE FRESH TIMER
NO
YES
ASSIGN RECIPE
NO
YES
Page 6
YES
41581.2 091609
ITCB
PROGRAMMING FUNCTIONS - FLOW CHART
BREW LOCKOUT?
PROGRAMMING FUNCTIONS - LEVEL I
NO
DONE YES
PROGRAMMING FUNCTIONS - LEVEL 2
SET LANGUAGE?
NO
YES
REVIEW RECIPES
UNITS
METRIC DONE
ENG
NO
YES
SET NEW RECIPE?
MASTER TEMP 205°
READY DEGREE 5°
NO
(-)
(-)
YES
ENABLE SANITATION
NO
DONE
YES
DONE
(+)
ENABL ENERGYSAVR
NO
DONE
DONE
(+)
ENABLE FRESH TIMER
YES
NO
DONE
YES
ASSIGN RECIPE
NO
YES
ENABLE ADS?
NO
DONE
YES
XX
REFILL
XXX
(-)
DONE
(+)
SPRAY OZ/M: XX.X
DILUTE OZ/M: XX.X
CALIBRATE FLOW?
BREW COUNTERS?
(-)
(-)
NO
NO
DONE
(+)
SET RECIPES TEMPS
NO
YES
DONE
(+)
ENTER SERVICE #
ENTER ASSET #
NO
YES
NO
YES
YES
YES
SERVICE TOOLS
NO
YES
FACTORY DEFAULTS
NO
YES
Page 7
41581.2 091609
FACTORY DEFAULTS
ICB
Brew Lockout
Enabled
Enabled
Disabled
Disabled
Set Language
English
English
English
English
Units
English
English
English
English
Review Recipes
√
√
√
√
Assign Recipes
√
√
√
√
Set New Recipe
√
√
√
X
Set (Master) Temp
200°
200°
205°
205°
Ready Degree
5°
5°
5°
5°
Enable Ads
Disabled
Disabled
Disabled
Disabled
Enable Sanitation
Disabled
Disabled
Disabled
Disabled
Enable Energy Saver
Disabled
Disabled
Disabled
Disabled
Enable Fresh Timer
Disabled
Disabled
Disabled
Disabled
Refill
155
155
155
155
Left Spray Oz.
X
35.0
X
X
Right Spray Oz.
X
35.5
X
X
Spray Oz.
36.0
24.0
24.0
Left Bypass Oz.
X
30.0
X
X
Right Bypass Oz.
X
35.5
X
X
Bypass
31.0
X
X
X
Dilution Oz.
X
X
71.0
71.0
Calibrate Flow
Reset
Reset
Reset
Reset
Set Recipes Temps
X
ICB Twin
X
X
Page 8
ITCB
Coffee 200°
Tea 205°
ITB
X
41581.2 091609
PROGRAMMING WITH RECIPE CARD
NOT AVAILABLE ON ITB
Using a RECIPE CARD to load recipes:
The RECIPE CARD includes all the information needed
READY TO BREW
to set up that particular coffee/tea name. The informaWATER TEMP XXX°
tion from the RECIPE CARD is loaded into the brewer’s
memory by holding the chip area up to the brewer’s
POSITION CARD UNDER
SENSOR COIL
SENSING COIL. This information can include all the
recipe settings for that particular name. These can all
be loaded in seconds.
CARD CONTAINS
NOTE: Instructions to program the brewer and grinder
are printed on the RECIPE CARD, along with the coffee
name that is being programmed.
Procedure to program the coffee name:
1. Remove the funnel(s) if present.
2. Position the RECIPE CARD vertically, so that the
top end of the CHIP is beneath the (Left on Twins)
SENSING COIL (located on the underneath side of
the front display panel).
3. After a short pause the display will read CARD
CONTAINS RECIPE FOR then will change to (RECIPE
NAME) SHOW-QUIT-SAVE. All brewing parameters
for that recipe are now transferred from the CARD
to the brewer.
4. To show (view) this information, press and release
SHOW. The display will scroll through all of the
brew settings for that recipe. This display will then
return to CARD CONTAINS RECIPE FOR then will
change to (RECIPE NAME) SHOW-QUIT-SAVE.
5. If all brew settings are correct, press SAVE. The display will read (RECIPE NAME) SETUP COMPLETE.
All brew settings for that name are now stored in
the brewer’s memory.
6. If the brewing information is not correct, or it is
desired to exit the setup before the settings are
loaded into the brewer’s memory, press QUIT. The
display will read (RECIPE NAME) NOT SAVED. The
display will then return to the MAIN SCREEN.
Page 9
RECIPE FOR
5 SEC.
(RECIPE NAME)
SHOW QUIT SAVE
SCROLLS THROUGH
ALL BREW SETTINGS
FOR THAT RECIPE
(RECIPE NAME)
SETUP COMPLETE
(RECIPE NAME)
NOT SAVED
READY TO BREW
WATER TEMP 200°
41581.2 091609
PROGRAMMING WITH AD CARD
NOT AVAILABLE ON ITB
Using an AD CARD to load ADS:
The information is loaded into the brewer’s memory
by holding the chip area up to the brewer’s SENSING
COIL.
NOTE: Instructions to program the brewer are printed
on the AD CARD.
Procedure to program the AD:
1. Remove the funnel(s) if present.
2. Position the RECIPE CARD vertically, so that the
top end of the CHIP is beneath the (Left on Twins)
SENSING COIL (located on the underneath side of
the front display panel).
3. After a short pause the display will read CARD
CONTAIN ADS/SHOW-QUIT-SAVE.
4. To show (view) this information, select "SHOW".
The display will scroll through all of the ad on that
chip. The display will then return to CARD CONTAIN
ADS/SHOW-QUIT-SAVE.
5. If message is correct, press SAVE. The display will
read AD MESSSAGE SETUP COMPLETE. The ad is
now stored in the brewer’s memory.
6. If the ad is not correct, or it is desired to exit the
setup before the ad is loaded into the brewer’s
memory, press QUIT. The display will then return
to the MAIN SCREEN.
READY TO BREW
WATER TEMP XXX°
POSITION CARD UNDER
SENSOR COIL
CARD CONTAIN ADS
SHOW QUIT SAVE
SCROLLS THROUGH
COMPLETE MESSAGE
AD MESSAGE
SETUP COMPLETE
READY TO BREW
WATER TEMP 200°
NOTE: ENABLE ADS must be
turned on in LEVEL 2 in order
for the newly programmed ad
message to be displayed.
Page 10
41581.2 091609
PROGRAMMING THE BREWER
PROGRAMMING FUNCTIONS - LEVEL 1
* BREW LOCKOUT
This function allows the operator to prevent or allow brewing if the water temperature is less than the set READY
temperature.
Procedure for setting Brew Lockout:
1. To access this function screen press and hold the right hidden button. Release when the display reads:
BREW LOCKOUT?
NO DONE
YES
Press here Press here Press here
for DONE
for YES
for NO
2. The YES or NO should be flashing. Select YES to prevent brewing if the water temperature is below the set
READY temperature. Select NO to permit brewing at any water temperature.
3. When finished, select DONE. This will exit this function screen and return to the MAIN SCREEN.
PROGRAMMING FUNCTIONS - LEVEL 2
The functions in the second level of programming allow the operator to adjust brew settings and other feature
options.
To access the level 2 function screens press and hold the right hidden button for approximately 5 seconds.
Release when the display reads:
* SET LANGUAGE
This function allows the operator to select the language used for the display.
Procedure for setting Language:
1. Press and hold the right hidden button until the display reads SET LANGUAGE? and release.
2. Press YES to proceed. The display should now read ENGLISH. Using (-) and (+), scroll through the available
languages until the desired language is shown on the display.
3. When finished, press SELECT. If the language selected is different from the current settings,the display will
read CHANGE LANGUAGE? ARE YOU SURE? and then will change to CHANGE LANGUAGE? To convert the
display to the new language, select YES. To retain the current language, select NO.
4. The display should now read UNITS. To exit programming and return to the MAIN SCREEN, press ENABLE
BREW ON/OFF switch.
(cont.)
Page 11
41581.2 091609
PROGRAMMING THE BREWER (cont.)
PROGRAMMING FUNCTIONS - LEVEL 2 (cont.)
* UNITS
This function allows the operator to select if numeric settings are displayed in English or Metric units.
Procedure for setting the Units:
1. Press and hold the right hidden button until the display reads SET LANGUAGE? Press and release the right
hidden button until the display reads UNITS. The METRIC or ENG should be flashing.
2. Select METRIC to have settings displayed in Metric units. Select ENG for English units.
NOTE: Changing the UNIT settings will restore ALL settings to Factory Default.
3. Select DONE to advance to the next programming screen. To exit programming and return to the Main Screen,
press ENABLE BREW ON/OFF switch.
NOTE: This manual is written based on Factory Default Settings (English Units). If brewer is set for Metric Units,
displays will be different (ex: Brew oz will become Brew liters, Temperature changes from F° to C°).
ADJUSTMENT RANGES
ICB
ITB/ITCB
BREW OZ
OFF/10-224 OFF/10-135
% BYPASS
0-90%
DILUTE OZ
0-580
DILUTE DELAY
0-10 Min
PULSE BREW
1st On Time – OFF to 1 Min
Off Time – OFF - 20 seconds
Last On Time – Pre-Infuse to 1 Min
DRIP TIME
OFF to 5 Min
SWEET METER
1-14
* REVIEW RECIPES (Modify or Show recipes)
This function has two parts:
1. It allows the operator to view the brew settings for
the various coffee recipes stored into the brewer.
2. It allows the operator to modify (change) any of
the brew settings for a particular recipe stored in
the brewer.
Procedure for reviewing the recipes:
1. Press and hold the right hidden switch until the
display reads SET LANGUAGE. Press and release the
right hidden switch until the display reads REVIEW
RECIPES. Select YES.
2. The display should now read the name of the first
recipe, along with MODIFY SHOW and NEXT.
(cont.)
Page 12
DEFAULT RECIPE CHART - ICB
No Name Coffee
Jamaica Blue Mtn
Regular
Guatemalan
Decaf
Light Roast
Colombian
Dark Roast
Colombia Supremo
Expresso
Costa Rican
Amaretto
Ethiopian
Hazelnut
Kona
French Vanilla
Kenya AA
Irish Creme
Sumatran
Vanilla Nut
French Roast
Caramel
Italian Roast
Raspberry
Mocha Java
Almond
House Blend
Dark Mtn Roast
Breakfast Blend
Hot Tea
DEFAULT RECIPE CHART - ITB/ITCB
Tea 1
Iced Coffee (ITCB ONLY)
Tea 2
No Name Coffee (ITCB ONLY)
Tea 3
Hot Tea
ICB
ITB
ITCB
DEFAULT ASSIGNMENTS
BREW A
BREW B
BREW C
Regular
Decaf
Brkfst Blnd
Disabled
Tea 1
Disabled
Tea 1
Hot Tea No-Nm Coff
41581.2 091609
PROGRAMMING THE BREWER (cont.)
PROGRAMMING FUNCTIONS - LEVEL 2 (cont.)
3. Select SHOW. The screen will scroll through all the brew settings for that particular recipe. When finished,
the display will return to the recipe name just viewed.
4. To see the settings again, select SHOW. To change settings, select MODIFY. Then the screen will display
BREW OZ and a batch light will be blinking.
5. Using (-) or (+), set the amount of brew water to be dispensed for that batch size.
6. When finished, press the other batch size and repeat step #8.
7. When finished setting both batch sizes, select DONE. The display should read 2 BATCHES DONE?
8. If both batch sizes are not correct press and release NO to return to the BREW OZ setup screen and repeat
steps #8, 9 and 10.
REVIEW RECIPES
VIEW/MODIFY ITEMS
ICB
NO
YES
ITB/ITCB
Brew Ounces
% Bypass
Dilution Ounces
Dilution Delay Time
Pulse Brew/Preinfusion Times
Drip Times
* SWEET METER
PRESSING NO WILL
ADVANCE TO NEXT
FUNCTION SCREEN
NO NAME COFFEE
MODIFY SHOW NEXT
REGULAR
* ITB/ITCB WITH FACTORY SWEETENER
MODIFY SHOW NEXT
BY PRESSING "MODIFY", YOU CAN STEP
THROUGH & CHANGE ALL THE BREW
SETTINGS FOR THAT RECIPE, SIMPLY
FOLLOW THE ON SCREEN PROMPTS
SCROLLS THROUGH
ALL DEFAULT RECIPES
(RECIPE NAME)
MODIFY SHOW NEXT
BY PRESSING "SHOW", THE
DISPLAY WILL AUTOMATICALLY
SCROLL THROUGH ALL THE BREW
SETTINGS FOR THAT RECIPE
Page 13
THAT WAS THE
LAST RECIPE
41581.2 091609
PROGRAMMING FUNCTIONS - LEVEL 2 (cont.)
9. If both batch sizes are correct, press YES. This will
advance to the DILUTE OZ (ITCB) or BYPASS %
(ICB)
10.Using (-) or (+), set the amount of dilution water for
that particular batch size to be dispensed through
the dilution nozzle into the tea dispenser (ITCB) or
% bypass water to be dispensed around the filter/
grounds (ICB).
11.When finished, press the other batch size and repeat
step #10.
12.When finished setting both batch sizes, press and
release DONE. The display should read 2 BATCHES
DONE?
13.If both batch sizes are not correct, select NO to
return to the BYPASS % function (ICB) or DILUTE
OZ function (ITCB) and repeat steps #10-12.
14.If both batch sizes are correct, press YES. This will
advance to the DILUTE DELY function (ITCB) or SET
PULSE BREW function (ICB) jump to step # 21.
15.(ITCB ONLY) Press and release YES. The display
should now read DILUTE DELY: and a batch light
will be blinking. Press and release the batch size
to be modified.
16.Using (-) or (+), set the time delay for the dilution
water to start for that particular batch size.
17.When finished, press the other batch size and repeat
step # 16.
18.When finished setting both batch sizes, press and
release DONE. The display should read 2 BATCHES
DONE?
19.If both batch sizes are not correct, press and release
NO to return to the DILUTE DELY setup screen and
repeat steps 16 - 18.
20.If both batch sizes are correct, press YES. The
display should now read SET PULSE BREW.
21.To set PULSE BREW press YES. The display should
now read SELECT METHOD. To set the EASY method,
continue to step # 22. To set by MANUAL method,
jump to step # 28.
OFFTIME
INITIAL SPRAY
ONTIME
ONTIME
INITIAL SPRAY
OFF-TIME
OFFTIME
REMAINING ON
OFFTIME
ONTIME ALTERNATES UNTIL
BREW CYCLE IS
COMPLETED
Setting Pulse Brew – EASY Pulse Brew
Range: Minimum: will adjust to the minimum time
required to brew that batch using the set brew volumes
and flow rate for the sprayhead. Maximum – will adjust
depending on settings and will always be minimum time
+ 3 minutes. The brewer will automatically calculate
what the 1ST ON TIME, OFF TIMES, and LAST ON
TIME will be using THE INITIAL ON TIME, plus a 7
pulse routine.
22.Select EASY. With EASY flashing, select NEXT.
23.The display should now read BREW TIME: and a
batch light will be blinking. Select the batch size to
be modified.
24.Using (-) or (+), set the total brew time desired
including spray times and off times.
25.When finished, press the other batch size and repeat
step # 24.
26.When finished setting both batch sizes, press
DONE. The display will show the pulse settings to
accommodate the brew time entered. Press and
release each batch size to display the settings for
that batch. After a delay, the display should read 2
BATCHES DONE?
27.If both batch sizes are not correct, press NO to
return to the BREW TIME setup screen and repeat
steps 24-26.
Setting Pulse Brew/PreInfusion – MANUAL
28.Select MANUAL. With MANUAL flashing, select
NEXT.
29.The display should now read, 1st ON TIME and a
batch light will be blinking. Select the batch size to
be modified.
30.Using (-) or (+), adjust the 1ST ON TIME.
31.When finished, press the other batch size and repeat
step # 30.
NOTE: To disable pulse brew, set 1ST ON TIME to OFF.
Brewer will automatically pulse on tea recipes with a
brew volume greater than 86.0 oz.
32.When finished setting both batch sizes, press
DONE.
33.The display should now read OFF TIME. Adjust the
OFF TIME using (-) or (+).
(cont.)
PRE-INFUSION
Page 14
41581.2 091609
PROGRAMMING FUNCTIONS - LEVEL 2 (cont.)
34.When finished, press the other batch size and repeat
step # 33.
35.When finished setting both batch sizes, press and
release DONE.
36.The display should now read LAST ON:. Adjust the
LAST ON TIME using (-) or (+). If PREINFUSION
is desired, set the LAST ON TIME to PreI.
37.When finished, press the other batch size and repeat
step # 36.
38.When finished setting both batch sizes, press and
release DONE.
39.The display will show the three times just entered.
Press and release each batch size to display the settings for that batch. If the 1ST ON TIME is set to OFF,
the display will read PULSE BREW DISABLED. After
a 5 second delay, the display will read 2 BATCHES
DONE?
40.If both the pulse brew settings for both batch sizes
are not correct, press and release NO to return to
the 1ST ON TIME setup screen and repeat steps 24
through 39.
41.If both batch sizes are correct, press YES. The
display should now read DRIP TIME.
Setting SWEET METER: Optional on ITCB
This function allows the operator to adjust the amount
of sweetener added to the dilution water. The solenoid
is pulsed on/off for the duration of the dilution cycle.
Setting #1 will produce the least amount of sweetener
(weakest) and (#14) being the most (strongest).
Procedure:
47.The display should now read "SWEETNER"
48.Press (-) to decrease the amount, or (+) to increase.
(Range: 1 - 14)
49.When finished, press and release the right hidden
switch, or press and release the "ENABLE BREW
ON/OFF" switch to return to the main screen.
Setting DRIP TIME:
NOTE: Drip time also controls the solenoid on time
for models with optional funnel locks.
42.The display should now read DRIP TIME, along with
either the word OFF or a time showing. A batch
light will also be blinking.
43.Using (-) or (+), set the amount of time from when
the brew spray ends to when the funnel is emptied
of hot liquid.
44.When finished, press the other batch size and repeat
step #43.
45.When finished setting both batch sizes, press and
release DONE. The display should read 2 BATCHES
DONE?
46.Select YES. The screen should show the name of
the recipe being programmed (modified) along
with SETUP COMPLETE (except for ITCB w/Sweet
meter, step # 47).
Page 15
41581.2 091609
PROGRAMMING FUNCTIONS - LEVEL 2 (cont.)
ICB
ITB/ITCB
REVIEW RECIPES
REVIEW RECIPES
NO
NO
YES
NO NAME COFFEE
TEA 1
MODIFY SHOW NEXT
MODIFY SHOW NEXT
BREW OZ:
(-)
DONE
64
BREW OZ:
(+)
(-)
% BYPASS: 20
(-)
DONE
NO
DRIP TIME: 0:30
DONE
(+)
DONE
76
(+)
DILUTE OZ: 320.0
(+)
(-)
DONE
(+)
DILUTE DELAY 00.0
SET PULSE BREW?
(-)
YES
YES
(-)
DONE
(+)
SELECT METHOD
SET PULSE BREW?
EASY
NO
MANUAL
YES
DRIP TIME: 1:20
(-)
DONE
SELECT METHOD
(+)
SWEETNER
OPTIONAL-ONLY ON UNITS WITH
-
FACTORY INSTALLED SWEETENER
EASY
MANUAL
4
+
OVERVIEW ONLY - SOME SCREENS OMITTED
Page 16
41581.2 091609
PROGRAMMING THE BREWER (cont.)
PROGRAMMING FUNCTIONS - LEVEL 2 (cont.)
* ASSIGN RECIPE to or disable BREW SWITCH(S)
This function allows the operator to assign a recipe to
(or disable) each of the 3 brew switches (A, B, C). Any
saved recipes listed under "REVIEW RECIPES" can be
assigned to a brew switch. Only one recipe per brew
switch is allowed.
Procedure to select switch recipes
1. Press and hold the right hidden switch until the
display reads SET LANGUAGE. Press the right hidden switch until the display reads ASSIGN RECIPE?
Press YES.
2. The display should now read SELECT RECIPE BREW
SWITCH A, and then REGULAR (ICB) or TEA 1
(ITCB).
3. Using (-) and (+), scroll through the stored recipes
in the brewer’s memory until the desired recipe
name is reached.
4. Select DONE to set that recipe for brew switch A.
5. The display should now read SELECT RECIPE
BREW SWITCH B, and then DECAF (ICB) or HOT
TEA (ITCB).
6. Using (-) and (+), scroll through the stored recipes
in the brewer’s memory until the desired recipe
name is reached.
7. Select DONE to set that recipe for brew switch B.
8. The display should now read SELECT RECIPE BREW
SWITCH C, and then BREAKFAST BLEND (ICB) or
NO NAME COFFEE (ITCB).
9. Using (-) and (+), scroll through the stored recipes
in the brewer’s memory until the desired recipe
name is reached.
10.Select DONE to set that recipe for brew switch C.
11.Repeat steps 2 - 10 for right side of Twins.
ASSIGN RECIPE
NO
ADVANCE TO
NEXT FUNCTION
SCREEN
YES
SELECT RECIPE
<-<-<-BREW SWITCH A
"RECIPE NAME"
(-)
DONE
(+)
SCROLL THROUGH
STORED RECIPES IN
BREWER MEMORY
SELECT RECIPE
<-<-<-BREW SWITCH B
"RECIPE NAME"
(-)
DONE
(+)
SCROLL THROUGH
STORED RECIPES IN
BREWER MEMORY
SELECT RECIPE
<-<-<-BREW SWITCH C
"RECIPE NAME"
(-)
DONE
(+)
SCROLL THROUGH
STORED RECIPES IN
BREWER MEMORY
Procedure to disable a Brew Switch:
1. Follow the same procedure as above. Choose DISABLED instead of recipe name.
2. Select DONE to disable that brew switch.
REPEAT FOR BREW
SWITCH A, B, C FOR
RIGHT SIDE
SET NEW RECIPE?
NO
Page 17
YES
41581.2 091609
NOT AVAILABLE ON ITB
PROGRAMMING THE BREWER (cont.)
PROGRAMMING FUNCTIONS - LEVEL 2 (cont.)
* SET NEW RECIPE (COFFEE ONLY)
To set a new COFFEE recipe using a Smart Funnel
and a G9-2T DBC or MHG Grinder:
This function allows the operator to set BREW VOLUMES, BYPASS %, PULSE BREW/PREINFUSION
TIMES AND DRIP OUT TIMES for each coffee name
stored in the grinder’s memory.
Certain coffee names are stored in the grinder’s memory.
When a particular name of coffee is ground into the
Smart Funnel, that name and the batch size selected
are transferred from the grinder to the programming
CHIP located in the funnel handle. The funnel is then
inserted into the brewer’s funnel rails. The SENSING
COIL on the brewer reads the information contained in
the handle. The name of the coffee flavor will then appear on the display. This allows the operator to set the
BREW VOLUMES, BYPASS % (N/A on ITCB), PULSE
BREW/PREINFUSION TIMES AND DRIP OUT TIMES for
that particular coffee name. Each coffee name can be
set individually to provide optimum brewing quality.
SET NEW COFFEE ITEMS
ICB
ITCB
Brew Ounces
Dilution Ounces
Dilution Delay Time
Pulse Brew/Preinfusion Times
Drip Times
* SWEET METER
% Bypass
* ITCB WITH FACTORY SWEETENER
Procedure for Setting the Recipe:
NOTE: Before beginning setup, place a server beneath
the brew funnel.
1. Insert the funnel into the grinder and select the
small batch size to grind. It is not necessary to have
coffee beans in the hopper(s) in order to program
the brewer. The coffee name is pre-selected and
stored in the grinder’s memory for the side being
ground.
2. Press the GRIND switch. When the grinder stops
grinding, remove the funnel.
3. On the brewer, press and hold the right hidden
switch until the display reads SET LANGUAGE.
Press and release the right hidden switch until the
display reads SET NEW RECIPE.
4. Select YES. The display should read INSERT FUNNEL WITH NEW NAME, then QUIT SETUP? These
two displays will repeatedly cycle.
5. Insert the funnel into the rails on the brewer (Left
on Twins). The display should read the name of
the coffee that was ground into the funnel, along
with a NO and YES. If the name on the display is
correct, press YES.
6. If, for some reason, the name of the coffee from
the grinder did not load properly into the funnel,
or if a grind has not yet been done, the display will
read MUST GRIND INTO FUNNEL FIRST. It will be
necessary to grind another batch following steps
1, 2 & 5.
NOTE: If brewer memory is full, the display will read
RECIPE STORAGE AREA IS FULL and then REMOVE
A FLAVOR? To remove a recipe press and release
YES. Press NEXT to scroll through the stored recipes.
When the display reads the name of the recipe to be
removed, press and release REMOVE. The display
will read REMOVE? Press CANCEL to exit the SET
NEW RECIPE function. Press OK to remove that
recipe. The display will then show BEGIN SETUP
OF (COFFEE NAME).
7. If the grind is acknowledged by the brewer, the
display will read BEGIN SETUP OF (COFFEE NAME).
Then the screen will display BREW OZ and a batch
light will be blinking. Follow steps on page 11
(Review Recipes) to adjust recipe settings.
Page 18
41581.2 091609
PROGRAMMING THE BREWER (cont.)
PROGRAMMING FUNCTIONS - LEVEL 2 (cont.)
* SET TEMP - ICB (MASTER TEMP - ITCB)
This function allows the operator to adjust the brew
water temperature in the tank. This also sets the hot
water faucet dispense temperature.
Procedure for setting the Set Temp
Range: 185° to 205° F (85° - 96° C)
1. Press and hold the right hidden button until the
display reads SET LANGUAGE. Press the right
hidden button until the display reads SET TEMP.
2. Using (-) and (+), adjust the brew and faucet temperature.
3. When finished, press and release DONE to save
the new setting and to advance to the next function
screen, READY DEGREE. Press ENABLE BREW ON/
OFF switch to exit programming and return to the
MAIN SCREEN.
* READY DEGREE
This function allows the operator to set the minimum
temperature allowable to start a brew cycle. The range
can be from 2° to 20° F below the set temperature. The
water must be at the READY temperature or higher
for the display to indicate READY TO BREW. If brew
lockout is enabled, the brewing process will not start
below this READY temperature.
Procedure to set ready temperature
Range: 2° to 20° F (2° to 10° C) below set temp
1. Press and hold the right hidden button until the display reads SET LANGUAGE. Press the right hidden
button until the display reads READY DEGREE.
2. Using (-) and (+), adjust the ready temperature.
3. When finished, select DONE to save the new setting
and to advance to the next screen, ENABLE ADS.
Press ENABLE BREW ON/OFF switch to exit.
* ENABLE ADS
This function allows the operator to choose whether
or not to display an advertising message. An ad can be
saved to the brewer by either writing the ad using the
programming commands, or by entering the ad into
the brewer using an AD CARD. This message will be
displayed when the brewer is not in use.
Procedure to Enable/Disable Ads:
1. Press and hold the right hidden button until the
display reads SET LANGUAGE. Press the right hidden button until the display reads ENABLE ADS. The
YES or NO will be flashing to indicate the current
selection.
2. Select NO to disable this function, or:
3. Select YES to enable this function.
4. When finished, select DONE to save the new setting
and advance to the next function screen.
5. If NO was selected, the display should now read
ENABLE SANITATION. To exit programming and
return to the MAIN SCREEN, press ENABLE BREW
ON/OFF switch.
6. If YES was selected, the display should now read
NEW AD?. This screen allows the operator to select
between using an ad card to read in a new ad, or
writing an ad through the control panel.
Procedure to WRITE an Ad:
NOTE: Writing and saving a new ad will erase any
previously saved ad in the brewer’s memory.
7. From the NEW AD? screen, select WRITE.
8. The display should now read 2 LINES 16 CHARS
AVAILABLE, and then SCROL THRU ALPHA, NEXT
-> NEXT LETTER, and then WRITE TOP LINE?. The
ad can be up to 32 characters long, 16 per line. The
ad will be written in two steps, first the top line,
then the bottom line.
9. To write the top line of a new ad, select YES. To skip
the top line and only write a bottom line, select NO
and proceed to step 13.
10.The display will now read A with a flashing cursor
below it. Press the SCROLL button to scroll through
the alphabet and available characters. When the desired character is shown on the display, select NEXT
to move to the next character in the top line.
11.Repeat step 10 until the top line is complete.
Page 19
41581.2 091609
PROGRAMMING THE BREWER (cont.)
PROGRAMMING FUNCTIONS - LEVEL 2 (cont.)
12.Select DONE. The display should now read WRITE
BTM LINE?.
13.To write the bottom line, select YES.
14.To skip the bottom line, select NO.
a. If neither a top nor bottom line was written, the
display should now read ENABL SANITATION.
b. If only a top line was written, the ad will be
displayed followed by SAVE? Proceed to step 18.
15.The display will now read A with a flashing cursor
below it. Scroll through the alphabet and available
characters. When the desired character is shown
on the display, select NEXT to move to the next
character in the bottom line.
16.Repeat step 15 until the bottom line is complete.
17.Select DONE. The display will now show the written
ad, and then SAVE?
18.To cancel saving the ad, select NO. The display
should now read ADVERTISEMENT NOT SAVED!
and then will return to the NEW AD screen.
19.To correct or edit the ad, select EDIT. The display
should now read WRITE TOP LINE? Repeat steps
10 though 17.
20.To save the ad as it is shown, select YES. The
display should now read ADVERTISEMENT SETUP
COMPLETE, and then ENABL SANITATION. To exit
programming and return to the MAIN SCREEN,
press ENABLE BREW ON/OFF switch.
* ENABLE SANITATION
This function allows the operator to enable the sanitation function and set the time before a cleaning alert
will be displayed.
Procedure for enabling sanitation:
Range: 0.0 to 72.0 hrs
1. Press and hold the right hidden button until the
display reads SET LANGUAGE. Press and release
the right hidden button until the display reads ENABL SANITATION. The YES or NO will be flashing
to indicate the current selection.
2. Select NO to disable this function (no sanitation
alert will be displayed on the screen), or:
3. Select YES to enable this function (a sanitation alert
will displayed on the screen).
4. When finished, select DONE to save the new setting
and advance to the next function screen.
5. If NO was selected, the display should now read
ENABLE ENERGYSAVR. To exit programming and
return to the MAIN SCREEN, press ENABLE BREW
ON/OFF switch.
6. If YES was selected, the display should now read
X.X HRS -> CLEAN. This screen allows the operator to set the amount of time from when a brew is
completed until a sanitize alert will be displayed.
Use (-) and (+) to adjust the set time. When finished,
Procedure to READ in a new Ad: Not available on ITB
select DONE.
NOTE: Saving a new ad will erase any previously saved
ad in the brewer’s memory.
NOTE: The timer will not begin until after a brew cycle
has been completed.
7. From the NEW AD? screen, select CARD.
8. The display will show INSERT AD CARD. Place 7. The display should now read X.X HRS UNTIL
the AD CARD vertically so that the top end of the
NEXT CLEAN, and then advance to ENABLE EN"chip" is beneath the sensing coil (located on the
ERGYSAVR.
underneath side of the front display panel).
8. Once the set time has expired, the display will read
9. After a short pause, the display will read CARD
PLEASE SANITIZE, and then PRESS FULL FOR 3
CONTAINS AD. To view the ad, press and release
SEC TO CANCEL.
SHOW. To save the ad to the brewer's memory,
9. Clean and sanitize the machine.
select SAVE. To cancel, select QUIT.
10.When finished, press and hold the FULL batch
10.After the ad is saved, the display will read AD MESswitch to reset the Sanitation timer. The display
SAGE SETUP COMPLETE, and then will advance to
should now read SANITATION COMPLETE and then
ENABLE SANITATION.
will return to the MAIN SCREEN.
Page 20
41581.2 091609
PROGRAMMING THE BREWER (cont.)
PROGRAMMING FUNCTIONS - LEVEL 2 (cont.)
* ENABLE ENERGY SAVER
This function allows the operator to enable the ENERGY
SAVINGS mode function and set the idle time. Once
the set idle time has expired, the operator can choose
to have the heaters either turn off, or reduce the tank
holding temp to 140° F (60° C).
Procedure to enable energy savings mode:
Range: 0.5 to 24.0 hrs
If enabled, default setting is 140° F (60° C) tank temperature after 4.0 hrs. idle time.
1. Press and hold the right hidden switch until the
display reads SET LANGUAGE. Press and release the
right hidden switch until the display reads ENABLE
ENERGYSAVR. The YES or NO will be flashing to
indicate the current selection.
2. Select NO to disable or:
3. Select YES to enable this function.
4. When finished, press and release DONE to save the
new setting and advance to the next screen.
5. If NO was selected, the display should now read
EnableFreshTimer. To exit programming and return
to the MAIN SCREEN, press ENABLE BREW ON/
OFF switch.
6. If YES was selected, the display should now read
X.X HRS -> IDLE. This screen allows the operator
to set the amount of time the brewer is not in use
before energy save mode engages. Using (-) and (+),
adjust the idle time. When finished, select DONE.
7. The display should now read AFTER IDLE TIME?
Once the set idle time has expired, the heaters can
either be shut off or held at 140° F.
8. To have the heaters shut off after the set idle time,
select OFF and then DONE to save the settings.
The display should read MACHINE OFF AFTER X.X
HRS, and then EnableFreshTimer.
9. To have the temperature reduce to 140° F, select
140° and then DONE to save the settings. The display
should read MACHINE AT 140° AFTER X.X HRS,
and then EnableFreshTimer.
10.Once the idle time has expired, the display will
read either ENERGY SAVER...NO TEMPERATURE
or ENERGY SAVER...REDUCED TEMPERATURE,
depending on the settings. This screen will alternate
with PRESS ANY SWITCH TO RE-HEAT.
* ENABLE FRESH TIMER
This function allows the operator to enable the Freshness
Alert and set the expiration time. The expiration time is
the amount of time the product is allowed to sit in the
server/dispenser before a fresh batch is brewed.
Procedure for enabling/setting the Freshness Timer:
Range: Coffee 0.5 to 4.0 hrs
Hot Tea 0.5 to 8.0 hrs
If enabled, default setting is 2.0 hrs. for Coffee and 2.0
hrs. for Hot Tea.
1. Press and hold the right hidden button until the
display reads SET LANGUAGE. Press and release
the right hidden button until the display reads ENABLE FRESHTIMER.
2. Select NO to disable or:
3. Select YES to enable this function (the unit will display a message once the set time has expired).
4. When finished, select DONE to save the new setting
and advance to the next screen.
5. If NO was selected, the display should now read
REFILL. To exit programming and return to the
MAIN SCREEN, press either ENABLE BREW ON/
OFF switch.
6. If YES was selected, the display should now read
COFFEE. This screen allows the operator to set the
amount of time from the end of brewing a batch
of coffee until a Freshness Alert message will be
displayed. Using (-) and (+), adjust the freshness
time for coffee. When finished, select DONE.
7. The display should now read HOT TEA. Using (-)
and (+), adjust the freshness time for hot tea. When
finished, select DONE.
8. This display should now read REFILL. To exit programming and return to the MAIN SCREEN, press
ENABLE BREW ON/OFF switch.
9. Once the set time has expired, the display will read
FRESHNESS ALERT BREW (A,B or C), and then
FRESHNESS ALERT BREW FRESH BATCH alternating with the MAIN SCREEN.
10.Empty the server/dispenser the previous batch was
brewed into and replace under the funnel.
11.Brew a new batch
12.The freshness timer will reset. The display should
now return to the MAIN SCREEN.
Page 21
41581.2 091609
PROGRAMMING THE BREWER (cont.)
PROGRAMMING FUNCTIONS - LEVEL 2 (cont.)
* REFILL
Range: 0 to 155
This function allows the operator to adjust the sensitivity of the refill circuit. This is mainly a troubleshooting
feature. Water in different geographical locations can
have different conductivities. By adjusting the sensitivity
of the refill circuit, this will allow the brewer to operate
under various water conditions.
Procedure to set the sensitivity threshold of the refill
circuit:
NOTE: Make sure the water in the tank is touching the
refill probe.
1. Press and hold the right hidden switch until the
display reads SET LANGUAGE. Press and release the
right hidden switch until the display reads REFILL
and shows a number on both sides of the word.
2. To adjust the threshold setting, press (-) to decrease
or (+) to increase the setting.
NOTE: Always make sure that the number on the right
is larger than the number on the left when water is in
contact with the refill probe in the tank.
3. When finished, select DONE. This saves the new
setting and advances to the next function screen
(L) SPRAY OZ/M. To exit programming and return
to the MAIN SCREEN, press ENABLE BREW ON/
OFF switch.
* SPRAY OZ/M
This function allows the operator to view or enter the
actual flow rate coming out of each sprayhead. This is
NOT used to control the actual flow rate, but to tell the
internal processor how fast the water is flowing.
Procedure to set the sprayhead flow rate:
1. Press and hold the right hidden switch until the
display reads SET LANGUAGE. Press and release
the right hidden switch until the display reads SPRY
OZ/M. The number represents what the brewer
thinks is the flow rate out of that sprayhead.
2. If the actual flow rate of the sprayhead is known
but is different than the number on the display, use
the (-) and (+) to enter the correct flow rate.
3. Select DONE.
4. Repeat procedure for right side of Twins.
5. When finished, press and release DONE to advance
to the next screen. To exit programming and return
to the MAIN SCREEN, press ENABLE BREW ON/
OFF switch.
NOTE: If the flow rate is unknown, proceed to the
CALIBRATE FLOW screen.
* BYPASS OZ/M (ICB & ICB Twins only)
This function allows the operator to view or enter the
actual flow rate coming out of each bypass fitting. This
is NOT used to control the actual flow rate, but to tell
the internal processor how fast the water is flowing.
Procedure to adjust the bypass flow rate setting:
1. Press and hold the right hidden switch until the
display reads SET LANGUAGE. Press and release
the right hidden switch until the display reads
BYPASS OZ/M. The number represents what the
brewer thinks is the flow rate out of that bypass.
2. If the actual flow rate of the bypass is known but
is different than the number on the display, use the
(-) and (+) to enter the correct flow rate.
3. Select DONE.
4. Repeat procedure for right side of Twins.
5. When finished, press and release DONE to advance
to the next screen. To exit programming and return
to the MAIN SCREEN, press ENABLE BREW ON/
OFF switch.
NOTE: If the flow rate is unknown, proceed to the
CALIBRATE FLOW screen.
* DILUTE OZ/M (ITB/ITCB only)
This function allows the operator to view or to enter the
actual flow rate coming out of the dilution nozzle. This
is NOT used to control the actual flow rate, but to tell
the internal processor how fast the water is flowing.
Procedure to adjust the dilution flow rate setting:
1. Press and hold the right hidden switch until the
display reads SET LANGUAGE. Press and release the
right hidden switch until the display reads DILUTE
OZ/M. The number represents what the brewer
thinks is the flow rate out of the dilution nozzle.
Page 22
41581.2 091609
PROGRAMMING THE BREWER (cont.)
PROGRAMMING FUNCTIONS - LEVEL 2 (cont.)
2. If the actual flow rate of the nozzle is known but is
different than the number on the display, use the
(-) and (+) to enter the correct flow rate.
3. When finished, select DONE. This saves the new
setting and advances to the next screen, CALIBRATE
FLOW. To exit programming and return to the MAIN
SCREEN, press ENABLE BREW ON/OFF switch.
NOTE: If the flow rate is unknown, proceed to the
CALIBRATE FLOW screen.
* CALIBRATE FLOW
This function allows the operator to test and enter the
actual flow rate of the sprayhead(s) and the bypass/
dilution for each side of the brewer by dispensing each
separately for one minute. The volumes are then entered
into the brewer.
Procedure to calibrate the sprayhead flow rate:
1. Place a container, accurately graduated with a minimum capacity of 60 ounces, under the funnel.
2. Press and hold the right hidden switch until the
display reads SET LANGUAGE. Press and release
the right hidden switch until the display reads
CALIBRATE FLOW?
3. Select YES to advance to SPRAY HEAD CAL screen.
(Selecting NO in the CALIBRATE FLOW screen will
advance to BREW COUNTERS).
4. Select YES.
The display should read CONTAINER READY? If
container is under the funnel, select YES.
5. The display should read CALIBRATE SPRAY. Press
and release any BREW button on the side to be calibrated to begin the sprayhead flow for calibration.
The display should read CALIBRATE SPRAY...60
SEC TO FINISH. The 60-second timer on the display
will count down to zero. When the counter reaches
zero, the display will change to LEFT or RIGHT OZ,
along with a number.
6. Measure the amount of water in the container and
use (-) and (+) to match the display to the amount
in the container. Then select DONE.
7. The display should now read NEW L or NEW R
SPRY FLOW, along with the correct flow rate of
the sprayhead. After about 5 seconds, the display
will return to the CALIBRATE FLOW screen.
8. Repeat steps 1-7 to calibrate the other side.
9. To exit the CALIBRATE FLOW function and advance
to the next screen, select NO. To exit programming
and return to the MAIN SCREEN, press either ENABLE BREW ON/OFF switch.
Procedure to calibrate the bypass flow rate: (ICB)
1. Place a container, accurately graduated with a minimum capacity of 60 ounces, under the funnel.
2. Press and hold the right hidden switch until the
display reads SET LANGUAGE. Press and release
the right hidden switch until the display reads
CALIBRATE FLOW?
3. Select YES to advance to SPRAY HEAD CAL screen.
Select NO to advance to BYPASS CAL.
4. Select YES.
The display should read CONTAINER READY? If
container is under the funnel, select YES.
5. The display should read CALIBRATE BYPASS. Press
any BREW button on the side to be calibrated to
begin the flow for calibration. The display should
read CALIBRATE BYPASS...60 SEC TO FINISH. The
60-second timer on the display will count down to
zero. When the counter reaches zero, the display
will change to LEFT or RIGHT OZ/M, along with a
number.
6. Measure the amount of water in the container and
using the (-) and (+), adjust the amount on the
display to match the amount in the container. Then
select DONE.
7. The display should now read NEW L or NEW R
BYPS FLOW, along with the correct flow rate of
the bypass. After about 5 seconds, the display will
return to the CALIBRATE FLOW screen.
8. Repeat steps 1-7 to calibrate the other side.
9. To exit the CALIBRATE FLOW function and advance
to the next function screen, select NO. To exit programming and return to the MAIN SCREEN, press
ENABLE BREW ON/OFF switch.
Procedure to calibrate the dilution flow rate: (ITCB)
1. Place a container, accurately graduated with a minimum capacity of 130 ounces, under the funnel.
Page 23
(cont. on page 24)
41581.2 091609
PROGRAMMING THE BREWER (cont.)
PROGRAMMING FUNCTIONS - LEVEL 2 (cont.)
* CALIBRATE FLOW (cont.)
ICB Series
ITB/ITCB Series
CALIBRATE FLOW?
CALIBRATE FLOW?
NO
YES
NO
BREW
COUNTERS
BREW
COUNTERS
SPRAYHEAD CAL
SPRAYHEAD CAL
NO
NO
BYPASS CAL?
QUIT
YES
CONTAINER READY?
QUIT
YES
YES
CONTAINER READY?
QUIT
60 SEC TO FINISH
QUIT
(-)
DONE
(+)
(+)
(-)
DONE
(+)
NEW DILUTE FLOW
XX.X OZM
XX.X OZM
5 sec
CALIBRATE FLOW?
NO
YES
CALIBRATE SPRAY
QUIT
START
CALIBRATE SPRAY
SPRAYHD OZ XX.X
DILUTE OZ XX.X
5 sec
QUIT
CALIBRATE DILUTE
NEW L BYPS FLOW
5 sec
CONTAINER READY?
60 SEC TO FINISH
60 SEC TO FINISH
XX.X OZM
YES
START
QUIT
NEW SPRAY FLOW
L/R OZ XX.X
YES
CALIBRATE DILUTE
L/R OZ XX.X
CALIBRATE BYPASS
YES
CONTAINER READY?
CALIBRATE SPRAY
CALIBRATE SPRAY
DONE
QUIT
PRESS BREW START
CALIBRATE BYPASS
60 SEC TO FINISH
DILUTION CAL?
YES
PRESS BREW START
(-)
YES
(-)
DONE
(+)
NEW SPRAY FLOW
XX.X OZM
5 sec
CALIBRATE FLOW?
YES
NO
Page 24
YES
41581.2 091609
PROGRAMMING THE BREWER (cont.)
PROGRAMMING FUNCTIONS - LEVEL 2 (cont.)
NOTE: If the display is already on the DILUTION CAL
screen, skip steps 2-3 and proceed directly to step 4.
2. Press and hold the right hidden switch until the
display reads SET LANGUAGE. Press and release
the right hidden switch until the display reads
CALIBRATE FLOW?
3. Select YES to advance to SPRAY HEAD CAL screen.
Select NO to advance to DILUTION CAL.
4. Select YES.
The display should read CONTAINER READY? If
container is under the funnel, select YES.
5. The display should read CALIBRATE DILUTE. Select
START to begin the dilution flow for calibration. The
display should read CALIBRATE DILUTE...60 SEC
TO FINISH. The 60-second timer on the display will
count down to zero. When the counter reaches zero,
the display will change to DILUTE OZ/M, along with
a number.
6. Measure the amount of water in the container and
using the (-) and (+), adjust the amount on the
display to match the amount in the container. Then
select DONE.
7. The display should now read NEW DILUTE FLOW,
along with the correct flow rate of the sprayhead.
After about 5 seconds, the display will return to the
CALIBRATE FLOW screen. To exit programming and
return to the MAIN SCREEN, press ENABLE BREW
ON/OFF switch.
NOTE: On dual dilution models, left and right dilution
calibrations will be shown.
Page 25
41581.2 091609
PROGRAMMING THE BREWER (cont.)
PROGRAMMING FUNCTIONS - LEVEL 2 (cont.)
* BREW COUNTERS
This function allows the operator to track the total number of brew cycles completed, as well as the number of
batches brewed using each of the brew buttons. There
are (up to) six resettable counters, and one life counter
that is not resettable.
Procedure to view/reset the brew counters:
1. Press and hold the right hidden switch until the
display reads SET LANGUAGE. Press and release
the right hidden switch until the display reads BREW
COUNTERS.
2. Pressing NO will advance to the next programming
function. Select YES to view the first brew counter
(TOTAL LIFE BREWS). This number represents the
total number of brew cycles this brewer has completed. This counter is non-resettable. Press NEXT
to advance to the next brew counter, <- <- BREW
A (left side).
3. This counter represents the number of brews for
Brew A on the left side of the brewer. To reset the
counter to zero, press and release RESET. Press
and release NEXT to advance to the next counter.
4. Repeat step 3 for the remaining two left counters,
BREW B and BREW C.
5. Repeat step 4 for the three right side brew counters.
(Twin only)
6. When finished, press NEXT to advance to the next
programming function, ENTER ASSET #. To exit
programming and return to the MAIN SCREEN,
press ENABLE BREW ON/OFF switch.
BREW COUNTERS?
NO
YES
PRESSING NO WILL
ADVANCE TO
ENTER ASSET #
TOTAL LIFE BREWS
XXXX
NEXT
<- <- XXX BREW A
RESET
NEXT
<- <- XXX BREW B
RESET
NEXT
<- <- XXX BREW C
RESET
ICB Twin
shown.
ITB/ITCB
similar
NEXT
BREW A XXX -> ->
RESET
NEXT
BREW B XXX -> ->
RESET
NEXT
BREW C XXX -> ->
RESET
NEXT
ENTER ASSET #?
NO
Page 26
YES
41581.2 091609
PROGRAMMING THE BREWER (cont.)
PROGRAMMING FUNCTIONS - LEVEL 2 (cont.)
* SET RECIPE TEMPS (ITCB only)
This function allows the operator to set separate temperatures for each selected recipe.
NOTE: Setting recipe temps will override the MASTER
TEMP. The tank will hold at the lowest temperature
between the three selected recipes stored in the brew
buttons. For instance, let’s say Brew A’s recipe temperature is set at 205°, Brew B’s recipe temperature is
set at 205°, and Brew C’s recipe temperature is set at
200°. The tank will hold at 200°. If Brew A or Brew B
is pressed, the tank will heat to the 205° temperature.
The brew button must be pressed again in order for
a brew to start. After the completion of that brew, the
tank will return to the 200° holding temperature. It
may take awhile for the tank to return to the lower
temperature.
NOTE: To return to using the MASTER TEMP setting
after RECIPE TEMPS have been used, press and hold
the right hidden switch until the display reads SET
LANGUAGE. Press and release the right hidden switch
until the display reads SET RECIPE TEMPS. Select YES.
The display will read WILL OVERRIDE THE MASTER
TEMP, and then OVERRIDE? To return to using the
MASTER TEMP, select NO. To exit programming and
return to the MAIN SCREEN, press ENABLE BREW ON/
OFF switch.
1. Press and hold the right hidden switch until the
display reads SET LANGUAGE. Press and release
the right hidden switch until the display reads SET
RECIPE TEMPS.
2. To set different temperatures for different recipes,
press and release YES. Pressing NO will advance
to the next programming function, SERVICE
TOOLS.
3. The display should read WILL OVERRIDE THE
MASTER TEMP, and then OVERRIDE? To retain the
MASTER TEMP setting, press and release NO. To
set separate recipe temperatures, press and release
YES.
4. The display should read TEA 1. Using (-) and (+),
adjust the temperature for TEA 1. When finished,
press and release DONE.
5. The screen should now read TEA 2. Use (-) and (+)
to adjust the temperature for TEA 2. When finished,
press and release DONE.
6. Repeat for all standard and stored recipes.
7. After the last temperature has been entered, press
DONE. The screen should now read TANK WILL
HOLD AT LOWEST TEMP, and then advance to the
ENTER ASSET # screen. To exit programming and
return to the MAIN SCREEN, press ENABLE BREW
ON/OFF switch.
SET RECIPE TEMPS
NO
WILL OVERRIDE
THE MASTER TEMP
OVERRIDE?
NO
YES
PRESSING NO
WILL
RETAIN THE
MASTER TEMP
TEA 1
(-)
XXX°
DONE
TEA 2
(-)
(-)
(+)
XXX°
DONE
COFFEE
DONE
(+)
XXX°
(+)
TANK WILL HOLD
AT LOWEST TEMP
ENTER ASSET #?
NO
Page 27
YES
PRESSING NO WILL
ADVANCE TO
ENTER ASSET #
YES
41581.2 091609
PROGRAMMING THE BREWER (cont.)
PROGRAMMING FUNCTIONS - LEVEL 2 (cont.)
* ASSET NUMBER
This function allows the operator to enter the machine's
asset number. This can be useful for tracking the usage
or service of an individual machine within a group.
Procedure to enter the asset number:
1. Press and hold the right hidden switch until the
display reads SET LANGUAGE. Press and release
the right hidden switch until the display reads ENTER
ASSET #?
2. Select YES. The display will now read
ANXXXXXX.
3. Scroll down (-) or up (+), to set the asset number
of the machine. NOTE: Starting from the right, each
digit will control the next digit, like an odometer.
4. When finished, press and release DONE. The display
will now read SERVICE #. To exit programming and
return to the MAIN SCREEN, press ENABLE BREW
ON/OFF switch.
NOTE: To view the Asset Number, press and hold the
left hidden switch until the display reads ASSET
NUMBER. After releasing the switch, the display will
read SERIAL NUMBER then the software version.
* SERVICE NUMBER
This function allows the operator to enter in the telephone number to call if service is needed. The service
number will be displayed anytime there is a fault message displayed.
Procedure to enter the service number:
1. Press and hold the right hidden switch until the
display reads SET LANGUAGE. Press and release
the right hidden switch until the display reads ENTER SERVICE #?
2. Press and release YES. The display will now read
SCROL THRU #'S NEXT ->NEXT NUMBER, followed
by 000-000-0000. UP TO 16 CHARACTERS ARE
AVAILABLE.
3. Press the SCROL button to scroll through the numbers. When the desired number is shown, press
and release NEXT to move to the next digit in the
phone number.
4. Repeat Step 3 until the entire number is entered.
5. Press and release DONE. The display will now read
SERVICE TOOLS?
* SERVICE TOOLS
(FOR AUTHORIZED SERVICE PERSONNEL ONLY)
This function allows the testing of individual components
and the ability to check switches for proper function. This
function also tests the funnel sensor coil’s frequency
(diagnostic tool for troubleshooting purposes only).
Refer to Service Manual for in depth procedures.
Test Outputs:
The following components can be individually tested:
(L/R) Brew Valve(s)
(L/R) Bypass Valve(s) ICB(TWIN)
(L/R) Dilution Valve(s) ITB/ITCB (w/Dual Dilution)
Refill Valve
Tank Heater Relay
Tank Heater Triac
L/R Funnel Lock (Optional)
Sweetener Solenoid (Optional)
Test Switches:
The following components can be individually tested:
Membrane Switches
Test Frequency: (NOT AVAILABLE ON ITB)
The following components can be individually tested:
L/R Smart Funnel read coils.
* FACTORY DEFAULTS
This function allows the operator to erase ALL of the
previously entered recipes and ad messages. Factory-set
default values will replace ALL previous settings.
Procedure to set factory defaults:
1. Press and hold the right hidden switch until the
display reads SET LANGUAGE. Press and release
the right hidden switch until the display reads FACTORY DEFAULTS.
2. Press YES to restore defaults. The display will read
WILL REPLACE ALL BREW SETTINGS followed with
ARE YOU SURE?
3. Selecting NO, will exit without resetting. Select
YES to load the defaults. After factory defaults have
been restored, the display will return to the MAIN
SCREEN. The factory default values will have replaced
ALL previously entered values. It will NOT reset the life
brew counter. If factory defaults are restored, it will be
necessary to recalibrate the flow rates.
Page 28
41581.2 091609
TROUBLESHOOTING
A troubleshooting guide is provided to suggest probable causes and remedies for the most likely problems
encountered. If the problem remains after exhausting the troubleshooting steps, contact the Bunn-O-Matic
Technical Service Department.
• Inspection, testing, and repair of electrical equipment should be performed only by qualified service personnel.
• All electronic components have 120-240 volt ac and low voltage dc potential on their terminals. Shorting of
terminals or the application of external voltages may result in board failure.
• Intermittent operation of electronic circuit boards is unlikely. Board failure will normally be permanent. If
an intermittent condition is encountered, the cause will likely be a switch contact or a loose connection at a
terminal or crimp.
• Solenoid removal requires interrupting the water supply to the valve. Damage may result if solenoids are
energized for more than ten minutes without a supply of water.
• The use of two wrenches is recommended whenever plumbing fittings are tightened or loosened. This will
help to avoid twists and kinks in the tubing.
• Make certain that all plumbing connections are sealed and electrical connections tight and isolated.
• This brewer is heated at all times. Keep away from combustibles.
WARNING
–
•
•
•
•
Exercise extreme caution when servicing electrical equipment.
Unplug the brewer when servicing, except when electrical tests are specified.
Follow recommended service procedures.
Replace all protective shields or safety notices.
Page 29
41581.2 091609
TROUBLESHOOTING (cont.)
PROBLEM
PROBABLE CAUSE
REMEDY
Temperature Too Low
1. Water temperature in the tank
does not meet the ready temperature.
A) Wait for the brewer to heat to the
proper temperature.
1. Tank Heater failure.
Service required
2. Control Board/Thermistor failure
Service required
1. Water shut off to brewer
Check water supply shut-off
2. Inlet Solenoid failure
Service Required
3. Control Board Failure
Service Required
4. ON/OFF switch is OFF
Turn switch ON
Temp Sensor Out Of Range, Check
For Bad Connections
1. Temperature Sensor Probe
wire(s) broken or not making connection
Check wire and connection of both
black and white wires of temperature
probe.
Temp Sensor Out Of Range, Check
Wire For Shorts
1. Temperature Sensor Probe
wire(s) shorted to housing or to
each other.
Check to confirm that wire(s) are
not pinched between two surfaces
or connected to each other.
Equipment will not operate
1. No power or incorrect voltage
Measure the voltage at the terminal
block and confirm that it matches
the voltage specified on the brewer
data plate withing +/- 10%.
Heating Time Too Long
Fill Time Too Long
Page 30
B) Disable the BREW LOCKOUT
function. See page 16 for procedure.
41581.2 091609
TROUBLESHOOTING (cont.)
PROBLEM
PROBABLE CAUSE
REMEDY
Brew cycle will not start
1. No water
Check plumbing and shut-off
valves
2. No power or incorrect voltage to
the brewer
Check for voltage across the terminals at the terminal block.
3. ON/OFF switch
Test the ON/OFF switch. Refer
to the test switch procedures on
page 50.
4. Brew switch
Test the BREW switch. Refer to the
test switch procedures on page
50.
5. Brew valve
Test the brew valve. Refer to the test
outputs procedures on page 48.
6. Control Board
Substitute a control board known
to be in good working order.
Page 31
41581.2 091609
TROUBLESHOOTING (cont.)
PROBLEM
PROBABLE CAUSE
REMEDY
Automatic refill will not operate
or display shows FILL TIME TOO
LONG
1. No water
Check plumbing and shut-off
valves
2. Refill probe or Sensitivity setting
Remove the strainer and check for
obstructions. Clear or replace.
3. Refill valve
Check the sensitivity setting. Refer
to the REFILL function on page
40. If the left three digit number
is less than the right number, the
machine “thinks” it is full and the
refill valve should be off. If the left
number is larger than the right, then
the refill valve will automatically be
turned on to fill the tank. The right
number is the threshold setting and
can be adjusted to compensate for
extreme water conditions: very pure,
low conductance water requires a
higher setting, while high mineral
content, high conductance water
requires a lower setting. Note that
the left number changes from a high
value when water is NOT touching
the refill probe to a low valve when
water IS touching the probe. For
best operation, the right number
should be set to a value midway
between these low and high numbers. Before changing the setting,
confirm that the refill probe is free
of scale buildup and the connection
to it is secure. Test the refill valve.
Refer to the test outputs procedures
on page 48.
Page 32
41581.2 091609
TROUBLESHOOTING (cont.)
PROBLEM
PROBABLE CAUSE
Automatic refill will not operate or
display shows FILL TIME TOO LONG
(Continued)
REMEDY
Refill valve – Disconnect the brewer
from the power source and remove
wires from refill valve coil. Check
for continuity across the terminals
of the solenoid coil. If continuity is
not present, replace the refill valve.
If continuity is present, the coil may
be stuck closed. Shut water off to
brewer. Press the ON/OFF switch to
turn off the brewer. Open the faucet
and drain water down in the tank
until flow stops or slows to a trickle.
Attach a voltmeter to the terminals
of the refill solenoid. Connect the
brewer to the power source. Press
the ON/OFF switch to turn the brewer
on. Within five seconds, voltage
should be present at the solenoid
terminals. If voltage is not present,
refer to the wiring schematic and
check the wiring harness.
4. Control Board
Substitute a control board known
to be in good working order.
5. ON/OFF Switch
ON/OFF switch must be ON for the
refill circuit to operate. Turn ON.
Page 33
41581.2 091609
TROUBLESHOOTING (cont.)
PROBLEM
PROBABLE CAUSE
REMEDY
Water flows into tank continuously
with power removed from brewer.
1. Refill valve
Foreign material lodged in valve,
holding it in open state.
2. Refill probe or sensitivity setting
Check the sensitivity setting. Refer
to the REFILL function on page
40. If the left three digit number
is less than the right number, the
machine “thinks” it is full and the
refill valve should be off. If the left
number is larger than the right, then
the refill valve will automatically be
turned on to fill the tank. The right
number is the threshold setting and
can be adjusted to compensate for
extreme water conditions: very pure,
low conductance water requires a
higher setting, while high mineral
content, high conductance water
requires a lower setting. Note that
the left number changes from a high
value when water is NOT touching
the refill probe to a low valve when
water IS touching the probe. For
best operation, the right number
should be set to a value midway
between these low and high numbers. Before changing the setting,
confirm that the refill probe is free
of scale buildup and the connection
to it is secure.
3. Control Board
Substitute a control board known
to be in good working order.
Page 34
41581.2 091609
TROUBLESHOOTING (cont.)
PROBLEM
PROBABLE CAUSE
REMEDY
Water will not heat or display shows
HEATING TIME TOO LONG.
1. Limit Thermostat
Remove power from the brewer.
Check for continuity through the
limit thermostat. CAUTION: Do not
eliminate or bypass limit thermostat. Use only replacement part
29329.0001.
2. Temperature probe
Remove the probe from the grommet and submerge in a water bath
of approximately 70°F (21°C).
Connect an ohmmeter to the pins
in the connector. At 60°F (16°C),
the reading should be 15.3k ± 2k
OHMS, at 70°F (21°C) the reading
should be 11.8k ± 2k OHMS, and
at 80°F (27°C) the reading should
be 9.3k ± 2k OHMS. If the probe is
within these parameters, reconnect
to the control board.
3. Tank heaters
Remove power from the brewer.
Check for continuity through the
tank heaters. If no continuity is
present, check for a wiring problem
(consult wiring schematic), then
replace the tank heater if no wiring
problem is found.
4. Control Board
Remove power from the brewer.
Connect a voltmeter across the
tank heater. Reapply power to the
brewer and refer to testing outputs
on page 48. If the voltage measured
when the tank heater is turned on
is very low or zero, then substitute
a control board know to be good
working order.
Page 35
41581.2 091609
TROUBLESHOOTING (cont.)
PROBLEM
PROBABLE CAUSE
REMEDY
No bypass water
1. Bypass valve
Test the bypass valve. Refer to the
test outputs procedures on page
48.
2. Recipe settings
1. Lime buildup
Check to make sure bypass % has
been set for the current recipe.
Inspect the probe and tank assembly
for excessive lime deposits. Delime
as required.
2. Temperature probe
Remove the probe from the grommet and submerge in a water bath
of approximately 70°F (21°C).
Connect an ohmmeter to the pins
in the connector. At 60°F (16°C),
the reading should be 15.3k ± 2k
OHMS, at 70°F (21°C) the reading
should be 11.8k ± 2k OHMS, and
at 80°F (27°C) the reading should
be 9.3k ± 2k OHMS. If the probe is
within these parameters, reconnect
to the control board.
3. Control Board
Remove power from the brewer.
Connect a voltmeter across the
tank heater. Reapply power to the
brewer and refer to testing outputs
on page 48. If the voltage measured
when the tank heater is turned on
is very low or zero, then substitute
a control board know to be good
working order.
Spitting or unusual steaming from
sprayhead or air vent.
Page 36
41581.2 091609
TROUBLESHOOTING (cont.)
PROBLEM
PROBABLE CAUSE
REMEDY
Inconsistent beverage level in
server/dispenser
1.
Improper water pressure
Check operating water pressure to
the brewer. It must be between 20
and 90 psi (138 and 620 kPa).
2.
Brew valve
Test the brew valve. Refer to test
outputs on page 48. Turn the valve
on for 30 seconds and collect the
water dispensed from the sprayhead. Repeat the test several times
to confirm a consistent volume of
dispensed water. If not consistent,
check the valve, tubing and sprayhead for lime buildup.
3.
Bypass valve
If bypass is being used on the inconsistent brewing recipe, test the
bypass valve. Refer to test outputs
on page 48. Turn the valve on for
30 seconds and collect the water
collected from the funnel. Repeat
the test several times to confirm
a consistent volume of dispensed
water. If not consistent, check the
valve, tubing and fittings for lime
buildup.
4.
Lime buildup
Inspect for lime buildup that could
block the tank, tank fittings, tubing,
valves and sprayhead.
5.
Brew volume adjustment
Adjust the brew volume, calibrate
sprayhead and bypass as required
to achieve the desired volume for
each brew cycle.
Page 37
41581.2 091609
TROUBLESHOOTING (cont.)
PROBLEM
PROBABLE CAUSE
REMEDY
Dripping from sprayhead.
1. Brew valve
Repair or replace leaky valve
Water overflows filter.
1. Type of paper filter
BUNN paper filters should be used
for proper extraction
2. No sprayhead
Check sprayhead
1. Beverage left in server from
previous brew
The brew cycle should be started
only with an empty server under
the funnel.
2. Brew volume adjustment
Adjust the brew volume, calibrate
sprayhead and bypass as required
to achieve the desired volume for
each brew cycle
1. Solenoids
The mounting screws on the solenoids must be tight or they will
vibrate during operation
2. Plumbing lines
Plumbing lines should not be resting
on the countertop.
3. Water supply
The brewer must be connected to a
cold water line. Water pressure to
the brewer must not be higher than
90 psi (620 kPa). Install a regulator
if necessary to lower the working
pressure to approximately 50 psi
(345 kPa).
4. Tank heaters
Remove and clean lime off tank
heaters.
Beverage overflows server.
Brewer is making unusual noises.
Page 38
41581.2 091609
TROUBLESHOOTING (cont.)
PROBLEM
PROBABLE CAUSE
REMEDY
Weak beverage.
1. Type of paper filter
BUNN paper filters should be used
for proper extraction
2. Coffee
For coffee, a sufficient quantity of
fresh drip or regular grind should
be used for proper extraction.
3. Sprayhead
Bunn-O-Matic sprayhead should
be used to properly wet the bed of
ground coffee in the funnel
4. Funnel Loading
The BUNN paper filter should be
centered in the funnel and the bed
of grounds leveled by gently shaking.
5. Water temperature
Empty the server, remove its cover,
and place the server beneath the
sprayhead. Place empty funnel over
the server entrance (not in the funnel
rails). Press brew. Check the water
temperature immediately below
the sprayhead with a thermometer.
The reading should not be less than
195°F (90°C).
6. Incorrect recipe
Consider adjusting brew volumes,
bypass percentage and pulse brew
routines. Contact Bunn-O-Matic for
suggestions.
Page 39
41581.2 091609