1
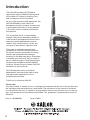
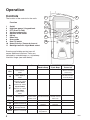
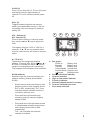
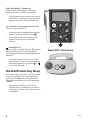
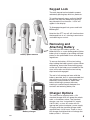
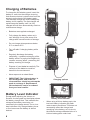
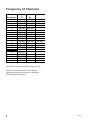
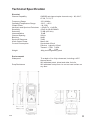
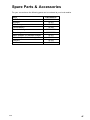
SAILOR SP3300
Operation Manual
Introduction
The SAILOR Portable VHF SP3300 is
approved to fulfil the GMDSS requirements
for portable VHF radios for Safety at Sea
and is waterproof to IP67 standard.
As part of the required safety equipment, the
SAILOR SP3300 is to be used in an
emergency situation. However, the best way
to guarantee functionality in an emergency,
is to use the radio in the daily communication onboard.
This is possible due to a unique battery
concept. The primary emergency battery is
to be stored for emergency situations and a
secondary rechargeable battery can be
used for daily communication. In this way
you have at least 8 hours operation time.
The range of maritime communication
products from SAILOR includes radios for
the leisure market to equipment for fishing
vessels and complete communication
solutions for the deep sea sector. Everything
is covered from basic VHF units to state-ofthe-art satellite systems, Ship Security Alert
Systems and complete compact GMDSS
solutions. Please find your nearest SAILOR
distributor on: www.sailor.dk
SAILOR operate a policy of continual
development and reserve the right to alter
and improve the specification of our
products without notice.
Thank you for choosing SAILOR.
Please note
Any responsibility or liability for loss or damage in connection with the use of this product and
the accompanying documentation is disclaimed. The information in this manual is furnished
for informational use only, is subject to change without notice, may contain errors or inaccuracies, and represents no commitment whatsoever. This agreement is governed by the laws of
Denmark.
Doc. no.: B3300GB0
ii
Issue: C/0451
Contents
Introduction ............................................................................................................. ii
Warranty Limitation .............................................................................................................. 1
Operation ................................................................................................................. 2
Controls ................................................................................................................................ 2
Disable/Enable Key Beep .................................................................................................... 4
Keypad Lock ......................................................................................................................... 5
Removing and Attaching Battery ......................................................................................... 5
Charger Options ................................................................................................................... 5
Charging of Batteries ........................................................................................................... 6
Battery Level Indicator ......................................................................................................... 6
General .................................................................................................................... 7
Antenna ................................................................................................................................ 7
Transmission Range ............................................................................................................ 7
Frequency of Channels ........................................................................................................ 8
Battery Life Guidelines ........................................................................................................ 9
Fault Finding ...................................................................................................................... 10
Technical Specification ...................................................................................................... 11
Spare Parts & Accessories ................................................................................... iii
Warranty Limitation
IMPORTANT - The radio is a sealed waterproof unit. To create and maintain its waterproof
integrity it was assembled in a controlled environment using special equipment. The radio is
not a user maintainable unit, and UNDER NO CIRCUMSTANCES should the unit be opened,
except by authorised personnel. Unauthorised opening of the unit will invalidate the warranty.
0438
1
Operation
Controls
1
The location of the controls for the radio
1
2
3
4
5
6
7
8
9
10
11
2
Function
3
On/off
High/Low power / Keypad Lock
PTT (Push To Talk)
Volume mode select
Squelch mode select
Up key
Down key
Scan mode
Dual /Tri watch
Select Priority / Personal channel
Backlight on/off & Light Mode select
4
5
6
7
8
9
10
11
Pressing and holding certain keys will
access additional functions. These are
indicated by a double beep, or a triple beep
if held for longer (see table below).
Key
1 x Press
2 x Press
VOL
Select Volume
Mode
* Select secondary
SQ
Select Squelch
Mode
Standard Mode
Channel Up / Down
Volume Mode
Volume Up / Down
Squelch Mode
Squelch Up / Down
Light Mode
Light level Up /
Down
Disable / Enable
First Key Beep
SCAN
Memory Scan
D/W
Dual Watch
16
Select Channel 16
Press & Hold
Double Beep
Press & Hold
Triple Beep
Hold During
Power Up
channel set
Add / Delete
Inhibit / Enable
channel from Scan All Channels selected channel
memory scan
from scan
Tri Watch
Select Personal
Set Personal
Channel
Channel
Select Light Mode
Backlight On/Off
Hi/Lo
Select 1 or 2.5 Watt
Engage / disable
keypad lock
* If available
2
0451
On/Off (1)
Press to turn the radio on. To turn off, press
and hold the key for approximately 2
seconds. This is to avoid accidental power
off.
Hi/Lo (2)
Toggles between high and low transmit
power (see specification section). Use the
low setting over short ranges to preserve
battery life.
VOL - Volume (4)
SQ - Squelch (5)
Press to select Volume or Squelch mode
then use the and keys to adjust the
level.
The display will show “VOL” or “SQL” for 3
seconds - if / are not pressed within
this time, their function will revert to channel
select.
/ (6 & 7)
These keys will change the selected
channel. Pressing VOL, SQ or , then /
within 3 seconds will adjust the volume,
squelch or backlighting level respectively.
The bargraph will indicate the level selected.
SCAN mode (8)
Scans through the channels stored in the
channel memory (display shows MEM
SCAN).
0438
•
Select channel and press twice to add/
delete to memory scan (display shows
ENT or DEL respectively). The ❑ icon
indicates that the selected channel is
included in memory scan.
•
Press and hold until double beep
sounds to scan all channels (display
shows SCAN).
•
Press and hold until triple beep sounds
to inhibit/enable selected channel from
scan (display shows INH or ENA
respectively).
The - icon indicates the selected
channel is inhibited
a
b
f
c
g
d
h
e
i
a. Bar graph Power up
Battery level
Standby
Battery level
Transmit
Battery level
Volume Mode Volume level
Squelch Mode Squelch level
pressed
Backlight level
b Personal Channel indicator
c Channel selected
e High or Low power indicator
f Function indicator
g Selected channel stored in momory
h Channel inhibited from scan
i
Scan mode selected
3
D/W - Dual Watch / Triwatch (9)
Press to select Dual Watch of selected
channel and Ch16. Display shows D/W.
•
Press and hold until double beep sounds
for Triwatch - selected channel, personal
channel and Ch16. Display shows T/W.
16 - Channel 16 / Personal Channel (10)
Press to select channel 16.
•
Press and hold until double beep to select
personal channel (display shows )
•
Press and hold for three beeps to set
selected channel as the personal
channel.
- Backlight (11)
Press to turn on and off. Use / to adjust
the backlighting level (5 levels available).
The bargraph indicates the backlighting level
selected.
•
Keep VOL held down
The battery save function turns off the
backlighting if no key is pressed after 20
seconds. Press any key (except or )
to turn light on again.
Disable/Enable Key Beep
The radio beeps every time a key is pressed
to confirm operation. To disable key beep,
press and hold SQ while turning the set on.
Repeat this procedure to turn the key beep
on again.
•
4
Second level functions (such as All
Channel Scan, Triwatch etc.) will still be
indicated by a beep, even if the key beep
is disabled.
0438
Keypad Lock
The radio keypad can be locked to prevent
accidentally pressing keys while in a pocket etc.
To lock the keypad, press and hold the Hi/
Lo key. The radio will beep twice and any
key pressed will not function - LOCK will
appear in the display.
To disengage keypad lock, press and hold
Hi/Lo again.
Note that the PTT key will still function when
the keypad lock is on, allowing transmission
and receiving as normal.
Removing and
Attaching Battery
Battery pack removal
The radio has two battery options - an
850mAh NiCa or a non rechargeable Lithium
battery that is capable of providing sufficient
power for the specified 8 hours according to
regulations.
To remove the battery, lift the two locking
clips holding the battery pack in place. When
reattaching, ensure the three locating pegs
on the top of the battery are located into the
slots in the radio and that the two locking
clips have both engaged.
The set is fully waterproof even with the
battery removed, but it is recommended that
any moisture on the top of the battery or in
the battery compartment is wiped clear
before attaching to prevent the water
creating a conductive path between the
contacts and reducing battery life.
Charger Options
Battery charger
0451
The radio can be supplied with a 12V
standard charger that will accept the whole
radio, or the battery alone. The standard
charger runs from a standard 12V supply
(10.5V-16V), or from AC mains with an
appropriate optional adapter / power supply.
Charging with the standard charger takes
approximately 14-16 hours. There is also a
fast charger available which will charge the
battery within 1 1/2 hours.
5
Charging of Batteries
To charge the NiCa battery pack, insert the
battery or radio into the charger ensuring
that excess moisture is wiped clear from the
contacts on the back of the battery pack.
The standard charger will trickle charge the
battery to full capacity. The fast charger will
rapid charge the battery until it is fully
charged and will then automatically switch to
maintenance charge.
•
Batteries are supplied uncharged.
•
Fully charge the battery when not in
use, although it may lose some of its
charge after several months of storage.
•
Do not charge at temperatures below
0°C or above 40°C.
•
Turn off radio if charging battery while
fitted.
•
Regularly discharge the battery
completely - repeated recharging of the
battery while it is partly discharged may
create a ‘memory effect’, preventing the
battery reaching full charge.
•
Dispose of used batteries carefully. The
contents of the batteries could be
harmful to the environment.
•
Never expose to a naked flame.
•
IMPORTANT: The Lithium battery is
not rechargeable, and under no
circumstances should any attempt be
made to recharge it. Replacement
lithium batteries can be re-ordered
from your local reseller.
Charging options
Battery Level Indicator
Except when adjusting the Volume or
Squelch, the bar graph on the display shows
the battery charge level. This indicates the
voltage at the battery terminals, not
necessarily the charge stored. Ten or nine
bars indicate a fully charged battery, three
or four bars mean the battery is almost
drained.
6
Battery level indicator
•
When using a lithium battery pack, the
low level battery indicator may flash
under transmit conditions. This does not
necessarily reflect the charge level
remaining in the battery, as it is due to
the different voltage characteristics of a
Lithium battery pack under load.
0438
General
Antenna
Transmission Range
The antenna for the radio is fitted to the unit
via a robust screw fitting to an M6 threaded
socket on the top of the radio. This system is
more rugged than a traditional BNC
connector, so the radio’s drop-proof integrity
is not compromised by the antenna fixing.
Because VHF signals travel in a straight line
and are not reflected back off the ionosphere as lower frequency signals are, the
range of VHF signals is limited to ‘line of
sight’, beyond which the other vessel
passes behind the curve of the Earth.
Therefore, the range will increase greatly the
higher above sea level the antenna is, as
illustrated (assuming maximum transmission
power is used):
While the radio is drop-proof and very
robust, damage to the antenna such as
bending or kinking may adversely affect the
transmission efficiency of the unit, which
may lead to overloading of the power
module. Damaged antenna should be
replaced immediately.
Cherbourg
Isle of Wight
87 km / 65 M
3M
6M
9-3
/2
2-1
m
k
-53
20
-26
km
/1
46
30 m/
100 ft
Mast
20 km / 12 M
9 m/
30 ft
Mast
13
8- -16
10 km
M
Niton
8 km / 5 M
Endeavour
Replacement antenna and other spare parts
can be purchased from your local reseller.
Please refer to section Spare Parts &
Accessories.
0438
Therefore, the typical range of a hand-held
radio such as this one used at sea level will
be approximately 8 Km (5 Miles). This will
increase as height above sea level increases, or if the other radio user’s antenna
is at a greater height - note that the range
between the yacht with the antenna
mounted on a 9 M (30 Ft) mast and the
hand-held user increases to 13-16 Km (8-10
Miles).
7
Frequency of Channels
Channel
Designator
6
8
9
10
11
12
13
14
15
16
17
67
68
69
70
71
72
73
74
77
Tx
156.300
156.400
156.450
156.500
156.550
156.600
156.650
156.700
156.750
156.800
156.850
156.375
156.425
156.475
156.525
156.575
156.625
156.675
156.725
156.875
Rx
156.300
156.400
156.450
156.500
156.550
156.600
156.650
156.700
156.750
156.800
156.850
156.375
156.425
156.475
156.525
1W only
1W only
The radio is fitted with simplex channels only.
Channel 70 is restricted for DSC (Digital
Selective Calling) use only and is therefore
not available on the radio.
8
0438
Battery Life Guidelines
•
New batteries should be fully charged
and fully discharged several times to
achieve full capacity.
To a large extent, the battery life will depend
on the usage, or Duty Cycle of the radio - i.e.
the battery will be drained much quicker if
the radio is transmitting continually than if it
is just receiving. Additionally, if the radio is
set to High Power (2.5Watts*), the power
drain will be considerably greater than if
transmitting on Low Power (1Watt*)
* Standard power settings.
Values predicted from calculation –
Battery Pack
850mAh NiCa
Typical Life of fylly charged pack at 25° C
Duty Cycle Ai
Duty Cycle Aii
Duty Circle B
9.2 hrs
13.5
5.1 hrs
Ai
Based on -
5% Transmit at 2.5W setting of r.f. output power (1.4Amp)
5% Receive at 200mW Audio (0.15Amps)
90% Receiver squelched (0.02Amps)
Aii
Based on -
5% Transmit at 1W setting of r.f output power (0.8Amp)
5% Receive at 200mW Audio (0.15Amps)
90% Receiver squelched (0.02Amps)
B
Based on -
10% Transmit at 2.5W setting of r.f. output power (1.4Amp)
10% Receive at 250mW Audio (0.15Amps)
80% Receiver squelched (0.02Amps)
Charge Held While Stored
The Following Data is Approximate:
Battery Pack
850mAh NiCa
0438
Duration
Up to 50% Charge
At 25°C
At 45°C
4-6 Months
4 Weeks
9
Fault Finding
Symptom
Unit will not switch on
Possible Cause
Remedy
y Re-charge battery
y Battery not charged
y Battery not attached correctly
y Ensure battery is fully
to radio
engaged (see secton 2.5)
Scan or Memory Scan is y Noise on the channel is holding y Increase squelch level
y Inhibit channel from scan
locking on a channel
the scan
without a signal
y Priority channel selected
y Select a working channel
Dual Watch not being
entered
(normally Ch16)
y Exit Dual Watch
Cannot change channel y Dual Watch (D/W) engaged
y Consult your national
Certain channel numbers y Some channels are restricted
authority for permitted
are not obtainable
and programmed out depending
on country of purchase
channels in your region
y Exit D/W or Scan
y Scanning or D/W function
Will not transmit
Will not transmit on 2.5W y Low voltage when full
y Battery charge low but OK on 1W
transmitting current is drawn
recharge the battery
y Consult your national
authority
Transmissions
y Damaged antenna
y Replace antenna
persistently weak
These simple checks should be carried out
before seeking technical assistance and
may save time and expense.
Before contacting your servicing agent
please obtain the radio’s serial number and
the software iteration - this is shown in the
large digits on the display for 2 seconds
after the radio is turned on.
10
0451
Technical Specification
Electrical
Channel Capability
Frequency Range
Operating Temperature Range
Output Power
Harmonic and Spurious Emissions
Sensitivity
Selectivity
Intermodulation
Channel Spacing
Blocking
Spurious Response
Audio Output Power
Current Consumption
Weight
Environmental
Waterproof
Drop Resistance
0438
GMDSS sets have simplex channels only - 06, 08-17,
67-69, 71-74, 77
155-163Mhz
-20°C - +60°C
1 & 2.5W
<.25µW Tx, <1nW Rx
0.5µV for 20 dB SINAD
70 dB (±25 kHz)
70 dB
25kHz
90dB
70dB
Max 0.4W
Squelched <25mA
Receive typically 125mA
Transmit 2.5W 0.95A
1W
0.6A
400g including battery pack
To a depth of 1m fully submersed, including a 45°C
thermal shock.
Will withstand petrol, diesel and other fuel oils.
Will withstand a drop from 1m on to a hard surface on
any face.
11
12
0438
Spare Parts & Accessories
For your convenience the following parts can be ordered at your local reseller
Item
VHF Radio
8033000008
Antenna
55.367
NiCa Battery
55.359
Lithium Battery
0438
Part Num ber
55.360
Standard charger
8033210001
Fast charger
8033220001
Mains Adapter for standard charger
55.357
Mains Adapter for fast charger
55.358
Lanyard
55.366
Leather Holster
55.365
iii