1
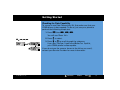
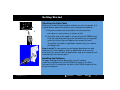
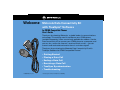
Welcome
Motorola Data Connectivity Kit
with TrueSync® Software
for CDMA Compatible Phones
User’s Guide
Thank you for choosing Motorola - a global leader in communications
technology. This exciting new kit transforms your CDMA phone
(available separately) into a conveniently portable fax modem. Use the
Data Connectivity Kit to connect your CDMA phone to a computer, and
you can fax*, access the Internet*, send and check e-mail* – you can
transmit and receive data wherever there is a wireless signal!
Thank you for purchasing the Motorola Data Connectivity Kit with
TrueSync Software for CDMA Compatible Phones!
• Getting Started
• Placing a Data Call
• Ending a Data Call
• Receiving a Data Call
• TrueSync Synchronization
• Troubleshooting
©1999 Motorola, Inc.
* Contact your Service Provider for availability.
Getting Started
Now that you have opened the package, you are ready to go.
To get started, connect the cable, install the software, and
make a wireless data connection.
It is as easy as that!
In the package, you will find:
• The Motorola Data Cable.
• A CD-ROM with installation software.
• A TrueSync® Getting Started Guide.
Digital
1 menu
2
abc
3 def
batt
5
lock
jk l
6 mno
8
vib
tuv
9
0
opr
4 ghi
7 pqrs
RCL
STO
FCN
©1999 Motorola, Inc.
CLR
mute
wxyz
To begin making wireless data connections, you will
also need:
• A Motorola CDMA Phone with data capability.
• A compatible desktop, laptop, or handheld computer.
SEND
END
Previous
Menu
Next
2
Getting Started
Checking for Data Capability
To use your new Data Connectivity Kit, first make sure that your
CDMA phone is data capable. To do so, just use your phone to
perform the following simple test.
ƒ
⁄ ¤ fi.
1. Press
then
,
,
You will see: Phone Info.
2. Press A to select.
ƒ ⁄, ¤, fi
Phone
Phon
e
Info
Modem/Fax
Mode
m/Fax
Cap able
Capable
TrueSync
True
Sync
Capable
©1999 Motorola, Inc.
3. Press q or Z to scroll through the submenu.
If you see: TrueSync Capable and Modem/Fax Capable,
your CDMA phone is data capable.
If you do not see the screens shown to the left as you scroll,
contact your Service Provider for more information.
Previous
Menu
Next
3
Getting Started
Attaching the Data Cable
7 pqrs
0
RCL
opr
STO
CLR
SEND
Before you install the fax/modem software on your computer, it is
a good idea to attach the cable to your computer and phone.
END
FCN
1.
1. Plug the smaller end of the cable into the accessory
connector on your phone, as shown at left.
2. The other end of the cable is a 9-pin plug (a PC RS232 plug).
Find the matching serial port on the back of your computer,
insert the 9-pin plug, and tighten the screws by hand.
To indicate the cable is attached on both ends, your phone
will beep once.
2.
Keep in mind: To save power, some laptops deactivate unused
serial ports. If this happens, open an application that uses the
serial port, like a fax or dial-up application, and your computer will
automatically activate the port.
Installing the Software
To begin making wireless data calls, you will need to
install the software from the CD-ROM that came in the Data
Connectivity Kit. Included on the disk is the CDMA modem driver
for your computer.
©1999 Motorola, Inc.
Previous
Menu
Next
4
Getting Started
What is Pre-arrangement?
Some networks require you to change a setting on your phone
before you can receive an incoming fax or data call. This is called
pre-arrangement.
If your network requires it, do not worry about placing data or fax
calls – the pre-arrangement setting only applies to receiving calls.
In pre-arrangement mode, you will not be able to receive incoming
Voice Calls. Once you have selected a pre-arrangement setting,
your phone will remain in that setting until you change it.
Continue to learn how to set up pre-arrangement.
©1999 Motorola, Inc.
Previous
Menu
Next
5
Getting Started
Setting up Pre-arrangement
Note: This menu option is only available if your Service
Provider requires pre-arrangement and the data cable is
connected to your phone.
1. Press
P ho
h o n e
e
B oo
ook
2. Press q or Z to scroll to Phone Options and press A to
select.
T im
i m e rs
rs
3. Press q or Z to scroll to Data Setup and press A to select.
T on
one
C on
o n t ro
rol
L oc
ock
S ec
e c u re
re
P ho
h o n e
e
O pt
p t i on
ons
ƒ then A to enter the menu.
D at
ata
S et
etup
V oi
o i c e
e
O nl
nly
I nc
n c o mi
m i n g
g
Fax
I nc
n c o mi
m i n g
g
D at
ata
T o M ai
ain
M en
enu 4. Press q or Z to scroll to Voice Only, Incoming Fax,
Incoming Data or To Main Menu and press A to select.
If you select Incoming Fax or Incoming Data, you will see:
NoIncoming VoiceCalls.
After a few seconds, your phone will return to Data Setup. If
and the phone
you would like to keep the setting, press
will return to its idle state. You will see: Data or Fax Ready.
º
Your phone will automatically return to Voice Only mode if
you remove the cable, turn OFF the phone, or shut down
your computer.
Keep in mind: When your phone is in Data or Fax mode, you can
still place voice calls, but you will not be able to receive voice calls.
©1999 Motorola, Inc.
Previous
Menu
Next
6
Placing a Data Call
Making a Wireless Data Connection
Once the data cable is connected, your phone becomes a modem
for your computer. To send a fax or data, use an application on
your computer to place the call.
Keep in mind: You cannot place data or fax calls through your
phone’s keypad. All data and fax calls must be placed through the
application on your computer.
1. Make sure the cable is connected properly.
2. Open the application on your computer, like a fax or dial-up
application, and place the call through the application on
your computer.
1 2 2 5
Dialing
312-555-1212
IU
1 2 2 5
Connecting..
IU
©1999 Motorola, Inc.
3. The phone will display the number dialed through your
computer. If the number is in your phone’s internal Phone
Book, your phone will display the name stored in the entry.
While the connection is being made,
your phone will display: Connecting...
Your phone will automatically redial 3 times (or until it is
successful). If the call is not connected after 3 tries, the display will
return to idle.
Previous
Menu
Next
7
Placing a Data Call
Reading the Display
Once the call is successfully connected, your phone’s display
shows transmission information.
You will see:
• the kind of call, either Fax or Data.
• the connection speed.
12 25
Fax 14.4 0:12:11
847-555-1212
Tx
Rx
IU
©1999 Motorola, Inc.
• the time elapsed for the current connection.
• the number to which you are connected.
• real-time transfer rates for sending info.
• real-time transfer rates for receiving info.
Previous
Menu
Next
8
Ending a Data Call
When making data calls, keep in mind that some of the normal
ways to end a wireless call, like pressing the Smart Button or
closing the phone, will not work.
To end a data call:
Close the connection through the application on your
computer.
Your phone will return to the idle display.
Keep in mind: If your service requires pre-arrangement,
your phone will remain in pre-arranged status when the data
call is ended. You will see either Fax Ready or Data Ready.
Note: Disconnecting the cable or turning OFF your phone will
also end a data call, but they may disrupt your computer.
See troubleshooting for more information.
©1999 Motorola, Inc.
Previous
Menu
Next
9
Receiving a Data Call
When you have an incoming data or fax call, your phone’s display
will show what kind of call you are receiving, along with the
number of the caller. (If the number matches an entry in your
Phone Book, you will see the name stored in the entry instead).
1 2 2 5
Data
Call
312-555-1212
To receive a data or fax call:
• The cable must be attached to your phone and
computer.
IU
• Both your phone and computer must be turned ON.
1 2 2 5
Call
Fax
312-555-1212
• If your service requires pre-arrangement, your
phone must be set in the appropriate mode to
receive the call.
IU
©1999 Motorola, Inc.
Previous
Menu
Next
10
Receiving a Data Call
If you are using the software that came in the Motorola Data
Connectivity Kit, the application that you installed will
automatically answer incoming data or fax calls.
Keep in mind: The data cable must be connected to your phone
and a computer and both must be ON. Also remember, if you press
on your phone, you will lose the incoming call.
æ
To receive a call:
1. Check that the data cable is connected.
2. Select the pre-arrangement mode if necessary.
3. Your phone will automatically answer the call.
or
If necessary, select the menu option in the application.
12 25
Connecting..
IU
While the connection is being made,
your phone will display: Connecting...
If the connection does not succeed, the display will
return to idle.
If you are not using the software that came with the Data
Connectivity Kit, consult the user’s guide that came with the
software you are using.
©1999 Motorola, Inc.
Previous
Menu
Next
11
Receiving a Data Call
Reading the Display
Once the call is successfully connected, your phone’s display
shows transmission information.
You will see:
• the kind of call, either Fax or Data.
• the connection speed.
12 25
Fax 14.4 0:12:11
847-555-1212
Tx
Rx
IU
©1999 Motorola, Inc.
• the time elapsed for the current connection.
• the number to which you are connected.
• real-time transfer rates for sending info.
• real-time transfer rates for receiving info.
Previous
Menu
Next
12
Receiving a Data Call
Caller IDs
12 25
mith J
02 S
Home
1-312-555-1212
Your phone stores the numbers of incoming fax or data calls with
your other Caller IDs.
Keep in mind: You will not be able to return data or fax calls
through your phone’s menus, which include the Caller ID and Last
10 Dialed menus. All data and fax call must be placed through your
computer.
During the Call
While connected on a data call, you can still access most of your
phone’s features.
• Navigate the phone’s menu system to change or view your
phone’s features or Phone Book entries.
• Read messages or Caller IDs that you received before
placing the call.
Call Waiting
If you subscribe to Call Waiting, it will automatically be deactivated
whenever you are on a data or fax call.
©1999 Motorola, Inc.
Previous
Menu
Next
13
TrueSync® Synchronization
Introducing TrueSync Software
Wireless data calls are only the beginning. With the Data Cable and
TrueSync software, your phone can exchange select information
with your compatible computer.
You can use TrueSync to transfer and synchronize contact
information from your phone to your compatible desktop, laptop
or handheld computer, and vice versa.
That way, you only enter contact information once and you can
have the information everywhere you want it!
Keep in mind: TrueSync software is designed to synchronize
certain basic features of the initial releases of many Personal
Information Managers (PIM) hardware and software.
Continued on the next page.
©1999 Motorola, Inc.
Previous
Menu
Next
14
TrueSync® Synchronization
Using TrueSync Software
Here are just a few ways TrueSync software helps make
communication easier than ever:
• Add a contact to your phone on the go. Update your contact
file at the home or office later.
• Transfer contacts into your phone’s internal Phone Book for
easy access and quick memory dialing.
• Customize many of your phone’s features, like ringer styles
and security settings, through TrueSync software’s simple
interface.
• Synchronize with select Personal Information
Managers (PIMs). TrueSync software helps provide onestep, multi-point synchronization with some of the most
popular PIM managers, devices and services.
Visit www. starfish.com for more information on TrueSync and
software product updates.
©1999 Motorola, Inc.
Previous
Menu
Next
15
Troubleshooting
Q. I plugged the cable
into my phone
but my phone did
not beep.
How do I know if the
data cable is ready
to go?
A. The beep is a sure sign that you are setup correctly.
If you did not hear the beep, the first thing to check is
that your phone is data capable. To do so, just follow
these steps:
ƒ
⁄ ¤ fi.
1. Press
then
,
,
You will see: Phone Info.
2. Press A to select.
3. Press q or Z to scroll through the submenu. Your CDMA
phone is data capable if you see: TrueSync Capable and
Modem/Fax Capable.
Next make sure that both ends of the data cable are connected,
the smaller plug to your phone and the larger to your computer.
Also check the model number of the cable to be sure you have
the right one. Look for SYN7464 printed on the cable.
If all of the above checks out, your computer may have
deactivated the port to save power. Try opening an application
that uses the port, like a fax or dial-up application, and your
computer will automatically activate the port.
©1999 Motorola, Inc.
Previous
Menu
Next
16
Troubleshooting
Q. My phone beeped
when I attached the
cable but my fax and
data applications do
not work at all.
What is wrong?
A. Keep in mind that you must be in an area with digital coverage.
Check your phone’s display for
to be sure you are in a digital
coverage area.
Some wireless networks may not support data or fax
transmission. If you see the digital indicator but you are
roaming on an unfamiliar network, this may be the case.
Also remember that data and fax transmission usually
requires a subscription. Contact your Service Provider for
more information.
Q. Why does the
computer show a
connection rate of
19200 Kbps?
A. 19200 is the rate of the connection between your computer and
the phone. The rate of the connection between your phone and
the network is displayed on your phone and will be either 14400
or 9600.
Q. I can not end my
data call by closing
the application on
my computer.
A. If necessary, try pressing
on the phone. You might also
disconnect the cable or turn OFF the phone. Remember, if
possible always close the connection through your computer.
These alternative methods may disrupt the application on your
computer.
º
What can I do?
©1999 Motorola, Inc.
Previous
Menu
Next
17
Trademarks
MOTOROLA and STARTAC are registered trademarks
of Motorola, Inc.
©1999 Motorola, Inc.
TrueSync is a registered trademark
of Starfish Software, Inc.
©1999 Motorola, Inc.
Previous
Menu
18