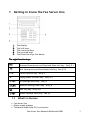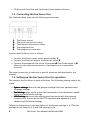
1
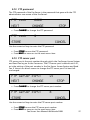
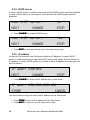
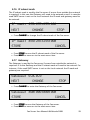
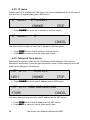
Fax Server Uno
and
Setup
Manual
1.001 08 Vidicode 2008
Contents
1
Getting to know the Fax Server Uno ........................... 7
1.1
1.2
1.3
2
What's in the box ................................................................. 7
Connecting the Fax Server Uno ........................................... 8
Setting up the Fax Server Uno for operation ..................... 8
System settings ............................................................. 9
2.1
2.2
2.3
2.4
2.5
3
Set the Clock ......................................................................... 9
Protect the Fax Server with a Password.............................. 9
Remove Password protection ............................................ 10
Set the Language ............................................................... 10
Reset all values ................................................................... 11
Fax settings ................................................................. 13
3.1
3.2
3.3
3.4
3.5
3.6
3.7
3.8
3.9
3.10
3.11
3.12
3.13
3.14
3.15
3.16
3.17
3.18
3.19
4
Fax ID................................................................................... 13
Top text ............................................................................... 13
Maximum Fax speed........................................................... 14
Fax Send retries .................................................................. 14
Send Retry time .................................................................. 15
Retry after voice ................................................................. 15
Send Start Time .................................................................. 15
Fax to Printer ...................................................................... 16
Speaker................................................................................ 16
Speaker volume............................................................... 16
Beep after Rx/Tx .............................................................. 17
Dial prefix ........................................................................ 17
No Answer time-out........................................................ 18
No Carrier time-out......................................................... 18
Caller ID ........................................................................... 18
Rings to answer on.......................................................... 19
Ring volume..................................................................... 19
Ring variation .................................................................. 20
Ring frequency ................................................................ 20
LAN settings................................................................ 21
4.1
4.2
4.3
4.4
4.5
4.6
4.7
E-mail address ..................................................................... 21
Reply address ...................................................................... 22
SMTP server IP address ....................................................... 22
SMTP server port ................................................................ 23
SMTP Login ......................................................................... 23
Domain name ..................................................................... 24
DNS server ........................................................................... 24
Fax Server Uno Manual ©Vidicode 2008
3
4.8 Printer address .................................................................... 25
4.9 Printer port ......................................................................... 25
4.10
Printer queue................................................................... 26
4.11
FTP user ............................................................................ 26
4.12
FTP password ................................................................... 27
4.13
FTP server port................................................................. 27
4.14
DHCP server ..................................................................... 28
4.15
IP address ......................................................................... 28
4.16
IP subnet mask................................................................. 29
4.17
Gateway ........................................................................... 29
4.18
IP name ............................................................................ 30
4.19
Network Time Server ...................................................... 30
4.20
NTP server port................................................................ 31
4.21
GMT correction................................................................ 31
4.22
TelNet............................................................................... 31
4.23
Service timer .................................................................... 32
5
Fax Server Uno function keys..................................... 33
5.1
5.2
5.3
5.4
Rx, the received faxes......................................................... 33
Tx, the sent faxes................................................................ 34
Fax or E-mail a fax again.................................................... 35
Add a new E-mail address to the list ................................ 36
5.4.1
5.5
5.6
6
Edit the E-mail list ................................................................. 37
Empty Send and Received queues..................................... 38
Disk info .............................................................................. 38
Fax Server Setup ......................................................... 39
6.1
6.2
6.3
6.4
6.5
6.6
6.7
7
Fax Server Setup Introduction ........................................... 39
Software updates ............................................................... 39
Installation .......................................................................... 40
Setting up a Fax Server Uno .............................................. 41
The user list ......................................................................... 42
Create a new user............................................................... 42
Edit a user profile ............................................................... 43
Acknowledgements.................................................... 45
7.1
7.2
Guarantee ........................................................................... 45
Liability................................................................................ 45
8
INDEX.......................................................................... 47
4
Fax Server Uno Manual ©Vidicode 2008
Introduction
The Fax
Fax Server Uno is a stand-alone network fax machine. Together with the
Fax Server Easy Access
Access software it forms a complete network faxing system.
Faxes can be sent from every workstation on the network with the Fax Server
Easy Access
Access software. The Fax Server Easy Access
Access software addresses the Fax
Server Uno, which stores the fax and takes care of the actual fax transmission.
All faxes received by the Fax Server Uno are stored on the internal hard disk
and can be viewed from every workstation with the Uno Easy Access software.
The Fax Server Uno handles incoming and outgoing fax transmission and stores
all sent and received faxes. All stored faxes are available through the network.
The Fax Server has extensive E-mail capabilities. Incoming faxes can be
selectively E-mailed to programmed E-mail addresses. Fax transmission results
are E-mailed to the Send Fax User.
Fax Server Setup
The Fax Server Setup application is a tool for the network manager to create
ftp accounts for users of the Fax Server Uno. The FTP user accounts are used to
personalize the Fax Servers archive. The Fax Server Uno will allow a user to
view faxes that have been received on specific telephone extension numbers
only. Getting the Fax System to work
For the Fax System to work you need at least:
• A Fax Server connected to a telephone line and to the network.
• At least one workstation with the Fax Server Access System application
installed.
• At least one workstation with the Send Fax application installed.
SendFax and Fax Server Access System software are described in their respective
manuals.
Fax Server Uno Manual ©Vidicode 2008
5
Care and Maintenance
Keep the Call Recorder Pico dry. If it gets wet,
wipe it dry immediately with a soft, clean cloth.
Liquids might contain minerals that corrode the
electronic circuits.
Use and store the Call Recorder Pico only in
temperature conditions between 0 and 40 degrees
Celsius. Temperature extremes can shorten the life
of electronic devices and distort or melt plastic
parts.
Keep the Call Recorder Pico away from excessive
dust and dirt.
Do not use aggressive chemicals, cleaning solvents
or strong detergents to clean the Call Recorder
Pico.
6
Fax Server Uno Manual ©Vidicode 2008
1 Getting to know the Fax Server Uno
1.
2.
3.
4.
5.
The display.
The Soft keys..
The numerical keys.
The arrowed keys.
The 8 function keys. See below.
The eight function keys:
Received faxes queue and Received faxes info key. See § 5.1
Sent faxes queue and Send faxes info key. See § 5.2
E-mail function key. See § 6
Empty queue function key. See § 5.5
Fax settings menu key. See § 3
Network settings menu key. See § 4
Disk info key. See § 5.6
System settings menu key. See § 2
1.1
What's in the box
• Fax Server Uno
• Mains supply adapter.
• Telephone cable with RJ11 connectors.
Fax Server Uno Manual ©Vidicode 2008
7
• CD-Rom with Send Fax and Fax Server Access System software.
1.2 Connecting the Fax Server Uno
The FaxServer back plate has the following connections.
1.
2.
3.
4.
5.
The Power socket.
The Serial connection socket.
The Ethernet connection socket.
The telephone line
The telephone connection.
Connect the Fax Server Uno as follows.
• Connect the Power supply to the power socket. 1
• Connect the Ethernet plug to the Ethernet socket 3
• Connect the telephone line to the Line socket 4. The Phone socket in 5
allows for the optional connection of a telephone or a second fax
machine.
The serial connection is used only in specific occasions not described in this
manual.
1.3 Setting up the Fax Server Uno for operation
The setup of the Fax Server is done as follows. The following setting have to be
made.
• System settings deal with the general settings like clock, password and
language settings.
• Fax Settings relate to the actual fax transmission, like transmission speed,
top line and dial prefix settings.
• LAN Settings deal with the settings that have to do with the network
connection of the Fax Server like FTP username and password, E-mail
address and IP Number settings.
Follow the instructions in the description of the System settings in § 2 The Fax
settings can be found in § 3 and LAN settings in § 4.
8
Fax Server Uno Manual ©Vidicode 2008
2 System settings
Enter the System settings as follows.
• Press the
Sys button.
A sequence of System settings will need to be passed. Every item will have at
least three options:
• Press NEXT to move on to the next menu item.
• Press CHANGE to enter the value or property of the menu item.
• Press STOP to exit the menu.
Press NEXT repeatedly to scroll through the menu items. The following
sequence of menu items will appear:
2.1 Set the Clock
• Press the
Sys button.
• Press CHANGE to change the setting of the clock.
Clock: »a
STORE
22-04-06
11:03
CANCEL
• Press key's 1-7 to change the day of the week.
The default date and time format is DD-MM-YY and HH:MM (when American
has been set as language the format is changed to MM-DD-YY). Use the
arrowed keys to move the blinking character left and right.
• Press soft key STORE to store the changes or press soft key CANCEL to
return to previous values.
2.2 Protect the Fax Server with a Password
The Fax Server can be protected with a password against unauthorized use.
When password protection has been enabled all operations are blocked before
the correct password has been entered.
Fax Server Uno Manual ©Vidicode 2008
9
• Press the
Sys button.
• Press NEXT once.
Password active:
NEXT
No
CHANGE
STOP
• Press CHANGE to enter a password.
Password:
»000
STORE
CANCEL
• Press STORE to enable the entered password.
• Press STOP to exit the menu.
From this point on you will be prompted for the password before entering the
menus.
2.3 Remove Password protection
• Press the
Sys button.
• Enter the password and press CONTINUE.
CONTINUE
• Press NEXT once.
Password active:
NEXT
Yes
CHANGE
STOP
• Press CHANGE to disable the password.
• Press STOP to save and exit the menu.
The password protection has now been disabled.
2.4 Set the Language
• Press the
Sys button.
• Press NEXT twice.
10
Fax Server Uno Manual ©Vidicode 2008
Language:
NEXT
English
CHANGE
STOP
• Press CHANGE to select the preferred language.
• Press STOP to save and exit the menu.
2.5 Reset all values
Use Reset all values to reset all fax transmission and system values.
• Press the
Sys button.
• Press NEXT four times.
Reset all values:
CHANGE
No
STOP
• Press CHANGE to enable the Reset all values operation.
Reset all values:
CHANGE
Yes
STOP
• Press STOP to execute the Reset all values operation.
Attention: Reset all values operation will disable the password protection.
Fax Server Uno Manual ©Vidicode 2008
11
12
Fax Server Uno Manual ©Vidicode 2008
3 Fax settings
Enter the Fax settings as follows.
• Press the
Fax button.
A sequence of Fax settings will need to be passed. Every item will have at least
three options:
• Press NEXT to save and move on to the next menu item.
• Press CHANGE to enter or change the value or property of the menu item.
• Press STOP to exit the menu.
• Press NEXT repeatedly to scroll through the menu items. The following
sequence of menu items will appear:
3.1 Fax ID
The Fax ID is the actual identification of the fax machine. When a fax is
transmitted both fax machines negotiate their Fax ID's.
Fax-Id:
NEXT
CHANGE
STOP
• Press CHANGE
CHANGE to enter the Fax ID.
Fax-Id:
STORE
»
CANCEL
• Press STORE to save the Fax ID.
• Press NEXT to move on to the next menu item.
3.2 Top text
The Top text is the text that is printed as the top line of the fax. The Top Text is
mandatory in the United States.
Fax Server Uno Manual ©Vidicode 2008
13
Top Text:
NEXT
CHANGE
STOP
• Press CHANGE to enter the Top text.
Top Text:
»
STORE
CANCEL
• Press STORE to save the Top text.
• Press NEXT to move on to the next menu item.
3.3 Maximum Fax speed
The fax transmission speed is negotiated between the two fax machines before
the actual transmission of the fax takes place and depends on the quality of
the telephone connection. The Maximum Fax speed is an upper limit to the
transmission speed.
Maximum Fax speed:
NEXT
14400
CHANGE
STOP
• Press CHANGE to change the transmission speed.
Select 14400, 9600 or 4800 bps. The default 14400 bps setting is advised.
• Press NEXT to save and move on to the next menu item.
3.4 Fax Send retries
The Fax Send Retries property determines the number of times the Fax Server
will try to send a fax in case of unsuccessful transmission.
Fax Send Retries:
NEXT
CHANGE
3x
STOP
• Press CHANGE to change the number of retries.
14
Fax Server Uno Manual ©Vidicode 2008
• Select a value between 0x and 15x.
• Press NEXT to save and move on to the next menu item.
3.5 Send Retry time
The Send retry time is the time the Fax Server will take to resend the fax.
Send Retry:
NEXT
120s
CHANGE
STOP
• Press CHANGE to change the e Send retry time.
• Select a value between 15 and 1800 seconds.
• Press NEXT to save and move on to the next menu item.
3.6 Retry after voice
Retry after voice determines whether the Fax Server should retry to send a fax
when the fax number was answered but no fax machine found on the remote
side. This property enabled allows for the recipient to put the call through to
the fax machine.
Retry after voice:
NEXT
CHANGE
Yes
STOP
• Press CHANGE to enable or disable the retry after voice property.
• Press NEXT to save and move on to the next menu item.
3.7 Send Start Time
Send Start Time is used when a large amount of faxes are sent. Setting the
Send Start Time will keep the faxes in queue. The queue is sent at the set time.
Send Start Time:
NEXT
CHANGE
Off
STOP
Fax Server Uno Manual ©Vidicode 2008
15
• Press CHANGE to enable Send Start Time. Keep pressing CHANGE to
increase the start time. Press CHANGE once more after 23:45 to turn Off
again.
• Press NEXT to save and move on to the next menu item.
It is still possible to send a fax directly when the Send Start Time has been
enabled. In SendFax application the fax should be marked as Priority fax. See
§ 2.4 in the SendFax manual.
3.8 Fax to Printer
The Fax to Printer property enables the use of a network printer. Settings of a
network printer appear in the Network settings menu in § 4.8.
Fax to Printer:
NEXT
Off
CHANGE
STOP
• Press CHANGE to change Printer mode.
Choose between Rx (received only),
only) Tx (sent only) or All.
All
• Press NEXT to save and move on to the next menu item.
3.9 Speaker
Select the speaker mode.
Speaker:
Dial only
NEXT
CHANGE
STOP
• Press CHANGE to change speaker mode.
Choose between Dial only,
only Always on and Always off.
off
• Press NEXT to save and move on to the next menu item.
3.10 Speaker volume
Set the speaker volume.
16
Fax Server Uno Manual ©Vidicode 2008
Speaker:
0
NEXT
CHANGE
STOP
• Press CHANGE to change speaker mode.
Select a value between 0 and 7.
• Press NEXT to save and move on to the next menu item.
3.11 Beep after Rx/Tx
Beep after Rx/Tx lets the Fax Server sound a beep after a fax has been sent or
received.
Beep after Rx/Tx:
Yes
NEXT
STOP
CHANGE
• Press CHANGE to enable or disable the Beep after Rx/Tx property.
• Press NEXT to save and move on to the next menu item.
3.12 Dial prefix
Use the Dial prefix to have the Fax Server dial the Dial prefix before dialing the
fax number as supplied by the Send Fax application.
Dial prefix:
NEXT
CHANGE
STOP
• Press CHANGE to enter the Dial prefix, use the character W to insert a
waiting period. For example “0W0767”.
Dial Prefix:
STORE
»
CANCEL
• Press STORE to save the Dial prefix.
• Press NEXT to move on to the next menu item.
Fax Server Uno Manual ©Vidicode 2008
17
3.13 No Answer time-out
The No Answer timeout time determines the time the Fax Server will wait for
the remote fax machine to answer the call.
No Answer Timeout:
120s
NEXT
STOP
CHANGE
• Press CHANGE to change the No Answer timeout.
Select a value between 20 and 180 seconds. It is advised to keep the default 60
second setting.
• Press NEXT to save and move on to the next menu item.
3.14 No Carrier time-out
The No Carrier timeout determines the time the Fax Server and the remote fax
machine have for negotiation.
No Carrier Timeout:
60s
NEXT
STOP
CHANGE
• Press CHANGE to change the No Carrier timeout.
Select a value between 20 and 180 seconds. It is advised to keep the default 60
second setting.
• Press NEXT to save and move on to the next menu item.
3.15 Caller ID
The Fax Server supports four different kinds of Caller ID methods.
Caller ID:
NEXT
DTMF-pola
CHANGE
STOP
• Press CHANGE to change Caller ID method.
Choose between DTMFDTMF-pola,
pola DTMFDTMF-ring,
ring FSKFSK-pola and FSKFSK-ring.
ring Caller ID's are
stored with the fax data and can be viewed in the Fax Server Access System.
Fax Server Uno Manual ©Vidicode 2008
18
Caller ID is sent by the your service provider as it is commonly used on
telephone lines. It is not to be confused with Fax ID or CSID. It is often an extra
service to be ordered from your service provider to have Caller ID enabled on
your telephone line.
• Press NEXT to save and move on to the next menu item.
3.16 Rings to answer on
Rings to answer on determines the number of times the telephone rings before
the Fax Server answers the telephone call.
Rings to answer on:
1x
NEXT
STOP
CHANGE
• Press CHANGE to change the Rings to answer on value.
Select a value between 0x and 12x.
• Press NEXT to save and move on to the next menu item.
This setting determines whether the Fax Server Uno or the connected normal
fax machine handles the incoming fax traffic. This setting can be made on most
fax machines. Set the machine you want to handle the incoming fax traffic to
the lowest Rings to answer on, so this machine will always answer the phone
first. Always allow for a margin of two or three rings for the setting of the
second machine. In case the first machine fails the second can serve as a backup system.
3.17 Ring volume
The Ring volume determines the volume of the ringer of the Fax Server.
Ring volume:
NEXT
CHANGE
3
STOP
• Press CHANGE to change the Ring volume property.
Select a value between 0 and 12.
• Press NEXT to save and move on to the next menu item.
Fax Server Uno Manual ©Vidicode 2008
19
3.18 Ring variation
Ring variation determines the variation in the sound of the ring.
Ring variation:
NEXT
2x5
CHANGE
STOP
• Press CHANGE to change the Ring variation property.
Select a value between 1x3 and 3x12.
• Press NEXT to save and move on to the next menu item.
3.19 Ring frequency
Ring frequency determines the pitch of the ring.
Ring frequency:
No
CHANGE
STOP
• Press CHANGE to change the Ring frequency property.
Select a value between 400+50 and 3400+350.
• Press STOP to save and exit the menu.
20
Fax Server Uno Manual ©Vidicode 2008
4 LAN settings
Enter the LAN settings as follows.
• Press the
LAN button.
A sequence of LAN settings will need to be passed. Every item will have at least
three options:
• Press NEXT to move on to the next menu item.
• Press CHANGE to enter or change the value or property of the menu item.
• Press STOP to exit the menu.
•
Press NEXT repeatedly to scroll through the menu items. The following
sequence of menu items will appear:
4.1 E-mail address
The Fax Server has extensive E-mail capabilities. All received faxes can easily be
forwarded to one E-mail address.
E-mail:
NEXT
CHANGE
STOP
• Press CHANGE to enter an E-mail address.
E-mail:
STORE
»
CANCEL
Use the numerical keys to enter the E-mail address.
• Press STORE to save the E-mail address.
• Press NEXT to move on to the next menu item.
•
There is an option to E-mail the received faxes to different E-mail
addresses. The Fax Server holds a list of E-mail addresses to distribute received
faxes. In case several extensions are used as local fax numbers the E-mail
distribution can take place according to extension number. Your PBX should
support this function. Selection of faxes for distribution via E-mail can also take
place according to remote Fax ID. See § 6.
Fax Server Uno Manual ©Vidicode 2008
21
4.2 Reply address
Because the Fax Server cannot receive E-mail the E-mails sent by the Fax Server
require another reply address.
Reply:
NEXT
CHANGE
STOP
• Press CHANGE to enter the E-mail reply address.
Reply:
»
STORE
CANCEL
Use the numerical keys to enter the E-mail reply address.
• Press STORE to save the E-mail reply address.
• Press NEXT to move on to the next menu item.
4.3 SMTP server IP address
The Fax Server uses the IP address of the SMTP server to send E-mail. In case a
local SMTP server is used the IP number can be entered directly. In case of an
SMTP server outside the network both the Gateway and the Subnet Mask need
to be set later on.
SMTP-srv:
NEXT
0:0:0:0
CHANGE
STOP
• Press CHANGE to enter the IP address of the SMTP server.
SMPT-srv: »00:000:000:000
STORE
CANCEL
Use the numerical keys to enter the IP address of the SMTP server. Both an IP
number or IP name are allowed. In case an IP name is used the DNS server
needs to be configured. See § 4.7 for details.
22
• Press STORE to save the IP address of the SMTP server.
Fax Server Uno Manual ©Vidicode 2008
• Press NEXT to move on to the next menu item.
4.4 SMTP server port
SMTP-server port is the port number through which the Fax Server connection
is to be made with the SMTP server. The SMTP-server port of the Fax Server is
default set to 25. Do not change the SMTP-server port number when this value
is not explicitly changed in the SMTP server.
SMTP-server port:
25
NEXT
STOP
CHANGE
• Press CHANGE to change the SMTP-server port number.
SMTP-server Port:
»
STORE
CANCEL
Use the numerical keys to enter the SMTP-server port number.
• Press STORE to save the SMTP-server port number.
• Press NEXT to move on to the next menu item.
4.5 SMTP Login
Sometimes SMTP servers are set up to require a login. In this case SMTP Login
should be enabled. When SMTP Login is enabled the next questions in the
menu will ask for SMTP User name and Password.
SMTP Login:
NEXT
No
CHANGE
STOP
• Press CHANGE to enable SMTP Login.
SMTP Login:
NEXT
Yes
CHANGE
STOP
• Press NEXT to save and move on to the next menu item.
Fax Server Uno Manual ©Vidicode 2008
23
4.6 Domain name
The domain name of the SMTP server is required as domain name in the Fax
server. In case the SMTP server is on the network the network domain is
required. In case the SMTP server is outside the network the domain name of
the SMTP server is required. Contact your provider for more information.
Domain:
NEXT
CHANGE
STOP
• Press CHANGE to enter the domain of the SMTP server.
Domain:
»
STORE
CANCEL
Use the numerical keys to enter the domain of the SMTP server.
• Press STORE to save the domain of the SMTP server.
• Press NEXT to move on to the next menu item.
4.7 DNS server
In case an IP name has been configured for your SMTP server you need to
configure the IP number of the Domain Name Server server.
DNS srv:
NEXT
0.0.0.0
CHANGE
BACK
• Press CHANGE to enter the DNS server.
DNS srv: »00:000:000:000
STORE
CANCEL
Use the numerical keys to enter the DNS server.
• Press STORE to save the DNS server.
• Press NEXT to save and move on to the next menu item.
24
Fax Server Uno Manual ©Vidicode 2008
4.8 Printer address
The printer address refers to the IP address of the network printer. Network
printer will allow new faxes (sent and received) to be printed directly to a
network printer. Here the main printer is defined.
Printer:
NEXT
0.0.0.0
CHANGE
STOP
• Press CHANGE to enter the IP address of the Printer.
IP addr: »00:000:000:000
STORE
CANCEL
Use the numerical keys to enter the IP address of the Printer.
• Press STORE to save the IP address of the Printer.
• Press NEXT to move on to the next menu item.
4.9 Printer port
Printer port is the port number through which the Fax Server connects to the
Network Printer. The Printer port is default set to 515, as is the setting of the
port number in most printers. If there is no direct reason to change the Printer
port it is best left unchanged.
Printer port:
NEXT
515
CHANGE
STOP
• Press CHANGE to change the Printer port number.
Printer port:
STORE
»
CANCEL
Use the numerical keys to enter the Printer port number.
• Press STORE to save the Printer port number.
• Press NEXT to move on to the next menu item.
Fax Server Uno Manual ©Vidicode 2008
25
4.10 Printer queue
Some printers require a printer queue name.
Printer queue:
NEXT
FaxUno
CHANGE
STOP
• Press CHANGE to enter the Printer queue name.
Pr. queue:
FaxUno
STORE
CLEAR
CANCEL
Use the numerical keys to enter the Printer queue name.
• Press STORE to save the Printer queue name.
• Press NEXT to move on to the next menu item.
4.11 FTP user
The FTP user is administrators user name of the Fax Server. It can be used in
the Fax Server Access System and Send Fax to log on to the Fax server. The
administrator username and password has unlimited authorities.
FTP user:
NEXT
0000
CHANGE
STOP
• Press CHANGE to change the FTP user name.
FTP user:
»
STORE
CANCEL
Use the numerical keys to enter the FTP user name.
• Press STORE to save the FTP user name.
• Press NEXT to move on to the next menu item.
26
Fax Server Uno Manual ©Vidicode 2008
4.12 FTP password
The FTP password of the Fax Server is the password that goes with the FTP
administrator user name of the Fax Server.
FTP pwd:
NEXT
0000
CHANGE
STOP
• Press CHANGE to change the FTP password.
FTP pwd:
»
STORE
CANCEL
Use the numerical keys to enter the FTP password.
• Press STORE to save the FTP password.
• Press NEXT to move on to the next menu item.
4.13 FTP server port
FTP server port is the port number through which the Fax Server Access System
and Send Fax log on to the Fax server. The FTP server port is default set to 21,
as is the setting of the port number in the Fax Server Access System and Send
Fax. If there is no direct reason to change the FTP server port it is best left
unchanged.
FTP server port:
NEXT
21
CHANGE
STOP
• Press CHANGE to change the FTP server port number.
FTP server port:
STORE
»
CANCEL
Use the numerical keys to enter the FTP server port number.
• Press STORE to save the FTP server port number.
• Press NEXT to move on to the next menu item.
Fax Server Uno Manual ©Vidicode 2008
27
4.14 DHCP server
In case a DHCP server is used on the network the DHCP server must be enabled.
In case a DHCP server is not used on the network the DHCP server must be
disabled.
User DHCP server:
No
NEXT
STOP
CHANGE
• Press CHANGE to enable DHCP server.
User DHCP server:
Yes
NEXT
STOP
CHANGE
• Press NEXT to save and move on to the next menu item.
4.15 IP address
As part of the network the Fax Server needs an IP address. In case a DHCP
server is used (see previous item) the DHCP server will assign the Fax Server an
IP address. In case a DHCP server is not used a static IP address must be given to
the Fax Server.
IP addr: 0:0:0:0
NEXT
CHANGE
STOP
• Press CHANGE to enter the IP address of the Fax server.
IP addr: »00:000:000:000
STORE
CANCEL
Use the numerical keys to enter the IP address of the Fax server.
• Press STORE to save the IP address of the Fax server.
• Press NEXT to move on to the next menu item.
28
Fax Server Uno Manual ©Vidicode 2008
4.16 IP subnet mask
The IP subnet mask is used by the Fax server if access from outside the network
is required. In this case the Gateway will need to be entered as well. In case the
used SMTP server is not on the local network the IP mask and gateway need to
be entered.
IP mask: 255:255:255:000
NEXT
CHANGE
STOP
• Press CHANGE to change the IP subnet mask of the Fax server.
IP mask: »55:255:255:000
STORE
CANCEL
Use the numerical keys to enter the IP subnet mask of the Fax server.
• Press STORE to save the IP subnet mask of the Fax server.
• Press NEXT to move on to the next menu item.
4.17 Gateway
The Gateway is used by the Fax server if access from outside the network is
required. If so the Gateway and the IP subnet mask will need to be entered. For
instance, if the used SMTP server is not on the local network the IP mask and
gateway are required.
Gateway: 0.0.0.0
NEXT
CHANGE
STOP
• Press CHANGE to enter the Gateway of the Fax server.
Gateway: »00:000:000:000
STORE
CANCEL
Use the numerical keys to enter the Gateway of the Fax server.
• Press STORE to save the Gateway of the Fax server.
• Press NEXT to move on to the next menu item.
Fax Server Uno Manual ©Vidicode 2008
29
4.18 IP name
Aside from the IP address the Fax Server can also be addressed by an IP name if
this function is supported by your DNS server.
IP name:
IPFax0001
CHANGE
STOP
• Press CHANGE to enter an IP name for the Fax server.
IP name:
»
CANCEL
Use the numerical keys to enter an IP name for the Fax server.
• Press STORE to save the IP name of the Fax server.
• Press NEXT to move on to the next menu item.
4.19 Network Time Server
Network Time Server refers to the IP address of the Network Time Server.
Network Time Server is used to synchronies the time of the FaxServer with the
time on the Network Time Server.
NTP srv:
NEXT
0.0.0.0
CHANGE
STOP
• Press CHANGE to enter the IP address of the NTP server.
NTP srv: »00:000:000:000
STORE
CANCEL
Use the numerical keys to enter the IP address of the NTP server.
• Press STORE to save the IP address of the NTP server.
• Press NEXT to move on to the next menu item.
30
Fax Server Uno Manual ©Vidicode 2008
4.20 NTP server port
NTP server port is the port number through which the Fax Server connects to
the Network Time Server. The NTP server port is default set to 123, as is the
setting of the port number in most NTP servers. If there is no direct reason to
change the NTP server port it is best left unchanged.
NTP server port:
NEXT
123
CHANGE
STOP
• Press CHANGE to change the NTP server port number.
NTP server port:
STORE
»
CANCEL
Use the numerical keys to enter the NTP server port number.
• Press STORE to save the NTP server port number.
• Press NEXT to move on to the next menu item.
4.21 GMT correction
GMT correction property is used to identify the time zone. NTP server normally
issues GMT. GMT correction can be set in half hours from -15:00 to + 15:00.
GMT correction:
NEXT
CHANGE
00:00
STOP
• Press CHANGE to set GMT correction. Keep pressing CHANGE to increase
the correction. It will start with + 1:00, keep pressing CHANGE to increase.
After + 15:00 there will appear - 15:00.
• Press NEXT to save and move on to the next menu item.
GMT correction refers to Winter time. Summer time and Winter time are
corrected automatically.
4.22 TelNet
TelNet can be used to log on to the Fax Server and configure the Fax Server
from your PC. If required contact your supplier for more details.
Fax Server Uno Manual ©Vidicode 2008
31
TelNet active:
NEXT
No
CHANGE
STOP
• Press CHANGE to enable TelNet.
TelNet active:
NEXT
Yes
CHANGE
STOP
• Press NEXT to save and move on to the next menu item.
4.23 Service timer
The Service timer determines the performance of the network connection.
Default the Service timer is set to Automatic. Changing the setting should only
be done when advised by a service engineer to solve
problems.
Service Timer:
Auto
CHANGE
STOP
• Press CHANGE to change the Service timer.
The following settings are available:
S1-S5, F1-F3 and U1-U3. Where S stands for Slow, F for Fast and U for Ultrafast.
The Service Timer is the last item in the LAN settings menu.
• Press STOP to exit the LAN menu.
32
Fax Server Uno Manual ©Vidicode 2008
5 Fax Server Uno function keys
Under normal circumstances the Fax Server does not need much attention.
Operation is done through the Fax Server Access System and Send Fax
applications. Once the settings have been made the reception of faxes is done
automatically. Received faxes are E-mailed to the programmed E-mail address.
Received faxes can also be viewed over the network with the Fax Server Access
System application. Once the Send Fax application has been installed on a
network workstation and the settings have been made the sending of faxes is
done with the Send Fax application from the workstation over the network.
The Fax Server is operated with the eight function keys, which allow for
viewing basic info on the status of the Fax Server and concise info of sent and
received faxes. The function of the function keys is described in the following
paragraphs.
•
Rx gives information on the received. Both the archive and the queue can
be viewed. See § 5.1.
• Tx gives information on the sent faxes. Both the archive and the queue
can be viewed. See § 5.2.
•
displays the E-mail list. See § 6.
•
allows you to empty the Rx and Tx queues. See § 5.5.
•
Fax opens the Fax settings menu. See § 3.
•
•
LAN opens the Network settings menu. See § 4.
•
Sys opens the System settings menu. See § 2.
displays the free disk space. See § 5.6.
5.1 Rx, the received faxes
The Rx key opens the received faxes menu.
• Press the Rx key to enter the received faxes menu.
Received Faxes
ARCHIVE
QUEUE
STOP
• Press STOP to exit the Received faxes menu.
• Press QUEUE to view the received faxes queue. The QUEUE contains all
the received faxes that still need to be E-mailed.
• Press ARCHIVE to enter the search the received faxes. The ARCHIVE
contains all the received faxes.
Fax Server Uno Manual ©Vidicode 2008
33
Search the received faxes archive on time, date and/or Fax ID.
Received on: »4-04-06
SEARCH
TIME
STOP
In the search the date time and Fax ID is always incorporated. You are first
prompted to enter the date.
• Enter the date you want to search and press SEARCH to perform the
search.
If you want to search on date only the Fax Server uses wildcards in the search
strings for the time and Fax ID. If you want to search according to date only
you can enter wildcards for the date, e.g. **:**:**.
• Press the TIME key to search.
• Enter a time to search for. Use wildcards (star key) to expand your search
criteria, e.g. enter 13:** to search for faxes received between 13:00 and
13:59 hours for the specified date or date range.
• Press SEARCH to search for the entered search string.
•
It is possible to further refine your search according to Fax ID.
• Enter wildcards for in the Time search string and press Fax ID to enter a
Fax ID to search for.
• Press SEARCH to search for the entered search string.
Use the double arrowed keys to scroll through the found faxes and select a fax.
Use the single arrowed keys to scroll through the fax properties of the selected
fax.
5.2 Tx, the sent faxes
The Tx key opens the sent faxes menu.
• Press the Tx key to enter the sent faxes menu.
Sent Faxes
ARCHIVE
QUEUE
STOP
• Press STOP to exit the Sent faxes menu.
34
Fax Server Uno Manual ©Vidicode 2008
• Press QUEUE to view the Send faxes queue. The QUEUE contains all the
Send faxes that still need to be sent.
• Press ARCHIVE to enter the search the sent faxes The ARCHIVE contains all
the sent faxes.
Search the sent faxes archive on time, date or Fax ID.
Sent on
»4-04-06
ARCHIVE
TIME
STOP
In the search the date time and Fax ID is always incorporated. You are first
prompted to enter the date.
• Enter the date you want to search and press SEARCH to perform the
search.
If you want to search on date only the Fax Server uses wildcards in the search
strings for the time and Fax ID. If you want to search according to date only
you can enter wildcards for the date, e.g. **:**:**.
• Press the TIME key to search.
• Enter a time to search for. Use wildcards (star key) to expand your search
criteria, e.g. enter 13:** to search for faxes sent between 13:00 and 13:59
hours for the specified date or date range.
• Press SEARCH to search for the entered search string.
•
It is possible to further refine your search according to Fax ID.
• Enter wildcards for in the Time search string and press Fax ID to enter a
Fax ID to search for.
• Press SEARCH to search for the entered search string.
Use the double arrowed keys to scroll through the found faxes and select a fax.
Use the single arrowed keys to scroll through the fax properties of the selected
fax.
5.3 Fax or E-mail a fax again
Faxes that are present in the Fax Server database can be sent again as fax or as
E-mail. The fax can be sent to any new fax number or E-mail address.
• Select a fax in the Rx or Tx archive.
• Press the
button.
Fax Server Uno Manual ©Vidicode 2008
35
Sent this fax?
E-mail
•
•
•
•
FAX
BACK
Choose E-mail or FAX to E-mail or fax the selected fax.
Press CLEAR to clear the entry.
Enter the E-mail address or fax number.
Press SEND to email or enter a number and press START to send the fax.
5.4 Add a new E-mail address to the list
The email list on the Fax Server Uno is normally edited with the Fax Server
Setup application. See Chapter 6 for details.
• Press the
button to enter the E-mail list menu.
E-mail list
LIST
NEW
STOP
• Press NEW to add a new E-mail address to the list.
E-mail: »
SAVE
CLEAR
STOP
Use the numerical keys to enter the E-mail address.
• Press SAVE to save the E-mail address and continue with the extension
numbers.
Number:
SAVE
»
CLEAR
STOP
Use the numerical keys to enter the extension numbers. The extension numbers
need to be separated by the #, e.g. 256#845#973.
• Press SAVE to save the extension numbers.
36
Fax Server Uno Manual ©Vidicode 2008
Test@address
256#845#973
SAVE
STOP
• Press SAVE to save the new entry in the E-mail list.
From this point onwards all faxes received through extension numbers 256, 845
and 973 will be E-mailed to Test@address.
5.4.1
Edit the E-mail list
The email list on the Fax Server Uno is normally edited with the Fax Server
Setup application. See Chapter 6 for details.
Edit the E-mail list as follows.
• Press the
button to enter the E-mail list menu.
E-mail list
LIST
NEW
STOP
• Press LIST to edit the E-mail list.
Test@address
NEXT
256#845#973
CHANGE
STOP
• Press NEXT to move on to the next entry in the E-mail list or press
CHANGE to edit the E-mail address or the extension numbers.
E-mail:
»est@address
SAVE
CLEAR
STOP
• Press SAVE to save the E-mail address and continue with the extension
numbers.
Number:
SAVE
»56#845#973
CLEAR
STOP
Fax Server Uno Manual ©Vidicode 2008
37
The extension numbers need to be separated by the #, e.g. 256#845#973.
• Press SAVE to save the Extension numbers.
You will return to the E-mail list menu.
• Press NEXT to select an other entry in the E-mail list or press STOP to exit
the E-mail list menu.
5.5 Empty Send and Received queues
The
key opens the empty queue menu.
• Press the
key to enter the empty queue menu.
Empty Queue
RECEIVED
SENT
STOP
• Press RECEIVED to empty the received queue.
• Press SENT to empty the sent queue.
• Press STOP to exit the Empty queue menu.
5.6 Disk info
Pressing the
on the display.
Monday
button shows the free disk space of the Fax Server's hard disk
24-04-06
Free on Disk:
38
10:26
9960 MB
Fax Server Uno Manual ©Vidicode 2008
6 Fax Server Setup
6.1 Fax Server Setup Introduction
The Fax Server Setup application is a tool for the network manager to create
ftp accounts for users of the Fax Servers.
The FTP user accounts are used to personalize the Fax Servers archive. The Fax
Server will allow a user to view faxes that have been sent by specific users and
to view faxes received on specific telephone extension numbers only.
The Fax Server Setup does not keep any records by itself. For every time the
application is started a connection to the Fax Server is required to retrieve the
user information. This information can then be edited and uploaded to the Fax
Server.
It is possible to create a user account without an ftp account. Any user without
an ftp account will only receive faxes received on his own extension in his
email.
6.2 Software updates
Both Fax Server Setup application can be updated over the web.
Choose Help in the main menu and select “Check
Check for update”
update
A new dialog opens where the current version is displayed.
Click on the “Check
Check update”
update button to check for updates.
The program will check on the Vidicode website for updates of the program.
If there are updates they will be displayed.
Click “do
do update”
update to execute the update.
Note: The file that is downloaded is a zipped file that is unpacked by the
application itself. Update files are approximately 1 Mb in size.
Updates can not be executed while the program is performing other tasks.
An open internet is required for this operation
Fax Server Uno Manual ©Vidicode 2008
39
6.3 Installation
Placing the CD-ROM in your computer gives you a choice of installation of
Vidicode software. Choose to install the FaxServer Setup software. If the
installation is not started automatically, start the FSSetup.exe file in the FSAS
folder on the CD to start installation manually. Follow the instructions on the
screen.
40
Fax Server Uno Manual ©Vidicode 2008
6.4 Setting up a Fax Server Uno
When the program is started the following dialog appears:
• Enter the FaxServer IP address.
The port setting on the FaxServer is default set to 21.
• Select the UserID’s tab.
The Fax Server Setup will now come up with the following dialog for FTP
username and password:
• Enter the administrator ftp username and password.
The Fax Server Setup will now make a connection to the fax server to retrieve
user information.
Fax Server Uno Manual ©Vidicode 2008
41
Now select the UserID’s tab after the connection has terminated.
The Userlist as on the Fax Server Uno is now displayed. If there is no user list
present on the Fax Server Uno the dialog will be blank.
6.5 The user list
The user list displays the User ID, The username the email address and the
number.
The User ID consists of two characters, the user ID is user throughout the Fax
Server applications to identify a user.
The UserName of the user is user as a more intuitive name for the user.
The email address is the email address the received faxes of the user are sent
to.
The number is the extension number which is used as a fax number of the user.
6.6 Create a new user
Click NEW to create a new user.
The following dialog appears:
42
Fax Server Uno Manual ©Vidicode 2008
Enter the user properties of the new user.
For every user there is an option to create an ftp account for the user.
With the ftp account a user can setup a connection to the Fax Server Uno with
the Fax Server Access System software to view his or her faxes on the Fax
Server. For every user access to existing user accounts can be set. Check the
checkboxes of existing users in the list to enable access to the faxes of said
users.
Click OK to finish.
6.7 Edit a user profile
A user profile is edited much the same way as creating a new user.
• Select a user in the list of users and click “Edit
Edit”
Edit
A new dialog appears with the selected user properties. Now you can edit the
user properties.
• Click OK to save the changes.
Fax Server Uno Manual ©Vidicode 2008
43
At this point the user profile has changed in the user list as displayed on your
screen. To save the list on the Fax Server Uno the list needs to be transferred to
the Fax Server.
• Press “Update
Update FaxServer”
FaxServer to transfer the user profiles to the Fax Server.
44
Fax Server Uno Manual ©Vidicode 2008
7 Acknowledgements
7.1 Guarantee
Your Fax Server Uno has a 12-month factory guarantee. The guarantee is
effective for normal use only. We would like to emphasize that the guarantee
is not valid under exceptional environmental conditions, such as extreme
temperatures or humidity levels, nor in the unlikely event of a lightning strike.
The guarantee is not valid if the machine has not been handled properly, for
example when it has been dropped, or bumped into. In order to qualify for
guarantee, you should contact your supplier, and show the receipt. If your
supplier cannot help you, you should contact the manufacturer. The
manufacturer reserves the right to determine the final date of the guarantee
period on the basis of the date of production. Costs of transport to and from
the supplier or the manufacturer are for the buyer’s account. Guarantee is for
parts only and does not cover any costs resulting from the breakdown of the
Fax Server Uno. The Fax Server Uno has various extra features that have not
been described in this manual. Additional information about this is given in a
technical information bulletin. Subjects discussed in this technical
documentation are further configuration options, remote configuring, and
how to update the firmware in the Fax Server Uno. The further configuration
options concern all aspects of operation. In our experience most people are
interested in configurations related to user’s access.
7.2 Liability
Correct functioning of the Fax Server Uno cannot be guaranteed under all
conditions and thus we do not accept any liability for loss of information or
other damages due to the use of the Fax Server Uno.
Vidicode is not a source of official interpretation of laws of any country or
state and shall not be construed as a source for making decisions.
Fax Server Uno Manual ©Vidicode 2008
45
46
Fax Server Uno Manual ©Vidicode 2008
8 INDEX
guarantee, 45
A
Acknowledgements, 45
adapter, 7
Add E-mail address, 36
Archive
Fax Server, 33
I
IP address
Fax Server, 28
L
C
Language
Caller ID, 18
clock, 9
Connecting, 8
liability, 45
Fax Server, 11
N
Network
D
Service timer, 32
day, 9
DHCP server, 28
dial prefix, 17
Disk info, 38
Domain name, 24
E
Network settings
Fax Server, 21
No Answer time-out, 18
No Carrier time-out, 18
P
password protection
Fax Server, 9
E-mail address
Fax Server, 21
empty queue, 38
F
Fax ID, 13
fax retries, 14
Fax settings
Fax Server, 13
FTP password
Fax Server, 27
FTP server port
Fax Server, 27
FTP user
Fax Server, 26
function keys, 7
G
Gateway, 29
R
received faxes, 33
Reply address, 22
retry after voice, 15
retry time, 15
Ring volume, 19
Rings to answer on, 19
S
Search
Fax Server, 33
sent again, 35
sent faxes, 34
Service timer, 32
Settings
Fax Server, 8
SMTP server, 22
SMTP-server port, 23
Fax Server Uno Manual ©Vidicode 2008
47
speaker, 16
subnet mask, 29
T
TelNet, 32
top line, 13
transmission speed
V
volume, 16
W
wildcards, 34, 35
Fax Server, 14
48
Fax Server Uno Manual ©Vidicode 2008