1
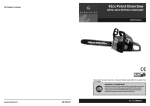
Service Manual
MCCULLOCH CHAIN SAW - MS1436NAV
NOTE: These materials are for use by trained technicians experienced in the service and repair of outdoor power equipment of the
kind described in this publication, and are not intended for use by untrained or inexperienced individuals. These materials are
intended to provide supplemental information to assist the trained technician. Untrained or inexperienced individuals should seek
the assistance of an experienced and trained professional. Read, understand, and follow all instructions and use common sense
when working on power equipment. This includes the contents of the product’s Operators Manual, supplied with the equipment. No
liability can be accepted for any inaccuracies or omission in this publication, although care has been taken to make it as complete
and accurate as possible at the time of publication. However, due to the variety of outdoor power equipment and continuing
product changes that occur over time, updates will be made to these instructions from time to time. Therefore, it may be
necessary to obtain the latest materials before servicing or repairing a product. The company reserves the right to make changes
at any time to this publication without prior notice and without incurring an obligation to make such changes to previously published
versions. Instructions, photographs and illustrations used in this publication are for reference use only and may not depict actual
model and component parts. © Copyright 2005 MTD Products Inc. All Rights Reserved.
MTD Products LLC - Product Training and Education Department
FORM NUMBER 769-01424
9/2004
TABLE OF CONTENTS
Air Filter ....................................................................................................................................................................1
Fuel Filter ..................................................................................................................................................................2
Spark Arrester Screen .............................................................................................................................................2
Spark Plug ................................................................................................................................................................3
Removal of Brake Assembly .....................................................................................................................................3
Removing the Chain and Bar ....................................................................................................................................4
Removal of Clutch and Drum Assembly ...................................................................................................................4
Removal of the Chain Oiler ....................................................................................................................................... 5
Starter Servicing ........................................................................................................................................................7
Air Gap ......................................................................................................................................................................9
Flywheel Removal .....................................................................................................................................................9
Carburetor Removal ................................................................................................................................................10
Carburetor Adjustment ...........................................................................................................................................12
Chain Tension Adjustment ......................................................................................................................................13
0
McCulloch Chain Saw
MS1436NAV
1.1.
MCCULLOCH CHAIN SAW MS1436NAV
Using a T-25 Torx driver, loosen the shroud
retaining screws and lift of the top cover. See
Figure 1.
Screws
MCCULLOCH GASOLINE CHAIN SAWS
Figure 1
The MS are McCulloch brand. They are all 42cc
engines even though we rate them as less in most
cases. The only difference between the models is the
NAV are Non Anti-Vibration and AV is Anti-Vibration.
1.2.
Lift the air filter out of air-box. See Figure 2.
Model: MS1436 NAV - 14” Bar and 36CC Engine
This product has been tested at a computed kickback
angle (CKA) and conforms to ANSI B175.1-2000,
Annex C.
This Service Manual is a supplement to the User Manual. Read, understand and follow all safety procedures
before operating or servicing this chain saw. Refer to
the Owners Manual for procedures for proper setup
and operation.
Additional information can be found in the 2004 MTD
Update Manual: Form number # 769-00960.
IMPORTANT: Prior to servicing the chain saw,
remove the spark plug wire from the spark plug.
Figure 2
1.3.
WARNING: Never perform maintenance when
the engine is hot, to avoid any chance of burning
hands or fingers.
1.
AIR FILTER
CAUTION: Never operate saw without the air filter. Dust and dirt will be drawn into engine and
damage it. Keep the air filter clean!
1
Clean air filter. Wash filter in clean, warm, soapy
water. Rinse in clear, cool water. Air dry completely.
1.4.
2.5.
Remove the wire screen from the air box. See
Figure 3.
Lift filter out of tank. See Figure 4.
Fuel Filter
Figure 4
Figure 3
1.5.
Wash screen in clean, warm, soapy water. Rinse
in clear, cool water. Air dry completely.
2.6.
Pull filter off with a twisting motion. Discard filter.
2.7.
Install new filter. Insert end of filter into tank
opening. Make sure filter sits in bottom corner of
tank. Use a long handle screwdriver to aid in filter placement if necessary.
3.
SPARK ARRESTER SCREEN
NOTE: It is advisable to have a supply of spare
filters and screens on hand.
1.6.
2.
Install air filter in reverse order of disassembly.
Install engine/air filter cover. Make sure cover fits
properly. Tighten the cover retaining screws
securely.
NOTE: A clogged spark arrester screen will dramatically reduce engine performance.
3.1.
FUEL FILTER
CAUTION: Never operate your saw without a
fuel filter. The fuel filter should be replaced after
each 20 hours of use.
2.1.
Drain fuel tank completely before changing filter.
2.2.
Remove the fuel tank cap.
2.3.
Bend a piece of soft wire into a hook shape.
2.4.
Reach into fuel tank opening and hook fuel line.
Carefully pull the fuel line toward the opening
until you can reach it with your fingers.
NOTE: Do not pull the hose completely out of
tank.
Using a 10mm socket, remove the 3 bolts securing the muffler to the cylinder. Remove the muffler. See Figure 5.
Bolts
Figure 5
2
3.2.
4.4.
Using a medium Phillips screwdriver, remove the
2 screws that hold the spark arrester cover to the
muffler. See Figure 6.
Using the scrench, remove the spark plug. See
Figure 7.
Scrench
Figure 7
Figure 6
3.3.
Discard the used spark arrester screen and
replace it with a new one.
3.4.
Reasemble the muffler components and install
the muffler to the cylinder. Tighten securely.
4.
SPARK PLUG
Push STOP switch down.
4.2.
Remove the shroud. See AIR FILTER Section.
4.3.
Disconnect the wire connector from the spark
plug by pulling and twisting at the same time
Check electrode gap with wire feeler gauge and
set gap to .025" (.635mm) if necessary.
4.6.
Reinstall a new spark plug.
NOTE: A resistor spark plug must be used for
replacement (McCulloch part no. 9295-310502).
NOTE: This spark ignition system meets all
requirements of the Canadian InterferenceCausing Equipment Regulations.
NOTE: NOTE: For efficient operation of the saw
engine, spark plug must be kept clean and properly gapped.
4.1.
4.5.
5.
REMOVAL OF BRAKE ASSEMBLY
5.1.
Disconnect the spark plug wire from the engine.
5.2.
Using a 5/8” socket, remove the nut attaching
the cover to the unit. See Figure 8.
Torx Screw
Hex Nut
Figure 8
3
5.3.
Using a T-25 Torx wrench, remove the screw
securing the cover to the unit. See Figure 8.
5.4.
Remove the cover.
6.
REMOVING THE CHAIN AND BAR
6.1.
Remove the brake assembly cover. See
REMOVAL OF BRAKE ASSEMBLY Section.
6.2.
Remove the chain from the bar. See Figure 9.
Hole for Tab
Figure 11
Figure 9
6.3.
Lift the bar from the mounting stud and guide.
6.4.
During assembly make certain that the tab from
the tensioning screw fits into the hole in the
chain bar. See Figure 10. See Figure 11.
Tensioning Screw
7.
REMOVAL OF CLUTCH AND DRUM ASSEMBLY
7.1.
Remove the spark plug from the unit.
7.2.
Remove the brake assembly kit cover.
7.3.
Remove the chain and bar.
7.4.
Place a piece of starter cord into the spark plug
opening. This will aid in removing of the nut
securing the clutch and drum assembly to the
crankshaft. See Figure 12.
Starter Cord
Tab
Figure 12
Figure 10
4
7.5.
Using a 13mm socket, remove the nut securing
the clutch and drum assembly to the crankshaft.
See Figure 13.
7.7.
Inspect and repair as needed.
NOTE: During assembly, the machined groove
in the drum/sprocket assembly must engage the
tabs on the nylon worm gear. See Figure 15.
Tabs
Machined Groove
Hex Nut
Figure 13
Figure 15
NOTE: This is a left hand threaded nut. Remove
in a clockwise fashion.
7.6.
Remove the assembly from the crankshaft. See
Figure 14.
Drum Assembly
8.
REMOVAL OF THE CHAIN OILER
8.1.
Remove the brake kit assembly.
8.2.
Remove the chain and bar.
8.3.
Remove the clutch and drum assembly.
8.4.
Using a number 2 phillips screwdriver. Remove
the two screws securing the anti-dust cap to the
chain oiler. See Figure 16.
Clutch Assembly
Anti-Dust Cap
Screws
Hex Nut
Figure 14
Figure 16
5
8.5.
Using needle nose pliers, remove the worm
gear. See Figure 17.
8.7.
Remove the shaft from the oil pipe. Inspect the
shaft for damage. See Figure 19.
Worm Gears
Figure 17
8.6.
Figure 19
Using the tip of a small screwdriver, lift the rear
portion of the pump shaft from the housing. See
Figure 18.
8.8.
Using a small screwdriver, remove the ends of
the two hoses from the housing. Inspect for
damage. See Figure 20.
Hose Connector
Pump Shaft Assembly
Figure 18
Figure 20
6
8.9.
Remove the brass pump housing from the oil
pipe. See Figure 21.
9.
STARTER SERVICING
9.1.
Using a T-25 Torx wrench, remove the four
screws attaching the starter housing assembly to
the housing assembly. See Figure 23.
Pump Housing
Torx Screws
Figure 21
NOTE: The small hole in the brass pump housing must be facing up into the upper oil hose during assembly. The flats on the pump housing
align with the molded tabs on the housing.
Figure 23
NOTE: Replace the felt washer any time you
service the chain oiler. See Figure 22.
9.2.
Remove the housing from the unit.
9.3.
Use a screwdriver to lift the starter cord from
around the pulley and unwind the starter cord.
This takes tension off the starter pulley. See Figure 24.
Starter Cord
Felt Washer
Figure 22
Figure 24
8.10. Torque the nut securing the clutch drum assembly to the crankshaft to during assembly.
7
9.4.
9.6.
Using a T-25 Torx driver, remove the screw
attaching the pawl retainer to the pulley housing.
See Figure 25.
If the starter return spring is broken, lift of the
spring retaining cover and replace the spring.
See Figure 27.
Torx Screw
Notch
Spring Retainer Cover
Figure 25
Figure 27
9.7.
NOTE: There is a spring under the retainer.
9.5.
Replace the pawls if they are worn.
NOTE: During assembly, note the proper orientation of the pawl retainer. The pawl retainer
slots will face the same direction as the pawls.
See Figure 26.
If the starter cord is broken, attach one end of
the starter rope to the pull handle. Pass the lose
end of the cord through the starter housing
assembly and through the pulley. Knot the end
of the cord and make sure it is secure in the pulley. See Figure 28.
Hold spool in place and wind cord clockwise.
Place tension of spool during last two winds.
Figure 28
Figure 26
9.8.
8
Wind the starter cord around the pulley. Wind the
starter pulley clockwise to put tension on the
spring during the last loop of the starter cord.
10.
AIR GAP
11.5. Using a 13mm socket, loosen but do not
remove the nut securing the flywheel to the
crankshaft. See Figure 30.
Using a feeler guage, measure the air gap between the
flywheel and the coil. The measurement should be
between .08”-.010”. Loosen the mounting screws to
adjust the air gap. See Figure 29.
Hex Nut
Figure 30
.08”-.010” Air Gap
11.6. Unthread the nut until it is flush will the end of
the drive shaft.
Figure 29
11.
FLYWHEEL REMOVAL
IMPORTANT: If any of the air fins on the flywheel break off for any reason, a serious imbalance and resulting vibration and damage to the
engine will occur.
11.1. Remove the spark plug from the engine.
11.2. Place a length of starter cord into the spark plug
opening. This will ease removal of the flywheel.
11.3. Using a T-25 Torx wrench, remove the four
screws attaching the starter housing assembly to
the housing assembly.
11.4. Remove the housing from the unit.
9
12.4. Using a small screwdriver, lift out the metal
screen.
11.7. Place a large screwdriver under the flywheel and
while applying upward pressure, tap on the nut
on the drive shaft to release the flywheel from
the shaft. See Figure 31.
12.5. Using a 8mm socket, remove the two nuts
securing the air filter assembly to the carburetor.
See Figure 33.
Hex Nuts
Hex nut flush with end of crankshaft
Figure 31
Figure 33
NOTE: There is an alignment key in the drive
shaft. During assembly make sure the key does
not slip out of the keyway. See Figure 32.
12.6. Using a screwdriver, pry the wire harness from
the clip on the air filter assembly. See Figure 34.
Machined slot
Key
Wire Harness
Figure 32
Figure 34
11.8. Torque the nut to during assembly.
12.
12.7. Release the air filter assembly from the two
mounting bolts, slide it to the left and remove it
from the carburetor.
CARBURETOR REMOVAL
12.8. Inspect the brass colored fuel tank breather for
any blockage.
12.1. Disconnect the spark plug wire.
12.2. Using a T-25 Torx driver, remove the three
screws securing the top cover. Remove the
cover.
NOTE: Blockage of this breather will allow the
chainsaw to operate briefly but then stop due to
lack of fuel.
12.3. Lift out the foam air filter.
10
12.9. Using a small flat bladed screwdriver, pry the
fuel line from the carburetor inlet. See Figure 35.
12.11. Pry the choke handle from the carburetor. See
Figure 37.
Fuel Line
Choke Lever
Figure 35
Figure 37
NOTE: In order to remove the throttle cable from
the carburetor it will be necessary to remove the
left side of the handle assembly and create slack
in the cable.
12.10. Lift up on the choke lever to remove the rubber
grommet from the housing. See Figure 36.
12.12. Using a T-25 Torx driver, remove the four screws
securing the handle halves.
12.13. Remove the left handle half.
12.14. Raise up on the trigger assembly enough to
allow removal of the throttle cable from the trigger. See Figure 38.
Throttle Cable
Rubber Grommet
Choke Lever
Figure 36
Figure 38
12.15. Push the throttle cable and housing towards the
saw body.
11
12.18. Remove the primer tube from the lower left side
of the carburetor. See Figure 41.
12.16. Pull rearward on the carburetor until it clears the
two mounting screws. See Figure 39.
Mounting Screws
Primer Tube
Figure 39
Figure 41
NOTE: You can replace the carburetor as a
complete assembly if it is obviously gummed up
beyond repair or you can purchase a rebuild kit
and rebuild the carburetor in about 15 minutes.
12.17. Rotate the carburetor forward and to the left in
order to remove the throttle cable from the carburetor. See Figure 40.
NOTE HOLES
12.19. Install the carburetor in the reverse order of disassembly.
13.
CARBURETOR ADJUSTMENT
The carburetor was pre-set at the factory for optimum
performance and to meet all federal and state emission
guidelines. Unless you are a trained service professional, take your unit to the nearest Authorized Service
Center listed in the Yellow Pages for any adjustment.
The carburetor does have Low and High adjustment
screws for qualified. technicians. See Figure 42.
Throttle Cable
Figure 40
NOTE: Note which hole the throttle cable is
attached to on the carburetor.
Low Setting High Setting
Figure 42
12
14.
CHAIN TENSION ADJUSTMENT
14.1. Chain tension adjustments can be made using a
standard screwdriver. See Figure 43.
Tensioner Screw
Figure 43
NOTE: Follow proper chain tensioning procedures outlined in the User Manual.
13