1
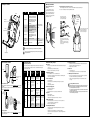
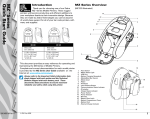
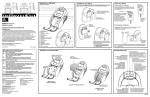
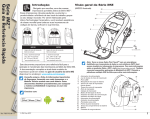
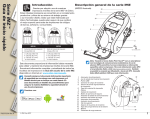
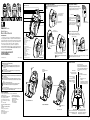
MZ Series Overview
Batteries are shipped uncharged. Remove any protective packaging from new battery packs, install it
in the printer and charge completely prior to initial use.
14
13
12
11
10
MZ 220
Charging the Battery
Installing the Battery
(MZ 220 Illustrated)
Remove the power supply from its box. Remove and discard
the shipping ring from the mains receptacle cavity.
1
2
1. Use a coin to rotate the
Battery Compartment
lock 1/4 turn as shown.
9
MZ 320
3
8
2. Remove the Battery
Compartment Cover
4
5
Zebra® MZ Series
Mobile Printers
Battery Pack
7
Mains Adapter
Verify that the mains adapter shipped
with your Printer is the correct one for
your region.
Install the mains adapter into the
Power Supply by hooking the top edge
into the mains receptacle cavity, and
rotating it until it snaps into place.
Shipping Ring
Remove and discard
Using the Charger Power Supply
Note location of label
Quick Start Guide
MZ Series Charger Power Supply p/n AT17947-1
Introduction
110-240 VAC 50-60 Hz 0.6A Input; 12 VDC 1.25 A output
Plug into AC receptacle
6
Thank you for choosing one of our Zebra MZ Series Mobile Printers.
These rugged printers will become productive and efficient additions to
your workplace thanks to their innovative design. Because they are made
by Zebra Technologies Corporation, you can be assured of world-class
support for all of your bar code printers, software, and supplies.
This document provides an easy reference for operating and
maintaining the MZ Series Mobile Printers. Complete documentation for
this printer series is provided by the MZ Series User Guide available on
the Internet at: http://www.zebra.com.
QSG-MZS-004 rev. A
Preparing the Charger Power Supply
© ZIH Corp. 2006
Important Safety Information
Static Discharge and Thermal Printing
1.
2.
3.
4.
5.
6.
7.
8.
9.
10.
11.
12.
13.
14.
15.
16.
17.
18.
19.
Feed Switch
Media Status Light
USB Port
Battery Charging Receptacle
Media Sensor
Media Cover
Platen
Printhead
Latch Release Button
Communications Status Indicator
IR window
Charge Status Indicator
Power Switch
Power Indicator
Belt Clip
Battery Door Latch
Battery Compartment Cover
Battery Pack
External Charge Contacts
15
16
3. Plug the Battery
Pack connector into the
Printer.
Plug into printer
Charger Jack
17
18
19
4. Re-install the Battery Compartment Cover and rotate
the lock back 1/4 turn to lock it in place .
Ensure battery leads are not pinched prior to replacing
battery cover.
Loading Media
Printer Controls
Power Light (Green)
Caution • Static Discharge
The discharge of electrostatic energy can damage or destroy the printhead or electronic
components used in this device. DO NOT TOUCH the printhead or any exposed electronic
components.
Press Latch
Button
Caution • Printhead
The printhead can become hot after prolonged printing. Use only the supplied cleaning pen
to perform maintenance on the printhead.
Media Roll
Note direction media pulls
off the roll.
Power Button
Press and hold to turn unit on.
Press again to turn unit off
Battery Safety
Always observe the safety precaution in the Lithium-Ion Battery Technical Bulletin included with
each Battery Pack.
Caution • Short Circuits
Avoid accidental short circuiting of any battery. Allowing battery terminals to contact conductive material will create a short circuit which could cause burns and other injuries or could start
a fire.
Important • Lithium-Ion (Li-ion) Battery Disposal
Always dispose of used printer batteries properly. Disposal regulations may vary by location. Refer to the MZ series Users Guide for more battery recycling information.
The printer may be used while charging the battery. However, prolonged use of the printer
while charging will greatly increase charge times.
Charge Light (Green/
Amber)
Green indicates the battery
fully charged. Amber indicates
the battery is less than 90%
charged.
Media Cover Opens
Indicates power status and battery condition. A
steadily lit indicator means the battery has more
than a 30% charge remaining. A blinking indicator
means the battery has less than a 30% charge
remaining.
Feed Button
Press to advance the media. Release
to stop.
Media Status Light
(Amber)
When off Indicates normal operation,
blinking indicates either no media or
that the media compartment is open
Pull Media out of Printer
Caution • Use Zebra Chargers
Use of any charger not approved specifically by Zebra for use with its batteries could cause damage to the Battery Pack or the Printer and will void the warranty.
Product Support
For product support, contact Zebra Technologies at: www.zebra.com
In the Americas contact:
In the Asia Pacific region contact:
Zebra Technologies International, LLC
333 Corporate Woods Parkway
Vernon Hills, Illinois 60061-3109 USA
Phone: +1.847.793.2600 or +1.800.423.
0422
Fax: +1.847.913.8766
Zebra Technologies Asia Pacific, LLC
16 New Industrial Road
#05-03 Hudson TechnoCentre
Singapore 536204
Phone: +65-6858 0722
Fax: +65-6885 0838
In Europe, Africa, the Middle East, and India
contact
Zebra Technologies Europe Limited
Zebra House
The Valley Centre, Gordon Road
High Wycombe
Buckinghamshire HP13 6EQ, UK
Phone: +44.1494.472872
Fax: +44.1494.450103
Open the Media Cover
Load the Media Roll
Close Media Cover
Close the Cover
IrDA® Window
This area must be within the line of sight
of any other IrDA enabled device for IR
communications to occur.
Communication Light (Blue)
When lit steadily indicates a wireless
communications link is established, when
blinking indicates data transmission.
Over
Wearing the Printer
Cleaning the Printer
Belt Clip (standard on all
printers)
Tear Bar
Printhead
Elements
Media
Compartment
Area
Method
Printhead
Use a Zebra cleaning pen or a
70% isopropyl alcohol solution
on a cotton swab to clean the
print elements from end to end
(the print elements are located
in the thin gray line on the
printhead).
To use: hook the clip over
your belt and ensure that the
clip is securely attached to the
belt. The belt clip will pivot to
allow you to move freely while
wearing the Printer.
Interval
Refer to figure below. Secure each end of the shoulder strap by looping through
the slots on the belt clip and securing with the buckle.
Thread the free end of the
shoulder strap through one
of the slots on the belt clip
Pull Strap here
to lengthen
Hold Buckle
Pull Strap here
to shorten
After every five rolls of
media (or more often, if
needed)
Platen
Rotate the platen roller and
clean it thoroughly with a
Zebra cleaning pen or a 70%
isopropyl alcohol solution and
a cotton swab.
Tear bar
Clean thoroughly with a
Zebra cleaning pen or a 70%
isopropyl alcohol solution and
a cotton swab.
Exterior
Water dampened cloth
As needed
Brush/air blow.
After every five rolls of
media (or more often, if
needed)
Media
Compartment
Interior
Adjustable Shoulder Strap (Accessory Kit)
Clip Printer to
belt
Once the shoulder strap is secured,
slide the buckle away from or
towards the Printer until you
achieve the desired length.
Thread the free end of the shoulder
strap through the buckle and pull tight
to adjust.
Do the same procedure on the other
end of the strap in the remaining slot
on the belt clip.
Note • Twelve packs of approved cleaning pens are available from Zebra as p/n AN11209-1.
Caution • To avoid possible personal injury or damage to the Printer, never insert any pointed or
sharp objects into the Printer.
Platen Surface
Troubleshooting
Interpreting Indicators
Connecting the Printer
Troubleshooting Topics
The printer’s indicators display various printer functions and their status. Check the indicator status, then refer to the Troubleshooting topic
referenced in the chart.
Terminal
or PC
Function
Communications Cable
to Terminal
Power
Indicator Status:
Steady
Indicator Status:
Blinking
Green
Indicates printer is
on and battery condition is OK to use.
Blinking signifies
Low Battery
Amber/
Green
Off indicates battery
is not charging. Amber indicates battery
is charging. Green
indicates battery is
charged.
N/A
Off indicates no error condition
No media or media
door is open.
Application may
be missing or corrupted
2,4,7,9
Cable/IrDA:N/A
Data is being received
5,8
Bluetooth: Printer
has paired with
another Bluetooth
device.
Data is being received
5,8
802.11g: Radio is
associated with a
WLAN
Radio is trying to
associate with a
WLAN.
5,8
USB Port
Charger
Connect With a Cable
Refer to the Label Vista™ application on the Internet at http://www.zebra.com for help on setting
up the Printer.
If you are connecting to a PC you may need to install the Zebra Universal Driver available on the
Internet at : http://www.zebra.com.
Error
Terminal
with wireless
communications
ability
MZ Series
Printer with
wireless option
Connect by Radio
Refer to the Wireless Quick Start Guide on the Internet at http://www.zebra.com for help on setting up your wireless printer.
Communications
Troubleshooting
Topic
Indicator
Color
Amber
Blue
3
1,6,10
1. No power:
• Ensure you press and hold the Power switch until the Power light
comes on.
• Check that battery is installed properly.
• Recharge or replace battery as necessary.
2. Media does not feed:
• Be sure Media Cover is closed and latched.
• Check media compartment. Ensure media is not binding on the
sides of the compartment.
3. Poor or faded print
• Clean printhead.
• Check battery for possible damage. Recharge or replace as
necessary.
• Check quality of media.
4. Partial or missing print:
• Check media alignment.
• Clean printhead.
• Ensure Media Cover is properly closed and latched.
5. No print:
• Replace battery.
• Check cable to terminal.
• (Wireless units only) Restore wireless connection.
6. Reduced battery life:
• Check battery date code — if battery is one to two years old,
short life may be due to normal aging.
• Recharge or replace battery.
7. Flashing Amber indicator:
• Check that media is loaded and that printhead is closed and
securely latched.
• If media is present and latch is closed, indicates that no
application is present or application is corrupted. Program must
be re-loaded.
8. Communication Error:
• (Wireless units only) Check that media is loaded, head is closed
and blue communication link light is on.
• Replace cable to terminal.
9. Label Jam:
• Open media cover.
• Generously apply alcohol to Printer in area of jammed label.
10. Battery Pack Is Hard to Install
• Do not force the battery into place. Verify you have not pinched
any wires between the battery and the printer.
• Verify you are plugging the battery connector into the printer
correctly.
.
Resetting an MZ Series Printer
If the printer has locked up and is not responding to any operator inputs or external commands, either from a connected terminal or from a linked LAN, you can perform a forced reset as follows:
1. Open the media compartment and remove any media.
2. Press the Feed button and hold it approximately ten seconds until the Power, Communications and
Error indicators turn off and stay off.
3. After the three indicators turn off wait ten more seconds and press the Power button. The Printer
will restart and normal operation can resume.