1
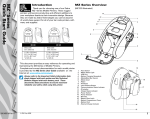
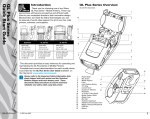
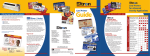
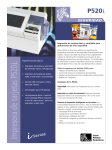
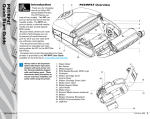
1. Cameo Series Overview
2. Loading Media
1
Zebra® Cameo Series
Mobile Printers
9
Quick Start Guide
2
Introduction
Thank you for choosing one of our Zebra
Cameo Series Mobile Printers. These rugged printers
will become productive and efficient additions to your
workplace thanks to their innovative design. Because
they’re made by Zebra Technologies, you can be
assured of world-class support for all of your bar code
printers, software, and supplies.
This document provides an easy reference for operating and maintaining your Cameo Series Mobile
Printer. Complete documentation for this model printer
is provided by the Cameo Series User Guide available
via the Internet at: http://www.zebra.com .
Cameo models are as follows:
Model
Media
Width
Mag Card
Reader
IrDA
Bluetooth
802.11b
WLAN1
Cameo 2
2”
opt.
opt.
opt.
N/A
Cameo 3
3”
opt.
opt.
opt.
opt.
1
1
1. Only one wireless option may be installed on a printer.
QSG-CM2-3-003 rev. A
1
3
8
7
Pull Media
out of Printer
Note direction
media pulls off
the roll.
4
Adjust Edge
Guide for width
of media
CAMEO 3 W / MAG CARD
READER
11
1.
2.
3.
4.
5.
6.
7.
8.
9.
10.
11.
Magnetic Card Reader (MCR) Slot
Printhead
Gap Sensor
Media Edge Guide
Platen Roller
Media Cover
Battery Charging Receptacle
Communications Port
Control Panel
Belt Clip
Battery
10
6
5
Close Media Cover
CAMEO 2 W / MAG CARD READER
© ZIH Corp. 2006
3. Installing the Battery
4. Charging Batteries
Note • Batteries are shipped uncharged. Remove protective shrink-wrap and
labels from new battery packs and allow to charge completely prior to use.
6. Printer Controls
5. Connect the Printer
Communications Port
Charger Jack
Power Light
Power Button
See Table
Press to turn unit on.
Press again to turn unit off
Rotate Belt Clip
out of the
Terminal
Insert the tabs on the
Battery Pack into the
Printer.
Feed Button
Press to advance the media
one blank label or a software
determined length of journal
media.
Communications Cable to
Terminal
Refer to “Connection Cables for
Encore, Cameo & Bravo Printers.xcl”
at http://www.zebra.com.
IR Window
Status Light:
See table
Connect With a Cable
Rotate the Battery
Pack into the Printer
until the latch clicks
into place.
INSTALLING THE CAMEO 2
BATTE RY
• A battery is ”cycled” by fully charging it, then
fully discharging it through normal use.
Press the Battery
Pack into the
Printer until the
latch clicks
into place.
Power Light (green)
Off
Cameo 2/3
(Cable)
Notes
• Cameo batteries must be cycled several times
before maximum capacity is realized.
Insert this end
of the Battery
Pack into the
printer
INSTALLING THE CAMEO 3
BATTE RY
Refer to the Label Vista™ application on the Internet at http://www.zebra.com for
help on setting up the printer.
UCN-72
Single
Charger
•For most consistent results, remove the
Battery Pack from the Printer when charging.
• Please refer to the “Safety Guide” included
with this product for more information on
battery and charger safety.
Cameo
Series
printer
with
wireless
option
Wireless Connection
Cameo 2/3
(IrDA or BT)
Power Off
Power Off
On
Power On
Power On
Power On
Terminal with wireless
communications ability
Refer to the Wireless Quick Start Guide on the Internet at http://www.zebra.com
for help on setting up your wireless printer.
Cameo 3
(WLAN)
Power Off
Radio
connected
to WLAN*
Status Light (yellow)
Blink
Low Battery
Warning
Off
On
Blink
Normal
Latch open
or out of
media
MCR ready
for card
swipe
Low battery
Warning
Normal
Latch open
or out of
media
Low Battery
Warning
and/or
Radio not
connected
to WLAN
Normal
Latch open
or out of
media
MCR ready
for card
swipe
Random
blinking
indicates
data
transmission
MCR ready
for card
swipe
* Connection to WLAN does not guarantee communications are enabled. Passwords
and/or other network settings must also be correct.
Over
7. Cleaning the Printer
8. Troubleshooting
Printer Self Test:
Printhead Elements
Gap
Sensor
Area
Printhead
Platen Bearing
Point
Tear
Bar
Platen Surface
Method
Interval
Use the supplied cleaning pen
or 70% isopropyl alcohol on a
cotton swab to clean the print
elements from end to end (the
print elements are located
in the thin gray line on the
printhead).
Tear bar
Clean thoroughly with the
cleaning pen or 70% isopropyl
alcohol and a cotton swab.
Platen
Rotate the platen roller and clean
it thoroughly with the cleaning pen
or 70% isopropyl alcohol and a
cotton swab.
After every five rolls of
media (or more often, if
needed)
Troubleshooting Guide
Linerless
Platen
Clean bearing points only.
Do not use alcohol to clean
linerless platen surface!
Exterior
Water-dampened cloth
As needed
Interior
Brush/air blow. Ensure the Gap
Sensor is free of dust.
After every five rolls of
media (or more often,
if needed)
Important • Always turn the printer off prior to cleaning.
Never use any sharp objects on the printer mechanism as it
could damage the printhead. Use only isopropyl alcohol, the
supplied cleaning pen and/or a cotton swab for cleaning the
printer.
Platen Bearing
Point
10. Using the Magnetic Card Reader
9. Using the Belt Clip
Note • This feature is an option on the Cameo Series
Belt Clip (standard on all printers)
To use: hook the clip over your belt, and ensure that the clip is
securely attached to the belt. The belt clip will pivot to allow you to
move freely while wearing the printer.
Card can be
read in both
directions.
Magnetic
Card
Reader Slot
Clip printer to
belt
Place the Magnetic Stripe
Card in the reader slot
with the magnetic stripe
facing as shown.
Flashing Status LED
indicates the MCR is
active and awaiting a
card swipe
Printer can pivot freely
when clipped to belt
Cameo Series Printers can perform a self test which will aid in diagnosing most printing problems. Refer to the Troubleshooting section
below for help in interpreting the self-test.
The self test is activated by the following key sequence:
1. Press the “FEED” key
2. While still holding down the “FEED” key, turn on the printer by
pressing and releasing the “ON” key.
3. Continue pressing the “FEED” key until self test starts.
The Cameo will perform the self test and remain on. The unit prints
a line of interlocking “x” characters, then print out the version of software loaded in the printer followed by two reports. The first report indicates model, ROM version, serial number, baud rate, etc. The second
report contains application information. If no second report appears,
there is no application loaded.
No power
• Check battery and recharge or replace as necessary.
Media does not feed:
• Be sure media compartment cover is closed and latched.
Poor or faded print:
• Clean printhead.
• Check or replace battery. Refer to Battery Disposal section for
information on proper disposal of batteries.
• Check quality of media.
Partial or missing print:
• Check media alignment
• Clean printhead.
• Verify media compartment cover is closed and latched
Prints illegible characters:
• Check baud rate.
No print:
• Check baud rate
Battery Disposal
The EPA certified RBRC® Battery Recycling Seal on the
Nickel-Metal Hydride (Ni-MH) battery supplied with your
printer indicates Zebra Technologies Corporation is voluntarily participating in an industry program to collect and recycle these
batteries at the end of their useful life, when taken out of service in the
United States or Canada. The RBRC® program provides a convenient
alternative to placing used Ni-MH batteries into the trash or the municipal waste stream, which may be illegal in your area.
Please call 1-800-8-BATTERY for information on Ni-MH battery recycling and disposal bans or restrictions in your area. Zebra Technologies
Corporation’s involvement in this program is part of our commitment
to preserving our environment and conserving our natural resources.
Outside North America, please follow local battery recycling guidelines.
Product Disposal
Do not dispose of this product in unsorted municipal waste.
This product is recyclable. Please recycle according to your
local standards. For more information, please see our web
site at: http://www.zebra.com/recycle
• Replace battery. Refer to Battery Disposal section for information
on proper disposal of batteries.
• Check cable connection to terminal
• Wireless units: verify communication link between printer and
terminal
• Wireless printers associated with a LAN: refer to the RF LAN
Information section of the Self Test printout to verify the printer’s
SSID and IP addresses are correct, and that the printer is
“associated” with the wireless LAN.
• Invalid label format or command structure — use Hex Dump
Mode for troubleshooting. Refer to the Programming Manual for
more information.
Reduced battery charge life:
• Recondition (cycle) battery.
• Damaged battery-replace. Refer to Battery Disposal section for
information on proper disposal of batteries.
• Check battery date code: if one to two years old, short charge life
may be due to normal aging.
Status light flashing and beeper chimes:
• No application: reload program.
Status light flashing
• If using IrDA or Bluetooth wireless communications: normal
indication data is being processed.
• If equipped with Magnetic Card Reader (MCR): indicates reader is
ready for a card swipe.
Status light always on:
• Check that media is loaded and media compartment cover is
closed and latched
Power Light Flashing
• Low battery warning
• Cameo 3 WLAN units: Printer ‘s radio is not associated with a
WLAN access point.
Communication Error:
• Check that media is loaded, media compartment cover is closed
and latched, and error light is off.
• Check baud rate setting.
• Replace cable to terminal.
Product Support
For product support, contact Zebra Technologies at: www.zebra.com
Zebra Technologies International, LLC
333 Corporate Woods Parkway
Vernon Hills, Illinois 60061-3109 USA
Phone: +1.847.793.2600 or +1.800.423.
0422
Fax: +1.847.913.8766
Zebra Technologies Europe Limited
Zebra House
The Valley Centre, Gordon Road
High Wycombe
Buckinghamshire HP13 6EQ, UK
Phone: +44.1494.472872
Fax: +44.1494.450103
Zebra Technologies
Latin American Sales Office
9800 NW 41ST Street
Suite 220
Doral, Florida 33178 USA
Phone: +1.305.558.8470
Fax: +1.305.558.8485
Zebra Technologies Asia Pacific, LLC
16 New Industrial Road
#05-03 Hudson TechnoCentre
Singapore 536204
Phone: +65.6858.0722
Fax: +65.6885.0838