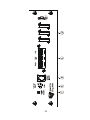
1
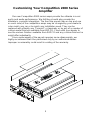
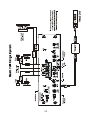
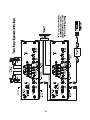
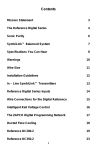
Contents MISSION STATEMENT...............................................................................3 C2K INTRODUCTION ................................................................................4 CUSTOMIZING YOUR COMPETITION 2000 SERIES AMPLIFIER ..........5 MADE IN AMERICA....................................................................................6 OUR DEDICATION TO SONIC PURITY REQUIRES THE HIGHEST OF QUALITY IN INTERNAL COMPONENT PARTS .......................................7 SYMBILINK™ BALANCED SYSTEM ........................................................9 SPECIFICATIONS YOU CAN HEAR........................................................10 A WORD ABOUT “WEIGHTED” SPECIFICATIONS ..............................11 WARNINGS...............................................................................................12 INSTALLATION GUIDELINES .................................................................13 COMPETITION 2000 KEY FEATURES....................................................14 THE COMPETITION 2000 TWO CHANNEL AMPS.................................15 2 CHANNEL CONTROLS .........................................................................17 POWER ENDPLATE CONTROLS ...........................................................19 12V HOOKUP............................................................................................19 C2K 1.0X POWER VS. DISTORTION AND SPECIFICATIONS .............20 C2K 2.0X POWER VS. DISTORTION AND SPECIFICATIONS .............22 C2K 3.0X POWER VS. DISTORTION AND SPECIFICATIONS .............24 C2K 6.0X POWER VS. DISTORTION AND SPECIFICATIONS .............26 C2K CROSSOVER RESPONSE..............................................................28 1 THE COMPETITION 2000 4 CHANNEL AMPS .......................................29 4 CHANNEL CONTROLS .........................................................................31 POWER ENDPLATE CONTROLS ...........................................................33 12V HOOKUP............................................................................................33 C2K 2.5X POWER VS. DISTORTION AND SPECIFICATIONS .............34 C2K 4.0X POWER VS. DISTORTION AND SPECIFICATIONS .............36 CUMULATIVE ERROR .............................................................................38 CLASS D FOR THE AUDIOPHILE...........................................................39 CLASS D AMPLIFIER WARNINGS .........................................................40 MANUAL FOR SAFE SOUND..................................................................41 CONTROL PLATE FEATURES................................................................43 POWER ENDPLATE HOOKUPS .............................................................45 START UP AND ADJUSTMENTS............................................................46 C2K 9.0XD POWER VS. DISTORTION AND SPECIFICATIONS...........48 DISPLAY AND CONTROL OPTIONS ......................................................50 SYSTEM DIAGRAMS ...............................................................................52 TECHNICAL ASSISTANCE......................................................................72 2 Mission Statement Committed to excellence ZAPCO is dedicated to the pursuit of audio fidelity. Our prime objectives are to design and manufacture audio products of unsurpassed quality, to provide unparalleled support and service for these products and to conduct business in a manner that will enhance the quality of life for all involved. Experience: Knowledge from doing There is absolutely no substitute for experience; that is a simple fact of life. Another simple fact is that ZAPCO has, for over twenty-five years, been the leader in defining quality standards for the car audio industry. These years of experience have led to a thorough understanding of the challenges that are unique to the world of car audio. ZAPCO's relentless quest for sonic purity consistently yields imaginative designs that utilize the most innovative technologies. The resulting products set the criteria by which all others in the industry are judged. 3 C2K Introduction The ZAPCO Competition 2000 Series Amplifiers Thank you for considering ZAPCO and congratulations on your purchase of our Competition 2000 series product. The ZAPCO competition series has long been considered the finest sound quality amplifier for competitive use. For the year 2000, we once again raise the bar and take the quest for sonic purity to its next level. Our new Competition chassis and updated circuit design have not only brought improved cosmetics and more features to the line, they have done what many thought was impossible. They have actually improved the sonic performance of the competition series. In one of the many rave reviews of ZAPCO products last year, one writer stated that ZAPCO’s circuit design and construction quality were “head and shoulders” above the competition. We can only imagine what they’ll be saying this year. In developing this manual, we have tried to include all the technical information needed to properly install and use the product. We have also included a good deal of information which we hope will help you understand what makes our Competition series different from all other products, and why we at ZAPCO believe it’s worth the time, money, and effort to design and build our amps and processors the way we do. We hope you will read and enjoy the manual in its entirety, that you will have many years of musical pleasure from the product. If you should have any questions or comments, they will be both welcome and appreciated. You can contact us on the net at www.zapco.com or by phone at (209) 577-4268. Thank you, from all of us at ZAPCO. 4 Customizing Your Competition 2000 Series Amplifier Our new Competition 2000 series amps provide the ultimate in sonic purity and audio performance. We felt they should also provide the ultimate in cosmetic integration. The four trim panels (two on top and one on each side) of the competition amps may be changed by your dealer to color match any car or to match any installation need. They can be replaced with virtually any “Formica”, or laminate, or by any of a number of custom metal finishes available from ZAPCO. Check with your dealer to see the various finishes available from ZAPCO and any custom finishes he might offer individually. Since replacement of the panels requires some disassembly, we highly recommend that it be performed only by an authorized dealer. Improper re-assembly could result in voiding of the warranty. 5 Made In America Now just what does this mean and why does it matter? We ask this question because we believe it matters a great deal. We know others think it matters also, because it’s plastered on so many boxes. However, before we look at why it matters, let’s ask what it means. If a product comes into this country complete except for a couple of screws that hold on a cover plate, should it be called “Made in America”? We don’t think so! If a company hides its origin of manufacture, you know there’s a reason. Usually it’s that the quality is so poor that they need the “Made in America” claim to make the sale. Are foreign products inferior? Of course not! Most car audio manufacturers have products built all over the world, and they are fine products. However, if you look at the boxes they come in, each box will tell you exactly where the product in that box was made. These companies let their reputation stand or fall on the quality of what they produce. If you make a quality product you don’t have to trick people into buying it with dishonest labels. Why do we want to protect the “Made in America” label? The concept of “Made in America” speaks directly to our ability to control the quality and performance of the products we sell. It means that we make our products here, top to bottom, in Modesto, CA. We don’t just sell amps and processors. We conceive, design, test, and manufacture every amp and processor we sell, ourselves. We build up all our own circuit boards on our own surface mount machines. We wind most of our power supply transformers right here at the factory. We even have our own heat sink extruded so our own machine shop can build the chassis and our screener can then screen them. We use 5532 and Bur Brown op-amps in our products and 1% metal film resisters throughout. When Auto Sound and Security reviewed our amp, they felt these better components played a major part in our superior sound quality. Why don’t other companies use the same quality parts? As the reviewer put it “You don’t see these used very often because they cost more”. At ZAPCO, we will not sacrifice our sound quality or engineering integrity to save on production cost. We fully intend to continue building the finest car audio electronics money can buy. We can only do that by putting the finest quality components we can find inside the product. How do we know these components go into our products? We put them in ourselves. Because we build it all ourselves we can guarantee the quality control of every product ZAPCO sells. 6 Our Dedication to Sonic Purity Requires the Highest of Quality in Internal Component Parts • Resistors All resistors (other than power resistors) are 1% precision, low noise metal film. This is a key reason why ZAPCO products have the industries’ best noise specifications, and why you won’t see as much fluctuation in our test certificates as you will in others. Precision resistors also reduce distortion and improve channel matching. • Capacitors Capacitors are similar to batteries. Like a battery, they store energy and have an electrolyte (internal fluid). Also like a battery, a capacitor can have a very limited life. “Computer grade” capacitors for example, are reliable only in cool environments with very little current applied to them. Only the best high current and high temperature capacitors should be used in an auto-sound application. Although these capacitors typically cost five times as much as those used in our competitor’s products, ZAPCO insists that no audio degradation will occur over time. • Transistors Two types of transistors are used in ZAPCO products, bi-polar and MOSFET. MOSFET transistors are rugged, high current devices that are suitably used as switches. They are the choice for switching power supplies. They are however, very non-linear and are not suitable for use as audio outputs. They cannot be matched and their inherent distortion requires too much feedback to achieve reasonable distortion levels. Bipolar transistors are used exclusively in our outputs. The audio performance of a bipolar transistor heavily outweighs any minor advantages a MOSFET might offer in durability. We solve the durability question by simply using considerably more output devices than the amp needs. This gives us a bulletproof amp with the sound we demand of a ZAPCO product. • Transformers Most of the transformers used in our products are hand-wound in our own facility to ensure maximum quality. This is the only way that current capability, efficiency, and radiated noise can all be kept within our demanding parameters. All transformers are securely mounted in their respective chassis. Transformers are massive, and if not securely mounted can cause failure among internal components due to vibration. 7 • Power Supplies Regulated or Un-regulated? For years amplifier designers have debated which type of power supply is best. What’s the truth about power supplies? They each have advantages and disadvantages and there is no, one, best type. Limiting yourself to one type of power supply limits your amplifier design components. ZAPCO uses both types of supplies depending on the intended use of each amp, as well as expected current demands and operating environment. 8 SymbiLink™ Balanced System The most natural configuration for an audio system in the automobile places the signal source in the dash with the amplifiers located some distance away, usually under the seat or in the trunk of the vehicle. The reality of this arrangement dictates the necessity to make long runs of low level signal cable usually from the front to the back of the car. The electrical environment in an automobile is one that is inherently noisy and filled with conditions that threaten to degrade signal fidelity at every turn. Capacitive loading due to the long cable lengths, the potential for ground loops, alternator charging currents or currents generated by the amplifiers themselves are all factors that induce noise and distortion into the signal cables. By no means is this an ideal situation. Thankfully, ZAPCO has found the solution. SymbiLink components convert a standard unbalanced audio signal into the fully balanced domain usually reserved for expensive professional audio equipment found in recording studios or at your local concert venue. After this conversion is made, the audio cabling becomes virtually immune to electrical interference in the surrounding environment and is much less susceptible to signal degradation over long cable runs. It is for this reason that balanced signal cables are common in professional or industrial applications. ZAPCO has made this technology available for your car. ZAPCO engineers also discovered that the pulsating D.C. current in the automobile chassis and amplifier power wiring caused a significant amount of low frequency distortion. ZAPCO's balanced SymbiLink technology completely eliminates this distortion. 9 Specifications You Can Hear Our dedication to sonic purity, and to the concept of cumulative error demands that we design and build our amps and processors to be the cleanest in the industry. And we do! ZAPCO amps are the standard by which other amps are measured. However, it concerns us when one specification (THD) that can’t be heard in most modern, high end amps becomes the only meaningful specification manufacturers seem to publish. THD is only one of a number of specs that make ZAPCO amps sound better than the others, and, of the four prime specs, it is probably the least obvious in normal use. • Damping Factor: The most common misconception about ZAPCO amps is that we drastically under-rate our power output. Not true, it just sounds that way. Today’s music, of all styles, has a great deal of bass content. Damping describes an amps ability to control a woofer. An amp with poor damping will leave bass notes sounding soft and undefined, regardless of its power. In most amp lines, the largest units have damping factors between 200 and 400. In the ZAPCO Competition series, our smallest amp has dampening of over 875. Since rock solid bass is perceived as a function of power, our 100 watt amp sounds like other companies’ 300 watt amps. • Slew Rate: A similar situation exists in the higher frequencies. Ever turn up the volume and hear cymbals sounding like finger-nails on a blackboard? That’s because the amplifier simply wasn’t fast enough to accurately reproduce the high frequency ring of the cymbals. A higher slew rate means a faster amp, which means crystal clear highs. ZAPCO amps have the highest slew rates in the industry. Once again, clear defined, sound is perceived as a function of power. • Signal to Noise Ratio: Noise is an ever-present problem in auto-sound reproduction. ZAPCO approaches this problem in two ways. First, is at the input source. Our amps can all use the SymbiLink balance line inputs, which drastically reduce the noise coming into the amp. Secondly, ZAPCO amps are built with the highest quality, lowest noise components available. We have the highest signal to noise ratios in the industry. The extra money we spend on better components is directly rewarded with better sound. 10 • Stereo Separation: The ability of an amplifier to maintain the separation between the right and left channels is what allows an amp to reproduce an accurate sound stage. Music is recorded with each instrument in its own location in the sound stage. You should hear it the same way. • Results: To assure that no ZAPCO product ever fails to meet our standards, we must build them all to exceed these standards by comfortable margins. Our superior design and construction give our amps advantages that go beyond power output and show a sound quality difference you will hear the moment you turn on your system. A WORD ABOUT “WEIGHTED” SPECIFICATIONS Most of the time, when you see specifications, they will be preceded by the term “A” weighted. “A” weighting is a way of coloring numbers to make specifications look better. You assume the factor you’re measuring is going to have a certain amount of bad stuff, so you pretend that much isn’t there and only measure the rest. About the only place you can find specs that aren’t “A” weighted is in ZAPCO manuals and literature. We publish only “raw” specs at ZAPCO. If we don’t like the specifications of one of our products we’ll make it better, not try to make the numbers look better. 11 Warnings ZAPCO highly recommends that a fuse or circuit breaker be placed within 18" of the battery. Although products have adequate internal protection, it is possible that a pinched power wire between the component and the battery may result in a fire. The protection device should be placed where it can be accessed easily and all wiring should be routed safely and correctly according to the following guidelines: Do not run wiring close to hot or spinning objects. Always use wire grommets when routing wire through the firewall or any other metal panels. Make sure that the potential for pinched wiring is avoided by routing all wires away from moving hinges and seats. This also includes brake, gas and clutch pedals, hood and trunk hinges, etc. Caution: Continuous exposure to excessive sound pressure levels may cause permanent hearing loss. ZAPCO strongly advises that you use common sense when setting volume levels. If you experience ringing in the ears, it could cause permanent hearing damage! CAUTION! When connecting our amplifiers to prewired stock speakers care must be taken that there are no common connections in the speaker wires, i.e. minus to minus or plus to plus connections, as this will cause the amplifier to go into immediate protection or may cause damage to the amplifier. Output connections are not common chassis ground. Please follow the hookup instructions in this owner’s manual. Any questions should be directed to your local Zapco dealer or call us at 209-577-4268. 12 Installation Guidelines Mounting your Competition Amplifier is easy. Keep in mind the following guidelines: • The amplifier may be mounted in any direction, on wood, metal or carpet. • The metal case of the amplifier may be grounded or left isolated. • The amplifier requires adequate ventilation. Position the amplifier with sufficient surrounding area for proper cooling. • Keep fan and vent endplates clear for proper internal cooling. • Keep the amplifier out of the engine compartment and other locations that may cause excessive heat or moisture. • Do not mount the amplifier to a subwoofer enclosure or any other place that may have excessive vibration! 13 Competition 2000 Key Features • SymbiLink Balanced Signal Technology • Low Distortion • Symmetrical, discrete Power Amplifier Circuitry • Short Circuit, High Temperature, Reverse, DC offset, and Overvoltage Protection • 25-Ampere Bipolar Amplifier Output Transistors • Precision 1% Resistors used throughout • 50-Ampere MOSFET Switching Devices • Very high Damping Factor • Low Global Feedback • Can drive highly Reactive Loads • Four Layer Circuit Board with 2 ounce Copper • Dual Color LED for Power and Protection Indications • Gate Drive Boost maximizes power supply efficiency and improves overall performance • Load stability to one ohm on two channel models set to stereo mode • Quality ZAPCO construction • Designed and manufactured in the USA • Three year warranty (Dealer Installed) 14 The Competition 2000 Two Channel Amps ZAPCO has a reputation for sound reproduction and for quality that is unsurpassed. With all the new amps coming onto the market, not one was any threat to ZAPCO’s standing as the premium amp and processor line. So, why change now? Because we can! Because ZAPCO conceives, designs, and builds every product we sell ourselves, we and we alone determine our standards. Rather than chase the industry, we seek new ways to improve the finest products available…Our own. Our new chassis design, with changeable inserts, allows unparalleled cosmetic integration. It also allowed us to incorporate a number of performance enhancements into the new line along with the improved features. All the new amps have dual cooling fans, one intake, and one exhaust. This gives optimum cooling for the power supply and the output devices and increases the mounting possibilities. The new chassis allows our circuit boards to be considerably wider, allowing more space between components and more copper on the board. The entire C2K line uses four layer boards with 2-Oz copper, instead of the industry standard two-layer/1 Oz board. No other manufacturer does this. It gives our amps improved specs in almost every area. Our newly redesigned power supplies with custom wound torroids give the C2K two channel amps up to 40% more power into one-ohm loads than previously possible. Since total value results from both performance and versatility, we have included all the features you would want in the new comps. We have even designed a few features you’ve probably never seen before. Please take the time to study the next few pages and become familiar with all the features and controls of your C2K amp. Then, grab your favorite disk, hit the volume, and experience the result of our passions for music and for sonic purity. We think you will agree that they are passions well worth indulging. 15 16 2 Channel Controls 1. Channel Selector: Allows selection of either Rt. or Lt. channel input when used as a single channel mono amp. 2. Xover Range Select: Shows frequency ranges for internal range switch (13) and AUX range switch (6). 3. Amp Function Selector: Configures the input to the internal amp for single channel bridged, stereo, or L&R sum mono (bass amp). 4. Left and Right clip indicators: If they flash more than occasionally, there is too much gain on the amplifier, and the signal is being distorted. 5. Speaker Connectors: Marked for two channels at 1-Ohm minimum or one channel at 2 Ohms Minimum. 6. Aux Freq Range: Sets xover range for AUX out crossover [see range select (2)]. 7. Aux XO Freq: Sets crossover frequency within range setting (6). 8. Crossover Function: Sets Aux crossover function to Hi, Low, or Full Range. 9. Aux Out: Auxiliary output to provide conditioned signal for another amp. 10. Sub Filt: Subsonic filter to protect speakers and reduce distortion. 11. Input voltage selector: allows amp to be used with non-SimbiLink systems if needed. 12. Amp Gain: This should always be in the full off position and is used only to balance multi-amp systems. (Feel free to contact ZAPCO for instructions). 13. Identical to 6, but for the amps internal crossover. 14. Identical to 7, but for the amps internal crossover. 15. Identical to 8, but for the amps internal crossover. 16. Pre Clip indicator: When this light flashes, it indicates that too much signal is being given to the amp. Check for excess gain in preamp or line driver or switch the voltage selector. 17. Input: Main SymbiLink input to amplifier. 18. Slave Output: True “passthrough” output to feed unaffected signal out for next amp. 19. Unbalanced selector: Can be used w/voltage selector to run amp with weaker RCA signals when SymbiLink balanced lines are not available. 17 18 Power Endplate Controls 1. Power On / Protect indicator: Glows green when amplifier is on. Turns red when amp is in protection. 2. Turn On Delay: Since some decks take longer than others to turn on, we have included an adjustment on the C2K amps to lengthen their turn-on delay. This will eliminate any dangerous turn-on pops. 3. RSD Port: All C2K amps will support a remote mount status display to provide a visual check on amp functions. 4. Power connectors: See chart below for appropriate wire size. Use of small gauge wire will greatly restrict amplifier performance. Always use the same size wire for both Power (+12V) and Ground (-12V). 5. Main Power Fuses: Fuse sizes are listed on the I.D. plate above the fuses. If the fuses should blow, always, replace with the fuse rating on the I.D. plate. • • • • 1.0X: 5 amp fuses 2.0X: 10 amp fuses 3.0X: 20 amp fuses 6.0X: 30 amp fuses 12V Hookup The use of small gauge wire will greatly reduce the power potential of your C2K Amplifier. Please observe the following minimum wire gauges. Since electricity works only when it travels in a full circle, please remember that the ground connection must use the same size wire as the power connection. Amplifier Run less than 10 ft Run over 10 ft 1.0X or 2.0x 10 Gauge 8 Gauge 3.0X or 6.0X 8 Gauge 4 Gauge When using multiple amps, use a 4 gauge Minimum to run to a junction block, close to the amps. If possible, run 2 or 0 gauge to the junction block, as any current loss will result in a loss of power. 19 C2K 1.0X Power VS. Distortion and Specifications 20 Specifications for C2K 1.0X Power per channel - stereo T.H.D. +N @ 1 kHz <.025% 25 watts x 2 @ 4Ω Power - Mono <.02% 50 watts x 1 @ 8Ω Frequency Response 20Hz - 20kHz +0db -.28db S/N Ratio >95dB Transient Distortion <.009% Separation >60dB Damping Factor >875 @ 4Ω @1kh Input Sensitivity 1 - 4 volts or 4 - 16 volts Slew Rate 21 V/uS Idle Current 1.47 amperes Dimensions 2.375”H x 8.75”W x 13.5”L 21 C2K 2.0X Power VS. Distortion and Specifications 22 Specifications for C2K 2.0X Power per channel - stereo T.H.D. +N @ 1 kHz <.02% 50 watts x 2 @ 4Ω Power - Mono 100 watts x 1 @ 8Ω <.017% Frequency Response 20Hz - 20kHz +0db -.35db S/N Ratio >100dB Transient Distortion <.01% Separation >60dB Damping Factor >900 @ 4Ω @1kh Input Sensitivity 1 - 4 volts or 4 - 16 volts Slew Rate 26 V/uS Idle Current 1.75 amperes Dimensions 2.375”H x 8.75”W x 13.5”L 23 C2K 3.0X Power VS. Distortion and Specifications 24 Specifications for C2K 3.0X Power per channel - stereo T.H.D. +N @ 1 kHz <.009% 75 watts x 2 @ 4Ω Power - Mono <.007% 150 watts x 1 @ 8Ω Frequency Response 20Hz - 20kHz +0db -.35db S/N Ratio >100dB Transient Distortion <.008% Separation >65dB Damping Factor >1000 @ 4Ω @1kh Input Sensitivity 1 - 4 volts or 4 - 16 volts Slew Rate 28 V/uS Idle Current 1.67 amperes Dimensions 2.375”H x 8.75”W x 17.5”L 25 C2K 6.0X Power VS. Distortion and Specifications 26 Specifications for C2K 6.0X Power per channel - stereo T.H.D. +N @ 1 kHz <.014% 150 watts x 2 @ 4Ω Power - Mono <.007% 300 watts x 1 @ 8Ω Frequency Response 20Hz - 20kHz +0db -.32db S/N Ratio >100dB Transient Distortion <.007% Separation >60dB Damping Factor >1000 @ 4Ω @1kh Input Sensitivity 1 - 4 volts or 4 - 16 volts Slew Rate 32 V/uS Idle Current 1.77 amperes Dimensions 2.375”H x 8.75”W x 17.5”L 27 C2K Crossover Response 28 The Competition 2000 4 Channel Amps To accompany the new two channel C2K amps, we offer the 4 channel versions, the C2K 2.5X and the 4.0X. In addition to all the standard C2K features, we have made some changes to greatly increase the value of our four channel amps. First, with the C2K series, all ZAPCO 4 channel amps have independent, fully variable crossovers for front and rear amps. Second, each end of the amps can be easily switched to a single channel mono input so they can be used as true stereo amps while “building” a larger system. Finally, we have effectively doubled the power of our Competition 4 channel amps. The competition series was conceived and designed for the serious competitor. Since it was capable of operating at loads as low as 1 Ohm, you could “load down” the amp with multiple woofers and get up to three times the amps rated power. While this is a great advantage for woofers, it is usually a disadvantage for mids and highs, which are usually 4 Ohms or more. By making our four channel amps work best at these higher loads, we give you, the consumer, the best of both worlds. Load down our two channel amps for maximum bass performance and use our four channel amps for the crispest, cleanest highs you have ever heard. Of course, all the C2K features like sub-sonic filter, RSD port, variable turn-on delay, and slave output for “daisy chaining” amps are included with the new competition 4 channels as well. Moreover, as with every ZAPCO product, the C2K four channels are made right here in Modesto, California, by people who care about sound and about quality. Never before, have there been such versatile amplifiers as the Competition 2000, four channels, from ZAPCO. If you should have any questions or comments about your ZAPCO C2K four channel, please contact us at (209) 577-4268 or www.zapco.com. 29 30 4 Channel Controls 1. Source Select: Sets amp function to 4 channel or 2 channel, stereo. In 2 channel, stereo mode, the two front channels are bridged to a single left channel and the rears are bridged to a single right channel, and only the front input and crossover are used. 2. Xover Range Select: Shows frequency ranges for front range switch (15) and rear range switch (7). 3. Front Function Selector: Configures the input to the front amp for left channel bridged, stereo, or L&R sum mono (bass amp). 4. Front and Rear clip indicators: If they flash more than occasionally, there is too much gain on the amplifier, and the signal is being distorted. 5. Speaker Connectors: Marked for 4 channels at 2 Ohms minimum or 2 channels at 4 Ohms minimum. 6. Rear Function Selector: Configures the input to the rear amp for right channel bridged, stereo, or L&R sum mono (bass amp). 7. Rear Freq. Range: Sets xover range for AUX out crossover [see range select (2)]. 8. Rear XO Freq.: Sets crossover frequency within range setting (6). 9. Crossover Function: Sets Rear crossover function to Hi, Low, or Full Range. 10. Rear Input: When using amplifier in 4 channel mode. 11. Sub Filt: Subsonic filter to protect speakers and reduce distortion. 12. Input voltage selector: allows amp to be used with non-SimbiLink systems if needed. 13. Front and Rear Amp Gains: These should always be in the full off position and are used only to balance multi-amp systems. (Feel free to contact ZAPCO for balancing instructions). 14. Identical to 7, but are for the front amps crossover. 15. Identical to 8, but are for the front amps crossover. 16. Identical to 9, but are for the front amps crossover. 17. Pre-Clip Indicator: When this light flashes, it indicates that too much signal is being given to the amp. Check for excess gain in the preamp or line driver, or, switch the voltage selector to its higher setting. 18. Front Input: This is the front input in 4 channel mode and it is the main input in 2 channel, stereo mode. 19. Slave Output: this is a true ‘Passthrough” out to provide an unaffected signal for another amplifier. 20. Unbalanced selector: Can be used w/voltage selector to run amp with weaker, RCA signals, when SymbiLink balanced lines are not available. 31 32 Power Endplate Controls 1. Power On / Protect indicator: Glows green when amplifier is on. Turns red when amp is in protection. 2. Turn On Delay: Since some decks take longer than others to turn on, we have included an adjustment on the C2K amps to lengthen their turn-on delay. This will eliminate any dangerous turn-on pops. 3. RSD Port: All C2K amps will support a remote mount status display to provide a visual check on amp functions. 4. Power connectors: See chart below for appropriate wire size. Use of small gauge wire will greatly restrict amplifier performance. Always use the same size wire for both Power (+12V) and Ground (-12V). 5. Main Power Fuses: Fuse sizes are listed on the I.D. plate above the fuses. If the fuses should blow, always, replace with the fuse rating on the I.D. plate. • • 2.5X: 15 amp fuses 4.0X: 25 amp fuses 12V Hookup The use of small gauge wire will greatly reduce the power potential of your C2K Amplifier. Please observe the following minimum wire gauges. Since electricity works only when it travels in a full circle, please remember that the ground connection must use the same size wire as the power connection. Amplifier Run less than 10 ft Run over 10 ft 2.5x 10 Gauge 8 Gauge 4.0X 8 Gauge 4 Gauge When using multiple amps, use a 4 gauge Minimum to run to a junction block, close to the amps. If possible, run 2 or 0 gauge to the junction block, as any current loss will result in a loss of power. 33 C2K 2.5X Power VS. Distortion and Specifications 34 Specifications for C2K 2.5X Power per channel - stereo T.H.D. +N @ 1 kHz <.015% 50 watts x 4 @ 4Ω Power - Mono <.01% 100 watts x 2 @ 8Ω Frequency Response 20Hz - 20kHz +0db -.33db S/N Ratio >85dB Transient Distortion <.02% Separation >60dB Damping Factor >700 @ 4Ω @1kh Input Sensitivity Slew Rate .5 – 2.17 volts or 2.6 – 10.5 volts 34 V/uS Idle Current 2.6 amperes Dimensions 2.375”H x 8.75”W x 17.5”L 35 C2K 4.0X Power VS. Distortion and Specifications 36 Specifications for C2K 4.0X Power per channel - stereo T.H.D. +N @ 1 kHz <.035% 100 watts x 4 @ 4Ω Power - Mono <.017% 200 watts x 2 @ 8Ω Frequency Response 20Hz - 20kHz +0db -.23db S/N Ratio >90dB Transient Distortion <.025% Separation >60dB Damping Factor >1000 @ 4Ω @1kh Input Sensitivity 1 - 4 volts or 4 - 16 volts Slew Rate 30 V/uS Idle Current 3.95 amperes Dimensions 2.375”H x 8.75”W x 19.5”L 37 Cumulative Error An issue that often is debated is at what level does distortion become detectable to the human ear? Is there truly an audible difference between a unit that measures .05% THD and one that measures .1% THD? There are many that contend, with good cause, that distortion does not become audible until the magnitude approaches 1-% or more. Why do we go to such great lengths in order to ensure the accuracy of each unit when such minute differences are most likely inaudible? The answer to this question underlies ZAPCO’s entire design philosophy and is based on the simple concept of cumulative error. To understand the point you must consider all the pieces of electronic equipment that comprise the chain between the original performance and your ears. From the microphone used to record the performance, to the speakers used to reproduce it, the ultimate accuracy of the final output is directly dependent on the accuracy of all of the pieces that comprise the system. Given that this is not a perfect world, it is inevitable that each piece of equipment will add some distortion or error to the original signal. Signal degradation along this chain can be nothing but cumulative. It is the cumulative error of the system as a whole of which we must be mindful. From ZAPCO’s perspective, the idea that .1% THD, inaudible in and of itself, is good enough, is unthinkable! If .002% THD is possible it is the obligation of the manufacturer to do all that is feasible to attain that maximum level of performance. 38 Class D for the Audiophile We saw our first Class D amp in 1975. Numerous companies have been trying since then to design and build a full range Class D, with very little success. Class D amps have had so much noise and distortion that they destroy mids and highs. Even when used strictly as bass amps they’ve been dangerous. Competitors who use class D amps in SPL cars invariably blow out all their woofers when they hit those high numbers. This happens because of the extreme distortion the class D amps have been putting out when they’re driven hard. This may be acceptable to professional competitors, who get their speakers for free, but for the noncompetitor who has to pay for them out of their own pocket, it can be a real nightmare. Not to mention that most of us want to be able to listen to music in our cars and need an amp that sounds great on everything, not just woofers. Welcome to ZAPCO’s world! Where dreams of Class D power, and full range sound quality come true. The ZAPCO C2K 9.0XD is the ultimate car audio amp in so many ways. The first, of course is power. With over 2000 watts RMS into either 2 Ohms or 4 Ohms, and a chassis only 18” long, it’s easily the most powerful amp of its size. But that’s only the start of the story. The 9.0XD has the most advanced microprocessor control system ever offered in a car audio amplifier. This amp has a serial port that allows it to talk to other amps, to a PC, or even to your car. It can be programmed to control its own power output and clipping levels. The microprocessor system in this amp will be the heart of our new systems as we move into the realm of full digital, from source to speaker output. With all of it being brought to you by ZAPCO. When you’re ready for the ultimate in car audio, ZAPCO has your product. 39 Class D Amplifier Warnings WARNING!! THIS AMPLIFIER IS AN EXTREMELY HIGH CURRENT DEVICE AND MUST BE PROPERLY FUSED. ZAPCO Recommends a 175 amp fuse at the amp, and, a 200 amp fuse at the battery. To avoid putting yourself and your vehicle at risk, this product should be installed by a qualified professional only. WARNING!! The speaker outputs of this amplifier can generate very high voltages! At full power, each terminal will have 60 Volts of EMF. If you bridge this amp, you will have 120 Volts across the speaker terminals. If you touch them during a 60hz note it will be exactly the same as putting your finger in a light socket. WARNING!! This amplifier draws more current than most stock electrical systems can provide. We highly recommend the use of a high output alternator and extra batteries. We also recommend 2 farads of external capacitance per amplifier. 40 Manual for Safe Sound Hopefully you’re reading this manual carefully, front to back, every word. If so you’re probably wondering why you see so many warnings and cautions. Is the C2K 9.0XD dangerous? Only in the wrong hands! Read this manual and follow the instructions and you will have many years of outstanding performance. Why all the warnings? The C2K 9.0XD can develop over 2,000 watts RMS and can draw as much as 175 amps. How many speakers will handle that kind of power? None, unless the enclosure is built to very precise specifications. How many cars can deliver 175 amps of operating current? None! If you are going to drive this amp to full power, you will need to upgrade your electrical system. For these reasons, we highly recommend that the amp be installed by a competent professional, familiar with the amp and with this manual and with the speakers you are using. However, the amp can be safely installed for basic operation by any one, if the manual is thoroughly understood and carefully followed. Please study the next few pages until you have a thorough understanding of all the control functions and how they work and also the electrical and speaker wiring. If you have any questions while reading the manual, feel free to call our technical department at (800) 473-6723. Once you feel comfortable with the control and hook-up basics, the next section will take you through an initial startup procedure that will safely get your system up and running and sounding like nothing you’ve ever heard before. In the final section, we will explain some optional pieces you can get for the C2K 9.0XD and talk about some of the things you can do with the 9.0XD’s D.C.S. digital microprocessor system. Thank you, and enjoy your amplifier. 41 42 CONTROL PLATE FEATURES 1. Mode select: Assigns the function of the adjustment knob as needed. 2. Adjust Knob: Multi- function knob for set-up adjustments on 9.0XD. 3. LED bank: LEDs indicate function of adjustment knob and the levels within each function. 4. Program/Display port and IR Remote port: Allows use of remote control and remote display as well as PC interface. 5. Bridge in Select: Configures amp as single channel R. or L. amp. 6. Bass crossover controls. Items 1 through 3 operate the basic amp controls. This is done by selecting the function (or mode) of the digital encoder knob, and then making adjustments using the LEDs as a guide. There are three basic functions you need to adjust at installation. The first is volume. This is the same as input sensitivity, and should be left all the way down at initial setup. The last is turn-on delay. This allows you to extend the delay to be sure the amp is the last piece of equipment to turn on, thus eliminating any “turn-on pop”. The adjustment in the middle is probably one you haven’t seen before. It’s called pre-clip. Pre-clip is a failsafe system for your speakers. It operates as a governor on the input side of the amp and, once set, puts an absolute limit on how much input the amp will accept. Worried about someone hopping into the car and cranking up your system? Don’t! Once you’ve set the pre-clip, nobody can give your speakers more than you’ve set them for. When adjusting the amp, the first three LEDs indicate the function of the encoder and the next four LEDs show the relative level within each function. Item 4 refers to the ports provided for options and programming. Item 5 is the bridge channel select switch. If your system is to be set up with a right channel amp and a left channel amp, this switch will put each amp to its proper channel. Item 6 is the crossover control section. The 9.0XD will operate full range or as a bass amp. When engaged, the crossover can be set anywhere from 38Hz to 500Hz. If the amp is used mono, switch the input switch to L & R SUM MONO and switch the crossover into 48dB. 43 44 Power Endplate Hookups 1. 12 volt Negative, or Ground, Connection 2. 12 volt Positive, Power Connection 3. Switched Power plug Power Connection: The main power wire for this amplifier should be a 2gauge wire from the car battery as a minimum. For long runs we highly recommend a 0-gauge wire. While the amp may draw more current than many alternators can deliver, we recommend a 175-amp ANL fuse at the amp as fail-safe protection. Failure to properly fuse the amp will void the warrantee. While the fuse at the amp will protect the amplifier, that much current in the line from the battery does present a short circuit threat to the vehicle. To insure the safety of both your vehicle and yourself, we highly recommend a fuse of 200 amps at the vehicle’s battery in addition to the fuse at the amp. Proper Configuration Batt.___fuse_____________________________fuse___Amplifier 200amp 175amp Ground Connection: The most common problems with high power amp installations relate to the ground connection. Electricity travels in a circuit and the amount of current the circuit will conduct is limited by the smallest piece of conductor in that circuit. Therefore, your ground wire must be same gauge as your power wire! Anything smaller will restrict your power output. Also, for the ground connection to be effective, it must have a clean secure connection to the frame or other structural member. Many sheet metal parts in cars are isolated from the frame, by rubber or plastic, to reduce road noise and vibration. These do not make good ground points. Do not ground to sheet metal. Switched Power Plug: The switched power plug has two connections. The first is the turn-on lead from the head unit. This connection wakes up the amp when 12 volts is applied, from the system. The second connection is switched 12 volts out. When power is applied to the turn-on wire, it closes a relay in the amp to provide 12V out to operate as a turn-on for other amps or accessories in the system and avoid having to add outboard relays. 45 Start Up and Adjustments 1. Please Note! When you turn on the C2K 9.0XD, the adjustment LED’s will light up to display the last adjustment made, regardless of the position of the selector switch. Therefore, when making or verifying settings you must make a minor adjustment to each setting so the microprocessor will set the LED’s to display that particular setting. 2. If this amp is being moved from one car, or system, to another, please perform the “reset” function (at # 4.) before proceeding further. 3. Initial start up procedure/check list: • Make sure all installation guidelines have been followed. • Configure amp for proper operation. (Crossover, stereo/mono, etc.) • Connect any peripherals to the system. (EQ’s, VFD’s,etc.) • Make sure the 175-amp fuse is installed on the main 12 volt lead. • Re-read all warning labels. • Turn down the head unit volume. • Turn on the system at 0 volume. • Using the amps MODE button, switch to the VOLUME LED, turn the ADJUST knob counter clockwise to assure that gain is at minimum. • Slowly turn up the volume at the head unit, paying close attention to the sound of the speakers. • Check for proper response from the speakers and volume level, making sure that speakers don’t exceed their limit. (Bottom out) • If speakers bottom out, go immediately to the “Pre-Clip” Level adjustment section. • If the speakers do not bottom out, and you want more volume, you can now adjust the gain using the Volume Adjust procedure. 4. Pre-Clip Level setting: This is an extremely important safety setting, as the pre-clip, when properly used will prevent the speakers from exceeding their limits of travel. • Set the amp VOLUME at minimum • Push the MODE SELECT button until the Pre Clip LED lights. • Turn the ADJUST knob counter clockwise until the ¼ LED lights up. • Bring deck volume level up to expected maximum(usually ¾), while listening for any speaker problems or bottoming out. 46 • • Slowly turn the ADJUST knob clockwise until you hear that the speakers have reached their limit of travel, then, turn the control back counter clockwise to a safe level. If the speakers do not bottom out at max deck power, you can bring up their level with the VOLUME setting of the amp. As soon as any bottoming out is heard, stop increasing VOLUME and switch over to Pre Clip to set the pre clip level. 5. Reset procedure: • With amp off, push in and hold the MODE SELECT button. • While holding the MODE SELECT in, turn on the amplifier. • This will reset all functions to factory levels. Volume…Minimum, Pre Clip…Maximum, Turn-On…1 Sec. 6. Turn-on Delay: With the ON DELAY LED lit, turning the ADJUST knob will vary the turn on delay from 1 to 4 seconds. 47 C2K 9.0XD Power VS. Distortion and Specifications 48 Specifications for C2K 9.0XD Power per channel - stereo T.H.D. +N @ 1 kHz 300 watts x 2 @ 4Ω 1000 watts x 2 @ 2Ω Power - Mono <.05% <.2% 600 watts x 1 @ 8Ω <.07% Frequency Response 20Hz - 20kHz +0db -.23db S/N Ratio >85dB Separation >70dB Damping Factor >225 @ 4Ω @1kh Input Sensitivity 250mV - 8 volts Slew Rate >20 V/uS Idle Current 3.8 amperes Dimensions 2.375”H x 8.75”W x 19.5”L Please Note: The 9.0XD is available as either a 2 Ohm stereo / 4 Ohm mono version, or as a 1 Ohm stereo / 2 Ohm mono version. 49 Display and Control Options To go with the most advanced amp around, ZAPCO has developed the most advanced display around. The XD-VFD is an in-dash mountable, vacuum florescent display, which allows you to monitor temperature, battery voltage, amplifier rail voltage, and power output. It also gives you a readout of your volume, preclip, and turn-on delay settings, plus, adding a “soft mute” switch to automatically roll back any clipped signals. The display also adds a function to put a delay on the +12V out if needed Once you add the XD-VFD, you can also use a wired remote, which can be mounted in some convenient location up front. Then you can make all your amp adjustments from your seat while monitoring the display. If you prefer to use a wireless remote, the XD-VFD has a built in I/R receiver for the remote. Need more than an XD-VFD? If you have a PC in the car, we’ve got you covered. We have an adapter to hook your PC to the display port and a cool Windows program which will let your PC control all the amp functions with a great full screen display to show all the functions on sections of the control screen. With more than one amp, you can open windows for each amp and toggle between them. 50 51 System Diagrams For Two Channel Amps: 1. Basic Full Range System 2. Two Amp System with Sub 3. Two Way System with Sub Amp and Processor 4. Three Amp three way with Bandpass 5. Three Amp with Processor (Crossovers at 12 and 18 dB) 6. Single Channel Right / Single Left and Mono Sub 7. Three Amp System with Full Competition Processing For Four Channel Amps: 1. Basic Four Channel Non-Fading 2. Four Channel Front & Rear with Mono Sub 3. Two Way System with Fader 4. Two Channel with Mono Sub 5. Two Channel Mid / High Plus Two Channel Mono Sub For the 9.0XD Digital Amp: 1. Power Endplate Connections 2. Full Range System 3. 60 dB Bi-Amp System 4. Three Channel System with Processor 5. Six Channel with Two Mono Bass Amps 6. Three Channel Mono Block 7. Five Channel with Bandpass 52 53 54 55 56 57 58 59 60 61 62 63 64 65 66 67 68 69 70 71 Technical Assistance Should you experience a problem with your Competition 2000 Amplifier, please contact the dealer that sold you this product. If your dealer is unable to solve your problem, you may contact the factory service department directly. Phone: (209) 577-4268 Monday - Friday, 8AM - 5PM Pacific Time FAX: (209) 577-8548 Also, check our web page, www.zapco.com, for tips. You can also e-mail technical help directly from our web page or [email protected]. If you need to return this product for repair, please call the factory for a Return Materials Authorization (RMA) number. We will ask you for information that will include your name, return shipping address, daytime phone number, model and serial number, and a detailed description of your problem. A photocopy of your original purchase receipt is necessary to determine warranty status and should also be included. Once we issue you an RMA, please write it in a highly visible area on the package. ZAPCO will not accept any packages that do not have a valid RMA number clearly marked on the outside of the package. Once you have a valid RMA number, send all repairs to: A.R.P.A. of America Corp. D.b.a. Zapco Attn.: Service Department 413 S. Riverside Drive Suite D Modesto, California, 95354 72