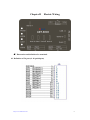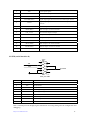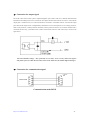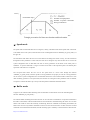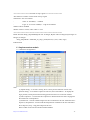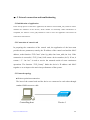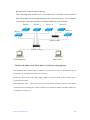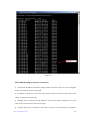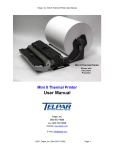
1
ADT-8840 ADT-8840 Four-Axis Off-Line Motion Control Card User’s Manual ADTECH (SHENZHEN) CNC TECHNOLOGY CO. LTD Add: 5/F, Building 27-29, Tianxia IC Industrial Park, Yiyuan Road, Nanshan District, Shenzhen P.C.: 518052 Tel: 0755-26722719 (20-line) E-mail:[email protected] Fax: 0755-26722718 http://www.adtechcn.com ADT-8840 Four-Axis Off-Line Motion Control Card User’s Manual Declaration on Copyright The copyright of all parts in this Manual is reserved by ADTECH (SHENZHEN) CNC TECHNOLOGY CO. LTD (hereinafter referred to as “ADTECH”) and, without permission by ADTECH, nobody shall reproduce, copy, transcribe or translate any part therein. No part of this Manual shall be considered as warranty, expression of standpoint or other implications in any form whatsoever. If any information is disclosed, either directly or indirectly, any profit is lost or undertaking is terminated just because of the information indicated in this Manual or on the product it describes, ADTECH and its employees shall bear no responsibility. In addition, the specifications and other materials mentioned in this Manual shall only be used for reference and the contents therein shall be subject to change without prior notice. Trademark The product names are only mentioned in this Manual for the purpose of identification, which may be the trademark of others or whose copyright is reserved by others. We hereby declare that: ※ INTEL and PENTIUM are the trademarks of Intel Corporation; ※ WINDOWS and MS—DOS are trademarks of Microsoft Corporation; ※ ADT-8840 is the trademark of ADTECH; ※ Marks not mentioned here belong to their respective companies that underwent the registration procedures. All rights reserved. ADTECH (SHENZHEN) CNC TECHNOLOGY CO. LTD http://www.adtechcn.com 1 Contents Chapter I Overview ....................................................................................................... 7 ) About the prodcut ........................................................................................................................... 7 ) Features ........................................................................................................................................... 7 ) Specification ................................................................................................................................... 8 ) Outer dimensions ............................................................................................................................ 9 ) Operating environment ................................................................................................................. 10 ) Application.................................................................................................................................... 10 Chapter II Electric Wiring ........................................................................................ 10 ) Illustration and definition for terminals ....................................................................................... .11 ) Connecting to power supply ........................................................................................................ .20 ) Standard USB interface (USB) .................................................................................................... .21 ) Standard Ethernet interface (RJ45) ............................................................................................... 21 ) Connection for input signal........................................................................................................... 21 ) Connection for pulse output signal ............................................................................................... 22 ) Connection for output signal......................................................................................................... 23 ) Connection for communication signal .......................................................................................... 23 Chapter III Features.................................................................................................. 24 ) Preset drive.................................................................................................................................... 24 ) Continuous drive........................................................................................................................... 25 ) Velcoity curve ............................................................................................................................... 25 ) Set-speed drive.............................................................................................................................. 25 ) Speed mode................................................................................................................................... 27 ) Buffer mode .................................................................................................................................. 27 ) Position management .................................................................................................................... 28 ) Interpolation.................................................................................................................................. 29 ) Pulse output mode......................................................................................................................... 30 ) Hardware limit signal.................................................................................................................... 31 ) Signal corresponding to server motor ........................................................................................... 31 ) Drive by external signal ................................................................................................................ 31 Chapter IV Basic Library Functions of ADT8840.................................................... 32 Chapter V Definitions of Functions in ADT8840's Basic Library.............................. 37 ) 1. Basic parameters setup.............................................................................................................. 37 1.1 1.2 1.3 1.4 1.5 1.6 1.7 1.8 1.9 1.10 DEVICEADDR_INIT( )................................................................................................................. 36 TCP_CONN ( ) ........................................................................................................................... 36 CLOSE_NETCONN ( ) .................................................................................................................. 36 CLOSE_ALL ( ) ........................................................................................................................... 36 GET_SOCK ( )............................................................................................................................. 37 UART_SHOW ( ).......................................................................................................................... 37 ADT8840A_SET_STOP0_MODE( ) ............................................................................................... 37 ADT8840A_SET_STOP1_MODE( ) ............................................................................................... 37 ADT8840A_SET_LIMIT_MODE( ) ................................................................................................ 38 ADT8840A_SET_PULSE_MODE( ) ............................................................................................... 38 ) 2. Drive status detection….40 http://www.adtechcn.com 2 2.1 ADT8840A_GET_STATUS( ) ........................................................................................................ 39 2.2 ADT8840A_GET_INP_STATUS( ) ................................................................................................. 39 2.3 ADT8840A_GET_INT_STATUS( ) ................................................................................................. 39 ) 3. Motion parameters setup........................................................................................................... 41 3.1 3.2 3.3 3.4 3.5 ADT8840A_SET_ACC( ).............................................................................................................. 40 ADT8840A_SET_STARTV( ) ........................................................................................................ 40 ADT8840A_SET_SPEED( )........................................................................................................... 41 ADT8840A_SET_COMMAND_POS( ) ........................................................................................... 41 ADT8840A_SET_ACTUAL_POS( )................................................................................................ 42 ) 4. Motion parameters detection..................................................................................................... 44 4.1 ADT8840A_GET_COMMAND_POS( )........................................................................................... 43 4.2 ADT8840A_GET_ACTUAL_POS( ) ............................................................................................... 43 4.3 ADT8840A_GET_SPEED( ) .......................................................................................................... 43 4.4 ADT8840A_ALL_COMMAND_POS( ) ........................................................................................... 44 4.5 ADT8840A_ALL_ACTUAL_POS( ) ............................................................................................... 44 4.6 ADT8840A_ALL_SPEED( ) .......................................................................................................... 44 ) 5. Drive ......................................................................................................................................... 46 5.1 5.2 5.3 5.4 5.5 5.6 5.7 5.8 5.9 5.10 5.11 5.12 ADT8840A_PMOVE( ) ................................................................................................................. 45 ADT8840A_PMOVE2( ) ............................................................................................................... 45 ADT8840A_PMOVE3( ) ............................................................................................................... 45 ADT8840A_PMOVE4( ) ............................................................................................................... 46 ADT8840A_DEC_STOP( ) ............................................................................................................ 46 ADT8840A_SUDDEN_STOP( )...................................................................................................... 47 ADT8840A_INP_MOVE2( ) .......................................................................................................... 47 ADT8840A_INP_MOVE3( ) .......................................................................................................... 47 ADT8840A_INP_MOVE4( ) .......................................................................................................... 47 ADT8840A_CONTINUE_MOVE( )............................................................................................... 48 ARCCOMP( )............................................................................................................................. 48 ADT8840A_ARC( ) .................................................................................................................... 49 ) 6. Input and output of switch value............................................................................................... 51 6.1 ADT8840A_READ_BIT( ) ............................................................................................................ 50 6.2 ADT8840A_WRITE_BIT( )........................................................................................................... 50 6.3 ADT8840A_SUDDEN_WRITE_BIT................................................................................................ 50 6.4 ADT8840A_READ_8BIT( )........................................................................................................... 51 ) 7. Intermit function ....................................................................................................................... 52 7.1 ADT8840A_CLEAR_INT( ) .......................................................................................................... 51 7.2 ADT8840A_ENABLE_INT( ) ........................................................................................................ 51 7.3 ADT8840A_DISABLE_INT( ) ....................................................................................................... 51 ) 8. Hardware buffer ........................................................................................................................ 53 8.1 ADT8840A_RESET_FIFO( ).......................................................................................................... 52 8.2 ADT8840A_READ_FIFO( )........................................................................................................... 52 8.3 ADT8840A_ FIFO_INP_MOVE1() ................................................................................................. 52 8.4 ADT8840A_ FIFO_INP_MOVE2() ................................................................................................. 53 8.5 ADT8840A_ FIFO_INP_MOVE3() ................................................................................................. 53 http://www.adtechcn.com 3 8.6 ADT8840A_ FIFO_INP_MOVE4() ................................................................................................. 54 ) 9. System....................................................................................................................................... 56 9.1 9.2 9.3 9.4 9.5 9.6 9.7 9.8 9.9 9.10 ADT8840A_FS_REMOVE( ) ........................................................................................................ 55 ADT8840A_NET_SETUP( ).......................................................................................................... 55 ADT8840A_SET_SPEED_MODE( )................................................................................................ 55 ADT8840A_SET_BUFF_MODE( ) ................................................................................................. 56 ADT8840A_SET_PULSEMM( ) ..................................................................................................... 56 ADT8840A_GET_PULSEMM( )..................................................................................................... 56 ADT8840A_UPLOAD_SYSFILE( )................................................................................................. 56 ADT8840A_DOWNLOAD_SYSFILE( )........................................................................................... 57 ADT8840A_GO_HOME( ) ............................................................................................................ 57 ADT8840A_STOP_ALL( )........................................................................................................... 58 ) 10. G Code .................................................................................................................................... 60 10.1 10.2 10.3 10.4 10.5 10.6 ADT8840A_DOWNLOAD_GFILE ( )............................................................................................ 59 ADT8840A_UPLOAD_GFILE() ................................................................................................... 59 ADT8840A_G_CODE( ) ............................................................................................................. 59 ADT8840A_RUN_GFILE( )......................................................................................................... 59 ADT8840A_G_STATUS( )........................................................................................................... 60 ADT8840A_GET_GBUFF_DEPTH ( )........................................................................................... 60 Chapter VI Making Use of Functions In Motion Control Library ......................... 62 ) 1. Overview of ADT-8840 Function Library................................................................................. 62 ) 2. Use of dynamic-link library under Windows environment ....................................................... 62 ) 3. Help for commissioning in development of application ........................................................... 63 ) 4. Average of execution time of function command ..................................................................... 63 Chapter VII Major Points on Development of Motion Control Card ....................... 63 ) Initialization of card ...................................................................................................................... 63 ) Speed setting ................................................................................................................................. 63 ) Signals of STOP 0 and STOP 1..................................................................................................... 65 Chapter VIII Examples of programming for development of motion control card . 66 ) 1. VB programming ...................................................................................................................... 66 ) 2. VC programming ...................................................................................................................... 79 Chapter IX Network configuration and interface commissioning ............................. 95 ) 1. Overview................................................................................................................................... 95 ) 2. Network environment and host's configuration ........................................................................ 95 ) 3. Search or perform network configuration through serial interface ........................................... 95 ) 4. Network configuration of host (upper PC).............................................................................. 100 ) 5. Network connection and troubleshooting ............................................................................... 105 ) 6. Information ............................................................................................................................. 108 ) 7. Commissioning and observing program running through serial interface .............................. 108 Chapter X Precautions and Troubleshooting .......................................................... 109 ) Precautions.................................................................................................................................. 109 ) Maintenance .............................................................................................................................. 109 ) Troubleshooting .......................................................................................................................... 110 http://www.adtechcn.com 4 Chapter I Overview ) About the product ADT-8840 is a high-performance and multifunctional Off-Line Motion Control Card, whose hardware consists of high-speed microprocessor, large-scope customized IC chips and multilayer PCBs, a structure that integrates the technological strengths of various manufacturers at home and abroad and features its high reliability, improved performance and proven technology. Embedded in the product are 4-path pulse/direction signal output, phase AB+Z pulse input for encoders of four axes, 34-path optical coupler output+4-path alarm input, 18-path optical coupler output+4-path axis-control output, two-path RS232 communication module, USB interface and network interface. ADT-884 is designed on the basis of the control and transmission protocol for Ethernet and TCP/IP protocol, with which one system can support 64 control cards that control 256 server/stepping motors. With bandwidth of 10Mbps, ADT-884 can be operated in a LAN whose bandwidth is 100Mbps. At present, ADT-884 and its supporting software can be used in the LAN based on Ethernet or connected to PC’s network interface with the crossover cables. ) Features ● S3C44B0X CPU(ARM7)from Samsung, with major frequency of 66MHz; ● Large-scope programmable FPGA, real-time multipurpose control technology and hardware interpolation technology, high reliability; ● Compatible with highly segmented driver, with high machining precision and steady running; ● 2~4-axis random linear interpolation; ● 2-axis software random arc interpolation; ● Providing buffer for commands of software and hardware to improve efficiency and stability; ● Linear acceleration/deceleration; ● Real-time reading of logic position, actual position and drive speed in running; ● 34-path optical coupler isolation input; ● Optical-coupler isolation pulse input of phase A and B for encoders of 4 axes +phase Z home position input (can be used for inputting the switch value of 12-path); ● Optical-coupler isolation input with 18-path open collector, with four-axis output, which can be used for omnipotent server control or server alarm deletion; ● Embedded with 8M SDRAM and 32M Nand FLASH ROM, a sufficient memory space that can satisfy the running of various complicated programs and machining; http://www.adtechcn.com 5 ● Standard Ethernet RJ45 network interface, TCP/IP protocol supported, ensuring high-speed and reliable data communication in environment interfered by electromagnetism. Users can realize real-time control over the distant equipment through the LAN. Single-section maximum communication distance reaches 185 meters (subject to the electromagnetism environment and wiring), with five sections at maximum; ● Average responsive time of 2.5-4 seconds for commands from the host to the equipment, high real-time performance; ● Some of the commonly used control commands are optimized to realize the combined effects of multiple basic commands; ● Supporting some of G-code machining commands, off-line or real-time machining and control achieved through G-code; ● One-host-and-multiple-server mechanism allows users to control and oversee multiple devices (64 at maximum) through one host PC (after expanded with router or HUB ) (subject to the performance of host and network); ● Antivirus performance improved at the lower layer of the network to resist interference from virus like ARP and network administrator to improve communication reliability. ● With USB1.1 interface, application in ADT-8840can be upgraded to facilitate the on-site operation whenever necessary; ● Optimized structure with full optical coupler isolation control provides high interference resistance; ● RS232 (±15KV static protection); ● Prompting buzzer; ● All hardware programmed as function library to facilitate development. ) Specification Input of switch value: Channel: 32, full optical coupler separation; Input voltage: 5-24V; High level: >4.5V; Low level: <1.0V; Isolation voltage: 2500V DC; Delay time for optical coupler input: not over 0.1ms. Counting input: Channel: 4AB phase encoding input, full optical coupler isolation (reuse with 8 input switch values); Max. counting frequency: 2MHz; http://www.adtechcn.com 6 Input voltage: 5-24V; High level: >4.5V; Low level: <1.0V; Isolation voltage: 2500V DC. Pulse output: Channel: 4-axis pulse, 4-axis direction, full optical coupler isolation; Max. pulse frequency: 2MHz; Output type: 5V differential output; Output mode: pulse+direction or pulse+pulse. Output of switch value: Channel: 18, full optical coupler separation; Output type: NPN collector open-circuit 5-24VDC, rated current 0.5A, with max. current of 1 A for single path. RS-232 communication rate (bps): 115200 ) Outer dimensions http://www.adtechcn.com 7 ) Operating environment: Power supply: DC 24V Power consumption: 3.6W — 5.0W Operating temperature: 45℃ Storage temperature: -40℃ — 55℃ Humidity: 40% — 80% Storage humidity: 0% — 95% ) Application z Engraving and milling machine z Spray coater, welding machine z Four-axis robot http://www.adtechcn.com 8 Chapter II Electric Wiring ) Illustration and definition for terminals 4.1 Definition of JA port (0~16-path input) http://www.adtechcn.com 9 Line No. Name Definition 1 INCOM1 Shared input 1 2 IN0 home position X 3 IN1 Home position Y 4 IN2 Home position Z 5 IN3 Home position A 6 IN4 X positive limit 7 IN5 X negative limit 8 IN6 Y positive limit 9 IN7 Y negative limit 10 IN8 Z positive limit 11 IN9 Z negative limit 12 IN10 A positive limit 13 IN11 A negative limit 14 IN12 Manual stop 15 IN13 Manual return to home position 16 IN14 Manually run the program for machining 17 IN15 18 IN16 http://www.adtechcn.com Regular input 10 4.2 Definition of JB port (17~33-path input) . Line No. Name 1 INCOM2 2 IN17 3 IN18 4 IN19 5 IN20 6 IN21 7 IN22 8 IN23 9 IN24 10 IN25 11 IN26 12 IN27 13 IN28 14 IN29 15 IN30 16 IN31 17 IN32 18 IN33 http://www.adtechcn.com Definition Shared input 2(please connect it to +12V~+24V power) Regular input 17 ~ 33 (Please notice its order by refereeing to the silk printing on PCB) 11 4.3 Definition of JC port (18-path input) . Line No. Name Definition 1 24VGND Shared output 2 OUT0 Regular 0 ~ 17 3 OUT1 4 OUT2 5 OUT3 6 OUT4 7 OUT5 8 OUT6 http://www.adtechcn.com 12 9 OUT7 10 OUT8 11 OUT9 12 OUT10 13 OUT11 14 OUT12 15 OUT13 16 OUT14 17 OUT15 18 OUT16 19 OUT17 20 +24V +24V power input for loading (requiring external 12~+24 V power) 4.4 Definition of axis X’s port (axis X’s pulse and direction) JCP1 PUCOM 1 EXT_VCCA 9 2 10 +24V 3 24VGND 11 4 XECA+ XECAXECB+ XECB- 12 5 13 6 14 7 15 8 XPU+ XPUXDR+ XDRXALARM OUT18 XECZ+ XECZ- DB15 15-pin female jack (same as lathe and milling machine) http://www.adtechcn.com 13 Line No. Name Definition 1 XPU+ Axis X’s pulse signal + 2 XPU- Axis X’s pulse signal - 3 XDR+ Axis X’s direction signal + 4 XDR- Axis X’s direction signal - 5 XALARM (IN34) 6 OUT18 7 XECZ+(IN38) Phase Z’s input + for axis X’s encoder 8 XECZ-(IN38) Phase Z’s input - for axis X’s encoder 9 EXT_VCCA Driver used for single-end input 10 +24V 24V power + (output to server) 11 24VGND 24V power - (output to server) 12 XECA+(IN42) Phase A’s input + for axis X’s encoder 13 XECA-(IN42) Phase A’s input - for axis X’s encoder 14 XECB+(IN43) Phase B’s input + for axis X’s encoder 15 XECB-(IN43) Phase B’s input - for axis X’s encoder Regular input signal, can be used as server alarm input of axis X Regular input signal, can be used as server full capacity and other functions 4.5 Definition of axis Y’s port (axis Y’s pulse and direction) http://www.adtechcn.com 14 JCP2 PUCOM 1 EXT_VCCA Y PU+ 9 2 Y PU- 10 +24V 3 24VGND Y DR+ 11 4 Y ECA+ Y ECAY ECB+ Y ECB- Y DR- 12 5 Y ALARM 13 6 OUT19 14 7 Y ECZ+ 15 8 Y ECZ- DB15 15-pin female jack (same as lathe and milling machine) Line No. Name 1 YPU+ Axis Y’s pulse signal + 2 YPU- Axis Y’s pulse signal - 3 YDR+ Axis Y’s direction signal + 4 YDR- Axis Y’s direction signal - 5 YALARM (IN35) 6 OUT19 7 YECZ+(IN39) Phase Z’s input + for axis Y’s encoder 8 YECZ-(IN39) Phase Z’s input - for axis Y’s encoder 9 EYT_VCCA Driver used for single-end input 10 +24V 24V power + (output to server) 11 24VGND 24V power - (output to server) 12 YECA+(IN44) http://www.adtechcn.com Definition Regular input signal, can be used as server alarm input of axis Y Regular input signal, can be used as server full capacity and other functions Phase A’s input + for axis Y’s encoder 15 13 YECA-(IN44) Phase A’s input - for axis Y’s encoder 14 YECB+(IN45) Phase B’s input + for axis Y’s encoder 15 YECB-(IN45) Phase B’s input - for axis Y’s encoder 4.6 Definition of axis Z’s port (axis Z’s pulse and direction) JCP3 PUCOM EXT_VCCB +24V 1 9 2 10 3 11 4 ZECA+ ZECAZECB+ ZECB- 12 5 13 6 14 7 15 8 ZPU+ ZPUZDR+ ZDRZALARM OUT20 ZECZ+ ZECZ- DB15 15-pin female jack (same as lathe and milling machine) . Line No. Name 1 ZPU+ Axis Z’s pulse signal + 2 ZPU- Axis Z’s pulse signal - 3 ZDR+ Axis Z’s direction signal + 4 ZDR- Axis Z’s direction signal - 5 ZALARM (IN36) 6 OUT20 http://www.adtechcn.com Definition Regular input signal, can be used as server alarm input of axis Z Regular input signal, can be used as server full capacity and other functions 16 7 ZECZ+(IN40) Phase Z’s input + for axis Z’s encoder 8 ZECZ-(IN40) Phase Z’s input - for axis Z’s encoder 9 EZT_VCCA Driver used for single-end input 10 +24V 24V power + (output to server) 11 24VGND 24V power - (output to server) 12 ZECA+(IN46) Phase A’s input + for axis Z’s encoder 13 ZECA-(IN46) Phase A’s input - for axis Z’s encoder 14 ZECB+(IN47) Phase B’s input + for axis Z’s encoder 15 ZECB-(IN47) Phase B’s input - for axis Z’s encoder 4.7 Definition of axis A’s port (axis A’s pulse and direction) JCP4 PUCOM 1 EXT_VCCB 9 2 10 +24V 3 24VGND 11 4 AECA+ AECAAECB+ AECB- 12 5 13 6 14 7 15 8 APU+ APUADR+ ADRAALARM OUT21 AECZ+ AECZ- DB15 15-pin female jack (same as lathe and milling machine) . Line No. Name 1 APU+ http://www.adtechcn.com Definition Axis A’s pulse signal + 17 2 APU- Axis A’s pulse signal - 3 ADR+ Axis As direction signal + 4 ADR- Axis A’s direction signal - 5 AALARM (IN37) 6 OUT21 7 AECZ+(IN41) Phase Z’s input + for axis A’s encoder 8 AECZ-(IN41) Phase Z’s input - for axis A’s encoder 9 EAT_VCCA Driver used for single-end input 10 +24V 24V power + (output to server) 11 24VGND 24V power - (output to server) 12 AECA+(IN48) Phase A’s input + for axis A’s encoder 13 AECA-(IN48) Phase A’s input - for axis A’s encoder 14 AECB+(IN49) Phase B’s input + for axis A’s encoder 15 AECB-(IN49) Phase B’s input - for axis A’s encoder Regular input signal, can be used as server alarm input of axis A Regular input signal, can be used as server full capacity and other functions 4.8 SI 0 (serial interface 0) JCP5 1 6 TX0 2 7 RX0 3 8 VDD50 4 9 5 公头 Male jack DB9 Line No. Name Definition 1 NC Not connected 2 TX0 Transmit data 3 RX0 Receive data 4 GND Power’s grounding 5 GND Power’s grounding 6 NC 7 VDD5.0 Provide 5V power to external devices 8 VDD5.0 Provide 5V power to external devices 9 NC Not connected Not connected SI 0 is normally used for displaying the information of running during network configuration and debugging. http://www.adtechcn.com 18 4.9 SI 1 (serial interface 1) JCP6 1 6 TX1 2 RX1 3 7 8 VDD50 4 9 5 母头 Female jack DB9 Line No. Name Definition 1 NC Not connected 2 TX1 Transmit data 3 RX1 Receive data 4 GND Power’s grounding 5 GND Power’s grounding 6 NC 7 VDD5.0 Provide 5V power to external devices 8 VDD5.0 Provide 5V power to external devices 9 NC Not connected Not connected SI 1 not used ) Connecting to power supply The mainboard of this device employs +24 VDC as its power source, which should be supplied from the external switching power. The wiring for the power supply is shown in the figure below: http://www.adtechcn.com 19 ) Standard USB interface (USB) ) Standard Ethernet interface (RJ45) When the host is directly connected to the Control Card, crossover cables will be used for the connection. In other words, one end of the wires adopts standard 568B line order, and the other 568A line order. ) Connection for input signal Optical coupler input The INCOM terminal should be connected to the positive pole of the external power source and the input signal to the corresponding pin. Among the terminals, the shared terminal of IN0—IN16 is INCOM1; the shared terminal of IN17—IN33 INCOM2. When in use, the shared terminal should be connected to +24V power source. For the input terminals, the lower level is effective. The current of single-path input should not be over 15mA, but not less than 5mA. http://www.adtechcn.com 20 ) Connection for pulse output signal 1. Differential mode: This mode is suitable for the stepping driver and most of the server drivers with independent pulse and direction input. It is recommended this mode is used, for it provides high anti-interference capacity. Driver of stepping motor Driver of server motor 2. Single-end mode This mode was used for the stepping motors, with which the anodes of pulse and direction were connected together in early time. Driver of stepping motor Note: It is not suitable for stepping motors, the cathodes of whose pulse and direction are connected together. EXTVCC5.0A or EXTVCC5.0B is not used for other purposes except for the non-differential connection method of the driver’s pulse. Otherwise, the internal circuit of the ADT-8840 might be damaged. Any two of the four pins, namely, PU+, PU-, DR+ and DR- shall never be connected together. Otherwise, the internal circuit of the ADT-8840 might be damaged too. http://www.adtechcn.com 21 ) Connection for output signal The switch value of this control system is output through the open collector, with JC1 as both the shared terminal and GND of the loaded power source. In actual use, the operator should connect the Pin 20 of JCI to +24V, and the output point is enabled at low level. The load should be connected to somewhere between +24V and the output point. The internal output circuit is safeguarded by mechanisms of over-current protection, over-voltage protection, short circuit protection, overheat protection and follow-current protection. However, if an external sensible load is connected, like the relay, you should connect a follow-current diode at the two ends of the relay, as shown in the figure below: or Note: Recommended voltage: < 24V (preferably not over 30V). Never reversely connect the negative and positive poles, nor allow the load to have short circuit. Otherwise, the module might be damaged. ) Connection for communication signal PC Control Card Communication mode RS232 http://www.adtechcn.com 22 Chapter III System Functions ) Preset drive “Preset drive” means pulses of a set number are output with a fixed velocity or acceleration/deceleration. This function is performed when the tool needs to move to a specific position or execute a specific action. The mechanism of preset drive for acceleration/deceleration is shown in the figure below. When the number of remaining pulses is smaller than that of accumulated pulses, the system will begin to decelerate, and terminate its drive once the output of designated pulses is completed. To perform preset drive for acceleration/deceleration, the following parameters should be set: a) Range: R; b) Acceleration/deceleration: A/D; c) Start velocity: SV; d) Drive velocity: V; e) Output pulse number: P Velocity Drive velocity Automatic deceleration Stop when the output of designated pulses is completed Start velocity Preset drive Time When preset drive for acceleration/deceleration is engaged, the system will start automatic deceleration at the computed point as shown in the above figure. http://www.adtechcn.com 23 ) Continuous drive In continuous drive mode, the output of drive pulses will keep going till the stop commands of high position or external stop signal is enabled. This function can be performed when home position search, scanning or control of motor speed is needed. ) Velocity curve The drive pulses of each axis are output through the preset drive commands with positive/negative direction or through the continuous drive commands. And the velocity curves of preset speed, linear acceleration/deceleration and S-shape acceleration/deceleration can be generated through mode or parameter setting. ) Set-speed drive “Set-speed drive” means drive pulses are output with an unchanged speed. If the set drive velocity is lower than the start velocity, there will be no acceleration/deceleration drive, but set-speed drive. When signals for home position search, encoder’s phase Z and the like are used, if the system needs to stop immediately after the signal is found, the system can perform set-speed drive at a low velocity value from the very beginning, without the need of acceleration/deceleration drive. To perform Set-speed drive, the following parameters should be set: z Range: R; z Start velocity: SV; z Drive velocity: V. Velocity SV V Time Set-speed drive http://www.adtechcn.com 24 Linear acceleration/deceleration drive “Linear acceleration/deceleration drive” means the system accelerate to the set drive velocity from start velocity in a linear fashion. In Set-speed mode, the acceleration counter counts the number of pulses accumulated during the acceleration process. When the number of remaining pulses is smaller than that of accumulated pulses, the system will begin to decelerate (automatically). In deceleration, the velocity will be lowered to the start value in a linear fashion. To perform linear acceleration/deceleration drive, the following parameters should be set: z Range: R; z Acceleration: A; acceleration/deceleration; z Deceleration: D; individually set deceleration (subject to temporary setting); z Start velocity: SV; z Drive velocity: V; z Output pulse number: P, for preset drive (subject to temporary setting) Velocity D D A SV To small number of output pulse to reach the drive velocity Linear acceleration/deceleration drive Time Triangle prevention for preset drive In preset drive mode with linear acceleration and deceleration, if the number of output pulses is smaller than that needed to reach the drive speed through acceleration, a triangle-shape wave will be generated. At the time, the triangle prevention function will be activated. Triangle prevention function means, in preset drive mode with linear acceleration and deceleration, even if the number of output pulse is smaller than needed, the system will stop acceleration and maintain the unchanged velocity after the number of pulses consumed during acceleration and deceleration is greater than 1.5 times of the total number of output pulses. Therefore, even when the number of output pulse is smaller than one half of that of output pulses, the motion will be within the Set-speed domain. http://www.adtechcn.com 25 Velocity Acceleration stops Number of output pulses Number of pulses consumed during acceleration Time Triangle prevention for linear acceleration and deceleration ) Speed mode The speed mode of ADT-8840 falls into two categories, namely, self-define mode and set-speed mode. The former is the default value in the system, while the latter can be set through the function “adt8840a_set_speed_mode()” at the upper PC. The self-define mode means the user can set the function and change the motion velocity, SV and acceleration through the motion parameters. In this mode, the data can be changed at any time and will not be saved in the system configuration files of ADT-8840. The unit of velocity parameters in this mode can be either pulse or millimeter. A speed in millimeter is a figure converted on the basis of the equivalent pulses. The default pulse equivalent of the four axes is 320p/mm. The set-speed mode means the user can set the speed mode as a fixed value through the function “adt8840a_set_speed_mode()” after the operation velocity parameters are properly set. The set velocity parameters will be saved in system configuration files of ADT-8840 and used as correct and fixed data on motion for some other machining operations. In set-speed mode, the functions for setting the motion parameters will be disabled, except the G code and the follow-up velocity in the interpolation commands of hardware buffer. ) Buffer mode In upper PC, the software buffer machining mode or immediate execution mode can be activated through the function “adt8840a_set_buff_mode()”. The software buffer machining mode means the user can save the motion commands or IO operation commands in the buffer of ADT-8840, with which ADT-8840 can also transmit the commands during the motion in a real-time manner. This mode can ensure the continuity of machining. With 512 commands on machining at maximum, the buffer works in such a way that the commands in it flows on a first-in-first-out basis. In other words, the executed commands will be deleted from the buffer, and the remaining space is added by 1 after the deletion. When the user http://www.adtechcn.com 26 downloads the commands from the buffer by batches, it must know the remaining space in the buffer through the query command “adt8840a_get_buff_depth()”, so as to avoid the overflow of software cache. In this mode, only when the current command is fully executed, can the next command be executed. When this mode is enabled, if any hardware buffer commands are downloaded into the control card while the non-hardware buffer commands are being executed, the hardware buffer commands will also be saved in the software buffer. Once all non-hardware buffer commands are executed, the hardware buffer commands will be saved in the hardware buffer. Please note that the hardware buffer commands accumulated in the software buffer should not exceed the capacity of the hardware buffer. The immediate execution mode refers to a machining method used when the buffer is closed. In this mode, the user can only transmit the commands in the way the single command is executed. In other words, when the control card is executing the motion commands, the user must judge at the upper PC whether the current motion is completed. Only when the completion of motion is detected, can the next command be executed. Otherwise, the motion state might become confused. In addition to the software buffer mode, ADT-8840 also provides some interpolation functions with hardware buffer, such as: adt8840a_fifo_inp_move1(), adt8840a_fifo_inp_move2(), adt8840a_fifo_inp_move3(), adt8840a_fifo_inp_move4(), Details on interpolation of hardware buffer will be provided in the follow-up chapters of this Manual. ) Position management Logic-position counter and actual-position counter The logic-position counter counts the number of pulses based on the positive/negative direction output. In other words, it counts “1” upward when one positive pulse is output, and “1” downward when one negative pulse is output. The actual-position counter counts the pulses coming from the external encoder. The user can use the commands to select the pulse type as phase A/B signal or independent 2 pulses of upward/downward counted signals. The counting direction can be set. The data of the two counters can be written and read at any time, whose counting ranges between -2,147,483,648 ~ +2,147,483,647. http://www.adtechcn.com 27 Two-phase pulse input mode Count upward Count downward Up/down pulse input mode ) Interpolation The controller can perform the linear interpolation for any 2-4 axes. During the interpolation process, the interpolation computation is carried out under the pulse’s basic time order of the designated axis X. Therefore, such parameters as the designated axis X’s start velocity and drive velocity should be set before the interpolation command is executed. Linear interpolation for 2-4 axes After the end-point coordinates relative to the current position are set, the system will begin to perform the linear interpolation. The coordinates of linear interpolation is within a scope of 24-digit character with symbol. The interpolation ranges from the current position of the axis to somewhere between -8,388,607 and +8,388,607. Minor axis Major axis Position precision of linear interpolation Minor axis Major axis Example of drive pulse output at the endpoint(X:20, Y:9) As shown in the figure above, within the whole interpolation scope, the position precision for the designated line is ±0.5LSB. The figure also shows the example of drive pulse output for linear interpolation. Among the set values of endpoint, the one with the greatest absolute value comes from the major axis, which keeps outputting pulse during the interpolation drive, while others are minor axes. Depending on the results of interpolation arithmetic, sometimes the pulses are output, sometimes not. http://www.adtechcn.com 28 Hardware buffer interpolation As for the control card without the hardware interpolation function, if the next interpolation is needed after the previous one is ended, it can only inquire whether the previous interpolation is finished so that the next data of the next interpolation can be output. If the upper PC runs slowly, or a multipurpose operating system runs in the upper computer, there will be pause between the two interpolations, which not only affects the effects of interpolation, but also makes it hard to raise the interpolation speed. With the hardware buffer interpolation in ADT-8840, this problem can be properly solved, for a great number of interpolation commands can be continuously saved in the space of hardware buffer. Even if the system is executing an interpolation command for motion, an interpolation command can be written. When a command is written into an empty hardware buffer, the control card will immediately execute the first written command on a first-in-first-out basis. The system will stop once the execution of the current interpolation command is completed at the time the hardware buffer is empty. The user should judge whether the buffer space is full when saving the interpolation commands into it. If it is full, no more command can be written. Otherwise, the commands might be lost. With hardware buffer interpolation, the pause between two interpolations can be effectively avoided. Even if the computer runs slowly, good effects can be obtained. Note: 1. When a hardware buffer interpolation command is being executed, if the interpolation motion needs to be stopped immediately, the operator must first clear the buffer and then stop the motion. 2. When a hardware buffer interpolation command is being executed, no other motion command should be executed simultaneously. Otherwise, motion confusion will arise. 3. Interpolation buffer only works in even speed state, not in acceleration and deceleration state. ) Pulse output mode As shown in the table below, two modes are available for the drive output pulses. In independent 2 pulse output mode, drive pulses are output from PU/CW when it is a positive direction drive, and from DR/CCW when negative. In 1 pulse output mode, drive pulses are output from PU/CW and direction signals are output from DR/CCW. When positive logic setting is available for pulse/direction Pulse output mode Drive direction Independent 2 pulse +direction drive output output mode -direction drive output 1 pulse output mode http://www.adtechcn.com Wave shape of output signal PU/CW Signal DR/CCW Signal Low Level Low Level +direction drive output Low Level -direction drive output High Level 29 ) Hardware limit signal The hardware limit signal (LMT+ ,LMT-) serves as the input signal that limits the drive pulse of both positive and negative direction drives. When the limit signal and its logic level are both enabled, the motion of the concerning axis will stop immediately. ) Signal corresponding to server motor Input signals connected to the driver of the servo motor include INPOS (in-position signal) and ALARM (alarm signal). For each signal, the enabled state/disabled state and the logic level can be set. The input signal INPOS corresponds to the signal that indicates the positioning the server motor is completed. If it is set as “enabled”, after one drive is finished, the system will wait for the enabled state of INPOS and then the return of drive state will end. The joint ALARM receives alarm signal from the driver of the servo motor. When it is set as “enabled”, the system will monitor the state of ALARM. If the signal is effective, the drive will stop immediately. The states of these input signals used for the driver of the motor can be read through universal I/O function. The common output signal can be used for clearing of bias counter, resetting of alarm state, startup of server unit. ) Drive by external signal Drive by external signal refers to the motion controlled by the external signals (switch). This mode is mainly used for the adjusting the machine in a manual way. The currently used external manual signals include: IN12: Manual stop. Once responded, 500 positive pulses are output from OUTO. IN13: Manual return to the home position. The system will automatically start or close STOP0. If the user uses phase Z signal, he should use IN13 in upper PC. IN14: Manually run the files for machining. These three signals are enabled by lower level. Chapter IV Basic Library Functions of ADT8840 Type Basic parameters Function DeviceAddr_init Definition Initialization of device interface’s address Page 35 TCP_Conn Network connection 35 Close_netconn Close network connection 35 Close_all Close network connection and resources 35 Get_sock http://www.adtechcn.com Get the raw socket for network communication 36 30 Uart_show Switch for showing the debugging state of serial interface 36 adt8840a_set_stop0_mode Stop mode (software buffer) 36 adt8840a_set_stop1_mode Stop mode (software buffer) 37 adt8840a_set_limit_mode Limit mode 37 adt8840a_set_pulse_mode Pulse mode 37 adt8840a_get_status Get single-axis drive status 38 adt8840a_get_inp_status Get interpolation drive status 39 adt8840a_get_int_status Get interruption status 39 adt8840a_set_acc Set acceleration (software buffer) 39 Motion adt8840a_set_startv Set start velocity (software buffer) 40 parameters adt8840a_set_speed Set drive velocity (software buffer) 40 adt8840a_set_command_pos Set logic counter (software buffer) 41 adt8840a_set_actual_pos Set actual counter (software buffer) 41 adt8840a_get_command_pos Get logic position 41 adt8840a_get_actual_pos Get actual position 42 adt8840a_get_speed Get drive velocity 42 adt8840a_all_ command _pos Get logic positions of four axes 42 adt8840a_all_actual_pos Get actual positions of four axes 43 adt8840a_all_speed Get drive velocities of four axes 43 Drive status detection setup Motion parameters detection adt8840a_pmove adt8840a_pmove2 adt8840a_pmove3 adt8840a_pmove4 Drive Switch value Interrupt Single-axis preset drive (software buffer) Dual-axis interactive drive(software buffer) Tri-axis interactive drive(software buffer) Fourl-axis interactive drive(software buffer) 43 44 44 45 adt8840a_dec_stop Deceleration stop 45 adt8840a_sudden_stop Sudden stop 45 adt8840a_inp_move2 Dual-axis interpolation (software buffer) 46 adt8840a_inp_move3 Tri--axis interpolation (software buffer) 46 adt8840a_inp_move4 Four-axis interpolation (software buffer) 46 adt8840a_continue_move Continuous motion (software buffer) 47 ArcComp Arc parameters computation 47 adt8840a_arc Arc machining 47 adt8840a_read_bit Read single input point 48 adt8840a_write_bit Output single point 48 adt8840a_sudden_write_bit Output single point (software buffer) 49 adt8840a_read_8bit Continuously read 8 input points’ status 49 adt8840a_Clear_Int Clear interruption mark 49 adt8840a_Enable_ADT834INT http://www.adtechcn.com Enable interruption service for motion control 50 31 adt8840a_Disable_ADT834INT 50 adt8840a_read_fifo Get buffer status 50 1-axis hardware buffer interpolation (software buffer) 2-axis hardware buffer interpolation adt8840a_fifo_inp_move2 (software buffer) interpolation 3-axis hardware buffer interpolation adt8840a_fifo_inp_move3 (software buffer) 4-axis hardware buffer interpolation adt8840a_fifo_inp_move4 (software buffer) 51 52 52 52 adt8840a_FS_Remove Delete file 53 adt8840a_Net_Setup Network configuration for control card 53 adt8840a_set_speed_mode Set speed mode 53 adt8840a_set_buff_mode Set software buffer mode 54 adt8840a_set_pulsemm Set pulse equivalent 54 adt8840a_get_pulsemm Get pulse equivalent 54 Upload parameters of system adt8840a_upload_sysfile configuration files Download parameters of system adt8840a_download_sysfile configuration to control card Function for returning to home position adt8840a_go_home (software buffer) adt8840a_stop_all Stop all machining card Open and upload G-code program files adt8840a_upload_gfile 55 55 56 56 Download G-code program to control adt8840a_download_gfile G Code 50 Reset buffer Hardware System control adt8840a_reset_fifo adt8840a_fifo_inp_move1 buffer Disable interruption service for motion in control card 56 57 adt8840a_g_code G-code command 57 adt8840a_run_gfile Run G-code files for machining 57 Query the machining status where adt8840a_g_status G-code files are run adt8840a_get_gbuff_depth Query buffer depth of G command 58 58 G codes supported by ADT-8840 Type G code Definition Format Remarks Motion G00(G0) Inching G00X_Y_Z_W_ Select X, Y, Z or W G01(G1) Linear interpolation G90 G01X_Y_ G91 G01X_Z_ Linear interpolation for any two axes or three axes http://www.adtechcn.com 32 G02(G2) G03 (G3) To indicate the circle center: Take X and Y as the coordinates of the endpoint of the arc, and I and J as the coordinates of the start point of the arc relative to the circle center. To indicate the radius: Take X and Y as the coordinates of the endpoint of the arc, and R as the radius. Positive arc interpolation G17 G02 X_Y_I_J_(I, K or J, K) or G17 G02 X_Y_ R_ Reverse arc interpolation To indicate the circle center: Take X and Y as the coordinates of the endpoint of the arc, and I G17 G03 and J as the coordinates of X_Y_I_J_(I、K orJ、 the start point of the arc relative to the circle K) or G17 G03 X_Y_ R_ center. To indicate the radius: Take X and Y as the coordinates of the endpoint of the arc, and R as the radius. Note: F can be used in interpolation commands for changing the interpolation speed. Delay Delay G04 P_ G90 Absolute coordinates G90 G01X_Y_ G91 Relative coordinates G91 G01X_Z_ M3 Spindle’s positive rotation M3(OUT1) Turn off reverse rotation, start positive rotation M4 Spindle’s reserve rotation M4(OUT2) Turn off positive rotation, start reverse rotation M5 Spindle stops M5 Stop positive and reverse rotation M8 Turn coolant on M8(OUT3) Turn on coolant M9 Turn coolant off M9 Turn off coolant Mode Output Set time delay after P (ms) G04 http://www.adtechcn.com Mode setting is of mode commands, default as absolute value 33 M10 Tighten tool M10(OUT5) Tighten tool M11 Loosen tool M11 Loosen tool M20 Tools bank advances M20(OUT6) Tools bank advances M21 Tools retreat M21 Tools bank retreat M32 Turn on lubrication M32(OUT4) Turn on lubrication M33 Turn off lubrication M33 Turn off lubrication M0 Program end M0(OUT0) Output 500ms pulse M1 Program end M1 Output high level M2 End OFF M2 Output low level M6 Output 7 ON M6(OUT7) Universal output M7 Output 7 OFF M7 Universal output M12 Output 8 ON M12(OUT8) Universal output M13 Output 8 OFF M13 Universal output M14 Output 9 ON M14(OUT9) Universal output M15 Output 9 OFF M15 Universal output M16 Output ON 10 M16(OUT10) Universal output M17 Output OFF 10 M17 Universal output M18 Output ON 11 M18(OUT11) Universal output M19 Output OFF 11 M19 Universal output M22 Output ON 12 M22(OUT12) Universal output M23 Output OFF 12 M23 Universal output M24 Output ON 13 M24(OUT13) Universal output M25 Output OFF 13 M25 Universal output M26 Output ON 14 M26(OUT14) Universal output M27 Output OFF 14 M27 Universal output M28 Output ON 15 M28(OUT15) Universal output M29 Output 15 M29 Universal output http://www.adtechcn.com bank signal 34 OFF M34 Output ON 16 M35 Output OFF 16 M36 Output ON 17 M37 Output OFF 17 M34(OUT16) Universal output M35 Universal output M36(OUT17) Universal output M37 Universal output Note: For standard output, the user can refer to the standards for milling machine. The user can define them as universal output in accordance with the actual situation. Special commands L http://www.adtechcn.com Logic judgment command (for example, L16 is used for examining the signal of point IN16. When there is input signal, the execution will proceed continuously. ) 35 Chapter V Definitions of ADT8840's Library Functions ) 1. Basic parameters setup 1.1 DeviceAddr_init( ) Name void DeviceAddr_init(void) Definition Initialization of device interface’s address Input parameter None Output parameter None Return value None Note Initialization should be first performed before the motion function is used 1.2 TCP_Conn ( ) Name int TCP_Conn(char *ip_addr,char *,int *err) Definition TCP network connection Input parameter ip_addr mac_addr IP address MAC address (MAC=media access control) Output err: to receive the wrong code; 0:OK, 1: existing connection; 2: exceed the max. parameter connection number Return value Successful use of device No. (0-63); (-1): use failure Note Network connection should be performed before the motion function is used 1.3 Close_netconn ( ) Name void Close_netconn(int dev_num) Definition Close network connection Input parameter dev_num: device number Output None parameter Return value 1.4 None Close_all ( ) Name void Close_all(void) Definition Close network connection and resources Input parameter None Output None parameter Return value None http://www.adtechcn.com 36 1.5 Get_sock ( ) Name unsigned int Get_sock(int dev_num) Definition Get the raw socket for network communication based on the device number Input parameter dev_num:device number Output None parameter Return value 1.6 Non-zero SOCKET value, “0xffffffff” means the device number is disabled Uart_show ( ) Name int Uart_show(int dev_num,unsigned int on_off) Definition Switch for showing the debugging state of serial interface dev_num:device number Input parameter on_off: switch for showing the debugging state of serial interface. 0: off; 1: display all information; 2: Only display the non-timed inquiry information. Output None parameter Return value 0: execution OK; -1: transmission abnormity; -4: disabled device interface Note Starting the debugging of serial interface will consume a large number of system resources 1.7 adt8840a_set_stop0_mode( ) Name int adt8840a_set_stop0_mode(int dev_num,int axis, int value, int logic) Definition Set stop0 singal as enabled/disabled and set its logic level dev_num: Input parameter axis: Axis number(1 - 4) value: logic: Output device number 0: disabled 0: stop at low level 1: Enabled 1: stop at high level None parameter Return value Signal in disabled state in initialization, stop at low level; Note 1.8 0: execution OK; -1: transmission abnormity; -4: disabled device interface Immediate stop; STOP1 is the same. adt8840a_set_stop1_mode( ) Name int adt8840a_set_stop1_mode(int dev_num,int axis, int value, int logic) Definition Set stop1 singal as enabled/disabled and set its logic level dev_num: Input parameter axis: value: logic: Output device number Axis number(1 - 4) 0: disabled 0: stop at low level 1: Enabled 1: stop at high level None parameter http://www.adtechcn.com 37 Return value 0: execution OK; -1: transmission abnormity; -4: disabled device interface Note Signal in disabled state in initialization, stop at low level; 1.9 adt8840a_set_limit_mode( ) Name int adt8840a_set_limit_mode(int dev_num ,int axis, int v1, int v2, int logic) Definition Set the mode for inputting nLMT signal for positive/negative limit dev_num: axis: Input parameter Axis number(1 - 4) v1: 0: enabled at positive limit 1: disabled at positive limit v2: 0: enabled at negative limit 1: disabled at negative limit logic: Output device number 0: enabled at low level 1: enabled at high level None parameter Return value 0: execution OK; -1: transmission abnormity; -4: disabled device interface Note Enabled at positive/negative limit and low level in initialization 1.10 adt8840a_set_pulse_mode( ) Name Definition int adt8840a_set_pulse_mode(int dev_num,int axis, int value, int logic,int dir_logic) Set the work mode for output pulse dev_num : device number axis: axis number (1 - 4) value: 0: pulse+pulse mode 1: pulse+direction mode Input parameters logic : 0: positive logic pulse positive logic pulse: 1: negative logic pulse negative logic pulse: dir-logic: 0: positive logic for direction output signal 1: negative logic for direction output signal Output parameters None Return 0: execution OK; -1: transmission abnormity; -4: disabled device value interface Note http://www.adtechcn.com Pulse+direction mode, positive logic pulse and positive logic for direction output signal in initialization. 38 ) 2. Drive status detection 2.1 adt8840a_get_status( ) Name int adt8840a_get_status(int dev_num ,int axis, int *value) Definition Get axis’s drive status Input parameter Output parameter Return value Note 2.2 dev_num: device number axis: axis number(1 - 4) Value: pointer of drive status; 0: drive end; non-0: drive under way 0: execution OK; 1: execution failure; -1: transmission abnormity; -2: response overtime; -3: abnormal data received; -4: disabled device interface None adt8840a_get_inp_status( ) Name int adt8840a_get_inp_status(int dev_num ,int *value) Definition Get axis’s interpolation drive status Input parameter dev_num: device number Output parameter Return value Note 2.3 Value: pointer of interpolation status; 0: interpolation end; non-0: interpolation under way 0: execution OK; 1: execution failure; -1: transmission abnormity; -2: response overtime; -3: abnormal data received; -4: disabled device interface None adt8840a_get_int_status( ) Name int adt8840a_get_int_status(int dev_num ,int *value) Definition Get interruption status Input parameter None http://www.adtechcn.com 39 Output parameter Return value Note Value: pointer of interruption status; 0: interruption end; non-0: interruption under way 0: execution OK; 1: execution failure; -1: transmission abnormity; -2: response overtime; -3: abnormal data received; -4: disabled device interface None ) 3. Motion parameters setup 3.1 adt8840a_set_acc( ) Name int adt8840a_set_acc(int dev_num ,int axis, Definition Set acceleration int Value) dev_num: device number Input parameter axis: axis number (1 - 4) Value: A’s value (1 - 32000) Output parameter Return value None 0: execution OK; -1: transmission abnormity; -4: disabled device interface Parameters for linear acceleration and deceleration in linear acceleration drive. When acceleration is set as A, the following equation is used: Acceleration (PPS/SEC) = A*250 The scope of acceleration A is 1~32000. Note For example, if it is: set_acc(1, 100); The acceleration should be: 100*250 = 25000 Pps/Sed 3.2 adt8840a_set_startv( ) Name int adt8840a_set_startv(int dev_num ,int axis, int Value) Definition Set start velocity dev_num: device number Input parameter axis: axis number (1 - 4) Value: SV’s value (1-2000000) Output parameter None http://www.adtechcn.com 40 Return value 0: execution OK; -1: transmission abnormity; -4: disabled device interface Note None 3.3 adt8840a_set_speed( ) Name int adt8840a_set_speed(int dev_num,int axis, long Value) Definition Set drive velocity dev_num: device number Input parameter axis: axis number (1 - 4) Value: V’s value (1 - 2000000) Output parameter Return value None 0: execution OK; -1: transmission abnormity; -4: disabled device interface It is value that reaches the set-speed domain in acceleration/deceleration drive. The set-speed drive starts from this value. If this value is set below the start velocity, the system Note will not perform acceleration/deceleration drive, but set-speed drive from the very beginning. 3.4 adt8840a_set_command_pos( ) Name int adt8840a_set_command_pos(int dev_num,int axis, long Value) Definition Set number of logic-position counter dev_num: device number Input parameter axis: axis number (1 - 4) Value: scope (-2147483648 ~ +2147483647) http://www.adtechcn.com 41 Output parameter None Return value 0: execution OK; -1: transmission abnormity; -4: disabled device interface Note Logic-position counter can be written and read at any time. 3.5 adt8840a_set_actual_pos( ) Name int adt8840a_set_actual_pos(int dev_num,int axis, long Value) Definition Set number of actual-position counter dev_num: device number Input parameter axis: axis number (1 - 4) Value: scope (-2147483648 ~ +2147483647) Output parameter None Return value 0: execution OK; -1: transmission abnormity; -4: disabled device interface Note Actual-position counter can be written and read at any time. http://www.adtechcn.com 42 ) 4. Motion parameters detection adt8840a_get_command_pos( ) Name int adt8840a_get_command_pos(int dev_num,int axis, long *pos) Definition Get the logic position for each axis Input parameter Output dev_num: device number axis: axis number (1 - 4) pos: pointer of logic position value parameter Return value 0: execution OK; 1: execution failure; -1: transmission abnormity; -2: response overtime; -3: abnormal data received; -4: disabled device interface With this function, the logic position of the axis can be obtained at any time. When the Note motor has not lost its step, it represents the current position of the axis. adt8840a_get_actual_pos( ) Name int adt8840a_get_actual_pos(int dev_num,int axis, long *pos) Definition Get the logic position for each axis Input parameter Output dev_num: device number axis: axis number (1 - 4) pos: pointer of actual position value parameter Return value 0: execution OK; 1: execution failure; -1: transmission abnormity; -2: response overtime; -3: abnormal data received; -4: disabled device interface With this function, the actual position of the axis can be obtained at any time. Even when the motor lost its step, the user can know the current position of the axis. Note The axis must be connected to encoder or grating ruler. This number actually represents the number counted by the encoder or grating ruler. adt8840a_get_speed( ) Name int adt8840a_get_speed(int dev_num,int axis, long *value) Definition Get the current drive velocity of each axis Input parameter Output dev_num: device number axis: axis number (1 - 4) pos: pointer of current drive velocity parameter Return value 0: execution OK; 1: execution failure; -1: transmission abnormity; -2: response overtime; -3: abnormal data received; -4: disabled device interface http://www.adtechcn.com 43 The unit of the parameter is the same as set value of drive velocity—V. Note 4.4 With this function, the drive velocity can be obtained at any time. adt8840a_all_command_pos( ) Name int adt8840a_all_command_pos( int dev_num,long pos[]) Definition Get the logic positions of four axes Input parameter int dev_num: device number Output long pos[]: receive the data of logic position for each axis; parameter pos[1]: position of axis 2; pos[2]: position of axis 3; pos[3]: position of axis. Return value Note 4.5 pos[0]: position of axis 1; 0: execution OK; 1: execution failure; -1: transmission abnormity; -2: response overtime; -3: abnormal data received; -4: disabled device interface None adt8840a_all_actual_pos( ) Name int adt8840a_all_actual_pos( int dev_num,long pos[]) Definition Get the actual positions of four axes Input parameter int dev_num: device number Output long pos[]: receive the data of actual position for each axis; parameter pos[1]: position of axis 2; pos[2]: position of axis 3; pos[3]: position of axis. Return value Note 4.6 pos[0]: position of axis 1; 0: execution OK; 1: execution failure; -1: transmission abnormity; -2: response overtime; -3: abnormal data received; -4: disabled device interface None adt8840a_all_speed( ) Name int adt8840a_all_speed( int dev_num,long speed[]) Definition Get the drive velocities of four axes Input parameter int dev_num: device number Output long pos[]: receive the drive velocities of four axes. parameter Return value Note 0: execution OK; 1: execution failure; -1: transmission abnormity; -2: response overtime; -3: abnormal data received; -4: disabled device interface None http://www.adtechcn.com 44 ) 5. Drive 5.1 adt8840a_pmove( ) Name int adt8840a_pmove(int dev_num,int axis, long pulse) Definition Preset drive dev_num: device number axis: axis number (1 - 4) Input parameter pulse: Output pulses >0 Positive direction movement <0 Negative direction movement Scope (-268435455~+268435455) Output None parameter Return value The parameters needed by the velocity curve must be set before the drive command is Note 5.2 0: execution OK; -1: transmission abnormity; -4: disabled device interface written. adt8840a_pmove2( ) Name int adt8840a_pmove2(int dev_num,int axis1,int axis2 , long pulse1,long pulse2) Definition Preset drive dev_num: device number int axis1: axis number engaged in interpolation Input parameter int axis2: axis number engaged in interpolation long pulse1: relative distance that axis 1 travels long pulse2 : relative distance that axis 2 travels Output parameter Return value 0: execution OK; -1: transmission abnormity; -4: disabled device interface The parameters needed by the velocity curve must be set before the drive command is Note 5.3 None written. adt8840a_pmove3( ) Name int adt8840a_pmove(int dev_num,int axis, long pulse) Definition Preset drive http://www.adtechcn.com 45 dev_num: device number axis: axis number (1 - 4) Input parameter pulse: Output pulses >0 Positive direction movement <0 Negative direction movement Scope (-268435455~+268435455) Output parameter Return value 0: execution OK; -1: transmission abnormity; -4: disabled device interface The parameters needed by the velocity curve must be set before the drive command is Note 5.4 None written. adt8840a_pmove4( ) Name int adt8840a_pmove(int dev_num,int axis, long pulse) Definition Preset drive dev_num: device number long pulse1: relative distance that axis 1 travels Input parameter long pulse2 : relative distance that axis 2 travels long pulse3: relative distance that axis 3 travels long pulse4: relative distance that axis 4 travels Output parameter Return value 0: execution OK; -1: transmission abnormity; -4: disabled device interface The parameters needed by the velocity curve must be set before the drive command is Note 5.5 None written. adt8840a_dec_stop( ) Name int adt8840a_dec_stop(int dev_num,int axis) Definition Drive deceleration stop Input parameter Output dev_num: device number axis: axis number (1 - 4) None parameter Return value 0: execution OK; -1: transmission abnormity; -4: disabled device interface In the process of outputting drive pulses, this command is used to stop the deceleration. Note Even when the drive velocity is lower than the start velocity, you can also use it to stop the deceleration immediately. http://www.adtechcn.com 46 5.6 adt8840a_sudden_stop( ) Name int adt8840a_sudden_stop(int dev_num,int axis) Definition Sudden stop Input parameter Output dev_num: device number axis: axis number (1 - 4) None parameter Return value It immediately stops the pulse output when the drive is under way, even if the Note 5.7 0: execution OK; -1: transmission abnormity; -4: disabled device interface acceleration/deceleration drive is engaged, adt8840a_inp_move2( ) Name Definition int adt8840a_inp_move2(int dev_num,int axis1,int dev_num, int mode,int axis2,long pulse1,long pulse2) Dual-axis linear interpolation dev_num: device number Input parameter axis1,axis2: axis number engaged in interpolation pulse1,pulse2: relative distance the axis travels Output None parameter Return value Supports interpolation of any two axes. The interpolation speed is based on the minimum Note 5.8 0: execution OK; -1: transmission abnormity; -4: disabled device interface axis speed. adt8840a_inp_move3( ) . Name Definition int adt8840a_inp_move3(int dev_num,int mode,int axis1, int dev_num,int axis2, int dev_num,int mode,int axis3,long pulse1, long pulse2, long pulse3) Tri-axis linear interpolation dev_num: device number Input parameter axis1,axis2, axis3: axis number engaged in interpolation pulse1,pulse2,pulse3: relative distance the axis travels Output None parameter Return value Supports interpolation of any three axes. The interpolation speed is based on the minimum Note 5.9 0: execution OK; -1: transmission abnormity; -4: disabled device interface axis speed. adt8840a_inp_move4( ) . Name int adt8840a_inp_move4(int dev_num,long pulse1, long pulse2, long pulse3, long pulse4) http://www.adtechcn.com 47 Definition Input parameter Output Four-axis linear interpolation dev_num: device number pulse1,pulse2,pulse3, pulse4: relative distance the axis travels None parameter Return value 0: execution OK; -1: transmission abnormity; -4: disabled device interface Note i. The interpolation speed is based on the axis X’s speed. ii. At present, the four-axis interpolation is performed through the fixed axis 1, 5.10 axis 2, axis 3 and axis 4. adt8840a_continue_move( ) Name int adt8840a_continue_move(int dev_num,int axis, int dir) Definition Single-axis continuous motion dev_num: device number Input parameter axis: axis number (1-4 dir: motion direction Output parameter Return value 0: execution OK; -1: transmission abnormity; -4: disabled device interface The parameters needed by the velocity curve must be set before the drive command is Note 5.11 None written. ArcComp( ) Name BOOL ArcComp() Definition Arc parameters computation double fix[]: Coordinates of any three point in the plane. fix[0]: coordinate of endpoint on axis X; fix[1]: coordinate of endpoint on axis Y; fix[2]: coordinate of midpoint Input parameter on axis X; fix[3]: coordinate of midpoint on axis Y; fix[4]: coordinate of start point on axis X; fix[5]: coordinate of start point on axis Y. Output parameter Return value float cen[]: arc’s parameter structure. cen[0]: coordinate X of center of circle; cen[1]: coordinate Y of center of circle; cen[2]: included angle of endpoint; cen[3]: included angle of start point; cen[4]: radius; cen[5]: arcing angle. 0: arc computation OK; -1: arc computation failure http://www.adtechcn.com 48 Note 5.12 The coordinates of any three points in the plane can’t be on the same point or line. adt8840a_arc( ) Name int adt8840a_arc(int dev_num,int axis1,int axis2,float cen[]) Definition Arc machining parameter int dev_num: device number int axis1: plane axis 1 Input parameter int axis2: plane axis 2 float cen[]: arc’s parameter structure. cen[0]: coordinate X of center of circle; cen[1]: coordinate Y of center of circle; cen[2]: included angle of endpoint; cen[3]: included angle of start point; cen[4]: radius; cen[5]: arcing angle. Output parameter None Return value 0: arc computation OK; -1: arc computation failure Note None http://www.adtechcn.com 49 ) 6. Input and output of switch value 6.1 adt8840a_read_bit( ) Name int adt8840a_read_bit(int dev_num,int number,int *value) Definition Read single input point Input parameter Output dev_num: device number number: input point number Value: 0: low; 1: high parameter Return value 0: execution OK; 1: execution failure; -1: transmission abnormity; -2: response overtime; -3: abnormal data received; -4: disabled device interface For the scope of input points and the related functions, please refer to the corresponding Note operating instructions of controller’s hardware. . 6.2 6.2 adt8840a_write_bit( ) Name int adt8840a_write_bit(int dev_num , int number, int value) Definition Output single point (executed in line in software buffer) dev_num: device number Input parameter number: output point number Value: 0: low; 1: high Output None parameter Return value For the scope of output points and the related functions, please refer to the corresponding Note 6.3 0: execution OK; -1: transmission abnormity; 4: disabled device interface operating instructions of controller’s hardware. adt8840a_sudden_write_bit Name int adt8840a_sudden_write_bit(int dev_num , int number, int value) Definition Output single point (executed immediately) dev_num: device number Input parameter number: output point number Value: 0: low; 1: high Output None parameter Return value Note 0: execution OK; -1: transmission abnormity; 4: disabled device interface For the scope of output points and the related functions, please refer to the corresponding operating instructions of control card’s hardware. http://www.adtechcn.com 50 6.4 adt8840a_read_8bit( ) Name int adt8840a_read_8bit(int dev_num,int ios,int *value) Definition Keep reading the status of 8 input points Input parameter Output int dev_num: device number int ios: initial IO number int value: the statuses of successive 8 input points, which correspond to 0-7 respectively. parameter Return value Note 0: execution OK; 1: execution failure; -1: transmission abnormity; -2: response overtime; -3: abnormal data received; -4: disabled device interface None ) 7. Interrupt function 7.1 adt8840a_clear_int( ) Name int adt8840a_clear_int(int dev_num,int mode) Definition Mark for clearing interruption Input parameter dev_num: device number Output None parameter Return value 0: execution OK; -1: transmission abnormity; -4: disabled device interface Note None 7.2 adt8840a_enable_int( ) Name int adt8840a_enable_int(int dev_num) Definition Enable interrupt service in motion control Input parameter dev_num: device number Output None parameter Return value 0: execution OK; -1: transmission abnormity; -4: disabled device interface Note None 7.3 adt8840a_disable_int( ) Name int adt8840a_disable_int (int dev_num) Definition Disable interrupt service in motion control Input parameter dev_num: device number Output None parameter Return value 0: execution OK; -1: transmission abnormity; -4: disabled device interface Note None http://www.adtechcn.com 51 ) 8. Hardware buffer 8.1 adt8840a_reset_fifo( ) Name int adt8840a_reset_fifo(int dev_num) Definition Reset buffer. In other words, clear all commands in the buffer. Input parameter dev_num: device number Output None parameter Return value Clearing FIFO (first-in-first-out) is only to clear the data in the buffer, and it won’t stop the Note 8.2 0: execution OK; -1: transmission abnormity; -4: disabled device interface current motion. adt8840a_read_fifo( ) Name int adt8840a_read_fifo(int dev_num, UINT *value) Definition Get to know buffer’s space used Input parameter None dev_num: device number value: space used The value indicates the status of FIFO, whose definitions are as follows: D15: full D14: almost full D13: empty D12: almost empty Full—FIFO is full and nor more data can be written (normally not used); Almost full—The remaining space of FIFO is less than 8 (used for judging whether more data can be placed into FIFO); Output Empty—There are no data in FIFO (used for judging whether FIFO is empty); parameter Almost empty—The remaining data in FIFO are less than 8 (normally not used). The above statuses can be judged by referring to the data saved in FIFO. “Byte” is used as the unit of data, with 2048 bytes for maximum. The number of the bytes is subject to the interpolation command: fifo_inp_move1: 3 byte fifo_inp_move2: 4 byte fifo_inp_move3: 5 byte fifo_inp_move4: 6 byte Return value Note 8.3 0: execution OK; 1: execution failure; -1: transmission abnormity; -2: response overtime; -3: abnormal data received; -4: disabled device interface Clearing FIFO (first-in-first-out) is only to clear the data in the buffer, and it won’t stop the current motion. adt8840a_ fifo_inp_move1() http://www.adtechcn.com 52 Name int adt8840a_fifo_inp_move1(int dev_num ,int axis1, long pulse1, long speed) Definition Buffer single drive dev_num: device number Input parameter axis1: axis number (1-4) pulsel: relative distance that the axis travels speed: moving speed Output None parameter Return value 0: execution OK; -1: transmission abnormity; -4: disabled device interface Note None 8.4 adt8840a_ fifo_inp_move2() Name int adt8840a_fifo_inp_move2(int dev_num ,int axis2, long pulse1,long pulse2, long speed) Definition Buffer two-axis interpolation motion dev_num: device number Input parameter axis1,axis2: axis number engaged in interpolation pulse1,pulse2: relative distance that each axis travels speed: interpolation speed Output None parameter Return value 0: execution OK; -1: transmission abnormity; -4: disabled device interface Note None 8.5 adt8840a_ fifo_inp_move3() Name Definition int adt8840a_fifo_inp_move3(int dev_num ,int axis2, int dev_num ,int axis3,long pulse1, long pulse2, long pulse3, long speed) Buffer three-axis interpolation motion dev_num: device number Input parameter axis1, axis2, axis3: axis number engaged in interpolation pulse1, pulse2: relative distance that each axis travels speed: interpolation speed Output parameter None http://www.adtechcn.com 53 Return value 0: execution OK; -1: transmission abnormity; -4: disabled device interface Note None 8.6 adt8840a_ fifo_inp_move4() Name Definition int adt8840a_fifo_inp_move4(int dev_num,long pulse1,long pulse2,long pulse3, long pulse4,long speed) Buffer four-axis interpolation motion dev_num: device number Input parameter pulse1, pulse2, pulse3, pulse4:: relative distance that each axis travels speed: interpolation speed Output parameter None Return value 0: execution OK; -1: transmission abnormity; -4: disabled device interface Note None http://www.adtechcn.com 54 ) 9. System 9.1 adt8840a_FS_Remove( ) Name int adt8840a_FS_Remove(int dev_num,const char *pFileName) Definition Delete file Input parameter Output int dev_num: device number char *pFileName: file’s path name None parameter Return value Note 9.2 0: execution OK; 1: execution failure; -1: transmission abnormity; -2: response overtime; -3: abnormal data received; -4: disabled device interface None adt8840a_Net_Setup( ) Name int adt8840a_Net_Setup(int dev_num,char *IP,char *MASK,char *Gateway,char *MAC) Definition Carry out network configuration for control card int dev_num: device number char *IP: IP address Input parameter char *MASK: subnet mask char *Gateway: IP address of gateway char *MAC: MAC address of control card Output None parameter Return value -3: abnormal data received; -4: disabled device interface To restore the default network configuration, use the function “adt8840a_FS_Remove()”, Note 9.3 0: execution OK; 1: execution failure; -1: transmission abnormity; -2: response overtime; delete the “net.txt” files and then re-electrify the system. adt8840a_set_speed_mode( ) Name int adt8840a_set_speed_mode(int dev_num,int mode) Definition Set the speed mode Input parameter Output int dev_num: device number int mode: 0: free mode; 1: fixed mode None parameter Return value 0: execution OK; -1: transmission abnormity; -4: disabled device interface http://www.adtechcn.com 55 Note 9.4 None adt8840a_set_buff_mode( ) Name int adt8840a_set_buff_mode(int dev_num,int buffmode) Definition Set the software buffer mode Input parameter Output int dev_num: device number int mode: 0: software buffer enabled; 1: software buffer disabled None parameter Return value 0: execution OK; -1: transmission abnormity; -4: disabled device interface Note None 9.5 adt8840a_set_pulsemm( ) Name int adt8840a_set_pulsemm(int dev_num,int axis,int PulseMm) Definition Set the pulse equivalent int dev_num: device number Input parameter int axis: axis number int PulseMm: pulse equivalent Output None parameter Return value 0: execution OK; -1: transmission abnormity; -4: disabled device interface Note None 9.6 adt8840a_get_pulsemm( ) Name int adt8840a_get_pulsemm(int dev_num,int axis,int *PulseMm) Definition Get the pulse equivalent int dev_num: device number Input parameter int axis: axis number (1-4) int PulseMm: receive the pulse equivalent of the current axis Output None parameter Return value 0: execution OK; -1: transmission abnormity; -4: disabled device interface Note None 9.7 adt8840a_upload_sysfile( ) Name int adt8840a_upload_sysfile(int dev_num,int mode,char *file,SYSPARA *syspara Definition Upload parameters of system configuration files http://www.adtechcn.com 56 int dev_num: device number int mode: upload mode 0: upload the currently used parameters of control card to host Input parameter 1: upload parameters from system files of control card to host char *file: file name of system parameters. If null character string is input, it means the default fine name “system.ini” is used. Output None parameter Return value 0: execution OK; -1: transmission abnormity; -4: disabled device interface Note None 9.8 adt8840a_download_sysfile( ) Name int adt8840a_download_sysfile(int dev_num,int mode,SYSPARA *syspara,char *file) Definition Download parameters of system configuration to control card int dev_num: device number int mode: download mode 0: only download parameters to control card but not save the system configuration files Input parameter 1: download parameters to control card and save the system configuration files char *file: file name of system parameters. If null character string is input, it means the default fine name “system.ini” is used. Output None parameter Return value 0: execution OK; -1: transmission abnormity; -4: disabled device interface The parameters can only be saved in fixed speed mode. To restore the default network Note configuration, use the function “adt8840a_FS_Remove()”, delete the “system.ini” files and then re-electrify the system. 9.9 adt8840a_go_home( ) Name int adt8840a_go_home(int dev_num,HOMEMODE *home_para) Definition Function for returning to home position Input parameter Output int dev_num: device number HOMEMODE home_para: structure of parameter for returning to the home position. None parameter Return value 0: execution OK; -1: transmission abnormity; -4: disabled device interface Note None http://www.adtechcn.com 57 9.10 adt8840a_stop_all( ) Name int adt8840a_stop_all(int dev_num) Definition Function for returning to home position Input parameter int dev_num: device number Output None parameter Return value 0: execution OK; -1: transmission abnormity; -4: disabled device interface Note None http://www.adtechcn.com 58 ) 10. G code 10.1 adt8840a_download_gfile ( ) Name int adt8840a_upload_gfile(int dev_num) Definition Download G-code program (.dot) from local PC to control card Input parameter int dev_num: device number Output None parameter Return value 0: execution OK; -1: transmission abnormity; -4: disabled device interface Note None 10.2 adt8840a_upload_gfile() Name int adt8840a_upload_gfile(int dev_num,char **g_code,int *code_len) Definition Open and upload G-code program files in control card int dev_num: device number Input parameter char **g_code: G-code proram int *code_len: length of G-code proram Output None parameter Return value 0: execution OK; -1: transmission abnormity; -4: disabled device interface Note None 10.3 adt8840a_g_code( ) Name int adt8840a_g_code(int dev_num,char *G_code) Definition Send single G-code command Input parameter Output int dev_num: device number char *G_code: character string of G-code command None parameter Return value 0: execution OK; -1: transmission abnormity; -4: disabled device interface Note None 10.4 Name adt8840a_run_gfile( ) int adt8840a_run_gfile(int dev_num) http://www.adtechcn.com 59 Definition Run G-code files in control card for machining Input parameter int dev_num: device number Output None parameter Return value 0: execution OK; -1: transmission abnormity; -4: disabled device interface Note None 10.5 adt8840a_g_status( ) Name int adt8840a_g_status( int dev_num,int *status) Definition Query the machining status where G-code files are run Input parameter int dev_num: device number Output int *status: G-code machining status; 0: machining not started; 1: machining under way parameter Return value Note 10.6 0: execution OK; 1: execution failure; -1: transmission abnormity; -2: response overtime; -3: abnormal data received; -4: disabled device interface None adt8840a_get_gbuff_depth ( ) Name int adt8840a_get_gbuff_depth(int dev_num,int *buff_depth) Definition Query buffer depth of G command Input parameter int dev_num: device number Output int * buff_depth: number of G codes parameter Return value Note 0: execution OK; 1: execution failure; -1: transmission abnormity; -2: response overtime; -3: abnormal data received; -4: disabled device interface None http://www.adtechcn.com 60 Chapter VI Use of Library Functions for Motion Control ) 1. Overview of ADT-8840’s Function Library The function Library of ADT-8840 serves as interfaces with which the user can operate the control card to realize the corresponding functions. ) 2. Use of dynamic-link library under Windows environment Compiled by using VC, the dynamic-link library under Windows environment is located at “development kit\drive\dynamic link” in the disk, and suits the program language tools commonly used under the environment, such as VB and VC. 2.1 Use from VC (1) Create a new project; (2) Copy the file “8840.lib” and “adt8840.h” under “development kit\VC” in the disk to the path of the newly created project; (3) Correct click “file view” in the “work space” of the newly created project, and select “Add Files to Project”. In the dialogue box of inserted file, select “Library Files(.lib)” as file type, search out “8840.lib” and select it, then click “OK” to complete the loading of static library; (4) Add #include “adt8840.h” to the declaration part of the source program file, header file or global header file “StdAfx.h”. After the above four steps, the user can use the functions in the dynamic-link library. Note: Use in VC.NET is similar to that of VC. 2.2 Use in VB (1) Create a new project; (2) Copy the file “adt8840.bas” under “development kit\VB” in the disk to the path of the newly created project; (3) Select the menu command “project\add module”, select the tab page “save now” in the dialogue box, search out the module file “adt8840.bas” and click the button for opening; After the above three steps, the user can use the functions in the dynamic-link library for the progam. Note: Use through VB.NET is similar to that of VB. http://www.adtechcn.com 61 ) 3. Help for debugging in developing through application The function library of ADT-8840 provides help on debugging. (1) Use the debugging tool to display the input parameters actually received by the control card and the execution results. The displaying state of serial interface debugging is enabled or disabled through the function “Uart_show()”, with default as “disabled”. If the state of serial interface debugging is enabled, a number of system resources will be consumed, which can affect the execution speed. (2) When this option is enabled, it will help the development personnel examine execution failures of the control card caused by the unauthorized parameter input. Once the program becomes stable and mature, the user can disable the return of execution results of the control card through the Mode option. When the mode option is enabled, the return value of the function will include the execution results of the control card (0: execution OK; 1: execution failure; -1: transmission abnormity; -2: response overtime; -3: abnormal data received; -4: disabled device interface). When disabled, the return value of the function will not include the execution results of the control card (0: execution OK; -1: transmission abnormity; -4: disabled device interface). ) 4. Average execution time of function command If the control card provides no execution results, the average execution time of function commands will be 2.5 ms. If it does, 4 ms. These time values are only used for reference and the actual execution time should be subject to the host and running state of the network. When real-time control is under way, as many unrelated applications as possible in the host should be closed, so as to ensure the stability of response. Chapter VII Major Points on Developing Motion Control Card Some problems may arise in programming with this control card. However, most of the problems are caused by the incorrect understanding of the working principle of the card. In the part below are situations users often come cross and the related explanations. ) Initialization of card At the very beginning the program runs, the user should initialize the device address through the function “DeviceAddr_init()”, and then detect the network connection through “TCP_Conn()” to see whether the connection of ADT8840 is conforming. A device number will be returned once the connection is successful. After that, the user should set the pulse output mode and work mode of limit switch in accordance with the situation of the machine. The function “DeviceAddr_init()” should be used only when the application is about to be initialized. After the initialization is completed, the all network resources should be released through the function “Close_all()”. http://www.adtechcn.com 62 Note: The library functions, namely, “DeviceAddr_init() and TCP_Conn()”, serve as the “gate” through which ADT-8840 passes. Only after the motion control card is successful initialized by using these two functions, can other functions be used effectively. ) Speed setting 2.1 Uniform motion It is easy to carry out the setting. What the user needs to do is to set the drive velocity with the same value as the start velocity. No need to set other parameters. The related functions are as follows: adt8840a_set_startv adt8840a_set_speed 2.2 Acceleration and deceleration with symmetrical line This is the most commonly seen method. The user should set the start velocity, drive velocity and acceleration and automatic deceleration should be employed. The related functions are as follows: adt8840a_set_startv adt8840a_set_speed adt8840a_set_acc 2.3 Interpolation speed With ADT8840, the user can choose any two, three or four axes for linear interpolation. As for the interpolation speed, the system will take the speed parameter of the front-most as the speed of the long axis. For example, at: adt8840a inp_move2 (0,3,1,100,200) It takes the speed parameter of the first axis—axis X, as the interpolation speed, and it has noting to do with the sequence of the parameters. And at: adt8840a inp_move3 (0,3,4,2,100,200,500) It takes the speed parameter of the second axis—axis Y, as the interpolation speed, and it has noting to do with the sequence of the parameters. Note: The speed ratio of interpolation is only half that for single-axis motion. In other words, the interpolation speed is only half of that of the single-axis motion with the same feunction. http://www.adtechcn.com 63 ) Signal STOP0 and STOP1 STOP0 and STOP1 are signals each axis has. Thus there are eight STOP signals totally, which are mainly used when the machine needs to return to the home position. To return to the home position, one or multiple signals can be used in accordance with the situation. However, it should be noted that, as this signal is defined as deceleration stop, a deceleration switch can be added in front of the home position switch when the system returns to the home position at high speed. That is to say, two STOP signals are used, one for home position switch and the other for deceleration switch. It also works if only one signal is used. In that case, after the system stops when it receives the STOPS signal, it will move reversely at uniform speed and stop when the signal is received again. http://www.adtechcn.com 64 Chapter VIII Examples of Programming for Developing Motion Control Card All motion-control functions are of immediate return. When the drive commands is sent out, the motion process will be controlled by the control card. At the time, the user can oversee the whole motion process through the upper PC in a real-time manner, or compulsorily stop the motion. Note: When an axis is moving, it is not allowed to send new drive command to it. Otherwise, the system will quit the previous drive and execute the new drive command. Although the programming languages are of great variety, they in nature share some common points. In short, programming languages can be summarized as “three structures and one idea”. By three structures it means all programming languages are focused on sequence structure, loop structure and branch structure. By one idea it means the algorithm and module division are used to complete the design, which is the key and critical part of programming. To ensure the usability, standardization, expansibility and maintainability of the program, the examples given below are presented from the perspective of design and divided into several modules as follows: motion control module (further packaging the library functions provided by the control card), implementation module (together with the code segment), monitoring module and stop module. The application of ADT-8840’s functions library in VB and VC programming languages will be briefly presented as follows. If other languages are used, the user can make reference from exemplified VB and VC procedures. ) 1. VB programming 1.1 Preparation (1) Create a new project, and save it as “test.vbp”; (2) By referring to the method mentioned earlier, add “adt8840.bas” module to the project. 1.2 Motion control module (1) Add a new module to the project, and save it as “ctrlcard.bas”; (2) First self-define the initialization functions of the control card in this module and initialize the library functions that need to be packaged into the initialization functions. (3) Keep self-defining other related motion control functions, such as speed setting function, single-axis motion function and interpolation motion function. (4) The source code of “ctrlcard.bas” '********************** motion control module ******************** 'To quickly develop application system with high usability, expansibility and maintainability, http://www.adtechcn.com 65 'we have 'packaged all library functions by referring to the type on the basis of the ' function library of the control card. The following example only involves 'one motion control card. '******************************************************** Public Result As Integer 'return value Const MAXAXIS = 4 'max. axis number '***********************initialize functions**************************** 'This function includes the library function commonly used in the initialization of the control card. It is the 'basis of using their functions and must be used first in the exemplified program. 'Return value<=0, it indicates the initialization failure; Return value>0, it indicates the successful initialization. '***************************************************************** Public Function Init_Card(ByVal devnum As Integer) As Integer 'when response mode is 1, responding to the serial-interface reception is enabled; when 0, disabled If (devnum = 0) Then For i = 1 To MAXAXIS Result = adt8840a_set_command_pos(devnum, 0, i, 0) adt8840a_set_actual_pos devnum, 0, i, 0 adt8840a_set_startv devnum, 0, i, 1000 adt8840a_set_speed devnum, 0, i, 2000 adt8840a_set_acc devnum, 0, i, 625 'reset logic-position counter ' reset actual-position counter 'set start velocity ' set drive velocity 'set acceleration Next i Init_Card = 1 Else Init_Card = -1 End If End Function '****************************set speed module***************************** ' Judge from the parameter whether it is uniform speed or acceleration/deceleration ' Set the start velocity, drive velocity and acceleration ' Parameters: ' axis –axis number StartV - start velocity ' ' ' Speed - drive velocity Add - acceleration Return value=0: correct; return value=1: error http://www.adtechcn.com 66 '****************************************************************************** *** Public Function Setup_Speed(ByVal axis As Integer, ByVal startv As Long, ByVal speed As Long, ByVal add As Long) As Integer If (startv - speed >= 0) Then Result = adt8840a_set_startv(devnum, 0, axis, startv) adt8840a_set_speed devnum, 0, axis, startv Else Result = adt8840a_set_startv(devnum, 0, axis, startv) adt8840a_set_speed devnum, 0, axis, speed adt8840a_set_acc devnum, 0, axis, add End If End Function '*********************single-axis function******************* 'This function is used for driving the single axis 'Parameters: axis- axis number; pulse- number of output pulse ' Return value=0: correct; return value=1: error '******************************************************* Public Function Axis_Pmove(ByVal axis As Integer, ByVal pulse As Long) As Integer Result = adt8840a_pmove(devnum, 0, axis, pulse) Axis_Pmove = Rresult End Function '****************************function for continuous drive*************************** 'This function is used to drive a single continuous-motion axis 'Parameters: axis-axis number; value-output direction 'Value-0: positive direction; 1: negative direction 'Return value=0: correct; return value=1: error '******************************************************************* Public Function Axis_Cmove(ByVal axis As Integer, ByVal value As Long) As Integer Result = adt8840a_continue_move(devnum, 0, axis, value) Axis_Cmove = Result End Function '*******************function for interpolation of any two axes******************** 'This function is used to drive any two axes for interpolation http://www.adtechcn.com 67 'Parameters: axis1 , axis2 – axis number engaged in the interpolation pulse1, pulse2-number of output pulses of the corresponding axis 'Return value=0: correct; return value=1: error '******************************************************* Public Function Interp_Move2(ByVal axis1 As Integer, ByVal axis2 As Integer, ByVal pulse1 As Long, ByVal pulse2 As Long) As Integer Result = adt8840a_inp_move2(devnum, 0, axis1, axis2, pulse1, pulse2) Interp_Move2 = Result End Function '******************* function for interpolation of any three axes ******************** ' This function is used to drive any three axes for interpolation 'Parameters: axis1, axis2 , axis3– axis number engaged in the interpolation pulse1, pulse2, pulse3-number of output pulses of the corresponding axis 'Return value=0: correct; return value=1: error '****************************************************************************** Public Function Interp_Move3(ByVal axis1 As Integer, ByVal axis2 As Integer, ByVal axis3 As Integer, ByVal pulse1 As Long, ByVal pulse2 As Long, ByVal pulse3 As Long) As Integer Result = adt8840a_inp_move3(devnum, 0, axis1, axis2, axis3, pulse1, pulse2, pulse3) Interp_Move3 = Result End Function '*******************function for interpolation of four axes*********************** ' This function is used to drive the four axes—XYZW for interpolation 'Parameters: pulse1, pulse2, pulse3-number of output pulses of the corresponding axis 'Return value=0: correct; return value=1: error '************************************************************************* Public Function Interp_Move4(ByVal pulse1 As Long, ByVal pulse2 As Long, ByVal pulse3 As Long, ByVal pulse4 As Long) As Integer Result = adt8840a_inp_move4(devnum, 0, pulse1, pulse2, pulse3, pulse4) Interp_Move4 = Result End Function '*******************function for stopping running******************************** 'This function is used to stop running, including immediate stop and stop by deceleration 'Parameters: axis-axis number; mode: 0-immediate stop; 1-stop by deceleration 'Return value=0: correct; return value=1: error '************************************************************************* http://www.adtechcn.com 68 Public Function StopRun(ByVal axis As Integer, ByVal mode As Integer) As Integer If mode = 0 Then Result = adt8840a_sudden_stop(devnum, axis) Else Result = adt8840a_dec_stop(devnum, axis) End If End Function '*******************function for position setting******************** 'This function is used to set the logic position and actual position ' Parameters: axis-axis number; pos-position value ' Mode 0: set logic position; 1: set actual position 'Return value=0: correct; return value=1: error '************************************************************* Public Function Setup_Pos(ByVal axis As Integer, ByVal pos As Long, ByVal mode As Integer) As Integer If mode = 0 Then Result = adt8840a_set_command_pos(devnum, 0, axis, pos) Else Result = adt8840a_set_actual_pos(devnum, 0, axis, pos) End If End Function '*******************get current information on motion******************** 'This function is used to get the current information on logic position, actual position and running speed ' Parameters: axis-axis number; logps-ligic position ' Actpos-actual position; speed-running speed 'Return value=0: correct; return value=1: error '******************************************************************* Public Function Get_CurrentInf(ByVal axis As Integer, LogPos As Long, actpos As Long, speed As Long) As Integer Result = adt8840a_get_command_pos(devnum, axis, LogPos) adt8840a_get_actual_pos devnum, axis, actpos adt8840a_get_speed devnum, axis, speed Get_CurrentInf = Result End Function http://www.adtechcn.com 69 '*******************function for getting to know the motion status******************** 'This function is used to get to know the drive status and interpolation status of each axis ' Parameters: axis-axis number; value-status (0-drive end; non-0: drive under way) ' Mode 0-get to know the drive status of single axis; non-0: get to know the drive status of interpolation 'Return value=0: correct; return value=1: error '******************************************************* Public Function Get_MoveStatus(ByVal axis As Integer, value As Long, ByVal mode As Integer) As Integer If mode = 0 Then GetMove_Status = adt8840a_get_status(devnum, axis, value) Else GetMove_Status = adt8840a_get_inp_status(devnum, value) End If End Function '***********************read input point******************************* 'This function is used to read the single input point 'Parameters: number-input point (0 ~ 49) 'Return value: 0: low level; 1: high level; -1: error '**************************************************************** Public Function Read_Input(ByVal number As Integer, value As Integer) As Integer Read_Input = adt8840a_read_bit(devnum, number, value) End Function '*************** function for outputting single-point signal *************** 'This function is used to output single point single 'Parameters: number-output point (0~21) 'Value: 0: low level; 1: high level 'Return value=0: correct; return value=1: error '**************************************************************** Public Function Write_Output(ByVal number As Integer, ByVal value As Integer) As Integer Write_Output = adt8840a_write_bit(devnum, 0, number, value) End Function '*****************************set pulse output mode ******************************* http://www.adtechcn.com 70 'This function is used to set the work mode of pulse 'Parameters: axis-axis number; value-pulse’s work mode: 0: pulse+pulse mode; 1: pulse+direction mode 'Return value=0: correct; return value=1: error 'Default pulse’s work mode: pulse+direction mode 'This program employs the positive logic pulse and positive logic for direction output signals, which are the default values '****************************************************************************** Public Function Setup_PulseMode(ByVal axis As Integer, ByVal value As Integer) As Integer Setup_PulseMode = adt8840a_set_pulse_mode(devnum, 0, axis, value, 0, 0) End Function '*****************************set limit signal mode****************************** 'This function is used to set the mode of limit-inputting nLMT from positive/negative direction 'Parameters: axis-axis number ' Value1: 0—positive limit enabled; 1—positive limit disabled ' Value2: 0—negative limit enabled; 1—negative limit disabled ' Logic: 0—low level enabled; 1—high level enabled 'Default values: positive limit enabled, negative limit enabled, low level enabled 'Return value=0: correct; return value=1: error '*************************************************************************** Public Function Setup_LimitMode(ByVal axis As Integer, ByVal value1 As Integer, ByVal value2 As Integer, ByVal logic As Integer) As Integer Setup_LimitMode = adt8840a_set_limit_mode(devnum, 0, axis, value1, value2, logic) End Function '********************set mode of stop0 signal ********************* 'This function is used to set the mode of stop0 signal 'Parameters: axis-axis number ' Value: 0—disabled; 1—enabled ' Logic: 0—low level enabled; 1—high level enabled 'Default values: disabled 'Return value=0: correct; return value=1: error '************************************************************ Public Function Setup_Stop0Mode(ByVal axis As Integer, ByVal value As Integer, ByVal logic As Integer) As Integer Setup_Stop0Mode = adt8840a_set_stop0_mode(devnum, 0, axis, value, logic) End Function http://www.adtechcn.com 71 '********************set mode of stop1 signal ********************* 'This function is used to set the mode of stop1 signal 'Parameters: axis-axis number ' Value: 0—disabled; 1—enabled ' Logic: 0—low level enabled; 1—high level enabled 'Default values: disabled 'Return value=0: correct; return value=1: error '************************************************************* Public Function Setup_Stop1Mode(ByVal axis As Integer, ByVal value As Integer, ByVal logic As Integer) As Integer Setup_Stop1Mode = adt8840a_set_stop1_mode(devnum, 0, axis, value, logic) End Function 1.3 Implementation module 1.3.1 Interface configuration Note: (1) Speed setting—to set start velocity, drive velocity and acceleration of each axis; position setting—to set the drive pulse of each axis; drive information—to display the logic position, actual position and running speed of each axis in a real-time manner. (2) Drive objective—to select the drive objective to determine the axis that’s engaged in the interaction or interpolation. (3) Interaction—used to send the single-axis drive command to all axes selected as drive objective; interpolation—used to send the interpolation command to all axes selected as drive objective; stop—stop pulse output of all axes. Pulse is taken as the unit for all abovementioned data. http://www.adtechcn.com 72 1.3.2 The initialization codes are in the uploaded events, which are described as follows: Private Sub Form_Load() DeviceAddr_init ' initialize the device’s interface address m_MacAddr.Text = "00-AB-CD-00-01-23" 'designate network adapter’s address m_IPAddr.Text = "192.168.0.123" ' designate IP address of control card m_INFO.Text = "please initialize first" End Sub Private Sub InitiallDevice_Click() Init_Board 'card initialization End Sub '********************card initialization********************* Private Sub Init_Board() Dim ip_addr, mac_addr As String Dim sock1 As Integer, err As Integer, count As Integer devnum = -1 ip_addr = "192.168.0.123" '' designate network adapter’s address mac_addr = "00-AB-CD-00-01-23" ' designate IP address of control card devnum = TCP_Conn(ip_addr, mac_addr, err) sock1 = Get_sock(devnum) If sock1 = -1 Then m_Device.Text = "none" m_IPStatus.Text = "connection failure" m_INFO.Text = "please check the device’s connection" Else m_Device.Text = "0" m_IPStatus.Text = "connection OK" count = Init_Card(devnum) If count = 1 Then MsgBox "8840 control card initialization completed!" m_INFO.Text = "device initialization completed" InitiallDevice.Enabled = False Else m_INFO.Text = " device initialization failure" End If End If End Sub 1.3.3 Interaction codes are provided at the button “AxisPmove_Click” where they can be http://www.adtechcn.com 73 accessed by clicking, and send out corresponding drive commands based on the selected objective. The names of the four check boxes (selected objective) are X, Y, Z and A and the codes are described as follows: '***************** judgment of speed setup ************************ ' Setting scope of start velocity and drive velocity: (1~2M) ' Setting scope of acceleration: (1×125~64000×125) '***************************************************** If m_bX.value = vbUnchecked And m_bY.value = vbUnchecked And m_bZ.value = vbUnchecked And m_bA.value = vbUnchecked Then MsgBox " Please select interaction axis!" End If If m_bX.value = vbChecked Then Setup_Speed 1, m_nStartV(0).Text, m_nSpeed(0).Text, m_nAdd(0).Text End If If m_bY.value = vbChecked Then Setup_Speed 2, m_nStartV(1).Text, m_nSpeed(1).Text, m_nAdd(1).Text End If If m_bZ.value = vbChecked Then Setup_Speed 3, m_nStartV(2).Text, m_nSpeed(2).Text, m_nAdd(2).Text End If If m_bA.value = vbChecked Then Setup_Speed 4, m_nStartV(3).Text, m_nSpeed(3).Text, m_nAdd(3).Text End If If m_bX.value = vbChecked Then Axis_Pmove 1, m_nPulse(0).Text End If If m_bY.value = vbChecked Then Axis_Pmove 2, m_nPulse(1).Text End If If m_bZ.value = vbChecked Then Axis_Pmove 3, m_nPulse(2).Text End If If m_bA.value = vbChecked Then Axis_Pmove 4, m_nPulse(3).Text End If End Sub 1.3.4 Interpolation codes are provided at the button “InterpMove_Click” where they can be accessed by clicking, and send out corresponding drive commands based on the selected objective. The names of the four check boxes (selected objective) are X, Y, Z and A and the codes are described as follows: Private Sub InterpMove_Click() http://www.adtechcn.com 74 '*****************judgment of speed setup **************** ' Setting scope of start velocity and drive velocity: (1~2M) ' Setting scope of acceleration: (1×125~64000×125) '***************************************************** '***************************interpolation*************************************** ' ADT-8840 control card can realize interpolation of any two,, three or four axes '***************************** four-axis interpolation***************************** If m_bX.value = vbChecked And m_bY.value = vbChecked And m_bZ.value = vbChecked And m_bA.value = vbChecked Then Setup_Speed 1, m_nStartV(0).Text, m_nSpeed(0).Text, m_nAdd(0).Text Interp_Move4 m_nPulse(0).Text, m_nPulse(1).Text, m_nPulse(2).Text, m_nPulse(3).Text '************************* three-axis interpolation ********************************** '************************** interpolation of axis X, Y and Z************************** ElseIf m_bX.value = vbChecked And m_bY.value = vbChecked And m_bZ.value = vbChecked Then Setup_Speed 1, m_nStartV(0).Text, m_nSpeed(0).Text, m_nAdd(0).Text Interp_Move3 1, 2, 3, m_nPulse(0).Text, m_nPulse(1).Text, m_nPulse(2).Text '************************* interpolation of axis X, Y and A ************************ ElseIf m_bX.value = vbChecked And m_bY.value = vbChecked And m_bA.value = vbChecked Then Setup_Speed 1, m_nStartV(0).Text, m_nSpeed(0).Text, m_nAdd(0).Text Interp_Move3 1, 2, 4, m_nPulse(0).Text, m_nPulse(1).Text, m_nPulse(3).Text '************************* interpolation of axis X, Z and A ************************ ElseIf m_bX.value = vbChecked And m_bZ.value = vbChecked And m_bA.value = vbChecked Then Setup_Speed 1, m_nStartV(0).Text, m_nSpeed(0).Text, m_nAdd(0).Text Interp_Move3 1, 3, 4, m_nPulse(0).Text, m_nPulse(2).Text, m_nPulse(3).Text '************************* interpolation of axis Y, Z and A ************************** ElseIf m_bY.value = vbChecked And m_bZ.value = vbChecked And m_bA.value = vbChecked Then Setup_Speed 2, m_nStartV(1).Text, m_nSpeed(1).Text, m_nAdd(1).Text Interp_Move3 2, 3, 4, m_nPulse(1).Text, m_nPulse(2).Text, m_nPulse(3).Text '************************* two-axis interpolation********************************** '************************ interpolation of axis X and Y***************************** ElseIf m_bX.value = vbChecked And m_bY.value = vbChecked Then Setup_Speed 1, m_nStartV(0).Text, m_nSpeed(0).Text, m_nAdd(0).Text Interp_Move2 1, 2, m_nPulse(0).Text, m_nPulse(1).Text '************************ interpolation of axis X and Z*************************** ElseIf m_bX.value = vbChecked And m_bZ.value = vbChecked Then Setup_Speed 1, m_nStartV(0).Text, m_nSpeed(0).Text, m_nAdd(0).Text Interp_Move2 1, 3, m_nPulse(0).Text, m_nPulse(2).Text '*********************** interpolation of axis X and A***************************** ElseIf m_bX.value = vbChecked And m_bA.value = vbChecked Then http://www.adtechcn.com 75 Setup_Speed 1, m_nStartV(0).Text, m_nSpeed(0).Text, m_nAdd(0).Text Interp_Move2 1, 4, m_nPulse(0).Text, m_nPulse(3).Text '********************** interpolation of axis Y and Z****************************** ElseIf m_bY.value = vbChecked And m_bZ.value = vbChecked Then Setup_Speed 2, m_nStartV(1).Text, m_nSpeed(1).Text, m_nAdd(1).Text Interp_Move2 2, 3, m_nPulse(1).Text, m_nPulse(2).Text '********************** interpolation of axis Y and A******************************** ElseIf m_bY.value = vbChecked And m_bA.value = vbChecked Then Setup_Speed 2, m_nStartV(1).Text, m_nSpeed(1).Text, m_nAdd(1).Text Interp_Move2 2, 4, m_nPulse(1).Text, m_nPulse(3).Text '*********************** interpolation of axis Z and A******************************* ElseIf m_bZ.value = vbChecked And m_bA.value = vbChecked Then Setup_Speed 3, m_nStartV(2).Text, m_nSpeed(2).Text, m_nAdd(2).Text Interp_Move2 3, 4, m_nPulse(2).Text, m_nPulse(3).Text Else MsgBox "Please select the interpolation axis", "prompt" End If End Sub 1.4 Monitoring module The monitoring module is used to get the information on axis’ drive and display the information on motion, and at the same time, prevent the system from sending new drive commands during the drive process. The monitoring module performs its functions through the timer, whose codes are described as follows: Private Sub Timer1_Timer() Dim nLogPos As Long Dim nActPos As Long Dim nSpeed As Long Dim nStatus(4) As Long Dim value As Integer For i = 1 To 4 'logic position 'actual position 'running speed 'drive status of axis 'IO status Get_CurrentInf i, nLogPos, nActPos, nSpeed m_nLogPos(i - 1).Caption = nLogPos m_nActPos(i - 1).Caption = nActPos m_nRunSpeed(i - 1).Caption = nSpeed Get_MoveStatus i, nStatus(i - 1), 0 'detect limit signal and stop0 signal Read_Input (i - 1) * 2 + 4, value If value = 0 Then http://www.adtechcn.com 76 m_bPLimit(i - 1).value = 1 Else m_bPLimit(i - 1).value = 0 End If ' detect positive limit (XLMT+ : 5,YLMT+ :7,ZLMT+ :9,WLMT+ :11) Read_Input (i - 1) * 2 + 5, value If value = 0 Then m_bNLimit(i - 1).value = 1 Else m_bNLimit(i - 1).value = 0 End If 'detect stop 0 (XSTOP0 : 0,YSTOP0 :1,ZSTOP0 :2,WSTOP0 :3) Read_Input (i - 1), value If value = 0 Then m_bStop0(i - 1).value = 1 Else m_bStop0(i - 1).value = 0 End If 'detect stop 0 (XSTOP1 : 38,YSTOP1 :39,ZSTOP1 :40,WSTOP1 :41) Read_Input (i + 37), value If value = 0 Then m_bStop1(i - 1).value = 1 Else m_bStop1(i - 1).value = 0 End If Next i If nStatus(0) = 0 And nStatus(1) = 0 And nStatus(2) = 0 And nStatus(3) = 0 Then 'axis’ drive under way AxisPmove.Enabled = True InterpMove.Enabled = True BaseparaSet.Enabled = True ClearPos.Enabled = True AxisCmove.Enabled = True Else 'exis’s drive end AxisPmove.Enabled = False InterpMove.Enabled = False BaseparaSet.Enabled = False ClearPos.Enabled = False AxisCmove.Enabled = False End If End Sub http://www.adtechcn.com 77 1.5 Stop module The stop module is mainly used to control sudden events during the drive process that require immediate stop of all axes’ motions. The codes of stop module are provided at the button “CmdStop” where they can be accessed by clicking. The codes are described as follows: Private Sub Stop_Click() For i = 1 To 4 StopRun i, 0 Next i End Sub ) 2. VC programming 2.1 Preparation (1) Create a new project, and save it as “VCExample.dsw”; (2) By referring to the method mentioned earlier, add static library “8840.lib” to the project. 2.2 Motion control module (1) Add a new category to the project, for which the header file can be saved as “CtrlCard.h” and source file as “CtrlCard.cpp”; (2) First self-define the initialization functions of the control card in this module and initialize the library functions that need to be packaged into the initialization functions. (3) Keep self-defining other related motion control functions, such as speed setting function, single-axis motion function and interpolation motion function. (4) The codes of the header file “CtrlCard.h” are decribed as follows: # ifndef __ADT8840__CARD__ # define __ADT8840__CARD__ /************************* motion control module *********************** To quickly develop application system with high usability, expansibility and maintainability, we have 'packaged all library functions by referring to the type on the basis of the function library of the control card. The following example only involves one motion control card. ********************************************************************/ #define MAXAXIS 4 // max. number of axes class CCtrlCard { public: int Setup_HardStop(int value, int logic); int Setup_Stop1Mode(int axis, int value, int logic); int Setup_Stop0Mode(int axis, int value, int logic); int Setup_LimitMode(int axis, int value1, int value2, int logic); int Setup_PulseMode(int axis, int value); http://www.adtechcn.com 78 int Setup_Pos(int axis, long pos, int mode); int Write_Output(int number, int value); int Read_Input(int number, int &value); int Get_CurrentInf(int axis, long &LogPos, long &ActPos, long &Speed); int Get_Status(int axis, int &value, int mode); int StopRun(int axis, int mode); int Interp_Move4(long value1, long value2, long value3, long value4); int Interp_Move3(int axis1, int axis2, int axis3, long value1, long value2, long value3); int Interp_Move2(int axis1, int axis2, long value1, long value2); int Axis_Pmove(int axis ,long value); int Axis_Cmove(int axis ,long value); int Setup_Speed(int axis ,long startv ,long speed ,long add ); int Init_Board(int dec_num); CCtrlCard(); int Result; // return value }; #endif (5) The codes of source file “CtrlCard.cpp”are described as follows: #include "stdafx.h" #include "DEMO.h" #include "CtrlCard.h" #include "adt8840.h" int devnum=-1; CCtrlCard::CCtrlCard() { } /'*******************initialize functions************************ This function includes the library function commonly used in the initialization of the control card. It is the basis of using their functions and must be used first in the exemplified program. Return value<=0, it indicates the initialization failure; Return value>0, it indicates the successful initialization. **********************************************************/ int CCtrlCard::Init_Board(int devnum) { /***********************************************************/ int mode =0;//'when response mode is 1, responding to the serial-interface reception is enabled; when 0, disabled if(devnum==0) http://www.adtechcn.com 79 { for (int i = 1; i<=MAXAXIS; i++) { Result=adt8840a_set_command_pos(devnum, mode,i,0); adt8840a_set_actual_pos(devnum, mode,i,0); adt8840a_set_startv(devnum, mode,i,0); adt8840a_set_speed(devnum, mode,i,0); adt8840a_set_acc(devnum, mode,i,0); } if(Result==0 ) return 1; else return Result; } else return -1; } /****************************set speed module***************************** Judge from the parameter whether it is uniform speed or acceleration/deceleration Set the start velocity, drive velocity and acceleration Parameters: axis –axis number StartV - start velocity Speed - drive velocity Add - acceleration Return value=0: correct; return value=1: error **********************************************************************/ int CCtrlCard::Setup_Speed(int axis, long startv, long speed, long add ) { if (startv - speed >= 0) // uniform motion { Result = adt8840a_set_startv(devnum,0, axis, startv); adt8840a_set_speed (devnum,0, axis, startv); } else // acceleration/deceleration motion { Result = adt8840a_set_startv(devnum,0, axis, startv); adt8840a_set_speed (devnum,0, axis, speed); adt8840a_set_acc (devnum,0, axis, add); } return Result; } http://www.adtechcn.com 80 /*********************single-axis function********************** This function is used for driving the single axis Parameters: axis- axis number; pulse- number of output pulse Return value=0: correct; return value=1: error **********************************************************/ int CCtrlCard::Axis_Pmove(int axis, long value) { Result = adt8840a_pmove(devnum,0, axis, value); return Result; } /*******************function for interpolation of any two axes******************** This function is used to drive any two axes for interpolation Parameters: axis1 , axis2 – axis number engaged in the interpolation; value1, value2-number of pulses Return value=0: correct; return value=1: error *************************************************************************/ int CCtrlCard::Interp_Move2(int axis1, int axis2, long value1, long value2) { Result = adt8840a_inp_move2(devnum,0, axis1, axis2, value1, value2); return Result; } /******************* function for interpolation of any three axes ******************** This function is used to drive any three axes for interpolation Parameters: axis1, axis2 , axis3– axis number engaged in the interpolation; value1,value2,value3—number of pulses Return value=0: correct; return value=1: error **************************************************************************/ int CCtrlCard::Interp_Move3(int axis1, int axis2, int axis3, long value1, long value2, long value3) { Result = adt8840a_inp_move3(devnum,0, axis1, axis2, axis3, value1, value2, value3); return Result; } /*******************function for interpolation of four axes******************** This function is used to drive the four axes—XYZW for interpolation Parameters: value1,value2,value3,value4-number of output pulses Return value=0: correct; return value=1: error http://www.adtechcn.com 81 ********************************************************************/ int CCtrlCard::Interp_Move4(long value1, long value2, long value3, long value4) { Result = adt8840a_inp_move4(devnum,0, value1, value2, value3, value4); return Result; } /********************************* stop running********************************** This function is used to stop running, including immediate stop and stop by deceleration Parameters: axis-axis number; mode: deceleration method (0-immediate stop; 1-stop by deceleration) Return value=0: correct; return value=1: error ******************************************************************************/ int CCtrlCard::StopRun(int axis, int mode) { if(mode == 0) // immediate stop { Result = adt8840a_sudden_stop(devnum, axis); } else // stop by deceleration { Result = adt8840a_dec_stop(devnum, axis); } return Result; } /***************function to get to know the drive status of axis************************ This function is used to get to know the drive status and interpolation status of each axis Parameters: axis-axis number; value-status pointer (0-drive end; non-0: drive under way) Mode (0-get to know the drive status of single axis; 1- get to know the drive status of interpolation Return value=0: correct; return value=1: error ***************************************************************************/ int CCtrlCard::Get_Status(int axis, int &value, int mode) { if (mode==0) / get to know the drive status of single axis Result=adt8840a_get_status(devnum,axis,&value); else // get to know the drive status of interpolation Result=adt8840a_get_inp_status(devnum,&value); return Result; } http://www.adtechcn.com 82 /********************* get current information on motion ************************ This function is used to get the current information on logic position, actual position and running speed Parameters: axis-axis number; LogPos-logic position; ActPos-actual position; Speed-running speed Return value=0: correct; return value=1: error ************************************************************************/ int CCtrlCard::Get_CurrentInf(int axis, long &LogPos, long &ActPos, long &Speed ) { Result = adt8840a_get_command_pos(devnum,axis, &LogPos); adt8840a_get_actual_pos (devnum, axis, &ActPos); adt8840a_get_speed (devnum, axis, &Speed); return Result; } /*********************** read input point ******************************* This function is used to read the single input point Parameters: number-input point (0 ~39) Return value: 0: low level; 1: high level; -1: error ********************************************************************/ int CCtrlCard::Read_Input(int number,int &value) { Result = adt8840a_read_bit(devnum, number, &value); return Result; } /*************** function for outputting single-point signal *************** This function is used to output single point single Parameters: number-output point (0~15); value: 0: low level; 1: high level Return value=0: correct; return value=1: error ****************************************************************/ int CCtrlCard::Write_Output(int number, int value) { Result = adt8840a_write_bit(devnum,0, number, value); return Result; } /*******************set position counter**************************** This function is used to set the logic position and actual position Parameters: axis-axis number; pos-value of the position; Mode: 0-set logic position; non-0-set actual position Return value=0: correct; return value=1: error http://www.adtechcn.com 83 **************************************************************/ int CCtrlCard::Setup_Pos(int axis, long pos, int mode) { if(mode==0) { Result = adt8840a_set_command_pos(devnum,0,axis, pos); } else { Result = adt8840a_set_actual_pos(devnum,0, axis, pos); } return Result; } /********************set pulse output mode ********************** This function is used to set the work mode of pulse Parameters: axis-axis number; value-pulse’s work mode: 0: pulse+pulse mode; 1: pulse+direction mode Return value=0: correct; return value=1: error Default pulse’s work mode: pulse+direction mode This program employs the positive logic pulse and positive logic for direction output signals, which are the default values *************************************************************/ int CCtrlCard::Setup_PulseMode(int axis, int value) { Result = adt8840a_set_pulse_mode(devnum, 0, axis, value, 0, 0); return Result; } /'*****************************set limit signal mode****************************** This function is used to set the mode of limit-inputting nLMT from positive/negative direction Parameters: axis-axis number Value1: 0—positive limit enabled; 1—positive limit disabled Value2: 0—negative limit enabled; 1—negative limit disabled Logic: 0—low level enabled; 1—high level enabled Default values: positive limit enabled, negative limit enabled, low level enabled **************************************************************************/ int CCtrlCard::Setup_LimitMode(int axis, int value1, int value2, int logic) { Result = adt8840a_set_limit_mode(devnum, 0, axis, value1, value2, logic); return Result; } http://www.adtechcn.com 84 /********************set mode of stop0 signal ********************* This function is used to set the mode of stop0 signal Parameters: axis-axis number Value: 0—disabled; 1—enabled Logic: 0—low level enabled; 1—high level enabled Default values: disabled Return value=0: correct; return value=1: error *********************************************************/ int CCtrlCard::Setup_Stop0Mode(int axis, int value, int logic) { Result = adt8840a_set_stop0_mode(devnum,0, axis, value ,logic); return Result; } /********************set mode of stop1 signal ********************* This function is used to set the mode of stop1 signal 'Parameters: axis-axis number Value: 0—disabled; 1—enabled Logic: 0—low level enabled; 1—high level enabled Default values: disabled Return value=0: correct; return value=1: error *********************************************************/ int CCtrlCard::Setup_Stop1Mode(int axis, int value, int logic) { Result = adt8840a_set_stop1_mode(devnum,0, axis, value, logic); return Result; } /*************function for continuous drive of single axis************ This function is used for driving the single axis Parameters: axis- axis number; pulse- pulse direction Return value=0: correct; return value=1: error ***********************************************************/ int CCtrlCard::Axis_Cmove(int axis, long value) { Result = adt8840a_continue_move(devnum,0, axis, value); return Result; } http://www.adtechcn.com 85 2.3 Implementation module 2.3.1 Interface configuration Note: (1) Speed setting—to set start velocity, drive velocity and acceleration of each axis; position setting—to set the drive pulse of each axis; drive information—to display the logic position, actual position and running speed of each axis in a real-time manner. (2) Drive objective—to select the drive objective to determine the axis that’s engaged in the interaction or interpolation. (3) Interaction—used to send the single-axis drive command to all axes selected as drive objective; interpolation—used to send the interpolation command to all axes selected as drive objective; stop—stop pulse output of all axes. Pulse is taken as the unit for all abovementioned data. 2.3.2 The initialization codes of ADT-8840 are provided at the initialization item in the window. The codes newly added by the user are described as follows: SetDlgItemText(IDC_EDIT_OPPIP,"192.168.0.123");// designate IP address of control card SetDlgItemText(IDC_EDIT_MAC,"00-AB-CD-00-01-23");//designate network adapter’s address SetDlgItemText(IDC_EDIT_INFO," please initialize first "); DeviceAddr_init();//initialize the device’s interface address //******* set the default start velocity as 100********* m_nStartvX = 100; http://www.adtechcn.com 86 m_nStartvY = 100; m_nStartvZ = 100; m_nStartvA = 100; //********* set the default drive velocity as 2000******** m_nSpeedX = 2000; m_nSpeedY = 2000; m_nSpeedZ = 2000; m_nSpeedA = 2000; //********* set the default acceleration as 2500********** m_nAddX = 2500; m_nAddY = 2500; m_nAddZ = 2500; m_nAddA = 2500; //******** set the default target position as 1000000****** m_nPulseX = 1000000; m_nPulseY = 1000000; m_nPulseZ = 1000000; m_nPulseA = 1000000; UpdateData(FALSE); SetTimer(MAINTIMER,100,NULL); // start the timer 2.3.3 Interaction codes are provided at the interaction button where they can be accessed by clicking, and send out corresponding drive commands based on the selected objective. The codes are described as follows: /********************************* interaction button acts *******************************/ void CVCExampleDlg::OnButtonPmove() { UpdateData(TRUE); long Startv[]={m_nStartvX,m_nStartvY,m_nStartvZ,m_nStartvA}; // start velocity long Speed[]={m_nSpeedX,m_nSpeedY,m_nSpeedZ,m_nSpeedA}; // drive velocity long Add[] ={m_nAddX,m_nAddY,m_nAddZ,m_nAddA}; // acceleration if(m_bX) { //************* set speed of axis X***************// g_CtrlCard.Setup_Speed(1, m_nStartvX, m_nSpeedX, m_nAddX); } if(m_bY ) { //************* set speed of axis Y **************// http://www.adtechcn.com 87 g_CtrlCard.Setup_Speed(2, m_nStartvY, m_nSpeedY, m_nAddY); } if(m_bZ ) { //************* set speed of axis Z **************// g_CtrlCard.Setup_Speed(3, m_nStartvZ, m_nSpeedZ, m_nAddZ); } if(m_bA ) { //************* set speed of axis A**************// g_CtrlCard.Setup_Speed(4, m_nStartvA, m_nSpeedA, m_nAddA); } // drive command //************* drive of axis X ***************// if(m_bX) g_CtrlCard.Axis_Pmove(1, m_nPulseX); //************* drive of axis Y ***************// if(m_bY) g_CtrlCard.Axis_Pmove(2, m_nPulseY); //************* drive of axis Z***************// if(m_bZ) g_CtrlCard.Axis_Pmove(3, m_nPulseZ); //************ drive of axis A***************// if(m_bA) g_CtrlCard.Axis_Pmove(4, m_nPulseA); if((!m_bX) && (!m_bY) && (!m_bZ) && (!m_bA)) MessageBox( "Please select interaction axis!"," prompt"); } Interpolation codes are provided at the interpolation button where they can be accessed by clicking, and send out corresponding drive commands based on the selected objective. The codes are described as follows: /********************************* interpolation button acts *********************************/ void CVCExampleDlg::OnButtonInpmove() { UpdateData(); long Startv[]={m_nStartvX,m_nStartvY,m_nStartvZ,m_nStartvA}; //start velocity long Speed[]={m_nSpeedX,m_nSpeedY,m_nSpeedZ,m_nSpeedA}; //drive velocity long Add[]={m_nAddX,m_nAddY,m_nAddZ,m_nAddA}; //acceleration long Pulse[]={m_nPulseX,m_nPulseY,m_nPulseZ,m_nPulseA}; // number of axis’ drive pulses http://www.adtechcn.com 88 //************ two-axis interpolation***********// if(m_bX && m_bY && !m_bZ && !m_bA) // interpolation of axis X and Y { g_CtrlCard.Setup_Speed(1, Startv[0], Speed[0], Add[0]); g_CtrlCard.Interp_Move2(1, 2, Pulse[0], Pulse[1]); } else if(m_bX && !m_bY && m_bZ && !m_bA) // interpolation of axis X and Z { g_CtrlCard.Setup_Speed(1, Startv[0], Speed[0], Add[0]); g_CtrlCard.Interp_Move2(1, 3, Pulse[0], Pulse[2]); } else if(m_bX && !m_bY && !m_bZ && m_bA) // interpolation of axis X and W { g_CtrlCard.Setup_Speed(1, Startv[0], Speed[0], Add[0]); g_CtrlCard.Interp_Move2(1, 4, Pulse[0], Pulse[3]); } else if(!m_bX && m_bY && m_bZ && !m_bA) // interpolation of axis Y and Z { g_CtrlCard.Setup_Speed(2, Startv[1], Speed[1], Add[1]); g_CtrlCard.Interp_Move2(2, 3, Pulse[1], Pulse[2]); } else if(!m_bX && m_bY && !m_bZ && m_bA) // interpolation of axis Y and W { g_CtrlCard.Setup_Speed(2, Startv[1], Speed[1], Add[1]); g_CtrlCard.Interp_Move2(2, 4, Pulse[1], Pulse[3]); } else if(!m_bX && !m_bY && m_bZ && m_bA) // interpolation of axis Z and W { g_CtrlCard.Setup_Speed(3, Startv[2], Speed[2], Add[2]); g_CtrlCard.Interp_Move2(3, 4, Pulse[2], Pulse[3]); } //************* three-axis interpolation**************// else if(m_bX && m_bY && m_bZ && !m_bA) // interpolation of axis X, Y and Z { g_CtrlCard.Setup_Speed(1, Startv[0], Speed[0], Add[0]); g_CtrlCard.Interp_Move3(1, 2, 3, Pulse[0], Pulse[1], Pulse[2]); } http://www.adtechcn.com 89 else if(m_bX && m_bY && m_bZ && !m_bA) // interpolation of axis X, Y and Z { g_CtrlCard.Setup_Speed(1, Startv[0], Speed[0], Add[0]); g_CtrlCard.Interp_Move3(1, 2, 3, Pulse[0], Pulse[1], Pulse[2]); } else if(m_bX && m_bY && !m_bZ && m_bA) // interpolation of axis X, Y and W { g_CtrlCard.Setup_Speed(1, Startv[0], Speed[0], Add[0]); g_CtrlCard.Interp_Move3(1, 2, 4, Pulse[0], Pulse[1], Pulse[3]); } else if(m_bX && !m_bY && m_bZ && m_bA) // interpolation of axis X, Z and W { g_CtrlCard.Setup_Speed(1, Startv[0], Speed[0], Add[0]); g_CtrlCard.Interp_Move3(1, 3, 4, Pulse[0], Pulse[2], Pulse[3]); } else if(!m_bX && m_bY && m_bZ && m_bA) // interpolation of axis Y, Z and W { g_CtrlCard.Setup_Speed(2, Startv[1], Speed[1], Add[1]); g_CtrlCard.Interp_Move3(2, 3, 4, Pulse[1], Pulse[2], Pulse[3]); } //************ four-axis interpolation*************// else if(m_bX && m_bY && m_bZ && m_bA) // interpolation of axis X, Y, Z and W { g_CtrlCard.Setup_Speed(1, Startv[0], Speed[0], Add[0]); g_CtrlCard.Interp_Move4(Pulse[0], Pulse[1], Pulse[2], Pulse[3]); } else { MessageBox("Please select interaction axis!"," prompt"); } } 2.4 Monitoring module The monitoring module is used to get the information on axis’ drive and display the information on motion, and at the same time, prevent the system from sending new drive commands during the drive process. The monitoring module performs its functions through the timer, whose codes are described as follows: //********************get real-time information*************************// // get the logic position, actual position, running speed and drive status // http://www.adtechcn.com 90 // read positive/negative limit and stop0 // //*********************************************************// void CVCExampleDlg::OnTimer(UINT nIDEvent) { long log=0,act=0,spd=0; UINT nID1[]={IDC_POS_LOGX,IDC_POS_LOGY,IDC_POS_LOGZ,IDC_POS_LOGW}; UINT nID2[]={IDC_POS_ACTX,IDC_POS_ACTY,IDC_POS_ACTZ,IDC_POS_ACTW}; UINT nID3[]={IDC_RUNSPEED_X,IDC_RUNSPEED_Y,IDC_RUNSPEED_Z,IDC_RUNSPEED_W} ; CStatic *lbl; CString str; int status[4]; for (int i=1; i<MAXAXIS+1; i++) { g_CtrlCard.Get_CurrentInf(i,log,act,spd); // get the logic position, actual position, running speed and drive status //********display logic position ********// lbl=(CStatic*)GetDlgItem(nID1[i-1]); str.Format("%ld",log); lbl->SetWindowText(str); //******** display actual position ********// lbl=(CStatic*)GetDlgItem(nID2[i-1]); str.Format("%ld",act); lbl->SetWindowText(str); //******** display running speed ********// lbl=(CStatic*)GetDlgItem(nID3[i-1]); // without speed ratio, actual speed=obtained value str.Format("%ld",spd); lbl->SetWindowText(str); //******get drive status******// g_CtrlCard.Get_Status(i,status[i-1],0); } //******************signal detection***************** // Axis X’s STOP0 0 Axis Y’s STOP0 1 // Axis Z’s STOP0 2 Axis A’s STOP0 3 // Positive limit of axis X -4 Negative limit of axis X-5 // Positive limit of axis Y -4 Negative limit of axis Y-5 // Positive limit of axis Z -8 Negative limit of axis Z-9 // Positive limit of axis A -10 Negative limit of axis A-11 http://www.adtechcn.com 91 //******************************************* UINT nIDIN1[]={ IDC_STOP0_X,IDC_STOP0_Y, //X,Y home position IDC_STOP0_Z,IDC_STOP0_W, //Z,A home position IDC_LIMIT_X,IDC_LIMIT_X2, //Positive/negative limit of axis Y IDC_LIMIT_Y,IDC_LIMIT_Y2, // Positive/negative limit of axis Y IDC_LIMIT_Z,IDC_LIMIT_Z2, // Positive/negative limit of axis Z IDC_LIMIT_W,IDC_LIMIT_W2 }; // Positive/negative limit of axis A CButton *btn; int value=0; for (i=0; i<12; i++) { g_CtrlCard.Read_Input(i,value);//read signal, note the status is not of the return value btn=(CButton*)GetDlgItem(nIDIN1[i]); btn->SetCheck(value==0?1:0); } //******************signal detection***************** // Input of phase Z at the encoder as STOP1 // Axis X’s STOP1 38 Axis Y’s STOP1 39 // Axis Z’s STOP1 40 Axis A’s STOP1 41 //******************************************* UINT nIDIN2[]={ IDC_STOP1_X,IDC_STOP1_Y,IDC_STOP1_Z,IDC_STOP1_W }; for (i=0; i<4; i++) { g_CtrlCard.Read_Input(38+i,value);// Read IN38 to signal IN41 btn=(CButton*)GetDlgItem(nIDIN2[i]); btn->SetCheck(value==0?1:0); } //************************** control through button**************************** if(devnum==0&&status[0]==0 && status[1]==0 && status[2]==0 && status[3]==0) { //**************** drive completed**************** btn=(CButton*)GetDlgItem(IDC_BUTTON_PMOVE); http://www.adtechcn.com 92 btn->EnableWindow(TRUE); btn=(CButton*)GetDlgItem(IDC_BUTTON_CMOVE); btn->EnableWindow(TRUE); btn=(CButton*)GetDlgItem(IDC_BUTTON_INPMOVE); btn->EnableWindow(TRUE); btn=(CButton*)GetDlgItem(IDC_BUTTON_CLEARPOS); btn->EnableWindow(TRUE); btn=(CButton*)GetDlgItem(IDC_BUTTON_BASEPARA); btn->EnableWindow(TRUE); } else { //********** drive under way********** btn=(CButton*)GetDlgItem(IDC_BUTTON_PMOVE); btn->EnableWindow(FALSE); btn=(CButton*)GetDlgItem(IDC_BUTTON_CMOVE); btn->EnableWindow(FALSE); btn=(CButton*)GetDlgItem(IDC_BUTTON_INPMOVE); btn->EnableWindow(FALSE); btn=(CButton*)GetDlgItem(IDC_BUTTON_CLEARPOS); btn->EnableWindow(FALSE); btn=(CButton*)GetDlgItem(IDC_BUTTON_BASEPARA); btn->EnableWindow(FALSE); } CDialog::OnTimer(nIDEvent); } 2.5 Stop module The stop module is mainly used to control sudden events during the drive process that require immediate stop of all axes’ motions. The codes of stop module are provided at the button “CmdStop” where they can be accessed by clicking, and described as follows: void CVCExampleDlg::OnButtonStop() { for (int i = 1; i<=MAXAXIS; i++) { g_CtrlCard.StopRun(i,1); } } http://www.adtechcn.com 93 Chapter IX Network Configuration and Serial-Interface Debugging ) 1. Overview ADT-884 is designed on the basis of the control and transmission protocol for Ethernet and TCP/IP protocol. With bandwidth of 10Mbps, ADT-884 can be operated in the LAN whose bandwidth is 100Mbps. At present, ADT-884 and its supporting software can be used in an Ethernet-based LAN or connected to PC’s network interface with the crossover cables. Without returned commands, the minimum time interval of repeat execution that ADT-8840 can achieve is 2 milliseconds. With returned commands, 4 milliseconds. ) 2. Network environment and host's configuration ADT-8840 can be running on cross-subnet basis in a LAN consisting of multiple subnets. But it is recommended that device run in exclusive subnets, where large-capacity network tools should not be installed and run so as to avoid communication delay or failure caused by the network overload. When the controlling host is engaged in real-time control, as many unrelated applications as possible should be closed to ensure the good response of the host. Required configuration of host: ■ X85 compatible PC, CPU over P4 recommended, with memory of 512M ■ At least one serial interface and one network interface ■ Windows XP or Windows 2000 OS ) 3. Search or network configuration through serial interface tool As the LAN of the client may vary in environment, it can’t be guaranteed that IP address of control card and address (MAC) of network adapter have exclusive values in the client’s network before the product is delivered. With only one IP address and one network adapter’s address (MAC) before delivery, all new control cards must be confirmed or network resources engaged must be re-configured through the serial-interface debugging tool “SSCOM32.EXE”(attached http://www.adtechcn.com 94 with ADT-8840) before connection to other systems, so as to ensure the exclusiveness of IP address and network adapter’s address in the LAN. 3.1 Serial-interface debugging First connect ADT-8840 to serial interface of PC through the communication cable and then run the serial-interface debugging tool “SSCOM32.EXE” (see the tool attachment). Basically, the software for serial interface debugging can be set as follows: select proper serial-interface number (default: COM1), set baud rate as 115200, data bit as 8, stop bit as 1, parity bit as None and flow control as None, and select “Send New String” in the check box. The operating interface of serial-interface debugging tool is shown in the figure below: Figure 1 If the serial interface is properly connected, some start-up information will be displayed automatically by the serial-interface debugging tool after ADT-8840 is electrified. When a sound “di” is heard from the buzzer, it means ADT-8840 has been successfully started and some system information and information about current network configuration can be displayed in the window of the debugging software. At the same time, the system prompts the user can press any key to enter the detection\configuration mode. Configured with some default values before delivery, the control card will display some ex-factory network configurations at the time of start-up provided http://www.adtechcn.com 95 the user didn’t re-configure them. Defaults of network configurations are as follows: IP address: 192.168.0.123 Subnet masl: 255.255.255.0 Default gateway: 192.168.0.1 Address of network adapter (MAC): 00-AB-CD-00-01-23 3.2 Network configuration of ADT-8840 The user can activate the window of serial-interface software and press any key to enter the interface of configuration within 30 seconds after ADT-8840 is started, as shown in Figure 2. Two commands for configuration mode appear in Figure 2. Format of command input and how to send: enter the command by starting with the character “:” and the character string prompted in the interface (see Figure 2). Then click Send to complete the process. If the user has not input the command within 30 seconds, the system will automatically close the configuration mode so as to prevent the control card from unexpectedly entering the test mode, a situation caused by the serial interface interference. When the system closes the test/configuration mode, if the user needs to access the test/configuration mode again, the control card should be electrified again after powered-off. Figure 2 shows the two commands used for test/configuration. http://www.adtechcn.com 96 Figure 2 After the user enters the command “:000004”in the test/configuration interface and click Send or Enter, the system will enter the state of network configuration for the control card. The actual command related to the network configuration appears on the screen again, as shown in Figure 3: Figure 3 Figure 3 shows there are six commands for network configuration, the top four of which provide the format of the command and indicate the command characters are associated with the content of configuration. If the format of input command has error, the error will be prompted in the screen. If the input command is correct, what is entered will be displayed again, as shown in Figure 4. Before network configuration is saved, the user must ensure IP address, adder mask, gateway IP and network adapter address have been correctly set. Otherwise, the system will prompt the related item has not been configured, as shown in Figure 5. http://www.adtechcn.com 97 Figure 4 Figure 5 After the network configuration is completed successfully and saved, prompt will appear in the http://www.adtechcn.com 98 interface saying the control card must be re-started to make the configuration effective. After the control card is restarted, in the power-on information the user will find “find network configuration files, configuration is under way…”, as shown in Figure 6. Figure 6 The network configuration of ADT-8840 can also be realized through the function “adt8840a_Net_Setup()”in the application after the network is successfully connected. ) 4. Network configuration of host (upper PC) The network configuration of the controlling host should be modified through the dialogue box of properties designed for TCP/IP protocol, which can be opened under Windows environment by following the procedures below: From Start menu or on the desktop, make selections by following items below: right click Network Neighborhood->Properties->click network connection window->right click local area connection and click properties->open the properties window->activate the general options->select Internet Protocol (TCP/IP)->click properties, and you will open the properties http://www.adtechcn.com 99 window for TCP/IP protocol, as shown in Figure 7, 8, 9 and 10. Figure 7 Figure 8 http://www.adtechcn.com 100 Figure 9 http://www.adtechcn.com 101 Figure 10 http://www.adtechcn.com 102 Figure 11 In the properties window for TCP/IP protocol, select “use the IP address below”. Then the user can set the host’s IP address, subnet mask and default gateway in accordance with the subnet number of the LAN where the host is installed. If no real gateway exists in the subnet, the gateway can be set as the number of the first host in the subnet, like “192 . 168 . 0 . 1”. In actual use, the subnet number should be consistent with that of the host. If not, the user can modify the network configuration files of the control card through the serial interface software tool to make them so. Of course, if the control card is connected to the host via the crossover cable, the user can also modify the IP address of the host to accommodate host to the control card. http://www.adtechcn.com 103 ) 5. Network connection and troubleshooting 5.1 Initialization of application In the start-up process of the host’s application, the function “DeviceAddr_init()”must be used to initialize the interfaces of the devices, which number 63 maximally. When initialization is completed, the function “Close_all()”should be used to close the application and release all connections and resources. 5.2 Connection of control card In preparing the connection of the control card, the application of the host must provide the two parameters, namely, the IP address of the control card and the MAC address, to the function “TCP Conn” (char *ip_addr, char *mac_addr, int *err). If the connection is successful, “TCP_Conn()”will return a device number (0-63). If not, it returns “-1”. “int *err” is used to receive the returned results of some continuous operations. The function “TCP_Conn()” binds the device’s IP address and MAC together so as to improve the anti-virus performance of the system. 5.3 Network topology ■ Point-to-point interconnection The host of the control card and the device are connected to each other through standard 568B crossover cable. Controlling host http://www.adtechcn.com Device 1 104 ■ Connection with start-shape topology The controlling host and the device are connected to each other via the switch or hub with standard 568A straight-through cable. In actual practice, we recommend you take the related specification of industrial Ethernet as the criterion. Device 2 Device 3 Device 4 Device 5 Device 6 Device 1 Switch or hub Switch or hub Controlling host Other hosts 5.4 Detect IP address and MAC address of all devices through host The IP address and network adapter’s address of control card can also be detected through the command “arp”. The detection details are as follows: ■ Click the Start menu->select Run->input “CMD” to open the DOS window->input “arp-a” command->press Enter In the displayed items, “Type” and “static” are the IP address and MAC address of the device registered in the controlling host. Check carefully to see whether IP address and MAC address are inconsistent. See Figure 12. http://www.adtechcn.com 105 Figure 13 5.5 Troubleshooting for network connection 1) Inconsistent IP address and network adapter address of device as they are not re-configured. Set the network items for the device again 2) IP address of the device is not in the same subnet as that of the host. Set them in the same subnet, or change the subnet mask. 3) Multiple devices with the same IP addresses and network adapter addresses exist in the LAN. Set the network items for the device again. 4) Network cables are not matched to each other. The device and controlling host should be http://www.adtechcn.com 106 connected to each other through crossover cable, while the device and the HUB or router can be connected to each other through either crossover cable or straight-through cable. 5) IP address and MAC address of the device don’t exist at the time of network connection. Use the serial-interface software tool to get (or modify) the real IP address and MAC address of the control card, and confirm their exclusiveness in the subnet. 6) Unreliable physical connection, check 7) Error of default gateway setting. Set it correctly 8) If the problem still exists after all abovementioned solutions are used, you can power off the control card and power on it again. ) 6. Information on network configuration IP address: it is four-segment decimal value, two neighboring segments of which are separated by the character “.”. The maximum value of each segment should not exceed 255, and the highest segment should not exceed or be equal to 223 or be equal to 0. Normally, the first three segments represent the subnet number, whereas the last segment represents the host number within the subnet (what’s said here is based on the normal situation. There are also exceptions.) The IP address of the control card should be within the same subnet as that of the controlling host. If they are not in the same subnet, the value of mask should be properly adjusted (it is recommended the control card and the host be within the same subnet). Subnet mask: it is four-segment decimal value, two neighboring segments of which are separated by the character “.”. The maximum value of each segment should not exceed 255. This code is used to distinguish the dividing domain subnet number from that of the host number. Default mask: it is four-segment decimal value, two neighboring segments of which are separated by the character “.”. The maximum value of each segment should not exceed 255, and the highest segment should not exceed or be equal to 223 or be equal to 0. If the real gateway exists in the subnet, the user should fill out the IP address of the real gateway. If not, the default gateway should be set as the first host number in the subnet, like xxx . xxx . xxx . 1. Network adapter’s address (MAC): It is a six-segment hexadecimal value, two neighboring segments of which are separated by the character “.”. The maximum value of each segment should not exceed FF, and the highest segment should not be equal to 01. http://www.adtechcn.com 107 ) 7. Debugging and observing program running through serial interface ADT-8840 provides methods to help developers debug program through observation of the information on running. After serial interface 0 is connected to PC, run the serial-interface debugging software “SSCOM32.EXE”. Then the user can open or close the corresponding debugging information through the function “Uart_show(int dev_num,unsigned int on_off)” in the application. The definitions of the related values are as follows: on_off=0: close debugging information; on_off=1: display all debugging information; on_off=2: only display non-timed inquiry information. Chapter X Precautions and Troubleshooting ) Precautions For your safety: 1. Never attempt to open the machine shell without permission. 2. Cut off the power to the control card if it will not be used for an extended period of time. 3. Keep the control card away from dust and iron powder. Instructions: Improper use of the control card can lead to malfunction, or even cause damage to it. Please follow the instructions below when you use the control card. 1. If the output relay is a non-solid one, the user must install a follow-current diode in a parallel way on the coil. Check whether the power supply for each part is conforming so as to prevent the control card from being damaged by nonconforming power source. 2. The service life of the control card is subject to the ambient temperature. Therefore, if the temperature is too high at the site, the user should install a fan to disperse the heat. 3. Never use the control card in an environment with high temperature, high humidity, dust and erosive gases. 4. Use a rubber cushion as buffer where the vibration is violent. 5. The conforming power for ADT8840 is 24VDC. 6. The voltage of output circuit is 12VDC~24VDC, and 24VDC is a recommended value. ) Maintenance Caution before maintenance 1. Cut off the power supply for the main return circuit before any maintenance work is carried out. 2. The operator should make sure the power supply is cut off to avoid unexpected accident. Caution before power-on http://www.adtechcn.com 108 Check whether the wiring is correct before the system is electrified. Pay attention to the mutual influence between the high and low voltage (if you feel confused, refer to the wiring diagram of the joint box) 1. Check whether the driver’s current is excessively high or low and subdivision setup is correct. 2. Check whether the motor and the corresponding axis are correctly set. 3. Check whether the input and output circuits match each other. 4. Check whether the power switch of the control box is disconnected. Regular check Under normal operation conditions (daily average temperature: 30°C; load: 80%; running time: 12 h/day), carry out daily or regular check for the items below. ● Check whether the ambient temperature and humidity are Daily check Daily conforming and there is too much dust or other foreign objects. ● Check whether there is abnormal vibration or sound. ● Check whether the vents are jammed by yarns or other objects. ) Troubleshooting z Axis X, Y, Z or A doesn’t act 1). Check [basic-parameter setup] to see whether the output mode, direction, pulses per round and millimeters of axis X, Y, Z or A are correct. 2). Check [I/O diagnosis] of [IO detection] to see whether axis X, Y, Z or A has input limit signal. If it does, check the wiring. 3). Check whether the wiring between the motor and driver and the driver and board card are correct, and whether drover provide sufficient current to drive the motor. If it is a servo system, check whether its control mode is correct. (This software supports position control mode). 4). Check whether axis X, Y, Z or A is overloaded. z Abnormal sounds heard from axis X, Y, Z or A 1). Check whether the speed for axis X, Y, Z or A is set too high. Normally, when the stepping motor is not loaded, the speed should be uniformed as 5-6 r/s. If it is a servo system, the value is slightly higher than this. 2). Check whether the current provided by the driver is sufficient or excessively high. z Graphics generated by the system is not precise in size and has position deviation. 1). Check whether there is a clearance or belt’s ductility tolerance at axis X, Y, Z and U. 2). Check whether the millimeter/r and pulse/r values at each axis are accurate. http://www.adtechcn.com 109