1
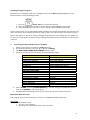
Hospitality Television
20/26/32HF5335D
15/20HF5234
-1-
Installation of your Philips Hotel TV
1.
Introduction
This addendum has been designed to help you install programmes on this Digital TV and activating the hotel
mode.
Use this addendum in conjunction with the User Manual of this television.
Please handle the TV with care and wipe with a soft cloth to ensure your TV keeps looking new.
2.
The benefits of the Philips hotel TV
This TV is specially designed for hotels. The Philips hotel TV offers all kind of features to
Maximise the convenience for the hotel and meet the needs for the guest
Welcome message to give a friendly welcome to your guest when activating the tv
Remote control features like low battery detection and an anti-theft screw for preventing of theft for
batteries
Access to the user menu can be blocked. This prevents users (e.g. guests) from deleting or changing
program settings and/or modifying picture and sound settings. This ensures that TVs are always set up
correctly.
A switch-on volume and programme can be selected. After switching on, the TV will always start on the
specified program and volume level.
The maximum volume can be limited in order to prevent disturbance.
The television keys VOLUME +/- , PROGRAM +/- and MENU can be blocked.
Screen information can be suppressed.
Programmes can be blanked
3.
Installing the channels
Installing Digital Programs (only applicable for 20/26/32HF5335D)
Ensure the TV is in Digital mode. If it is in Analogue mode, press the A/D (Analogue/Digital) key on the
Remote Control to enter the Digital mode.
1.
2.
5.
Press the
(Menu Digital) key on the Remote Control
Press the Up/Down Arrow Key to scroll to the item called INSTALLATION and press the Right Arrow
Key
Press the Up/Down Arrow Key to scroll to the item called SERVICE SETUP and press the Right Arrow
Key
Press the Up/Down Arrow Key to scroll to the item called REINSTALL ALL SERVICES and press the Right
Arrow Key
Press the Up/Down Arrow Key to scroll to the item called SEARCH and press OK to start the scan. The
6.
Press the OK key again to Store all the services that have been found.
3.
4.
TV will now start to scan and install all available (Digital) TV channels and Radio stations automatically.
When the scan is completed, the TV menu will indicate the number of digital services found.
-2-
Installing Analogue Programs
Ensure the TV is in Analogue mode. If it is in Digital mode, press the A/D (Analogue/Digital) key on the
Remote Control to enter the Analogue mode.
1.
2.
3.
Press the
(Menu TV) key on the Remote Control
Press the Up/Down Arrow Key to scroll to the item called INSTALL and press OK
Press the Up/Down Arrow Key to scroll to the item AUTO STORE and press OK
The TV will now start to scan and install all available (Analogue) TV channels automatically. This operation will
take a few minutes. The TV display will show the progress of the scan and the number of programmes found.
Refer to the chapter on Automatic Tuning of Analogue Programmes in the User Manual for more details. You
can also refer to the chapter on Manual Tuning of Analogue Programmes in the User Manual if a manual scan is
preferred.
4.
Activating the Hotel Mode Setup menu (BDS)
1.
2.
3.
4.
Switch on the television and select an analogue channel
On the Remote Control, press keys: [3, 1, 9, 7, 5, 3, MUTE]
The BDS HOTEL MODE SETUP MENU becomes visible
Use the cursor keys to select and change any of the following settings:
Function
BDS MODE
SWITCH ON SETTINGS
SWITCH ON VOLUME
MAXIMUM VOLUME
SWITCH ON CHANNEL
POWER ON
DISPLAY MESSAGE
WELCOME MESSAGE
CONTROL SETTINGS
LOCAL KEYBOARD LOCK
REMOTE CONTROL LOCK
OSD DISPLAY
HIGH SECURITY MODE
AUTO SCART
MONITOR OUT
BLANK CHANNEL
STORE
5.
6.
Possible selections
ON /OFF
0-100, LAST STATUS
0-100
USER DEFINED, LAST STATUS
ON/STANDBY/LAST STATUS
ON/OFF
LINE 1/LINE 2/CLEAR
ON/OFF/ALL
ON/OFF
ON/OFF
ON/OFF
ON/OFF
ON/OFF
ON/OFF
>
Select “STORE” and press [CURSOR RIGHT] to save the settings and exit BDS Hotel Mode
setup. Press [MENU] to exit without saving.
For BDS Hotel Mode settings to take effect, you must turn the TV set Off, then back On.
BDS Hotel Mode Functions
This paragraph describes the functionality of each item in the BDS Hotel Mode Setup menu.
BDS MODE
ON
BDS Hotel Mode is ON:
The user menu is blocked.
All settings of the Hotel Mode Setup menu are in effect.
-3-
OFF
BDS Hotel Mode is OFF:
The TV operates as a normal consumer TV
SWITCH ON VOL
When the user switches the TV ON, it will play at the specified volume level. There are 2 options:
LAST STATUS Upon start-up, the TV volume will be set to the level before the TV set was
last turned off.
USER DEFINED As specified by installer
Remark: “SWITCH ON VOL” cannot exceed the MAXIMUM VOL level. This is the volume level with which
the Hotel Mode Setup menu was entered.
MAXIMUM VOL
The TV Volume will not exceed the selected volume level.
SWITCH ON CHANNEL
When the user switches the TV ON, it will tune to the specified channel. There are 2 options:
LAST STATUS The TV will switch on to the last channel that was shown before the TV set
was turned off
USER DEFINED Any analogue channel can be chosen to be the first channel to switch on
POWER ON
The Power On function allows the TV to enter a specific mode of operation (On or Standby) after the mains
power is activated.
ON
When set, the TV will always turn ON after the mains power is enabled.
STANDBY
When set, the TV will always turn to STANDBY after mains power is enabled
LAST STATUS When set, the TV will always turn to the last power status before the mains power was
disabled.
DISPLAY MESSAGE
ON
Enables display of the Welcome Message for 30 seconds after the TV set is turned on
OFF
Disables the display of the Welcome Message.
If OSD DISPLAY is set to OFF, then the Welcome Message is automatically disabled.
WELCOME MESSAGE
The Welcome Message function allows the TV to show a customized greeting to the hotel guest whenever the
TV is switched on. This helps to personalize the hotel experience for guests.
The Welcome Message can consist of 2 lines of text, with each line containing a maximum of 20 alphanumeric
characters. Use the Remote Control arrow keys to create the Welcome Message.
To enable the display of the Welcome Message, the DISPLAY MESSAGE option must be ON
To clear the Welcome Message from the TV’s memory, select CLEAR
LOCAL KEYBOARD LOCK
ON
The television keys VOLUME +/-, PROGRAM +/- and MENU are blocked.
OFF
The television keys VOLUME +/-, PROGRAM +/- and MENU function normally
ALL
The television keys VOLUME +/-, PROGRAM +/-, MENU and POWER are blocked.
REMOTE CONTROL LOCK
ON
Standard Remote Control keys are disabled.
OFF
All Remote Control keys will function normally.
OSD DISPLAY
ON
Normal screen information is displayed (e.g. programme information)
OFF
Screen information is suppressed.
-4-
HIGH SECURITY MODE
ON
Allows access to the BDS Hotel Mode Setup Menu via the special BDS Setup Remote only.
(RC2573/01)
OFF
Allows access to the BDS Hotel Mode Setup Menu via BDS Setup Remote or via normal Remote
Control (using special key code sequence).
AUTO SCART
The Auto Scart function enables auto-detection of AV devices that are connected to the TV’s Scart connector.
ON
Enables Auto Scart switching in BDS Hotel Mode.
OFF
Disables Auto Scart switching in BDS Hotel Mode.
MONITOR OUT
ON
Allows audio & video output from TV via relevant AV connectors (if available).
OFF
Disables both Audio & Video output from the TV (to prevent illegal copying).
BLANK CHANNEL
The Blank Channel function disables the display of video on the TV, but does not affect the audio output. This
function can be used for audio applications (example: Off-air radio transmission, music channels, and so on),
which do not necessarily require the display of video.
ON
The current programme is blanked
OFF The current programme is not blanked (normal visible; DEFAULT value)
BLANK CHANNEL can be set for every channel. Use [P+ / P-] to go through all the programmes and set the
desired status per channel. The programme number is visible in the top left corner.
Low Battery Check
This television set has a special feature which checks the battery power level of a TV Remote Control, and
indicates if the battery is low and requires changing.
(Note: The Low Battery Check function works only with certain models of Remote Controls. Please check
with the Philips sales representative if the Remote Control used with this TV supports this function)
To activate the Low Battery Check function, hold the TV Remote Control in front of the TV, and press and
hold the OK button on the Remote Control for at least 5 seconds. A message will appear on the TV screen to
indicate if the battery power level is OK, or if it is Low. If the message indicates that the battery level is low, it
is recommended to change the batteries of the Remote Control immediately.
5.
Cloning of settings
Cloning of analogue TV channels and TV settings as described in the chapter
Hotel Mode Set-up menu
For 15/20HF5234
o Wireless cloning with the SmartLoader 22AV1120 or 22AV1135
o Cloning off all adjustable TV settings + analogue channel table
For 20/26/32HF5335D
o Wired cloning with the SmartLoader 22AV1135 using the wire packed with the SmartLoader
o Cloning off all adjustable TV settings + analogue channel table (digital channel table via automatic
installation)
Instruction for cloning of settings between TVs
Philips SmartLoader (22AV1135/00)
The Philips SmartLoader is an installation tool especially designed for easy and fast installation and copying of
TV settings on Philips Institutional TV’s.
-5-
The Philips SmartLoader works in 2 modes – Wireless and Wired:
Wireless mode ---- through infrared sensor (15/20HF5234)
Switch the SmartLoader to “Wireless” mode by sliding the side-switch to the
icon on the SmartLoader
device. Point the Wireless SmartLoader to the TV’s infrared receiver (optimal distance of 5-30cm) and proceed
with the Installation procedure listed below.
Wired mode ---- using the by-packed accessory cable(s) (20/26/32HF5335D)
Switch the SmartLoader to “Wired” mode by sliding the side-switch to the
device.
icon on the SmartLoader
Examine the rear connectors of the TV set to determine if the 3-pin or 4-pin female connector wire (packed
with the Wireless SmartLoader) should be used. Plug in the correct connector wire to the corresponding
opening on the TV set (usually marked as SERV C), and then connect the RJ11 jack end of the accessory wire
to the RJ11 socket on the SmartLoader.
The Installation Procedure consists of three simple steps:
1. Choosing a Master TV
The Master TV is the TV set whose installation and configuration settings are to be copied into other TV’s (of
the same type only).
2. Programming the SmartLoader with the settings from the Master TV
Follow these steps to program the SmartLoader with the settings of the Master TV.
a)
Wireless method
Set the SmartLoader to “Wireless” mode using the side switch.
Turn on the TV, and while holding the SmartLoader, point it in the direction of the
TV. Press the “MENU” Key on the SmartLoader.
b) Wired method
Connect the SmartLoader to the TV using the appropriate accessory cable.
Set the SmartLoader to “Wired” mode using the side switch.
Turn on the TV, and while holding the SmartLoader, point it in the direction of the
TV. Press the “MENU” Key on the SmartLoader.
The Master TV will show the following menu:
SMARTLOADER TO TV >
TV TO SMARTLOADER >
On the TV screen, highlight the menu option “TV TO SMARTLOADER”
Press the right arrow key on the SmartLoader to start the programming process
A number display (from 0~100) will be shown on screen, indicating the percentage of the programming
progress from the TV to the SmartLoader. When the programming is completed, “##” will show “100” and the
message “DONE” will appear.
TV TO SMARTLOADER ## (0-100)
The SmartLoader is programmed and can be used to install and configure other TVs.
Copying the settings of the Master TV to other TVs with the SmartLoader
Follow these steps to install and configure the settings of a Philips TV with the SmartLoader.
-6-
a) Wireless method
Set the SmartLoader to “Wireless” mode using the side switch.
Turn on the TV, and while holding the SmartLoader, point it in the direction of the
TV. Press the “MENU” Key on the SmartLoader.
b) Wired method
Connect the SmartLoader to the TV using the appropriate accessory cable.
Set the SmartLoader to “Wired” mode using the side switch.
Turn on the TV, and while holding the SmartLoader, point it in the direction of the
TV. Press the “MENU” Key on the SmartLoader.
On the TV screen, highlight the menu option “SMARTLOADER TO TV”
Press the right arrow key on the SmartLoader to initiate the copying process
> A number display (from 0~100) will be shown on screen, indicating the percentage of the installation
progress from the SmartLoader to the TV. When the data transfer is completed, “##” will show “100” and
the message GOODBYE will appear.
SMARTLOADER TO TV ## (0-100)
>
The TV will go to Standby mode. When the TV is next powered on, it will be configured with the settings
from the Master TV, and ready for use.
Problems and Solutions:
1.
The message “I2C ERROR” is displayed on the screen.
Bad connection of RJ11 wire or wrong data transmission has occurred. Try again.
2.
The message “WRONG VERSION” is displayed on the screen.
The program contained in the SmartLoader has a software code incompatible with the actual TV.
Reprogram the Wireless SmartLoader from a Master TV whose software code is compatible with the
actual TV.
3.
TV doesn’t respond to the SmartLoader.
Check if the LED on the SmartLoader lights up in green when pressing any button.
If the LED is red, it means that the batteries are low and should be replaced.
Bring the SmartLoader closer to the TV infrared receiver and try again.
Notes:
Make sure that the 3 R6/AA sized batteries are placed correctly in the bottom compartment of the
SmartLoader. The LED on the SmartLoader should light up in green when pressing any button, indicating
operational batteries. When the LED shows red, the batteries need to be replaced.
The SmartLoader can only copy the settings between 2 TVs of the same type. Once the
SmartLoader is programmed with the settings from a Master TV of a certain type or model,
then these settings can be installed on another TV of the same model only.
The SmartLoader cannot be used to copy the (digital) channel table of a Digital TV set.
If the SmartLoader is used with a DVB (European Digital) TV set, then the TV set must first
be switched to Analog mode.
-7-
Disposal of your old product.
Your product is designed and manufactured with high quality materials and
components, which can be recycled and reused. When this crossed-out wheeled bin
symbol is attached to a product it means the product is covered by the European
Directive 22002/96/EC. Please find out more about the separate collection system for
electrical and electronic products in your local neighborhood.
Please act according to your local rules and do not dispose of your old products with
your normal household waste. The correct disposal of your old product will help
prevent potential negative consequences for the environment and human health.
The packaging of this product is intended to be recycled. Apply to the
local authorities for correct disposal.
2007© Koninklijke Philips Electronics N.V. all rights reserved
Specifications are subject to change without notice
Trademarks are property of Koninklijke Philips Electronics N.V. or their respective owners.
-8-