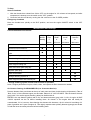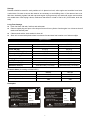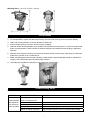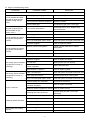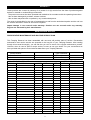
1
R
INSTRUCTION MANUAL
TAMPING RAMMER
MR68H/MR75R
!
WARNING
To reduce the risk of injury, all operators and maintenance personnel must read and understand these
instructions before operating, changing accessories, or performing maintenance on Masalta power
equipment. All possible situations cannot be covered in these instructions. Care must be exercised
by everyone using, Maintaining or working near this equipment.
Contents
Introduction……………………………………………………………………………………………………………1
Application …………………………………………………………………………………………………..……….1
Operating safety………………………………………………………………………………………………..… 2-3
Prior to Starting the Operation …………………………………………………………………………………..3-4
Operation ………………………………………………………………………………………………………… 4-5
Service and Maintenance ……………………………………………………………………………………… 5-6
Specification ………………………………………………………………………………………………………6-7
Transportation ……………………………………………………………………………………………………….7
Trouble shooting ………………………………………………………………………………………………….7-8
Warranty and Maintenance Record …………………………………………………………………………….. 9
EC Declaration ……………………………………………………………………………………………………. 10
Introduction
Thanks for your selection of this equipment. We have taken care in the design, manufacture and testing of
the product. It is covered by a six month warranty. Should service or spare parts be required, prompt and
efficient service is available from our company or our agent.
Definition of Tamping Rammer
Tamping Rammer is a compacting machine, capable of quickly working by applying consecutive impacts to
the surface of soil-in order to level the uneven soil surface, to compact the soil uniformly so that the void
among soil particles are minimized and to increase its dry density with moisture in the soil removed.
Construction of Tamping Rammer
Air-cooled engine has bee installed as its source of power.
Transmission of the power is taken place by increasing engine speed to engage a centrifugal clutch, and
the speed is substantially reduced by means of gears and rotational motion is converted into reciprocal
(vertical) motion.
A heavy duty spring is installed at the part that moves up and down so that its force and the weight of
tamping rammer work each other to develop powerful compacting force at the foot of the rammer. Proper
service and operation are essential for full commissioning of such performance.
Application
Rammers are designed to compact loose soils and gravel to prevent settling and to provide a firm, solid
base for the placement of footings, concrete slabs, foundations, gas piping works, water pipe works and
cable backfill works, etc.
Warnings for incorrect application and abuse
Please do not use in such as following cases. It may cause damage because machine is likely to be
unbalanced.
Pile foundation
Hard soil excessively compacted over normal condition
Steep bank slope
Tamping Rammer is to be used for compacting cohesive clay, gravels, and patching work on asphalt, etc.
1
Structure
The upper part is made up of Power source, Clutch, Connecting Rod and Operating Handle, Fuel Tank that
connected via Shock Absorbing Rubber to body. Bottom end is made up of Spring Cylinder (Sliding part),
Foot Plate that ramps body, Foot and Bellows that covers sliding part.
Operating Safety
Safety Notes
This manual contains NOTES, CAUTIONS, and WARNINGS which must be followed to prevent the
possibility of improper service, damage to the equipment, or personal injury.
Notes: Notes contain additional Information important t a procedure.
CAUTION: Cautions provide information important to prevent Errors which could damage machine or
components.
WARNING
Warnings warn of conditions or practices which could
lead to personal injury or death!
Operating Safety
Familiarity and proper training are required for the safe operation of equipment! Equipment operated
improperly or by untrained personnel can be dangerous! Read the operating instructions and familiarize
yourself with the location and proper use of all instruments and controls. Inexperienced operators should
receive instruction from someone familiar with the equipment before being allowed to operate the rammer.
NEVER operate rammer in applications for which it is not intended.
NEVER allow improperly trained personnel to operate rammer.
NEVER touch hot muffler, engine cylinders, or cooling fins. Burns will result.
NEVER use accessories or attachments which are not recommended by MASALTA for rammer. Damage
to rammer and/or injury to user may result.
NEVER leave a running machine unattended.
NEVER run machine indoors or in an enclosed area such as a deep trench unless adequate ventilation
is provided. Exhaust gas from the engine contains poisonous carbon monoxide gas; exposure to carbon
monoxide can cause loss of consciousness and may lead to death.
NEVER tamper with or disable the function of operating controls.
NEVER use choke to stop engine.
NEVER operate the machine in areas where explosions may occur.
ALWAYS remove or disconnect engine spark plug before servicing rammer, to avoid accidental start-up.
ALWAYS read, understand, and follow procedures in Operator’s Manual before attempting to operate
equipment.
ALWAYS be sure that all other persons are at a safe distance from the rammer. Stop the machine if
people step into the working area of the machine.
ALWAYS be sure operator is familiar with proper safety precautions and operation techniques before
using rammer.
ALWAYS wear protective clothing when operating rammer. Wear goggles or safety glasses, hearing
protection, and safety shoes.
ALWAYS keep hands, feet, and loose clothing away from moving parts of rammer.
ALWAYS use common sense and caution when operating rammer.
2
ALWAYS be sure rammer will not tip over, roll slide, or fall when not being operated.
ALWAYS turn engine OFF when rammer is not being operated.
ALWAYS guide the rammer in such a way that the operator is not squeezed between the rammer and
solid objects. Special care is required when working on uneven ground or when compacting coarse
material. Make sure to stand firmly when operating the machine under such conditions.
ALWAYS operate the rammer in such a way that there is no danger of it turning over or falling in, when
working near the edges of breaks, pits, slopes, trenches and platforms.
Operator Safety while using Internal Combustion Engines
Internal combustion engines present special hazards during operation and fueling! Failure to follow the
safety guidelines described below could result in severe injury or death.
WARNING
DO NOT smoke while operating rammer.
DO NOT smoke when refueling engine.
DO NOT refuel hot or running engine.
NO NOT refuel engine near open flame.
DO NOT spill fuel when refueling engine.
DO NOT operate rammer near open flames.
ALWAYS refill fuel tank in well-ventilated area.
ALWAYS replace fuel tank cap after refueling.
ALWAYS check fuel lines, fuel cap, and fuel tank for leaks
and cracks before starting engine. Do not run machine if fuel
leaks are present, or fuel cap or fuel lines are loose.
Service Safety
Poorly maintained equipment can become a safety hazard! In order for the equipment to operate safely
and properly over a long period of time, periodic maintenance and occasional repairs are necessary.
WARNING
ALWAYS replace safety devices and guards after
repairs and maintenance.
ALWAYS keep area around muffler free of debris in
order to reduce to chance of an accidental fire.
ALWAYS do Periodic Maintenance as recommended
in Operator’s Manual.
ALWAYS clean debris from engine cooling fins.
ALWAYS replace worn or damaged components with
spare parts designed and recommended by
MASALTA for servicing this rammer.
DO NOT attempt to clean or service rammer while it
is running.
DO NOT operate rammer with safety devices or
guards removed or not in working order.
DO NOT operate rammer without air cleaner.
DO NOT remove air cleaner paper element,
precleaner, or air cleaner cover while operating
rammer.
DO NOT alter engine speeds. Run engine only at
speeds specified in Technical Data Section.
Prior to Starting the Operation
This machine is of oil bath lubrication system.
Check the oil level through a window at rear end of the foot. Replenish oil if oil is not visible at the
window. For lubrication, use automobile engine oil of 10W-30 SE, SF or better grade. Capacity is
830cc.
Fill the fuel tank with regular gasoline (unleaded). Simultaneously, check engine oil and make it a habit
to replenish on the earlier side. Low lubrication oil level may result in engine seizure due to
3
consumption during operation. Nevertheless, oil level should be checked prior to start up without fail.
For lubrication, use automobile engine oil of 10W-30 SE, SF or better grade. See Engine Operating
Manual for further detail.
Check every bolt, nut or screwed area for tightness. Loosened due to vibration may result in
unexpectedly serious trouble. Be sure to tighten any screwed area.
Remove dirt and dust. Particularly clean the vicinity of recoil starter and foot.
Operation
Starting up for Petrol engine
1. Open the fuel shut-off valve by moving the fuel cock level to the open position.
2. Set the engine ON/OFF switch to the “ON” position.
3. Grip the recoil starter handle and pull it until you feel slight resistance. Then pull sharply and quickly.
Return the recoil starter handle to the starter case before releasing.
4. Grip the recoil starter handle and pull it a little to feel a slight resistance. Then pull it powerfully from
there. To release the handle do not release it at the position where it has been pulled to, but release it
after returning closely to the starter case.
5. If the engine has started, while listening to explosion sounds, return the choke lever slowly to full-open
position. Be sure to perform a warm-up run for the period 3 to 5 minutes at low speed, while paying
careful attention to gas leakage or abnormal sound.
6. If it is difficult to start the engine by repeatedly pulling the starter rope, remove ignition plug and check
the sparking performance. If the plug is wet due to excessive fuel intake or soiled, replace the coil or
clean sufficiently to its internals. With the ignition plug removed, pull the recoil starter handle 2-3 times
to discharge excessive blended gas.
Starting up for machine
1. Turning the choke level to open the choke. Running the engine for 5 minutes at low speed to warm the
engine.
2. Move the throttle level quickly to the “FULL OPEN” position. DO NOT move the throttle level slowly as
this may cause damage to the clutch or spring.
Caution: Make sure that the throttle lever is moved to the FULL OPEN position. Operating the rammer at
less than full speeds can result in damage to the clutch springs or foot.
3. After starting to tamping action, adjusts the jumping motion to suit particular soil condition by lightly
controlling the throttle lever. When the engine speed falls between the set values shown on the engine,
your work can be carried out at the best efficiently. Increasing the engine speed unnecessarily, does
not cause the compaction force to increase. On the contrary, a resultant resonance causes the
compaction force to decrease, damaging the machine.
4. Under cold weather, the oil in the machine being viscous, resistance at reciprocating part is greater
causing the tamping rammer to perform somewhat irregular movement. Therefore, it is recommended
to perform warm-up run while moving the throttle lever repeatedly between ON and OFF positions,
before entering the work.
5. Soil contacting surface of the foot is lined with heat-treated metal sheet for extra strength. However, for
compacting cobblestone, use the filling-up soil for example so that the foot hits the soil uniformly.
6. The tamping rammer has been designed to advance while jumping. For quicker advance, erect the
machine by pushing its handle down slightly so that flat surface of the foot at its rear-end contacts the
ground.
7. To stop the tamping action, move throttle lever quickly from the FULL OPEN to IDLE position.
4
To Stop
Normal shutdown
1. With the throttle lever closed from ON to OFF, run the engine for 3-5 minutes at low speed, and after
temperature is lowered, turn the switch to the “OFF” position.
2. Close the fuel shut-off valve by moving the fuel cock lever to the CLOSED position.
Emergency shutdown
Move the throttle lever quickly to the IDLE position, and turn the engine ON/OFF switch to the OFF
position.
Maintenance and Storage:
Periodic Maintenance Schedule
Daily
Before
Starting
After
First
5
hours
Every
Week
or
25 hours
Tighten ramming shoe hardware.
●
●
Check and tighten engine cylinder screws.
●
●
Check and tighten external hardware.
●
●
Check fuel level.
●
Check oil level of machine.
●
Check fuel line and fittings for cracks or
leaks.
●
Clean engine cooling fins.
●
Clean and check spark plug gap.
●
Every
month
or
100 hours
Every
3 months
or
300 hours
●
Replace spark plug.
Clean recoil starter.
●
Change ramming system oil. *
●
Clean engine muffler and exhaust port.
●
* Change ramming system oil after first 50 hours of operation.
Note: If engine performance is poor, check, clean, and replace air filter elements as needed.
Air Cleaner Cleaning for MR68H/MR75R (6 to 12 months Service):
Remove element from pre-cleaner at the top of crank case and clean it with cleaning oil (kerosene). Take of
‘Bolt, Cover’ of the crankcase upper part and take ‘Element’ off ‘AIR CLEANER’. Wet the bottom element
(gray) with 7-9cc and let upper element (yellow) be familiar with oil.
MR75R is the top element (yellow) with 2-5cc and bottom element (gray) with 13-15cc of engine oil SAE
10W-30 squeeze out the oil before installing them. Air cleaner of the engine side will hardly be
contaminated. If it is, however, after cleaning the element with kerosene, dip it in mixed oil consisting of 3
parts of gasoline and 1 part of engine oil. Then tightly squeeze outer primary element (sponge) and shake
off well the inner secondary element before installing them.
5
Storage
Rammer should be stored in such position as it is placed on level, after engine and machine have been
cooled down. Be sure to secure the rammer as necessary to avoid falling down. If the rammer has to be
laid down inevitably, tighten fuel tank cap and engine oil plug securely and wait until engine and machine
are cooled down. After laying it down, make sure that there is no leak of fuel or oil. (If fuel leaks, drain the
tank)
Long-Term Storage
Drain fuel from fuel tank, fuel line and carburetor.
Remove spark plug and pour a few drops of motor oil into cylinder. Crank engine 3 to 4 times so that oil
reaches all internal parts.
Clean exterior with a cloth soaked in clean oil.
Store unit covered with plastic sheet in moisture free and dust free location out of direct sunlight.
Specification
Model
MR68H
MR75R
Petrol, Honda GX100
Petrol, Robin EH12-2D
Power kW (hp)
2.2 (3.0)
3.0 (4.0)
Operation Mass kg (lbs)
68 (149)
75 (165)
Percussion Rate per min.
650-695
640-680
Impact Force kg
1300
1400
Jumping Stroke mm
40-85
40-80
Fuel Tank Capacity l
2.8
2.8
Shoe Size mm (in)
330x285 (13x11)
330x285 (13x11)
Dimension mm (in)
430x760x1020 (17x31x40)
430x760x1020 (17x31x40)
Motor
Acoustic Noise (According to 2000/14/EC)
MR68H
MR75R
Measured sound power level
105dB
105dB
Guaranteed sound power level
107dB
107dB
2dB
2dB
Uncertainty
Nameplate
MODEL / MODELE / MODELO
MR68H
OPERATION MASS. / POIDS TOTAL /
68
Kg
PESO OPERATIRO
OUTPUT / PUISS. MAXI. /
MODEL / MODELE / MODELO
MR75R
OPERATION MASS. / POIDS TOTAL /
75
Kg
3.0
Kw
PESO OPERATIRO
2.2
OUTPUT / PUISS. MAXI. /
Kw
POTENCIA MAX.
POTENCIA MAX.
MANUF. YR. / FABRICATION ANNEE /
MANUF. YR. / FABRICATION ANNEE /
2006
FABRICACION ANO
SERIAL NO. / N. DE SERIE / N. SERIE
2006
FABRICACION ANO
H68H06
SERIAL NO. / N. DE SERIE / N. SERIE
H75R06
Masalta Engineering Co., Limited
Masalta Engineering Co., Limited
Fortune Plaza, No.278 of Suixi Rd., Hefei China
Http://www.masalta.com.cn
Fortune Plaza, No.278 of Suixi Rd., Hefei China
Http://www.masalta.com.cn
6
Working Size (L x W x H): 76 x 43 x 102 cm
Transportation
1.
2.
3.
4.
5.
Shutdown engine for transportation.
For transportation, tighten fuel tank cap securely and close fuel cock to prevent fuel from spilling.
Drain fuel for transportation over long distance or bad road.
Secure machine firmly to prevent it from moving or tipping.
Rammer should be transported in such position as it is placed on level ground. In case of it must be laid
down for transportation, drain fuel tank as well as carburetor and make sure that oil plug is tightened
securely.
6. Direction to lay down the rammer, must be such that air cleaner comes to top. After laying it, make sure
that there is no leak of oil or residual fuel.
7. Make sure lifting device has enough capacity to hold machine (see identification plate on machine for
weight). Use central lifting point (a) when lifting machine.
8. Use trolley kit (supplied as optional) for short distance transportation.
Troubleshooting Guide
A. Rammer Troubleshooting
SYMPTOM
Engine rotates
but amplitude
not uniform or
does not strike
POSSIBLE PROBLEM
SOLUTION
Operating speed of throttle
lever is incorrectly set?
Set throttle lever to correct position.
Oil in excess?
Drain excess oil. Bring to correct level.
Clutch slips?
Replace or adjust clutch.
Spring Failure?
Replace spiral spring.
Speed of engine improper?
Adjust engine speed to correct operating RPM setting.
7
B. Engine Troubleshooting Guide
SYMPTOM
POSSIBLE CAUSE
SOLUTION
Difficult to start
Fuel is available but spark
plug will not ignite.(Power
available at high tension
code.)
fuel is available but spark
plug will not ignite.(Power
NOT available at high
tension code.)
Fuel is available and spark
plug ignites (compression
normal).
Fuel is available and spark
plug ignites (compression
normal).
Ignition plug being bridging?
Check ignition system.
Carbon deposit at ignition?
Clean or replace ignition.
Short circuit due to deficient insulator?
Replace insulators.
Improper spark gap?
Set spark plug gap to the correct gap.
Short circuit at stop switch?
Check stop switch circuit. Replace stop
switch if defective.
Ignition coil defective?
Replace ignition coil.
Muffler clogged with carbon deposits?
Clean or replace muffler.
Mixed fuel quality is inadequate?
Check fuel to oil mixture.
Fuel in use inadequate (water, dust)?
Flush fuel system and replace with fresh fuel.
Air cleaner clogged?
Clean or replac air cleaner.
Defective cylinder head gasket?
Tighten cylinder head bolts or replace
head gasket.
Cylinder worn?
Replace cylinder.
Spark plug loose?
Tighten spark plug.
Air cleaner clogged?
Clean or replace air cleaner.
Operation not satisfactory
Not enough power available Air in fuel line?
(compression normal, no
Fuel level in carburetor float
missfiring)
chamber improper?
Bleed (remove air) from fuel line.
Adjust carburetor float.
Carbon deposit in cylinder?
Clean or replace cylinder.
Ignition coil defective?
Not enough power available
(compression normal, no
Ignition plug often shorts?
missfiring)
Fuel in use inadequate (water, dust)?
Engine overheats.
Flush fuel system and replace with fresh fuel.
Replace ignition wires, clean ignition.
Flush fuel system and replace with fresh fuel.
Mixed fuel quality is inadequate?
Check fuel to oil mixture.
Excessive carbon deposition in
combustion chamber?
Clean or replace crankcase.
Exhaust or muffler clogged with carbon? Clean or replace muffler.
Spark plug heat value incorrect?
Replace spark plug with correct type
spark plug.
Governor adjustment improper?
Adjust governor to correct lever.
Gvoernor spring defective?
Clean or replace ignition.
Fuel flow erractic?
Check fuel line.
Air taken in through suction line?
Check suction line.
Dust in rotating part?
Clean recoil starter assembly.
Spring spring failure?
Replace sprial spring.
Rotational speed fluctuates.
Recoil starter not working
properly.
8
WARRANTY
These products are covered by warranty for a period of six (6) months from the date of purchase against
defects in material or workmanship provided that:
· The product concerned has been operated and maintained in accordance with the operating instructions.
· Has not been damaged by accident, misuse or abuse.
· Has not been tampered with or repaired by any unauthorized person.
The owner is responsible for the cost of transportation to and from the authorized repairer and the unit is at
the owners risk while in transit to and from the repairer.
Impact damage is not covered under warranty. Clutches are not covered under any warranty.
Engines are warranted by their manufacturer.
MAINTENANCE RECORD
PREVENTATIVE MAINTENANCE AND ROUTINE SERVICE PLAN
This Tamping Rammer has been assembled with care and will provide years of service. Preventative
maintenance and routine service are essential to the long life of your Tamping Rammer. After reading
through this manual thoroughly, you will find that you can do some of the regular maintenance yourself.
However, when in need of parts or major service, be sure to see your dealer. For your convenience we
have provided this space to record relevant data about your Tamping Rammer.
Invoice Number:
Date Purchased:
Serial Number:
REPLACEMENT PARTS USED
PART NO. DESCRIPTION
Type of Machine:
Dealer Name:
Dealer Phone:
QUANTITY COST
9
DATE
MAINTENANCE LOG
DATE
OPERATION
EC DECLARATION OF CONFORMITY/DECLARATION CE DE CONFORMITE/DECLARACÓIN DE CONFORMIDAD CE/
DECLARÇÃO CE DE CONFORMIDADE/EG-VERKLARING VAN OVEREENSTEMMING
GB
We, Masalta Engineering Co., Limited, RM 501, Fortune Plaza, No.278 of Suixi Rd., Hefei
230041, China, hereby certify that if the product described within this certificate is bought
from an authorised Masalta dealer within the EEC, it conforms to the following EEC
directives: 98/37/EC (This directive is a consolidation of the original machinery directive
89/392/EEC), Electromagnetic Compatability Directive 89/336/EEC (as amended by
92/31/EEC & 93/68/EEC).
F
Nous soussignons, Masalta Engineering Co., Limited, RM 501, Fortune Plaza, No.278 of
Suixi Rd., Hefei 230041, China, certifions que si le produit décrit dans ce certificat est achet
é chez un distributeur autorisé Masalta au sein de la CEE, il est conforme aus norme CEE
ci-après: 98/37/CE (cette norme est une codification des normes de la machine d'origine
89/392/CEE), Norme compatible pour I'électromagnisme 89/336/CEE (modifié par
92/31/CEE et 93/68/CEE).
E
La Sociedad, Masalta Engineering Co., Limited, RM 501, Fortune Plaza, No.278 of Suixi
Rd., Hefei 230041, China, por el presente documento certifica que si el producto descrito en
este certificado es comprado a un distribuidor autorizado de Masalta en la CEE, este es
conforme a las siguientes directivas: 98/37/CE de la CEE (Esta directiva consolida la
directiva inicial sobre maquinaria 89/392/CEE), Directiva 89/336 CEE sobre Compatibilidad
Electromagnética (según enmiendas 92/31.CEE y 93/68/CEE).
P
O signatário, Masalta Engineering Co., Limited, RM 501, Fortune Plaza, No.278 of Suixi
Rd., Hefei 230041, China, pelo presente, declara que se o produto descrito neste certificado
foi adquirido a um distribuidor autorizado do Masalta em qualquer pais da UE, está em
conformidade com o estabelecido nas seguintes directivas comunitárias: 98/37/EC (esta
directive é uma consolidaçã o da directive de maquinaria original 89/392/EEC), Directiva de
Compatibilidade Electromagnética 89/336/EEC (conforme corrigido pelas 92/31/EEC &
93/68 EEC).
NL
Ondergetekende, Masalta Engineering Co., Limited, RM 501, Fortune Plaza, No.278 of Suixi
Rd., Hefei 230041, China, verklaren hierbii dat als het product zoals beschreven in dit
certificaat is gekocht van een erkende Masalta dealer binnen de EEG, het voldoet aan de
volgnede EEG richtlijnen: 98/37/EC (Deze richtlijn is een opvolger van de orginele
Machinerichtlijn 89/392/EEG), Electromagnetische Compatability Richtlijn 89/336/EEG
(geamendeerd door 92/31/EEG & 93/68 EEG).
Signed by:
Managing Director
Signature:
Le Directeur Général
Medido por:
Director Gerente
Assinado por:
Getekend door:
Director-Geral
Tony Hoo
Algemeen Directeur
10
Distributed By
MASALTA ENGINEERING CO., LTD
Add:RM 501, Fortune Plaza, No.278 of Suixi Rd., Hefei 230041,China
Tel: 86-551-5609770, 5609780
Fax: 86-551-5609010, 5609444
E-mail: [email protected], [email protected]
Http://www.masalta.com.cn
Version: 01/06/01
Printed:06/2006