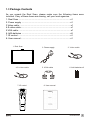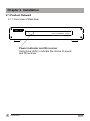
1
ZINWELL
ZINWELL
ZINWELL
ZINWELL
ZINWELL
ZINWELL
ZINWELL
ZINWELL
ZINWELL
ZINWELL
ZINWELL
ZINWELL
ZINWELL
ZINWELL
ZINWELL
ZINWELL
ZINWELL
ZINWELL
ZINWELL
ZINWELL
ZINWELL
ZINWELL
ZINWELL
ZINWELL
ZINWELL
ZINWELL
ZINWELL
ZINWELL
ZINWELL
ZINWELL
ZINWELL
ZINWELL
ZINWELL
ZINWELL
ZINWELL
ZINWELL
ZINWELL
ZINWELL
ZINWELL
ZINWELL
ZINWELL
ZINWELL
ZINWELL
ZINWELL
ZINWELL
ZINWELL
ZINWELL
ZINWELL
ZINWELL
ZINWELL
ZINWELL
ZINWELL
ZINWELL
ZINWELL
ZINWELL
ZINWELL
Real
Scan
ZINWELL
ZINWELL
ZINWELL
ZINWELL
ZINWELL
ZINWELL
ZINWELL
ZINWELL
ZINWELL
ZINWELL
ZINWELL
R
ZINWELL
ZINWELL
ZINWELL
ZINWELL
ZINWELL
ZINWELL
PV-310 series
ZINWELL
ZINWELL
ZINWELL
ZINWELL
User
Manual
ZINWELL
ZINWELL
ZINWELL
ZINWELL
ZINWELL
ZINWELL
ZINWELL
ZINWELL
ZINWELL
ZINWELL
ZINWELL
ZINWELL
ZINWELL
ZINWELL
ZINWELL
ZINWELL
ZINWELL
ZINWELL
ZINWELL
ZINWELL
ZINWELL
ZINWELL
ZINWELL
ZINWELL
ZINWELL
ZINWELL
ZINWELL
ZINWELL
ZINWELL
ZINWELL
ZINWELL
ZINWELL
ZINWELL
ZINWELL
Table of Contents
Chapter 1 Introduction
1.1 Important Notices............................................................................................... 2
1.2 Product Functions.............................................................................................. 2
1.3 Package Contents.............................................................................................. 3
Chapter 2 Installation
2.1 Product Outward................................................................................................ 4
2.1.1 Front view of Real Scan................................................................................4
2.1.2 Rear view of Real Scan............................................................................... 5
2.2 System Installation............................................................................................. 6
Chapter 3 Operation Instruction
3.1 Initial Setting....................................................................................................... 7
3.2 IR Control............................................................................................................ 8
3.3 Advanced Setting............................................................................................... 9
3.3.1 MAIN MENU.................................................................................................. 9
3.3.2 PICTURE setting.......................................................................................... 9
3.3.3 OSD setting................................................................................................... 10
3.3.4 PREFERENCE setting.................................................................................11
Chapter 4 Other Information
4.1 Troubleshooting..................................................................................................12
4.2 Specifications......................................................................................................13
Table of Contents
1
Chapter 1 Introduction
Thanks for your purchase of Zinwell Real Scan. With Real Scan, you can turn your
existing standard video to a high quality on your display devices. The system set
up is very easy and there is no additional requirement for hardware or software.
You don't need to learn a complicated set up procedure and you can enjoy your
Real Scan with just plug and play.
1.1 Important Notices
Please use the Real Scan under a normal environment
1. Try to avoid the following circumstances.
Heat or direct sunlight places
Location with huge magnetic field
Unstable or vibrational places
Exposure to rain or moisture places
2. For the unauthorized person, please don't service this product ; otherwise the
damage caused by unauthorized servicing is not covered by warranty.
3. Unplug this product from AC outlet and remove batteries from IR control, when
this product is left unused for a long time.
1.2 Product Functions
With the advanced video processing technology to improve video quality.
Double scan conversion (15.75 KHz to 31.5 KHz) and 3:2 pull down technology.
Full screen, true color display.
Easy operation - With one button to switch signals coming from composite
VIDEO, S-VIDEO.
On screen display operation with IR remote controller.
2
Introduction
1.3 Package Contents
As you unpack the Real Scan, please make sure the following items were
included. If any of these items are missing, call your local agencies.
1. Real Scan .......................................................................................x1
2. Power supply ..................................................................................x1
3.Video cable.......................................................................................x1
4.S-video cable....................................................................................x1
5.VGA cable.........................................................................................x1
6. AAA batteries ..................................................................................x2
7. IR control.........................................................................................x1
8. User manual....................................................................................x1
1. Real Scan
4.S-video cable
7. IR control
2. Power supply
3. Video cable
6. AAA batteries x2
5. VGA cable
8. User manual
ZINWELL
ZINWELL
ZINWELL
ZINWELL
ZINWELL
ZINWELL
ZINWELL
ZINWELL
ZINWELL
ZINWELL
ZINWELL
ZINWELL
ZINWELL
ZINWELL
ZINWELL
ZINWELL
ZINWELL
ZINWELL
ZINWELL
ZINWELL
ZINWELL
ZINWELL
ZINWELL
ZINWELL
ZINWELL
ZINWELL
ZINWELL
ZINWELL
ZINWELL
ZINWELL
ZINWELL
ZINWELL
ZINWELL
ZINWELL
ZINWELL
ZINWELL
ZINWELL
ZINWELL
ZINWELL
ZINWELL
ZINWELL
ZINWELL
ZINWELL
ZINWELL
ZINWELL
ZINWELL
ZINWELL
ZINWELL
ZINWELL
ZINWELL
ZINWELL
ZINWELL
PV-310 series
ZINWELL
ZINWELL
ZINWELL
ZINWELL
ZINWELL
ZINWELL
ZINWELL
ZINWELL
Real
Scan
ZINWELL
ZINWELL
ZINWELL
ZINWELL
ZINWELL
ZINWELL
ZINWELL
ZINWELL
ZINWELL
ZINWELL
ZINWELL
ZINWELL
R
ZINWELL
ZINWELL
ZINWELL
ZINWELL
ZINWELL
ZINWELL
ZINWELL
ZINWELL
ZINWELL
ZINWELL
ZINWELL
ZINWELL
User
Manual
ZINWELL
ZINWELL
ZINWELL
ZINWELL
ZINWELL
ZINWELL
ZINWELL
ZINWELL
ZINWELL
ZINWELL
ZINWELL
ZINWELL
ZINWELL
ZINWELL
ZINWELL
ZINWELL
ZINWELL
ZINWELL
ZINWELL
ZINWELL
ZINWELL
ZINWELL
ZINWELL
ZINWELL
ZINWELL
ZINWELL
ZINWELL
ZINWELL
ZINWELL
ZINWELL
ZINWELL
ZINWELL
Introduction
3
Chapter 2 Installation
2.1 Product Outward
2.1.1 Front view of Real Scan
RealScan-PROGRESSIVE
PV-310
Power indicator and IR receiver
Using blue LED to indicate the status of power
and IR receiver
4
Installation
2.1.2 Rear view of Real Scan
5
4
3
2
1
1
VIDEO INPUT
Please connect the external video from VCR, LD, V8 or video game to the
VIDEO INPUT of box.
2
S-VIDEO INPUT
If the external video is s-video, please connect to the S-VIDEO INPUT of box.
3
VGA OUTPUT
Please use the VGA OUTPUT to your progressively scanned TV or projector.
4
DC IN
Please connect to your 12V power supply.
POWER
Switch between power-on and power-off.
5
Installation
5
2.2 System Installation :
Progressively
Big Screen
scanned
TV
TV
or
projector
Video cable
DVD/VCR/LD/IRD
S-VIDEO cable
Camera
Video game
Adapter
Please turn off the power of all devices before connection.
6
Installation
Chapter 3 Operation Instruction
3.1 Initial Setting
When you finished the connections of Real Scan, because all the function settings
are in the IR control, please refer to the following instructions of IR control and
start the system setting.
Steps:
1. Please install 2 AAA batteries into IR control.
2. Please refer to p6 for your configuration.
3. Turn on the power.
4. Press the "C-Video" or "S-Video" button to select signal source.
Operation Instruction
7
3.2 IR Control
1 POWER
Switch between power-on
2
Select
Select the currently
highlighted menu item
3 Exit
Exit the current menu
selection and return to
the parent menu. Press
this key repeatedly to
close all menus.
8 Res.
Select resolution of
1024x768, 800x600 and
640x480.
7 Menu
Display the main menu
6
Adjust the selected item on
menu or adjust the volume
Press to select desired item
on the menu or select
4 C-video
Composite Video select.
5 S-video
S-Video select
8
Operation Instruction
3.3 Advanced Setting
3.3.1 MAIN MENU
The MAIN MENU shown below displays when you press "Menu" button. Press
" " or " " button to select one of them below and press "Select" button to
enter Sub-Menu.
MAIN MENU
PICTURE
OSD
PREFERENCE
EXIT
SEL
3.3.2 PICTURE setting
PICTURE Sub-Menu provides BRIGHTNESS, CONTRAST, SATURATION,
SHARPNESS, HUE adjustment modes and RESET.
1 To select BRIGHTNESS, CONTRAST, SATURATION, SHARPNESS or
HUE, press " " or " " button.
2 To adjust selected item, press "
" or " " button.
3 When you are finished making all picture adjustments, press "Exit" button
back to main menu.
4 Select RESET to return adjustments back to factory settings.
PICTURE
BRIGHTNESS
CONTRAST
SATURATION
SHARPNESS
HUE
100
Operation Instruction
9
3.3.3 OSD setting
OSD Sub-Menu provides OSD POSITION selected mode and RESET.
1 To enter OSD POSITION, press "Select" button in OSD. Using "
", " "
or " ", "
" button to adjust OSD menu to where you want on the screen.
2 When you are finished making OSD POSITION adjustment, press "Exit"
button back to main menu.
3 Select RESET to return adjustments back to factory settings.
OSD
OSD POSITION
RESET
SEL
EXIT
OSD POSITION
EXIT
10
Operation Instruction
SEL
3.3.4 PREFERENCE setting
PREFERENCE Sub-Menu provides RESOLUTION and INPUT SIGNAL modes.
1
2
3
4
To select RESOLUTION or INPUT SIGNAL , press " " or" " button.
To enter "1024 x 768", "800 x 600" or "640 x 480", press "Select" button
in RESOLUTION. Press " " or " " button to select one of them, then
press "Select" button to confirm setting and return to Sub-Menu
simultaneously.
To enter C-VIDEO or S-VIDEO , press "Select" button in INPUT SIGNAL,
press " " or " " button to select one of them, and press"Select" button to
confirm setting and return to Sub-Menu simultaneously.
When you are finished making all selections, press "Exit" button back to
main menu.
PREFERENCE
RESOLUTION
RESOLUTION
1024x768
INPUT SIGNAL
800x600
640x480
EXIT
SEL
EXIT
PREFERENCE
RESOLUTION
C-VIDEO
INPUT SIGNAL
S-VIDEO
EXIT
EXIT
SEL
INPUT SIGNAL
SEL
SEL
RECOMMENDED RESOLUTION
The "1024x768", "800x600", "640x480" for NTSC
The "1024x768", "800x600" for PAL
Other Information
11
Chapter 4 Other Information
4.1 Troubleshooting
Symptom
No picture on display
Solution
Make sure the power cord is connected to
an AC outlet, DC plug is connected to DC IN
port and the power LED is on.
Make sure the display's power is on.
Check the connection of your source signal.
To reset the Real Scan, unplug the DC IN
adapter from the unit and then plug it back in
again.
Video is distorted
The remote control can't
control the Real Scan.
Check all of the connection.
Make sure batteries are installed.
Check remaining battery life.
If you still have difficulties that you can't resolve using the tips described above,
please unplug and plug in the AC cord to reset your Real Scan. Otherwise,
please call your local agency for servicing.
12
Operation Instruction
4.2 Specifications
POWER
12VDC 1.2A OUTPUT
VIDEO INPUT
Composite video RCA connector
S-VIDEO INPUT
S-Video 4-pin mini DIN
VGA OUT
D-Sub 15 pin Female connector
Power Consumption
15W Typical
Operating Temperature
5
Operating Humidity
5% ~ 80%
Dimensions
230 x 140 x 40 mm
Weight
1080g
IR Control
31 Buttons (AAA batteries x2)
~ 45
Other Information
13
14
Operation Instruction
ZINWELL
ZINWELL
ZINWELL
ZINWELL
ZINWELL
ZINWELL
ZINWELL
ZINWELL
ZINWELL
ZINWELL
ZINWELL
ZINWELL
ZINWELL
ZINWELL
ZINWELL
ZINWELL
ZINWELL
ZINWELL
ZINWELL
ZINWELL
ZINWELL
ZINWELL
ZINWELL
ZINWELL
ZINWELL
ZINWELL
ZINWELL
ZINWELL
ZINWELL
ZINWELL
ZINWELL
ZINWELL
ZINWELL
ZINWELL
ZINWELL
ZINWELL
ZINWELL
ZINWELL
ZINWELL
ZINWELL
ZINWELL
ZINWELL
ZINWELL
ZINWELL
ZINWELL
ZINWELL
ZINWELL
ZINWELL
ZINWELL
ZINWELL
ZINWELL
ZINWELL
ZINWELL
ZINWELL
ZINWELL
ZINWELL
ZINWELL
ZINWELL
ZINWELL
ZINWELL
ZINWELL
ZINWELL
ZINWELL
ZINWELL
ZINWELL
ZINWELL
ZINWELL
ZINWELL
ZINWELL
ZINWELL
ZINWELL
ZINWELL
ZINWELL
ZINWELL
ZINWELL
ZINWELL
ZINWELL
ZINWELL
ZINWELL
ZINWELL
ZINWELL
ZINWELL
ZINWELL
ZINWELL
ZINWELL
ZINWELL
ZINWELL
ZINWELL
ZINWELL
ZINWELL
Headquarters : 7F, 512, Yuan Shan Rd., Chung Ho City, Taipei Hsien 235, Taiwan
Tel: 886-2-2225-1929 Fax: 886-2-2225-1447 e-mail: [email protected] http://www.zinwell.com.tw
ZINWELL
ZINWELL
ZINWELL
ZINWELL
Hsinchu Plants (Sat-Comm & Satellite TV Product Sales) : 2, Wen Hua Rd., Hsin Chu Industrial Park, Hsin Chu Hsien 303,
Taiwan
Tel:
886-3-597-9050 Fax: 886-3-597-8857
e-mail: [email protected]
ZINWELL
ZINWELL
ZINWELL
ZINWELL
ZINWELL
ZINWELL
ZINWELL
ZINWELL
Ib02061799
ZINWELL