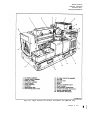
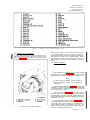
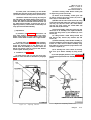
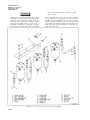
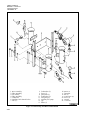
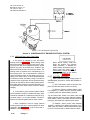
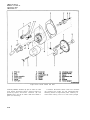
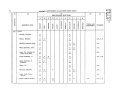
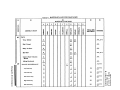
1
ARMY
TECHNICAL
NAVY
AIR
MARINE
FORCE
CORPS
PUBLICATION
TECHNICAL
-2
WIRE,
DOD
1
DIESEL
T M - 0 5 6 8 4 C - 1 2
AND
PHASE
-3
ENGINE
WIRE,
MODEL
MEP-003A
This
copy
is
3
MANUAL
ORGANIZATIONAL
DRIVEN,
PHASE
-4
MANUAL
TACTICAL
WIRE,
120,
SKID
MTD
1OKW,1
120/240
AND
120/208
PHASE
VOLTS
C LASS
HERTZ
NSN
UTILITY
6 0
6115-00-465-1030
a
reprint
pages from Changes 1
which
includes
through
current
4
PUBLISHED UNDER THE AUTHORITY OF THE DEPARTMENTS OF THE ARMY, AIR FORCE, NAVY
AND
HEADQUARTERS
JULY
2
MANUAL
MAINTENANCE
SET,
P-8-262-I
TO-35C2-3-455-1
TECHNICAL
GENERATOR
NAVFAC
ORDER
TECHNICAL
OPERATOR
TM5-6115-585-12
MANUAL
U.S.
MARINE
1977
CORPS
TM
5-6115-585-12
NAVFAC
P-8-262-12
TO-35C2-3-455-1
TM-05684C-12
WARNING
All
specific
cautions
adhered to. Otherwise,
and
warnings
contained
in
this
manual
shall
be
strictly
severe injury, death and/or damage to the equipment may
result.
HIGH
VOLTAGE
is produced when this Generator Set is in operation.
D E A T H
or severe burns may result if personnel fail t o observe safety precautions. Do not
operate this Generator Set until the ground terminal stud has been connected
to a
suitable ground. Disconnect the battery ground cable before removing and installing
components
on the engine
or in the electrical
control
panel system. Remove all
rings, watches, and other jewelry when performing maintenance on this equipment.
Loose fitting clothing should be secured to prevent it catching in moving parts. Do
not attempt to service or otherwise make any adjustments, connections or reconnections of wires
or cables until Generator Set is shut-down and completely de-
energized.
DANGEROUS
Batteries
generate
explosive
gas
during
GASES
charging:
therefore,
utilize
extreme
caution, do not smoke, or use open flame in the vicinity of the Generator Set when
servicing batteries.
Exhaust discharge contains noxious and deadly fumes.
Do not operate Generator
Sets in enclosed areas unless exhaust discharge is properly vented to the outside.
To avoid sparking between filler
nozzle and fuel tank, always maintain metal to
metal contact between filler nozzle and fuel tank when filling fuel tank.
Do not smoke or use open flame in the vicinity of the Generator Set while fueling.
LIQUIDS
UNDER
HIGH
PRESSURE
are generated as a result of operation of the Generator Set. Do
not expose any
part of the body to a high pressure leak in the fuel injection system.
NOISE
Operating level
recommended
of this generator can cause hearing damage. Ear protectors, as
by the medical or safety officer,
must be worn when working near
this set.
WARNING
Clean parts in a well-ventilated area. Avoid inhalation of solvent fumes and prolonged exposure of skin to cleaning solvent. Wash exposed
skin thoroughly. Dry
cleaning solvent (Fed. Spec. P-D-680) used to clean parts is potentially dangerous
to personnel and property. Do not use near open flame or excessive heat. Flash
point of solvent is 100° F. to 138° F. (38° C. to 59° C.).
ARMY TM 5-6115-585-12
NAVFAC P-8-623-12
AIR FORCE TO-35C2-3-455-1
MARINE CORPS TM-05684C/05685B-12
C12
C H A N G E
H E A D Q U A R T E R S
DEPARTMENTS
A N D
N O .
1 2
OF
THE
WASHINGTON,
Operator
GENERATOR
1
SET,
and
DIESEL
PHASE-2
Organizational
ENGINE
WIRE,
1
Maintenance
DRIVEN,
PHASE-3
ARMY,
H E A D Q U A R T E R S
D.C.,
3
27
AND
M A R I N E
APRIL
AIR
FORCE
C O R P S
1992
Manual
TACTICAL
WIRE,
NAVY
U . S .
SKID
PHASE-4
MTD,
10KW
WIRE
120, 120/240 AND 120/208 VOLTS
DOD
MODEL
CLASS
TM
1.
the
UTILITY
6 0
6115-00-465-1030
MEP-112A
UTILITY
400
6115-00-465-1027
5-6115-585-12,
as
NAVFAC
for
public
P-8-623-12,
release;
TO
Distribution
35C2-3-455-1,
is
unlimited
TM
05684C/05685B-12,
25
July
1977
is
follows:
Remove
margin.
An
and
insert
pages
illustration
Remove
C-17
2.
N S N
MEP-003A
Approved
changed
H E R T Z
Retain
this
sheet
and
in
as
change
indicated
is
below.
indicated
by
a
New
or
miniature
changed
pointing
material
C-17
C-18
of
manual
for
reference
purposes.
is
indicated
hand.
Insert
pages
front
text
pages
and
C-18
by
a
vertical
bar
in
ARMY TM 5-6115-585-12
NAVFAC P-8-623-12
AIR FORCE TO-35C2-3-455-1
MARINE CORPS
TM-05684C/05685B-12
C 1 2
By Order of the Secretaries of the Army , Air Force, and Navy (Including the Marine Corps):
GORDON R. SULLIVAN
Genera/, United States Army
Official:
Chief of Staff
MILTON H. HAMILTON
MILTON H. HAMILTON
Administrative Assistant to the
Secretary of the Army
01066
MERRILL A. McPEAK
General USAF
Chief of Staff
Official:
CHARLES C. McDONALD
General, USAF
Commander, Air Force Logistics Command
DAVID E. BOTTORFF
Rear Admiral, CEC, US Navy
Commander
Navy Facilities Engineering Command
H.E. REESE
Deputy for Support
Marine Corps Research, Development and
Acquisition Command
DISTRIBUTION:
To be distributed in accordance with DA Form 12–25E, (qty rqr block no. 0868).
TM 5-6115-585-12
NAVFAC P-8-262-12
TO-35C2-3-455-1
TM-05684C-12
WARNING
All specific cautions and warnings contained in this manual shall be strictly
adhered to. Otherwise, severe injury, death and/or damage to the equipment may
result.
HIGH VOLTAGE
is produced when this Generator Set is in operation.
DEATH
or severe burns may result if personnel fail to observe safety precautions. Do not
operate this Generator Set until the ground terminal stud has been connected to a
suitable ground. Disconnect the battery ground cable before removing and installing
components on the engine or in the electrical control panel system. Remove all
rings, watches, and other jewelry when performing maintenance on this equipment.
Loose fitting clothing should be secured to prevent it catching in moving parts. Do
not attempt to service or otherwise make any adjustments, connections or reconnections of wires or cables until Generator Set is shut-down and completely deenergized.
DANGEROUS GASES
Batteries generate explosive gas during charging; therefore,
utilize extreme caution.
Do not smoke, or use open flame
in the vicinity of the Generator Set when servicing batteries.
E x h a u s t d i s c h a r g e c o n t a i n s n o x i o u s a n d d e a d l y f u m e s . DO
not operate Generator Sets in enclosed areas unless exhaust
discharge is properly vented to the outside.
Exhaust discharge contains noxious and deadly fumes. Do not operate Generator
Sets unenclosed areas unless exhaust discharge is properly vented to the outside.
To avoid sparking between filler nozzle and fuel tank, always maintain metal to
metal contact between filler nozzle and fuel tank when filling fuel tank.
D O not smoke or use open flame in the vicinity of the Generator Set while fueling.
LIQUIDS UNDER HIGH PRESSURE
are generated as a result of operation of the Generator Set. Do not expose any
part of the body to a high pressure leak in the fuel injection system.
NOISE
Operating level of this generator can cause hearing damage. Ear protectors, as
recommended by the medical or safety officer, must be worn when working near
this set.
WARNING
Clean parts in a well-ventilated area. Avoid inhalation of solvent fumes and prolonged exposure of skin to cleaning solvent. Wash exposed skin thoroughly. Dry
cleaning solvent (Fed. Spec. P-D-680) used to clean parts is potentially dangerous
to personnel and property. Do not use near open flame or excessive heat. Flash
point of solvent is 100°F. to 138°F. (38°C. to 59°C.).
Change 5
a/(b
blank)
DEPARTMENT
OF
THE
DEPARTMENT
OF
THE
DEPARTMENT
MARINE
OF
CORPS
THE
ARMY
NAVY
AIR
TECHNICAL
TM5-6115-585-12
NAVFAC
PUBLICATION
FORCE
TECHNICAL
MANUAL
TECHNICAL
P-8-623-12
TO-35C2-3-455-1
ORDER
TM-0568
MANUAL
4C12/05685B-12
HEADQUARTERS
DEPARTMENTS
OF
THE
ARMY,
NAVY,
WASHINGTON,
OPERATOR’S
AND
AIR
D.C.
FORCE,
25
&
JULY
USMC
1977
ORGANIZATIONAL
M A I N T E N A N C E
M A N U A L
GENERATOR SET, DIESEL ENGINE DRIVEN, TACTICAL SKID MTD 10KW, 1 PHASE
-2 WIRE, 1 PHASE -3 WIRE, 3 PHASE -4 WIRE, 120, 120/240 AND 120/208 VOLTS
DOD MODEL
CLASS
HERTZ
NSN
MEP-003A
UTILITY
60
6115-00465-1030
MEP-112A
UTILITY
400
6115-00-465-1027
TABLE OF CONTENTS
Page
CHAPTER
Section
Section
CHAPTER
Section
. . .
. . . .
. . . .
. . . .
v
vi
vii
1-1
GENERAL . . . . . . . . . . . . . . . . . . . . . . . . . . . . . . .
1-1
1-1.
1-2.
1-3.
1-4.
1-5.
1-6.
1-7.
1-8.
.
.
.
.
.
.
.
.
1-1
1-1
1-1
1-1
1-1
1-1
1-1
1-1
DESCRIPTION AND DATA . . . . . . . . . . . . . . . . . . . . . .
1-2
1-9.
Description of Generator Set . . . . . . . . . . . . . . . . .
1-10. Tabulated Data . . . .
1-2
1-5
2.
OPERATING
2 - 1
I.
OPERATING PROCEDURE .
2-1
2-1.
2-2.
2-3.
2-4.
2-5.
2-6.
2-1
2-1
2-1
2-1
2-6
2-6
LIST OF EFFECTIVE PAGES....
LIST OF ILLUSTRATIONS . . .
LIST OF TABLES . . . . . . .
INTRODUCTION . . . .
1.
I.
II.
.
. .
. . .
. . .
. . .
. . . . . . . .
. . . . . . . . .
. . . . . . . . . .
. . . . . . . . . .
. . .
. . .
. . .
. . .
. . .
. . . .
. . . .
. . . .
.
Scope . . . . . . . . . . . . . . . . . . . . . . . . . . . .
Limited Applicability . . . . . . . . . . . . . . . . . . .
Maintenance Forms and Records . . . . . . . . . . . . .
Reporting of Errors . . . . . . . . . . . . . . . . . . . .
Levels of Maintenance Accomplishment . . . . . . . . .
(A, MC) Destruction of Material to Prevent Enemy Use .
(A, F, MC) Administrative Storage . . . . . . . . . . . .
Preparation for Shipment and Storage . . . . . . . . . .
.
.
.
.
.
.
.
.
INSTRUCTIONS
General . . . . . . .
Power Connections .
Equipment Reconnection . .
Starting Generator Set . . .
Operating in Alternate Modes
Shutting Down Unit . . . .
. . . . .
. . . . .
. . . . .
. . . . . .
. .
. .
. .
. .
. .
. .
. .
. .
.
.
.
.
.
.
.
.
. .
. .
. .
. . .
. . . .
. . . .
. . . .
. . . .
Change 2
i
TM5-6115-585-12
NAVFAC P-8-262-12
TO-35C2-3-455-1
TM-05684C-12
TABLE OF CONTENTS (CONT)
Page
Section
II.
OPERATING UNDER UNUSUAL CONDITIONS . . . . . . . . . . . .
2-6
2-7.
Operation in Extreme Heat . . . .
2-8.
Operation in Extreme Cold (-25°
2-9.
Operation in Dusty or Sandy Areas
2-10. Operation in Wet or Humid Areas .
.
.
.
.
2-6
2-6
2-6
2-6
. . .
. . .
. . .
. . .
. .
. . .
. .
. .
. .
. .
. .
. .
CHAPTER
3.
OPERATOR
INSTRUCTIONS . . . . . . . .
3-1
Section
I.
CONSUMABLE OPERATING AND MAINTENANCE SUPPLIES . . .
3-1
3-1.
3-1
Section
II.
Section
Section
Section
III.
IV.
V.
MAINTENANCE
Consumable Supplies . . . . . . . . . . . . . . . . . . . . .
. . . . . . . . . . . . . . . . . . . .
3-1
General . . . . . . . . . . . . . . . . . . . . . . . . . . . .
Lubrication Order . . . . . . . . . . . . . . . . . . . . . . .
3-1
3-1
PREVENTIVE MAINTENANCE CHECKS AND SERVICES (PMCS) . .
3-4
3-4.
3-5.
3-6.
3-7.
3-8.
. . .
. . .
. . .
. . .
. . .
3-4
3-4
3-4
3-4
3-4
. . . . . . . . . . . . . . . . . . . . . . . . .
3-5
3-9.
General . . . . . . . . . . . . . . . . . . . . . . . . . . . . .
3-10. Malfunctions Not Corrected By Use of the Troubleshooting
Table . . . . . . . . . . . . . . . . . . . . . . . . . . . . .
3-5
OPERATOR
3-8
LUBRICATION
3-2.
3-3.
INSTRUCTIONS
General . .
Correcting
Determining
PMCS for
Preventive
3-22.
3-23.
3-24.
3-25.
MAINTENANCE
4.
ORGANIZATIONAL
Section
I.
SERVICE
4-1.
4-2.
II.
. . . . . . . . .
MAINTENANCE
3-5
.
.
.
.
.
.
.
.
.
.
3-8
3-9
3-10
3-10
3-13
3-13
3-14
3-14
3-17
3-19
. .
. .
. .
. .
. .
3-20
3-21
3-23
3-23
3-27
. . . . . . . . . . . . . . . . .
4-1
.
.
.
.
.
.
.
.
.
.
. . . . . . . . . . . .
4-1
Inspecting and Servicing Generator Set . . . . . . . . . . . .
Installing Generator Set. . . . . . . . . . . . . . . . . . . .
4-1
4-2
UPON
RECEIPT
OF
MATERIAL
. . . . . . . . . . . . . . . . .
4-4
Dismantling Generator Set for Movement . . . . . . . . . .
Reinstalling Generator Set After Movement . . . . . . . . .
4-4
4-4
MOVEMENT
4-3.
4-4.
PROCEDURES
Battery Assembly . . . . . . . . . . . . . . . . . . . . .
Ground Rod and Fuel Drum Adapter Hold-Down Assembly
Fuel Tank Assembly . . . . . . . . . . . . . . . . . . .
Shutter Box Assembly . . . . . . . . . . . . . . . . . . .
Exhaust Muffler Assembly . . . . . . . . . . . . . . . .
Engine Starter Assembly . . . . . . . . . . . . . . . . .
AC Output Control Box Assembly . . . . . . . . . . . . .
Air Cleaner Assembly . . . . . . . . . . . . . . . . . .
Control Cubicle Assembly . . . . . . . . . . . . . . . . .
Fuel System (Less Tank) . . . . . . . . . . . . . . . . .
Control Cubicle Support Assembly, Speed Control and
Engine Control Wiring Harness . . . . . . . . . . . . .
Engine Cooling System . . . . . . . . . . . . . . . . . .
Generator Assembly . . . . . . . . . . . . . . . . . . . .
Engine Assembly . . . . . . . . . . . . . . .
Skid-Base Assembly . . . . . . . . . . . . . . . . . . .
CHAPTER
Section
. . . . . . . . . . . . . . . . . . . . . . .
and Reporting Deficiencies . . . . . . . . .
PMCS Intervals . . . . . . . . . . . . . .
Units in Continuous Operation . . . . . . . .
Maintenance Checks and Services . . . . .
TROUBLESHOOTING
3-11.
3-12.
3-13.
3-14.
3-15.
3-16.
3-17.
3-18.
3-19.
3-20.
3-21.
i i
. . . . . .
F, -32° C)
. . . . . .
. . . . .
TO
ANEW
WORKSITE
TM 5-6115-585-12
NAVFAC P-8-262-12
TO-35C2-3-455-1
TM-05684C/05685B-12
TABLE OF CONTENTS (CONT)
Page
Section
III.
REPAIR PARTS SPECIAL TOOLS; SPECIAL TEST, MEASUREMENT AND DIAGNOSTIC EQUIPMENT AND SPECIAL
SUPPORT EQUIPMENT . . . . . . . . . . . . . . . . . . . . . . . . . . . . . . . . . . . . . .
Special Tools and Equipment.. . . . . . . . . . . . . . . . . . . . . . . . . . . . . .
Maintenance Repair Parts . . . . . . . . . . . . . . . . . . . . . . . . . . . . . . . . .
4-4
4-4
4-4
LUBRICATION INSTRUCTIONS . . . . . . . . . . . . . . . . . . . . . . . . . . . . . . . .
Lubrication . . . . . . . . . . . . . . . . . . . . . . . . . . . . . . . . . . . . . . . . . . . . .
4-7.
4-4
4-5.
4-6.
Section
IV.
4-4
Section
V.
PREVENTIVE MAINTENANCE
CHECKS AND SERVICES (PMCS).
PMCS, General . . . . . . . . . . . . . . . . . . . . . . . . . . . . . . . . . . . . . . . . . .
4-8.
4-5
4-5
Section
VI.
TROUBLESHOOTING . . . . . . . . . . . . . . . . . . . . . . . . . . . . . . . . . . . . . . . . .
4-6.1
4-6.1
4-12.
4-13.
Section
VII.
Troubleshooting, General . . . . . . . . . . . . . . . . . . . . . . . . . . . . . . . . . .
Malfunctions Not Corrected By Use of the Troubleshooting
Table . . . . . . . . . . . . . . . . . . . . . . . . . . . . . . . . . . . . . . . . . . . . . . . . .
4-6.1
RADIO INTERFERENCE SUPPRESSION . . . . . . . . . . . . . . . . . . . . . . . .
4-10
4-14.
4-15.
General Methods for Proper Suppreseion . . . . . . . . . . . . . . . . . . . . .
Radio Interference Suppression Components . . . . . . . . . . . . . . . . . .
4-10
4-10
Section
VIII.
MAINTENANCE OF ENGINE COOLING SYSTEM . . . . . . . . . . . . . . . .
4-16.
Description and Function . . . . . . . . . . . . . . . . . . . . . . . . . . . . . . . . . .
Engine Cooling Assembly . . . . . . . . . . . . . . . . . . . . . . . . . . . . . . . . .
4-17.
4-12
4-12
4-12
Section
IX.
MAINTENANCE OF FUEL SYSTEM . . . . . . . . . . . . . . . . . . . . . . . . . . . .
4-18.
Description and Function . . . . . . . . . . . . . . . . . . . . . . . . . . . . . . . . . . .
4-16
4-19.
4-20.
Fuel Tank Assembly . . . . . . . . . . . . . . . . . . . . . . . . . . . . . . . . . . . . . .
Fuel Filter Assemblies and Strainer Aseembly . . . . . . . . . . . . . . . .
4-21.
4-22.
Electric Fuel Pumps, Fuel Hoses and Auxiliary Solenoid Valve . .
Auxiliary Fuel Solenoid Valve. . . . . . . . . . . . . . . . . . . . . . . . . . . . . .
Fuel Shut-Off Solenoid Valve... . . . . . . . . . . . . . . . . . . . . . . . . . . . .
4-23.
Section
X.
Section
XI.
XII.
4-17
4-21
4-21
4-21
.
.
.
.
4-24
4-24
4-24
4-26
Battery Charging Alternator . . . . . . . . . . . . . . . . . . . . . . . . . . . . . . .
Starter Lockout Switch and Gear . . . . . . . . . . . . . . . . . . . . . . . . . . .
4-29
4-31
MAINTENANCE OF OIL SYSTEM . . . . . . . . . . . . . . . . . . . . . . . . . . . . . .
4-33
4-33
4-33
MAINTENANCE OF ENGINE ELECTRICAL SYSTEM . . . . . .
Description and Function . . . . . . . . . . . . . . . . . . . . . . . . . .
4-24.
4-25.
Battery Assembly . . . . . . . . . . . . . . . . . . . . . . . . . . . . . . . .
4-26.
Engine Starter Assembly . . . . . . . . . . . . . . . . . . . . . . . . . .
4-27.
4-28.
Section
4-16
4-16
.
.
.
.
. . . .
. . . . . .
. . . . . .
. . . . . .
4-29.
4-30.
4-31.
4-32.
Function and Description . . . . . . . . . . . . . . . . . . . . . . . . . . . .
Oil Cooler . . . . . . . . . . . . . . . . . . . . . . . . . . . . . . . . . . . . . . . . .
Low Oil Pressure Switch . . . . . . . . . . . . . . . . . . . . . . . . . . . . .
Oil Filter . . . . . . . . . . . . . . . . . . . . . . . . . . . . . . . . . . . . . . . . . .
.
.
.
.
.
.
.
.
.
.
.
.
.
.
.
.
.
.
.
.
.
.
.
.
4-33.
Oil Pressure Gauge . . . . . . . . . . . . . . . . . . . . . . . . . . . . . . . . . . . . . . .
MAINTENANCE OF CONTROL SYSTEM . . . . . . . . . . . . . . . . . . . . . . . .
4-34.
4-35.
Description and Function . . . . . . . . . . . . . . . . . . . . . . . . . . . . . . . . . .
DC Control System . . . . . . . . . . . . . . . . . . . . . . . . . . . . . . . . . . . . . . .
Change 6
4-34
4-36
4-37
4-38
4-38
4-38
iii
TM 5-6115-585-12
NAVFAC P-6-623-12
TO-35C2-3-455-1
TM-05682C/05885B-12
TABLE OF CONTENTS (CONT)
Page
Section XII.
MAINTENANCE OF CONTROL SYSTEM (CONT):
4-36. AC Instrumentation System . . . . . . . . . . . . . . . . . . . . . .
4-37. Load Terminal Board Assembly . . . . . . . . . . . . . . . . . . . . .
4-38. Control Cubicle Assembly . . . . . . . . . . . . . . . . . . . . . . . . .
Section XIII.
MAINTENANCE OF ENGINE . . . . . . . . . . . . . . . . . . . . . . . . .
4-39. Description and Function . . . . . . . . . . . . . . . . . . . . . . . .
4-40. Exhaust Muffler Assemblies . . . . . . . . . . . . . . . . . . . . . .
4-41. Air Cleaner Assembly . . . . . . . . . . . . . . . . . . . . . . . . . .
4-42. Engine Assembly . . . . . . . . . . . . . . . . . . . . . . . . . . . . .
4-43. Intake Manifold Assembly . . . . . . . . . . . . . . . . . . . . . . .
4-44. Rocker Arm Covers . . . . . . . . . . . . . . . . . . . . . . . . . . . .
4-45. Breather . . . . . . . . . . . . . . . . . . . . . . . . . . . . . . . . . . .
4-46. Valve Rocker Arms . . . . . . .. . . . . . . . . . . . . . . . . . . .
4-47. Injector Nozzle Assembly and Fuel Lines . . . . . . . . . . . . . .
4-48. Glow Plug Assemblies . . . . . . . . . . . . . . . . . . . . . . . . . .
4-49. Oil Drain Hose and Valve . . . . . . . . . . . . . . . . . . . . . . .
4-50. Oil Pan-Base . . . . . . . . . . . . . . . . . . . . . . . . . . . . . . . .
4-51. Oil Fill Tube . . . . . . . . . . . . . . . . . . . . . . . . . . . . . . . .
4-52. Engine Mounting Assembly...... . . . . . . . . . . . . . . . .
Section XIV.
MAINTENANCE OF GENERATOR ASSEMBLY . . . . . .
4-53. Description and Function . . . . . . . . . . . . . . . . .
4-54. Generator/Exciter Assembly . . . . . . . . . . . . . . . .
4-55. Screen-Guard . . . . . . . . . . . . . . . . . . . . . . . . .
Section XV.
MAINTENANCE OF SKID-BASE . . . . . . . . . . . . . . . . . . . . . . . .
4-56. Description and Function . . . . . . . . . . . . . . . . . . . . . . . . .
4-57. Skid-Base . . . . . . . . . . . . . . . . . . . . . . . . . . . . . . . . . . .
CHAPTER 5
MATERIAL USED IN CONJUNCTION WITH DOD STANDARD
10KW DIESEL ENGINE DRIVEN, MODEL MEP-003A and
MEP-112A . . . . . . . . . . . . . . . . . . . . . . . . . . . . . . . . . . . . .
Section
I.
II.
Change 8
.
.
.
.
.
.
.
.
.
.
.
.
.
.
.
.
.
. .
. .
. .
General . . . . . . . . . . . . . . . . . . . . . . . . . . . . . . . . . . . . .
ACOUSTIC SUPPRESSION KIT . . . . . . . . . . . . . . . . . . . . . . . . .
5-2.
5-3.
5-4.
5-5.
5-6.
5-7.
5-8.
5-9.
5-10.
5-11.
5-12.
5-13.
5-14.
i v
.
.
.
.
AUXUILLARY EQUIPMENT . . . . . . . . . . . . . . . . . . . . . . . . . . . . .
5-1.
Section
.
.
.
.
.
.
.
.
.
.
.
.
.
.
.
.
.
.
.
Acoustic Suppression Kit . . . . . . . . . . . . . . . . . . . . . . .
Cover Assembly . . . . . . . . . . . . . . . . . . . . . . . . . . . . .
Top Panel Assembly . . . . . . . . . . . . . . . . . . . . . . . . . .
Left Panel Assembly with Side Closure Assembly . . . . . . .
Right Panel Assembly . . . . . . . . . . . . . . . . . . . . . . . . .
Rear Panel Assembly . . . . . . . . . . . . . . . . . . . . . . . . . .
Exhaust Plenum Assembly . . . . . . . . . . . . . . . . . . . . . .
Left Support Assembly . . . . . . . . . . . . . . . . . . . . . . . . .
Right Support Assembly . . . . . . . . . . . . . . . . . . . . . . . .
Front Panel Assembly . . . . . . . . . . . . . . . . . . . . . . . . .
Side Closure Assembly . . . . . . . . . . . . . . . . . . . . . . . . .
Rear Closure Assembly . . . . . . . . . . . . . . . . . . . . . . . .
Rear Flap Assembly . . . . . . . . . . . . . . . . . . . . . . . . . .
.
.
.
.
.
.
.
.
.
.
.
.
.
.
.
.
.
.
.
.
.
.
.
.
.
.
4 - 3 8
4-41
4-42
4 - 4 5
4 - 4 5
4 - 4 5
4 - 4 7
4 - 4 7
4 - 4 9
4 - 4 9
4 - 4 9
4 - 4 9
4 - 5 1
4 - 5 1
4 - 5 3
4 - 5 3
4 - 5 3
4 - 5 3
4 - 5 5
4 - 5 5
4 - 5 6
4 - 5 6
4 - 5 6
4 - 5 6
4 - 5 6
5
-
1
5
-
1
5
5
-
1
2
5
5
5
5
5
5
5
5
5
5
5
5
5
- 1
- 1
- 1
- 1
- 1
- 1
- 1
- 2
- 2
- 2
2
2
8
0
2
4
6
6
8
8
1
1
3
TM
5-6115-585-12
NAVFAC
P-8-623-12
TO-35C2-3-455-1
TM-05682C/05685B-12
TABLE OF CONTENTS (CONT)
Page
Section
III.
ACOUSTIC SUPPRESSION KIT REPAIR . . . . . . . . . . . . . . . .
5-25
5-15.
5-25
5-16.
5-17.
5-18.
5-19.
5-20.
5-21.
5-22.
General . . . . . . . . . . . . . . . . . . . . . . . . . . . . . . . . . . .
Panel Replacement . . . . . . . . . . . . . . . . . . . . . . . . . .
Latch Replacement . . . . . . . . . . . . . . . . . . . . . . . . . .
Catch Replacement . . . . . . . . . . . . . . . . . . . . . . . . . .
Rubber Flap Replacement . . . . . . . . . . . . . . . . . . . . .
Hinges . . . . . . . . . . . . . . . . . . . . . . . . . . . . . . . . . . . .
Captive Nuts . . . . . . . . . . . . . . . . . . . . . . . . . . . . . . .
Front Panel Silencer . . . . . . . . . . . . . . . . . . . . . . . . .
.
.
.
.
.
.
.
.
.
.
.
.
.
.
.
.
5-25
5-27
5-27
5-27
5-29
5-29
5-29
APPENDIX A.
REFERENCES . . . . . . . . . . . . . . . . . . . . . . . . . . . . . . . . . . . .
A-1
APPENDIX B.
ITEMS TROOP INSTALLED OR AUTHORIZED LIST . . . . . .
B-1
APPENDIX C.
MAINTENANCE ALLOCATION CHART . . . . . . . . . . . . . . . .
C-1
Section
I.
II.
III.
INTRODUCTION . . . . . . . . . . . . . . . . . . . . . . . . . . . . . . . . . .
MAINTENANCE ALLOCATION CHART . . . . . . . . . . . . . . . .
TOOLS, TEST AND SUPPORT EQUIPMENT
C-1
C-3
IV.
REQUIREMENTS . . . . . . . . . . . . . . . . . . . . . . . . . . . . . . . . .
EXPLANATIONS OF REFERENCE CODES . . . . . . . . . . . . . .
C-18
C-19
APPENDIX D.
ADDITIONAL AUTHORIZATION LIST . . . . . . . . . . . . . . . . .
D-1
INDEX . . . . . . . . . . . . . . . . . . . . . . . . . . . . . . . . . . . . . . . . . . . . . . . . . . . . . . . . .
INDEX 1
iv.1/(iv.2
blank)
TM 5-6115-585-12
NAVFAC P-8-623-12
To-35C2-3-455-1
TM-05684C/05685B-12
LIST OF ILLUSTRATIONS
Figure
1-1.
1-2.
1-2.1.
1-2.2.
1-3.
1-4.
1-5.
1-6.
1-7.
1-7.1.
1-8.
1-9.
1-9.1.
1-10.
2-1.
2-2.
2-3.
2-4.
3-1.
3-2.
3-3.
3-4.
3-5.
3-6.
3-7.
3-8.
3-9.
3-10.
3-11.
3-12.
3-13.
3-14.
3-15.
3-16.
3-17.
3-18.
3-19.
3-20.
3-21.
3-22.
3-23.
3-24.
4-1.
4-2.
4-3.
4-4.
4-5.
4-6.
4-7.
4-8.
4-9.
4-10.
4-11.
Title
Engine Generator Set Right-Rear, Thee-Quarter View . .
Engine Generator Set Left-Front, Three-Quarter View . . .
Engine Generator Set Left-Front Three-Quarter View (MEP-112A) . . . . . . . . . . . . . . . .
Engine Generator Set, Left Front, Three-Quarter View (MEP-112A Only), with
Acoustic Suppression Kit . . . . . . . . . . . . . . . . . . . . . . . . . . . . . . . . . . . . . . . . . . . . . . . . . . . . . . . . . . . . .
Tie Down, Lifting, and Towing Provisions Crated Set(MEP003A) . . . . . . . . . . . . . . . . .
Installation Plans . . . . . . . . . . . . . . . . . . . . . . . . . . . . . . . . . . . . . . . . . . . . . . . . . . . . . . . . . .
Fuel Syetam Schematic . . . . . . . . . . : . . . . . . . . . . . . . . . . . . . . . . . . . . . . . . . . . . . . . . . . .
Eletrical Cable Schematic.. . . . . . . . . . . . . . . . . . . . . . . . . . . . . . . . . . . . . . . . . . . . . . . . .
Generator Set Electrical Schematic (MEP-003A) . . . . . . . . . . . . . . . . . . . . . . . . . . . . . . . .
Generator Set Electrical Schematic (MEP-112A) . . . . . . . . . . . . . . . . . . . . . . . . . . . . . . . .
Generator Set Wiring Harneas . . . . . . . . . . . . . . . . . . . . . . . . . . . . . . . . . . . . . . . . . . . . .
AC Output Control Box Wiring Harness (MEP-003A) . . . . . . . . . . . . . . . . . . . . . . . . . . .
AC Output Control Box Wiring Harness (MEP-112A) . . . . . . . . . . . . . . . . . . . . . . . . . .
Control Cubicle Wiring Harness . . . . . . . . . . . . . . . . . . . . . . . . . . . . . . . . . . . . . . . . . . . . . .
Load Terminals . . . . . . . . . . . . . . . . . . . . . . . . . . . . . . . . . . . . . . . . . . . . . . . . . . . . . . . . . . .
Reconnection switch . . . . . . . . . . . . . . . . . . . . . . . . . . . . . . . . . . . . . . . . . . . . . . . . . . . . . . .
Control Panel . . . . . . . . . . . . . . . . . . . . . . . . . . . . . . . . . . . . . . . . . . . . . . . . . . . . . . . . . . . . .
. . . . . . . . . . . . . . . . . . . . . . . . . . . . . . . .
Load Terminal and Reconnection Configuration.
Deleted . . . . . . . . . . . . . . . . . . . . . . . . . . . . . . . . . . . . . . . . . . . . . . . . . . . . . . . . . . . . . . . . . . . . . . . . . . . . .
Battery Assembly . . . . . . . . . . . . . . . . . . . . . . . . . . . . . . . . . . . . . . . . . . . . . . . . . . . . . . . .
Ground Rod and Fuel Drum Adapter Pipe Hold-Down . . . . . . . . . . . . . . . . . . . . . . . . . .
Fuel Tank . . . . . . . . . . . . . . . . . . . . . . . . . . . . . . . . . . . . . . . . . . . . . . . . . . . . . . . . . . . . . .
Shutter and Thermo Power Element Assembly . . . . . . . . . . . . . . . . . . . . . . . . . . . . . . . .
Exhaust Muffler Assembly . . . . . . . . . . . . . . . . . . . . . . . . . . . . . . . . . . . . . . . . . .
Electric Starter . . . . . . . . . . . . . . . . . . . . . . . . . . . . . . . . . . . . . . . . . . . . . . . . . . . . . . . . .
AC Output Control Box Aseembly . . . . . . . . . . . . . . . . . . . . . . . . . . . . . . . . . . . . . . . . . . .
Air Cleaner and Shroud Assembly . . . . . . . . . . . . . . . . . . . . . . . . . . . . . . . . . . . . . . . . . . .
Air Cleaner Aseembiy . . . . . . . . . . . . . . . . . . . . . . . . . . . . . . . . . . . . . . . . . . . . . . . . . . . .
Cleaning Air Filter Element . . . . . . . . . . . . . . . . . . . . . . . . . . . . . . . . . . . . . . . . . . . . . .
Control Cubicle . . . . . . . . . . . . . . . . . . . . . . . . . . . . . . . . . . . . . . . . . . . . . . . . . . . . . . . .
Fuel Filters and Fuel Strainer Aseembly . . . . . . . . . . . . . . . . . . . . . . . . . . .
Fuel Pump Assembly . . . . . . . . . . . . . . . . . . . . . . . . . . . . . . . . . . . . . . . . . . . . . . . . . . . .
Control Cubicle Support Assembly . . . . . . . . . . . . . . . . . . . . . . . . . . .
Speed Control Assembly . . . . . . . . . . . . . . . . . . . . . . . . . . . . . . . . . . . . . . . . . . . . . . .
Engine Cooling Assembly . . . . . . . . . . . . . . . . . . . . . . . . . . . . . . . . . . . . . . . . . . . . . .
Generator Assembly . . . . . . . . . . . . . . . . . . . . . . . . . . . . . . . . . . . . . . . . . . . . . . .
Intake Manifold Assembly . . . . . . . . . . . . . . . . . . . . . . . . . . . . . . . . . . . . . . . . .
Oil Drain Hoes . . . . . . . . . . . . . . . . . . . . . . . . . . . . . . . . . . . . . . . . . . . . . . . . . . . . . .
Oil Filter and Oil Pressure Switch . . . . . . . . . . . . . . . . . . . . . . . . . . . . . . . . .
Engine Stop Solenoid . . . . . . . . . . . . . . . . . . . . . . . . . . . . . . . . . . .
Battery and Frame . . . . . . . . . . . . . . . . . . . . . . . . . . . . . . . . . . . . . . . . . . . . . . .
Ground Stud . . . . . . . . . . . . . . . . . . . . . . . . . . . . . . . . . . . . . . . . . . .
Uncrating
Generator
Set.....
.
.
.
.
.
.
.
.
.
.
.
.
.
.
.
.
.
Grounding Generator Set..... . . . . . . . . . . . . . . . . . . . . . . . .
.
.
.
.
.
.
.
.
.
.
.
.
.
.
.
.
.
.
.
.
.
.
.
.
Primary_Radio Interference Suppression Components . . . . . . . . . . . . . . . . . . . . . .
Shutter Assembly . . . . . . . . . . . . . . . . . . . . . . . . . . . . . . . . . . . . . . . . . . . . . . . . . . . .
Adjusting Shutters . . . . . . . . . . . . . . . . . . . . . . . . . . . . . . . . . . . . . . . . . . . . . . . . . . . . . . .
Adjusting Thermo Unit . . . . . . . . . . . . . . . . . . . . . . . . . . . . . . . . . . . . . . . . . . . . . . . . . . .
Fuel Tank Assembly . . . . . . . . . . . . . . . . . . . . . . . . . . . . . . . . . . . . . . . . . . . . . . . . . .
Testing Float Switch . . . . . . . . . . . . . . . . . . . . . . . . . . . . . . . . . . . . . . . . . . . . . . .
Fuel Filter . . . . . . . . . . . . . . . . . . . . . . . . . . . . . . . . . . . . . . . . . . . . . . . . . . . . . . .
Fuel Strainer Element . . . . . . . . . . . . . . . . . . . . . . . . . . . . . . . . . . . . . . . . . . . . . . . . . . . . .
Fuel Filter and Fuel Strainer Assembly . . . . . . . . . . . . . . . . . . . . . . . . . . . . . . . . . . . . .
.
.
.
.
.
.
.
.
.
Page
1-3
1-4
1-4.1
1-4.2
1-8
1-9
1-9
1-10
1-11
1-12.1
1-13
1-14
1-14.1
1-15
2-3
2-3
2-4
2-5
3-2
3-9
3-10
3-11
3-12
3-13
3-14
3-14
3-15
3-16
3-17
3-18
3-19
3-20
3-20
3-21
3-22
3-23
3-24
3-25
3-25
3-25
3-26
3-27
4-2
4-3
4-11
4-14
4-15
4-15
4-17
4-18
4-19
4-19
4-20
Change 8
v
TM 5-6115-585-12
NAVFAC P-8-623-12
TO-35C2-3-455-1
TM-05684C/05685B-12
LIST OF ILLUSTRATIONS
Figure
Title
Page
4-22
4-12.
Fuel Pump, Fuel Hoses and Solenoid. . . . . . . . . . . . . . . . . . . . . . . . . . . . . . . . . . . . . . . . . . . .
4–13.
Fuel Pump . . . . . . . . . . . . . . . . . . . . . . . . . . . . . . . . . . . . . . . . . . . . . . . . . . . . . . . . . . . . . . .
4-23
4-14.
Adjusting Fuel Shut–Off Solenoid . . . . . . . . . . . . . . . . . . . . . . . . . . . . . . . . . . . . . . . . . . . . . . .
4-23
4–15.
Fuel Solenoid Test Set–Up . . . . . . . . . . . . . . . . . . . . . . . . . . . . . . . . . . . . . . . . . . . . . . . . . . . .
4-24
4-16.
Installing Battery Cables . . . . . . . . . . . . . . . . . . . . . . . . . . . . . . . . . . . . . . . . . . . . . . . . . . . . . . .
4–25
4–17.
4–26
4-18.
Testing Batteries . . . . . . . . . . . . . . . . . . . . . . . . . . . . . . . . . . . . . . . . . . . . . . . . . . . . . . . . . . . .
Engine Starter installation . . . . . . . . . . . . . . . . . . . . . . . . . . . . . . . . . . . . . . . . . . . . . . . . . . . . .
4–19.
Testing Engine Starter . . . . . . . . . . . . . . . . . . . . . . . . . . . . . . . . . . . . . . . . . . . . . . . . . . . . . . . .
4–20.
4–21.
Testing Field Coil, Style II Starter . . . . . . . . . . . . . . . . . . . . . . . . . . . . . . . . . . . . . . . . . . . . . . .
Inspecting Engine Starter Brushes, Style I Starter . . . . . . . . . . . . . . . . . . . . . . . . . . . . . . . .
4–21 A.
Inspecting Engine Starter Brushes, Style II Starter . . . . . . . . . . . . . . . . . . . . . . . . . . . . . . . . . .
4–28.2
4–28.2
4–28.3
4–22.
Engine Starter Assembly, Style l Starter . . . . . . . . . . . . . . . . . . . . . . . . . . . . . . . . . . . . . . . . . .
4–28.4
4–22A.
Engine Starter Assembly, Style ll Starter . . . . . . . . . . . . . . . . . . . . . . . . . . . . . . . . . . . . . . . . . .
4–28.4
4–23.
4-24.
Battery Charging Alternator . . . . . . . . . . . . . . . . . . . . . . . . . . . . . . . . . . . . . . . . . . . . . . . . . . . .
Testing Battery Charging Regulator/Rectifier Assembly . . . . . . . . . . . . . . . . . . . . . . . . . . . . . .
4-29
4–25.
Lockout Switch and Gear . . . . . . . . . . . . . . . . . . . . . . . . . . . . . . . . . . . . . . . . . . . . . . . . . . . . . .
4-32
4–26.
Adjusting Starter Lockout Switch . . . . . . . . . . . . . . . . . . . . . . . . . . . . . . . . . . . . . . . . . . . . . . . .
4–33
4-27.
Pressure Oil System . . . . . . . . . . . . . . . . . . . . . . . . . . . . . . . . . . . . . . . . . . . . . . . . . . . . . . . . .
4-34
4-28.
4-29.
Oil Cooler Assembly . . . . . . . . . . . . . . . . . . . . . . . . . . . . . . . . . . . . . . . . . . . . . . . . . . . . . . . . . .
Replacing Oil Cooler Hoses (Early Model MEP–003A only) . . . . . . . . . . . . . . . . . . . . . . . . . . .
4-34
4–35
4–27
4–28.1
4–31
4–29.1.
Replacing Oil Cooler Hoses (Current Model MEP-003A and MEP-112A) . . . . . . . . . . . . . . . .
4–36
4–30.
4–31.
4–32.
4–32.1.
Oil Filter Assembly . . . . . . . . . . . . . . . . . . . . . . . . . . . . . . . . . . . . . . . . . . . . . . . . . . . . . . . . . . .
Replacing Oil Pressure Gauge . . . . . . . . . . . . . . . . . . . . . . . . . . . . . . . . . . . . . . . . . . . . . . . . . .
4–36.1
4–37
4–39
4–40
4-33.
Load Terminal Board Assembly. . . . . . . . . . . . . . . . . . . . . . . . . . . . . . . . . . . . . . . . . . . . . . . . .
Terminal Clip Replacement.. . . . . . . . . . . . . . . . . . . . . . . . . . . . . . . . . . . . . . . . . . . . . . . . . . .
Control Cubicle Assembly . . . . . . . . . . . . . . . . . . . . . . . . . . . . . . . . . . . . . . . . . . . . . . . . . . . . .
4-33.1.
Relay K1 lnternal Connection Diagram . . . . . . . . . . . . . . . . . . . . . . . . . . . . . . . . . . . . . . . . . . .
4-34.
Removing Control Cubicle Support Assembly . . . . . . . . . . . . . . . . . . . . . . . . . . . . . . . . . . . . . .
4-42.2
4-43
4-35.
Control Cubicle Test Set–Up . . . . . . . . . . . . . . . . . . . . . . . . . . . . . . . . . . . . . . . . . . . . . . . . . . .
4-44
4-36.
Engine Assembly . . . . . . . . . . . . . . . . . . . . . . . . . . . . . . . . . . . . . . . . . . . . . . . . . . . . . . . . . . . .
4-46
4-37.
Exhaust Muffler and Air Cleaner Assemblies . . . . . . . . . . . . . . . . . . . . . . . . . . . . . . . . . . . . . . .
4-48
4-38.
Rocker Arm Covers . . . . . . . . . . . . . . . . . . . . . . . . . . . . . . . . . . . . . . . . . . . . . . . . . . . . . . . . . .
4-49
4-39.
Cleaning Rocker Arm Cover Oil Line . . . . . . . . . . . . . . . . . . . . . . . . . . . . . . . . . . . . . . . . . . . . .
4-40.
4-50
4–51
4-41.
Checking and Adjusting Rocker Arm to Valve Clearance . . . . . . . . . . . . . . . . . . . . . . . . . . . . .
Cylinder Head Assembly . . . . . . . . . . . . . . . . . . . . . . . . . . . . . . . . . . . . . . . . . . . . . . . . . . . . .
4-42.
Oil Fill Tube . . . . . . . . . . . . . . . . . . . . . . . . . . . . . . . . . . . . . . . . . . . . . . . . . . . . . . . . . . . . . . .
4–53
4-43.
Engine Mounting Assembly . . . . . . . . . . . . . . . . . . . . . . . . . . . . . . . . . . . . . . . . . . . . . . . . . . . .
4-54
4-44.
Generator Screen-Guard . . . . . . . . . . . . . . . . . . . . . . . . . . . . . . . . . . . . . . . . . . . . . . . . . . . . . .
4-55
4-45.
Skid–Base Assembly . . . . . . . . . . . . . . . . . . . . . . . . . . . . . . . . . . . . . . . . . . . . . . . . . . . . . . . . .
4–57
5-1.
Instruction and Rating Plates... . . . . . . . . . . . . . . . . . . . . . . . . . . . . . . . . . . . . . . . . . . . . . . . .
5–3
5–2.
Cover Assembly, Removal and installation . . . . . . . . . . . . . . . . . . . . . . . . . . . . . . . . . . . . . . . .
5–7
5–3.
Top Panel Assembly and Exhaust Plenum, Removal and Installation . . . . . . . . . . . . . . . . . . . .
5–9
5-4.
Left Panel Assembly and Side Closure Assembly, Removal and Installation . . . . . . . . . . . . . .
5–11
5-5.
Right Panel Assembly, Removal and installation . . . . . . . . . . . . . . . . . . . . . . . . . . . . . . . . . . . .
5–13
5-6.
5–7.
Rear Panel Assembly, Removal and installation . . . . . . . . . . . . . . . . . . . . . . . . . . . . . . . . . . . .
Left Support Assembly, Removal and installation . . . . . . . . . . . . . . . . . . . . . . . . . . . . . . . . . . .
5–15
5–8.
Right Support Assembly, Removal and installation . . . . . . . . . . . . . . . . . . . . . . . . . . . . . . . . . .
5–19
5-9.
Front Panel Assembly, Removal and installation . . . . . . . . . . . . . . . . . . . . . . . . . . . . . . . . . . . .
5–10.
Rear Enclosure Assembly, Removal and installation . . . . . . . . . . . . . . . . . . . . . . . . . . . . . . . . .
5–20
5–22
5–11.
Rear Flap Assembly, Removal and installation . . . . . . . . . . . . . . . . . . . . . . . . . . . . . . . . . . . . .
5–24
5–12.
Replacement of ASK Hardware items . . . . . . . . . . . . . . . . . . . . . . . . . . . . . . . . . . . . . . . . . . . .
5–28
vi
Change 11
4-41
4-52
5–17
TM
5-6115-585-12
NAVFAC P-8-623-12
TO-35C2-3-455-1
TM-05682C/05685B-12
LIST OF TABLES (CONT)
Page
Table
2-1.
2-2.
3-1.
3-2.
3-3.
4-1.
4-2.
4-3.
4-4.
Generator Set Controls and Instruments . . . . . . . . . . . . . . . . . . . . . . . . .
Reconnection Switch Positions . . . . . . . . . . . . . . . . . . . . . . . . . . . . . . . . .
Consumable Operating and Maintenance Supplies . . . . . . . . . . . . . . . . . .
Preventive Maintenance Checks and Services . . . . . . . . . . . . . . . . . . . . . .
Troubleshooting . . . . . . . . . . . . . . . . . . . . . . . . . . . . . . . . . . . . . . . . . . . .
Preventive Maintenance Checks and Services . . . . . . . . . . . . . . . . . . . . . .
Troubleshooting . . . . . . . . . . . . . . . . . . . . . . . . . . . . . . . . . . . . . . . . . . . .
Master Switch Continuity Check. . . . . . . . . . . . . . . . . . . . . . . . . . . . . . .
Voltmeter-Ammeter Range Selector Switch Continuity Check . . . . . . . . . .
.
.
.
.
.
.
.
.
.
2-2
2-4
3-1
3-4.1
3-6
4-5
4-7
4-42
4-42.1
vii/(viii blank)
TM5-6115-585-12
NAVFAC P-8-623-12
TO-35C2-3-455-1
TM-05684C/05685B-12
CHAPTER 1
INTRODUCTION
Section I. GENERAL
1-1. SCOPE
This manual is for your use in operating and maintaining the DOD Standard Generator Sets, 10KW
Diesel Engine Driven, Model MEP-003A and Model
MEP-112A. It contains sections for operating procedures for operation under both normal and unusual
conditions; a section for lubrication instructions, including a Lubrication Order; a section for preventive
maintenance; a section for troubleshooting; and sections for both operator maintenance procedures and
organizational maintenance procedures. Thoroughly
familiarize yourself with the unit before operating
or servicing.
1-2. LIMITED APPLICABILITY
Some portions of this publication are not applicable
to all services. These portions are prefixed to indicate the services to which they pertain: (A) for Army,
(F) for Air Force, (N) for Navy, and (MC) for Marine
Corps. Portions not prefixed are applicable to all
services
1-3. Maintenance Forms and Records
mander, US Army Troop Support and Materiel
Readiness Command, ATTN DRSTS-MPSD, 4300
Goodfellow Boulevard, St. Louis, MO 63120.
b . ( F ) A i r F o r c e - AFTO Form 22 directly to:
Commander, Sacramento Air Logistics Center, ATTN:
MMEDT, McClellan Air Force Base, CA 95652, in
accordance with TO-00-5-1.
c. (N) Navy - by letter directly to: Commanding
Officer, US Navy, Ships Parts Control Center, ATTN:
Code 783, Mechanicsburg, PA 17055.
d. (MC) Marine Corps - by NAVMC Form 10772
directly to: Commandant Headquarters, US ‘Marine
Corps, ATTN: Code LMA-1, WASH DC 20380.
1-5.
LEVELS OF MAINTANCE ACCOMPLISH-
M E N T .
a. (A, MC) Army and Marine Corps users shall
refer to the Maintenance Allocation Chart (MAC) for
tasks and levels of maintenance to be performed.
a. (A) Maintenance forms and records used by
Army personnel are prescribed in TM 38-750.
b. (F) Air Force users shall accomplish maintenance at the user level consistent with their capability in accordance with policies established in AFM
66-1.
b. (F) Maintenance forms and records used by Air
Force personnel are prescribed in AFM-66-1 and the
applicable 00-20 Series Technical Orders.
c. (N) Navy users shall determine their maintenance levels in accordance with their service directives.
c. (N) Navy users should refer to their service
peculiar directives to determine applicable maintenance forms and records to be used.
d. (MC) Maintenance forms and records used by
Marine Corps personnel are prescribed in TM 470015/1.
e. (A) HAND RECEIPT. Hand receipts for the
End Item/Components of End Item (COEI), Basic
Issue Items (BII), and Additional Authorization List
(AAL) items are published in a Hand Receipt Manual.
The Hand Receipt manual numerical designator is
the same es the related Technical Manual with the
letters HR added to the number. These manuals are
published to aid in property accountability and are
available through: commander, US Army Adjutant
General publications Center, ATTN: AGDL-OD,
1655 Woodson Road, St. Louis, MO 63114.
1-4. REPORTING OF ERRORS
Report of errors, omissions, and recommendations
for improvement of this publication by the individual
user is encouraged. Reports should be submitted as
follows:
a. (A) Army - DA Form 2028 directly to: Com-
1-6. (A, MC) DESTRUCTION OF MATERIAL TO PREVENT ENEMY USE.
Army and Marine Corps personnel shall refer to TM
750-244-3 as a Source for procedures for the destruction of material to prevent enemy use.
1-7. (A, F,MC) ADMINISTRATIVE
STORAGE.
Army personnel shall refer to TM 740-90-1, Administrative Storage, for procedures for storage of
this equipment. Air Force personnel shall refer to
TO 35-1-4, Processing and Inspection of Aerospace
Ground Equipment, for storage and shipment of this
equipment. Marine Corps personnel shall refer to
MCO P4450.7.
1-8. PREPARATION FOR SHIPMENT AND STORAGE
a. (A) Army - Refer to TB 740-97-2 and TM 74090-1.
b. (F) Air Force - Refer to TO 35-1 -4 for end item
Generator Sets and to TO 38-1-5 for installed engine.
c. (N, MC) Navy and Marine Corps refer to individual Service directives for require-rents.
Change
4 1 - 1
TM5-6115-585-12
NAVFAC P-8-623-12
TO-35C2-3-455-1
TM-05684C/05685B-12
Section II. DESCRIPTION AND DATA
1-9. DESCRIPTION OF GENERATOR SET.
The MEP-003A is a 10 kilowatt, 60 Hertz Generator
Set. The MEP-112A is a 10 kilowatt, 400 Hertz Generator Set. Both consist of a revolving field alternator powered by an air cooled diesel engine. See
figures 1-1 and 1-2 for the location of major component. These sets are not designed for parallel
operation.
a. Engine.
(1) The engine powering this Generator Set is a
4 cylinder, 4 cycle air cooled engine, with a 140 cubic
inch (cu. in.) displacement. A mechanical governor
keeps engine speed at 1800 revolutions per minute
(RPM) under rated load conditions for the MEP-003A
and at 2000 RPM for the MEP-112A.
(2) Fuel is supplied either from this unit’s selfcontained fuel tank or, by using an adapter, directly
from a 55 gallon drum or other source. The fuel is
filtered by two cartridge type fuel filters and a single
fuel strainer, Two electric, self-priming fuel pumps
pump fuel to the fuel injection pump which delivers
the fuel at high pressure to fuel injection nozzles in
the cylinder head. When auxiliary source. of fuel is
used, three electric fuel pumps are used.
(3) Two 12 volt “wet cell” batteries in series
supply power for a 24 volt electric starter and for
glow plugs, located in the cylinder head, and two air
heaters located in the intake manifold, used for cold
weather starting. An alternator located beneath the
blower wheel and completely separate from the m ain
alternator automatically recharges these batteries
when the engine is operating.
b. Generator.
The generator on the MEP-O03A is a four pole, revolving field type. The generator on the MEP-112A
is a 24 pole, revolving field type, Alternating current,
supplied by the exciter assembly, is rectified and
used to create the revolving field.
A “solid-state” voltage regulator assembly automatically adjusts this current to obtain a constant
(±3%) voltage in the main stator (output) windings.
c. Controls.
All operator controls and indicator gauges necessary
for running the engine Generator Set are located on
the control panel. In addition, an oil pressure gage
is located on the engine and a fuel level gage is
located on the fuel tank. The speed control is located below the control panel.
used primarily for operating control and excitation
and (2) the ac output system to supply power to the
load.
The dc source consists of a 24 volt battery set (BT1
and BT2) that is kept charged by a battery charging
alternator (G2) and voltage regulator rectifier assembly (A5). Fuse (F1) protects the alternator from
overload. Circuit breaker (CB2) protects the battery
charging system from overload. Slave receptacle (J15)
permits an alternate external supply to be connected
to the battery circuit.
(2) Operation, Placing MASTER SWITCH (S1) into the
PREHEAT position, the preheat relay K2 is activated to
energize the heater elements (HR1 and HR2) and the engine
glow plugs (HR3, HR4, HR5, and HR6).
Placing the MASTER SWITCH in the PRIME-RUNAUXILIARY position activates the fuel pumps E2 and
E3 as well as the auxiliary fuel pump El. If the fuel
level is down, the fuel level switch S3 will be closed
and the auxiliary fuel solenoid will actuate permitting fuel to be pumped into the tank.
Placing the MASTER SWITCH (S1) into the PRIMERUN position maintains power to the main fuel pumps
but deactivates the auxiliary fuel pump.
(a) Start. Placing the MASTER SWITCH (Sl)
into the start position maintains the fuel pump circuits and the preheat circuits to the glow plugs (HR3,
HR4, HR5 and HR6) as well as to energize the governor solenoid (K5) and start relay (K1). The crank relay (K3) is energized, in turn energizing the start
solenoid (K6) and activating the starter (B1). The
governor brings the engine to speed, building up oil
pressure and closing oil pressure switch (S5). The
exciter field is flashed during this starting procedure.
(b) Run. Placing the MASTER SWITCH (S1) in the
PRIME-RUN position keeps the governor solenoid (K5)
energized thru the now closed oil pressure switch (S5) and fuel
will be supplied to the engine as long as the oil pressure is normal and the high temperature switch (S4) is not activated by
high temperature.
(c) Stop. Placing the MASTER SWITCH (S1) in
the OFF position de-energizes the governor solenoid
(K5) shutting off fuel to stop the engine. High temperature or low oil pressure will also shut the. engine
down.
d. Generator Set Electrical System (see schematic
figure 1-7).
(3) AC Circuitry. The main alternator (G1) is
wound with six pairs of coils that may be connected
by the AC Reconnect switch (S6) into various combinations, the output of which is available at the load
terminal board (TB1). Circuit breaker (CB1) protects
the alternator from overloads. The volt/ampere select switch (S8) permits switching voltmeter (MS) and
ammeter (M4) to read the load current and voltage
for the various arrangement of outputs.
(1) General. The generator set’s electrical system consists of two distinct systems (1) the dc system
Voltage regulator (A2) and current voltage transformer CVT1 monitors the alternator output voltage
Controls for selecting output voltage are located on
the output control box.
1-2
Change 4
TM5-6115-585-12
NAVFAC P-8-623-12
TO-35C2-3-45-1
TM-05684C/05685B-12
Figure 1-1. Engine Generator Set, Right-Rear, Three-Quarter View
Change 2
1-3
TM5-6115-585-12
NAVFAC P-8-623-12
TO-35C2-3-455-1
TM-05684C/05685B-12
Figure
1-4
Change 2
1-2.
Engine
Generator
Set,
Left-Front,
Three-Quarter
View
(MEP-003A-Only)
TM5-6115-585-12
NAVFAC P-8-623-12
TO-35C2-3-455-1
TM-05684C/05685B-12
Figure 1-2.1. Engine Generator Set, Left-Front, Three-Quarter View (MEP-112A Only)
Change
8
1-4.1
TM5-6115-585-12
NAVFAC P-6-623-12
TO-35C2-3-455-1
TM-05684C/05685B-l2
Figure 1-2.2 Engine Generator Set, Left Front, Three-Quarter View (MEP-003A Only),
With Acoustic Suppression Kit
1-4.2
Change 8
TM 5-6115-585-12
NAVFAC P-8-623-12
TO-35C2-3-455-1
TM-05684C/05685B-12
and current under load and varies the exciter field either
up or down to keep the generator field at such a value
as to maintain constant alternator output voltage. The
regulated voltage setting can be varied using the voltage
adjust rheostat (R1 ).
On MEP-003A, an ac receptacle (J14 ) is connected through
a protective circuit breaker (CB3) to provide 120 VAC.
WARRANTY :
DATE INSP :
MFD BY: ONAN CORP.
INSP STAMP:
(2) Operating Instruction Plate.
1-10. TABULATED DATA.
a. Identification and Instruction Plates (see figures 1-1
and 1-2 ).
(a) Location. This plate is located on the side of
the control cubicle.
(b) Content.
(1) Identification Plate.
OPERATING INSTRUCTIONS
(a) Location. This plate is located on the side of
the control cubicle.
(b) Content.
US DEPARTMENT OF DEFENSE
GENERATOR SET DIESEL ENGINE 10KW 60 H Z
MODEL: MEP-O03A
BEFORE STARTING SET
1. Insure output circuit breaker is off.
2. Fill crankcase (do not overfill) and fuel tank.
Ensure that vent on underside of fuel filler cap
is open before starting generator.
3. “WARNING” – Ground set to avoid shock.
hazard.
GENERATOR SET DIESEL ENGINE 10KW 400Hz
4. Set batteries are negative ground.
MODEL:
MEP-112A
STARTING SET
NSN: 6115-00-465-1030 (MEP-003A)
NSN: 6115-00-465-1027 (MEP-112A)
TM 5-6115-585-12
TO-35C2-3-455-1
1. Move “MASTER SWITCH” to “PRIME &
RUN” position to allow fuel to prime set.
2. Move “MASTER SWITCH” to “PREHEAT”
position end hold for (1) minute.
NOTE: Preheat is not required when engine is
hot.
NAVFAC P-8-623-12
TM-05684C/05685B-12
VOLTS: 120V 1PH.
120/240V 1PH.
120/208V 3PH.
PF: 0.8
AMPS: 104, 52,34.7
DRY WT: 1220 LB (MEP-003A)
DRY WT: 1325 LB (MEP-112A)
LG: 62 IN
W: 32 IN
HGT: 37 IN
3. Move “MASTER SWITCH” to “START” position and hold until engine fires continuously.
If engine does not start within 15 seconds,
repeat steps 1 and 2.
4. “MASTER SWITCH” will return to “PRIME &
RUN” position when released. If running from
fuel
source,
move
“MASTER
auxiliary
SWITCH” to “PRIME & RUN AUX FUEL”
position.
5. After warm up. Check frequency and voltage
and adjust if necessary.
6. M o v e " A C C i r c u i t B r e a k e r " t o " O N "
position.
STOPPING SET
1. Move “AC CIRCUIT BREAKER” to “OFF”
position.
2. Move “MASTER SWITCH” to “OFF” position.
CONTR NO: F04606-74-C-1133 (MEP-003A)
CONTR NO: DAAK70-78-C-0177 (MEP-112A)
3. For emergency stop Pull “DC CONTROL
CIRCUIT BREAKER-.” -
Change 6 1 - 5
TM5-6115-585-12
NAVFAC P-8-823-12
TO-35C2-3-455-1
TM-05684C/05685B-12
SERVICE INSTRUCTIONS
Ambient
Temperature
Lubricating
0il Capacity
(Less Filter)
5. 5QT
Fuels
Capacity- 12.5 GAL
Emergency-JP4
Primary-Diesel
-65° to -25ºF
-54” to -12°C
VV- F-800 Grade DFA
MIL-L-10295
-25° to -10°F
-32° to -23 °C
VV- F-800 Grade DF1
MIL-L-10295
-10° to -30°F
-23°to -1°C
VV-F-800 Grade DF1
+30° to +1OO°F
-1° to +38°C
W-F-800 Grade DF2
MIL-L-2104
+100° to +125°F
+38° to +52 °C
VV- F-800 Grade DF2
MIL-L-2104 Grads 30
For JP4 operation, see
Instruction Manual
MIL-L-2104 Grade 10
Grade 30
b. Tabulated Data for Generator Set.
(1) Generator Set.
Manufacturer: . . . . . . . . . . . . . . . . . . . . . . . . . . .
Onam Corp.
Model, Rated Frequency . . . . . . . . . . . . . . . . . . . . .
MEP-003A, 60 H Z
Model, Rated Frequency . . . . . . . . . . . . . . . . . . . . .
MEP-112A, 400 Hz
Operating temperature range:
without external heat
with external heat . .
-25° to +125°F, -32° to 462°C
-65° to -25°F, -54° to -32°C
Maximum Rated Output:
10Kw (0.8 power factor)
(0-5000 ft above sea level)
Voltage: . . . . . . . .
120V. (single phase, 2 wire)
120/240V. (single phase, 3 wire)
120/208V. (3-phase, 4 wire)
Fuel capacity: . . . . .
12.5 gallons (47.3 liters)
Dimensions and weights:
overall length . . . . . .
overall width . . . . . .
overall height . . . . .
net weight empty . . . .
net weight filled . . . .
shipping weight . . . . .
cubage . . . . . .
. .
. .
. .
. .
. .
. .
...
. .
. .
. .
. .
. .
. .
...
.
.
.
.
.
.
.
.
.
.
.
Dimensions and weights with ASK Installed
overall length . . . . . . . . . . . . . . . . . .
overall width . . . . . . . . . . . . . . . . . . .
overall height . . . . . . . . . . . . . . . . . .
net weight empty . . . . . . . . . . . . . . .
net weight fllled . . . . . . . . . . . . . . . .
shipping weight . . . . . . . . . . . . . . . .
cubage . . . . . . . . . . . . . . . . . . . . . .
1 - 6
Change 8
MEP-1124
MEP-003A
62 in. (157.5 cm.)
62 in. (157.5 cm.)
32 in. (81.3 cm.)”
32 in. (81.3 cm.)
37 in. (94 cm.)
37 in. (94 cm.)
1220 lb (553.4 kg)
1325 lb (601 kg)
1455 lb (660 kg)
1360 lb (616.9 kg)
1450 lb (658 kg)
1283.5 lb (582.2 kg)
42.5 cu. ft. (1.2 cubic meters) 42.5 cu. ft. (1.2 cubic meters)
(MEP-003A)
69 in. 175.3 cm)
36 in. 91.4 cm)
39 in. (99 cm)
1365 lb (619.7 kg)
1505 lb (683.3 kg)
1365 lb (61 9.7 kg)
55 cu ft (1.6 cubic meters)
(MEP-112A)
69 in. 175.3 cm)
36 in. 91.4 cm)
39 in. (99 cm)
1470 lb (667.4 kg)
1600 lb (726.4 kg)
1470 lb (667.4 kg)
55 cu ft (1.6 cubic meters)
TM5-6115-585-12
NAVFAC P-8-623-12
TO-35C2-3-455-1
TM-05684C/05685B-12
Ventilation requirements
(across the generator set) . . . . .
1600 CFM at 2000 RPM
1350 CFM at 1800 RPM
(2) Engine.
Manufacturer: . . . . . . . . . . . . . . . . . . . . . . . . . .
Onan Corp.
Type:
.
.
.
.
four stroke cycle, air cooled, diesel
Number
of
cylinders:
.
.
.
.
.
.
.
.
.
.
.
.
.
.
.
.
.
.
.
.
.
.
.
.
.
.
.
.
.
.
.
.
..
.
.
.
..
four
Change 8
1-6.1 /(1.6.2 blank)
TM5-6115-585-12
NAVFAC P-8-623-12
TO-35C2-3-455-1
TM-05684C/05685B-12
Displacement: . . . . . . . . . . . . . . . . . . . . . . . . . .
140 cu. in. (2294 cc.)
Compression ratio: . . . . . . . . . . . . . . . . . . . . . . . . .
19:1
Horsepower, 0-5000 ft above sea level . . . . . . . . . . . . . .
16@1800 RPM
18@2000 RPM
Lubricating oil capacity: . . . . . . . . . . . . . . . . . . . . . .
5.5qts, 6.5qts if filter is changed
(5. 2 liters, 6.2 liters if filter is
changed)
Governor: . . . . . . . . . . . . . . . . . . . . . . . . . . . . . .
internal flyball, external adjustment
Maximum battery charge rate . . . . . . . . . . . . . . . . . . .
not less than 6.5 ampere
Starting motor voltage: . . . . . . . . . . . . . . . . . . . . . . .
24 VDC
(3) Batteries.
Type: . . . . . . . . . . . . . . . . . . . . . . . . . . . . . . . . 6TN (per MS35000-3)
Voltage: . . . . . . . . . . . . . . . . . . . . . . . . . . . . . . .
12 VDC
Amp-Hrs: . . . . . . . . . . . . . . . . . . . . . . . . . . . . . .
100
(4) Fuel pumps.
Manufacturer: . . . . . . . . . . . . . . . . . . . . . . . . . . . . .
Bendix Corp.
Part No. . . . . . . . . . . . . . . . . . . . . . . . . . . . . . .
480517
Ground Polarity: . . . . . . . . . . . . . . . . . . . . . . . . . .
Negative
(5) Fuel filters.
Manufacturer: . . . . . . . . . . . . . . . . . . . . . . . . . . . .
Fram Corp.
Model: . . . . . . . . . . . . . . . . . . . . . . . . . . . . . . . .
244350
Fuel filter element: . . . . . . . . . . . . . . . . . . . . . . . . .
Part No. C1125PL
(6) Fuel strainer.
Manufacturer: . . . . . . . . . . . . . . . . . . . . . . . . . . . .
Fram Corp.
Model: . . . . . . . . . . . . . . . . . . . . . . . . . . . . . . . .
244344
Fuel strainer element: . . . . . . . . . . . . . . . . . . . . . . .
Part No. 35070
(7) Air cleaner.
Manufacturer: . . . . . . . . . . . . . . . . . . . . . . . . . . . .
Donaldson Co., Inc.
Model: . . . . . . . . . . . . . . . . . . . . . . . . . . . . . . . .
KAXOO-3851
Air cleaner element: . . . . . . . . . . . . . . . . . . . . . . . .
Part No. P1O 1222
(8) Engine oil filter.
Manufacturer: . . . . . . . . . . . . . . . . . . . . . . . . . . . .
Fram Corp.
Model: . . . . . . . . . . . . . . . . . . . . . . . . . . . . . . . .
170429
Oil filter element: . . . . . . . . . . . . . . . . . . . . . . . . . . .
Part No. CH6PL
Change
2
1-7
TM5-6115-585-12
NAVFAC P-8-623-12
TO-35C2-3-455-1
TM-05684C/05685B-12
Figure 1-3. Tie Down, Lifting, and Towing Provisions Crated Set (MEP-003A)
1-8
Change 2
TM5-6115-585-12
NAVFAC P-8-262-12
TO-35C2-3-455-1
TM-05684C-12
Figure 1-5. Fuel System Schematic
Figure 1-4. Installation Plans
1-9
TM5-6115-585-12
NAVFAC
P-8-262--12
TO-35C2-3-455-1
TM-05684C-12
1-10
Figure 1-6.
TM 5-6115-585-12
NAVFAC P-8-623-12
TO-35C2-3-455-1
TM-05684C/05685B-12
Figure 1-8. Generator Set Wiring Harness
C h a n g e
4
1-13
TM 5-6115-585-12
NAVFAC P-8-623-12
TO-35C2-3-455-1
TM-05684C/05685B-12
Figure 1-9. AC Output Control Box Wiring Harness (MEP-003A Only)
1-14
Change 6
TM5-6115-585-12
NAVFAC P-8-623-12
TO-35C2-3-455-1
TM-05684C/05685B-12
Figure 1-9.1. AC Ouptut Control Box Wiring Harness (MEP-112A Only)
Change 4
1-14.1/(1-14.2 blank)
TM5-6115-585-12
NAVPAC P-8-623-12
TO-35C2-3-455-1
TM05684C/05685B12
Figure 1-10. Control Cubicle Wiring Harness
Change 5
1-15/(1-16 blank)
TM 5-6115-585-12
NAVFAC P-8-623-12
TO-35C2-3-455-1
TM-05684C/05685B-12
CHAPTER 2
OPERATING
Section I.
INSTRUCTIONS
OPERATING
2-1. G E N E R A L
a. This chapter contains instructions for operation, power and control connections. Location and
function of controls and indicators and safety precautions are also provided.
b. Refer to table 3-2 and perform “Before Operation” Preventive Maintenance Checks and Services
before operating the Generator Set.
c. Before operating set, check for proper installation. See Chapter 4, Section I.
d. Table 2-1 describes the Generator Set controls
and instruments (see figure 2-3).
All personnel involved in the operation or
maintenance of the Generator Set should
become thoroughly familiar with the safety precautions prior to performing operation or maintenance procedures.
PROCEDURE
Stay clear of all exposed electrical terminals when Generator Set is operating.
Remove all rings, watches and other
jewelry when performing maintenance on
this equipment. Loose fitting clothing
should be secured to prevent it from
catching in moving parts.
2-2. P O W E R
CONNECTIONS.
warning
BEFORE ATTEMPTING TO CONNECT
LOAD CABLES, MAKE SURE THE
SET
IS
NOT
GENERATOR
OPERATING, ALL SWITCHES ARE IN
THE OFF OR OPEN POSITION AND
THE SET IS GROUNDED.
To connect load cables to Generator Set, attach load
leads to terminals located in output control box as required. See figure 2-1.
2-3. E Q U I P M E N T
RECONNECTION.
Prior to connection of load cables, make
sure all switches are in OFF or OPEN position, the Generator Set is not operating.
Inspect the Generator Set ground connection prior to starting the unit. Electrical
defects in load lines or load equipment can
cause death by electrocution when contact
is made with an ungrounded system.
Do not smoke or carry an open flame when
servicing the batteries or fuel tank. Exercise extreme care to prevent electrical arcing in the area of the batteries.
Battery electrolyte contains sulfuric acid
and can cause severe burns. Handle it with
care. If the electrolyte comes in contact
with the body, eyes, or clothing, rinse immediately with clean water. Avoid spilling
electrolyte on painted surfaces. Do not
work alone or smoke when servicing
batteries.
Do not operate Generator Set in an enclosed area unless the exhaust gases are piped
to the outside. Continued breathing of exhaust fumes is dangerous.
When selecting position 120V, 1 PH unit is
in 2 wire configuration. A situation
can/may exist in allowing a double fault to
occur. To eliminate this possibility the
reconnection switch will be rewired by
using a AWG #4 wire jumper between terminals #LO and #6 of section 9.
Before operating unit, be certain voltage and frequency rating of the load matches that of the Generator
Set. If the output voltage of the Generator Set must
be changed to match a particular load, rotate reconnection switch located on Reconnection Panel to
desired output connections. See figure 2-2.
2-4. S T A R T I N G G E N E R A T O R S E T ( S E E
FIGURE 2-3).
caution
Do not operate in excess of 200 hours con.
tinuous with JP-4. MILJ-5624 bulk fuel.
Do not use either to aid in starting unit.
Hearing protection is required.
Change 6
2-1
TM5-6115-585-12
NAVFAC P-8-623-12
TO-35C2-3-455-1
TM-05684C/05685B-12
a. When starting a set with a dry fuel system or after a
filter drain or change:
(1) Push In DC circuit breaker.
(2) Make sure the vent on the underside of the fuel
filler cap is open.
(3) On ASK equipped generators, open air Intake door,
(4) To prime fuel lines, slightly open plug (1, fig. 4-9)
on head (8) on filter assembly nearest check valve (6,
fig. 4-11).
(5) Move master switch to PRIME& RUN.
(6) When pump slows down, and no more bubbles
appear around plug, tighten plug (1, fig. 4-9).
NOTE
Preheat is not required when engine is
warm.
b. Move master switch to PREHEAT position and hold
for one minute.
2-2
Change 8
TM 5-6115-585-12
NAVFAC P-8-623-12
TO-35C2-3455-1
TM-05684C/05685B-12
Table 2-1. Generator Set Controls and Instruments
Control
Description
Function
BATTERY
INDICATOR
Green - fully charged: Yellow charging: Red - Under or over
charging
Indicates the degree of charge of the batteries. Needle
in the green area indicates fully charged between 26
and 30 volts. Needle in yellow area indicates charging
condition between 20 and 26 volts. Needle in red area
indicates an under charge or an over charge condition.
Panel Light
Shielded, bulb type, two used
Illuminates control panel.
RUNNING TIME
meter
Hourmeter; 0 to 9,999.9 hours
Indicates total operating time of Generator Set.
Frequency Meter
Model MEP-003A
Range 55 to 65 Hz; 0.1 Hz scale
divisions; red mark at 60 Hz
Indicates frequency of Generator output.
Frequency Meter
Model MEP-112A
Range 380 to 420 Hz; 1 Hz scale
divisions; red mark at 400 Hz
Indicates frequency of Generator output.
%RATED CURRENT METER
0 to 133 percent range; red line at
100 percent, green line at 0 percent
Indicates percent of rated output current.
Voltmeter, AC
O to 300 volt scale; suppressed from
O to 100 volts and linear from 100
to 300 volts. Red marks at 120, 208,
and 240 volt points.
Indicates Generator Set output voltage.
VOLTAGE ADJUST RHEOSTAT
Rheostat
Adjusts Generator Set output voltage. Clockwise to
increase and counterclockwise to decrease.
AMMETERVOLTMETER
TRANSFER
SWITCH
Rotary switch
Used to select phase, voltage and current combination
for reading on ammeter and voltmeter.
PANEL LIGHT
SWITCH
Toggle switch; ON-OFF
Controls panel lights.
MASTER SWITCH
Rotary switch, 5 positions, PREHEAT, OFF, PRIME & RUN
AUX. FUEL, PRIME& RUN, and
START
When placed in PREHEAT position, electrical power is
applied to glow plugs and preheater on the engine to
aid in cold engine starting. In OFF position, alI dc circuits are deenergized except panel lights, and battery
charging system. This position is use to stop the unit
under normal operation. The PRIME & RUN AUX.
FUEL position is used when set is running and auxiliary fuel system is being used and also to prime entire
fuel system before starting if required. The PRIME&
RUN position is used when set is running and auxiliary
fuel system is not used and also to prime engine fuel
system only before starting if required. When placed in
START position, energizes engine cranking system for
engine starting, activates glow plugs and air heaters,
and by-passes protective devices.
DC ONTROL
CIRCUIT
BREAKER
7.5 AMP breaker
Used for protecting dc circuit in case of short and also
for emergency stopping; pull out to activate.
Change 10
2-2.1 /(2-2.2 blank)
TM 5-6115-585-12
NAVFAC P-8-623-12
TO-35C2-3-455-1
TM-05684C/05685B-12
Table 2-1. Generator Set Controls and Instruments (Cont)
Control
Description
OIL PRESSURE
GAUGE
Function
Located on oil fill side of
Indicates engine oil pressure.
engine. 0-50 pounds per
square inch (psi)
RECONNECTION
Located on output con-
SWITCH
trol box. Three position
Used to select 120V, 1 phase; 120/240V,
1 phase; or 120/208V, 3 phase output for
rotary
Generator Set.
switch.
c. Place master switch in START position and
d. Master switch will return to PRIME & RUN
hold until engine comes to operating speed. If engine
does not start within 15 seconds repeat steps b and c.
position when released. If running from auxiliary fuel
source, move master switch to PRIME& RUN AUX.
If engine cranks too slow utilize slave receptacle (J14)
FUEL position.
for extra cranking power.
e. Check oil pressure on engine mounted gage.
NOTE
If engine does not come to operating speed
Oil pressure should be at least 20 psi minimum.
Check frequency on frequency meter on control panel
within 15 seconds, a minimum of 30
and adjust governor if necessary, using speed con-
seconds cooling period must be observed
trol (19, figure 1-1). Refer to paragraph 1-10.b. for
rated frequency. Pulling speed control knob out will
before attempting another start.
Figure
2-1.
Load
Terminals
Figure
2-2.
Reconnection
Switch
C h a n g e
6
2-3
TM 5-6115-585-12
NAVFAC P-8-623-12
TO-35C2-3-455-1
TM-05684C/05685B-12
Figure 2-3.
increase frequency, pushing speed control knob in will
decrease frequency. For fine control turn knob CW to
Control Panel
h.
Place
ammeter-voltmeter
transfer
switch
1-phase 120 V. output, l-phase 120/240 V. output, or
increase and CCW to decrease.
f. Place ammeter-voltmeter transfer switch in
position corresponding to the position of the reconnec-
3-phase 120/208 V.
2-3.
O Utput.
See table 2-1 and figure
tion switch. Adjust voltage adjust rheostat to desired
voltage as read on voltmeter. Turn rheostat clockwise
NOTE
For 3-phase output each of the four posi-
to increase voltage or counterclockwise to decrease
voltage.
tions indicated in table 2-2 must be
g. Place AC circuit breaker in ON position. Adjust
speed control to obtain full load frequency per
paragraph
checked.
Observe percent rated current meter. Do not exceed
5% load difference between phases. A 0.8 power factor
1-10.b.
Table 2-2. Reconnection Switch Positions
2-4
Change 2
in
position to check percent rated current for either
TM 5-6115-585-12
NAVFAC P-8-623-12
TO-35C2-3-455-1
TM-05684C/05685B-12
load equals a 100% meter reading for maximum rated
load. A 1.0 power factor load equals a 80%. meter
(5) Battery indicator should indicate yellow
while battery is charging, green when battery is fully
reading for maximum rated load.
charged.
i. During operating of the Generator Set observe
the following.
(1) Check 9. rated current meter.
(2) Check fuel level gage periodically.
(3) Oil pressure gage located on engine should indicate 20 psi minimum.
(6) AC voltmeter should indicate 120V., 208V. or
240V. depending on load connection.
(7) Frequency meter should indicate 60 Hz
(MEP-003A) or 400 Hz (MEP-112A) at rated load.
j. During operation, inspect for leaks, paying particular attention to engine fuel and oil lines and
connections.
(4) Check running time meter periodically in
order to perform preventive maintenance check-and
services at proper intervals.
Figure 2-4. Load Terminal and Reconnection Configuration
Change 2 2 - 5
TM 5-6115-585-12
NAVFAC P-8-262-12
TO-35C2-3-455-1
TM-05684C/05685B-12
k. During operation, listen for unusual noises
which may indicate a pending malfunction.
2-5.
OPERATING
IN
ALTERNATE
MODES.
warning
2-6. SHUTTING DOWN UNIT.
a. Place AC circuit breaker in the OFF position.
b. To stop the Generator Set, place the master
switch in the OFF position.
When selecting position 120V, 1 PH unit is
c. After operation of the Generator Set, perform
in 2 wire configuration. A situation
the inspection and service requirements as outlined in
can/may exist in allowing a double fault to
preventive maintenance checks and services under
Operator Maintenance Instructions, Chapter 3.
occur. To eliminate this possibility the
reconnection switch will be rewired by using a AWG #4 wire jumper between terminals #LO and #6 of section 9.
d . E m e r g e n c y S t o p . To stop Generator Set in an
emergency, pull out DC control circuit breaker (see
figure 2-3).
CAUTION
e. If generator set is not going to be operated for
Disconnect load before switching.
This unit can be set for 120 volt–1-phase, 120/240
volt—1-phase, or 120/208 volt—3-phase output.
Rotate reconnection switch to desired output connec-
two weeks or more, disconnect the negative cable from
the battery. The generator set will be ready to go upon
reconnection of the negative cable.
tion. Refer to figure 2-2.
Section II
2-7.
OPERATION
IN
EXTREME
OPERATION UNDER UNUSUAL CONDITIONS
HEAT.
To ensure satisfactory operation under conditions of
extreme heat, accomplish the following.
a. Be sure that nothing obstructs air flow to and
from the unit.
b. Keep cooling fins clean.
c. Inspect battery electrolyte level daily. Add
distilled water if necessary.
d. Keep generator free of dirt and grime. Be sure
ventilating screens are free of obstructions.
2-8. OPERATION IN EXTREME COLD (-25°F,
-32°C).
To ensure satisfactory operation under conditions of
extreme cold accomplish the following
a. Use correct lubricating oil in engine crankcase
for temperature conditions. (Refer to figure 3-1.)
Change oil only when engine is warm.
b. Use Arctic Grade diesel fuel.
c. Keep batteries in a well charged condition.
d. Be certain air cleaner intake control is in cold
weather position.
e. Shutter blades should be fully closed for cold
engine, open only partially under light load, open more
as load increases.
2-6
Change 6
f. Hold master switch in START position for 2
minutes after engine comes to operating speed.
2-9. OPERATION IN DUSTY OR SANDY
AREAS.
To ensure that the Generator Set will operate satisfactorily in dusty or sandy areas, accomplish the
following
a. Clean Generator Set frequently.
b. Service air cleaner frequently. Check air restriction indicator daily. If red signal is visible, service the
air cleaner. Be certain that all air cleaner and intake
manifold connections do not leak. Be certain oil filler
cap fits snugly.
c. Change crankcase oil and oil filter frequently.
d. Store oil and fuel in dust-free containers.
e. Make sure that Generator Set ground connection is free of dust and sand and connections are tight
before starting the unit.
2-10. OPERATION IN WET OR HUMID AREAS.
To ensure that the Generator Set will operate satisfactorily in wet or humid areas, accomplish the following
TM5-6115-585-12
NAVFAC P-8-623-12
TO-35C2-3-455-1
TM-05684C-12
a. Keep fuel tank full to protect against moisture
condensation and accumulation.
b.. Check wiring connectors for corrosion and wire
insulation for signs of deterioration..
2-11. OPERATION USING NATO SLAVE CABLE.
Cable
has
end
Slave
T h e existing A r m y
connectors with two p i n s t o m a t e w i t h the
Slave Receptacle on the Generator Set [figure
1 - 1 ] . The NATO Slave Cable has end connectors
with one pin. In order to utilize the NATO
Slave Cable on the Generator Set. an Adapter
See
Additional
used.
Connector
must
be
Authorization List [AAL] for Adaptor Connector.
caution
Before
using
make
sure
either
cable.
the
master
battery
and
all
switches
electrical
switches in
both
the
live
and dead equipment are in the OFF position.
IF attempting to install the cable into
live
operating
equipment,
arcing
can
occur.
Personal
injury or
damage to
equipment may occur.
Change 5
2-6.1/(2-6.2
blank)
TM 5-6115-585-12
NAVFAC P-8-623-12
TO-36C2-3-455-1
TM-05682C/0568B-12
CHAPTER 3
OPERATOR MAINTENANCE INSTRUCTIONS
Section I. CONSUMABLE OPERATING AND MAINTENANCE SUPPLIES
3-1. CONSUMABLE SUPPLIES.
Table 3-1 contains all consumable supplies and the
required quantities necessary for operating and maintaining this Generator Set.
Table 3-1. Consumable Operating and Maintenance Supplies
(1)
(2)
(3)
Component
Application
National Stock
Number
Description
Tank, Fuel
9130-00-256-8613
JP-4, MIL-J-5624,
Bulk
(4)
Qty Required
for Initial
Operation
(5)
Qty Required
for 8 Hours
Operation
12.5 Gal.
8.72 Gal.
(6)
Notes
Emergency
only
FUEL OIL, DIESEL
as follows:
9140-00-286-5294
Regular Grade, DF2
12.5 Gal.
8.72 Gal.
9140-00-286-5286
Winter Grade, DF1
12.5 Gal.
8.72 Gal.
9140-00-286-5283
Artic Grade, DFA
12.5 Gal.
8.72 Gal.
Crankcase
OIL, LUBRICATING
five gallon pail as
follows:
9150-00-265-9435
6.5 Qt.
9150-00-242-7603
Grade OE 30, MIL-L2104
Grade OE 10, MIL-L2104
Grade OES
681O-00-249-9354
Electrolyte
3.2 Gal.
9150-00-265-9428
Batteries
6.5 Qt.
6.5 Qt.
Section II. LUBRICATION INSTRUCTIONS
3-2. GENERAL.
quire lubrication and also the proper lubricant to be
To prevent excessive wear and insure continued
operation, lubrication of certain moving parts on this
unit is required. The Lubrication Order reproduced
in this section shows the areas of this unit which re-
3-3. LUBRICATION ORDER.
Lubricate generator set as instructed in Lubrication
Order LO 5-6115-565-12
Change
8 3-1/(3-2
All text and illustration on pages 3-2 and 3-3 have been deleted.
Blank)
TM5-6115-585-12
NAVFAC P-8-623-12
TO-35C2-3-455-1
TM-05684C/05685B12
Section III. PREVENTIVE MAINTENANCE CHECKS AND SERVICES (PMCS)
3-4. GENERAL.
NOTE
To ensure that the Generator Set is ready for operation at all times
it must be inspected systematically, so that defects may be discovered and corrected before they result in serious damage or
failure, The necessary preventive maintenance checks and services
that are to be performed by the Operator personnel are listed and
described in paragraph 3-8. For ASK equipped generators, checks
and services will be limited to those areas that can be inspected
through ASK access doors.
3-5. CORRECTING
CIENCIES.
AND
REPORTING
DEFI-
Leakage definitions for operator/crew
PMCS shall be classified as follows:
Class I
Seepage of fluid (as indicated by wetness or
discoloration) not great enough to form drops.
Class II
Leakage of fluid great enough to form drops but not
enough to cause drops to drip from item being
checked/inspected.
Class Ill
Leakage of fluid great enough to form drops that fall
from the item being checked/inspected.
Defects discovered during operation will be noted
for future correction. Stop operation imediately if
a deficiency is noted which would damage the equipment or is a safety hazard. All deficiencies and
short comings will be recorded together with the
corrective actions taken on the applicable form.
Marine Corps users should refer to current issue of
TM 4700-15/1.
Equipment operation is 14 allowable with minor
Ieakage (Class I or II). Of course, you must
consider the fluid capacity in the item/system being
checked/inspected. When in doubt, notify your
supervisor.
3-6. DETERMINING PMCS INTERVALS.
When operating with Class I or Class II Ieaks,
continue to check fluid Ievels as required.
Certain
formed
running
used to
Operator PMCS on this unit should be peron a per hour of operation - basis. The
time motor on the control panel should be
determine the Generator Set operating time.
3-7. PMCS FOR UNITS IN CONTINUOUS OPERATION.
For PMCS performed on an operating time basis,
perform PMCS as close as possible to the time intervals indicated. For units in continuous operation,
perform PMCS before startlng operation if continuous operation will extend service Interval past that
which is showen.
3-8. PREVENTIVE MAINTENANCE
SERVICES.
CHECKS
Table 3-2 contain tabulated listing of PMCS which
shall he performed by the Operator personnel. The
item numbers are listed Consecutively and indicate
the sequance of minimum requirements.
3-4
Change 8
CAUTION
TM 5-6115-585-12
NAVFAC P-S-623-12
TO-35C2-3-455-1
TM-05684C/05085B-12
Table 3-2. OPERATOR/CREW PREVENTIVE MAINTENANCE CHECKS AND SERVICES
para 4-2e
fig. 4-2
para 3-18
para 3-20
Change
7 3-4.1
TM 5-6115-585-12
NAVFAC P-8-623-12
TO-35C2-3-455-1
TM-05684C/05685B-12
Table
3-2.
OPERATOR/CREW
PREVENTIVE
MAINTENANCE
CHECKS
para 2-4h
para 4-20
para 4-20
3-4.2
C h a n g e
8
AND
SERVICES–CONT
TM 5-6115-585-12
NAVFAC P-8-623-12
TO-35C2-3-455-1
TM-05684C/05685B-12
Table 3-2. OPERATOR/CREW PREVENTIVE MAINTENANCE CHECKS AND SERVICES - CONT
Change
1 0 3-4.3/(3-4.4 blank)
TM5-6115-585-12
NAVFAC P-8-262-12
TO-35C2-3-455-1
TM-05684C-12
Section IV. TROUBLESHOOTING
3-9. GENERAL.
This section contains troubleshooting information for
locating and correcting operating troubles which may
develop in the Generator Set. Each malfunction for
an individual component unit, or system is followed
by a list of tests or inspections which will help you
to determine probable causes and corrective actions
to take. Y OU should perform the test/inspections and
corrective actions in the order listed.
3-10. MALFUNCTIONS NOT CORRECTED BY USE
OF THE TROUBLESHOOTING TABLE.
This manual cannot list all malfunctions that may
o c c u r , nor all tests or inspections and corrective
actions. If a malfunction is not listed or cannot be
corrected by listed corrective actions, notify your
supervisor.
C h a n g e
7 3-5
TM5-6115-585-12
NAVFAC P-8-262-12
TO-35C2-3-455-1
TM-05684C-12
Table 3-3. Troubleshooting
NOTE
Before you use twistable, be sure you have performed all applicable operating checks.
MALFUNCTION
TEST OR INSPECTION
CORRECTIVE ACTION
1. ENGINE FAILS TO CRANK WHEN MASTER SWITCH IS HELD IN THE START POSITION.
Step 1. Check to see that dc control circuit breaker on Control Panel is depressed (paragraph
2-4).
Depress button to set circuit breaker. If breaker will not stay depressed, notify
higher level of maintenance.
Step 2. Inspect for loose, corroded, or broken battery cables or starter ground cable (paragraph
3-11).
[ a ] I f l o o s e , c o r r o d e d , or broken battery cables and starter ground cable are
found, notify higher level maintenance.
[b] Use slave receptacle when extra cranking power is required.
Step 3. Check to see that electrolyte (liquid) level in each battery cell is above the top of the
plates (paragraph 3-11).
If electrolyte level is below top of plates, notify higher level maintenance.
2. ENGINE CRANKS NORMALLY BUT FAILS TO START.
Step 1. Check for empty fuel tank (paragraph 3-13).
If fuel tank is low or empty, fill.
Step 2. Check for sediment or water in both fuel filters and fuel strainer (paragraph 3-20).
Open drains on the bottom of fuel filters and fuel strainer, and drain sediment and
water. If necessary, drain fuel system and use fresh clean fuel supply.
Step 3. Inspect for loose fuel fittings or bad fuel lines (paragraph 3-20).
If fuel lines are loose, cracked or show signs of leaking, notify higher level maintenance.
Step 4. Check governor linkage for obstructions or binding (paragraph 3-21).
Remove any obstruction or notify higher level of maintenance.
3. ENGINE STARTS BUT DOES NOT RUN SMOOTHLY (MISFIRES, LOCKS, OR MAKES UNUSUAL
NOISES).
Step 1. Check steps 2 and 3 under ENGINE CRANKS NORMALLY BUT FAILS TO START above.
Perform corrective action as necessary.
Step 2. Check air cleaner assembly to see that inlet shutter assembly is in proper position for
either COLD WEATHER or NORMAL WEATHER operation (paragraph 3-18).
Push knob and slide assembly into proper position.
Step 3. Inspect exhaust muffler assembly for obstructions (paragraph 3-15).
Remove obstruction if possible or notify higher level maintenance.
3-6
Change 5
TM 5-6115-585–12
NAVFAC p-8-623-12
TO-35C2-3-455-1
TM-05684C/05685B-12
Table 3-3. Troubleshooting (Cent)
MALFUNCTION
TEST OR INSPECTION
CORRECTIVE ACTION
4. ENGINE STARTS AND RUNS NORMALLY BUT SUDDENLY “STOPS. “
Step 1. Check fuel level indicated by gauge on fuel tank (paragraph 3-13).
Add fuel if necessary.
Step 2. Check to see that shutters on shutter box have fully opened (paragraph 3-14).
Refer to next higher level of maintenance.
Step 3. Check to see that blower housing grille and engine cooling fins are clean (paragraph 3-22)
Refer to next higher level of maintenance.
Step 4. Low oil pressure will cause engine to shut down. Check oil level (paragraph 3-24).
Add correct weight oil, if necessary.
Step 5. Check that vent on under side of fuel filler cap is open (paragraph 3-13).
Clear vent hole.
5. ENGINE RUNS BUT EMITS BLACK SMOKE IN EXHAUST.
Step 1. Check air cleaner assembly to see that inlet shutter assembly is in proper position for
either COLD WEATHER or NORMAL WEATHER operation (paragraph 3-18).
Push knob and slide assembly into proper position.
Step 2. Check for restricted air intake. Red signal on air flow indicator should be visible
(paragraph 3-18).
Remove any restriction from intake port. Check and if necessary replace air
cleaner filter.
Step 3. Check load on Generator by checking % rated current meter on control panel (paragraph
3-19).
Notify immediate supervisor:
6. ENGINE RUNS WITH EXCESSIVE OIL CONSUMPTION.
Step 1. Inspect for oil leaks especially at front and rear oil seals, at oil pan gasket and dipstick
cap (paragraph 3-24).
Notify higher level maintenance.
Step 2. Check for red warning signal on air flow indicator indicating a dirty air cleaner filter
(paragraph 3-18).
Clean or replace filter. Reset air flow indicator by pushing reset button.
Step 3. Check for air leaks to crankcase (loose oil filler cap, leaks at gaskets, etc) (paragraph
3-24).
Tighten oil filler cap or notify higher level of maintenance.
3-7
TM 5-6115-585-12
NAVFAC P-8-623-12
TO-35C2-3-455-1
TM-05684C/05685B-12
Table 3–3. Troubleshooting (Cont)
paragraph 3-17
paragraph 3-21
3-11. BATTERY ASSEMBLY.
a. Inspect (see figure 3–2). On generators equipped
with acoustic suppression (ASK), remove batteries access
door.
The 6TN and 6TL batteries can be mixed or matched.
(1) Inspect battery cable terminal connectors (2),
(10) and (11) for corrosion, deterioration, or physical
batteries will perform properly in hot weather as long as
damage. Inspect battery terminal covers (12) for proper
installation and physical condition. Replace if cracked, split
or tom.
(2) Inspect cables (1), (3) and (4)) for breaks,
damage and deteriorated insulation.
(3) Inspect battery top frames (5), bottom frame
(12), and tray (13) for corrosion or physical damage. Check
to see that batteries are held securely in place and that all
attaching hardware nut (7), washer (8), screw (14), washer
(15) and bolt (9) are securely in place.
However, maintenance–free batteries cannot be mixed or
matched with military batteries. The 6TN and or the 6TL
electrolyte levels are carefully monitored. If the electrolyte
expands and causes the level to rise, some fluid must be
removed. If the level becomes too low due to evaporation,
distilled water may be used to obtain the proper level. A
good grade of drinking water (excluding mineral waters)
may be used if distilled water is not available.
Electrolyte
(NSN S
6810-00-249-9354
and
6810-00-843-1640) have a specific gravity of 1.280 and
should be used in these batteries. Do NOT adjust the
electrolyte in wet batteries to a lower specific gravity.
warning
Battery electrolyte can cause severe bums
to the skin. Always flush exposed parts of
the skin with water as quickly as possible.
3-8
Change 9
(4) Inspect battery (6) for leaks or cracks. Check
top of battery and battery caps for cleanliness. Check battery
electrolyte
(liquid)
level.
Level
should be
TM 5-6115-585-12
NAVFAC P-8-623-12
TO-35C2-3-445-1
TM-05684C/05685B-12
Figure 3-2. Battery Assembly
about 3/8 inch above top of plates. Check that battery
caps are not loose and that vent holes are free of
obstructions.
b. Clean.
c. Service.
(1) Fill batteries (6) with clean distilled water to a level of
3/8 inch above top of plates. In freezing weather run engine a
minimum of one hour after adding water.
3-12. GROUND ROD AND FUEL DRUM ADAPTER PIPE
HOLD-DOWN ASSEMBLY.
a. Removal (see figure 3-3). On ASK equipped generators,
remove oil access door and fuel filter access door.
Be sure that none of the neutralizing solution
enters the battery cells.
(1) Clean terminal connectors (2), (10) and (11),
batteries (6) and frame using a suitable neutralizing agent
and wipe dry with a clean cloth. Notify higher level maintenance if terminals, cables, batteries or frame is damaged.
Protect battery terminals with a light coat of silicone base
grease.
(1) Ground Rod and Fuel Drum Adapter Pipe.
Loosen screws (1), lockwaahers (2). Slide ground rod pieces
(3) out of hold-down assembly (4), then slide out fuel drum
adapter pipe (5).
(2) Hold-down adapter. Grasp hold-down assembly
(4) and remove screw (1) and lockwaeher (2). Remove holddown asseembly.
Change 8 3-9
TM5-6115-585-12
NAVFAC P-8-623-12
TO-35C2-3-455-1
TM-05684C/05685B-12
Do not over-tighten screws as damage to
hold-down assemblies may occur.
3-13. F U E L T A N K A S S E M B L Y .
a. Cleaning and Inspection (see figure 3-4).
(1) Fuel Tank Strap Assemblies. Inspect both
straps (1) for damage that would prevent them from
securely holding fuel tank (4) to skid-base (10).
Check that both straps are tight. Tighten Straps by
tightening nuts (2) and washers (3) securing each
strap to skid-base.
(2) Fuel Tank. Visually check fuel tank (4) for
dents or leaks. Check that filler (8) fits securely
onto tank and that filler cap and surrounding area is
clean. Clean using solvent and clean cloth.
(3) Fuel Level Gage. Check fuel level gage(6)
for physical damage. Check that gage shows FULL
when tank is full, and EMPTY when tank is empty.
Notify higher level maintnenance for replacement of
fuel level gage.
Figure
3-3. Ground Rod and Fuel
Adapter Pipe Hold-Down
Drum
b. Cleaning and Inspection.
(1)Ground Rod. Inspect ground rod for damage
and corrosion. Pay particular attention to the threaded
portions of each piece, making certain the pieces can
be properly assembled.
(2) Fuel Drum Adapter Pipe. Inspect pipe (5) for
c l e a n l i n e s s a n d condition of threaded portions. Clean
pipe with cleaning solvent and dry.
(3) Hold-down. Check hold-down assembly (4) for
physical damage and check condition of hardware (1
and 2).
c.
(4) Float Switch. Inspect float switch (7) for physical damage. Check that float switch is properly attached to tank.
(3) Fittings. Inspect three fittings (5) for physical
damage. Check that fittings are secured to fuel tank.
Notify higher level maintenance of leaky or damaged
fittings.
(6) Fuel Drain Valve. Inspect drain valve (9) for
physial damage. Check that valve operates properly.
If not, notify higher level maintenance.
(7) Filler Cap Assembly Inspect filler cap (8) for physical
damage. Check that vent on underside of cap opens and closes
easily. Ensure that vent on underside of filler cap is open before
starting generator.
3-14. S H U T T E R B O X A S S E M B L Y .
a. Inspect (see figure 3-5).
Installation.
(1) Hold-down. Position lockwashers (2) on
screws (1) and insert into holes in skid-base (6).
Position hold-down assemblies (4) against skid-base
(6), then start screw (1).
(2) Ground Rod and Fuel Drum Adapter Pipe.
Slide fuel drum adapter pipe (5) and ground rod (3).
between hold-down assemblies (4) and skid-base
(6). Tighten screws (1).
3-10 Change 8
Do not operate unit if shutter assembly is not
operating properly.
(1) Shutter Assembly. Check shutter assembly with
unit running under normal operating conditions.
When
engine is cold, shutter assembly should be fully closed.
When engine warms up, shutter assembly should be fully
open at 14°F (60°C) or above at full rated load. Make
certain shutter assembly is free of dirt and oil which could
cause shutters to stick.
TM5-6115-585-12
NAVFAC P-8-262-12
TO-35C2-3-455-1
TM-05684C-12
Figure 3-4. Fuel Tank
(2) Bracket Assembly. Check bracket assembly
(1) for secure mounting to shutter (4) and shutter box
(10). Brackets (11) should turn freely on bearings (12)
without excessive play.
(3) Shutters. Check shutters (4) to see that they
are free of dirt or grease. Check to see shutters are
flat and straight. Check to see that shutters close securely and that they can be easily opened by hand.
(4) Thermo Power Unit. Check thermo power unit
(7) located on inside of shutter assembly to see that
it is free of dirt, grease, or physical damage. Notify
higher level of maintenance for replacement of thermo
power unit.
3-11
TM5-6115-585-12
NAVFAC P-8-623-12
TO-35C2-3-455-1
TM-05684C/05685B-12
Figure 3-5. Shutter and Thermo Power Element Assembly
3-12
Change 2
TM5-6115-585-12
NAVFAC P-8-623-12
TO-35C2-3-455-1
TM-05684C/05685B-12
Figure 3-6. Exhaust Muffler Assembly
NOTE
3-15. EXHAUST MUFFLER ASSEMBLY.
Mount 45° elbows (12) on the mufflers (3) to deflect
exhaust heat away from the batteries.
Do not touch muffler assembly while unit is
running or immediately after shutdown, as
severe burns may result.
a. Inspect (see figure 3-6). Manually open shutter
assembly and check that muffler assembly (3) is
securely fastened to unit. Check that nuts (2) and lock
tabs (1) attaching muffler to unit are in place.
Check to see that exhaust is not obstructed and there
is no evidence of leaks.
3-16.
ENGINE STARTER ASSEMBLY.
a. Cleaning and Inspection (see figure 3-7). On ASK
equipped generators, remove BATTERIES access door.
Clean engine starter (1) by removing loose dirt with a
stiff nonmetallic brush. Clean off remaining dirt and oil
with dry cleaning solvent (Fed. Spec. P-D-680). Inspect
starter to see that electrical connections (4) are clean
and tight. Check to see that mounting bolts (2) are tight.
Check starter (1) for physical damage.
Change
8
3-13
TM5-6115-585-12
NAVFAC P-8-623-12
TO-35C2-3-455-1
TM-05684C/05685B-12
Figure 3-7. Electric Starter
3-17. AC OUTPUT CONTROL BOX ASSEMBLY.
a. Inspect (see figure 3-8).
(1) Control Box Assembly. Check box assembly
for cracks, dents, or other physical damage. Inspect
to see that covers (1) for both 120 volt ac outlets
operate properly (MEP-003A only). Check latches (2)
securing load terminal board cover (3). Check to see
that cover (3) for load terminal board opens and
closes properly. Check to see that electrical connectors (4) are clean and securely mounted.
Figure 3-8. AC Output Control Box Assembly
Check that clamp (17) attaching dust cap (18) to housing is secure and arrows on dust cap are pointing up.
Check that two clamps (7) holding cold weather
operation intake hose (19) are secure.
(2) Load Terminal Board Assembly. Check condition of load terminal board (5) and load terminals
(6) for cleanliness and tightness. Make certain that
the load leads are secured to terminals.
(2) Bracket Assembly. Inspect bracket assembly
(1) to see that it is securely fastened to generator
housing (2). Check that capscrews (3) and lockwashers
(4) which attach bracket to generator housing, and
three spacers (5) are in place.
3-18. AIR CLEANER ASSEMBLY.
(3) Inlet Shutter (see figure 3-10). Check inlet
shutter (6) to see that it slides easily from COLD
WEATHER to NORMAL WEATHER position and back.
a. Inspect on Equipment (see figure 3-9). On ASK equipped
generators, open AIR INTAKE and AIR CLEANER access doors.
(1) Housing. Inspect housing (8) for dirt, grease,
dents or other physical damage. Check to see that
housing is securely attached to bracket assembly (1).
3-14
Change 8
(4) Air Flow Indicator (see figure 3-10). Check
air flow indicator (7) for dirt, grease, physical damage, or if the red flag is visible.
TM5-6115-585-12
NAVFAC P-8-262-12
TO-35C2-3-455-1
TM-05684C-12
Figure 3-9. Air Cleaner and Shroud Assembly
3-15
TM5-6115-585-12
NAVFAC P-8-623-12
TO-35C2-3-455-1
TM-05684C/05685B-12
b. Removal and Service.
(1) Dust Cap (see figure 3-10). Every 100 operating hours (more frequently in dusty areas) service
dust cap (1) by removing cap from air cleaner housing (5), removing rubber seal (9), and cleaning out
any dirt or debris. The clamp (10) is loosened to remove dust cap and seal.
Do not use compressed air of more than 100
psi on the air cleaner element.
(2) Air Cleaner Element (see figure 3-10). Every
12 months, 1000 operating hours, or when red warning on air flow indicator becomes visible, whichever
comes first, clean or replace air cleaner element
(4). To remove the element remove dust cap (1) and
seal (9). Remove wing nut (2), seal (3) and remove
element (4). To clean element, direct dry clean air
up and down pleats on the inside of the element. (See
figure 3-11.) If element is very dirty, wash it by
soaking in mild detergent and water. Soak for fifteen
minutes or more. Rinse element thoroughly with
clean water from hose (maximum pressure 40 psi).
Air dry completely a minimum of 24 hours before
re-using. Do not dry with compressed air or heat
over 150°F (66°C).
Figure 3-10. Air Cleaner Assembly
3-16
Change 2
TM5-6115-585-12
NAVFAC P-8-623-12
TO-35C2-3-455-1
TM-05684C/05685B-12
ing lamp covers. Check
are clean and tight.
that
electrical
connections
(3) Panel Light Switch. Operate lamp switch (2)
to check that lamps are operable.
(4) Meters. Battery Indicator (M1), Hourmeter
(M2), Frequency Meter (M3), Percent Current Meter
(M4) and AC Voltmeter (M5). Inspect meter glass to
see that it is not cracked. Check to see the meter
face is clean and readable. Check to see that pointer
is not bent. Check to see that electrical connections
are clean and tight.
(5) DC Control Circuit Breaker (CB2). Inspect
circuit breaker for physical damage. Inspect electrical connections to see that they are clean and tight.
Check to see that when button on breaker is pushed
in or pulled out, it will remain in that position.
Figure 3-11. Cleaning Air Filter Element
Do not re-use element more than twice. Do
not re-use element if it has even the slightest
rupture.
c.
Installation.
(1) Air Cleaner Element. Slide element (4, figure
3-10) over stud in housing (5), install seal (3) on wing
nut (2) and secure element with wing nut (2). Hand
tighten wing nut. Install seal (9) and dust cap (1). Be
certain “Top” on dust cap faces up. Retighten clamp
(10) to secure dust cap. Depress reset button (8) to
reset indicator (7).
(6) Master Rotary Switch (S1). Inspect switch for
physical damage. Inspect electrical connections to
see that they are clean and tight. Check to see that
when placed in the OFF, PRIME & RUN AUX FUEL,
or PRIME & RUN positions the switch will remain in
position. Check to see that when placed in the PREHEAT position and released, switch returns to OFF
position. With DC Control Circuit Breaker (CB2)
pulled out (unit will not crank), check to see that when
released from START position the switch will automatically return to PRIME & RUN position.
(7) Panel Light Switch (S2). Inspect switch for
physical damage. Inspect for clean and tight electrical connections. Check to see that switch will remain in both ON and OFF positions.
(8) Range Selector Switch (S6). Inspect switch for
physical damage. Inspect for clean and tight electrical connections. Check to see that switch will remain in each of the six switch positions.
(9) Voltage Adjust Rheostat (R1). Inspect rheostat for physical damage. Inspect for clean and tight
electrical connections. Note rheostat position and
check that rheostat moves smoothly thru its range.
Return rheostat to previously noted position.
3-19. CONTROL CUBICLE ASSEMBLY.
a. Inspect (see figure 3-12).
(1) Control Cubicle Assembly. Inspect cubicle for
dirt, grease or physical damage which might affect
operation of the unit. Loosen three fasteners holding
control panel to permit access to the inside of the
cubicle. Check to see that all parts mounted to the
cubicle are secure and all hardware is in place.
Check that all instruments and controls operate normally when unit is running. Check for broken or badly
insulated harness wires and, if necessary, refer to
higher level of maintenance.
(2) Panel Light Assemblies (DS1 and DS2). Inspect panel light assemblies (1) for cracked or miss-
(10) AC Voltage Regulator (A2). Visually inspect
board and components for signs of overheating,
cleanliness and physical damage. Inspect for clean
and tight connections to the board and that board is
securely mounted.
(11) Transformers (T1 and T2). Inspect transformers for physical damage, cleanliness and that
electrical connections are clean and tight.
(12) Wiring Harness. Inspect wiring harness for
physical damage such as broken or frayed wires or
damaged insulation.
(13) Control Cubicle Box. Inspect box for physical damage.
Change 2
3-17
TM5-6115-585-12
NAVFAC P-8-262-12
TO-35C2-3-455-1
TM-05684C-12
Figure 3-12. Control Cubicle
3-18
TM 5-6115-585-12
NAVFAC P-8-623-12
TO-35C2-3-455-1
TM-05684C/05685B-12
b. Service.
(1) Panel Light. Panel lamp cover can be removed
for cleaning by turning them counterclockwise when
viewed from front.
Inspect two fuel filter assemblies (10) for dents or other
physical damage. Check for leaks especially around fuel line
fittings (12), drains (1), and where bowl joins the head. Check
that fuel filter assemblies are securely attached to mounting
bracket (16) and that bracket is securely attached to bracket
support on skid-base.
(2) Panel Lamps. Panel lamps are screw in base
types and are replaceable.
3-20. FUEL SYSTEM (LESS TANK).
a. Inspect (see figure 1-1).
(1) Fuel Filter Assemblies (see figure 3-13). On ASK
equipped generators, remove FUEL FILTERS access door.
(2) Fuel Strainer Assembly (see figure 3-13).
Inspect strainer assembly (11) for dents or other physical damage. Check for leaks especially around fuel
line fittings (12), drain (1), or where the bowl joins the
head. Check that strainer assembly (11) is securely
attached to mounting bracket (16).
Figure 3-13. Fuel Filters and Fuel Strainer Assembly
Change 8
3-19
TM 5-6115-585-12
NAVFAC P-8-623-12
TO-35C2-3-455-1
TM-05684C/05685B-12
(3) Fuel Pump Assemblies (Three) (see figure
3-14). Inspect fuel pumps (1) for dents or other physical damage. Check for leaks especially around hose
assembly fittings (2). Check that fuel pumps are securely a t t a c h e d t o m o u n t i n g b r a c k e t ( 3 ) a n d t h a t
mounting bracket is securely attached to bracket support
on
skid-base.
Inspect
electrical
leads
to
fuel
pumps to see that wires and connectors are not
broken, frayed, or damaged. Check that connectors
are tightly connected. Check that cap (4) on auxiliary
fuel pump inlet is securely in place when unit is not
being run from auxiliary fuel supply.
(4) Fuel Hoses. Inspect fuel hoses (2, 3 and 4,
figure 3-13) for leaks or physical damage. Check to
see that fuel hose fittings are securely tightened in
place.
b. Service.
(1) Fuel Filter Assemblies (see figure 3-13). Daily
before and after operation, open drain valves (1) and drain
water and sediment from assemblies.
(2) Fuel Strainer Assembly. Daily, before and after
operation, open drain valves (1) and drain water and sediment from strainer assembly (11).
Figure 3-15. Control Cubicle Support Assembly
3-21. C O N T R O L C U B I C L E S U P P O R T A S S E M B L Y ,
SPEED CONTROL AND ENGINE CONTROL
WIRING HARNESS.
a. Inspect.
(1) Vibration Mounts (Four) (see figure 3-15).
Inspect vibration mounts for deterioration or physical damage. Inspect mounts to see that they are free
of dirt, fuel, or oil. Check to see that mounts are
securely attached to control cubicle support on skidbase. If mounts are faulty, refer to higher level of
maintenance.
(2) Engine Control Wiring Harness Assembly. On ASK
equipped generators, open or remove all access doors. Inspect
wiring harness for broken or frayed wires. Check for wires with
damaged or deteriorated insulation. Check that all connectors and
terminals are clean and tight.
Figure 3-14. Fuel Pump Assembly
3-20
Change 8
(3) Speed Control Assembly (see figure 3-16). On ASK
equipped generators, lift motor speed control flap. Inspect to see
that speed control is firmly attached to unit. Check that speed
control moves in and out freely. If speed control is loose, refer to
higher level maintenance.
TM5-6115-585-12
NAVFAC P-8-623-12
TO-35C2-3-455-1
TM-05684C/05685B-12
Figure 3-16. Speed Control Assembly
3-22. ENGINE COOLING SYSTEM.
a. Inspect (see figure 3-17). On ASK equipped generators,
inspection is limited to parts of shroud assembly visible through
access doors.
(1) Shroud Assembly. Inspect shroud assembly (11) and
door panel (12) for dents or other physical damage. Inspect
hinge attaching door panel (12) to see that it swings freely.
Check to see that shroud assembly and door panel are properly secured to engine.
damage. Check that blower housing assembly is
properly secured to engine. With engine running
check for noise which would indicate blower wheel
is rubbing against blower housing assembly or blower
grille. (For units without ASK.)
(3) Blower Housing Grill Assembly. Inspect grille (30)
for dents or other physical damage and that grille is properly
secured to engine. (For unite without ASK.)
(2) Blower Housing Assembly. Inspect blower
housing assembly (33) for dents or other physical
Change 8
3-21
TM5-6115-585-12
NAVFAC P-8-262-12
TO-35C2-3-455-1
TM-05684C-12
Figure 3-17. Engine Cooling Assembly (Sheet 1 of 2)
3-22
TM5-6115-585-12
NAVFAC P-8-623-12
TO-35C2-3-455-1
TM-05684C/05685B-12
Figure 3-17. Engine Cooling Assembly (Sheet 2 of 2)
3-23. GENERATOR ASSEMBLY.
On ASK equipped generators, inspection is limited to screen
guard areas visible through access doors. Inspect screen
guard (3, figure 3-18) to see that it is clean and free of
debris and free of dents or cracks. Check that screen-guard
is securely fastened in place over opening in generator
housing-stator assembly. Inspect end-bell (2) to see that it is
clean and free of cracks or other physical damage. Check
that openings in end-bell and end-bell cover are free of
debris. Check that end-bell is securely attached to generator
housing.
3-24. ENGINE ASSEMBLY.
a. Lifting Attachment (sea figure 3-17). On ASK equipped
generators, open air intake door. Inspect for cracks or other
physical damage. Check that mounting screws (37) are secure.
NOTE
On ASK aquipped generators, if intake manifold is
suspected of possible problems, refer to higher level
of maintenance.
b. Intake Manifold Assembly (see figure 3-19). Inspect intake
manifold (1) for cracks or physical damage. Check that manifold
is properly secured to cylinder head and mounting screws (5)
and lock tabs (3) are in place.
c. Oil Drain Hose (see figure 3-20). On ASK equipped
generators, remove oil access door. Inspect oil drain hose for
physical damage. Check that drain valve operates properly and
does not leak when closed. Check that oil drain hose is properly
stored when not in use.
Figure 3-18. Generator Assembly
d. Engine Mounting Assemblies (Two) (see figure 3-19). On
ASK equipped generators, remove oil access door and batteries
access door. Inspect engine mounts (13) for deterioration or
physical damage. Check for accumulation of dirt, fuel, or oil.
Check that mounts are securely attached to engine and to skidbsse with all mounting hardware in place.
Change 8
3-23
TM5-6115-585-12
NAVFAC P-8-262-12
TO-35C2-3-455-1
TM-05684C-12
Figure 3-19. Intake Manifold Assembly
3-24
TM5-6115-585-12
NAVFAC P-8-262-12
TO-35C2-3-455-1
TM-05684C-12
Figure 3-21. Oil Filter and Oil Pressure Switch
Figure 3-20. Oil Drain Hose
e. Oil Filter Assembly (see figure 1-1). Inspect oil
filter assembly for dents or other physical damage.
Check for leaks especially at gasket (1, figure 3-21)
between body (3) and adapter (5) and between bolt (2)
and body (3). Check to see that drain plug (4) is securely in place and does not leak.
f. Oil Pressure Switch (see figure 3-21). Inspect oil
pressure switch (6) for dents or other physical damage. Check that switch is securely mounted to oil
filter adapter (5). Check for leaks where switch (6)
attaches to adapter (5). Check that both electrical
connections (7) to switch (6) are tight and free of corrosion.
g. Oil Pressure Gauge Assembly (see 45, figure
3-17). Inspect glass lens to see that it is not cracked.
Figure 3-22. Engine Stop Solenoid
3-25
TM5-6115-585-12
NAVFAC P-8-623-12
TO-35C2-3-455-1
TM-05684C/05685B-12
Inspect to see that there is no dirt or oil underneath
lens indicating that gage is no longer properly sealed.
Check to see that pointer is not bent or damaged.
Check that markings on gage are readable. Check to
see that meter is fastened securely to engine.
h. Flexible Oil Line (see figure 3-17). Inspect
flexible oil line to the oil pressure gage (45) for
physical damage. Check for leaks especially around
fittings.
i. Engine Stop Solenoid (see figure 3-22). Inspect
stop solenoid (1) for dents or other physical damage.
Check that solenoid is securely attached to cylinder
shroud bottom pan with two screws (2) and lockwashers (3). Check that electrical connections (4) to solenoid are clean and tight.
j. Oil Dip-Stick and Oil Fill Tube (see figure
4-42). Inspect oil dip-stick and oil fill tube for
physical damage. Check for leaks especially at
Figure 3-23. Battery and Frame
3-26
Change 5
TM5-6115-585-12
NAVFAC P-8-623-12
TO-35C2-3-455-1
TM-05684C/05685B-12
g a s k e t b e t w e e n o i l f i l l t u b e a n d engine block. Check
t h a t d i p - s t i c k f i t s s e c u r e l y i n t o oil fill tube with no
leaks.
3-25.
SKID-BASE ASSEMBLY.
Battery electrolyte can cause severe burns to
the skin. Always flush exposed parts of the
skin with water as quickly as possible.
a. Inspect (see figure 3-23).
(1) Battery Frame Bottom. On ASK equipped generators,
remove BATTERIES access door. Inspect battery frame bottom
(6) for dents, cracks, corrosion, or other physical damage. Check
to see that battery frame bottom is free of corrosion.
(2) Battery Tray. Check to see that battery tray
(8) is free of corrosion. Check that battery tray is
securely attached to skid-base (9) with screw.
(3) Ground Stud (see figure 3-24). On ASK equipped generators, lift rear penal flap and inspect ground stud for deformed
threads, corrosion, or other physical damage. Check that ground
stud is securely attached to skid-base. Check that connection to
stud are clean and tight.
b. Cleaning. Remove corrosion with a suitable neutralizing
agent. Wipe dry with a clean cloth.
Figure 3-24. Ground Stud
Change 8 3-27/(3-28 blank)
TM5-6115-585-12
NAVFAC P-8-623-12
TO-35C2-3-455-1
TM-05684C/05685B-12
CHAPTER 4
ORGANIZATIONAL
MAINTENANCE
Section I. SERVICE UPON RECEIPT OF MATERIAL
4-1. I N S P E C T I N G
AND
SERVICING
GENEATOR
SET.
a. Unloading Equipment.
(1) A crane, fork lift, or similar lifting device
or fabricated skids must be used to unload the
equipment. The equipment must be kept in the UP
position while unloading.
(4) Check engine intake and exhaust systems (figure 1-2) to make certain they are unobstructed by
foreign material.
(5) Check that main fuel tank drain cock (figure
1-2) is closed.
(6) Remove all preservative
preservative crankcase oil.
material
except
for
Do not smoke or use an open flame in the
vicinity when filling fuel tank.
Do not use a lifting device with a capacity of
less than 1500 pounds. Do not allow the crated
Generator Set to swing while it is suspended.
Failure to observe this warning may result in
serious injury or death to personnel.
b. Unpacking.
(1) Before unpacking, move the engine Generator
Set as near as possible to the location where it will
be operated.
Exercise care in the use of bars, hammers,
and similar tools while uncrating the unit to
avoid damaging the equipment.
(2) Remove the top and then the sides of the
crate (figure 4-1).
(3) Remove barrier bag, dessicant bags, and shipping material from engine Generator Set.
(4) Disconnect engine Generator Set from crate
skid by removing carriage bolts, nuts, washers, and
lift engine Generator Set off skid.
c. Service and Inspection.
(1) Prepare the engine Generator Set for inspection and servicing as outlined in the following
paragraphs. For Army users, refer to D A F o r m 2 2 5 8 .
(2) Make a thorough visual inspection of the entire Generator Set for loose or missing hardware or
damaged
or
missing
parts.
Report
all
damaged
or
missing parts on DD Form 6.
(3) Inspect all air cleaner connections for tightness and damage.
(3.1) On ASK equipped generators, inspect ASK for damage.
Check that exhaust plenum is clear of debris.
NOTE
On generators equipped with acoustic suppression
kit (ASK), route auxiliary fuel line under rear flap on
skid to auxiliary fuel pump.
(7) Fill fuel tank with appropriate fuel and set
MASTER SWITCH (figure 2-3) to RUN position to connect main fuel tank to electrical fuel pumps. If an
auxiliary source of fuel is to be used in operating the
engine Generator Set, connect fuel hose to AUXILIARY
FUEL, CONNECTION and set MASTER SWITCH to
RUN AUX FUEL position.
Do not attempt to remove sealing particles
that have fallen inside the battery as
damage to the battery could occur.
(8) Batteries are shipped in a dry state. If
batteries are hermetically sealed, destroy sealing
device inside each cell by tapping with a blunt instrument. Battery electrolyte must be requisitioned separately. To activate the battery, remove all
caps and fill battery cells with electrolyte. Electrolyte level should be 3/8 inch above top of plates
for each cell. Make sure vent holes in caps are
open, and replace caps. Connect batteries as
shown in figure 4-16.
NOTE
The electrolyte level must be rechecked approximately 30 minutes after initial filling as the
platas end separator will absorb the solution,
thus resulting in a low level. If the battery is not
to be used within 12 hours after initial filling, it
should be put on a charger and brought up to
the correct specific gravity. Test batteries as
deecribed in paragraph 4-25c, for the ambient
temperature in effect.
Change
8
4-1
TM5-6115-585-12
NAVFAC P-8-623-12
TO-35C2-3-455-1
TM-05684C/05685B-12
Figure 4-1. Uncrating Generator Set
Do not smoke or use an open flame in the vicinity when servicing batteries. Battaries generate
hydrogen, a highly explosive gas. Electrolyte
contains sulphuric acid and can cause severe
burns. Handle it with care. If the solution comes
in contact with the body, eyes or clothing, rinse
immediately with clean water. Avoid spilling
electrolyte on painted surfaces.
(9) Check crankcase oil level (paragraph 3-2) and
add oil as necessary (paragraph 3-3) in accordance with
the lubrication order (figure 3-1).
4-2. I N S T A L L I N G G E N E R A T O R S E T .
a. General. The engine Generator Set should be installed on a site clear of obstacles, with ample ventilation and level within ±15 degrees maximum.
4-2
Change 4
b. Outdoor Installation. When preparing for a permanent installation, be sure the base is solid enough to
support the weight of the unit. See figure 1-4 for dimensions of the bas. Seclect a location where there will be
sufficient space on all sides for servicing and operation
of the engine Generator Set. When preparing a temporary installation, move the engine Generator Set as
close to the worksite as practical. Use suitable planks,
logs, or other material for a base in an area where the
ground is soft.
c. Indoor Installation. Keep the area wall ventilated
at all times, so that the engine Generator Set will
receive a maximum supply of air. If a free supply of
fresh air is not available, provide duct work which will
assure the required ventilation (refer to paragraph 110.b.(1).). If louvers are used at the air entrance, increase the duct work size by 25 to 50 percent. Install a
gas-tight metal pipe exhaust from the exhaust outlets
to the outside of the installation. The termination of
the exhaust pipe shall be such that hot gases or sparks
will be discharged harmlessly and will not be directed
against combustible material or into an area contain-
TM5-6115-585-12
NAVFAC P-8-623-12
TO-35C2-3-455-1
TM-05684C/05685B-12
ing flammable gases or vapors. Use as few bends in the
pipe and as short a pipe as possible. The exhaust pipe
should include a low point with suitable means for
draining of condensate. Provide metal shields, 12 inches larger in diameter than the exhaust pipe where the
line passes through flammable walls. Wrap the exhaust
pipe with asbestos if there is any danger of anyone
touching it.
Do not operate the engine Generator Set in an
enclosed area unless the exhaust gases are
piped to the outside. Inhalation of exhaust
fumes will result in serious illness or death.
d. Leveling. The Generator Set is a portable unit
and is designed to operate satisfactorily up to 15º outof-level. Set up the unit as level. Set up the unit as level
as possible and keep it as level as possible during
operation.
e. Grounding. The Generator Set must be grounded
prior to operation. The ground can be, in order of
preference: (1) an underground metallic water piping
system, (2) a driven metal rod, or (3) a buried metal
plate (figure 4-2). If the effectively grounded portion of
the buried metallic water pipe is less than 10 feet due to
insulated sections or joints, this preferred grounding
method must be supplemented by an additional driven
metal rod ground or a buried metal plate ground. A
driven metal ground rod must have a minimum
diameter of 5/8 inch if solid or 3/4 if pipe, and driven
to a minimum depth of 8 feet. A buried metal ground
plate must have a minimum area of 9 square feet,
minimum thickness of 1/4 inch, and be buried at a
minimum depth of 4 feet. The ground lead must be at
least No. 6 AWG (American Wire Gauge) copper wire.
Change 4
4.2.1/(4-2.2
blank)
TM5-6115-585-12
NAVFAC P-8-623-12
TO-35C2-3-455-1
TM-05684C/05685B-12
Figure 4-2. Grounding Generator Set
C h a n g e
4 - 3
TM5-6115-585-12
NAVFAC P-8-262-12
TO-35C2-3-455-1
TM-05684C-12
Section II. MOVEMENT TO A NEW WORKSITE
DISMANTLING GENERATOR SET FOR MOVEMENT.
4-3.
a. Preparation for Movement.
(6) On ASK equipped generators, remove batteries access
door. Disconnect negative battery cable from battery.
(7) Disconnect any other hoses, lines or cables,
if used.
(1) Disconnect the load cables.
(8) Close and secure all doors and panels.
(2) Remove exhaust pipe extension if used.
(3) Make certain vent on underside of fuel filler
cap is closed.
(4) Refer to the Items Troop lnstalled or Authorized List (Appendix B and make sure all items are on
the equipment.
(5) Disconnect the ground lead from the ground
stud.
b. Movement. Preferred means of movement is to
transport. Towing for short distances is permissible
if terrain is suitable.
4-4. R E I N S T A L L I N G
MOVEMENT.
GENERATOR
SET
AFTER
Refer to paragraph 4-2 for reinstallation after movement to a new worksite.
Section III. REPAIR PARTS; SPECIAL TOOLS; SPECIAL TEST, MEASUREMENT
AND DIAGNOSTIC EQUIPMENT AND SPECIAL SUPPORT EQUIPMENT
4-5. SPECIAL TOOLS AND EQUIPMENT.
Special tools are listed in Appendix C, section III.
4-6. MAINTENANCE
REPAIR
PARTS.
Repair parts and equipment are listed and illustrated
in the repair parts and special tools list manual
covering organizational maintenance for this Generator Set.
Section IV. LUBRICATION INSTRUCTIONS
4-7. L U B R I C A T I O N .
a. Lubrication Order. Lubrication instructions for
the Generator Set are contained in L05-6115-585-12.
(F) Air Force lubrication instructions appear in the
applicable work card set in the TO 35C2-3-1-426
series.
(5) Open drain plug (1, figue 4-30) and drain
oil filter oil into a container having at least a 1
quart capacity.
(6) Remove through bolt (2) and pull oil filter
body (3) loose from oil filter adapter (5).
(7) Discard gasket (4) and oil filter element
(6).
b. Oil Change (see figure 3-20). On ASK equipped generators,
remove oil access door.
(1) With drain valve closed, disconnect oil drain
hose from the plug on the skid-base.
(2) Open drain valve and drain oil into a container having at least a 7 quart capacity.
(3) Close drain valve.
(4) Connect oil drain hose to plug on skid-base.
4-4
Change 8
(8) Wipe inside of oil filter body (3 clean with a
rag.
(9) Wipe inside of adapter (5) clean with a
rag. Insure the gasket groove is free of foreign
material. Inspect gaskets (7) and (10) to be sure
they are not torn or frayed. Check that retainer (8),
and spring (9) are not deformed. Replace damaged
components.
TM5-6115-585-12
NAVFAC P-8-262-12
TO-35C2-3-455-1
TM-05684C-12
(10) Apply a thin coat of clean engine oil,
MIL-L-2104 to a new gasket (4) Install new gasket
(4) in groove of adapter (5).
(11) Assemble components on through belt (2) in
the order shown in figure 4-30. Position body (3) with
drain plug (1) down on adapter (5). Tighten through bolt
(2) to 13± 2ft-lb dry.
(12) Pour 6.5 quarts of engine oil (see lubrication order for proper grade of oil) into oil fill tube
(9, figure 1-1).
(13) Check oil level with dip-stick.
(14) After 5 minutes of engine operation, check
crankcase oil level and bring oil level to full mark.
Section V. PREVENTIVE MAINTENANCE CHECKS AND SERVICES (PMCS)
4-8. P M C S , G E N E R A L .
To ensure that the Generator Set is ready for operation
at all times, it must be inspected systematically so defects
may be discovered and corrected before they result in
serious damage, failure or safety hazard. The necessary
preventive maintenance checks and services that are to
be performed by Organizational personnel are listed and
described in the following paragraphs. Defects discovered
during operation will be noted for future correction. Stop
operation immediately if a deficiency is noted which would
damage the equipment or present a safety hazard. All
faults will be recorded together with the corrective actions
taken on the applicable form. Air Force users shall refer
to the applicable inspection manuals and work card sets
in the TO 35C2-3-1-426 series for periodic requirements.
Marine Corps users should refer to current issue of TM
4700-15/1. On ASK equipped generators, full or partial
removal of ASK may be necessary to perform PMCS.
Table 4-1.
4-9. Determining PMCS Intervals. Organizational
PMCS on this unit should be performed on a - per
hours of operation - basis. The running time meter
on the control panel should be used to determine the
Generator Set operating time.
4-10. PMCS for Units in Continuous Operation. For
PMCS performed on an operating time basis, perform PMCS as close as possible to the time intervals
indicated. For units in continuous operation, perform
PMCS before starting operation if continuous operation will extend service interval past that which is
shown.
4-11. (A. N, MC) Preventive Maintenance Checks and
Services. Table 4-1 contains a tabulated listing of
PMCS which shall be performed by Organizational
personnel. The item numbers are listed consecutively
and indicate the sequence of minimum requirements.
ORGANIZATIONAL PREVENTIVE MAINTENANCE CHECKS AND SERVICES
Change
8
4-5
TM5-6115-585-12
NAVFAC P-8-262-12
TO-35C2-3-455-1
TM-05684C-12
TABLE 4-1.
ORGANIZATIONAL PREVENTIVE
ITEM TO BE
INSPECTED
MAINTENANCE CHECKS AND SERVICES--continued
PROCEDURES
Check for and have repaired
EQUIPMENT IS
Not Ready/
Available if:
Open drains on fuel strainer,
and primary and secondary filters.
Drain water and sediment (para
3-20). Allow to drain until fuel
runs clean.
4-6
Change 5
Fuel Tank
Open drain on fuel tank and drain
water and sediment (para 3-13).
Allow to drain until fuel runs
clean.
Lubricating
Oil and Filter
Change lubricating oil and filter
every 100 hours of operation
(L.O., fig. 3-1).
Fuel
er
Clean fuel strainer e v e r y 3 0 0
hours of operation ( p a r a 4 - 2 0 ) .
Strain-
Primary Fuel
Filter
Service primary f i l t e r e v e r y 5 0 0
hours of operation ( p a r a 4 - 2 0 ) .
Secondary
Fuel Filter
Service secondary filter every
1000 hours (para 4-20).
Batteries
Perform a hydrometer test on
batteries every 300 hours, or
Refer to para 4-25c
quarterly.
for test procedures.
Crankcase
Breather
Inspect breather tube every 500
hours, clean as necessary (para
4-45).
Dust caps
on air
cleaner
Clean out dust caps on air
cleaner assembly (every 100
operating hours or more frequently under unusual conditions.)
Air cleaner
Clean
hours
tate.
every
every 1000 operating
or as conditions dicReplace air cleaner
2000 operating hours.
Air cleaner
is missing or
unserviceable.
TM 5-6115-585-12
NAVFAC P-8-623-12
TO-35C2-3-455-1
TM-05684C/05685B-12
TABLE 4-1. ORGANIZATIONAL PREVENTIVE MAINTENANCE CHECKS AND SERVICES - continued
INTERVAL
ITEM
NO.
W
M
H
W - WEEKLY (40 HOURS)
M - MONTHLY (100 HOURS)
ITEM TO BE
INSPECTED
H - HOURS (AS INDICATED)
PROCEDURES
Check for and have repaired
or adjusted as necessary
12
500
Bonding Strap
(Engine to
skid base)
Remove bolts from both ends of bonding
strap (see item 1, Fig 4-3) and inspect
for corrosion on the bonding strap or
mating surfaces of the engine and skid
base. Clean surfaces and replace strap.
13
500
Rocker Arm
Covers
Service rocker covers every 500
operating hours (para 4-44).
14
500
Valve Rocker
Arms
Adjust the rocker arm to proper
valve clearance every 500
operating hours (para 4-46).
Change 10
EQUIPMENT IS
Not Ready/
Available if:
4-6.1/(4-6.2 blank)
TM 5-6115-585-12
NAVFAC P-8-623-12
TO-35C2-3-455-1
TM-05684C/05685B-12
Section VI. TROUBLESHOOTING
4-12. TROUBLESHOOTING, GENERAL.
This section contains troubleshooting information for locating and correcting operating troubles which may develop in
the Generator Set. Each malfunction for an individual component unit or system is followed by a list of tests or inspections which will help you to determine probable causes and
corrective actions to take. You should perform the tests/
inspections and corrective actions in the order listed.
4-13. MALFUNCTION NOT CORRECTED BY USE
OF THE TROUBLESHOOTING TABLE.
This manual cannot list all malfunctions that may occur, nor
all tests or inspections and corrective actions. If a malfunction is not listed or cannot be corrected by listed corrective
actions, notify your supervisor.
Change 10
4-6.3/(4-6.4 blank)
TM5-6115-585-12
NAVFAC P-8-262-12
TO-35C2-3-455-1
TM-05684C-12
Table 4-2. Troubleshooting
MALFUNCTION
TEST OR INSPECTION
CORRECTIVE ACTION
1. ENGINE FAILS TO CRANK WHEN MASTER SWITCH IS HELD IN THE START POSITION.
Step 1.
Use slave receptacle when extra cranking power is required.
Step 2. Test batteries (paragraph 4-25).
Replace defective batteries. Check battery alternator fuse and replace if necessary.
S t e p 3 . Inspect battery and starter cables for corrosion and loose connections.
Clean or tighten cables.
S t e p 4 . Test “START’’ position of master switch (paragraph 4-38).
Replace defective master switch.
step 5.
Inspect and test for open starter solenoid switch or for short to ground (paragraph 4-26).
Replace
defective
solenoid.
S t e p 6 . Inspect and test starter lockout switch (paragraph 4-28).
Adjust switch points if they are not closing or replace defective switch.
2. STARTER TURNS BUT WILL NOT ENGAGE ENGINE.
Step 1. Inspect starter drive assembly (paragraph 4-26).
Clean drive assembly if it is sticking.
Step 2. Inspect starter drive gear assembly for worn or broken teeth (paragraph 4-26).
Replace starter.
3. ENGINE CRANKS NORMALLY BUT FAILS TO START.
Step 1. Test stop solenoid for correct operation (paragraph 4-23).
Replace bad solenoid.
Step 2. Inspect fuel pumps for clogged strainers (paragraph 4-21).
Replace strainer element.
Step 3. Inspect for clogged fuel strainer element or fuel filter elements (paragraph 4-20).
Clean strainer element; replace fuel filter elements.
Step 4. Check for clogged fuel lines to injector pump.
Clean or replace clogged fuel lines.
Step 5. Test for worn or damaged fuel pumps (paragraph 4-21).
Replace bad pumps.
Step 6. Inspect and test intake manifold heaters (paragraph 4-43).
Replace bad heaters.
C h a n g e
5
4 - 7
TM5-6115-585-12
NAVFAC P-8-262-12
TO-35C2-3-455-1
TM-05684C-12
Table 4-2. Troubleshooting (Cont)
MALFUNCTION
TEST OR INSPECTION
CORRECTIVE ACTION
3. ENGINE CRANKS NORMALLY BUT FAILS TO START (Cont).
Step 7. Inspect and test glow plug assemblies (paragraph 4-48).
Replace bad glow plugs.
4. ENGINE STARTS
NOISES).
BUT
DOES NOT RUN SMOOTHLY (MISFIRES, KNOCKS, OR MAKES UNUSUAL
Step 1. Check steps 1, 2, 3, 4 and 5 under
START above.
ENGINE CRANKS NORMALLY BUT FAILS TO
Perform corrective action as necessary.
Step 2. Check valve to rocker arm clearance (paragraph 4-46).
Adjust clearance if necessary.
5. LOW ENGINE POWER ESPECIALLY UNDER HEAVY LOAD.
Step 1. Check steps 1, 2, 3, 4 and 5 under
START above.
ENGINE CRANKS NORMALLY BUT FAILS TO
Perform corrective actions as necessary.
Step 2. Check air cleaner assembly for obstructions (paragraph 4-41).
Remove
obstructions.
6. ENGINE HAS EXCESSIVE OIL CONSUMPTION.
Step 1. Check air cleaner element.
Clean or replace element if necessary.
Step 2. Check breather pipe (paragraph 4-45).
Clean or replace breather pipe.
7. LOW OIL PRESSURE.
Step 1. Check oil level (paragraph 4-51).
Add oil if required.
Step 2. Check oil pressure gauge (paragraph 4-33).
Replace a bad gauge.
8. HIGH OIL PRESSURE.
Step 1. Check oil.
Add proper grade of oil.
Step 2. Check oil pressure gauge (paragraph 4-33).
Replace gauge if necessary.
4-8
TM5-6115-585-12
NAVFAC P-8-623-12
TO-35C2-3-455-1
TM-05684C/05685B-12
Table 4-2. Troubleshooting (Cont)
MALFUNCTION
TEST OR INSPECTION
CORRECTIVE ACTION
9. ENGINE SHUTS DOWN.
Step 1. Check oil level (paragraph 4-51).
Add proper grade of oil.
Step 2. Check for restricted air cooling system (paragraph 4-41).
Clean restrictions from system.
Step 3. Check for overload on generator.
Keep generator load within set capability.
Step 4. Check low oil pressure switch (paragraph 4-31).
Replace a bad switch.
Step 5. Check thermo over heat switch (paragraph 4-17c).
Replace a bad switch.
10. ENGINE VIBRATES.
Step 1. Engine mounts loose or bad (paragraph 4-52).
Tighten mounting or replace as necessary.
Step 2. Check for loose blower wheel.
Tighten blower wheel.
Step 3. Check valve clearance (paragraph 4-46).
Reset valve clearance.
11. LOW GENERATOR OUTPUT VOLTAGE (NO LOAD).
Step 1. Low engine speed.
Set engine speed to achieve no-load frequency (paragraph 1-10.b.).
Step 2. Check voltage adjust rheostat (R1) setting (paragraph 4-38).
Set rheostat (R1) for proper output voltage.
12. HIGH GENERATOR OUTPUT VOLTAGE (NO LOAD).
Step 1. Check voltage adjust rheostat (R1) setting (paragraph 4-38).
Set rheostat (R1) for proper output voltage.
13. AC CIRCUIT BREAKER (CB1) WILL NOT CLOSE.
Step 1. Check for short circuit load.
Remove
short
circuit.
Change
2
4-9
TM5-6115-585-12
NAVFAC P-8-262-12
TO-35C2-3-455-1
TM-05684C-12
Table 4-2. Troubleshooting (Cont)
MALFUNCTION
TEST OR INSPECTION
CORRECTIVE ACTION
14. BATTERIES DO NOT RETAIN CHARGE.
Step 1. Check for blown alternator protection fuse (F1) (paragraph 4-27).
Replace fuse.
Step 2. Check for bad battery or batteries (paragraph 4-25).
Replace defective battery.
Section VII. RADIO INTERFERENCE SUPPRESSION
4-14. G E N E R A L M E T H O D S
PRESSION.
FOR
PROPER
SUP-
function it is to supress radio interference. The primary suppression components are shown in figure
4-3.
Essentially, suppression is attained by providing a low
resistance path to ground for stray currents. The
methods used include shielding the ignition and highfrequency wires, grounding the frame with bonding
straps, and using filtering systems.
4-15. R A D I O I N T E R F E R E N C E S U P P R E S S I O N C O M PONENTS.
a. Primary Suppression Components. The primary
suppression components are those whose primary
4-10
b. Secondary Suppression Components. These components have radio interference suppression functions
which are incidental or secondary to their primary
function. They are the internal-external tooth lockwashers on the fuel pumps and battery charging regulator-rectifier.
TM5-6115-585-12
NAVFAC P-8-262-12
TO-35C2-3-455-1
TM-05684C-12
Figure 4-3. Primary Radio Interference Suppresion Components (Sheet 1 of 2)
4-11
TM5-6115-585-12
NAVPAC P-8-623-12
TO-35C2-3-455-1
TM-05684C/05684B-12
Figure 4-3. Primary Radio Interference Supperssion Components (Sheet 2 of 2)
Section VIII. MAINTENANCE OF ENGINE COOLING SYSTEM
4 - 1 6 . DESCRIPTION AND FUNCTION.
The engine has a pressure air cooling system. Fins
on the engine blower draw air into the front of the engine housing and force it past the cylinders and out
the right side of the engine. The engine air outlet
uses a shutter assembly to control engine temperature. Part of the air is directed thru the air cleaner
at cold temperatures. A thermo power unit controls
shutter opening which limits air flow when the engine
is cold. When the engine air temperature reaches
approximately 120°F (49°C), the shutters begin to
open. The shutters are completely open at 140°F
(60°C). The cooling system contains a high temperature cut-out switch that shuts down the engine in
case the engine temperature reaches 394°F (201°C).
4-12
Change 8
4-17. ENGINE COOLING ASSEMBLY.
a. Inspection (See figure 3-17). On ASK equipped generators,
refer to para 5-3 and 5-8 and remove ASK cover assembly and
exhaust plenum assembly. Check that ASK front panel assembly
is clear of debris.
(1) Check shutters on shutter assembly (4) for
cleaniness and obstructions. Check blower housing
(33) externally and internally at engine blower for
cleanliness and obstructions.
(2)Open panel (12) by opening latches (14) and
check that panel hinge works properly. With panel
open, check engine fins for cleanliness and obstruction
to airflow.
b.
Removal.
(1) Disconnect negative lead from batteries.
TM5-6115-585-12
NAVFAC P-8-623-12
TO-35C2-3-455-1
TM-05684C-12
(2) Air Housing Duct Cover. Remove air housing
duct cover (2) by removing screws (1).
(3) Shutter Assembly. Disconnect wiring to thermal switch at connector plug (5) on outside of shutter
assembly. Loosen hose clamp (6) and disconnect air
intake hose from shutter assembly (4). Remove capscrews (3) attaching shutter assembly to engine and
blower housing (33). Carefully pull shutter assembly
(4) away from muffler (44) until lead from connector
(5) to high temperature cutout switch (42) becomes
accessible. Disconnect leads from high temperature
cutout switch (42) and remove shutter assembly (4).
(4) Remove screws (37), washers (38), spacers
(40) and shock-mounts (39) and remove lifting bracket
(41).
(1) and nuts (2). Remove screws (4) and special washer
(5) attaching thermo unit assembly (6) to shutter assembly and remove thermo power unit assembly. Be
careful plunger does not fall out of thermo unit assembly.
(2) Shutters. Remove eight screws (7) attaching
shutters (8) to bracket assemblies (9, 10 and 11). Remove shutters. Remove nuts (12) washer (13) and
shutter torsion springs (14). Brackets (11) can now be
removed. Remove bracket bearings. Remove screws
(17) and remove bearing (15) and washer (16), brackets
(9 and 10).
(3) Brackets.
(36).
(a) Remove clips (18) that retain lower rod
(19) in bracket (9) and pivot arm (20). Remove lower
rod and bracket (9). Remove bracket bearing, screw
(17) and remove bearing (15) and washer (16).
(6) Shroud Assembly. Open latches (14), remove
screws (7), and washers (8), lift panel (9) and shroud
(11) as an assembly from the engine and blower housing (33).
(b) Remove nut (21), clip (22) and ball arm assembly (23). Remove bracket (10) and associated
bearing (15), washer (16) and screw (17) using procedure as in paragraph (a) above.
(7) Baffles and Shrouds. Remove baffles (16) and
(17) by removing screw (15). Remove rear shroud
(23) by removing screw (20), screw (18), washer (19),
screw (34) and bracket (22). Remove baffles (26) by
removing nuts (24) and J bolt (25).
(c) Remove pivot arm (20) by removing nut
(24), lockwasher (25), flatwasher (26), washer (27),
bearings (28) and bolt (29).
(5) Remove screws (34) and remove front shroud
e. Test.
(8) Blower Grille Assembly. Remove screws (27)
and retainers (28) and remove grille (30).
(9) Blower Housing. Remove screws (31) attaching housing (33) to engine and remove screw (32) attaching housing to oil cooler support bracket. Remove
housing (33).
(10) Refer to paragraph 4-30 and remove oil
cooler and base. Remove screw (34), clip (35) and
shroud (36).
(1) Thermo Power Unit Assembly. Immerse the
thermo unit into a container of oil while monitoring
the oil temperature. Plunger of thermo unit should
start to extend when temperature reaches 120°F (49°
C). Total extension at 140°F (60°C) should be at least
13/64 inch. Replace thermo unit if it does not operate
properly.
f. Reassembly of Shutter Assembly.
(1)
c. Cleaning and Testing.
(1) Inspect the engine fins and the housing assemblies for debris and remove as necessary. Clean
using detergent, clean cloth and brush.
(2) Disconnect leads and remove high temperature cutout switch from cylinder head. Check continuity
between two terminals while heating switch with its
mounting stud submerged in oil. When the temperature
of the oil reaches 394 ±10°F (201 ±5°C) the switch
should open. Switch should close when temperature
drops below 394 ±10°F (201 ±5°C). If switch does not
perform as indicated, replace.
d. Disassembly of Shutter Assembly (see figure
4-4).
(1) Shutter Thermo Power Unit Assembly. Remove electrical connector (3) by removing screws
Brackets.
(a) Reassemble pivot arm (20) using bolt (29),
bearings (28), washer (27), flatwasher (26), lockwasher
(25) and nut (24).
ings
not
ball
(20)
(b) Mount bracket (10) to box (30) using bear(15), lockwasher (16), and screw (17). Be careful
to confuse bracket (10) with bracket (9). Connect
arm assembly (23) to bracket (10) and pivot arm
using clip (22) and nut (21).
(c) Mount bracket (9) along with bearing (15),
lockwasher (16) and screw (17). Ensure that bracket
is mounted so that shutter divider acts as inside stop.
Mount lower rod (19) to bracket (9) and pivot arm (20)
using clips (18).
(a) Install brackets (11), bearings (15) and lockwasher (16). Ensure that lower bracket is mounted so
that shutter divider acts as inside stop.
4-13
TM5-6115-585-12
NAVFAC P-8-623-12
TO-35C2-3-455-1
TM-05684C/05685B-12
Figure 4-4. Shutter Assembly
4-14
Change 2
TM5-6115-585-12
NAVFAC P-8-623-12
TO-35C2-3-455-1
TM-05684C/05685B-12
(2) Install power unit assembly (6) into shutter
assembly box (30) using screws (4) and special washer
(5). Mount connector (3) using screws (1) and nuts (2).
(3) Shutters. Mount torsion spring (14) using nut
(12) and washer (13). Mount shutters using screws (7).
Ensure that adequate clearance between shutter and
shutter box sides is maintained and that brackets (11)
are seated against shoulder of bearing (15) prior to
tightening screws (7). Check shutter to ensure they will
fully open and close without binding.
g. Adjustments.
(1) Shutters (see figure 4-5). Disconnect rod
from upper shutter. Adjust ball joint until upper
shutter closes tightly on lower shutter when lower
shutter is held closed. Re-attach rod to upper shutter.
(2) Thermo Unit (see figure 4-6). With Generator
Set at 70°F, (21°C) loosen thermo unit guide-mounting
screws, the mounting holes in the shutter box are
slotted. Slide the assembly to a position where the
thermo unit plunger rests on roll pins with shutters
closed. Tighten mounting screws.
h. Installation (see figure 3-17).
(1) Install shroud (38). clip (35) and screw (34).
Install oil cooler and base as described in paragraph
4-30.
Figure 4-5. Adjusting Shutters
(2) Blower Housing. Install blower housing (33)
on engine using screws (31 and 32).
(3) Blower Grille Assembly. Install grille (30)
on blower housing (33) using screws (27) and retainers (28). (For units without ASK.)
(4) Baffles and Shrouds. Install shroud (23) using
screws. (18 and 20) and washer (19). Install rear shroud
(36) wing clip (35) and screws (34). Install baffles
(16) and (17) using screws (15). Install baffle (26)
with hook bolt (25) and nut (24).
(5) Shroud Assembly. Install door panel (12) and
shroud (11) as an assembly to the engine and blower
housing (33) using screws (7) and washers (8). Close
latches (14).
(6) Lifting Bracket. Install lifting bracket (41)
with spacers (40), mounts (39), washers (38) and
Screws (37).
(7) Shutter Assembly. Install shutter assembly (4)
on engine and blower housing (33) using capscrews (3).
Connect air intake hose to shutter assembly using
hose clamp (6). Connect connector plug to thermo unit
connector receptacle (5).
(8) Air Housing Duct Cover. Mount air housing
duct cover (2) to shutter assembly (4) using screws
(l).
(9) On ASK equipped generators, refer to paragraphs
5-3 and 5-8 and replace ASK cover assembly and exhaust
plenum.
Figure 4-6. Adjusting Thermo Unit
Change 8
4-15
TM5-6115-585-12
NAVFAC P-8-623-12
TO-35C2-3-455-1
TM-05684C/05685B-12
Section IX. MAINTENANCE OF FUEL SYSTEM
4-18. DESCRIPTION AND FUNCTION.
(5) Loosen filler cap and remove filler cap (4) and
strainer (5).
a. Low Pressure System (see Schematic figure
1-5).
d. Cleaning and Inspection.
(1) Fuel pump may draw fuel from an external
source to fill set tank or set tank may be filled manually. If an external fuel source is selected, a float
valve assembly in the set tank maintains the fuel
level in the tank. Two other fuel pumps (in series)
draw fuel from the set tank and force the fuel through
a primary strainer, two filters, and a check valve
assembly, to the injection pump.
b. High Pressure System.
(1) Fuel injection pump forces the fuel, under
high pressure, to the fuel injection nozzles. The injection nozzles provide fuel to each combustion
chamber of the engine. Unused fuel is returned from
the injectors to the fuel tank. A cam and gear on the
camshaft drives the fuel injection pump. The gear
drives the pump face gear, providing fuel distribution
to each cylinder in the proper order. The cam operates the pump plunger, pressurizing fuel to the nozzles. A control sleeve meters fuel by controlling the
length of time the plunger spill port is closed, maintaining pressure, and therefore, the amount of fuel
delivered in each stroke. The pintle type injection
nozzles are conventional inward opening with adjustable opening pressure. They are factory adjusted
to open at 1900 to 1950 psi.
(1) Tank. Clean tank exterior using suitable solvent and clean cloth and brush. Inspect tank for
signs of physical damage. If damaged refer to higher
level of maintenance.
(2) Fuel Level Gage. Check that fuel level gage
face is clean and readable. Check that as cork float
is moved up and down, the meter movement rotates.
(3) Float Switch. Inspect terminal connector for
damage to threads. Check to see that float slides on
shaft without binding. Clean with suitable solvent if
required.
(4) Fittings. Inspect fittings for good leak-free
seating on tank and check threads for physical damage.
(5) Fuel Drain Valve Assembly. Check that drain
valve does not leak and threads for physical damage.
(6) Strainer. Invert and clean with solvent.
e. Test.
4-19. FUEL TANK ASSEMBLY<
(1) Float Switch. Remove float switch (6) from
tank (9). Using an ohmmeter, check for continuity
between terminals A and B of switch (see figure
4-8). Switch should show no continuity when float is
up. Switch should close when float drops to 2-7/8
±3/16 inch from threaded collar of float switch. Replace switch if it does not operate properly.
a. Inspection on Equipment. Refer to paragraph
3-13a.
(2) Tank. If tank shows signs of physical damage or leaks refer to higher level of maintenance.
b. Removal (see figure 4-7). Drain fuel into suitable container
by opening drain valve. Tag and disconnect fuel hoses from fuel
tank fittings. Disconnect electrical lead from electrical connector
(10). Remove nut (1) and flatwasher (2) from straps (3) on outside of fuel tank. Remove tank from skid-base. On ASK equipped
generators, remove top panel, left panel and side closure assemblies (para. 5-4 and 5-5).
c. Disassembly.
(1) Fuel Level Gage. Unscrew and remove fuel
level gage (5) using tools only on the hex portion of
the gage.
(2) Float Switch. Unscrew collar and disconnect
electrical connector (10) if not previously disconnected. Unscrew and remove float switch (6) using
tools only on the square portions of the switch.
(3) Unscrew and remove fittings (7).
(4) Holding pipe adapter (11) with a wrench, unscrew and remove drain valve (8).
4-16
Change 8
f. Reassembly (see figure 4-7).
(1) Fuel Drain, Valve. Engage threads of fuel
drain valve assembly (8) 1/2 turn into fuel tank
adapter (11). Coat threads with sealing compound
ML-S-22473. Tighten valve assembly Into adapter
(11).
(2) Fittings. Engage threads of fitting (7) 1/2 turn
into fuel tank (9). Coat threads with sealing compound MIL-S-22473. Tighten fittings into tank. Fittings should face Generator Set for proper connection
of fuel lines. Attach fuel lines to fittings.
(3) Float Switch. Engage threads of float switch
(6) 1/2 turn into tank (9). Coat threads with sealing
compound ML-S 22473. Tighten float switch (6) into
tank using tools only on square portion of switch. Attach electrical lead to connector (10) on top of float
switch and tighten.
TM5-6115-585-12
NAVFAC P-8-262-12
TO-35C2-3-455-1
TM-05684C-12
Figure 4-7. Fuel Tank Assembly
(4) Fuel Level Gauge. Engage threads of fuel
level gauge (5) 1/2 turn into tank (9). Coat threads
with sealing compound MIL-S-22473. Tighten float
level gauge into tank using tools only on hex portion
of gauge. Install filler cap (4) and strainer (5) into tank
(9).
g. Installation.
(1) Install straps (3) onto the skid-base and secure with nut (1) and flatwasher (2) on inside of skidbase only.
(2) Position fuel tank assembly onto skid-base, position
straps over tank assembly and secure with nut (1) and flatwasher (2). On ASK equipped generators, install side
closure, left panel and top panel assemblies (para. 5-4 and
5-5).
(3) Check that drain valve is closed before filling
tank with proper grade of fuel.
NOTE
After each time fuel filters or strainer is
drained or elements replaced, purge air from
fuel system by moving master switch on control panel to PRIME & RUN position. This
should activate the fuel transfer pump and
force trapped air back to the vented fuel tank.
4-20. FUEL FILTER ASSEMBLIES AND STRAINER
ASSEMBLY.
There are two identical fuel filter assemblies (see
figure 3-13), one which acts as the primary and the
Change 8
4-17
TM5-6115-585-12
NAVFAC P-8-623-12
TO-35C2-3-455-1
TM-05684C/05685B-12
Figure 4-8. Testing Float Switch
other as secondary, plus there is one fuel strainer. If
these filters or strainer are plugged, fuel flow will be
restricted and the engine may not run properly.
Periodic maintenance is required for this assembly.
a. Inspection (on Equipment). On ASK equipped generators,
remove FUEL FILTERS access door.
(1) Fuel Filter Assemblies and Strainer Assembly. Inspect the assembly for secure mounting, loose
4-18
Change 8
or leaking fittings and hoses, leaking valves and leaking at bowl and head interface.
b. Service.
(1) Fuel Filters (see figure 4-9). On ASK equipped
generators, remove right panel assembly (para 5-6).
Remove plug (1), open drain cock (2) and drain fuel Into
suitable container. Remove bolt assembly (3), gasket (4)
and filter body (5). Remove filter element (6) and
gasket (7). Inspect element for ruptures, clogs or other
TM5-6115-585-12
NAVFAC P-8-262-12
TO-35C2-3-455-1
TM-05684C-12
Figure 4-9. Fuel Filter
physical damage. Replace element if necessary.
Change primary element every 500 operating hours,
and secondary filter elements every 1000 operating
hours. Replace filter element (6), gasket (7), filter
body (5), gasket (4), and bolt assembly (3). Close drain
cock (2) and install plug (1).
Figure 4-10. Fuel Strainer Element
(2) Fuel Strainer Element (see figure 4-10).
Open drain valve (4) and drain fuel into suitable container. Remove nut (1) and washer (2) attaching body
(5) to head (10) and remove body and gasket (9). Remove retainer (6) and remove strainer element (7).
Inspect element for physical damage or clogging.
4-19
TM5-6115-585-12
NAVFAC P-8-262-12
TO-35C2-3-455-1
TM-05684C-12
warning
Clean parts in a well-ventilated area. Avoid
inhalation of solvent fumes and prolonged exposure of skin to cleaning solvent. Wash exposed skin thoroughly. Dry cleaning solvent
(Fed. Spec P-D-680) used to clean parts is
potentially dangerous to personnel and property. Do not use near open flame or excessive
heat. Flash point of solvent is 100°F to 138°F
(38° C to 59° C).
Every 300 operating hours, clean strainer element
(7) by soaking in dry cleaning solvent (Fed. Spec
P-D-680) and dry thoroughly using a clean dry cloth.
Replace strainer element (7) on stud (3) and secure
with retainer (6). Position gasket (9) and body (5) on
head (10) and secure with washer (2) and nut (1).
Close drain cock (4).
Figure 4-11. Fuel Filters and Fuel Strainer Assembly
4-20
TM5-6115-585-12
NAVFAC P-8-623-12
TO-35C2-3-455-1
TM-05684C/05685B-12
c. Removal.
(1) Fuel Filter Assembly (see figure 4-11). Drain
fuel into a suitable container by opening drain valve
(l). Disconnect fuel lines (2, 3 and 4) and drain fuel
lines. Remove elbow (5), check valve (6) and C O U P ling (7). Plug fuel lines to prevent accumulation of
foreign material.
(2) Remove screws (8) and lockwasher (9) attaching each filter assembly (10) and strainer assembly (11) to mounting bracket and remove filter or
strainer assembly. Remove inlet and outlet fittings
(12). Be careful when removing fittings not to damage housing.
(3) Remove nuts (13), lockwashers (14), screws
(15) and remove bracket (16).
(4) Inspect check valve (6) for cleanliness. Using a clean punch depress check valve from seat (opposite end of arrow) and check for free movement
and reseating upon release. Replace check valve if
it does not move freely.
d. Installation.
(1) Position bracket (16) on frame and secure
with screws (15), lockwashers (14) and nuts (13).
(2) Position fuel filter assembly (10) or fuel
strainer (11) on bracket (16) and secure with lockwashers (9) and screws (8).
(3) Install coupling (7), check valve (6) and elbow
(5) On fuel line (4). Make sure arrow on check valve
points toward coupling (7).
(4) Connect fuel lines (4, 3 and 2). Tighten drain
valve (1) in each filter assembly and strainer assembly.
(5) On ASK equipped generator, install ASK right panel
assembly (para. 5-6).
NOTE
When installing hose assembly (2), dean using fuel, making
sure all dirt is removed.
4-21. E L E C T R I C F U E L P U M P , H O S E S
AUXILIARY 30 SOLENOID VALVE.
AND
a. Testing on Equipment. Perform operational teat
for each pump individually. Each pump shroud pump
at 6 to 7 psi as registered on an accurate fuel pressure gauge. Connect fuel pressure gauge to output
port of pump. Turn master switch to PRIME AND
RUN position. Pressure gauge should register 6 to 7
psi. Replace defective pumps.
b. Service (see figure 4-13). On ASK equipped generators,
remove fuel access door. Remove cover (1), gasket (2) and
strainer (3). Be careful not to lose magnet (4). Every 500 operating hours replace gasket (2) and strainer (3) in both main
pumps and auxiliary pump. Ensure that chamfered surface of
magnet (4) is up prior to installation of new strainer and gasket.
hoses clean and plug to prevent contamination. Disconnect electrical connector (22) at solenoid valve (6).
(2) Fuel Pumps. Tag and disconnect electrical
lead from each fuel pump at connector on wiring
harness. Remove nuts (7), lockwashers (8 and 11) and
screws (9) attaching each pump (12 and 13) and pump
lead (10) to bracket (21) and remove pumps.
(3) Remove solenoid valve (6) from fittings (16
and 17) and remove fitting (5) from solenoid valve.
(4) Remove fittings (14, 15, 16 and 17) from fuel
pumps. Remove nuts (18), lockwasher (19), screw (20)
and remove bracket (21).
d. Installation.
(1) Position bracket (21) on frame and secure
with screws (20), lockwashers (19) and nuts (18).
(2) Install fuel fittings (17, 16, 15, 14 and 5) in
fuel pumps (12 and 13).
(3) Turn solenoid valve (6) onto fuel pump outlet
fittings (16 and 17) and position on fuel pump as shown
in figure 4-12.
(4) Install fuel pumps (12 and 13) on bracket (21)
and secure with screws (9), washers (8 and 11) and
nuts (7). Reconnect electrical leads to wiring harness’
and fuel solenoid valve.
(5) Install and tighten fuel hoses (4, 3, 2 and 1).
4-22. AUXILLARY FUEL SOLENOID VALVE.
a. Test on Equipment. On ASK equipped generators, remove
fuel access door and perform the following procedures.
(1) Ensure output pressure of auxiliary fuel pump
is 6 to 7 psi and fuel level in set tank is below 1/2
full. Disconnect harness at solenoid valve connector.
Place master switch in PRIME RUN and AUX position.
Ensure voltage between points A and B on harness
connector is 24 VDC. Reconnect harness to solenoid
valve. Test output pressure at output side of solenoid
valve. Pressure should be same as output pressure
of auxiliary fuel pump, if not replace solenoid valve.
A radio interference suppression diode is
mounted within the solenoid valve. The anode
of the diode is connected to terminal A with the
cathode connected to terminal B of the solenoid
valve. When connecting 24 volts dc across the
solenoid terminals, be sure to connect the
positive (+) lead to terminal B and the negative
(-) lead to terminal A.
c. Removal (see figure 4-12).
(1) Fuel Hoses. Tag and remove fuel hoses (1, 2,
3 and 4) by unscrewing at fittings (5.15 and 16). Keep
(2) With 24 volts dc applied across solenoid terminals A and B, the solenoid should draw approximately 1/2 ampere, if not replace solenoid valve.
Change 8
4-21
TM5-6115-585-12
NAVFAC P-8-262-12
TO-35C2-3-455-1
TM-05684C-12
1. Hose assembly
2. Hose assembly
3. Hose assembly
4. Hose assembly
5. Connector
6. Auxillary fuel solenoid valve
7. Nut (3)
8.
9.
10.
11.
12.
13.
14.
15.
Lockwasher (3)
Screw (3)
pump lead (3)
Lockwasher (3)
Fuel pump (2)
Auxillary fuel pump
Cap
Elbow (3)
Figure 4-12. Fuel Pump, Fuel Hoses and Solenoid
4-22
16. Elbow (3)
17. Connector
18.
19.
20.
21.
22.
Nut (4)
Lockwasher (4)
Screw (4)
Bracket
Connector
TM5-6115-585-12
NAVFAC P-8-623-12
TO-35C2-3455-1
TM-05684C/05685B-12
(3) With switch (S1) closed the plunger should
actuate and the current draw should be 0.25 ampere dc.
(4) If plunger does not actuate or if meter reads
above 0.35 amperes replace solenoid.
C . Remove (see figure 4-14). Tag and disconnect
harness leads (1). Remove the shut-off solenoid by
removing screws (9) and Iockwashers (10).
d. Installation. Mount shut-off solenoid using
screws (9) and lockwashers (10). Reconnect previously
tagged and removed harness wires (1).
e. Adjust. The solenoid plunger (3) should be adjusted so it
fully stops injection when in the deenergized position. With engine
running at full rated load, clearance between plunger (3) and control
arm (4) should be at least 1/8 inch. To adjust the plunger length,
loosen jam nut (6) on bottom of plunger. Turn knurled headscrew
(5). Lock jam nut (6) after correct adjustment. On ASK equipped
generators, install right panel assembly (para. 5-6).
Figure 4-13. Fuel Pump
4-23.
FUEL
SHUT-OFF SOLENOID
a. Inspect (on Equipment) (see figure 4-14). On ASK equipped
generators, remove right panel assembly (para. 5-6). Check that
electrical connections (1) are secure and clean. Check that rubber
boot (11 ) is clean and not broken. Check that governor and pump
linkage moves freely and is clean.
b. Test
(on Equipment) (see figure 4-15).
(1) Tag and remove the solenoid harness leads
(l). Figure 4-14.
Switch S2 in figure 4-16 must be closed during
initial activation of solenoid to prevent in-rush
currents from damaging the dc ammetar. Open
switch S2 after solenoid activation to permit dc
ammeter to function.
(2) Connect the solenoid into test setup (figure 415).
Figure 4-14. Adjusting Fuel Shut_Off Solenoid
Change 8
4-23
TM 5-6115-585-12
NAVFACP-8-623-12
TO–35C2–3-455-1
TM-05684C/05685B-12
Figure 4–15. Fuel Solenoid Test Set–Up.
Section X. MAINTENANCE OF ENGINE ELECTRICAL SYSTEM
4–24. DESCRIPTION AND FUNCTION.
a. The engine is cranked by a 24 volt electric
starting motor (see figure 1–7). When starting motor
solenoid is energized, the solenoid core pulls in, shifting the pinion gear into engagement with the engine
flywheel ring gear. At the same time, contacts in the
solenoid close to provide a circuit for the starter. The
starting motor is protected from overspeeding by an
overrunning clutch. Two 12 volt batteries in series are
used. The starting switch for this starting circuit is located in the control cubicle, A blower wheel alternator
is utilized to maintain the battery charge. The stator is
mounted on the engine block and the permanent magnet rotor is mounted into the air cooling system blower.
Solid state diode rectifiers convert the alternating current generated in the stator to direct current for battery
charging.
b. A new (Style II) gear–reduction electric starter
will be installed on engines manufactured during 1990;
and will be available as a replacement when the original starter, (Style I ) is no longer available. The Style II
starters are interchangeable with the Style I starter.
c. Slave receptacle is used to supply external
cranking power and as an output receptacle for other
equipment. Refer to Figure 4–34 for removal and installation of slave receptacle.
4–24
Change 11
Metal objects making contact between the positive and negative
battery terminals, or between the
positive battery terminal and the generator frame can cause FIRE or
EXPLOSION, Always keep the battery terminal covers on the battery
terminals. See Figure 3–2,
4-25.
BATTERY ASSEMBLY.
Battery Cables (Including Jumper Cable). On
ASK equipped generators, remove BATTERIES access door.
(1) Test. Test battery cable for continuity, Replace any cable that does not show continuity,
(2) Remove. Remove negative battery cable
from negative (–) battery terminal. Remove positive
(+) battery cable from positive battery terminal.
Tag and disconnect cables from starter case and
starter solenoid. Remove jumper between batteries.
Clean battery, starter, and starter solenoid terminals
thoroughly and install new cables as given below.
(3) Replace. Attach jumper cable between
negative (–) terminal of one battery and positive (+) terminal of the other battery. Attach positive battery cable
to the “B” Terminal stud on starter solenoid. Attach
TM5-6115-585-L2
NAVFAC P-8-623-12
TO-35C2-3-455-1
TM-05684C/05685B-12
Tag and disconnect cables from starter case and
starter solenoid. Remove jumper between batteries.
Clean battery, starter, and starter solenoid terminals thoroughly and install new cables as given
above.
(3) Replace. Attach jumper cable between negative (-) terminal of one battery and positive (+) terminal of the other battery. Tighten terminal connectors securely. Attach positive battery cable to
stud on starter solenoid. Attach negative battery cable
to stud on starter case (see figure 4-16). Attach positive cable to positive terminal on one battery and
negative cable to negative terminal on the other battery. Tighten terminal connectors securely.
Change 5
4-24.1/(4-24.2 blank)
TM 5-6115-585-12
NAVFAC P-8–623-12
TO–35C2–3-455-1
TM-05684C/05685B-12
Figure 4–16. Installing Battery Cables.
Change 11
4–25
TM 5-6115-585-12
NAVFAC P-8-623-12
TO-35C2-3-455-1
TM-05684C/05685B-12
negative battery cable (–) to the ground terminal “G” of
cell of battery separately using a hydrometer. Remove
the starter. See figure 4–16. Attach positive cable
cap from one cell and draw fluid from that cell into hy-
(+) to positive terminal on one battery and negative ca-
drometer. Hydrometer must register a specific gravity
ble (–) to negative terminal on the other battery.
Tighten all terminal connectors securely.
of 1.260 to 1.280. If specific gravity is below 1.260,
charge battery. See figure 4–17. Replace fluid into cell
NOTE
and replace cap. Check each battery cell using this
procedure. If one or more cells in a battery will not take
Always detach negative (–) cable first
and reattach it last.
a charge, replace battery.
b. Battery Top (Hold–down) Frame (see figure
3-2).
(2) Remove. Remove battery cables and top
frames, a and b above. Remove batteries from battery
frame.
(1) Remove. Tag and disconnect battery cables (1 and 3) and jumper cable (4) from batteries (6).
Remove six nuts (7) and flatwashers (8) holding top
(3) Replace. Place batteries in battery frame
with negative (–) terminals toward control panel end of
frame (5) in place, and remove top frame. If hook bolts
generator and positive (+) terminals toward blower
(9) do not need replacing, they need not be removed.
housing end of generator. Install battery top frame and
battery cables as outlined above.
(2) Replace. Hook six bolts (9) onto bottom
frame (6). Place top frame (5) over batteries (6) making certain hook bolts slide through the top frame.
Secure top frame in place with six flatwashers (8) and
nuts (7). Reattach battery cables (1 and 3) and jumper
cable (4).
(3) Repair. Straighten battery top frames
making certain they fit securely over batteries and hold
batteries in place.
c. Storage Batteries.
Battery electrolyte can cause severe
burns to the skin. Always flush exposed parts of the skin with water as
quickly as possible.
The 6TN and 6TL batteries can be mixed or matched.
However, maintenance–free batteries cannot be
mixed or matched with military batteries. The 6TN and
or the 6TL batteries will perform properly in hot weather
as long as electrolyte levels are carefully monitored. If
the electrolyte expands and causes the level to rise,
some fluid must be removed. If the level becomes too
Figure 4–17. Testing Batteries
4–26. ENGINE
STARTER
ASSEMBLY.
low due to evaporation, distilled water maybe used to
obtain the proper level. A good grade of drinking water
(excluding mineral waters) may be used if distilled
water is not available.
Electrolyte
(NSNs
6810–00-843-1640) have
6810–00–249–9354
a specific gravity of
and
1.280
and should be used in these batteries to a lower specific gravity.
door.
(1) Make sure batteries are fully charged and
that all battery and starter cables are serviceable and
properly installed.
(2) Connect voltmeter as shown in figure
(1) Test. Charge battery for a sufficient time
for battery to be fully charged (1 to 2 hours). Test each
4-26
a. Test. On equipment (see figure 4–19). On
ASK equipped generators, remove batteries access
Change 11
4–19, Test a. If voltage is indicated, solenoid maybe
defective. Proceed to step (4).
TM 5-6115–585-12
NAVFAC P-8-623-12
TO-35C2-3-455-1
TM-05684C/05685B-12
Figure 4–18. Engine Starter installation
Change 11
4-27
TM 5-6115-585-12
NAVFAC P-8-623-12
TO-35C2-3-455-1
TM-05684C/05685B-12
(3) Connect voltmeter as shown in figure
4–19, Test b. If battery voltage (24 volts) is not indi-
Inspect solenoid switch (3) for cracks, dents, or other
cated, the starter (B1) may be defective. Proceed to
physical damage. Check to see that the electrical ter-
step (4).
(b) Style II Starter. Refer to figure 4-22A.
minals are clean and free of corrosion. Check that
solenoid switch (3) is securely fastened to the starter
(4) Momentarily connect a jumper as shown
motor (4), with screws (1).
in figure 4–19, Test b. Voltmeter reading should drop
to zero and starter should crank engine. If voltmeter
does not drop to zero, solenoid is defective. If voltmeter reading does drop to zero but starter fails to crank
engine, starter is defective.
b. Removal (see figure 4–18). On ASK equipped
(3) Inspecting Drive Assembly. Refer to figure 4–22 for Style I Starter and figure 4–22A for Style II
Starter. Inspect drive gear for cracks or chipped teeth.
Check that gear and spring of drive moves freely, and
returns to rear position when released.
generators remove batteries access door. Tag and
disconnect leads (1) thru (6). On Style I Starters, remove nut (7), lockwasher(8), screw (9). Loosen but do
not remove screw (10), Iockwasher (11) and swing
support bracket (12) down and away from starter, On
Style II Starter, support bracket is not fastened to the
starter, loosen screw (10), Iockwasher (11) and swing
support bracket down and away.
(4) Inspecting Brushes.
(a) Style I Starter. Refer to figure 4-21.
Remove two through bolts (1) and lift end plate (2)
away from frame. Lift brush tension springs (3) and lift
each brush (4) from holder for inspection. Check brush
face for deep surface pits, cracks, or excessive chipping. Measure brush length. See figure 4–21. When
Support bracket and associated hardware must remain with engine at all
times! It provides support for Style I
Starters that may be used to replace
Style II Starters during Operator and
Organizational maintenance.
The
support bracket and associated hardware is supplied on all engines
manufactured with either the Style I or
Style II Starters.
brush is worn to length less than 1/4 inch, notify higher
level maintenance for replacement of brushes (4).
Clean area around brushes and commutator and dry
with low pressure compressed air. Lift brush springs
(3) and insert brushes (4) in brush holder. Reposition
end plate (2) on frame and insert and tighten through
bolts (1) securely.
(b) Style II Starter. Refer to figure 4-21A.
Remove two nuts (1) and flat washers (2), lift off termi-
Support starter (15) and remove screws (13), lock
washers (14) attaching starter to flywheel housing
nal assembly (3). Remove the two through studs (4),
(17). Slide starter out of housing.
brush holder (7) in place on the armature commutator.
screws (5) and carefully lift off cover (6), leaving the
Lift brush tension springs (8) and lift each brush (9)
c. Cleaning and Inspection of Starter Solenoid,
Drive Assembly and Starter Brushes.
from holder for inspection. Check brush face for deep
surface pits, cracks, or excessive chipping. Next
measure brush length. See figure 4–21A. When brush
(1) Cleaning Starter. Refer to paragraph
3–16a.
is worn to length less than 11.0 mm (0.433 inch), replacement is required. When Negative brushes are
(2) Inspecting Solenoid Switch,
worn, replacement is by installing a new brush holder
(7) which includes these brushes. When the Positive
(a) Style I Starter. Refer to figure 4-22.
Inspect solenoid switch (1) for cracks, dents, or other
physical damage. Check to see that the electrical ter-
brushes are worn, replacement in by installing a new
minals are clean and free of corrosion, Check that the
commutator with dry and low pressure compressed air.
stator (10). Individual brushes are NOT available for
replacement. Clean area around the brushes and
rubber boot (2) on plunger (3), cotter pin (4), clevis pin
Lift brush springs (8) and inserft brushes (9) in brush
(5), and yoke (6) are in good condition. Check that
plunger (3) and yoke (6) operate freely. Check that so-
holder(7). Reposition cover (6), fasten screws (5), in-
lenoid switch (1) is securely fastened to the starter
terminal assembly (3) on studs and fasten with flat
motor (8), with screws (14).
washers (2) and nuts (1). Tighten securely.
4-28
Change 11
sert through studs (4) and tighten securely. Place
TM 5-61 15–585-12
NAVFAC P–8-623-12
TO–35C2-3-455-1
TM-05684C/05685B-12
Figure 4-19.
C h a n g e
1 1 4-28.1
TM 5-6115-585-12
NAVFAC P–8-623-12
TO-35C2-3-455-1
TM-05684C/05685B-12
Figure 4–20. Testing Field Coil, Style II Starter
Figure 4–21. Inspecting Starter Brushes, Style I Starter
4-28.2
Change 11
TM 5-6115-585-12
NAVFAC P-8-623-12
TO-35C2-3-455-1
TM-05684C/05685B-12
Figure 4–21 A. Inspecting Starter Brushes, Style II Starter
d. Bench Test.
(1) Starter Assembly. Refer to paragraph
4–26a.
(2) Field Coil.
(a) Connect continuity tester as shown In
figure 4–18, Test c. An open circuit indicates a defective field coil.
and Iockwasher holding lead (12) on small solenoid
switch terminal. Remove nut and Iockwasher from
negative terminal (9) freeing lead (12). Remove nut
and lockwasher from solenoid field terminal (11). Remove cotter pin (4) and clevis pin (5) from plunger (3)
and yoke (6). Remove screws (14) and lift solenoid
switch (1) from frame (8). Retain hardware from terminals for solenoid installation, see following paragraph.
(2) Install Solenoid. Refer to figure 4-22.
(b) Connect tester for continuity as shown
in figure 4–19, Test d. Continuity indicates that the field
Place solenoid (1) on frame (8) and move to rear until
coil is shorted to the field frame.
field terminal (11 ) enters field coil lead strap. Install nut
(3) Field Coil. Style II Starter.
(a) Connect tester for continuity between
the field coil brushes as shown in figure 4–20, Test C.
An open circuit indicates a defective field coil.
(b) Connect tester for continuity between
a field brush and stator frame as shown in figure 4–20,
and Iockwasher, do not tighten. Install screws (14), do
not tighten. Align the plunger (3) on yoke (6) and insert
clevis pin (5) and secure with cotter pin (4). Install lead
(12) on small solenoid terminal and on negative terminal (9) Secure with nuts and Iockwashers. Tighten nut
and Iockwasher on field terminal (11), and screws (14).
f. Repair. Style II Starter.
Test D. Continuity indicates that the field coil is shorted
to the frame.
e. Repair. Style I Starter.
(1) Remove Solenoid. If solenoid is defective,
remove as follows: Refer to figure 4-22. Remove nut
(1) Remove Solenoid. If solenoid is defecRefer to figure 4–22A.
tive, remove as follows:
Remove nut and Iockwasher on terminal (M) freeing
lead (L). Remove screws (1), solenoid switch (3) and
spacers (2). Retain hardware from terminal (M).
Change 11
4–28.3
TM 5-6115–585-12
NAVFAC P–8-623-12
TO-35C2-3-455-1
TM-05684C/05685B-12
Figure 4–22. Engine Starter Assembly, Style I Starter
Figure 4-22A. Engine Starter Assembly, Style II Starter
4-28.4
Change 11
TM 5-6115-585-12
NAVFACP-8-623-12
TO–35C2–3-455-1
TM-05684C/05685B-12
Figure 4–23. Battery Charging Alternator
Change 11
4-29
TM 5-6115-585-12
NAVFACP-8-623-12
TO–35C2–3-455-1
TM-05684C/05685B-12
NOTE
NOTE
Solenoid mounting screw removal
may require the use of an impact type
driver.
Rotate Stator so wires come off the
top. Place clamp on top of oil pump.
Run wire over top of oil pump.
(2) Install Solenoid. Refer to figure 4-22A.
Support new solenoid (3) and original spacer(s), engage solenoid plunger on Iever(yoke), secure using
new screws (1).
g. Install Starter. Refer to figure 4–18. Slide
(a) Tag and disconnect stator lead (1) frcm
stator at terminal block (3) Check between two stator
leads for approximately 0.6 ohms continuity. If open cr
starter into opening in flywheel housing (17). Make
shorted, notify higher level of maintenance. Check for
certain starter lies flat against housing. Attach starter
to housing with screws (13) and Iockwashers (14). For
Style I Starter, swing support bracket(12) into position
continuity between each lead and ground. If continuity
is found, notify higher level of maintenance.
at back of the starter, and attach with screw (9), nut (7)
and Iockwasher (8). Tighten screw (10) and lock
washer (11) securing support bracket (12) to engine
block. Replace tagged leads per diagram, figure 4–18.
Remove tags.
4–27. B A T T E R Y C H A R G I N G A L T E R N A T O R .
(b) With the stator leads (1) disconnected,
check voltage across two leads (1) from stator. Voltage
should be in a range of 30–35 volts AC with the engine
operating normally at 1800 RPM. If voltage is less than
30 volts AC, stator on magnets in rotor may be defective. Refer to higher level of maintenance for
replacement of stator or rotor. Reconnect stator leads
(1).
a. Battery Alternator Stator (see figure 4–23).
On ASK equipped generators, remove ASK cover assembly (para 5–3).
(1) Remove blower housing (see paragraph
4–17).
(2) Inspect. The presence of the blower
wheel limits inspection of the battery alternator to inspecting that two leads (1) from stator (2) are free of
damage and are not rubbing against blower wheel and
are securely connected to terminal block (3) located on
engine back plate (4).
Avoid operation of Generator Set for
more than 3 minutes with engine
blower housing removed, as engine
will overheat.
b. Battery Charging Regulator/Rectifier Assembly (see figure 4-23).
(1)
Inspect.
Inspect
regulator/rectifier
as-
sembly (5) for physical damage. Check that leads from
assembly to terminal block (3) are not damaged or
frayed. Check that assembly Is securely mounted to
engine back plate (4).
(2) Test.
Avoid contact with blower wheel while
testing battery alternator voltage.
(3) Test.
(a) Test stator as given In paragraph
4–27A above to see that it is operating correctly.
(b) Remove fuse (9, figure 4-23) and connect a 10 amp ammeter across the fuse holder
terminals as shown in figure 4–24. With engine operating normally at 1800 RPM, charge rate shou!d be no
less than 6.5 amps when loaded by a discharged bat-
Do not operate unit more than 3 minutes with blower housing removed.
tery. Charge rate should taper-off as battery becomes
charged.
NOTE
Observe proper polarity when making
current test.
4-30
Change 11
TM5-6115-585-12
NAVFAC P-8-623-12
TO-35C2-3-455-1
TM-05684C/05685B-12
—,––— ——
Figure 4-24. Testing Battery Charging Regulator/Rectifier Assembly
(3) Remove (see figure 4-23). Disconnect and tag
leads on regulator/rectifier assembly. Remove screws
(7), washers (8) and nuts (6) attaching assembly to
engine back plate and remove assembly.
(1) Inspect. Inspect terminal block (3) for physical damage. Check that electrical connections to block
are clean and tight. Check that block is securely
fastened to engine back plate (4).
(4) Replace. Attach assembly to engine back plate
with three screws (7), six lockwashers (8), and three
nuts (6). Attach tagged leads from assembly.
(2) Test. Tag and disconnect leads to terminal
block. Check to see that there is no continuity between terminals on terminal block and ground.
c. Battery Charger Circuit Fuse (see figure 4-23).
(1) Inspect. Inspect fuse (9) for physical damage.
Check that end caps on fuse are free of corrosion.
Check that fuse is properly mounted in fuse holder.
(2) Test. Test Test (9) for continuity using an
ohmmeter. Replace fuse that does not show continuity.
(3) Replace. Remove fuse holder cap and remove
fuse. Install new fuse in fuse holder body and attach
fuse holder cap.
d. Terminal Block (see figure 4-23).
(3) Replace. Tag and disconnect leads at terminal
block. Remove two screws and nuts attaching block to
engine plate and remove block. Attach new terminal block
to engine back plate with two screws and nuts. Connect
previously tagged leads to terminal block. Remove tags. Or
ASK equipped generators, install ASK cover assembly (para.
5-3).
4-28. S T A R T E R L O C K O U T S W I T C H A N D G E A R .
On ASK equipped generators, remove oil access door.
a. Inspect (see figure 4-25). Disconnect negative battery
cable. Remove wing nut (1) and cover (3) and inspect
switch contact points between contact spring (15) and
adjusting screw(14) for physical damage.
b. Test.
With engine off, disconnect switch at
connector (8). Using an ohmeter, test that there is
Change
8 4 - 3 1
TMS-6115-585-12
NAVFAC P-8-262-12
TO-35C2-3-455-1
TM-05684C-12
Figure 4-25. Lockout Switch and Gear
continuity between connector (8) pins A and B on lead
from switch. Reconnect switch. operate engine at
operating speed, disconnect connector (8) and
between pins A and B on switch. check that switch is
open (no continuity).
4-32
c. Remove. Disconnect switch lead from connector
(8). Remove two screws (9) and lockwash ers (10)
attaching switch to engine back plate. Carefully remove switch taking care to to lose thrust plunger
TM5-6115-585-12
NAVFAC P-8-623-12
TO-35C2-3-455-1
TM-05684C/05685B-12
(20) and spring (12). Slide gear (5) out through opening
in engine back plate. clean any gasket (13) material
from switch and back Plate.
d. Repair. Repair starter lockout switch by raplacing found to be defective under inspection.
e. Replace. Make certain spacer (16) is on shaft and
slip timing gear (5) through opening in engine back
plate. Make certain that shaft seats properly in gear
cover and that gear teeth are properly meshed. Place
thrust plunger (20) and spring (12) in gear shaft. Slide
switch and gasket (13) over shaft and attach to engine
back plate with two screws (9) and lockwashers (10).
Use a new gasket (13) between switch and engine back
plate. Reconnect electrical connector (8).
f. Adjust. With engine stopped, remove cover retaining
wing nut (1) and remove cover (3). Turn adjusting screw
(14) clockwise until points open. Turn adjusting screw
counterclockwise until points just close (see figure 4-26).
Start engine and disconnect switch from wiring harness at
connector (8, figure 4-25). Adjust adjusting screw for a
Replace cover (3) and wing nut (1).
0.040 point gap.
Reconnect connector (8).
Be sure two wires are recessed in slot of housing
before tightening cover down.
Figure 4-26. Adjusting Starter Lockout Switch
Section XI. MAINTENANCE OF OIL SYSTEM
4-29. FUNCTION AND DESCRIPTION..
The diesel engine has pressure lubrication to all
working parts (see figure 4-27). The oil system
includes oil intake cup, gear type oil pump, bypass.
valve, oil pressure gage, low oil pressure shutoff,
full-flow oil filter, oil cooler, and passages to deliver oil throughout the engine. Oil is held in the oil
base, and forced through the oil filter and oil cooler
by the pump. Lines leading to the rocker housing,
passages through the block to crankshaft and front
camshaft bearing, crankshaft passages to connecting
rod bearings and connecting rod passages to piston
pin bushings complete the oil system network. The
bypass valve controls oil pressure by allowing excess
oil to flow directly back to the crankcase.
4-30. OIL COOLER.
a. Inspect (see figure 4-28). On ASK equipped generators,
remove ASK cover assembly (para. 5-3). Inspect oil cooler(1)
for physical damage. Visually check for leaks where oil cooler
Is connected to oil hoses (figure 4-29 or 4-29.1). Check that
cooler is securely fastened to mounting plate (2, figure 4-28)
and that plate is securely fastened to engine. Inspect oil hoses
for leaks and physical damage. inspect seal (1A, figure 4-28)
and replace if damaged. Blower housing must be removed to
inspect cooler and hoses.
b. Service Every 500 operating hours clean oil cooler
fins with air gun (50 psi) held 12 inches away from the
fine. Every 2500 operating hours remove oil cooler and
flush in both directions using solvent at 25 psi.
c. Remove. Remove blower housing. Disconnect
oil cooler hoses at valve of oil filter adapter (see
figure 4-29). Drain cooler into suitable container.
Remove machine screws (3, figure 4-28) and hex
nuts (4) attaching oil cooler (1) and oil cooler seal
(1A) to mounting plate (2) and remove cooler (1).
Remove and check hoses. Plug hose if not used immediately.
d. Replace. install oil cooler (1) and oil cooler sea (1A) on
mounting plate (2) and secure with screws (3) and hex nuts (4).
Attach oil hoses to cooler as shown in figure 4-29 or 4-29.1.
Replace blower housing shown in figure 4-29 or 4-29.1. Replace
blower housing. Replace any oil lost. On ASK equipped. generators, replace ASK cover assembly (para 5-3).
Change 8
4-33
TM5-6115-585-12
NAVFACP-8-623-12
TO-35C2-3-455-1
TM-05684C/05685B-12
Figure 4-27.
4-31.
Figure 4-30
Figure 4-28.
4-34
Change 8
TM5-6115-585-12
NAVFAC P-8-623-12
TO-35C2-3-455-1
TM-05684C/05685B-12
Figure 4-29. Replacing Oil Cooler Hoses
(Early Model MEP-003A Only)
Change 2
4-35
TM5-6115-585-12
NAVFAC P-8-623-12
TO-35C2-3-455-1
TM-05684C/05685B-12
Figure 4-29.1. Replacing Oil Cooler Hoses
(Current Model MEP-003A and Model MEP-112A)
4-36
Change 2
TM5-6115-585-12
NAVFAC P-8-623-12
TO-35C2-3-455-1
TM-05684C/05685B-12
Figure 4-30. Oil Filter Assembly
d. Install. Install switch (11) in adapter (5) and
tighten. Use wrench on square portion of switch base.
Connect leads at terminals 1 and 2.
4-32. OIL FILTER.
On ASK equipped generators, remove oil access door.
a. Service (see figure 4-30). Every 100 operating hours
replace oil filter element. Clean inside of bowl while filter is
removed. Replace defective hoses.
b. Remove. Drain oil filter into suitable container
by removing drain plug (1). Loosen through bolt (2)
and remove body (3). Remove and discard filter (6)
and gasket (4).
c. Replace. Clean filter mounting area in adapter (5) and
inside of body (3). Install new element (6) in body (3). Install new
gasket (4) in groove of adapter (5). Position body (3) (drain
down) with element installed on adapter (5) and secure with
through bolt (2). Tighten through bolt 10 to 15 ft-lb dry.
Change 8
4.36.1 /(4.36.2 blank)
TM5-6115-585-12
NAVFAC P-8-262-12
TO-35C2-3-455-1
TM-05684C-12
Figure 4-31. Replacing Oil Pressure Gauge
4-33. OIL PRESSURE GAUGE.
On ASK equipped generators, remove oil access door.
a. Test. Attach a pressure gauge of known accuracy
between flexible oil line and unit pressure gauge. Operate unit
for 1/2 hour and check that both gauges read the same. At
rated rpm the normal oil pressure range is 20 to 45 psi which
is dependent on sir and engine temperature, grade of oil, and
wear tolerances on the engine. If the unit pressure gauge is
in error by more than 5 lb, replace.
sure gauge and bracket. Remove fitting (5) and nuts
(6) attaching gauge (7) to mounting bracket (8) and
remove gauge (7).
c. Replace. Install oil pressure gauge (7) on mounting bracket (8) with nuts (6) two on each side of
bracket (6). Maintain gap between gauge and bracket
as indicated on figure 4-31. Position oil pressure
gauge and bracket on engine and install clamp (4),
lockwasher (3) and screw (2). Connect and tighten
oil line (1).
b. Remove (see figure 4-31). Disconnect and drain
oil line (1) to Oil pressure gauge (7). Remove screw
(2), lockwasher (3), clamp (4) and remove oil pres-
4-37
TM5-6115-585-12
NAVFAC P-8-262-12
TO-35C2-3-455-1
TM-05684C-12
Section XII. MAINTENANCE OF CONTROL SYSTEM
4-34. DESCRIPTION AND FUNCTION.
NOTE
All symbols (CB2, S1, etc. ) are the same as
used on the wiring diagram, figure 1-7, and
elsewhere throughout the manual.
4-35. DC CONTROL SYSTEM.
Operation of the dc control system is as follows.
Operator controlled dc functions are all contained in
three items mounted on the control panel. These are
the dc circuit breaker (CB2), the master switch (S1),
and the panel light switch (S2) (see figure 4-33).
a. The dc circuit breaker (CB2) controls all dc
power to the unit. When it is de-energized (pulled
out), all dc control circuits are de-energized, except
the battery charging system which is self protected
by fuse (Fl). This breaker can be used for emergency stopping of the unit.
b. The master switch (Sl) controls all starting and
operating of the set under normal conditions. It is a
five position rotary switch with the extreme position
in either direction being a momentary position. The
five positions control set operates as follows. When
the master switch is placed in position 1, marked
PREHEAT on control panel, a circuit is completed
between terminals 11 and 15 of the master switch,
this applies power to the coil of the preheat relay
(K2). When the preheat relay contacts close, power is
then applied to the glow plugs and preheaters on the
engine. This position of the switch should be used for
starting any time the engine is cold, or has not been
run for sometime. The normal period for preheating
is 1 minute, but can be as long as 1 minute 30 seconds
as conditions dictate. This switch position is momentary so that the preheat circuit remains activated
only as long as the operator holds the switch in
PREHEAT or START position. When the master switch
is placed in position 2, marked OFF on control panel,
all dc circuits are de-energized except the panel
lights, battery indicator, and the battery charging
system. This position is used to stop the set under
normal operation. When the master switch is placed
in position 3, marked PRIME & RUN AUX. FUEL on
control panel, circuits are completed between terminals 11-13, 11-14, 11-17 of the master switch.
This applies power to the engine fuel pumps, and the
auxiliary fuel system and also to one side of an
open contact of relay (K1). This position is used when
the set is running and the auxiliary fuel system is
being used, and also to prime the entire fuel system
before starting. Position 4 of the master switch,
marked PRIME & RUN on the control panel, is the
same as position 3 except that the circuit between
terminals 11-17, of the master switch is not made.
This position is used when the set is running and the
auxiliary fuel system is not being used, and also to
prime the engine fuel system only before starting.
4-38
When the master switch is placed in position 5,
marked START on the control panel, circuits are completed between terminals 11-13, 11-14, 11-15, 25-27,
25-28. The circuits between 11-13, 11-14, 11-15
activate the engine fuel pumps, apply power to one side
of an open contact of relay K1 and activate the preheat circuit as described in previous positions of the
switch. The circuit between 25-28 of the master
switch bypasses the safety devices which are capable
of stopping the engine. Bypassing the low oil pressure
safety device (S5) is essential until the engine has
sufficient oil pressure to close its contacts. Bypassing the safety device completes a circuit to the
engine fuel solenoid and relay coil (K1). Energizing
the start relay (K1) completes a circuit through the
contacts of (K1) to the running time meter, and to
one side of the low oil pressure switch. The circuit
between 25-27 of the master switch applies battery
voltage to the field flash resistor through diode (CR2).
This action applies field flashing current to the
exciter field. It also applies power through diode
(CR1), which prevents starting set when the battery
polarity is reversed, and the closed contacts of the
start disconnect switch (S7) to the crank relay coil
(K3). When the crank relay contacts close, a circuit
is completed to the starter solenoid (K6), which
closes and starts the cranking motor. With the
engine fuel solenoid energized and the starting motor
cranking the engine, the engine should start and accelerate toward the speed setting of the governor.
When engine speed passes approximately 1000 RPM
the start disconnect switch contact opens de-energizing the crank relay (K3) and in turn the start
solenoid and starting motor. With the engine accelerating and ac voltage building up, the governor
will take control of the engine and the voltage regulator will bring voltage to the value set by voltage
adjust rheostat. By the time the Generator Set is
under control of the regulator and governor, the
engine oil pressure will be sufficient to permit returning master switch (S1) to the PRIME & RUN or
PRIME & RUN AUX. FUEL position depending on
desired set operation. The set will now be operating
under control of the voltage regulator and governor
but without any load. As stated above, the set is now
ready to accept a load. Placing the ac circuit breaker
in the ON position connects the selected generator
output to the set load terminals. The breaker can be
opened manually or by automatic action of the internal
relay trip device in the case of an overload or a
short circuit. The panel light switch activates the
panel lights when placed in the ON position.
4-36. AC INSTRUMENTATION SYSTEM.
Operation of the ac instrumentation system which
consists primarily of ammeter voltmeter and ammeter-voltmeter transfer switch is as follows. The
function of the ammeter-voltmeter transfer switch
(S8) and the meter switching section of the reconnection switch (S6) is to provide the connections
TM 5-6115-585-12
NAVFAC P-8-623-12
TO-35C2-3-455-1
TM-05682C/05685B-12
for correct readings of voltmeter and ammeter
in all voltage connections and to ensure that
the secondaries of the current transformers are
never open circuited. This combination also
ensures that when the Generator Set is
connected for 3 phase operation that no meter
indications will be obtained with the ammetervoltmeter transfer switch (S8) in position 5 or
6, which are single phase positions. It also
ensures the reverse of this condition for
positions 1,2, 3, and 4 of switch (S8).
Figure 4-32. Load Terminal Board Assembly
Change 8
4-39
TM 5-6115-585-12
NAVFAC P-8-623-12
TO-35C2-3-455-1
TM-05682C/05685B-12
4-37. LOAD TERMINAL BOARD ASSEMBLY.
a. Load Terminal Removal (see figure 4-32).
(1) Unlatch door (3).
(2) Remove screws (1), lockwasher (2), and cover
and door assembly (3).
(3) Remove screws (4) and lockwasher (5).
(4) Carefully lift terminal board (6) and tag and
disconnect leads from load terminals (7) by removing
nut (11), lockwasher (10) and flatwasher (9).
(5) Remove load terminal (7) from terminal board (6)
by removing nut (8), flatwasher (12) and lockwasher (13).
b. Load Terminal Installation (see figure 4-32).
(1) Install load terminal (7) to terminal board (6)
by installing lockwasher (13), flatwasher (12) and nut (8).
(2) Connect leads to terminals (7) by installing
flatwashers (9), lockwashers (10) and nut (11).
(3) Install lockwashers (5) and screws (4).
(4) Install door assembly (3), lockwashers (2) and
screws(1).
(5) Latch door.
c. Replacement of Lost or Broken Terminal Clip
(Retainer Safety Clip). The terminl clip is a component of
both the load terminal and the ground terminal. If the terminal clip is lost or broken, fabricate as follows:
(1) Requisition bulk wire NSN 9505-00-804-3814
(0.042 inch diameter) for the ground terminal (ground
stud). Requisition bulk wire NSN 9505-01-049-0144 (0.050
inch diameter) for the load terminal.
(2) Cut off about 3 inches of the wire, short enough
to keep the clips from touching another terminal or the
generator frame in the open or closed position.
(3) Slip the wire through the hole in the terminal.
(4) Hold the terminal as shown (Detail A, figure
4-32.1) and bend both ends of the wire straight up keeping
the wire in as straight a line as you can with terminal body.
(5) Bend the wire into back-to-back 90º angles
(Detail B, figure 4-32.1) so that the legs of both angles are
about one-half inch long.
(6) Bend the ends of each 90° angle down and
around into a U-shape (Detail C, figure 4-32.1) so that if
done properly, the clip will hold the nut when it is unscrewed to install the cable (Detail D, figure 4-32.1).
Figure 4-32.1. Terminal Clip Replacement
4-40
Change 8
TM5-6115-585-12
NAVFAC P-8-623-12
TO-35C2-3-455-1
TM-05684C/05685B-12
Figure 4-33.
Change 8
4-41
TM
5-6115-585-12
NAVFAC
P-8-623-12
TO-35C2-3-455-1
TM-05684C/05685B-12
4-38. CONTROL CUBICLE ASSEMBLY.
a. Test, On Equipment (see figure 4-33).
NOTE
When disconnecting leads from terminals, tape
leads to prevent electrical shorts.
(1) Control Cubicle. Perform operational test on
control cubicle, checking for proper operation in each of the
Generator Set’s three modes using a voltmeter of known
accuracy. Check that ac output voltage indicated on control
panel matches output voltage at terminal board. Check that
Generator Set does come to an EMERGENCY STOP when
dc control circuit breaker (figure 2-3) is pulled. Test individual components of the control cubicle as given below. See
figure 4-33 for location of components.
(2) With the generator operating at rated frequency, flash the generator field by placing the master switch
on the control cubicle in the start position. If the generator
voltage fails to build up after flashing, the control cubicle
may be defective.
(3) Voltage Adjust Rheostat (R1). Turn the
Ammeter Voltmeter transfer switch to its various positions.
For each position of the switch, turn voltage adjust rheostat
to its extreme positions. Voltage reading should be as follows. Voltage adjust range shall be between 205 and 220V
for the 120/208V, 3 phase, 4 wire connection. Between 114
and 126V for the 120V, 1 phase, 2 wire connection. Between
228 and 252V for the 120/240V, 1 phase, 3 wire connection.
Assemblies
(DS1)
and
(4)
Panel
Light
(DS2). With a good incandescent lamp in place and 24 vdc
present at terminals of panel light (panel light switch ON),
check that lamps do light.
(5) Hour Meter (M2). Operate Generator Set.
Check hour meter against a known accurate time source.
Replace meter if necessary.
(6) Battery Charging Indicator (M1). Connect
meter capable of reading at least 35 volts DC from terminal
on battery charging indicator to ground. Operate Generator
Set. With the needle in the yellow area, the meter should read
between 18 and 27.5 volts. With the needle in the green area,
the meter should read between 24.5 and 31.5 volts. NOTE:
The apparent overlap in voltage between the yellow high and
green low is the result of a plus or minus 1.5 volt meter
tolerance.
(7) DC Control Circuit Breaker (CB2). Operate
Generator Set. Pull circuit breaker (CB2). If generator does
not come to an emergency stop, stop the unit using master
switch and replace breaker.
CAUTION
Disconnect battery cable before making checks,
unless otherwise noted.
(8) Master Switch (S1). Disconnect battery. Tag
and disconnect seven leads to master switch. Using an ohmmeter, check for continuity between terminals for each of the
five switch positions as given in table 4-3. If the continuity is
not found for each set of terminals listed, replace master
switch.
(9) Panel Light Switch (S2). Tag and disconnect
two leads to panel light switch. Using an ohmmeter, test for
continuity between terminals on switch. With the switch in
the OFF position, there should be no continuity. With the
switch in the ON position, there should be continuity.
Replace switch if necessary.
Table 4-3. Master Switch Continuity Check
NOTE
Be certain panel light switch is OFF before
installing or replacing panel light assembly.
4-42
Change 10
Switch Position
Check for Continuity
Between Terminals
PREHEAT
OFF
RUN AUX FUEL
RUN
START
11-15
NONE
11-13-17
11-13
11-13-15
25-27-28
TM 5-6115-585-12
NAVFAC P-8-623-12
TO-35C2-3-455-1
TM-05684C/05685B-12
Table 4-4. Voltmeter-Ammeter Range Selector Switch Continuity Check
Switch Position
Volts
Phase
Amps
L1-L2
L2-L3
L3-L1
L3-LO
L3-L1
L3-LO
3
3
3
3
1
1
L1
L2
L3
L3
L3
L3
Check for Continuity Between Terminals
11-15
11-17
11-17-18*
11-18
11-12
11-12
21-23
21-24
21-25
21-26
21-27
21-28
31-33
31-33
31-33
31-33
31-37
31-37
41-46-47
41-42-47
41-42-43
41-42-43
41-42-43-45
41-43-45-46
51-52
51-53
51-54
51-55
51-56
51-57
* Terminal 17 is jumped to terminal 18.
(10) Ammeter-Voltmeter Transfer Switch (S8).
Tag and disconnect sixteen leads to range selector switch.
Check for continuity between terminals for each of the
six switch positions as given in table 4-4. If continuity
is not found for each set of terminals listed, replace switch.
(11) Relays (K1), (K2), (K3), relay assembly (A1), diodes
(CR1) and (CR2) (see figures 1-7 and 4-33). Open circuit breaker
(CB2). On ASK equipped generators, remove batteries access
door. Disconnect battery cable. Tag, disconnect and tape the
following terminal lugs: A1 and A2 on crank relay (K3), preheat
relay (K2), and A1-4 and A1-3 on relay assembly A1. Tag and
disconnect terminals A1-5, A1-6, A1-7, and A1-8 on relay assembly
A1. Tact diodes CR1 and CR2 for shorted or open condition with
ohmmeter. Check CR1 by connecting positive lead of ohmmeter
to A1-5 and negative lead to A1-6. Ohmmeter should indicate
high resistance. Reverse ohmmeter leads. Ohmmeter should read
low resistance. If either CR1 or CR2 fails the above test, the
diode is defective and must be replaced. Reconnect terminals to
A1-5, A1-6, A1-7, and A1-8 on relay assembly A1. Reconnect
battery cable. Close circuit breaker (CB2). Hold master switch
in START position and using an ohmmeter check for continuity
between terminals A1 and A2 on crank relay K3, and continuity
between A1-3 and A1-4 on relay assembly A1. Continuity should
end when master switch is released, Repeat the above continuity
test for preheat relay K2 while holding master switch in
PREHEAT position. If either K2 or K3 fail the continuity test, the
relay is defective and must be replaced. Reconnect terminals A1
and A2 to relay K2 and K3, and terminals A1-4 and A1-3 to
relay assembly A1.
(12) Terminal Board Assembly (TB4) and (TB5). Tag and
disconnect leads to terminal boards. Test from each terminal to
ground for shorts. Replace board if any terminal shows continuity
to ground.
NOTE
On ASK equipped generators, access to J1 and J2
is through air intake door.
(13) Wiring Harness. Test wiring harness by using an
ohmmeter checking continuity of each wire. Perform point to
point checks between points indicated on figure 1-10. Wiring
harness need not be totally disconnected for checking continuity.
(14) Transformer (T1) (see figure 4-33). Tag and
disconnect five leads to transformer T1. Using an ohmmeter check primary winding by measuring resistance
from terminal H1 to H2. Resistance should be 18.6
ohms ± 1.86 ohms. Check secondary winding by measuring
resistance from terminal X1 to X3. Resistance should
be 1.6 ohms ± .16 ohms. If either of the windings do not
show the proper resistance. replace transformer.
(15) Transformer (T2) (see figure 4-33). Tag and
disconnect four leads to transformer T2. Check primary
winding by measuring resistance from terminal H1 to H2.
Resistance should be 155 ohms ± 15.5 ohms. Check secondary winding by measuring resistance from terminal Xl
to X2. Resistance should be 18.8 ohms ± 1.88 ohms. If
either of the windings do not show the proper resistance,
replace transformer.
b. Remove.
(1) Control Cubicle. On ASK equipped generators, remove
rear panel assembly (para. 5-7). Open air intake door. Tag and
detach two connectors for wiring harness from control cubicle (see
figure 1-2). Remove screw (6, figure 4-34) and nut (8) attaching
ground strap to cubicle support frame. Remove four screws (2),
Iockwashers (3) and flatwashers (4) attaching control cubicle to
vibration mounts (5) and remove cubicle (1).
c. Inspect.
(1) Inspect the control cubicle assembly per
paragraph 3-19.
(2) Frequency Tranducer (A3) (see figure 4-33).
Inspect transducer for physical damage. Check to see that
the electrical connections to transducer are clean and tight.
Check to see that transducer is securely attached to the
control cubicle.
Change 8
4-42.1
(3) Relay Assembly (A1). Inspect relay assembly
(5) for physical damage. Check that electrical connections
to as embly are clean and tight. Check that assembly is
securely attached to control cubicle.
(4) Relay (K1). Inspect relay (6) for physical
damage and continuity (see figure 4-33.1). Remove relay
from socket and inspect for bent or missing pins. Check
that relay is secured to socket with two screws.
Figure 4-33.1. Relay K1. Internal Connection Diagram
d. Disassembly.
(1) Panel Light Assemblies (DS1) and (DS2)
(see figure 4-33). Tag and detach two leads to each panel
light assembly (DS1) and (DS2). Remove nut and lockwasher securing light assembly to control panel and remove
light assembly.
(2) Hour Meter (M2). Tag and disconnect two
leads to hour meter. Remove three screws, lockwashers,
and nuts attaching hour meter to control panel and remove
meter.
4-42.2
Change 8
TM5-6115-565-12
NAVFAC P-8-623-12
TO-35C2-3-455-1
TM-05684C/05685B-12
TM5-6115-585-12
NAVFAC P-8-262-12
TO-35C2-3-455-1
TM-05684C-12
Figure 4-34. Removing Control Cubicle Support Assembly
(3) Battery Charging Indicator (M1). Tag and
disconnect lead to indicator. Remove two lockwashers
and nuts and retainer holding meter in place and
remove indicator.
(4) DC Control Circuit Breaker (CB2). Disconnect two leads to breaker. Remove two screws
attaching breaker to control panel and remove breaker.
(5) Master Switch (S1). Disconnect battery. Tag
and disconnect seven leads to master switch. Remove switch knob by loosening two setscrews. Remove
nut attaching switch to control panel and remove
switch.
(6) Panel Light Switch (S2). Tag and disconnect
two leads to switch. Remove nut attaching switch
to control panel and remove switch.
(7) Ammeter-Voltmeter Transfer Switch (S8).
Tag and disconnect sixteen leads to range selector
switch. Remove switch knob by loosening two
setscrews. Remove nut attaching switch to control
panel and remove switch. Install new switch as given
above.
(8) Voltage Adjust Rheostat (R1). Tag and
disconnect two leads to rheostat. Remove rheostat
knob by loosening two allen setscrews. Remove nut
and washer attaching rheostat to panel and remove
rheostat (9).
(9) Transformer (T1). Tag and disconnect five
leads to transformer. Remove four screws and
lockwashers attaching transformer to control cubicle
and remove transformer.
(10) Transformer (T2). Tag and disconnect four
leads to transformer. R e m o v e t w o s c r e w s a n d
lockwashers attaching transforrner to cubicle and
remove transformer.
Change 5
4-43
TM5-6115-585-12
NAVFAC P-8-262-12
TO-35C2-3-455-1
TM-05684C-12
(11) Relay (K2-K3). Disconnect battery. Tag and
disconnect four leads to relay. Remove two screws
and nuts attaching relay to control cubicle.
(12) Terminal Board Assemblies (TB4 and TB5).
Tag and disconnect leads to terminal boards. Remove
two screws and nuts attaching board to control cubicle
and remove board.
NOTE
(10) Terminal Board Assemblies (TB4) and (TB5).
Attach board to control cubicle with two screws and
nuts. Attach tagged leads to board (if necessary, refer
to schematic, figure 1-10).
(11) Voltage Adjust Rheostat (R1). Attach rheostat
(9) to control panel with nut and lockwasher provided with rheostat. Make certain that rheostat aligns
with slot on panel. Push rheostat knob onto shaft and
attach using two allen screws. Attach two tagged
leads to rheostat per wiring diagram, figure 1-7.
TB4 has 27 leads and TB5 has 36 leads.
e. Assembly.
(1) Panel Light Assemblies (DS1 and DS2). Attach
new light assembly to control panel with the nut and
lockwasher supplied with each assembly. Attach two
tagged leads to each panel light (if necessary refer
to wiring diagram, figure 1-7).
(2) Hour Meter (M2). Attach hour meter to control
panel with three screws, lockwashers, and nuts provided with meter. Attach two tagged leads to meter
(if necessary, refer to wiring diagram, figure 1-7).
(12) Transformer (T1). Attach transformer to
control cubicle with four screws and nuts. Connect
five tagged leads to (T1) per wiring diagram, figure
1-7.
(13) Transformer (T2). Attach transformer to
control cubicle with four screws and nuts. Connect
four tagged leads to (T2) per wiring diagram, figure
1-7.
f. Bench Test. Connect the control cubicle as shown
in figure 4-35 and proceed as follows.
(1) Position switches as follows:
(3) Battery Charging Indicator (M1). Slide battery
charging indicator into opening in control panel. Place
retainer over back of indicator and secure with two
lockwashers and nuts. Attach lead to indicator (if
necessary, refer to wiring diagram, figure 1-7).
(a) Master switch-stop
(b) Panel light switch-off
(c) S1-closed
(4) DC Control Circuit Breaker (CB2). Attach
circuit breaker to control panel with the two screws.
Reconnect tagged leads to breaker (if necessary, refer
to wiring diagram, figure 1-7).
(d) S2-open
(5) Master Switch (S1). Attach master switch to
control panel with nut and key ring provided with
switch. Make certain key on key ring aligns with slot
in control panel. Push switch knob onto shaft and
attach with two allen screws. Attach seven tagged
leads to switch (if necessary, refer to wiring diagram, figure 1-7).
(6) Panel Light Switch (S2). Attach panel light
switch to control panel with nut and key ring. Make
certain key on key ring aligns with slot in control
panel. Attach two tagged leads to switch (if necessary,
refer to wiring diagram, figure 1-7).
(7) Voltmeter-Ammeter Range Selector Switch
(S8). Attach range selector switch to control panel
with nut and key ring. Make certain key on key ring
aligns with slot in control panel. Push switch knob
onto shaft and attach with two allen screws. Attach
sixteen tagged leads to switch (if necessary, refer to
wiring diagram, figure 1-7).
(8) Relay (K1). Plug new relay into socket on
relay assembly A1 and secure with two screws.
(9) Relay (K2 and K3). Attach relay to control
cubicle with two screws and nuts. Reconnect four
tagged leads per wiring diagram, figure 1-7.
4-44
Figure 4-35. Control Cubicle Test Set-Up
TM5-6115-585-12
NAVFAC P-8-623-12
TO-35C2-3-455-1
TM-05684C/05685B-12
(2) Place master switch in preheat position.
Lamps L2 and L3 shall light indicating that the preheat circuitry is correct.
(9) Place master switch in the stop position.
All lamps shall be out indicating that all stop circuits
are correct.
(3) Place master switch in start position. Lamps
L1, L2, L3, L4, L5 and L6 shall light indicating that
all circuits for starting are correct.
(10) Place panel light switch in the on position.
Panel lights shall be on indicating that the panel light
circuit is correct.
(4) With the master switch in the start position,
open switch S1. Lamp L1 shall extinguish indicating
that the start disconnect circuitry is correct.
(11) Reposition all switches as in step 1 and disconnect test setup.
(12) Test CR1 and CR2 as follows:
(5) With the master switch in the start position.
Close switch S2 and then, place the master switch in
the prime and run position. Lamps L2 and L3 shall
extinguish. Lamps L4, L5 and L6 shall remain lit
indicating that the prime and run circuitry are correct.
(6) with the master switch in the prime and run
position and lamps L4, L5 and L6 lit open switch S2.
Lamp L4 shall extinguish indicating that the engine
protective devices circuit and the prime circuit is
correct.
the
run
L4,
the
(7) Repeat the procedure of step 5, except that
master switch shall be placed in the prime and
aux fuel position after closing switch S2 Lamps.
L5, L6 and L? shall remain lit indicating that
prime and run aux fuel circuitry is correct.
(8) With the master switch in the prime and run
aux fuel position and lamps L4, L5, L6 and L7 lit
open switch S2. Lamp L4 shall extinguish indicating
that the engine protective devices circuit and the
prime circuit is correct.
(a) Remove wires from terminals 6 and 7 of
A1.
(b) Measure forward and backward resistance
of CR1 between terminals 5 and 6 of A1. Resistance
should read high in one direction and low in the other.
If not, CR1 is bad.
(c) Measure forward and backward resistance
of CR2 between terminals 7 and 8 of A1. Resistance
should read high in one direction and low in the other.
If not, CR2 is bad.
g. Install.
(1) Control Cubicle. Attach control cubicle (1, figure 4-34) to
four vibration mounts (5) with four screws (2), lockwashers (3), and
flatwashers (4). Attach ground strap (7) to cubicle support frame
with screw (6) and nut (8). Attach two connectors from wiring harness to connectors on back of control cubicle. On ASK equipped
generators, install rear panel assembly (para. 5-7).
Section XIII. MAINTENANCE OF ENGINE
4-39. DESCRIPTION AND FUNCTION t
(See figure 4-36.) The engine assembly is a four
cylinder, air cooled, overhead valve, fuel injected
diesel equipped with; a blower housing (1) and a
shutter assembly (2) used to direct and control
cooling air, an oil cooler (3) and gear type oil pump
used to cool and circulate lubricating oil in the
engine, a replaceable cartridge type oil filter (4) to
remove contaminants from the lubricating oil, fuel
injection pump (5) to supply metered fuel to the
engine combustion cylinders through fuel injectors
located in the cylinder heads, air intake manifold (6)
and heaters that receive combustion air from the
external air cleaner (10) and heat the combustion air
if required, starter motor (7) coupled to the engine
drive gear for cranking the engine for starting, corrosion resistant exhaust mufflers (8) to reduce engine
exhaust noise, and a mechanical governor used
to maintain rated frequency under varying load.
4-40. EXHAUST MUFFLER ASSEMBLY
a. Inspect (see figure 4-37). If engine exhaust is
noisy or if exhaust gases are detected from shutter
assembly, indications are that muffler (3) or gaskets
(4) and (6) may be defective.
b. Remove. Remove shutter assembly as outlined
in paragraph 4-17. Bend lock tabs (2) down and
remove four nuts (1) holding muffler (3) in place.
Remove lock tabs (2), mufflers (3), mufflfer gaskets (4).
adapters (5) and adapter gaskets (6) from each
cylinder head.
c. Replace. Place gaskets (6), adapters (5) in place
on each cylinder head. Slide new muffler gaskets (4),
muffler (3), and lock tabs (2) over studs (7) in cyl
inder head and secure to cylinder head with nuts (1).
Change 8
4-45
TM5-6115-585-12
NAVFAC P-8-262-12
TO-35C2-3-455-1
TM-05684C-12
4-46
Figure 4-36.
TM5-6115-585-12
NAVFAC P-8-623-12
TO-35C2-3-455-1
TM-05684C/05685B-12
1.
2.
3.
4.
5.
6.
7.
8.
9.
10.
11.
12.
13.
14.
15.
16.
Blower housing
Shutter assembly
Oil cooler
Oil filter
Injection pump
Intake manifold assembly
Starter
Exhaust muffler
Governor
Air cleaner assembly
Oil dip-stick and filler
Screw (2)
Washer (2)
Shockmount (2)
Spacer (2)
Bracket
17.
18.
19.
20.
21.
22.
23.
24.
25.
26.
27.
28.
29.
30.
31.
Rocker cover (2)
Intake manifold
Screw (4)
Lock tab (4)
Gasket (2)
Lead
Heater (2)
Lead
Screw (2)
Washer (2)
Washer (4)
Spacer (4)
Adapter
Gasket
Engine shroud and door
panel
TS 6115-585-12/4-36(2)
Figure 4-36. Engine Assembly (Sheet 2 of 2)
NOTE
Upper and lower nut must be tightened evenly
in small increments so that muffler will lay
flat against adapters.
Bend lock tabs (2) up to secure nuts (1).
4-41. AIR CLEANER ASSEMBLY.
a. Inspect (see figure 4-37). On ASK equipped generators,
open air intake door and air cleaner door.
(1) Air Cleaner Assembly. Check air cleaner
assembly for corrosion, broken or dented components
or split hoses.
b. Remove.
(1) Air Cleaner Assembly. Loosen hose clamps
(9 and 11) attaching two air intake hoses (10 and 12)
to housing and detach hoses. Remove screws (13),
lockwashers (14) and remove air cleaner and bracket
and spacers (15). Remove air flow indicator (16) by
turning counterclockwise.
(2) Remove nut (17), lockwashers (18), screw
(19) and separate air cleaner (20) and bracket (21).
c. Repair.
(1) Air Cleaner Assembly. Weld and straighten
air cleaner housing as necessary.
(2) Mounting Bracket (see figure 4-37). If bracket
(21) is split or bent, weld and straighten bracket as
necessary. After completing repairs, check that
bracket securely attaches air cleaner to set.
d. Install.
(1) Air Cleaner Assembly (see figure 4-37).
Install air cleaner (20) on bracket (21) and secure
with screws (19), lockwashers (18) and nuts (17).
Install air flow indicator (16) on air cleaner.
(2) Install air cleaner, bracket and spacers (15) on
generator housing and secure with lockwashers (14) and
screws (13). Install hoses (10 and 12) and secure with clamps
(9) and (11).
4-42. ENGINE ASSEMBLY.
a. Inspect (see figure 1-1). Inspect engine for loose connections, leaks in oil and fuel systems, and free action of all
moving parts. Check that engine is securely mounted to skidbase. On ASK equipped generators, inspections of the engine
assembly are limited to components accessible through the
access doors.
b. Test. Operate engine with no load on Generator
Set, until it warms up to normal operating temperature indicated by shutters being in an intermediate position between open and closed. Check oil
pressure. Oil pressure should be 20-45 psi. Check
frequency on frequency meter. Frequency should be
approximately 60 Hz (MEP-003A) or 400 H Z ( M E P 112A). Apply full rated load to engine. Check that
governor adjusts engine quickly, smoothly, and without excessive hunting. Check that exhaust is normal
under load. Check that engine runs without excessive
fuel or oil consumption. Check that no unusual noise
is heard. Inability of engine to meet these tests may
indicate engine malfunctioning. See Troubleshooting,
Section VI.
c. Service. Service engine according to the schedule
given in table 4-1, Preventive Maintenance Checks
and Services.
d. Adjust. The only engine adjustments applicable
to this level of maintenance are to the valve rocker
arms stop solenoid. and starter lockout switch.
NOTE
Engine lifting attachment is for lifting engine
alone. Do not use this attachment for lifting
engine if generator is still attached. Use the
set lifting eye for this purpose (see figure 1-1).
Change 8
4-47
TM5-6115-585-12
NAVFAC P-8-262-12
TO-35C2-3-455-1
TM-05684C-12
Figure 4-37. Exhaust Muffler and Air Cleaner Assemblies.
4-48
TM5-6115-585-12
NAVFAC P-8-623-12
TO-35C2-3-455-1
TM-05684C/05685B-12
4-43. INTAKE MANIFOLD ASSEMBLY.
and tight. While engine is operating, check for leaks
a. Test. On Equipment (see figure 4-36). On ASK equipped
generators, remove right panel assembly (para. 5-6). Remove
hose between intake manifold and air cleaner to permit visual
inspection of heater coils (23). Place master switch (see figure
2-3) in the PREHEAT position. Good coils should start to heat
within one minute. Release switch as soon as coil begins to heat.
Replace a bad heater.
b. Inspect heater for physical damage.
Check that electrical connections to heater are clean
especially at the gasket (21, figure 4-36) between
manifold and cylinder head and the gasket (30) between
the manifold heater adapter (29) and the manifold.
Drop oil from an oil can or hold piece of thin paper
on point suspected of leaking. If leak exists, oil will
be sucked in or paper will be sucked against leaking
area.
c. Remove. Tag and disconnect leads (22 and 24)
from heaters (23) and remove heaters (23). Remove
leads (24) by removing screw (25), washers (26 and
27) and spacer (28). Remove adapter (29) and gasket
Figure 4-38. Rocker Arm Covers
Change 8
4-49
TM5-6115-585-12
NAVFAC
P-8-623-12
TO-35C2-3-455-1
TM-05684C/05685B-12
(30). Bend lock tabs (20) down and remove four screws (19)
attaching manifold to cylinder heads and remove manifold
(18). Clean away any gasket material (21) stuck to cylinder
heads or manifold.
4-44.
figure 4-38)
Figure 4-39. Cleaning Rocker Arm Cover Oil Line
4-46.
figure 3-9)
figure 4-40)
figure 4-38)
figure
4-39
figure 4-38)
4-45.
figure 4-40
figure 4-41)
4-50
Change 10
TM5-6115-585-12
NAVFAC P-8-262-12
T0-35C2-3-455-1
TM-05684C-12
Figure 4-40.
4-47.
figure 4-41)
figure 4-40.
4-48.
figure 4-41.
4-51
TM5-6115-585-12
NAVFAC P-8-262-12
TO-35C2-3-455-1
TM-05684C-12
Figure 4-41. Cylinder Head Assembly
4-52
TM5-6115-585-12
NAVFAC P-8-623-12
TO-35C2-3-455-1
TM-05684C/05685B-12
figure 4-41)
(para. 5-4)
4-49.
figure 3-20)
4-50.
4-51.
figure 4-42)
Figure 4-42. Oil Fill Tube
4-52.
figure 4-43)
(para. 5-3)
Change 8
4-53
TM5-6115-585-12
NAVFAC P-8-262- 12
TO-35C2-3-455-1
TM-05684C-12
Figure 4-43. Engine Mounting Assembly
4-54
TM 5-6115-585-12
NAVFAC P-8-623-12
TO-35C2-3-455-1
TM-05684 C/05685B-12
Section XIV. MAINTENANCE OF GENERATOR ASSEMBLY
4-53.
(see figure 1-1)
Figure 4-44. Generator Screen-Guard
4-55
TM 5-6115-585-12
NAVFAC P-8-623-12
TO-35C2-3-455-1
TM-05684C/05685B-12
figure 4-44)
4-54.
figure 1-1)
para 5-3
4-55.
para 5.3)
Section XV.
4-56.
figure 1-1.)
paragraph 4-25
figure 4-45)
4-57.
figure 4-45
paragraph 4-37.
figure 4-45)
figure 4-45).
paragraph 4-36
figure 4-45)
4-56
TM5-6115-585-12
NAVFAC P-8-623-12
TO-35C2-3-455-1
TM-05684C/05685B
Figure 4-45. Skid Base Assembly.
Change 4
4-57
TM5-6115-585-12
P-8-262-12
TO35C2-3-455-1
TM-05684C-12
NAVFAC
(b) Refer to paragraph 4-38 and Install control cubicle.
(2) Battery Frame Bottom and Tray.
(a) Position battery tray (12) and bottom frame
(11) on skid-base (24). Attach by installing nuts (5 and
9), lockwashers (6 and 10), bevel washers (7) and
screws (4 and 8).
NOTE
Bevel washers are only on the four bolts at
the outside of the skid-base.
4-58 Change 8
(b) See paragraph 4-25 and install batteries
and battery hold-downs.
(3) Slave Receptacle. Install bracket (23) with
screws (22). Install slave receptacle (21) on bracket
with screws (18), lockwashers (20) and nuts (19).
Install leads (17) on slave receptacle as tagged. Remove tags.
(4) Ground Stud. Install ground stud (16) on skid-base (24)
with Iockwasher (14) and nut (13). Install leads(15 and 17) on
ground stud (16) with Iockwasher (14) and nut (13). On ASK
equipped generator sets refer to chapter 5 and install entire
ASK assembly.
TM 5-6115-585-12
NAVFAC P-8-623-12
TO 35C2-3-455-1
TM-05684C/05685B-12
CHAPTER 5
MATERIEL USED IN CONJUNCTION WITH DOD STANDARD GENERATOR
SET, 10KW DIESEL ENGINE DRIVEN, MODELS MEP-003A AND MEP-112A
Section I.
5-1.
AUXILIARY EQUIPMENT
GENERAL .
This chapter describes all Organizational Level Maintenance procedures for auxiliary equipment (kits) which are used in conjunction with the generator set. Any effects of the auxiliary
equipment on the operation or maintenance procedures for the
generator set are identified in the procedures where they occur.
Change 8
5-1
TM 5-6115-585-12
NAVFAC P-8-623-12
TO 35C2-3-455-1
TM-05682C/05685B-12
Section II.
5-2.
ACOUSTIC SUPPRESSION KIT
ACOUSTIC SUPPRESSION KIT.
The acoustic suppression kit (ASK) is an add-on enclosure that
reduces the noise level from the DOD Standard Generator Set, 10KW
Diesel Engine Driven, Models MEP-003A and MEP-112A. The control
cubicle and ac output control box assembly are not covered and
the fuel tank is only partially covered. Other controls or areas
requiring frequent service can be reached through top panel and
right and left panel access doors. All ASK plates are shown in
figure 5-1.
5-3.
COVER ASSEMBLY.
a. Removal.
See figure 5-2. Remove cover assembly
consisting of top panel, left and right panels, front panel and
side closure assemblies as follows:
Remove four screws (1) and washers (2) securing
(1)
left panel assembly (3) to left support assembly (4).
Remove two screws (5) and locknuts (6), and four
(2)
washers (7 and 8), securing side closure assembly (9) to rear
closure assembly(10).
Remove six screws (11) and washers (12) securing
(3)
right panel assembly (13) to right support assembly (14).
Remove two screws (15) and washers (16) securing
(4)
right panel assembly (13) to rear panel assembly (17), and remove
two screws (18) and locknuts (19), and four washers (20 and 21)
securing right panel assembly (13) to rear closure assembly (10).
(5) Remove three screws (22) and locknuts (23), and
six washers (24 and 25) securing top panel assembly (26) to rear
closure assembly (10).
WARNING
The ASK Cover assembly is heavy. Four people are
required to lift cover. Failure to follow safety
rules could result in personal injury.
(6)
5-2
Lift and remove cover assembly from generator set.
Change 8
TM 5-6115-585-12
NAVFAC P-8-623-12
TO 35C2-3-455-1
TM-05684C/05685B-12
Figure 5-1.
Instruction and Rating Plates (Sheet 1 of 4)
Change 8
5-3
TM 5-6115-585-12
NAVFAC P-8-623-12
TO 35C2-3-455-1
TM-05682C/05685B-12
Figure 5-1.
5-4
Change 8
Instruction and Rating Plates (Sheet 2)
TM 5-6115-585-12
NAVFAC P-8-623-12
TO 35C2-3-455-1
TM-05684C/05685B-12
Figure 5-1.
Instruction and Rating Plates (Sheet 3)
Change
8
5-5
TM 5-6115-585-12
NAVFAC P-8-623-12
TO 35C2-3–455-1
TM-05682C/05685B-12
Figure 5-1.
5-6
Change 8
Instruction and Rating Plates (Sheet 4)
TM 5-6115-585-12
NAVFAC P-8-623-12
TO 35C2-3-455-1
TM-05684C/05685B-12
Figure 5-2.
Cover Assembly, Removal and Installation
Change
8 5 - 7
TM 5-6115-585-12
NAVFAC P-8-623-12
TO 35C2-3-455-1
TM-05682C/05685B-12
Installation.
See figure 5-2. Replace cover assembly
b.
consisting of top panel assembly, left and right panel assemblies, front panel and side closure assemblies on generator as
follows:
WARNING
The ASK Cover assembly is heavy. Four people are
required to lift cover. Failure to follow safety
rules could result in personal injury.
(1)
Position cover assembly on generator set.
Install three screws (22) and locknuts (23), and
(2)
six washers (24 and 25) securing top panel assembly (26) to rear
closure assembly (10).
(3)
Torque screws (22) to 16 ±2 ft-lbs dry.
Install two screws (18) and locknuts (19), and
(4)
four washers (20 and 21) securing right panel assembly (13) to
rear closure assembly (10) and install two screws (15) and
washers (16) securing right panel assembly (13) to rear panel
assembly (17).
(5)
(6)
Torque screws (18) to 16 ±2 ft-lbs dry.
Torque screws (15) to 18 ±2 in.-lbs dry.
(7)
Install six screws (11) and washers (12) securing
right panel assembly (13) to right support assembly (14).
(8)
Torque screws (11) to 18 ±2 in.-lbs dry.
Install two screws (5) and locknuts (6), and four
(9)
washers (7 and 8) securing side closure assembly (9) to rear
closure assembly (10).
(10) Torque screws (5) to 16 ±2 ft-lbs dry.
(11) Install four screws (1) and washers (2) securing
left panel assembly (3) to left support assembly (4).
(12) Torque screws (1) to 18 ±2 in.-lbs dry.
5-4.
TOP PANEL ASSEMBLY.
Removal.
See figure 5-3. Remove top panel assembly
from left, right and front panel assemblies, and side and rear
closure assemblies as follows:
Remove 13 screws (1) and washers (2) securing top
(1)
panel assembly (3) to left panel assembly (4), right panel
assembly (5) and front panel assembly (6).
5-8
Change 8
TM 5-6115-585-12
NAVFAC P-8-623-12
TO 35C2-3-455-1
TM 05684C/05685B-12
Figure 5-3.
Top Panel Assembly and Exhaust Plenum,
Removal and Installation
Change 8 5 - 9
TM 5-6115-585-12
NAVFAC P-8-623-12
TO 35C2-3-455-1
TM-05682C/05685B-12
Remove seven screws (7) and locknuts (8), and 14
(2)
washers (9 and 10) securing top panel assembly (3) to side
closure assembly (11) and rear closure assembly (12).
(3) Lift off top panel assembly (3).
Installation.
See figure 5-3.
Install top panel
b.
assembly to left, right and front panel assemblies, and to side
and rear closure assemblies as follows:
(1)
Position top panel assembly (3) on left panel
assembly (4), right panel assembly (5), front panel assembly (6),
side closure assembly (11), and rear closure assembly (12).
(2)
Install seven screws (7) and locknuts (8), and 14
washers (9 and 10) securing top panel assembly (3) to side
closure assembly (11) and rear closure assembly (12).
(3)
Torque screws (7) to 16 ±2 ft-lbs dry.
(4)
Install 13 screws (1) and washers (2) securing top
panel assembly (3) to left panel assembly (4), right panel
assembly (5), and front panel assembly (6).
(5) Torque screws (1) to 18 ±2 in.-lbs dry.
5-5.
LEFT PANEL ASSEMBLY WITH SIDE CLOSURE ASSEMBLY.
a. Removal.
See figure 5-4. Remove left panel assembly
with side closure assembly from top panel, front panel, left
support and rear closure assemblies as follows:
(1) Remove top panel assembly (1) as described in
paragraph 5-4.
(2)
Remove four screws (2) and washers (3) securing
left panel assembly (4) to left support assembly (5).
(3) Remove three screws (6) and washers (7) securing
left panel assembly (4) to front panel assembly (8).
(4)
Remove two screws (9) and locknuts (10), and four
washers (11 and 12) securing side closure assembly (13) to rear
closure assembly (14) and lift off left panel assembly (4) with
side closure assembly (13) .
(5)
Remove three screws (15) and locknuts (16),
six washers (17 and 18) securing side closure assembly (13
left panel assembly (4).
5-10
Change 8
TM 5-6115-585-12
NAVFAC P-8-623-12
TO 35C2-3-455-1
TM-05684C/05685B-12
Figure 5-4.
Left Panel Assembly and Side Closure Assembly,
Removal and Installation
Change 8
5-11
TM 5-6115-585-12
NAVFAC P-8-623-12
TO 35C2-3-455-1
TM-05682C/05685B-12
Install left panel with
Installation.
See figure 5-4.
b.
side closure assembly to top panel, front panel, left support and
rear closure assemblies as follows:
(1)
Install three screws (15) and locknuts (16) and
six washers (17 and 18) securing side closure assembly (13) to
left panel assembly (4).
(2)
Torque screws (15) to 16 ±2 ft-lbs dry.
Position left panel assembly (4) with side closure
(3)
assembly (13) on generator and install two screws (9) and lock–
nuts (10) and four washers (11 and 12) securing side closure
assembly (13) to rear closure assembly (14).
(4)
Torque screws (9) to 16 ±2 in.-lbs dry.
Install three screws (6) and washers (7) securing
(5)
left panel assembly (4) to front panel assembly (8).
(6)
Torque screws (6) to 18 ±2 in.-lbs dry.
(7)
Install four screws (2) and washers (3) securing
left panel assembly (4) to left support assembly (5).
(8)
Torque screws (2) to 18 ±2 in.-lbs dry.
Install top panel assembly (1) as described in
(9)
paragraph 5-4.
5-6.
RIGHT PANEL ASSEMBLY.
a. Removal.
See figure 5-5. Remove right panel assembly
from right support assembly, rear panel assembly, front panel
assembly, top panel assembly and rear closure assembly as
follows:
(1)
Remove six screws (1) and washers (2) securing
right panel assembly (3) to right support assembly (4).
Remove three screws (5) and washers (6) securing
(2)
right panel assembly (3) to front panel assembly (7).
Remove five screws (8) and washers (9) securing
(3)
right panel assembly (3) to top panel assembly (10).
four
rear
(17)
(18)
5-12
(4) Remove two screws (11) and two locknuts (12), and
washers (13 and 14) securinq riqht panel assembly (3) to
closure assembly (15) and remove two screws (16)and washers
securing right panel assembly (3) to rear panel assembly
and remove right panel asssembly (3) .
Change 8
TM 5-6115-585-12
NAVFAC P-8-623-12
TO 35C2-3-455-1
TM-05684C/05685B-12
Figure 5-5.
Right Panel Assembly, Removal and Installation
Change 8
5-13
TM 5-6115-585-12
NAVFAC P-8-623-12
TO 35C2-3-455-1
TM-05682C/05685B-12
Installation.
See figure 5-5.
Install right panel
b.
assembly to right support assembly, front panel assembly, top
panel assembly, rear closure assembly and rear panel assembly as
follows:
(1)
Position right panel assembly (3) on right support
assembly (4) and install two screws (11) and locknuts (12), and
four washers (13 and 14) securing right panel assembly (3) to
rear closure assembly (15) and install two screws (16) and
washers (17) securing right panel assembly (3) to rear panel
assembly (18).
(2)
Torque screws (11) to 16 ±2 ft-lbs dry.
(3) Torque screws (16) to 18 ±2 in.-lbs dry.
(4)
Install five screws (8) and washers (9) securing
right panel assembly (3) to top panel assembly (10).
(5)
Torque screws (8) to 18 ±2 in.-lbs dry.
Install three screws (5) and washers (6) securing
(6)
right panel assembly (3) to front panel assembly (7).
(7)
Torque screws (5) to 18 ±2 in.-lbs dry.
Install six screws (1) and washers (2) securing
(8)
right panel assembly (3) to right support assembly (4).
(9)
5-7.
Torque screws (1) to 18 ±2 in.-lbs dry.
REAR PANEL ASSEMBLY.
a. Removal. See figure 5-6. Remove rear panel assembly
from control cubicle support frame and right panel assembly as
follows:
(1) Remove two screws (1) and washers (2) securing
right panel assembly (3) to rear panel assembly (4) and remove
rear panel assembly (4).
(2) Remove four screws (5) and locknuts (6), and eight
washers (7 and 8) securing rear panel assembly (4) to control
cubicle support frame (9).
Installation.
b.
See figure 5-6.
Install rear panel
assembly to control cubicle support frame and right panel
assembly as follows:
(1) Position rear panel assembly (4) on control
cubicle support frame (9) and install four screws (5) and
locknuts (6), and eight washers (7 and 8) securing rear panel
assembly (4) to control cubicle support frame (9).
(2)
5-14
Torque screws (5) to 16 ±2 ft-lbs dry.
Change 8
TM 5-6115-585-12
NAVFAC P-8-623-12
TO 35C2-3-455-1
TM-05684C/05685B-12
Figure 5-6.
Rear Panel Assembly, Removal and Installation
Change 8
5-15
TM 5-6115-585-12
NAVFAC P-8-623-12
TO 35C2-3-455-1
TM-05682C/05685B-12
Install two screws (1) and washers (2) securing
(3)
right panel assembly (3) to rear panel assembly (4).
Torque screws (1) to 18 ±2 in.-lbs dry.
(4)
5-8.
EXHAUST PLENUM ASSEMBLY.
a. Removal.
See figure 5-3. Remove exhaust plenum
assembly from shutter assembly as follows:
(1) Remove top panel assembly (3)
paragraph 5-4.
as described in
(2) Remove four screws (13) and locknuts (14), and
eight washers (15 and 16) securing exhaust plenum assembly (17)
to shutter assembly (18) and lift off exhaust plenum assembly
(17).
Installation.
See figure 5-3.
b.
assembly on shutter assembly as follows:
Install exhaust plenum
(1) Position exhaust plenum assembly (17) on shutter
assembly (18) and install four screws (13) and locknuts (14), and
eight washers (15 and 16) securing exhaust plenum assembly (17)
to shutter assembly (18).
Torque screws (13) to 16 ±2 ft-lbs dry.
(2)
Install top panel assembly (3) as described in
(3)
paragraph 5-4.
5-9.
LEFT SUPPORT ASSEMBLY.
a. Removal.
See figure 5-7.
from skid as follows:
Remove left support assembly
(1) Remove four screws (1) and washers (2) securing
access plate (3) to AC output control box (4).
(2) Remove top panel assembly (5), as described in
paragraph 5-4.
(3) Remove left panel assembly (6) with side closure
assembly (7) as described in paragraph 5-5.
(4) Loosen four screws (8) and slide out left support
assembly (9) from under skid (10).
b.
Installation.
See figure 5-7. Install left support
assembly onto skid as follows:
(1) With four screws (8) loosened, slide left support
assembly (9) between skid (10) and bevel washers (11).
5-16
Change 8
TM 5-6115-585-12
NAVFAC P-8-623-12
TO 35C2-3-455-1
TM-05684C/05685B-12
Figure 5-7.
Left Support Assembly, Removal and Installation
Change 8
5-17
TM 5-6115-585-12
NAVFAC P-8-623-12
TO 35C2-3-455-1
TM-05682C/05685B-12
(2) Torque screws (8) to 26 ±2 ft-lbs dry.
Replace left panel assembly (6) with side closure
(3)
assembly (5) as described in paragraph 5-5.
(4)
Replace top panel assembly (5) as described in
paragraph 5-4.
(5) Replace four screws (1) and washers (2) securing
access plate (3) to AC output control box (4).
5-10.
RIGHT SUPPORT ASSEMBLY.
a. Removal.
See Figure 5-8. Remove right support
assembly from skid and right panel assembly as follows:
(1)
Remove right panel assembly (1) as described in
paragraph 5-6.
(2) Loosen six screws (2) securing right support
assembly (3) to skid (4) and slide out right support assembly (3)
from under skid (4).
b.
Installation.
assembly as follows:
See figure 5-8.
Install right support
(1) With six screws (2) loosened, slide right support
assembly (3) between skid (4) and bevel washers (5).
(2)
Torque screws (2) to 26 ±2 ft-lbs dry.
Replace right side panel (1) as described in
(3)
paragraph 5-6.
5-11.
FRONT PANEL ASSEMBLY.
a. Removal.
See figure 5-9. Remove front panel assembly
from right, left, and top panel assemblies as follows:
(1) Remove four screws (1) and washers (2) securing
the front panel assembly (3) to top panel assembly (4).
(2)
Remove six screws (5) and washers (6) securing
front panel (3) to left panel assembly (7) and right panel
assembly (8).
(3)
Remove front panel assembly (3).
Install front panel
b.
Installation.
See figure 5-9.
assembly to right, left and top panel assemblies as follows:
(1)
Position front panel assembly (3) to right and
left panel assemblies (8 and 7) and secure with six screws (5)
and washers (6).
5-18
Change 8
TM 5-6115-585-12
NAVFAC P-8-623-12
TO 35C2-3-455-1
TM-05684C/05685B-12
Figure 5-8.
Right Support Assembly, Removal and Installation
Change 8
5-19
TM 5-6115-585-12
NAVFAC P-8-623-12
TO 35C2-3-455-1
TM-05682C/05685B-12
Figure 5-9.
5-20
Front Panel Assembly, Removal and Installation
Change 8
TM 5-6115-585-12
NAVFAC P-8-623-12
TO 35C2-3-455-1
TM-05684C/05685B–12
(2)
Install four screws (1) and washers (2) securing
front panel assembly (3) to top panel assembly (4).
(3)
5-12.
Torque screws (1 and 5) to 18 ±2 in.-lbs dry.
SIDE CLOSURE ASSEMBLY.
Refer to paragraph 5-5 for removal and installation procedures.
5-13. REAR CLOSURE ASSEMBLY.
a. Removal.
See figure 5-10. Remove rear closure
assembly from control box support, side closure assembly, right
panel and top panel assemblies as follows:
(1) Remove top panel assembly (1) as described in
paragraph 5-4.
(2)
Remove two screws (2) and locknuts (3), and four
washers (4 and 5) securing rear closure assembly (6) to right
panel assembly (7).
(3)
Remove two screws (8) and locknuts (9), and four
washers (10 and 11) securing side closure assembly (12) to rear
closure assembly (6).
(4) Remove four screws (13) and locknuts (14), and
eight washers (15 and 16) securing rear closure assembly (6) to
mounting brackets (17) and remove rear closure assembly (6).
Installation.
See figure 5-10.
b.
Install rear closure
assembly to control box support, side closure assembly, right
panel and top panel assemblies as follows:
(1)
Install four screws (13) and locknuts (14), and
eight washers (15 and 16) securing rear closure assembly (6) to
mounting brackets (17).
(2)
Install two screws (8) and locknuts (9), and four
washers (10 and 11) securing side closure assembly (12) to rear
closure assembly (6).
Install two screws (2) and locknuts (3), and four
(3)
washers (4 and 5) securing rear closure assembly (6) to right
panel assembly (7).
(4)
Torque screws (2, 13, and 8) to 16 ±2 ft-lbs dry.
Install top panel assembly (1) as described in
(5)
paragraph 5-4.
Change 8
5-21
TM 5-6115-585-12
NAVFAC P-8-623-12
TO 35C2-3-455-1
TM-05682C/05685B-12
Figure 5-10.
5-22
Rear Closure Assembly, Removal and Installation
Change 8
TM 5-6115-585-12
NAVFAC P-8-623-12
TO 35C2-3-455-1
TM-05684C/05685B-12
5-14.
from
REAR FLAP ASSEMBLY.
See figure 5-11.
a. Removal.
skid as follows:
Remove rear flap assembly
(1) Remove three screws (1) and locknuts (2), and six
washers (3 and 4) securing rear flap assembly (5) to skid (6).
(2)
Remove rear flap assembly (5).
Installation.
b.
assembly as follows:
See figure 5-11.
Install rear flap
(1) Position rear flap assembly (5) on skid (6) and
install three screws (1) and locknuts (2), and six washers (3
and 4).
(2)
Torque screws (1) to 16 ±2 ft-lbs dry.
Change 8
5-23
TM 5-6115-585-12
NAVFAC P-8-623-12
TO 35C2-3-455-1
TM-05682C/05685B-12
Figure 5-11.
5-24
Change 8
Rear Flap Assembly, Removal and Installation
TM 5-6115-585-12
NAVFAC P-8-623-12
TO 35C2-3-455-1
TM-05684C/05685B-12
SECTION III.
5-15.
ACOUSTIC SUPPRESSION KIT REPAIR
GENERAL.
The local safety office and Preventative Medicine
Support Activity must be consulted prior to initial
CARC painting.
This section provides repair procedures for the Acoustic Suppression Kit (ASK). Repair of the ASK at all levels of Maintenance
is limited to replacement of panel assemblies and replacement of
hinges, latches, catches, captive nuts, rubber flaps and the
front panel silencer assembly. After repair is accomplished,
paint needed areas in accordance with MIL-STD-704 using paints
colors green 383, brown 383, and black as required by FEDSTD-595.
5-16.
REPLACEMENT OF ASK COMPONENTS.
a. Refer to Table 3-2 for inspection of ASK components for
damage and to determine if replacement is necessary.
b. Remove the ASK component to be replaced by following
the applicable removal procedures outlined in Section II.
c. Prior to replacement of the rear panel, left support,
right support, side closure and rear closure assemblies, adhesive
backed teflon tape must be applied to the new assemblies as
follows:
(1)
Rear Panel Assembly (refer to figure 5-6, item 4).
(a)
Wipe surface clean.
Cut a 11 3/4 in. length of adhesive backed
(b)
teflon tape from supplied bulk material.
(c) Apply adhesive backed teflon tape to the
right edge of rear panel assembly (edge with captive nuts). Use
hand pressure to remove air bubbles.
(d)
(2)
Clear tape from captive nut openings.
Left Support Assembly (refer to figure 5-7,
item 9).
(a)
Wipe surface clean.
(b) Cut a 61 in. length of adhesive backed teflon
tape from supplied bulk material.
Change 8
5-25
TM 5-6115-585-12
NAVFAC P-8-623-12
TO 35C2-3-455-1
TM-05682C/05685B-12
(c) Apply adhesive backed teflon tape to left
support assembly top surface (slotted surface which mounts
against underside of skid). Use hand pressure to remove air
bubbles.
(d) Clear tape from slotted openings.
(3) Right Support Assembly (refer to figure 5-8,
item 3).
(a)
Wipe surface clean.
(b) Cut a 61 in. length of adhesive backed teflon
tape from supplied bulk material.
(c) Apply adhesive backed teflon tape to right
support assembly top surface (slotted surface which mounts
against underside of skid). Use hand pressure to remove air
bubbles.
(d) Clear tape from slotted openings.
(4)
Side Closure Assembly (refer to figure 5-4,
item 13).
(a)
Wipe surface clean.
(b) Cut a 20 1/2 in. length and a 29 1/4 in.
length of adhesive backed teflon tape from supplied bulk
material.
(c) Apply adhesive backed teflon tape to top
edges (edges with four holes) and left edge (edge with three
holes).
Use hand pressure to remove air bubbles.
(d) Clear tape from holes.
(5) Rear Closure Assembly (refer to figure 5-10,
item 6).
(a)
Wipe surface clean.
(b) Cut a 23 in. length and a 14 in. length of
adhesive backed teflon tape from supplied bulk material.
(c) Apply adhesive backed teflon tape to top edge
(edge with three holes) and right edge (edge with two holes which
contacts right panel assembly). Use hand pressure to remove air
bubbles.
(d) Clear tape from holes.
5-26
Change 8
TM 5-6115-585-12
NAVFAC P–8-623-12
TO 35C2-3-455-1
TM-05684C/05685B-12
Install ASK replacement components by following the
d.
applicable installation procedures outlined in Section II.
5-17. LATCH REPLACEMENT.
The following procedures are for replacement of side closure door
latch assemblies. Figure 5-12 (Illustration A) shows a typical
latch assembly replacement.
Remove damaged latch assembly (1) by drilling out rivet
(2) using a No. 11 drill bit (0.191 dia.).
b.
Install new latch assembly (1) with a 3/16 inch dia.
rivet (2) using hand riveter.
5-18.
CATCH REPLACEMENT.
The following procedures are typical for replacement of all
access door catch assemblies. Figure 5-12 (Illustration B) shows
a typical catch assembly replacement using the left panel as an
example.
a. Remove damaged catch assembly (1) by drilling out
rivets (2) using a No. 11 drill bit (0.191 dia.).
Install new catch assembly (1) with four 3/16 inch dia.
b.
rivets (2) using hand riveter.
5-19.
RUBBER FLAP REPLACEMENT.
The following procedures are for replacement of all rubber flaps.
Figure 5-12 (Illustration C) shows a rubber flap replacement
using the rear flap assembly as an example.
a. Remove rubber
from panel, support, or
(4) and nuts (5) (or by
bit, 0.191 dia.). Save
flap (1) (and retainer(s) if provided)
angle (2) by removing screws (3), washers
drilling out rivets using a No. 11 drill
retainer(s) (if provided) for reuse.
b. Use old rubber flap as a pattern to cut a new flap from
bulk material and to mark new holes in flap for rivets or screws.
flap.
c. Drill out holes for rivets or screws in new rubber
Use No. 11 (0.191 dia.) drill bit for rivet holes.
Install new rubber flap (1) (with old retainer(s) if
d.
provided) on panel, support, or angle (2) with same number of
screws (3), washers (4) and nuts (5) (or 3/16 inch dia. rivets
using hand riveter).
Change 8
5-27
TM 5-6115-585-12
NAVFAC P-8-623-12
TO 35C2-3-455-1
TM-05682C/05685B-12
Figure 5-12.
5-28
Change 8
Replacement of ASK Hardware Items
TM 5-6115-585-12
NAVFAC P-8-623-12
TO 35C2-3-455-1
TM-05684C/05685B-12
5-20.
HINGES.
The followinq procedures are for hinqe replacement on the top
panel assembiy-access door. See figure 5-12.
(Illustration D).
a. Remove hinge (1) from panel assembly (2) and access
door (3) by drilling out rivets (4 and 5) using a No. 11 drill
bit (0.191 dia.).
Install hinge (1) to access door (3) and panel assembly
b.
(2) with same number of 3/16 inch dia. rivets (4 and 5) using
hand riveter.
5-21.
CAPTIVE NUTS.
The following procedures are typical for replacement of captive
nuts installed in the left and riqht panel assemblies, rear Panel
assembly, and front panel assembly. see figure 5-12 (Illustration E) showing an example for replacement of captive nuts.
a. Remove captive nut (1) from panel (2) by squeezing
sides of cage with pliers. Pull out until nut is freed.
Install new captive nut (1) by squeezing sides of cage
b.
with pliers until nut can be inserted into square opening in
panel (2).
5-22.
FRONT PANEL SILENCER.
The following procedures are to be followed for replacement of
the silencer attached to the front panel. See figure 5-12
(Illustration F).
a. Remove nine rivets (1) securing silencer (2) to front
panel (3) by drilling out rivets using a No.11 drill bit (0.191
dia.).
b. Apply adhesive backed teflon tape to all four inside
edges of new silencer. Use hand pressure to remove air bubbles.
Clear tape from rivet holes. Locate silencer on front panel by
aligning rivet holes.
Install new silencer (2) to front panel (3) with nine
c.
3/16 inch dia. rivets (1) using hand riveter.
Change 8
5-29/(5-30 blank)
TM5-6115-585-12
NAVFAC P-8-262- 12
TO-35C2-3-455-1
TM-05684C-12
APPENDIX A
REFERENCES
1.
PAINTING:
T.O.
35-1-3
Painting and marking of USAF Aerospace Ground Equipment.
2. RADIO SUPPRESSION :
MIL-STD-461
Radio Interference Suppression.
3. MAINTENANCE:
T.O. 1-1-1
T.O. 1-1-2
T.O. 35-1-11
T.O. 35-1-12
T.O. 35-1-26
T.O. 35-1-524
TM5-764
TM5-766
TM38-750
TM5-6115-585-24P
Cleaning of Aerospace Equipment.
Corrosion Control and Treatment for Aerospace Equipment.
Organization, Intermediate and Depot Level Maintenance or FSC 6115
Equipment.
Components and Procedures for Cleaning Aerospace Ground Equipment.
Repair/Replacement Criteria for FSC 6115 Aerospace Ground Equipment.
USAF Equipment Registration Number System Applicable to FSC 6115
Equipment.
Electric Motor and Generator Repair.
Electric Power Generation in the Field.
The Army Maintenance Management System.
Organizational, Intermediate (field) Direct Support and General Support and Depot Maintenance Repair Parts List.
4. SHIPMENT AND STORAGE:
T.O. 35-1-4
T.O. 38-1-5
Processing and Inspection of Aerospace Ground Equipment for Storage
and Shipment.
Processing and Inspection of Non-Mounted, Non-Aircraft Gasoline and
Diesel Engines for Storage and Shipment.
5. DESTRUCTION OF MATERIAL:
TM 750-244-3
Procedures for Destruction of Equipment to Prevent Enemy Use.
A-1/ (A- 2 blank)
TM5-6115-585-12
NAVFAC P-8-262-12
TO-35C2-3-455-1
TM-05684C-12
APPENDIX B
ITEMS TROOP INSTALLED OR AUTHORIZED LIST
(1)
(2)
SMR
Federal Stock
Number
Code
(3)
Description
(4)
(5)
Unit
of
Meas
Qty Auth
PACZZ
7520-00-559-9618
Case, Maintenance and operational Manual
EA
1
PACZZ
5975-00-878-3791
Rod, Ground w/attachments and wire
EA
1
PACZZ
5120-01-013-1676
Slide Hammer, Ground
EA
1
PACZZ
4210-00-555-8837
Extinguisher, Fire, Monobromotrifluoromethane w/mounting
bracket (charged replacement cylinder only NSN 4210-00708-0031). operating temperature range -50°F (-58°C) to
+120°F (+49°C).
EA
1
Note: When inspection maintenance or replacement of cylinder on Walter Kidde Co. extinguisher is necessary, the
proper torque for swivel nut is not to exceed 160 inch pounds
maximum.
PACZZ
6140-00-179-8418
Boot, Battery Terminal
EA
3
PACZZ
5935-00-322-8959
Adapter
EA
1
Connector
Change 5
B-1/(B-2 blank)
TM5-6115-585-12
NAVFAC P-8-262-12
TO-35C2-3-455-1
TM-05684C-12
APPENDIX C
MAINTENANCE ALLOCATION CHART
Section I. INTRODUCTION
1. GENERAL.
The maintenance functions are defined as follows:
a. This section provides a general explanation of all
maintenance and repair functions authorized at various
maintenance levels.
A - INSPECT. To determine serviceability of an
item by comparing its physical, mechanical and
electrical characteristics with established standards.
b. Section II designates overall responsibility for
the performance of maintenance functions on the
identified end item or component. The implementation
of the maintenance functions upon the identified end
item or component will be consistent with the assigned
maintenance functions.
B - TEST. To verify serviceability and to detect
electrical or mechanical failure by use of test equipment.
c. Section III lists the tools and test equipment
required for each maintenance function as referenced from Section II.
d. Section IV contains supplemental instructions or
explanatory notes required for a particular maintenance function.
2. EXPLANATION OF COLUMNS IN SECTION II.
a. Group Number. Column 1. The assembly group
number is a numerical group assigned to each assembly. The assembly groups are listed on the MAC in
disassembly sequence beginning with the first assembly removed in a top down disassembly sequence.
C - SERVICE. To clean, to preserve, to charge and
to add fuel, lubricants, cooling agents and air. (If it is
desired that elements, such as painting and lubricating, be defined separately, they may be so listed. )
D - ADJUST. To rectify to the extent necessary to
bring into proper operating range.
E - ALIGN. To adjust specified variable elements
of an item to bring to optimum performance.
F - CALIBRATE. To determine the corrections to
be made in the readings of instruments or test equipment used in precise measurement. Consists of the
comparison of two instruments, one of which is a
certified standard of known accuracy, to detect and
adjust any discrepancy in the accuracy of the instrument being compared with the certified standard.
G - INSTALL. To set-up for use in an operational
environment such as an emplacement, site or vehicle.
b. Assembly Group. Column 2. This column contains a brief description of the components of each
assembly group.
c. Maintenance Functions. Column 3. This column
lists the various maintenance functions (A through K).
The upper case letter placed in the appropriate
column indicates the lowest maintenance level authorized to perform these functions. The active repair
time required to perform the maintenance function is
included directly below the symbol identifying the
category of maintenance. The symbol designations for
the various maintenance levels are as follows:
C - Operator or Crew
O - Organizational Maintenance
F - Direct Support Maintenance
H - General Support Maintenance
D - Depot Maintenance
H - REPLACE. To replace unserviceable items with
serviceable like items.
I - REPAIR. Those maintenance operations necessary to restrore an item to serviceable condition
through correction of material damage or a specific
failure. Repair may be accomplished at each level of
maintenance.
J - OVERHAUL. Normally, the highest degree of
maintenance performed by the Army in order to
minimize time work is in process consistent with
quality and economy of operation. It consists of that
maintenance necessary to restore an item to completely serviceable condition as prescribed by maintenance standards in technical publications for each
item of equipment. Overhaul normally does not return
an item to like new, zero mileage or zero hour condition.
K - REBUILD. The highest degree of material
maintenance. It consists of restoring equipment as
nearly as possible to new condition in accordance with
C-1
TM5-6115-585-12
NAVFAC P-8-262- 12
TO-35C2-3-455-1
TM-05684C-12
original manufacturing standards. Rebuild is performed only when required by operational considerations or other paramount factors and then only at
the depot maintenance level. Rebuild reduces to zero
the hours of miles the equipment, or component
thereof, has been in use.
b. Maintenance Level. This column shows the lowest
level of maintenance authorized to use the tool or
test equipment.
c. Nomenclature. This column lists the name or
identification of the tool or test equipment.
d. Tools and Equipment. Column 4. This column is
provided for referencing by code the tools and test
equipment (Section III), required to perform the maintenance functions (Section II).
d. Tool Number. This column lists the manufacturer’s code and part number or federal stock number of tool or test equipment.
e. Remarks. Column 5. This column is provided
for referencing by code the remarks (Section IV)
pertinent to the maintenance functions.
4. EXPLANATION OF COLUMNS IN SECTION IV.
3. EXPLANATION OF COLUMNS IN SECTION III.
a. Reference Code. This column consists of a
number and a letter separated by a dash. The number
references the T&TE requirements listed in Section
II. The letter represents the specific maintenance
function the item is to be used with in Columns (A
through K) of Section II.
C-2
a. Reference Code, This column consists of two
letters separated by a dash (entered from Column 5
of Section II). The first letter references Alpha
sequence in Column 5 and the second letter references a maintenance function, Column 3 (A through K).
b. Remarks. This column lists information pertinent to the maintenance function to be performed
(as indicated in Section II).
Section II.
GROUP NO. 01
GROUP NO. 02
GROUP NO. 03
TM5-6115-585-12
NAVFAC P-8-262-12
TO-35C2-3-455-1
TM-05684C-12
C-3
TM5-6115-585-12
NAVFAC P-8-262-12
TO-35C2-3-455-1
TM-05684C-12
Section II.
C-4
GROUP NO. 03
GROUP NO. 04
Section II.
GROUP NO. 04
TM5-6115-585-12
NAVFAC P-8-262-12
TO-35C2-3-455-1
TM-05684C-12
Change 4 C-5
Change 4
TM5-6115-585-12
NAVFAC P-8-262-12
TO-95C2-3-455-1
TM-05684C-12
Section II.
C-6
GROUP NO. 04
GROUP NO. 05
GROUP NO. 06
Section II.
GROUP NO. 06
TM5-6115-585-12
NAVFAC P-8-262-12
TO-35C2-3-455-1
TM-05684C-12
GROUP NO. 07
C-7
TM5-6115-585-12
NAVFAC P-8-262-12
TO-35C2-3-455-1
TM-05684C-12
Section II.
C-8
GROUP NO. 07
GROUP NO. 08
Section II.
GROUP NO. 08
GROUP NO. 09
TM5-6115-585-12
NAVFAC P-8-262-12
TO-35C2-3-455-1
TM-05684C-12
C-9
M5-6115-585-12
NAVFAC P-8-262-12
TO-35C2-3-455-1
TM-05684C-12
Section II.
C-10
GROUP NO. 09
GROUP NO. 10
GROUP NO. 11
GROUP NO. 12
Section II.
GROUP NO. 12
GROUP NO. 13
C-11
TM 5-6115-585-12
NAVFAC P-8-623-12
TOO-35C2-3-455-l
TM-05684C/05685B-12
GROUP NO. 14
Change 7
TM5-6115-585-12
NAVFAC P-8-262-12
TO-35C2-3-455-1
TM-05684C-12
Section II.
C-12
GROUP NO. 14
Section II.
GROUP NO. 14
GROUP NO. 15
C-13
TM5-6115-585-12
NAVFAC P-8-262-12
TO-35C2-3-455-1
TM-05684C-12
Change 4
TM 5-6115-585-12
NAVFAC P-8-623-12
TO-35C2-3-455-1
TM-05684/C-/05685B12
Section II.
C-14 Change 10
GROUP NO. 15
Section II.
GROUP NO. 15
TM5-6115-565-12
NAVFAC P-8-262-12
TO-35C2-3-455-1
TM-05684C-12
C-15
Change 10
TM 5-6115-585-12
NAVFAC P-8-262-12
TO-35C2-3-455-1
TM-05684C-12
Section II.
C-16
GROUP NO. 15
GROUP NO. 16
Section II.
GROUP NO. 16
GROUP NO. 17
TM5-6115-585-12
NAVFAC P-8-623-12
TO-35C2-3-455-1
TM-05684C/05685B-12
Change 8 C-16.1/(C-16.2 blank)
Section II.
GROUP NO. 17
TM5-6115-585.12
NAVFAC P-8-623-12
TO-35C2-345-1
TM-05684C/05685B-12
C-17
TM5-6115-585-12
NAVFAC P-8-623-12
TO-35C2-3-455-1
TM-05684C/0568B-12
Section III. TOOLS, TEST AND SUPPORT EQUIPMENT REQUIREMENTS
C-18
Change 12
TM5-6115-585-12
NAVFAC P-8-262-12
TO-35C2-3-455-1
TM-05684C-12
Section IV. EXPLANATION OF REFERENCE CODES
REMARKS
REFERENCE CODE
A-A
Visual Inspection
B-B
Hydrometer Test
C-B
Operational Test
D-I
Weld and Straighten
E-B
Thermometer Test
F-B, C-D,
H, I-J
In accordance with Procedure in Applicable TM
G-A
Inspect for Minimum Length
H-B
Growler Test
I-B
Test for known Voltage
J-I
Fabricate New Harness
K-D
Adjust after Repair or Replacement
L-B
Continuity Test
M-D
Zero Adjustment
N-C
Replace Element
O-C
Drain Condensation
P-B
Insulation Breakdown and Continuity Tests
Q-K
Rewind
R-A
Visual, Audible and Physical Heat Detection
S-D
Adjust to Specification in Applicable TM
T-D
Adjust Injector Pressure Setting
U-B
Pressure Test
V-I
Includes Replacing Valves and Springs
W-B
Spring Tension and Length
C-19/(C-20 blank)
TM5-6115-585-12
NAVFAC P-8-623-12
TO-35C2-3-455-1
TM-05684C/05685B-12
APPENDIX D
ADDITIONAL AUTHORIZATION LIST
Section I. INTRODUCTION
D-1. SCOPE.
in with it. These items are authorized to you by CTA,
MTOE, TDA or JTA.
This appendix lists additional items you are authorized for
the support of the 10KW Generator Set
D-3. EXPLANATION OF LISTING.
D-2. GENERAL
This list identifies items that do not have to accompany
the 10KW Generator Set and that do not have to be turned
National stock number, descriptions and quantities are
provided to help you identify and request the additional
items you require to support this equipment.
Section II. ADDITIONAL AUTHORIZATION LIST
(1)
NATIONAL
STOCK
NUMBER
6115-01-273-7376
(2)
(3)
(4)
DESCRIPTION
U/M
QTY
AUTH
KT
1
Acoustic Suppression Kit
D-1/(D-2 blank)
TM 5-6115-585-12
NAVFAC P-8-623-12
TO-35C2-3-455-1
TM-05682C/0568B-12
ALPHABETICAL INDEX
Paragraph,
Figure, Table,
Number
Subject
A
AC Instrumentation System . . . . . . . . . . . . . . . . . . . . . . . . . . . . . . . . . . . . . . . . . . . . . . . . .
Acoustic Suppression Kit . . . . . . . . . . . . . . . . . . . . . . . . . . . . . . . . . . . . . . . . . . . . . . . . . .
Instruction and Rating Plates . . . . . . . . . . . . . . . . . . . . . . . . . . . . . . . . . . . . . . . . . . . .
Removal and Installation Procedures . . . . . . . . . . . . . . . . . . . . . . . . . . . . . . . . . . . . . . .
.
.
.
.
.
.
.
.
4-36
5-2
F5-1
.
.
.
.
5-3 thru 5-14,
F5-2 thru F5-11
5-15 thru 5-22
F5-12
F3-8
3-17
F1-9
1-7
F3-10
3-18, 4-41
3-18, 4-41
3-18, 4-41
4-41
F3-9
F3-11
4-22
4-22
5-1
Repair and Replacement of Hardware Items . . . . . . . . . . . . . . . . . . . . . . . . . . . . . . . . . . . .
AC Output Control Box Assembly . . . . . . . . . . . . . . . . . . . . . . . . . . . . . . . . . . . . . . . . . . . . . . .
lnspection . . . . . . . . . . . . . . . . . . . . . . . . . . . . . . . . . . . . . . . . . . . . . . . . . . . . . . .
AC Output Control Box Wiring Harness . . . . . . . . . . . . . . . . . . . . . . . . . . . . . . . . . . . . . . . . . . .
Administrative Storage . . . . . . . . . . . . . . . . . . . . . . . . . . . . . . . . . . . . . . . . . . . . . . . . . . . . . . .
Air Cleaner Assembly . . . . . . . . . . . . . . . . . . . . . . . . . . . . . . . . . . . . . . . . . . . . . . . . . . . . . . . .
Inspection . . . . . . . . . . . . . . . . . . . . . . . . . . . . . . . . . . . . . . . . . . . . . . . . . . . . . . . . . . . . .
Installation . . . . . . . . . . . . . . . . . . . . . . . . . . . . . . . . . . . . . . . . . . . . . . . . . . . . . . . . . . . . .
Removal and Service . . . . . . . . . . . . . . . . . . . . . . . . . . . . . . . . . . . . . . . . . . . . . . . . . . . . .
Repair . . . . . . . . . . . . . . . . . . . . . . . . . . . . . . . . . . . . . . . . . . . . . . . . . . . . . . . . . . . . . . . .
Air Cleaner and Shroud Assembly . . . . . . . . . . . . . . . . . . . . . . . . . . . . . . . . . . . . . . . . . . . . . . .
Air Fitter Element, Cleaning . . . . . . . . . . . . . . . . . . . . . . . . . . . . . . . . . . . . . . . . . . . . . . . . . . . .
Auxiliary Fuel Solenoid Valve . . . . . . . . . . . . . . . . . . . . . . . . . . . . . . . . . . . . . . . . . . . . . . . . . .
Test, On Equipment . . . . . . . . . . . . . . . . . . . . . . . . . . . . . . . . . . . . . . . . . . . . . . . . . . . . . .
Auxiliary Equipment . . . . . . . . . . . . . . . . . . . . . . . . . . . . . . . . . . . . . . . . . . . . . . . . . . . . . . . . .
B
Testing . . . . . . . . . . . . . . . . . . . . . . . . . . . . . . . . .
Battery Assembly . . . . . . . . . . . . . . . . . . . . . . . . . . . . . . . . .
Cleaning . . . . . . . . . . . . . . . . . . . . . . . . . . . . . . . . . . .
Inspection . . . . . . . . . . . . . . . . . . . . . . . . . . . . . . . . . . .
Removal . . . . . . . . . . . . . . . . . . . . . . . . . . . . . . . . . . . .
Repair . . . . . . . . . . . . . . . . . . . . . . . . . . . . . . . . . . . . .
Replacement. . . . . . . . . . . . . . . . . . . . . . . . . . . . . . . . . .
Test
. . . . . . . . . . . . . . . . . . . . . . . . . . . . .
Battery Cables, Installing.. . . . . . . . . . . . . . . . . . . . . . . . . . . .
Battery Charging Alternator . . . . . . . . . . . . . . . . . . . . . . . . . . .
Inspection . . . . . . . . . . . . . . . . . . . . . . . . . . . . . . . . . . .
Removal . . . . . . . . . . . . . . . . . . . . . . . . . . . . . . . . . . .
Replacement. . . . . . . . . . . . . . . . . . . . . . . . . . . . . . . . .
Test . . . . . . . . . . . . . . . . . . . . . . . . . . . . . . . . . . . . . .
Battery Charging Regulator/Rectifier Assembly, Testing . . . . . . . . . . . .
Battery and Frame. . . . . . . . . . . . . . . . . . . . . . . . . . . . . . . . .
Breather, Inspection. . . . . . . . . . . . . . . . . . . . . . . . . . . . . . .
Batteries,
.
.
.
.
.
.
.
.
.
.
.
.
.
.
.
.
.
.
.
.
.
.
.
.
.
.
.
.
.
.
.
.
.
.
F4-17
F3-2
3-11
3-11
4-25
4-25
4-25
4-25
F4-16
F4-23, 4-27
4-27
4-27
4-27
4-27
F4-24
F3-23
4-45
.
.
.
.
.
.
.
.
T3-1, 3-1
F3-12, F4-33
4-38
4-38
3-19
4-38
4-38
3-19
4-38
4-38
F3-15
3-21
F4-34
F4-35
F1-10
4-34
F4-41
c
Consumable Operating and Maintenance
Control Cubicle Assembly. . . . . . . .
Assembly . . . . . . . . . . . . .
Disassembly . . . . . . . . . . . .
Supplies . . . . . . . . . . . . . .
. . . . . . . . . . . . . . . . .
. . . . . . . . . . . . . . . . . .
. . . . . . . . . . . . . . . . . . .
.
.
.
.
.
.
.
.
.
.
.
.
Inspection . . . . . . . . . . . . . . . . . . . . . . . . . . . . . . . . . . . . .
Installation . . . . . . . . . . . . . . . . . . . . . . . . . . . . . . . . . . .
Removal . . . . . . . . . . . . . . . . . . . . . . . . . . . . . . . . . . .
Service . . . . . . . . . . . . . . . . . . . . . . . . . . . . . . . . . . .
Test, Bench . . . . . . . . . . . . . . . . . . . . . . . . . . . . . . . . . . .
Test, On Equipment. . . . . . . . . . . . . . . . . . . . . . . . . . . . . . . .
Control Cubicle Support Assembly . . . . . . . . . . . . . . . . . . . . . . . . . .
Inspection . . . . . . . . . . . . . . . . . . . . . . . . . . . . . . . . . . ..
Removing . . . . . . . . . . . . . . . . . . . . . . . . . . . . . . . . . . .
Control Cubicle Test Set-Up . . . . . . . . . . . . . . . . . . . . . . . . . . .
Control Cubicle Wiring Harness . . . . . . . . . . . . . . . . .
Change 8
INDEX 1
TM6-6115-585-12
NAVFAC P-8-262-12
TO-95C2-3-455-1
TM-05684C-12
ALPHABETICAL INDEX (CONT)
Paragraph,
Figure, Table,
Number
Subject
D
DC Control System . . . . . . . . . . . . . . . . . . . . . . . . . . . . . . . . . .
Destruction of Material to Prevent Enemy Use . . . . . . . . . . . . . . . . . . . .
4-35
1-6
E
Electric Starter . . . . . . . . . . . . . . . . . . . . . . . . . . . . . . . . . . . .
F3-7
Electrical Cable Schematic . . . . . . . . . . . . . . . . . . . . . . . . . . . . . .
F1-6
F4-36
Engine Assembly . . . . . . . . . . . . . . . . . . . . . . . . . . . . . . . . . . . .
4-42
Adjustment . . . . . . . . . . . . . . . . . . . . . . . . . . . . . . . . . . . .
4-39
Description and Function . . . . . . . . . . . . . . . . . . . . . . . . . . . . .
3-24, 4-42
Inspection . . . . . . . . . . . . . . . . . . . . . . . . . . . . . . . . . . . . .
4-42
Service . . . . . . . . . . . . . . . . . . . . . . . . . . . . . . . . . . . . . .
4-42
Test . . . . . . . . . . . . . . . . . . . . . . . . . . . . . . . . . . . . . . . .
F3-17
Engine Cooling System . . . . . . . . . . . . . . . . . . . . . . . . . . . . . . . .
4-17
Adjustment . . . . . . . . . . . . . . . . . . . . . . . . . . . . . . . . . . . .
4-17
c l e a n i n g
.
.
.
.
.
.
.
.
.
.
.
.
.
.
4-16
Description and Function . . . . . . . . . . . . . . . . . . . . . . . . . . . . .
4-17
Disassembly . . . . . . . . . . . . . . . . . . . . . . . . . . . . . . . . . . . .
3-22, 4-17
Inspection . . . . . . . . . . . . . . . . . . . . . . . . . . . . . . . . . . . . .
4-17
Installation . . . . . . . . . . . . . . . . . . . . . . . . . . . . . . . . . . . .
4-17
Reassembly . . . . . . . . . . . . . . . . . . . . . . . . . . . . . . . . . . . .
4-17
Removal . . . . . . . . . . . . . . . . . . . . . . . . . . . . . . . . . . . . . .
4-17
Test . . . . . . . . . . . . . . . . . . . . . . . . . . . . . . . . . . . . . . . .
4-24
Engine Electrical System, Description and Function. . . . . . . . . . . . . . . . .
Engine Generator Set
F1-2.1
Left-Front, Three-Quarter View(MEP-112A Only). . . . . . . . . . . . . . . . . . . . .
Left-Front Three-Quarter View, with Acoustic
F1-2.2
Suppression Kit . . . . . . . . . . . . . . . . . . . . . . . . . . . . . . . . . . . . .
F1-1
Right-Rear, Three-QuarterView . . . . . . . . . . . . . . . . . . . . . . . .
F4-43
Engine Mounting Assembly . . . . . . . . . . . . . . . . . . . . . . . . . . . . . .
4-52
Disassembly . . . . . . . . . . . . . . . . . . . . . . . . . . . . . . . . . . . .
4-52
Inspection . . . . . . . . . . . . . . . . . . . . . . . . . . . . . . . . . . . . .
4-52
Installation . . . . . . . . . . . . . . . . . . . . . . . . . . . . . . .
4-52
Reassembly . . . . . . . . . . . . . . . . . . . . . . . . . . . . . . . . . . . .
4-52
Removal . . . . . . . . . . . . . . . . . . . . . . . . . . . . . . . . . . . . . .
Engine Starter Assembly . . . . . . . . . . . . . . . . . . . . . . . . . . . . . . . F4-18, F4-22
3-16, 4-26
Cleaning and Inspection
4-26
Installation . . . . . . . . . . . . . . . . . . ....
4-26
Removal . . . . . . . . . . . . . . . . . . . . . . . . . . . . . . . . . . . . . .
4-26
Repair . . . . . . . . . . . . . . . . . .
4-26
Test, Bench . . . . . . . . . . . . . . . . . . . . . . . . . . . . . . . . . . . .
4-26
Test, On Equipment . . . . . . . . . . . . . . . . . . . . . . . . . . . . . . .
F4-21
Engine StarterBrushes, Inspecting . . . . . . . . . . . . . . . . . . . . . . . . .
F4-19
Engine Starter, Testing . . . . . . . . . . . . . . . . . . . . . . . . . . . . . . . .
F4-20
Engine Starter Wiring Diagram. . . . . . . . . . . . . . . . . . . . . . . . . .
Engine Stop Solenoid
F3-22
...... . . . .... . ......
. . . . . .
.
3-21
Engine Wiring Harness, Inspection. . . . . . . . . . . . . . . . . . .
F4-37
Exhaust Muffler Air CleanerAssemblies . . . . . . . . . . . . . . . . . . . .
F3-6
Exhaust Muffler Assemblies . . . . . . . . . . . . . . . . . . . . . . . . . . . . .
3-15, 4-40
Inspection . . . . . . . . . . . . . . . . . . . . . . . . . .
4-40
Removal . . . . . . . . . . . . . . . . . . . . . . . . . . . . . . . . . . . . . .
4-40
Replacement . . . . . . . . . . . . .
. . . ... . ...
.
.
●
●
●
●
●
F
Float Switch, Testing. . . . . . . . . . . . . . . . . . . . . . . . . . . . . . .
Fuel Filter . . . . . . . . . . . . . . . . . . . . . . . . . . . . . . . . . . . . . . .
INDEX 2
Change
8
F4-8
F4-9
TM5-6115-585-12
NAVFAC P-8-262-12
TO-35C2-3-455-1
TM-05684C-12
ALPHABETICAL INDEX (CONT)
Paragraph,
Figure, Table,
Number
Subject
F (CONT)
Fuel Filter and Strainer Assembly . . . . . . . . . . . . . . . . . . . . . . . .
Inspection . . . . . . . . . . . . . . . . . . . . . . . . . . . . . . . . . . . .
Installation . . . . . . . . . . . . . . . . . . . . . . . . . . . . . . . . . . .
Removal . . . . . . . . . . . . . . . . . . . . . . . . . . . . . . . . . . . . .
Service . . . . . . . . . . . . . . . . . . . . . . . . . . . . . . . . . . . . .
Fuel Pump . . . . . . . . . . . . . . . . . . . . . . . . . . . . . . . . . . . . . .
Fuel Pump, Fuel Hoses and Solenoid . . . . . . . . . . . . . . . . . . . . . . . .
Fuel Pumps and Hoses
Installation . . . . . . . . . . . . . . . . . . . . . . . . . . . . . . . . . . .
Removal . . . . . . . . . . . . . . . . . . . . . . . . . . . . . . . . . . . .
Service . . . . . . . . . . . . . . . . . . . . . . . . . . . . . . . . . . . . .
Test, On Equipment . . . . . . . . . . . . . . . . . . . . . . . . . . . . . .
FuelShut-Off Solenoid, Adjusting . . . . . . . . . . . . . . . . . . . . . . . . . .
Fuel Shut-Off Solenoid Valve
Adjustment . . . . . . . . . . . . . . . . . . . . . . . . . . . . . . . . . . .
Inspection . . . . . . . . . . . . . . . . . . . . . . . . . . . . . . . . . . . .
Installation . . . . . . . . . . . . . . . . . . . . . . . . . . . . . . . . . . .
Removal . . . . . . . . . . . . . . . . . . . . . . . . . . . . . . . . . . . .
Test, On Equipment . . . . . . . . . . . . . . . . . . . . . . . . . . . . . .
Fuel Solenoid Test Set-Up. . . . . . . . . . . . . . . . . . . . . . . . . . . . .
Fuel Strainer Element . . . . . . . . . . . . . . . . . . . . . . . . . . . . . . . .
Fuel System, Description and Function . . . . . . . . . . . . . . . . . . . . . .
FuelSystem (Less Tank), Inspection . . . . . . . . . . . . . . . . . . . . . . . .
Fuel System Schematic . . . . . . . . . . . . . . . . . . . . . . . . . . . . . . .
Fuel Tank Assembly . . . . . . . . . . . . . . . . . . . . . . . . . . . . . . . . .
Cleaning . . . . . . . . . . . . . . . . . . . . . . . . . . . . . . . . . .
Disassembly. . . . . . . . . . . . . . . . . . . . . . . . . . .
Inspection . . . . . . . . . . . . . . . . . . . . . . . . . . . . . . . . . . . .
Installation . . . . . . . . . . . . . . . . . . . . . . . . . . . . . . . . . . .
Reassembly . . . . . . . . . . . . . . . . . . . . . . . . . . . . . . . . . . .
Test . . . . . . . . . . . . . . . . . . . . . . . . . . . . . . . . . . . . . . . .
. F3-13, F4-11
4-20
.
4-20
.
4-20
.
4-20
.
. F3-14, F4-13
F4-12
.
.
.
.
.
.
4-21
4-21
4-21
4-21
F4-14
.
.
.
.
.
.
.
.
.
.
.
.
.
.
.
.
.
4-23
4-23
4-23
4-23
4-23
F4-15
F4-10
4-18
3-20
F1-5
F3-4, F4-7
3-13, 4-19
4-19
3-13, 4-19
4-19
4-19
4-19
G
Generator Assembly . . . . . . . . . . . . . . . . . . . . . . . . . . . . . . .
Description and Function. . . . . . . . . . . . . . . . . . . . . . . . . .
Inspection . . . . . . . . . . . . . . . . . . . . . . . . . . . . . . . . . .
Generator/Exciter Assembly, Inspection . . . . . . . . . . . . . . . . . . . .
Generator Screen-Guard. . . . . . . . . . . . . . . . . . . . . . . . . . .
Generator Set
Controls and Instruments . . . . . . . . . . . . . . . . . . . . . . . . . .
Description . . . . . . . . . . . . . . . . . . . . . . . . . . . . . . . . .
Dismantling for Movement.. . . . . . . . . . . . . . . . . . . . . . . .
Electrical Schematic . . . . . . . . . . . . . . . . . . . . . . . . . . . .
Grounding . . . . . . . . . . . . . . . . . . . . . . . . . . . . . . . . . .
Inspection and Servicing on Receipt . . . . . . . . . . . . . . . . . . . .
Installation . . . . . . . . . . . . . . . . . . . . . . . . . . . . . . . . .
Installation Plans . . . . . . . . . . . . . . . . . . . . . . . . . . . . . .
Re-installing after Movement . . . . . . . . . . . . . . . . . . . . . . .
Tabulated Data . . . . . . . . . . . . . . . . . . . . . . . . . . . . . . .
Uncrating . . . . . . . . . . . . . . . . . . . . . . . . . . . . . . . . . .
Wiring Harness . . . . . . . . . . . . . . . . . . . . . . . . . . . . . . .
Glow Plug Assemblies
Inspection . . . . . . . . . . . . . . . . . . . . . . . . . . . . . . . . .
Installation . . . . . . . . . . . . . . . . . . . . . . . . . . . . . . . . .
Removal . . . . . . . . . . . . . . . . . . . . . . . .
Test . . . . . . . . . . . . . . . . . . . . . . . . . . . . . . . . . . . . .
.
.
.
.
.
.
.
.
.
.
.
.
.
.
.
F3-18
4-53
3-23
4-54
F4-44
.
.
.
.
.
.
.
.
.
.
.
.
.
.
.
.
.
.
.
.
.
.
.
.
.
.
.
.
.
.
.
.
.
.
.
.
T2-1
1-9
4-3
F1-7
F4-2
4-1
4-2
F1-4
4-4
1-10
F4- 1
F1-8
. . .
. . .
4-48
4-48
4-48
4-48
. . . . . . . . . . . . .
. . .
INDEX 3
TM5-6115-585-12
NAVFAC P-8-262-12
TO-35C2-3-455-1
TM-05684C-12
ALPHABETICAL INDEX (CONT)
Paragraph,
G (CONT)
Ground Rod and Fuel Drum Adapter Hold-Down Assembly . . . . . . . . . . .
Cleaning and Inspection . . . . . . . . . . . . . . . . . . . . . . . . . . .
Installation . . . . . . . . . . . . . . . . . . . . . . . . . . . . . . . . . .
Removal . . . . . . . . . . . . . . . . . . . . . . . . . . . . . . . . .
Ground Stud . . . . . . . . . . . . . . . . . . . . . . . . . . . .
.
.
.
.
.
.
.
.
.
.
F3-3
3-12
3-12
3-12
F3-24
I
.
.
.
.
.
.
.
.
.
.
.
.
.
.
.
.
.
.
.
.
.
.
.
.
.
.
.
.
.
.
.
.
.
.
.
.
.
.
.
.
.
.
.
.
.
.
.
.
.
.
.
.
.
.
.
.
4-47
F3-19
4-43
4-43
4-43
4-43
4-43
Levels of Maintenance Accomplishment , . . . . . . . . . . . . . . .
Load Terminal Board Assembly . . . . . . . . . . . . . . . . . . . . .
Installation . . . . . . . . . . . . . . . . . . . . . . . . . . . . .
Removal . . . . . . . . . . . . . . . . . . . . . . . . . . . . . . .
Load Terminal and Reconnection Configuration . . . . . . . . . . . .
Load Terminals . . . . . . . . . . . . . . . . . . . . . . . . . . . . .
Lockout Switch and Gear.. . . . . . . . . . . . . . . . . . . . . . .
Low Oil Pressure Switch
Installation . . . . . . . . . . . . . . . . . . . . . . . . . . . . .
Removal . . . . . . . . . . . . . . . . . . . . . . . . . . . . . . .
Test, Bench . . . . . . . . . . . . . . . . . . . . . . . . . . . . .
Test, On Equipment . . . . . . . . . . . . . . . . . . . . . . . .
Lubrication Instructions
Operator/Crew . . . . . . . . . . . . . . . . . . . . . . . . . . .
Organizational . . . . . . . . . . . . . . . . . . . . . . . . . . .
Lubrication Order . . . . . . . . . . . . . . . . . . . . . . . . . . . .
.
.
.
.
.
.
.
.
.
.
.
.
.
.
.
.
.
.
.
.
.
.
.
.
.
.
.
.
.
.
.
.
.
.
.
.
.
.
.
.
.
.
.
.
.
.
.
.
.
1-5
F4-32
4-37
4-37
F2-4
F2-1
F4-25
.
.
.
.
.
.
.
.
.
.
.
.
.
.
.
.
.
.
.
.
.
.
.
.
.
.
.
.
4-31
4-31
4-31
4-31
. . . . . . .
. . . . . . .
. . . . . . .
3-2
4-7
F3-1, 3-3
. . . . . . . . . . . . . . . . .
. . . . . . . . . . . . . . . .
1-3
4-6
. . . . . . . . . . . . . . . . .
. . . . . . . . . . . . . . . . .
. . . . . . . . . . . . . . . . .
1-2
1-1
T4-3
Injector Nozzle Assembly and Fuel Lines, Inspection . . . . . .
Intake Manifold Assembly . . . . . . . . . . . . . . . . . . . . .
Inspection . . . . . . . . . . . . . . . . . . . . . . . . . . .
Installation . . . . . . . . . . . . . . . . . . . . . . . . . .
Removal . . . . . . . . . . . . . . . . . . . . . . . . . . .
Repair . . . . . . . . . . . . . . . . . . . . . . . . . . . .
Test, On Equipment . . . . . . . . . . . . . . . . . . . . .
.
.
.
.
.
.
.
.
.
.
.
.
.
.
L
M
Maintenance Forms and Records . . . . . . . . . .
Maintenance Repair Parts... . . . . . . . . . . . .
Manual
Applicability . . . . . . . . . . . . . . . . . .
Scope . . . . . . . . . . . . . . . . . . . . . .
Master Switch Continuity Check . . . . . . . . . .
o
Oil Cooler . . . . . . . . . . . . . . . . . . . . . . . . . . . . . . .
Inspection . . . . . . . . . . . . . . . . . . . . . . . . . . . . .
Removal . . . . . . . . . . . . . . . . . . . . . . . . . . . .
Replacement . . . . . . . . . . . . . . . . . . . . . . . . . . .
Service . . . . . . . . . . . . . . . . . . . . . . . . . . . . . .
Oil Cooler Hoses, Replacing . . . . . . . . . . . . . . . . . . . . .
Oil Drain Hose . . . . . . . . . . . . . . . . . . . . . . . . . . . .
Oil Drain Hose and Valve, Replacement . . . . . . . . . . . . . . .
Oil Fill Tube . . . . . . . . . . . . . . . . . . . . . . . . . . . . .
Installation . . . . . . . . . . . . . . . . . . . . . . . . . . . .
Removal . . . . . . . . . . . . . . . . . . . . . . . . . . . . .
INDEX 4
. . .
. . .
. . .
. . .
. . .
. . .
. . .
. . .
. . .
. . .
. . .
.
.
.
.
.
.
.
.
.
.
.
.
.
.
.
.
.
.
.
.
.
.
.
.
.
.
.
.
.
.
.
.
.
.
.
.
.
.
.
.
.
.
.
.
.
.
.
.
.
.
.
.
.
.
.
F4-28
4-30
4-30
4-30
4-30
F4-29
F3-20
4-49
F4-42
4-51
4-51
TM5-6115-585-12
NAVFAC P-8-262-12
TO-35C2-3-455-1
TM-05684C-12
ALPHABETICAL lNDEX (CONT)
Paragraph,
Figure, Table,
Number
Subject
O (CONT)
.
.
.
.
.
.
.
.
.
.
.
.
.
.
.
.
.
.
F4-30
4-32
4-32
4-32
F3-21
4-50
.
.
.
.
.
.
.
.
.
.
.
.
4-33
F4-31, 4-33
4-33
4-29
.
.
.
.
.
.
.
.
.
.
.
.
.
.
.
.
.
.
.
.
.
.
.
.
.
.
.
.
.
.
2-3
2-1
2-5
2-9
2-8
2-7
2-10
2-2
2-6
2-4
. . . . .
. . . .
. . . . .
1-8
F4-27
T3-2, T4-1
Oil Filter . . . . . . . . . . . . . . . . . . . . . . . . . . . . . . . . . . . .
Removal . . . . . . . . . . . . . . . . . . . . . . . . . . . . . . . . . . .
Replacement . . . . . . . . . . . . . . . . . . . . . . . . . . . . . . . .
Service . . . . . . . . . . . . . . . . . . . . . . . . . . . . . . . . . . .
Oil Filter and Oil Pressure Switch . . . . . . . . . . . . . . . . . . . . . . .
Oil Pan-Base, Inspection. . . . . . . . . . . . . . . . . . . . . . . . . . . .
Oil Pressure Gauge
Removal . . . . . . . . . . . . . . . . . . . . . . . . . . . . . . . . . .
Replacement . . . . . . . . . . . . . . . . . . . . . . . . . . . . . . . .
Test . . . . . . . . . . . . . . . . . . . . . . . . . . . . . . . . . . . . .
Oil System, Description and Function . . . . . . . . . . . . . . . . . . . . .
Operating Procedures
Equipment Reconnection. . . . . . . . . . . . . . . . . . . . . . . . . .
General . . . . . . . . . . . . . . . . . . . . . . . . . . . . . . . . . . .
Operating in Alternate Modes . . . . . . . . . . . . . . . . . . . . . . .
Operation in Dusty or Sandy Areas . . . . . . . . . . . . . . . . . . . .
Operation in Extreme Cold. . . . . . . . . . . . . . . . . . . . . . . . .
Operation in Extreme Heat. . . . . . . . . . . . . . . . . . . . . . . . .
Operation in Wet or Humid Areas . . . . . . . . . . . . . . . . . . . . .
Power Connections . . . . . . . . . . . . . . . . . . . . . . . . . . . . .
Shutting Down Unit . . . . . . . . . . . . . . . . . . . . . . . . . . . . .
Starting Generator Set... . . . . . . . . . . . . . . . . . . . . . . . .
P
Preparation for Shipment or Storage . . . . . . . . . . . . . . . . . . . .
Pressure Oil System. . . . . . . . . . . . . . . . . . . . .
Preventive Maintenance Checks and Services . . . . . . . . . . . . . . .
Operator
Correcting and Reporting Deficiencies . . . . . . . . . . . . . .
Determining Intervals . . . . . . . . . . . . . . . . . . . . . . .
General . . . . . . . . . . . . . . . . . . . . . . . . . . . . . . .
Units in Continuous Operation . . . . . . . . . . . . . . . . . . .
Organizational
Determining Intervals . . . . . . . . . . . . . . . . . . . . . . .
General . . . . . . . . . . . . . . . . . . . . . . . . . . . . . . .
Units in Continuous Operation . . . . . . . . . . . . . . . . . . .
Primary Radio Interference Suppression Components . . . . . . . . . . .
.
.
.
.
.
.
.
.
.
.
.
.
.
.
.
.
.
.
.
.
3-5
3-6
3-4
3-7
.
.
.
.
.
.
.
.
.
.
.
.
.
.
.
.
.
.
.
.
4-9
4-8
4-10
F4-3
. . . . . . . . . . . . .
. . . . . . . . . . . . .
. . . . . . . . . . . . . .
. . . . . . . . . . . . . .
. . . . . . . . . . . . . . .
.................
.................
..................
.................
.................
. . . . . . . . . . . . . .
. . . . . . . . . . . . . . . .
4-15
4-14
F2-2
T2-2
1-4
F4-39
F4-38
4-44
4-44
4-44
4-44
F4-40
R
Radio Interference Suppression Components . . . . . . .
General Methods . . . . . . . . . . . . . . . . . . .
Reconnection Switch . . . . . . . . . . . . . . . . . . . .
Reconnection Switch Positions . . . . . . . . . . . . . .
Reporting of Errors . . . . . . . . . . . . . . . . . . . .
Rocker Arm Cover Oil Line, Cleaning . . . . . . . . . .
Rocker Arm Covers . . . . . . . . . . . . . . . . . . . .
Inspection . . . . . . . . . . . . . . . . . . . . . . .
Removal . . . . . . . . . . . . . . . . . . . . . . .
Replacement . . . . . . . . . . . . . . . . . . . . .
Service . . . . . . . . . . . . . . . . . . . . . . . .
Rocker Arm to Valve Clearance, Checking and Adjusting
.
.
.
.
.
.
.
.
.
.
.
.
INDEX 5
TM5-6115-585-12
NAVFAC P-8-262-12
TO-35C2-3-455-1
TM-05684C-12
ALPHABETICAL INDEX (CONT)
Paragraph,
Figure, Table,
Number
Subject
s
Screen-Guard
Inspection . . . . . . . . . . . . . . . . . . . . . . . . . . . . . . . . . . .
Installation . . . . . . . . . . . . . . . . . . . . . . . . . . . . . . . . . .
Removal . . . . . . . . . . . . . . . . . . . . . . . . . . . . . . . . . . .
Repair . . . . . . . . . . . . . . . . . . . . . . . . . . . . . . . . . . . .
Shutter Assembly . . . . . . . . . . . . . . . . . . . . . . . . . . . . . . . . .
Shutter Box Assembly, Inspection . . . . . . . . . . . . . . . . . . . . . . . .
Shutter and Thermo Power Element Assembly . . . . . . . . . . . . . . . . . .
Shutters, Adjusting . . . . . . . . . . . . . . . . . . . . . . . . . . . . . . . .
Skid-Base . . . . . . . . . . . . . . . . . . . . . . . . . . . . . . . . . . . . .
Cleaning . . . . . . . . . . . . . . . . . . . . . . . . . . . . . . . . . . .
Description and Function. . . . . . . . . . . . . . . . . . . . . . . . . .
Inspection . . . . . . . . . . . . . . . . . . . . . . . . . . . . . . . . . . .
Installation . . . . . . . . . . . . . . . . . . . . . . . . . . . . . . . . . .
Removal . . . . . . . . . . . . . . . . . . . . . . . . . . . . . . . . . . .
Repair . . . . . . . . . . . . . . . . . . . . . . . . . . . . . . . . . . . .
Special Tools . . . . . . . . . . . . . . . . . . . . . . . . . . . . . . . . . . .
Speed Control . . . . . . . . . . . . . . . . . . . . . . . . . . . . . . . . . . .
Inspection . . . . . . . . . . . . . . . . . . . . . . . . . . . . . . . . . . .
Starter Lockout Switch, Adjusting . . . . . . . . . . . . . . . . . . . . . . . .
Starter Lockout Switch and Gear
Adjustment . . . . . . . . . . . . . . . . . . . . . . . . . . . . . . . . . .
Inspection . . . . . . . . . . . . . . . . . . . . . . . . . . . .
Removal . . . . . . . . . . . . . . . . . . . . . . . . . . . . . . . . . . .
Repair . . . . . . . . . . . . . . . . . . . . . . . . . . . . . . . . . . . .
Replacement . . . . . . . . . . . . . . . . . . . . . . . . . . . . . . . . .
Test . . . . . . . . . . . . . . . . . . . . . . . . . . . . . . . . . . . . . .
Starting Procedure . . . . . . . . . . . . . . . . . . . . . . . . . . . . . . . .
.
.
.
.
.
.
.
.
.
.
.
.
.
.
.
.
.
.
.
.
.
.
.
.
.
.
.
.
.
.
.
.
.
.
.
.
.
.
4-55
4-55
4-55
4-55
F4-4
3-14
F3-5
F4- 5
F4-45
3-25
4-56
3-25, 4-57
4-57
4-57
4-57
4-5
F3-16
3-21
F4-26
.
.
.
.
.
.
.
.
.
.
.
.
.
4-28
4-28
4-28
4-28
4-28
4-28
F2-3
.
.
.
.
.
.
.
.
.
.
F4-6
F1-3
T3-3, T4-2
3-9
4-12
Valve Rocker Arms
Adjustment . . . . . . . . . . . . . . . . . . . . . . . . . . . . . . . . . . . .
Inspection . . . . . . . . . . . . . . . . . . . . . . . . . . . . . . . . . . . . .
Voltmeter-Ammeter Range Selector Switch Continuity Check . . . . . . . . . . . .
4-46
4-46
T4-4
T
Thermo Unit, Adjusting . . . . . . . . . . . . . . . . . . . .
Tie Down, Lifting, and Towing Provisions Crated Set . . . .
Troubleshooting . . . . . . . . . . . . . . . . . . . . . . . .
Operator
General . . . . . . . . . . . . . . . . .
Organizational, General. . . . . . . . . . . . . . . . .
.
.
.
.
.
.
.
.
.
.
.
.
.
.
.
. . . . .
. . . . .
. . . . .
. . . . .
. . . .
.
.
.
.
.
.
.
.
.
.
v
INDEX 6
TM 5-6115-585-12
NAVFAC P-8-262-12
TO 35C2-3-455-1
TM 05684C-12
By Order of the Secretaries of the Army, the Navy, and the Air Force:
BERNARD W. ROGERS
General, United States Army
Chief of Staff
Official:
PAUL T. SMITH
Major General, United States Army
The Adjutant General
D. G. ISELIN
Rear Admiral, CEC, U. S. Navy
Commander,
Naval Facilities Engineering Command
Official:
DAVID C. JONES, General, USAF
Chief of Staff
AMES J. SHEPARD, Colonel, USAF
Director of Administration
W. R. JOHNSON
Brigadier General, U. S. Marine Corps
Acting Deputy Chief of Staff for Installations and Logistics
Distribution:
To be distributed in accordance with DA Form 12-25D, Operator maintenance requirements for Generator
Sets, Engine Driven: 10 KW, 60 HZ.