1
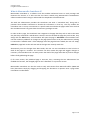
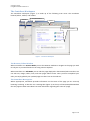
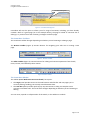
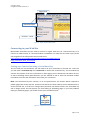
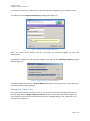
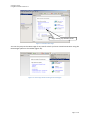
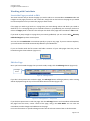
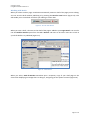
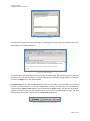
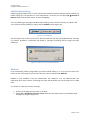
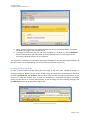
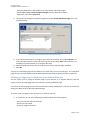
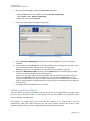
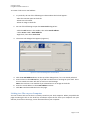
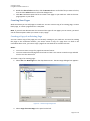
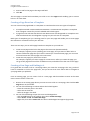
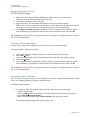
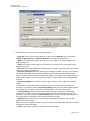
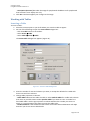
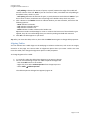
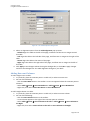
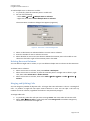
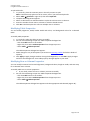
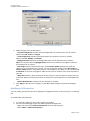
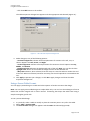
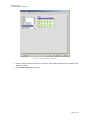
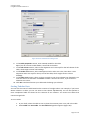
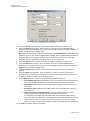
Succeed Training Using Macromedia Contribute 3 Succeed Training Using Macromedia Contribute 3 Contents What is Macromedia Contribute 3? .......................................................................... 2 The Contribute Workspace...................................................................................... 3 The Browser/Editor Window .............................................................................. 3 The Contribute Message Bar ............................................................................. 3 The Contribute Toolbars ................................................................................... 4 The Contribute Sidebar .................................................................................... 4 Setting up a Connection using a Contribute Key ........................................................ 5 Subsequent Connections ........................................................................................ 6 Locate the Page you wish to Edit ............................................................................. 8 Edit the Page ........................................................................................................ 8 Working with Drafts......................................................................................... 9 Publish Updated Page .......................................................................................... 11 Rollback ............................................................................................................. 11 Locking/Check in-Check out ........................................................................... 12 Linking to a New, Draft or Recently Published Page ................................................. 14 Linking to a Page on your Web site or on another Web site ....................................... 15 Linking to an E-mail Address ................................................................................ 16 Linking to a File on your Computer ........................................................................ 17 Creating a Copy of an Existing Page ...................................................................... 19 Creating a Page Based on a Template .................................................................... 20 Creating a New Page and Linking to it .................................................................... 20 Creating a New Page without Linking to it .............................................................. 22 Adding an Image using the Insert Menu or Image Button: ........................................ 23 Dragging Images to a Page .................................................................................. 24 Copying and Pasting Images ................................................................................. 24 Changing Image Properties .................................................................................. 24 Inserting a Table ................................................................................................. 26 Aligning Tables ................................................................................................... 27 Adding Rows and Columns ................................................................................... 28 Deleting Rows and Columns ................................................................................. 29 Merging and Splitting Cells ................................................................................... 29 Modifying Table Properties .................................................................................... 30 Modifying Row or Column Properties ...................................................................... 30 Modifying Cell Properties ...................................................................................... 31 Using a Preset Table Format ................................................................................. 32 Sorting Tabular Data ........................................................................................... 34 Adding a Section Anchor ...................................................................................... 36 Linking to a Section Anchor .................................................................................. 36 Page 1 of 37 Succeed Training Using Macromedia Contribute 3 What is Macromedia Contribute 3? Macromedia Contribute is a software tool that enables authorised users to easily manage and maintain the content of a web site that has been created using Macromedia’s Dreamweaver software without them having to understand the complexities of Dreamweaver. The web site administrator provides the Contribute user with a “Contribute Key” along with a password that enables Contribute to decode the information in that key. This key enables the Contribute user to set up a connection to a specific web site and edit the pages within that site that the site administrator has given them the necessary privileges to edit. In order to edit a page, the Contribute user navigates to the page that they wish to edit in the same way that they would with a web browser. Once the user has located the page they wish to edit, they simply click the Edit button, and Contribute will open the page in Edit Mode. The Contribute user can then make any additions or changes to the page (within limits set by the administrator). Editing is restricted to “editable areas” of the webpage. Once the page has been edited, the user can simply Publish the page back to the web site and the changes are instantly made live. Alternatively, once the changes have been made, the user can use Contribute to email a link to a draft of the page to a reviewer. The reviewer can then review the page and suggest changes as necessary. The Contribute user can easily access the draft of the page and make any further changes before finally publishing the page. If, for some reason, the published page is incorrect, then, assuming the site administrator has enabled this function, the changed page can be “rolled back” to a previous version. Macromedia Contribute can also be used to easily add content from Microsoft Office (2000 and later) documents simply by dragging and dropping the document in question onto a page when Contribute is in Edit Mode. Page 2 of 37 Succeed Training Using Macromedia Contribute 3 The Contribute Workspace The Contribute workspace (Figure 1) is made up of the following main areas: The Contribute browser/editor, toolbar, and sidebar: Side Bar Drop Down Menus Toolbar Browser/Editor Window Figure 1 - Contribute Workspace The Browser/Editor Window When Contribute is in Browse Mode you use the Browser window to navigate to the page you wish to edit just as you would browse a site using Internet Explorer. When Contribute is in Edit Mode you can edit the page displayed in the Browser/Editor window. You can edit text, images, tables, links, and even pages within frames. Once you have completed your edits you simply publish your updated page to make it live on the web site. The Contribute Message Bar Where appropriate, Contribute provides information on the status of the page you are currently browsing or editing. It does this via a message bar (Figure 2) at the top of the Browse/Edit Window that only appears when Contribute has some information regarding the status of a page. Page 3 of 37 Succeed Training Using Macromedia Contribute 3 Contribute Message Bar Figure 2 - Contribute Message Bar Contribute will use this space to inform you of a range of situations, including; you have already created a draft of a given page (as in the example above); the page is locked as someone else is editing it; or you don’t have the necessary privileges to edit the page. The Contribute Toolbars The Contribute toolbar changes depending on whether you are browsing or editing a page. The Browser Toolbar (Figure 3) contains buttons for navigating your web site or creating a new page. Figure 3 - Browser Toolbar The Editor Toolbar (Figure 4) contains buttons for editing and common operations from the File, Insert, Format, and Table drop down menus. Figure 4 - Editor Toolbar The Contribute Sidebar The sidebar (Error! Reference source not found.) has 2 parts: The Pages panel provides access to the web browser and all drafts and new pages you’re currently editing, enabling you to easily switch between them. The How Do I panel provides quick step by step instructions to help you complete some common Contribute tasks. The list of tasks changes depending on whether you are browsing or editing. You can resize, expand or collapse either of the Panels, or the Sidebar as a whole. Page 4 of 37 Succeed Training Using Macromedia Contribute 3 Pages Panel Expand/Collapse How Do I… Panel Figure 5 - Pages and How Do I Panels Connecting to your Web Site Macromedia Contribute may be used to connect to regular web sites via a Connection Key or to connect to HTML content in a Succeed module via WebDAV. For help with this latter topic, please see the guide on the Information Services web site at: http://www.stir.ac.uk/media/schools/is/documents/succeeddocuments/ using_contribute_with_succeed.pdf Setting up a Connection using a Contribute Key The first time you use Contribute, you will need to set up a connection to the web site. To do this you will need a Contribute Key and a Password to unlock that Contribute key. The Contribute Key contains the location of the site, information on what pages you are allowed to edit within the site, as well as detailing exactly what elements you are allowed to edit or add. The Password enables Contribute to extract that information and create your connection. Note: The Contribute key also contains, in an encrypted format, the account details required to publish pages back to the web site. These account details are those used by the site administrator to access the web site, so if this user changes their password, the details stored in the Contribute key will no longer match. This will prevent you from editing or publishing pages. If you have problems editing or publishing pages, you should contact your site administrator. Figure 6 – Contribute Connection Key Page 5 of 37 Succeed Training Using Macromedia Contribute 3 To set up your connection, double click on the Contribute Key supplied by your site administrator: You will then see the Import Connection Key. dialogue box (Figure 7). Figure 7 - Import Connection Key Dialogue Box Enter your name, email address and the connection key password supplied by your site administrator. If Contribute is happy with the password supplied, you may see the Updating Templates progress window (Figure 8). Figure 8 - Updating Templates Progress Window Contribute should now start up in Browse Mode, displaying the home page of the site for which you have been granted editing privileges. Subsequent Connections Once you have set up the connection to a site, you can access it simply by starting Contribute. On the Start Page there is a Begin editing my web sites section, within which there will be links to any sites to which you have set up a Contribute connections. To begin editing a site, simply click on its name in this list (Figure 9). Page 6 of 37 Succeed Training Using Macromedia Contribute 3 Begin editing my websites panel Figure 9 - Contribute Start Page You can also jump to the Home Page of any sites for which you have created connections using the Home Pages option on the Toolbar (Figure 10). Figure 10 - Home Pages button showing list of Homepages Page 7 of 37 Succeed Training Using Macromedia Contribute 3 Working with Contribute Locate the Page you wish to Edit The most common way to locate the page you wish to edit is to use Contribute in Browse mode and navigate to the page you wish to edit. To do this, simply click on the links on the page as you would in Internet Explorer until you reach the page you wish to edit. If the page you wish to go back to is a page that you were editing earlier and which you saved in draft form, or is a new page that you’ve created but haven’t yet published, you can simply click on its title in the Pages panel on the left. This will open the draft of the page with Contribute in Edit mode. If you wish to jump straight to a page that you recently published, you can use the File Recently Published Pages drop down menu option. You can also use Bookmarks in Contribute quickly to jump to any page. If you use Internet Explorer, your IE favourites should be automatically added to your Bookmarks. If you are familiar with the file names and folder structure of your web pages then they can be located using the Choose button (Figure 11). Figure 11 - The Choose button Edit the Page Once you have located the page that you wish to edit, simply click the Edit Page button (Figure 12). Edit Page Button Figure 12 - Edit Page Button If you don’t have permission to edit the page, the Edit Page button will be greyed out, and a warning will be displayed along the top of the Contribute Browse window (Figure 13). Figure 13 - Edit Page Button – “Greyed Out” If you do have permission to edit the page, click the Edit Page button and Contribute will download the page from the server, create a draft of the page, and go into Edit Mode. You can now use Contribute to make changes and additions to the page. For more information on specific editing activities see the relevant section later in this document. Page 8 of 37 Succeed Training Using Macromedia Contribute 3 Working with Drafts When you select to edit a page, Contribute automatically creates a draft of the page you are editing. You can save the draft without publishing it by pressing the Save for Later button (Figure 14). This will enable you to come back and finish your editing at a later date. Figure 14 - Save for Later Button When you save a draft, a shortcut to the draft of the page is added to your Pages Panel. You can also use the Send for Review option from the File > Actions sub menu to let other users take a look at your draft before it is published (Figure 15). Figure 15 - Email Review When you select, Send for Review Contribute puts a temporary copy of your draft page on the server after displaying a message that it is doing so, and giving you the option to Cancel (Figure 16). Page 9 of 37 Succeed Training Using Macromedia Contribute 3 Figure 16 - Send for Review Contribute then opens a new email message, containing a link to the copy of the draft on the server, requesting it be reviewed (Figure 17). Figure 17 - Email Message You should enter the email address of the reviewer in the To: field. The reviewer can then send back comments. You can open the draft to continue editing and/or publish the page simply by clicking on its title in the Pages list on the left-hand side. Important Note: If you click the Cancel button whilst in edit mode: - this will delete the draft that you are currently working on. If you click Cancel when working on a draft that you had previously saved using the Save for Later button (and accessed via the Pages panel), this will also be deleted regardless of the fact that you had saved it earlier! If you want to exit Edit mode but keep the draft you have been working on, you should use the Save for Later button. Figure 18 - Cancel & Save for Later Buttons Page 10 of 37 Succeed Training Using Macromedia Contribute 3 Publish Updated Page Publishing a page makes it live on your web site and therefore visible to web site visitors. Before you publish a page you can preview it in your web browser. To do this you can select File Preview in Browser from the drop down menu, or press the F12 key. If you’re publishing a new page Contribute will prompt you for a name for the file. To publish a file once you have finished editing it, simply click the Publish button (Figure 19). Figure 19 - Publish Button This will replace the version on the server with the draft that you have just published and, assuming you haven’t disabled it, Contribute will display a message confirming that the page has been published. Figure 20 - Confirmation of successful Publication Rollback If you accidentally publish a page before you have finished editing it, or if you need to revert to an earlier version of the page for any reason, then this can be achieved using Rollback. Rollback is only available if the site administrator has enabled it. The site administrator also determines how many versions of the page are held, and therefore how far the page can be rolled back. To roll back to a previous version of a page: 1. Browse to the page that you want to roll back. 2. Select File > Roll Back to Previous Version from the drop down menus. The Roll Back Page dialogue box appears (Figure 21). Page 11 of 37 Succeed Training Using Macromedia Contribute 3 Figure 21 - Roll Back Page Dialogue Box 3. Select a previous version of the published page from the list of available pages. Contribute will display the page in the Preview section. 4. If the page you selected is the one you want to publish (i.e. roll back to), click the Roll Back button and Contribute will replace the currently published version of the page with the previously published version that you selected. The page that is replaced by the Roll Back procedure will appear in the Roll Back Page dialogue box the next time it is accessed enabling you to roll back to that version if necessary. Locking/Check in-Check out In order to avoid multiple people editing the same page at the same time, Contribute employs a Locking mechanism. When a person selects to edit a page in Contribute or Dreamweaver, the file is marked as Checked Out and Locked so that no other users can edit the page simultaneously. If you browse to a page that another user currently has checked out, Contribute will display a message telling you that the file is currently being edited, as well as telling you who is editing the page, and the Edit Page button will be greyed out (Figure 22). Figure 22 - Locked File Warning Message Page 12 of 37 Succeed Training Using Macromedia Contribute 3 As long as another Contribute user has a draft of the page that they are either currently working on or have “saved for later”, the file will remain locked. Only when a Contribute draft is “published” or “cancelled”, will the file be unlocked. Likewise, a Dreamweaver user must “Check in” the file before it will be unlocked and available for editing with Contribute. If you see a message telling you that another user is currently editing the page you wish to edit, you should contact that user to determine whether or not they are currently editing the page. It may sometimes be the case that the user has checked the file out, finished their editing, but forgotten to check the file back in, or they may have an unpublished draft of the page which they have simply forgotten about. Editing and Inserting Text You can add text to a web page by typing the text, by copying and pasting text, or by dragging text from another application to your Contribute draft. You can also add the entire contents of a Microsoft Word or Excel document to a web page - see section on Inserting Content Directly from Microsoft Office Documents for more information. You can enter and edit text just as you would with Word. To enter text, use the cursor to place the insertion point in the draft (you must be in Edit Mode), then type the text. To edit text, use the cursor to highlight the text. You can then delete it, or format it using the toolbar options or the drop down menus (Figure 23). Figure 23 - Editing and Formatting Options Notes: The web site administrator can determine the amount of space that pressing Enter adds between paragraphs. If this is set to automatically enter a double line paragraph break, and you wish to only enter a single line break, simply hold down the Shift key when you press Enter. The default setting is to only to move down one line each time the Enter key is pressed. On a web page multiple blank spaces are usually only rendered as a single white space. With Contribute, the site administrator can determine if multiple blank spaces are displayed or not (the default is to show multiple blank spaces). If this is set to only display one blank space if multiple spaces are pressed, and you want to enter more than a single space, press Ctrl - Shift Space. This enters what Contribute calls a non-breaking space. N.B. Multiple blank spaces should be used with care, as you cannot guarantee how they will appear in every browser. It is much better to use Tables or cascading style sheets (CSS) to control layout. You can add special characters such as a copyright symbol or pound sign using the Insert > Special characters drop down menu option (Figure 24): Page 13 of 37 Succeed Training Using Macromedia Contribute 3 Figure 24 - Insert Special Characters drop down menu options More special character options are available by selecting the Other option from this menu. You may also select text from another application and copy and paste it into your Contribute draft. Creating Links to Web Pages or Other Files In Macromedia Contribute, you can make text or images in your web page act as links. Your text or image can link to any of the following: A current draft or a recently published page on your web site A new web page, which Contribute creates at the same time as the link (see Creating a New Page and Linking to it section within this document) An existing web page on your web site or on another web site An email address for someone An existing file on your computer, such as a Microsoft Word or PDF file Linking to a New, Draft or Recently Published Page You can easily create links to pages you have recently been working on. These can be to new pages that you have created but not yet linked to, draft pages that you have been working on recently but not yet published, or pages that you have recently published. To create a link to a new, draft or recently published page: 1. Navigate to the page where you wish to add the link (or select it from the Pages Panel if you already have a draft). 2. In the draft you are editing, do one of the following to indicate where the link will appear: - Place the insertion point in the draft. - Select text in the draft. - Select an image in the draft. 3. Do one of the following to open the Insert Link dialogue box: Page 14 of 37 Succeed Training Using Macromedia Contribute 3 - Click the Link button in the toolbar, then select Drafts and Recent Pages. - Select Insert > Link > Drafts and Recent Pages from the drop down menus. - Right-click, then select Insert Link. 4. The Insert Link dialogue box appears (Figure 25): Select Drafts and Recent Pages if it is not selected already. Figure 25 - Insert Link dialogue box: Drafts & Recent Pages 5. If you did not select text or an image in your draft, enter the link text in the Link text box. This is the text a web site visitor will click to go to the new page. Note: This text box is not available if you selected text or an image in the draft. 6. Select the page you wish to link to from the list of drafts and new pages available. 7. Click OK. A link to the new/draft page will be added to the draft that you were working on. The new/draft page that you have just linked to will be published when the draft containing the link is published. Linking to a Page on your Web site or on another Web site You can create a link on a page to another page on your web site or on another web site. Use this option to link to any web page that is not a draft or recently published page. If you want to link to a page on your web site that was recently published or is a draft, see section on Linking to a New, Draft or Recently Published Page. To create a link to a page on your web site or on another web site: 1. In your draft, do one of the following to indicate where the link will appear: - Place the insertion point in the draft. - Select text in the draft. - Select an image in the draft. Page 15 of 37 Succeed Training Using Macromedia Contribute 3 2. Do one of the following to open the Insert Link dialogue box: - Click the Link button in the toolbar, then select Browse to Web Page. - Select Insert > Link > Browse to Web Page. - Right-click, then select Insert Link. 3. The Insert Link dialogue box appears (Figure 26). Figure 26 - Insert Link Dialogue Box: Browse to Web Page 4. Click the Browse to Web Page button at the top of the dialogue box, if it is not already selected. 5. Enter link text in the Link text box, if you did not select text or an image on your draft. This is the text a web site visitor will click to go to the new page. Note: This text box is not available if you selected text or an image on the draft. 6. Beside the Web address (URL) text box, click the Browse button to find the page you want to link to, and then click OK to close the dialogue box. Tip: You can also copy and paste the web address into the text box from another source. If you click the Browse button, in the dialogue box, you can click the Choose button if you prefer to browse the file structure or need to select a file that isn’t linked. When you select a page, a preview appears in the dialogue box so that you can confirm that this is the page you want to link to. 7. Click OK. Contribute adds the link to your draft. Linking to an E-mail Address You can create a link to an e-mail address. The link can be text or an image. When a web site visitor clicks the link, Contribute creates a new message, with the email address you specified, in the visitor’s default email application. For example, you might create a text link that says “Contact us” to send e-mail to the site administrator. When the visitor clicks the text link, their browser launches the visitor’s e-mail application and creates an e-mail message addressed to the site administrator. Page 16 of 37 Succeed Training Using Macromedia Contribute 3 To create a link to an e-mail address: 1. In your draft, do one of the following to indicate where the link will appear: - Place the insertion point in the draft. - Select text in the draft. - Select an image in the draft. 2. Do one of the following to open the Insert Link dialogue box: - Click the Link button in the toolbar, then select Email Address. - Select Insert > Link > Email Address. - Right-click, then select Insert Link. 3. The Insert Link dialogue box appears (Figure 27): Figure 27 - Insert Link Dialogue Box: Email Address 4. Click the E-mail Address button at the top of the dialogue box, if it is not already selected. 5. Enter link text in the Link text box, if you did not select text or an image on your draft. This is the text a web site visitor will click to send an e-mail message. Note: This text box is not available if you selected text or an image on the draft. 6. Enter the e-mail address in the E-mail address text box. 7. Click OK. Contribute adds the link to the page. Linking to a File on your Computer You can create a link to a file that is currently stored on your local computer. When you publish the page containing the link to the local file, Contribute copies the file from your computer into your web site, then links to that copy, not to the actual file on your computer. Page 17 of 37 Succeed Training Using Macromedia Contribute 3 For example, you might link to a Word document saved in your home folder, or an HTML page saved on your desktop. This essentially adds a new page to your web site, with the content contained in the file. Note: Once the page has been published and the local file copied to the web site, changes to the local file will not be reflected in the copy of the file copied to the server. You can use the Insert Link dialogue box to insert a link to a file on your computer, or you can drag the file to your page. To create a link to a file on your computer using the Insert Link dialogue box: 1. In your draft, do one of the following to indicate where the link will appear: - Place the insertion point in the draft. - Select text in the draft. - Select an image in the draft. 2. Do one of the following to open the Insert Link dialogue box: - Click the Link button in the toolbar, then select File on My Computer. - Select Insert > Link > File on My Computer. - Right-click, then select Insert Link. 3. The Insert Link dialogue box appears (Figure 27): Figure 28 - Insert Link Dialogue Box: Files on My Computer 4. Click the File on My Computer button at the top of the dialogue box, if it is not already selected. 5. Enter link text in the Link text box, if you did not select text or an image on your draft. This is the text a web site visitor will click to go to another page. Note: This text box is not available if you selected text or an image on the draft. Page 18 of 37 Succeed Training Using Macromedia Contribute 3 6. Beside the File to link to text box, click the Browse button to find the file you want to link to, then click the Select button to close the dialogue box. 7. Click OK. Contribute copies the file to create a new page on your web site. A link to the new page appears in your draft. Creating New Pages With Contribute you can add pages to a web site. You can create a copy of an existing page, create a blank page, or create a page based on a template. Note: If you web site administrator has restricted the types of new pages you can create, you won’t see all of these options when you create or copy a page. Creating a Copy of an Existing Page You can create a copy of the page you are currently viewing on your web site. You must be viewing the page in the Contribute browser; you cannot create a copy of a page that is a draft in the Contribute editor. Also, you cannot copy a page from one web site to another web site. Notes: You cannot create a copy of a page that contains frames. You must create the new page first then link to it later. You cannot create the copy and add a link to it at the same time. To create a copy of an existing page: 1. Select File then New Page from the drop down menus. The New Page dialogue box appears: Figure 29 – The New Page Dialogue Box 2. Select Copy of Current Page in the panel on the left. Page 19 of 37 Succeed Training Using Macromedia Contribute 3 3. Enter a title for the page in the Page Title field. 4. Click OK. The new page is created and Contribute puts a link to it in the Pages Panel enabling you to create a link to it at a later date. Creating a Page Based on a Template You can create a new page based on a template. In Contribute there are two types of templates: A template created in Macromedia Dreamweaver. A Dreamweaver template is a template that a designer creates for you with editable and locked regions. A page from the web site that the web site administrator has designated as a template. Your web site administrator can designate any page on your web site as a template. Both types of templates give you a starting point for your new page and enable you to create pages that maintain a consistent look on your web site. There are two ways you can add a page based on a template to your web site: Create a new page and a link to the page at the same time (Recommended) For example, suppose you are updating your home page, and you want to add a link to a contact information page that you haven’t created yet. From the home page, you can insert a link and create the contact page at the same time. Create the new page first, then link to it later. For example, suppose you create a page for a new service. After you create the page, you can go to the page that lists all the available services, and add a link to the new service page. Creating a New Page and Linking to it It’s a good idea to create a link to a new page when you create the new page. This way, you don’t have to remember to link to the page later, and you ensure that users will be able to navigate to your page when you publish it. From an existing page, you can insert a link to a new page, which Contribute creates at the same time it inserts the link. To do this: 1. Browse to an existing page where you want to insert a link to a new page, then click the Edit Page button in the toolbar. 2. Do one of the following to indicate where the link will appear: - Place the insertion point in the draft. - Select text in the draft. - Select an image in the draft. 3. Do one of the following to open the Insert Link dialogue box: - Click the Link button in the toolbar, then select Create New Page. - Select Insert Link Create New Page. - Right-click, then select Insert Link. The Insert Link dialogue box appears (Figure 30). Page 20 of 37 Succeed Training Using Macromedia Contribute 3 Figure 30 – The Insert Link Dialogue Box 4. Click the Create New Page button at the top of the dialogue box, if it is not already selected. 5. Enter link text in the Link text box, if you did not select text or an image in your draft. This is the text a web site visitor will click to go to the new page. Note: This text box is not available if you selected text or an image in the draft. 6. If you have multiple web sites, and want to create the new page from a page in a web site other than the current one, select another web site in the Create new page from section. Note: If you don’t have permission to edit files in the folder you select, then Contribute saves the new page in the first folder you can edit for that web site. If you cannot edit any folders in the web site, then you cannot create a new page for that web site. 7. In the Create new page from section, select the type of page you want to create: - Select Blank Web Page to create a blank page. - Select a page in the Sample Web Pages folder to create a copy of a built-in sample page provided with Contribute. 8. Select a page in the Templates folder to create a new page based on a Dreamweaver template, or based on a page within your web site that the web site administrator designated as a template. 9. When you select a page type, a preview and a description appear. Note: If your web site administrator has restricted the types of new pages that you can create, or you do not have permission to edit this web site, you won’t see all of these options. 10. Enter a title for the new page in the New Page title text box. 11. This title appears in the browser title bar when a web site visitor views the page; it does not appear on the page itself. 12. Click OK. Contribute adds the link to the draft, and then opens the new page in the Contribute editor. To return to the draft where you added the link, click the draft title in the Pages panel. Note: Contribute creates the new page in the same folder as the page that links to it (unless you selected another web site in Step 6). When you publish your draft, Contribute also publishes the new page; you can change its folder location then if you need to. Page 21 of 37 Succeed Training Using Macromedia Contribute 3 Creating a New Page without Linking to it You might want to create your new page and add content before you create the link to it. If so, remember to add a link to the page before you publish it, otherwise web site visitors will not be able to navigate to the page. Note: It’s a good idea to create the new page and the link at the same time (see section above). To create a new page: 1. In the Contribute browser, click the New Page button in the toolbar or, in the browser or editor, select File New Page. The New Page dialogue box opens (Figure 31): Figure 31 - The New Page Dialogue Box 2. In the Create new page from section, select the type of page you want to create: - Select Blank Web Page to create a blank page. - Select Copy of Current Page to create a copy of the page on your web site that you are currently viewing. Note: You cannot create a copy of the current page if the page contains frames or if the page is a draft in the Contribute editor. You cannot copy a page from one web site to another web site. - Select a page in the Sample Web Pages folder to create a copy of a built-in sample page provided with Contribute. - Select a page in the Templates folder to create a new page based on a Dreamweaver template, or based on a page within your web site that the web site administrator designated as a template. When you select a page type, a preview and description appear. Note: If your web site administrator has restricted the types of new pages that you can create, or you do not have permission to edit this web site, then you won’t see all of these options when you create a page. 3. Click the Refresh Templates button to update your list of templates, if necessary. 4. Enter a page title in the Page title text box. This title appears in the browser title bar when a web site visitor views the page; it does not appear on the page itself. Page 22 of 37 Succeed Training Using Macromedia Contribute 3 5. Click OK. The new page opens in Contribute, ready for you to add content. Be sure to add a link to your new page before you publish it. Note: Contribute creates the new page in the same folder as the page you were viewing when you created the page. You can change the folder location when you publish the new page, if you need to. Inserting Images There are 3 ways you can add an image to your web page: Use the Insert menu or the Image button to add an image from your computer or web site. Drag an image from another source to your Contribute draft. Copy and paste an image from another source into your Contribute draft. Note: Images that you add to your page should be in one of the following web-ready formats: JPG, GIF, or PNG. You should also ensure that the image is suitably compressed for web delivery. If the image you want to add is in the wrong format, or if it needs to be compressed, you can use an image-editing tool (such as Photoshop) to convert the image to a web-ready format or compress it. If in doubt, contact your site administrator. When you add an image to a page, it is important to add descriptive text (or “alt” text) about the image so that the image is accessible to people with disabilities. Your web site administrator can enforce the image accessibility option so that a dialogue box prompts you for an image description whenever you add an image. Adding an Image using the Insert Menu or Image Button: To add an image using the Insert menu or the Image button: 1. Place the insertion point in your draft where you want the image to appear. 2. Do one of the following: - Click the Image button in the toolbar. - Select Insert Image. - Select From My Computer or From Web site from the pop-up menu. The Select Image or Choose Image from Web site dialogue box appears. 3. Browse to and select the image, then click the Select or OK button. 4. If the Image Description dialogue box appears, enter text to describe the image for people with disabilities or for people with their browsers set to display text only, then click OK. The image appears on your draft. If the image is from your computer, Contribute copies the image to an images folder on your web site when you publish the draft. Tip: After you insert the image, select the image, then click the Image button and select either option from the popup menu to change image properties. For more information, see “Changing image properties” section. Page 23 of 37 Succeed Training Using Macromedia Contribute 3 Dragging Images to a Page To add an image by dragging: 1. Reduce the size of the Contribute application window so that you can also see the application that contains the image you plan to drag. 2. In the other application, select the image. 3. Drag the image to your Contribute draft where you want the image to appear. Tip: You can’t drag an image from a web browser if the image has a link attached to it. Save the image to your computer first, then drag the image to your Contribute draft. 4. If the Image Description dialogue box appears, enter text to describe the image for people with disabilities or for people with their browsers set to display text only, then click OK. The image appears on your draft, and Contribute copies the image to an images folder on your web site, if it’s not already there. Copying and Pasting Images You can copy an image from another source, then paste it on your Contribute page. To add an image by copying and pasting: 1. 2. 3. 4. 5. In the application that contains the image you want to copy, select the image. Select Edit Copy. Place the insertion point in your Contribute draft where you want the image to appear. Select Edit Paste. If the Image Description dialogue box appears, enter text to describe the image for people with disabilities or for people with their browsers set to display text only, then click OK. The image appears on your draft, and Contribute copies the image to an images folder on your web site, if it’s not already there. Changing Image Properties After you add an image to a page, you can change its properties. Image properties include image source, size, padding, alignment, border, and alternate text. To change image properties: 1. In your draft, select the image you want to modify, then do one of the following: - Double-click the image. - Click the Image button in the toolbar, then select either option from the pop-up menu. - Select Format Image Properties. - Right-click the image, then select Image Properties from the pop-up menu. The Image Properties dialogue box appears (Figure 32). Page 24 of 37 Succeed Training Using Macromedia Contribute 3 Figure 32 - Image Properties Dialogue Box 2. Make changes as necessary to the following options: - Image file is the location of the image source file. Click the Browse button, then select Images on My Computer or Images on Web site, to change the image source. - Width is the width of the image. You can enter size in pixels or as a percentage of the original image size. - Height is the height of the image. You can enter size in pixels or as a percentage of the original image size. - Reset size returns the image to its original height and width. This option acts like an undo button for changes to image size. - Constrain proportions keeps the proportions of height and width constant. For example, if you double the height with this option enabled, then Contribute also doubles the width. Note: If possible, do not change the width and height of your image or you might reduce the quality of the image. If you must resize the image, it is a good idea to use an image editing program. - Horizontal padding is the amount of empty space, in pixels, on the right and left of the image. The number you enter represents the amount of space on each side of the image. For example, if you select 4 pixels for Horizontal padding, then 4 pixels of empty space appears on the right of the image, and 4 pixels of space appears on the left of the image. - Vertical padding is the amount of empty space on the top and bottom of the image. The number you enter represents the amount of space above and below the image. For example, if you select 4 pixels for Vertical padding, then 4 pixels of empty space appears on top of the image, and 4 pixels of space appears below the image. - Alignment refers to the location of the image on the page in relation to any text that appears around the image. When you select an alignment option, a graphic indicates how the image will align in relation to elements around the image. - Border is the width, in pixels, of the border around the image. Page 25 of 37 Succeed Training Using Macromedia Contribute 3 - Description (ALT text) describes the image for people with disabilities or for people with their browsers set to display text only. 3. Click OK. Contribute applies your changes to the image. Working with Tables Inserting a Table To insert a table: 1. Place the insertion point in your draft where you want the table to appear. 2. Do one of the following to open the Insert Table dialogue box: - Click the Table button in the toolbar. - Select Insert Table. - Select Table Insert Table. The Insert Table dialogue box appears (Figure 33): Figure 33 – The Insert Table Dialogue Box 3. Enter the number of rows and columns you want, or accept the defaults for a table with three rows and three columns. 4. Change table properties as desired: - Table width indicates how wide the table is. Select Default width for a table with columns that resize as you add content. Select Specific width if you want to enter a number for a fixed table width. Use the pop-up menu to indicate whether the number you enter is in pixels, or is a percentage of the page you want the table to be. - Border thickness is the thickness of the border around the table and between cells. Tip: Enter 0 if you do not want a table border. Page 26 of 37 Succeed Training Using Macromedia Contribute 3 - Cell padding indicates the amount of space, in pixels, between the edge of the table cell and the content of the cell. Note: If you do not enter a value, Contribute sets cell padding to the default value, which is 1 pixel. - Cell spacing indicates the amount of space, in pixels, between each table cell. Note: If you do not enter a value, Contribute sets cell spacing to the default value, which is 3 pixels. 5. Click a button in the Header section to indicate whether you want a header; select from the following options: - None indicates no header. - Left indicates a header column. - Top indicates a header row. - Both indicates a header column and a header row. Tip: Screen readers read headings for rows or columns that have one of these header types applied; they do not read headings that you create by making text bold and centered. 6. Click OK. The table appears in your draft. Tip: After you insert the table, select it, then click the Table button again to change table properties. Aligning Tables You can indicate how a table aligns on the web page in relation to elements, such as text or images, around it on the page. You cannot select an alignment option when you create a table. You must insert the table, then change the alignment option in table properties. To change alignment for a table: 1. In your draft, select the table whose alignment you want to change 2. Do one of the following to open the Table Properties dialogue box: - Click the Table button in the toolbar. - Right-click, then select Table Properties from the pop-up menu. - Select Table Table Properties. The Table Properties dialogue box appears (Figure 34: Page 27 of 37 Succeed Training Using Macromedia Contribute 3 Figure 34 – The Table Properties Dialogue Box 3. Select an alignment option from the Table alignment pop-up menu: - Default aligns the table to the left of the page, and does not flow text or images around the table. - Left aligns the table to the left side of the page, and flows text or images to the right of the table. - Center aligns the table in the center of the page. - Right aligns the table to the right side of the page, and flows text or images to the left of the table. 4. Click Apply to see changes without closing the dialogue box, or click OK to apply changes and close the dialogue box. The table alignment changes in your draft. Adding Rows and Columns To add a single row to a table: 1. In your draft, place the insertion point in a table cell, or select an entire row. 2. Do one of the following: - Click the Insert Row button in the toolbar. A new row appears below the insertion point or selection. - Select Table Insert Insert Row Above or Table Insert Insert Row Below. - Right-click, then select Insert Row Above or Insert Row Below. To add a single column in a table: 1. In your draft, place the insertion point in a table cell, or select an entire column. 2. Do one of the following: - Click the Insert Column button in the toolbar. - A new column appears to the right of the insertion point or selection. - Select Table Insert Insert Column to the Left or Table Insert Insert Column to the Right. - Right-click, then select Insert Column to the Left or Insert Column to the Right. Page 28 of 37 Succeed Training Using Macromedia Contribute 3 To add multiple rows or columns to a table: 1. In your draft, place the insertion point in a table cell. 2. Do one of the following: - Select Table Insert Multiple Rows or Columns - Right-click, then select Insert Multiple Rows or Columns. The Insert Rows or Columns dialogue box appears (Figure 35): Figure 35 - Insert Row or Column Dialogue Box 3. Select a radio button to indicate whether to insert rows or columns. 4. Enter the number of rows or columns to insert. 5. Select whether to insert new rows above or below the insertion point in the table or new columns to the left or right of the insertion point in the table. Deleting Rows and Columns You can delete a single row or column, or you can delete multiple rows or columns at the same time. To delete rows or columns: Select entire rows or columns, then press Delete or Backspace. Select entire rows or columns or place the insertion point in a single row or column, right click, then select Delete Row or Delete Column. Select entire rows or columns, then select Table Delete Row or Table Delete Column. Merging and Splitting Cells You can merge any number of adjacent cells - as long as the entire selection is a line or a rectangle of cells - to produce a single cell that spans several columns or rows. You can split a cell into any number of rows or columns, regardless of whether it was previously merged. To merge table cells: 1. In your draft, select the cells you want to merge. Note: You must select at least two cells. 2. Select Table Merge Cells or right-click, then select Merge Cells. Contribute merges any content in the cells into the single cell. Page 29 of 37 Succeed Training Using Macromedia Contribute 3 To split table cells: 1. In your draft, place the insertion point in the cell you want to split. Note: Contribute only splits one cell at a time, even if you select multiple cells. 2. Select Table Split Cell or right-click, then select Split Cell. 3. The Split Cell dialogue box appears. 4. Select a radio button to indicate whether to split the cell into rows or columns. 5. Enter the number of new rows or columns in which to divide the cell. 6. Click OK. Contribute splits the cell into multiple rows or columns. Modifying Table Properties You can modify alignment, width, border width and colour, and background colour for a selected table. To modify table properties: 1. In your draft, select the table you want to modify 2. Do one of the following to open the Table Properties dialogue box. - Click the Table button in the toolbar. - Right-click, then select Table Properties from the pop-up menu. - Select Table Table Properties. The Table Properties dialogue box appears. 3. Make changes to any of the options (see section on Inserting a Table for further details of options). 4. Click Apply to apply changes without closing the dialogue box, or click OK to apply changes and close the dialogue box. Your table property changes appear in your draft. Modifying Row or Column Properties You can modify horizontal and vertical alignment, background colour, height or width, and text wrap for a selected row or column. To modify table row or column properties: 1. In your draft, select the row or column you want to modify 1. Do one of the following to open the Table Properties dialogue box: - Click the Table button in the toolbar. - Right-click, then select Table Properties from the pop-up menu. - Select Table Table Properties. The Table Properties dialogue box appears with the appropriate tab selected (Figure 36): Page 30 of 37 Succeed Training Using Macromedia Contribute 3 Figure 36 - The Table Row and Column Properties Dialogue Box 2. Make changes to any of the options: - Horizontal alignment indicates horizontal placement for content in the row or column. Options are Left, Center, and Right. - Vertical alignment indicates vertical placement for content in the row or column. Options are Top, Middle, and Bottom. - Background color indicates the background colour for the selected row or column. Note: You can also click the Highlight Colour button in the toolbar to change the colour of the selected row or column. - Row height specifies how tall the row is, while Column width specifies how wide the column is. For a selected row or column, you can change the number in the Row height or Column width text box, then select pixels or a percentage for the width, or you can select Fit to Contents to clear the set height or width so that rows or columns resize to fit the content you add. - Wrap text indicates, when selected, that text wraps to a new line when it reaches the end of the cell. When not selected, text does not wrap, but the cell expands to accommodate the text. - Header Row/Column indicates that the selection is a header. 3. Click Apply to preview your changes, or click OK to apply changes and close the dialogue box. Modifying Cell Properties You can modify horizontal and vertical alignment, background colour, and text wrap for a selected cell. To modify table cell properties: 1. In your draft, select the cell or cells you want to modify. 2. Do one of the following to open the Table Properties dialogue box: - Right-click, then select Table Cell Properties from the pop-up menu. - Select Table Table Cell Properties. Page 31 of 37 Succeed Training Using Macromedia Contribute 3 - Click the Table button in the toolbar. The Table Properties dialogue box appears with the appropriate tab selected (Figure 37): Figure 37 – The Table Cell Properties Dialogue Box 3. Make changes to any of the following options: - Horizontal alignment indicates horizontal placement for content in the cell, row, or column. Options are Left, Center, and Right. - Vertical alignment indicates vertical placement for content in the cell. Options are Top, Middle, and Bottom. - Background color indicates the background color of the cell. Note: You can also click the Highlight Color button in the toolbar to change the color of the selected cell. - Wrap text indicates, when selected, that text wraps to a new line when it reaches the end of the cell. When not selected, text does not wrap, but the cell expands to accommodate the text. 4. Click Apply to preview your changes, or click OK to apply changes and close the Table Properties dialogue box. Using a Preset Table Format You can apply a preset design to a table and select options to further customize the design. Note: You can apply preset table designs to simple tables only. You can’t use these designs to format tables that contain merged cells or other unusual formatting that keeps the table from being a simple rectangular grid of cells. To use a preset table design: 1. In your draft, select a table to modify or place the insertion point in any cell in the table. 2. Select Table > Format Table. 3. The Format Table dialogue box appears with the Basic tab selected (Figure 38). Page 32 of 37 Succeed Training Using Macromedia Contribute 3 Figure 38 – The Format Table Dialogue Box 4. Select a design scheme from the list on the left. The sample table displays an example of the design you select. 5. Click the Advanced tab (Figure 39). Page 33 of 37 Succeed Training Using Macromedia Contribute 3 Figure 39 Format Table Advance Dialogue Box 6. In the Table properties section, enter a Border width for the table. Tip: If you do not want a table border, enter 0 for the border. 7. In the Left column section, select a Text alignment and a Text style for the left column of the table, which might contain row headings. 8. In the Header row section, select a Background color and a Text color, then select a Text alignment and a Text style for the top row of the table, which might contain column headings. 9. In the Other rows section, select a colour to apply to rows, then indicate how frequently you want the colours to alternate. Click Color to select a second row colour, if you choose to alternate row colour. 10. Click OK. Contribute formats your table with the design you selected. Sorting Tabular Data You can sort the rows of a table based on the contents of a single column. For example, if you have a Names column in a table, you can sort items in that column alphabetically. You can also perform a more complicated table sort based on the contents of two columns. You cannot sort tables that contain merged cells. To sort a table: 1. In your draft, select the table to sort or place the insertion point in any cell in the table. 2. Select Table then Sort Table. The Sort Table dialogue box appears (Figure 40): Page 34 of 37 Succeed Training Using Macromedia Contribute 3 Figure 40 – The Sort Table Dialogue Box 3. From the Sort by pop-up menu, select which column’s values you want to sort. 4. From the Order pop-up menu, select whether to sort the column alphabetically or numerically, then select whether to sort it in ascending order (A to Z, lower numbers to higher numbers) or descending order. Tip: When the contents of a column are numbers, select Numerically. An alphabetic sort applied to a list of one- and two-digit numbers results in the numbers being sorted as if they were words (resulting in ordering such as 1, 10, 2, 20, 3, 30) rather than being sorted as numbers (resulting in ordering such as 1, 2, 3, 10, 20, 30). 5. From the Sort by pop-up menu, select which column’s values you want to sort. 6. From the Order pop-up menu, select whether to sort the column alphabetically or numerically, then select whether to sort it in ascending order (A to Z, lower numbers to higher numbers) or descending order. 7. From the Then by pop-up menu, select a secondary column to sort on a different column. 8. From the Order pop-up menu, select whether to sort the secondary sort column alphabetically or numerically, and whether to sort it in ascending order (A to Z, lower numbers to higher numbers) or descending order. 9. In the Options section, select any of the following additional options: a. Sort includes first row specifies that the first row of the table is included in the sort. If the table has a header row, the header is the first row of the table. b. Sort header rows specifies to sort header rows using the same criteria as the body rows. c. Sort footer rows specifies to sort table footer rows using the same criteria as the body rows. d. Leave row colors in original positions specifies that any table row colours should remain associated with the same content after the sort. For example, if your table rows are formatted with two alternating colours, leave this option unselected to ensure that the sorted table still has alternatingcoloured rows. If the row colour is specific to the content of each row, then select this option to ensure that colour remains associated with the sorted rows. 10. Click OK. Contribute reorders the table. Page 35 of 37 Succeed Training Using Macromedia Contribute 3 Working with Anchors Adding a Section Anchor You can place an invisible marker, called a Section Anchor, on your page to mark a specific topic or place on the page. You can then create links to this anchor that will take web site visitors directly to the specified position on the page. A link to an anchor can be added to the same page as the anchor (enabling the user to navigate around the page) or a different page (enabling the user to jump straight to the appropriate section on a page). To add a section anchor to a page: 1. In your draft, place the insertion point at the beginning of the section where you want the page to open when a web site visitor clicks the link to the anchor. 2. Select Insert > Section Anchor. The Section Anchor dialogue box appears (Figure 41. Figure 41 – The Section Anchor Dialogue Box 3. Enter a name for your anchor. The name cannot begin with a number and cannot contain any spaces. You cannot have two anchors with the same name on a web page. 4. Click OK. Contribute inserts an anchor marker in your draft (Figure 42). Figure 42 - Anchor Markers Note: If you have invisible elements turned off, Contribute turns invisible elements on so that you can see the anchor marker. To turn invisible elements off again, select Edit Preferences, then select Invisible Elements. Linking to a Section Anchor You can link to a section anchor when you create the link, or you can edit an existing link to indicate or change a section anchor. To link to a section anchor: 1. In your draft, create a link (see section on “Creating links”). 2. In the Insert Link dialogue box, click the Advanced button to expand the dialogue box, if it is not already expanded. Page 36 of 37 Succeed Training Using Macromedia Contribute 3 3. Select a named anchor from the pop-up menu. Note: Any anchors in the page you are linking to appear in the list. 4. Click OK. Contribute adds the link to your draft. To add an anchor to an existing link: 1. Browse to the page with the link you want to edit, then click the Edit Page button in the toolbar. 2. Select the link, then right-click and select Link Properties. The Insert Link dialogue box appears. 3. Click the Advanced button to expand the dialogue box, if it is not already expanded. 4. Select a named anchor from the pop-up menu, or type an anchor name. Any anchors in the page you are linking to appear in the list. 5. Click OK. Contribute modifies the existing link. eLD, Information Services November 2014 Page 37 of 37