1
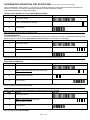
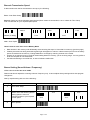
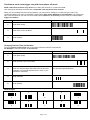
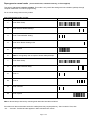
CIPHERLAB 1166 Bluetooth Scanner
THESE SIX PAGES ARE IMPORTANT.
Keep handy, perhaps laminated.
The notes will save trawling through the enclosed disc.
Encourage all personnel to spend a little time to become familiar with the scanner. It is simple to
operate with practice.
PLEASE READ THESE INSTRUCTIONS PRIOR TO MAKING A SUPPORT CALL.
Most issues will be resolved and save you time and cost of a phone call.
Please do not hesitate to call if issue still unresolved.
1. General Description of scanner - see page 2.
Please note: batteries are probably sufficiently charged to immediately start operations.
2. Normal Mode (Live Transmission) – see page 2.
Suitable for circulation and general scanning. Can also be used for small stocktake with Automatic
Memory and (semi) automatic upload (see item 3)
3. Automatic Memory and (semi) automatic upload - see page 2.
This mode is suitable for smaller stocktakes. Once the barcodes are transferred from the scanner to
the computer the barcodes are no longer in the scanner memory.
4. Alternative operation for Stocktake – see page 3 and 4.
This mode is suitable for larger stocktakes but it is still recommended doing the stocktake in
manageable batches. Barcodes are stored in the memory until deliberately transferred and deliberately
cleared. This means the computer can be used for other purposes while stocktake is in process. The
computer must be returned to the Stocktake module (or perhaps “Word”) to transfer the stored
barcodes. Take time to follow these instructions carefully to ensure the process is correct.
Pay particular attention to scanning “Enter Setup”, “Update”, “wait for prolonged beep”.
5. Barcode Transmission Speed - see page 4.
This has been set at ½ second (500ms). If it is uploading barcodes too fast then set to a slower speed.
6. Other Points to Note – see page 4.
7. Buzzer Setting (Volume and Pitch) – see page 4.
8. Auto Power Off Mode (Non Trigger Use) – see page 5.
For continuous type scanning after becoming familiar with the scanning distance.
9. Reinstate to Normal Mode and Automatic Memory (as per 2 and 3 above) – see Page 6.
Not to be used in returning from User Choice Memory (4 above).
Page 1 of 1
General
1. Connection / Charging
Insert and lock (slide latch) one battery in scanner and other battery in cradle. Connect cradle to computer and to
power; charging will take about 4 hours. The battery in the cradle is for charging purposes only – it does not
power the cradle. The battery in the scanner will also charge when scanner is returned to cradle. Adopt the habit
of swapping batteries at least once per week.
2. Cradle Indicator
A blue pulsing light (about 1 per sec.) means correct cradle/computer connection. This will change to a quicker
blue flash when the scanner ready to transmit after removal from cradle. This may continue for up to 15 minutes
after scanner has stopped being used. A rectangular light indicates battery status – red is charging, green yellow is charged. A red circle means power connected.
3. Scanner Indicator
A dual colour indicator is on top of the scanner. In the cradle it is flashing red means it is charging and solid red
means it is charged. Out of the cradle the indicator is off when not in use. In use it will flash blue every couple of
seconds in range and about every second out of range.
When scanning it will beep and turn red for a good read. An incorrect read will give a long, low beep
Once the scanner is returned to the cradle, there will be an initial blue flicker amongst the red flash. This will stop
after up to 15 minutes when scanner will beep to indicate that it is now dormant. This will coincide with the blue
flash in the cradle as in 2 above.
4. Practice using scanner
This is a distance scanner and not the touch type that is held close or on the label. It is recommended that you
experiment to find the best reading distance, perhaps 5 – 15 cm depending upon the label.
5. Test scanner
In a blank Microsoft Word document scan a few barcodes. If the barcodes appear then it means the scanner is
working properly. If not check previous notes.
6. Dormant scanner
If the scanner has been dormant for a while pull the trigger (no barcode) to awaken communications. A prolonged
beep will indicate scanner is now ready.
MODES - Normal Mode (Live Transmission), includes Automatic Memory
The scanner has been programmed and sent to you in this combined Mode which means the barcodes are transmitted
live to computer when in range.
Should you go out of range the scanner will “beep” and automatically go into memory mode (approx 300 barcodes).
Scanner will give 3 quick beeps if memory is full.
When the scanner is back in range, it may “beep” again and commence to transfer the barcodes to the computer.
Pressing the trigger will initiate the transfer sooner. If out of range for longer periods press the trigger to initiate the
transfer. Once transferred, the barcodes are no longer in the memory of the scanner. Therefore, it is important that the
computer be in the stocktake module to accept the barcodes and should not be changed by other staff.
Please note that distance to re-establish communication is normally closer than distance prior to going out of range.
Page 2 of 2
ALTERNATIVE OPERATION FOR STOCKTAKE (Use when library is open during stocktake)
This is a deliberately chosen memory. It can store up to 8000 barcodes but smaller batches are better). Barcodes are
stored in the memory until they are deliberately uploaded and then deliberately cleared.
Scan following barcodes in order (using trigger)
Change from “Normal” to “User Choice Memory Mode”
Step
Action
Barcode
1
Scan Enter Setup
2
Scan
3
Scan Update
Memory Mode - Enable
Now commence your first batch of the stock take.
Transfer Data to PC
You should be back in range with your stocktake module open on the computer. It is worth considering transferring first to
Microsoft Word to test the speed (particularly Thin Client users). If too fast then see next page.
Step
Action
Barcode
1
Scan Enter Setup
2
Wait for prolonged beep then scan Send Data
3
Scan Update
Data will now transfer to the PC but will stay in the memory of the scanner until cleared.
Clear data from Memory
Step
Action
Barcode
1
Scan Enter Setup
2
Wait for prolonged beep then scan Clear Data
3
Scan Confirm Clear Data
4
Scan Update
Continue with the next batch of stock take.
Return to Normal Mode after stocktake and the data has been cleared
Step
Action
1
Scan Enter Setup
2
Wait for prolonged beep then scan
Barcode
Memory Mode - Disable
3
Scan Update
You are now back in Normal Mode.
Page 3 of 3
Barcode Transmission Speed
If data transfers too fast for the software to accept, try the following:
First – Scan Enter Setup
Second – Select one of the following speed options (Note: 500ms recommended, 1 sec or slower for Thin Client).
Scan one barcode for your required speed option.
500ms
Default (no delay)
2 sec
5 sec
1 sec
3 sec
Last – Scan Update
Other Points to note: User Choice Memory Mode
•
•
•
•
Data remains in the memory until deliberately removed using the steps in Clear data from memory (previous page)
If battery becomes low during stocktake a green light will appear on scanner. Labels scanned prior to loss of battery
power are retained in the memory. Change batteries or recharge by returning scanner to the cradle.
Scanner is not required to be in cradle for downloading data from memory, just in receiving range. You may prefer to
be at the computer to view downloads.
Consider transferring to a text file first, in case of software malfunction
Buzzer Setting (Sound Volume / Frequency)
All Barcodes Australia has set to 2 kHz.
Please note this will adjust the scanning volumes / frequency only. It cannot adjust factory settings which alert program
changes etc.
Alter by experimenting with one of the following :
Step
Action
1
Scan Enter Setup
2
Select one of the following buzzer
setting options. Scan one
barcode to listen to your required
buzzer option
3
Barcode
4kHz
8kHz
Scan Update
Page 4 of 4
1kHz
2kHz
Continuous mode (non trigger use) with Auto power off mode
NOTE: 1266 Laser Scanners only. Never set a 1266 Laser Scanner to “Continuous Mode”.
Use “Auto Power Off Mode” as above with a maximum Time-out period of 30 seconds.
When you are confident with the scanning distance, you may wish to change to a continuous type mode. Fully
“Continuous Mode” may chew up the battery and therefore Auto Power Off Mode is recommended. The scanner will
stay continuous while in use. Non-use for a certain period (default is 10 seconds) puts the scanner to sleep. Press
trigger to reawaken.
Step
Action
Barcode
1
Scan Enter Setup
2
Scan Auto Power Off Mode
3
Scan Update
Changing Scanner Time-out Duration
You may prefer a period longer than 10 seconds, before the scanner turns itself off,
For Example: Time-out period to be 30 seconds.
Step
Action
Barcode
1
Scan Enter Setup
2
Scan Scanner Time-out Duration
3
Scan two Decimal Digits barcodes below for the time
required. If 30 seconds required scan 3, then 0. (99
seconds is maximum).
4
Scan Validate
5
Scan Update
See Decimal Digits table below
Decimal Digits:
1
0
3
2
6
5
4
8
7
Page 5 of 5
9
Reprogram to normal mode (Live transmission, automatic memory, as first supplied)
This page is not part of a regular schedule. This mode is only used if the settings are lost or deleted, perhaps through
computer malfunction or incorrect programming.
Do not use to change user memory modes.
Scan following barcodes in order.
Step
Action
Barcode
1
Scan Enter Setup
2
Scan Restore Default Settings
3
Scan Transmit Buffer Setting
4
Scan Scan Buzzer Setting 2 Khz
5
Scan Update
6
Wait for a long beep, then a couple of shorter delayed beeps.
7
Scan Enter Setup
8
Scan Inter-Character Delay
9
Scan *0
10
Scan 8
11
Scan Validate
12
Scan Update
Wait for above beeps, then test by scanning book barcodes into Microsoft Word.
If this fails scan the two barcodes under the cradle (these may require patience), “Set Connection” first, then
“AH…….barcode”. If either barcode appears in Microsoft Word then rescan.
Page 6 of 6