1
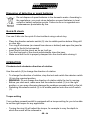
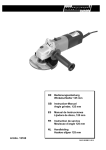
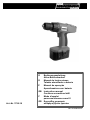
D
E
P
GB
F
GR
Art.-Nr. 1799-18
Bedienungsanleitung
Akku-Bohrschrauber
Manual de Instrucciones
Taladro atornillador a batería
Manual de operação
Aparafusadora com bateria
Instruction manual
Cordless screwdriver/drill
Mode d‘emploi
perceuse/visseuse sans fil
Εγχειρίδιο χειρισμού
αναφορτιζόμενο τρυπάνι
BA-1799-18-BM-06/2010
=
3–8
=
9 – 14
=
15 – 20
=
21 – 26
=
27 – 32
=
33 – 38
D-2
Cordless screwdriver/drill
Item No. 1799-18
User Manual
Contents
Section
•
General safety precautions for power tools
•
Additional safety precautions for cordless screwdriver/drills
•
Intended use
•
Scope of delivery, tool description
•
Technical data
•
Charging the battery
•
Operation
•
Care and maintenance
•
Spares, old power tools and environmental protection
•
Guarantee
Page
21
21
22
22
22
23
24
25
25
26
General safety precautions
Read and observe the general notes included on safety
precautions and this instructional-manual before using power
tools.
Additional precautions when using cordless screwdriver/drills:
•
•
•
•
•
•
•
Keep children and other persons away from the working area.
Wear protective glasses and a dust mask if the job will produce dust.
Use a vice or screw clamp to secure the work piece before you start working on
it.
Do not apply too much pressure, but select an appropriate speed. Too much
pressure will not increase drilling performance, but will damage the tool.
While not using the tool, turn the direction selector to the middle position to
prevent inadvertent activation.
Only use the charger indoors, and do not expose it to moisture or rain.
Make sure that the battery is inserted into the charger with the correct pole
orientation.
GB - 21
•
•
If you notice any damage on the charger housing or power supply unit, have it
checked through by a specialist workshop and, if necessary, repaired or
replaced.
Keep the tool out of children’s reach. Do not let anyone use the tool without
prior instruction on how to use it.
Intended purpose
This cordless screwdriver/drill is used for the following purposes:
- Screwing and unscrewing
- Drilling into wood, metal or plastic
Scope of delivery
1 Cordless screwdriver
1 18V battery pack
1 PSU
1 Charger
12 Screw bits
1 magnetic bitholder
1 double-side bit
Tool description (Fig. 1)
1. On/off dead-man switch
2. Clockwise/anti-clockwise selector
switch
3. Keyless chuck
4. Battery pack
5. fastening clips
6. Torque adjuster ring
7. Charger
8. PSU
Technical data
a) Cordless screwdriver/drill
Nominal voltage:
Turning speed w/o load:
Chuck:
Sound pressure level (LPA):
Vibration
Weight incl. battery:
18V
0-550 rpm
10 mm
< 75 dB(A)
≤ 2.5 m/s²
1.5 kg
The sound level may exceed 85 dB(A), so wear ear-protection!
GB - 22
b) Battery
Voltage:
Charging period:
Capacity:
15 x 1.2V Ni-Cd batteries
4 - 5 Std.
1,200 mAh
c) PSU
Primary:
Secondary:
230V/50 Hz AC
24V/400 mA DC
Charging the battery pack
•
•
•
•
•
•
•
•
•
•
•
Charge the battery pack (4) before using the drill for the first time.
Only charge the battery (4) at ambient temperatures of 10–40°C (50–104°F).
Plug the PSU (8) into a 230V AC mains power supply only, and connect it to
the charger (7).
Do not place anything else into the charger’s battery opening (7).
Never attempt to dismantle the battery (4).
Only use the charger supplied to charge the battery pack.
To remove the battery pack (4) from the tool, push both clips (5) down and pull
the battery downwards out of the housing.
Plug the battery pack (4) into the charger (7). Make sure that the plus (+) and
minus (-) poles are correctly oriented.
Red and green LED will light once the battery has been inserted correctly.
Only charge the battery for four to five hours. Overcharging the battery (longer
than eight hours) may damage the battery and/or charger.
Remove the battery pack (4) from the charger (7) and push it into the cordless
screwdriver’s handgrip until you hear the clips (5) click into place.
LED display
The red LED shows the loading-station is ready for charging; the green LED
shows the loading-process of the battery-pack. The LED displays on the charger
(9) do not show the charge status of the battery, and the charger does not switch
itself off once the battery is fully charged. Remove the battery from the charger
after four to five hours and unplug the charger from the mains.
GB - 23
Disposing of defective or spent batteries
Do not dispose of spent batteries in the domestic waste. According to
the regulations, you must return defective or spent batteries to local
outlets or battery-collection points. Failure to do so is regarded as a
misdemeanour punishable by fine.
Quick-fit chuck
You can fit bits into the quick-fit chuck without using a chuck key.
•
•
•
•
•
Place the direction selector switch (2) into its middle position before fitting drill
or other bits.
Turn ring B clockwise (as viewed from above or behind) and open the jaws far
enough for the bit to be inserted.
Insert the bit into the chuck as far as it will go.
Turn the front part of the chuck anticlockwise close the jaws.
Make sure that the bit is properly clamped into the chuck while closing it.
OPERATION
Clockwise/anti-clockwise direction of rotation
Use this switch (2) to change the direction of rotation.
•
•
•
•
To change the direction of rotation, stop the tool and switch the selector switch
(2) into the required position.
WARNING: Do not change the direction of rotation while the tool is running.
Before you start work, make sure that the selector switch (2) is in the right
position, or you may otherwise damage the cordless screwdriver/drill or the bit.
Switching the selector switch (2) to its middle position locks the on/off switch
(1).
Torque setting
Your cordless screwdriver/drill is equipped with a torque setting for you to be able
to set the right torque for any application.
•
Turning the ring (6) will adjust the torque, for example to vary the depth to
which the screw will be screwed in.
GB - 24
•
•
The torque increases with the number indicated by the marking on top of the
tool’s housing.
To drill, set the ring (6) onto the drill symbol, which will give you the highest
possible torque.
Switching the tool on and off
•
•
Squeezing the dead-man switch (1) will switch the tool on.
Releasing the dead-man switch (1) will switch the tool off.
Care and maintenance
•
•
•
Your cordless screwdriver/drill is maintenance-free.
Occasionally clean the housing with a dry cloth.
Do not use solvents, as they may damage the housing.
Replacement parts, old power tools and the environment
•
•
•
•
•
Only use original replacement parts and accessories.
If your tool has been so heavily used that it has become worn out and has to be
replaced, or you have no further use for it, you must turn the electrical tool in at
a central recycling centre for disposal.
Please contact your community waste collection service or local authority to
find out where you can hand in your tool for recycling.
Electric tools contain valuable raw materials that can be recycled. You will
contribute to recycling valuable raw materials by handing your tool in at a
central waste disposal centre.
Electric tools also contain substances that may be harmful to the environment
and humans if disposed of inappropriately.
•
The no-go sign with the dustbin means that you have a duty to take
that article with the sign to be recycled by a separate waste collection
facility for electrical and electronic equipment.
GB - 25
Full two-year guarantee
The guarantee period for your cordless screwdriver/drill begins on the day of
purchase. Please supply proof of the day of purchase by sending in the original
receipt.
During this period, the guarantee covers the following:
•
•
•
Free removal of any faults.
Free replacement of defective parts.
Including free expert service (free assembly by our experts)
This guarantee is conditional upon the fault not being the result of improper
handling.
If you have any queries or problems concerning quality or troubleshooting, please
contact the manufacturer:
Brüder Mannesmann Werkzeuge GmbH
Abt. Reparatur-Service
Lempstr. 24
42859 Remscheid, Germany
Tel.:
Fax:
Email:
+49 (2191) 37 14 71
+49 (2191) 38 64 77
[email protected]
GB - 26
3
6
2
1
4
5
B
2
1
3
7
8
6
7
4
5