1
Operators lVlanuat
i
i
_i:
....
_
' ..........................
_"_"_'_ ........
(RRFTSMRII °
6.75 Horsepower
2200 PSi
2.2 GPM
WAS
Model No. 580.762201
HOURS:
Mon. - Fri. 8 a.m. to 5 p.m. (CST)
• Safety
® Assembly
Operation
= Maintenance
= Parts
CAUTION:
Before using this product, read this
manual and follow all its Safety Rules
and Operating Instructions.
Sears, Roebuck
and Co., Hoffrnan
Estates,
Visit our Craftsman website: www.sears.com/craftsman
Part No, B3370 Draft 0 (7/9/98) Printed in the U.S.A.
nL 60179
SAFETY RULES ........................
2-3
STO RAG E .............................
15
ASSEMBLY
............................
4-5
TROUBLESHOOTING
....................
16
OP ERATION ..........................
6-10
................
18-27
MAINTENANCE
LIMITED
......................
REPLACEMENT
11-! 3
ONE YEAR WARRANTY
PARTS
HOW TO ORDER PARTS ..................
ON CRAFTSMAN
HIGH PRESSURE
28
WASHER
For one year from the date of purchase, when this Craftsman High Pressure Washer is maintained and
operated according to the instructions in the owner's manual, Sears will repair, free of charge, any defect in
material and workmanship.
If this high pressure washer is used for commercial purposes, this warranty applies for only 90 days from the
date of purchase. If this high pressure washer is used for rental purposes, this warranty applies for only 30
days after date of purchase.
This warranty does not cover:
• Expendable items such as spark plugs and air filters, which become worn during normal use.
o Repairs necessary because of operator abuse or negligence, including damage resulting from no water
being supplied to pump or failure to maintain the equipment according to the instructions contained in the
owner's
manual.
WARRANTY SERVICE IS AVAILABLE BY RETURNING THE HIGH PRESSURE WASHER TO THE
NEAREST SEARS SERVICE CENTER OR DEALER IN THE UNITED STATES.
This warranty gives you specific legal rights and you may also have other rights, which vary from state to
state.
Sears,
Roebuck
and Co., D/817 WA, Hoffman
Estates,
IL 60179
CAUTION: ALWAYS DISCONNECT SPARK PLUG WIRE AND PLACE WIRE WHERE IT CANNOT
CONTACT SPARK PLUG, TO PREVENT ACCIDENTAL STARTING WHEN SETTING UP,
TRANSPORTING, ADJUSTING OR MAKING REPAIRS TO YOUR HIGH PRESSURE WASHER.
I_
read this manual and follow all Safety
AUTION:
Before using
this product,
Rules
and Operating
Instructions.
°
Gasoline is highly FLAMMABLE and its vapors are
EXPLOSIVE. Do not permit smoking, open flames,
sparks or heat in the vicinity while handling
gasoline. Avoid spilling gasoline on a hot engine.
Allow unit to cool for 2 minutes before refueling.
Comply with al! laws regulating storage and
handling of gasoline.
*
Locate this pressure washer in areas away from
combustible materials, combustible fumes or dust.
!
The high pressure equipment is designed to be
used with Sears authorized parts only. If you use
this equipment with parts that do not comply with
minimum specifications, the user assumes all risks
and liabilities.
Engine exhaust gases contain DEADLY carbon
monoxide gas. This dangerous gas, if breathed in
sufficient concentrations, can cause
unconsciousness or even death. Operate this
equipment only in the open air where adequate
ventilation is available.
2
Some chemicals or detergents may be harmful if
inhaled or ingested, causing severe nausea,
fainting or poisoning. The harmful elements may
cause property damage or severe injury.
Do not allow CHILDREN
Washer at any time.
Always be certain the spray gun, nozzles and
accessories are correctly attached.
Never use a spray gun which does not have a
trigger lock or trigger guard in place and in working
order.
to operate the Pressure
Use a respirator or mask whenever there is a
chance that vapors may be inhaled. Read all
instructions with the mask so you are certain the
mask will provide the necessary protection against
inhaling harmful vapors.
Operate engine only at governed speed. Running
the engine at excessive speeds increases the
hazard of personal injury. Do not tamper with parts
which may increase or decrease the governed
speed.
High pressure spray may damage fragile items
including glass. Do not point spray gun at glass
when in the jet spray mode.
Do not wear loose clothing, jewelry or anything
that may be caught in the starter or other rotating
parts.
Keep the hose connected to machine or the spray
gun while the system is pressurized.
Disconnecting the hose while the unit is
pressurized is dangerous.
Before starting the Pressure Washer in cold
weather, check all parts of the equipment and be
sure ice has not formed there.
Units with broken or missing parts, or without
protective housing or covers should NEVER be
operated.
Hold the spray gun firmly in your hand before you
start the unit. Failure to do so could result in an
injury from a whipping spray gun. Do not leave the
spray gun unattended while the machine is
running.
The muffler and air cleaner must be installed and
in good condition before operating the Pressure
Washer. These components act as spark arrestors
if the engine backfires.
The cleaning area should have adequate slopes
and drainage to reduce the possibility of a fal! due
to slippery surfaces.
Check the fuel system for leaks or signs of
deterioration such as chafed or spongy hose,
loose or missing clamps or damaged tank or cap.
Correct all defects before operating the Pressure
Washer.
o
Do not spray flammable liquids.
o
Never allow any part of the body to come in
contact with the fluid stream. DO NOT come in
contact with a fluid stream created by a leak in the
high pressure hose.
Keep water spray away from electric wiring or fatal
electric shock may result.
Do not adjust unloader valve to a pressure in
excess of machine rating.
Do not secure trigger gun in the pull*back (open)
position.
Do not by-pass any safety device on this machine.
The muffler and engine heat up during operation
and remain hot immediately after shutting it down.
Avoid contact with a hot muffler or engine or you
could be severely burned.
High pressure streams of fluid this equipment
produces can pierce skin and its underlying
tissues, leading to serious injury and possible
amputation.
o
Never aim the gun at people, animals or plants.
High pressure spray can cause paint chips or
other particles to become airborne and fty at high
speeds.
Always wear eye protection when you use this
equipment or when you are in the vicinity where
the equipment is in use.
Operate the pressure at no more than the PSI fluid
pressure rated for your pressure washer.
o
Operate and store this unit on a stable surface.
o
High pressure hose can develop leaks from wear,
kinking, abuse, etc. Water spraying from a leak is
capable of injecting material into skin. Inspect
hose each time before using it. Check all hoses for
cuts, leaks, abrasions or bulging of cover, or
damage or movement of couplings. If any of these
conditions exist, replace hose immediately. Never
repair high pressure hose. Replace it with another
hose that meets minimum pressure rating of your
pressure washer.
Never move the machine by pulling on the high
pressure hose. Use the handle provided on the top
of the unit.
I
LOOK FOR THIS SYMBOL TO POINT OUT IMPORTANT SAFETY PRECAUTIONS.
MEANS "ATTENTION!!! BECOME ALERT!!! YOUR SAFETY IS INVOLVED,"
3
IT
CARTON
CONTENTS
The following parts are shipped loose with your
pressure washer:
•
Main Unit -- pressure washer with wheels,
guide handle.
o High Pressure Hose
o Parts Box #1 (which includes items listed below)
• Rotating Brush
, Vehicle/Boat Wash
o
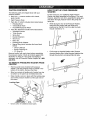
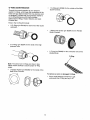
HOW TO SET UP YOUR PRESSURE
WASHER
For the most part, your Craftsman High Pressure
Washer has been assembled at the factory. You must,
however, attach the wire form, assemble the spray gun,
and attach the high pressure hose to the pump and
spray gun.
While facing the rear of the Pressure Washer,
insert the wire support with the longer arm
positioned on the left. From this view the hook
should resemble a "J'L
House/Multi-purpose Wash
Parts Box #2(which includes items listed below)
Adjustable Nozzle
o Turbo Nozzle
• Spray Gun
Nozzle Extension
Wire Form
o Motor Oil
!
"I
,, Rotating Brush Adapter
,_ Manual Bag (which includes the items listed
below)
o Owner's Manual
- Nozzle Cleaning Kit
, "O"-Ring Kit
Become familiar with each piece before assembling
the Pressure washer. Check all contents against the
illustration on Page 6. if any parts are missing or
damaged, call the Pressure Washer Helpline at 1-800222-3136.
TO REMOVE
CARTON
PRESSURE
WASHER
FROM
Remove parts boxes included with pressure
washer. The high pressure hose is packed in the
bottom of the carton. Remove the hose.
Slice two corners at handle end of carton from top
to bottom so the panel can be folded down flat.
•
Raise handle, secure in place with the locking caps
and roll the pressure washer out the open end of
the carton.
Locking Caps
Check carton for additional loose parts.
o
Cut tie wrap on chemical injection tube. Remove
chemical injection filter, thread chemical injection tube
through the wire form and reinsert filter into tube.
Placeassembled
spraygunonholder.
® Placeturbonozzlein grommetholeinbase.
Cutthetiewrapsonthehighpressurehoseand
connecthighpressurehosetogun.Tightenby
hand.
Removeplasticcapandconnecthighpressure
hoseto pump.Tightenby hand,
CHECKLIST
Before you operate your new high pressure washer
please review the following checklist:
AttachHigh
Pressure
hosehere
o
All assembly instructions have been completed.
=
The high pressure hose connections to the spray
gun and to the pump are tight and secure.
While learning how to use your high pressure
washer, pay extra attention to the following important
item:
Attachnozzleextensiontospraygun.
Engine oil is at proper level
_mportant: Any attempt to crank or start the engine
before it has been properly serviced with the
recommended oil may result in an engine failure, See
Page 9 for instructions on adding oil and proper oil
specifications,
important: The water supply to your pressure washer
must be connected and turned on prior to starting your
engine.
Attachadjustablenozzletothenozzleextension.
Be sure gas tank is filled properly with clean, fresh,
unleaded gasoline.
*
5
Become familiar with all controls - their location
and function. Operate those controls before starting
the engine.
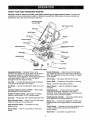
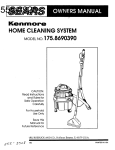
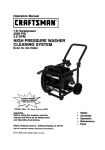
KNOW
YOUR
HIGH PRESSURE
WASHER
Read this owner's manual and safety rules before operating your high pressure washer, Compare the
illustrations with your high pressure washer to familiarize yourself with the locations of various controls and
adjustments. Save this manual for future reference.
Chemical Injection
Tube and Filter
High Pressure
Hose
Spray Gun
Recoil Starter
Gas Cap
Nozzle ,Extension
Air Filter
Turbo No__
Adjustable
Nozzle
Engine Throttle Control
Water Inlet
Primer Bulb
RotatingBrush
High Pressure
Outlet
Pump
_
"_"''_-_----_'_
Car Wash
House Wash
Rotating Brush Adapter
Adjustable Nozzle -- Attaches to the nozzle
extension and adjusts the spray pattern to be either a
low pressure stream or a high pressure stream.
Twisting the nozzle adjusts the narrow spray pattern to
a fan spray pattern. Note: You can only siphon
detergent in the low pressure mode.
Nozzle Extension -- Attach one end to the spray
gun, Attach the other end of the nozzle extension to
either the adjustable nozzle, turbo nozzle or rotating
brush adapter.
Oi! Fill Cap --Fiil
engine with SAE 30 oi! here.
Primer Bulb -- Prepares a cold engine for starting,
Air Filter -- Dry type filter element limits the amount
of dirt and dust that gets in the engine.
Pump - Develops high water pressure.
Car Wash -- Use the concentrate to wash your car or
boat.
Recoil Starter -- Used for starting the engine
manually.
Chemical Injection Tube and Filter -- Mixes water
and detergent in outlet water flow.
Rotating
scrubbing
extension.
you must
Engine Throttle Control - Sets engine in starting
mode for recoil starter; STOPS running engine.
Brush -- Use this brush for automatic
of surfaces. Attaches to the nozzle
Note: When attaching to nozzle extension,
use the accessory adapter.
Rotating Brush Adapter -- Allows the rotating brush
to be attached to the nozzle extension.
Gas Cap -- Fill gas tank with unleaded gasoline here,
High Pressure Hose -- Attach one end to the pump.
Attach the other end to the spray gun.
Spray Gun -- Controls the application of water onto
cleaning surface with trigger device. Includes safety
latch.
High Pressure Outlet -- Connection for high
pressure hose.
Turbo Nozzle -- Attaches to the nozzle extension and
creates a high pressure stream that rotates in a
circular pattern.
House Wash -- Use the concentrate to wash your
House.
Water Inlet -- Connection for garden hose.
6
HOW TO USE YOUR
PRESSURE
WASHER
IF YOU HAVE ANY PROBLEMS operating your
pressure washer, please call the pressure washer
helpline at 1-800-222-3136.
HOW TO USE THE ADJUSTABLE NOZZLE
A
DANGERI NEVER adjust spray pattern
when spraying. NEVER put hands in
front of spray nozzle to adjust spray
pattern. You could be injured,
One of the nozzles you can attach to the nozzle
extension is the adjustable nozzle. You can slide the
adjustable nozzle forward and backward to adjust the
spray pattern to be either high pressure or low
pressure. You can also twist the adjustable nozzle
from side to side to adjust the spray so it is
concentrated in a stream pattern or expanded into a
fan pattern.
o
,
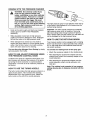
APPLYING DETERGENT
ADJUSTABLE NOZZLE
IMPORTANT: You must attach all hoses before you
start the engine. Starting the engine without all the
hoses connected and without the water turned ON will
damage the pump.
To apply detergent follow these steps:
Prepare the detergent solution as required by the
job. (For the enclosed bottles of detergent, add the
8 ounces of chemical to a 1 gallon plastic bottle
with handle (not included). FiII the rest of the bottle
with water.)
Hang the detergent solution on the "J" hook on the
wire form on the guide handle.
Place small filter on the chemical injection tube into
the detergent container.
*
Slide nozzle forward
for tow pressure
mode,
Twisting the nozzle adjusts the spray pattern from a
narrow )attern to a fan pattern.
AND CLEANING WITH
iMPORTANT: Use soaps designed specifically for
pressure washers. Household detergents could
damage the pump.
Slide the nozzle forward to adjust the spray to low
pressure mode. Slide the nozzle backward to
achieve high pressure.
Slide nozzle backward
to place in high
pressure mode.
If you get spray nozzle too close, especially using
high pressure mode, you may damage the cleaning
surface.
Slide the adjustable nozzle forward to tow pressure
mode. Detergent cannot be applied with nozzle
in high pressure position.
Note: The first step involves applying an appropriate
detergent/solvent solution to penetrate and loosen
grime. The detergent is applied at low pressure to
avoid splashing, overspraying and waste. Leave the
solution on surface for 3 to 5 minutes to allow solution
to work. Reapply as needed to prevent surface from
drying.
Note: The second step involves cleaning the surface
you have prepared with the pressure washer and then
rinsing it clean.
Review the use of the adjustable nozzle.
Connect garden hose to water inlet (see '%0
START PRESSURE WASHER"), check that high
pressure hose is connected to spray gun and pump
(see ASSEMBLY), and start engine.
Twist nozzle
counterclockwise for
fan spray pattern,
Twist nozzle
clockwise for narrow
spray pattern.
For most effective cleaning, keep spray nozzle
between 8 to 24 inches away from cleaning
surface.
•
For cleaning, start at lower portion of area to be
washed and work upward, using long, even
overlapping strokes.
•
Allow the detergent to soak in between 3-5 minutes
before washing and rinsing. Reappty as needed to
prevent surface from drying.
RiNSiNG
WiTH THE PRESSURE
WASHER
WARNING Be extremely careful if you
must use the pressure washer from
ladder, scaffolding or any other relatively
unstable location. Pressure in a running
washer builds in the wand as you climb.
When you press the trigger, the recoil
from the initial spray could force you to
fall, or if you are too close to the cleaning
surface, high pressure could force you
off a climbing apparatus.
•
Hook up the water supply and start your pressure
washer (see TO START THE PRESSURE
WASHER).
,
Slide adjustable nozzle back to high pressure
position and wait for detergent to clear, Detergent
will not flow when in the high pressure mode.
The high pressure spray is most effective when the tip
of the wand is held between 8 to 24 inches from the
surface being cleaned.
Important: The turbo nozzle produces an extremely
high pressure spray which is capable of removing
paint and cutting holes through surfaces if held too
close, Always make sure the surface you will clean will
not be damaged by the high pressure spray.
HOW TO USE THE ROTATING
When detergent has cleared you may want to
expand the spray pattern for a more gentle rinsing
action. Start at top of area to be rinsed, working
down with same action as for cleaning.
You can also stop detergent from flowing
removing siphon from bottle.
by simply
HOW TO USE ADJUST PRESSURE
THE PRESSURE CONTROL }(NOB
USING
....
Your pressure washer comes equipped with a rotating
brush. Use the brush to clean especially dirty surfaces.
It is a soft bristle brush with feathered ends that will
not scratch surfaces.
To connect the rotating brush to the spray gun:
Located on the pump is a pressure control knob, You
can increase and decrease the pressure of the spray
by turning the knob clockwise or counterclockwise
respectively. The knob is set at maximum pressure at
the factory.
HOW TO USE THE TURBO
BRUSH
*
Attach the accessory adapter to the rotating brush,
-
After attaching the accessories adapter onto the
rotating brush, attach the accessory adapter to the
nozzle extension,
o After attaching the accessories adapter onto the
nozzle extension, attach nozzle extension onto
spay gun,
Note: The rotating brush operates in low pressure
setting allowing you to dispense chemical with the
brush.
NOZZLE.
The turbo nozzle rotates the high pressure stream in a
rapid circular pattern. This increases the cleaning
effectiveness of the high pressure spray, Attach the
turbo nozzle on the end of the nozzle extension.
8
BEFORE STARTLING THE PRESSURE
WASHER
TO START
OiL
Use only high quality detergent oil rated with AP!
service classification SF or SG rated SAE 30
weight. Use no special additives.
o
Place pressure washer on a level surface
o
Clean area around oil fill and remove oil dipstick.
,,
Wipe dipstick clean.
WASHER
You have assembled your high pressure washer and
have prepared the engine for starting. You are now
ready to clean your car, boat or whatever you plan to
clean.
To operate the engine you will need to do the following:
ADD ENGINE
YOUFII PRESSURE
Place the pressure washer in an area close
enough to an outside water source that can flow at
a rate of at least 2.2 gallons per minute. Connect a
garden hose to the water spout.
Check that the high pressure hose is tightly
connected to the spray gun and to the pump. See
ASSEMBLY section for illustrations.
Pour oil from enclosed bottle into the oil fill opening
until oil reaches FULL mark on the dipstick. Stop
and check the oil level periodically. DO NOT
OVERFILL.
Pull back on the locking collar to remove the
female quick-connect from pump.
Assembled
Pull back on lockingQuick-Connect
collar to separate
o
Install oil dipstick, hand tighten securely.
Check oil level often during engine break in.
ADD GASOLINE
•
Use fresh, clean, unleaded
regular,
unleaded
Disassembled
male end
DANGER! NEVER fill fuel tank indoors.
NEVER fill fuel tank when engine is
running or hot. DO NOT light a cigarette
or smoke when filling the fuel tank.
Note: You will also need to pull back on the locking
collar to attach the female quick-connect.
DANGER! Do not overfill the fuel tank.
Always leave room for fuel expansion.
Wipe any fuel spillage from engine and
equipment before starting engine
premium, or reformulated automotive
only. Do not use leaded gasoline,
Check inlet screen. If the screen is dirty, clean
before attaching to garden hose. If the screen is
damaged, Do not connect to the garden hose.
Replace with the inlet screen provided in the o-ring
kit or call 1-800-366-PART to order a replacement
(p/n B2384).
gasoline
Attach the female quick-connect to garden hose
and then attach the garden hose to the water inlet.
Make sure the quick-connect is locked together.
Note; Do not use gasoline containing methanol
(wood alcohol). Gasoline containing up to 10%
ethanol or grain alcohol ("Gasohol"), or up to 15%
MTBE (Methyl Tertiary Butyl Ether), may be used but
requires special care when engine is unused for
extended periods.
See "Storage" instructions on Page 15.
,
Clean area around fuel fill cap, remove cap.
Add "UNLEADED" regular gasoline, slowly, to fuel
tank.
important:
,
Disassembled
female end
Never mix oil with gasoline.
Install fuel cap and wipe up any spilled gasoline.
o
9
Turn on the water.
IMPORTANT: Do not run pump without the water
supply connected and turned on. You must follow this
caution or the pump wil! be damaged.
•
Move the Throttle Control Lever to the 'Fast'
position
•
Push primer bulb 3 times. Wait about two 2
seconds between each push. In cold weather,
(55°F/13°C or below) push 5 times.
HOW TO STOP YOUR
WASHER
Note: Do not use primer to restart a warm engine
after a short shut down.
Position the nozzle in the tow pressure mode
(nozzle slid forward) and squeeze the trigger on
the spray gun to relieve the air pressure caused by
turning ON the water. Water will spew out the gun
in a thin stream, Continue to hold trigger until you
have a steady stream of water and no air remains
in the system. This will make it easier to pull start
the engine. Release the trigger.
O
Engage the safety latch on the gun.
Q
Grasp rope handle and pull slowly until you feel
some resistance. Then pull cord rapidly to
overcome compression, prevent kickback and start
the engine. Let rope return to starter slowly.
PRESSURE
•
Move the Throttle Control Lever to the 'Stow'
position.
•
Wait for the engine to idle down.
•
Move the Throttle Control Lever to the 'Stop'
position.
•
Simply shutting off the engine will not release
pressure in the system. Squeeze trigger on the
spray gun to relieve pressure in the hose.
Note; A small amount of water will squirt out from the
spray gun when you release the pressure.
SiPHONiNG
We recommend that you DO NOT siphon standing
water for your water supply. Contaminated, brackish
or dirty water can damage the pump. Connect only to
household water supply.
TIPS
Note: Always keep the Throttle Control Lever in the
'Fast' position when operating the pressure washer.
Note: If after 3 pulls the engine fails to start, prime the
engine again, purge the gun and pull the recoil starter
handle rapidly (Max. 3 pulls).
10
=
Never use the garden hose inlet to siphon
detergent or wax.
•
If you have the spray nozzle too far away, the
cleaning wil! not be as effective.
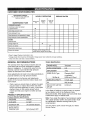
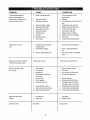
CUSTOMER
RESPONSIBILITIES
MAINTENANCE
SCHEDULE
FILL IN DATES AS YOU COMPLETE
REGULAR SERVICE
MAINTENANCE
PRESSURE
HOURLY OPERATING
Before Each
Use
TASK
t
Hours or
Every 25
Yearly
SERVICE DATES
Hours or
Every t00
Yearly
WASHER
CheckJclean water inlet screen
on quick-connect.
xt
Check high pressure hose.
x
Check detergent hose,
x
Check spray gun and assembly for leaks.
x
Purge pump of air and contaminants.
x
.......
,,,, ,,_,,,,,,
.........
,,•
, ,,
ENGINE
x
Check oiI tevel.
x*
Change engine oil.
X**
Service air cleaner.
Clean/replace
spark piug,
,,,,, ,,,
X
.....
,,,.,,,,, ..................
Prepare for storage,
Prepare unit for si0rage
remain idle for ionger than 30 days.
t Clean if clogged, Replace if perforated
i
,, ,,
if it is to
I
or torn.
* Change oil after first 2 hours then 25 thereafter,
Change sooner when under dirty or dusty conditions.
** Clean more often under dirty or dusty conditions.
GENERAL
RECOMMENDATIONS
Engine Specifications
The warranty of the high pressure washer does not
cover items that have been subjected to operator
abuse or negligence. To receive full value from the
warranty, operator must maintain high pressure
washer as instructed in this manual.
Some adjustments will need to be made periodically to
properly maintain your high pressure washer,
Once a year you should clean or replace the spark
plug and clean or replace the air filter and check
the gun and wand assembly for wear, A new spark
plug and clean air filter assure proper fuel-air
mixture and help your engine run better and last
longer,
Pressure Washer Specifications
FLOW RATE
2.2 GPM
DETERGENTMIX
Use undiluteddete[_ent
WATER SUPPLY
TEMPERATURE
Not to Exceed 140°F
RATED HORSEPOWER
6.75
DISPLACEMENT
172cc
SPARK PLUG: Type:
Champion RN4C
or equivalent
0.030 inch €0,76mm)
...........
..........
GASOLINE CAPACITY
1,5 U.S. _uart
OIL
SAE 30 weight
SOLID STATE IGNITION
AIR GAP
0.0125 inch
In the State of California a spark arrestor is required
by law (Section 4442 of the California Public
Resources Code), Other states may have similar laws.
Federal laws apply on federal lands,
PRODUCT SPECIFICATIONS
2200
Tecumseh
Set Gap to:
All adjustments in the Sewice and Adjustments
section of this manuat should be made at least once
each season.
PRESSURE
ENGINE MODEL
Note: If you equip the engine of your pressure washer
with a spark arrestor muffler, the spark arrestor must
be maintained in effective working order by the
owner!operator.
P;S!I
You can order a spark arrestor through your Sears
Sewice Center.
11
BEFORE
o
,,
.
•
Check
Check
Check
Check
Purge
Check
EACH
USE
ENGINE
water inlet screen for damage.
high pressure hose for leaks.
detergent inlet hose and filter for damage.
gun and wand assembly for leaks.
pump of air and contaminants.
engine oil level.
PRESSURE
WASHER
CHECKING
CHANGING
Change oil while engine is still warm from running,
as follows:
Check High Pressure Hose: High pressure hose can
develop leaks from wear, kinking, abuse. Inspect hose
each time before using it. Check for cuts, leaks,
abrasions or bulging of cover, or damage or movement
of couplings, tf any of these conditions exist, replace
hose immediately.
Disconnect spark plug wire from spark plug and
keep it away from spark plug.
Before you tip the pressure washer to drain oit,
drain fue! tank by running pressure washer until fuel
tank is empty.
ANGER: Water spraying from a leak is
capable of injecting material into skin.
NEVER repair high pressure hose.
Replace with hose that meets minimum
pressure rating of your pressure washer.
Clean area around oil fill, remove oil fill
cap!dipstick. Wipe dipstick clean.
Tip your pressure washer to drain oil completely
from the oil fill tube into a suitable container. When
crankcase is empty, return the pressure washer to
upright position.
_,heck Detergent Hose: Examine the filter on the
detergent hose and clean if clogged. Hose should fit
tightly on barbed fitting. Examine hose for leaks or
tears. Replace the filter or hose if either is damaged.
Check Gun and Wand: Examine hose connection to
gun and make sure it is secure. Test trigger by
pressing it and making sure it springs back into place
when you release it. Put safety latch in UP position and
test trigger. You should not be able to press trigger.
Fi!l engine crankcase with recommended oil until oil
level is at FULL point on dipstick. Do not overfill
above that mark. POUR SLOWLY.
When engine crankcase is filled to proper level,
install and tighten oil cap/dipstick.
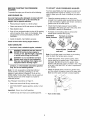
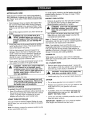
SERVICE AIR CLEANER
Purge Pump of Air and Contaminants
Your engine wil! not run properly and may be damaged
if you run it with a dirty air cleaner.
To remove the air from the pump, follow these steps:
Replace the air cleaner once every t00 hours of
operation or once each year, whichever comes first.
Replace more often if operating under dirty or dusty
conditions. Replacements are available at your local
Sears Authorized Service Center.
Set up the pressure washer as described in the
ASSEMBLY section and connect the water supply.
Remove the nozzle extension from the gun.
m
Pull the trigger on the gun and hold.
To remove the contaminants
these steps:
Important:
from the pump, follow
To clean or replace the air cleaner, follow these
steps:
Remove the nozzle attachment from the gun.
TURN COVER
Start the engine according to instructions in
OPERATION section.
o
Pull the trigger on the gun and hold.
o
When the water supply is steady and constant,
engage the safety latch and refasten the nozzle
attachment.
Do not attempt to clean or oil filter.
Important: Never run engine without complete air
cleaner installed on engine.
Set up the pressure washer as described in the
ASSEMBLY section, and connect the water supply.
-
ENGINE OIL
Change engine oil after first 2 hours then every 25
hours thereafter. If you are using your pressure washer
under extremely dirty or dusty conditions, or in
extremely hot weather, change oil more often.
MAINTENANCE
o
OIL LEVEL
Oil level should be checked prior to each use or at
least every 5 hours of operation. Keep oil level
maintained.
Check and Clean Inlet Screen: Remove quickconnect and examine inlet screen on the female
connector. Clean if it is clogged or replace if it is torn.
_
MAINTENANCE
TO THE LEF3"
(COUNTF_RCLOCKW|SE)
FILTER
TO
REMOVEE
,(O_OI3KW!_E)
TO T_GHT{_N
SLOT
!2
TURN COVER
TO THE RiGhT
Turn cover to the left (counterclockwise) and
remove it and filter from flange. Discard filter.
o
Clean cover and flange thoroughly.
Shut off the engine and turn off the water supply.
® Separate the nozzle from the nozzle extension.
® Rotate to stream setting.
Insert new filter into cover.
o
Remove orifice from the end of the nozzle using
the allen wrench included with the kit or a 2mm
or 5/64 allen wrench.
Position cover and filter firmly against flange with
tab on cover inserted into lower left corner of slot
in flange.
Push cover firmly against flange and turn it to the
right (clockwise) as far as it wilt go. Be sure
retainers are locked around flange.
CLEANIREPLACE
SPARK PLUG
Use the wire included in the kit or a small paper
clip to free the foreign materials clogging or
restricting the nozzle.
Change the spark plug every 100 hours of operation
or once each year, whichever comes first. This will
help your engine to start easier and run better.
Replace with champion RN4C or equivalent type
spark plug.
o
Clean area around spark plug
Remove and inspect spark plug.
insert wire into orifice and turn back and forth to
clear obstruction,
Replace spark plug if electrodes are pitted,
burned or porcelain is cracked. For replacement
use Champion RN4C only.
Remove additional debris by back flushing water
supply through wand. Back flush between 30 to
60 seconds. Turn wand to stream spray and
move nozzle from low to high pressure while
flushing.
Check electrode gap with wire feeler gauge and
set gap at 0.030 (0.76mm) if necessary.
NOZZLE
MAINTENANCE
•
If the nozzle becomes restricted or clogged with
foreign materials, such as dirt, excessive pump
pressure may develop. A partially clogged nozzle
can cause a pulsing sensation during use. This
generally is not a pump related problem, but rather a
clogged or partially restricted nozzle.
Reinstall orifice into nozzle. DO NOT overtighten.
Reconnect nozzle to nozzle extension.
Reconnect the water supply, turn ON the water,
and start the engine.
Test the pressure washer by operating with
nozzle in the high and the low pressure positions.
If the nozzle becomes clogged or partially restricted,
immediately clean the nozzle with the kit included
with your pressure washer by following these
instructions:
18
O-RING MAINTENANCE
1 O-Ring (p/n B2386) for the outside of the Male
Quick-Connect.
Through the normal operation of your pressure
washer, O-Rings, which keep the connections of the
hoses and gun tight and leak-free may become worn
or damaged. Provided with your pressure washer is
an O-Ring Maintenance Kit which provides
replacement O-Rings, Rubber Washer and Quick
Connect filter,
O
Parts in the O-Ring Kit Include:
o 2 O-Rings
extension.
(p/n B2726) for each end of the nozzle
1 Water Inlet Screen (p/n B2384) for the Female
Quick-Connect.
•
2 O-Rings (p!n B2264) for the ends of the high
pressure hose.
i O-ring (p/n B2688) for the connection end of the
rotating brush.
/
O-Ring
Note; The above two O-Rings are close in size.
Please match carefully to assure proper O-Ring
usage.
•
I Rubber Washer (p!n B2385) for the inside of the
Male Quick-Connect.
To remove a worn or damaged O-Ring:
•
14
Use a small flathead screwdriver to get
underneath the O-Ring and pry it off.
AFTER
EACH USE
To avoid engine problems, the fuel system should be
emptied before storage of 30 days or longer. Follow
these instructions:
Water should not remain in the unit for long periods of
time. Sediments of minerals can deposit on pump parts
and ffreeze" pump action. Follow these procedures after
every use:
PROTECT FUEL SYSTEM
Remove all gasoline from the fuel tank to prevent
gum deposits from forming on these parts and
causing possible malfunction of engine.
Flush detergent hose by placing the injector filter
into a pail of clear water while running Pressure
Washer with nozzle in low pressure mode. Flush
until you can see clear water running through the
tube.
DANGER:
Drain fuel into approved
container outdoors, away from open
flame. Be sure engine is cool. Do not
smoke.
Shut off the engine and let it cool, then remove all
hoses.
Run engine until engine stops from lack of fuel.
Make sure you have water supply to pump inlet
connected and turned ON.
WARNING:
Be sure
throttle
is in If
"STOP" position
before
you lever
continue.
you start engine without the proper water
supply connected, you can damage the
pump.
Empty the pump of all pumped liquids by pulling
recoil handle about 6 times. This should remove
most of the liquid in the pump.
Note: If "Gasohol" has been used, complete above
instructions and then put 1/2 pint of unleaded gasoline
into fuel tank and repeat above instructions.
Note: Fuel stabilizer (such as STA-BIL) is an
acceptable alternative in minimizing the formation of
fuel gum deposits during storage. Add stabilizer to
gasoline in fuel tank or storage container. Run engine
at least 10 minutes after adding stabilizer.
Coil the high pressure hose and inspect it for
damage. Cuts in the hose or fraying of it could
result in leaks and loss of pressure. Should any
damage be found, replace the hose. DO NOT
attempt to repair a damaged hose. Replace the
hose with the genuine Craftsman part.
CHANGE OIL
While engine is still warm, drain oil from crankcase.
Refill with recommended grade. (See Changing Engine
Oil on Page 12.)
Drain water from hose and properly hang it on the
wire support provided on the guide handle.
OIL CYLINDER BORE
DANGER:
NEVER store engine with fuel
in tank indoors or in enclosed, poorly
ventilated areas where fumes may reach
an open flame, spark or pilot light as on a
furnace, water heater, clothes dryer or
other gas appliance.
Remove spark plug and squirt about ! ounce (30
ml) of engine oil into the cylinder. Cover spark plug
hole with rag. Crank slowly to distribute oil.
1,_
Install spark plug. Do not connect spark plug wire.
o Store in a clean, dry area.
CAUTION:
You must protect your unit
from freezing temperatures.
Failure to do
so will permanently damage your pump
and render your unit inoperable,
WINTER
OTHER
Do not store gasoline from one season to another.
o
Replace your gasoline can if your can starts to rust.
Rust and/or dirt in your gasoline will cause
problems.
•
If possible, store your unit indoors and cover it to
give protection from dust and dirt. BE SURE TO
EMPTY THE FUEL TANK.
STORAGE
To protect the unit from freezing temperatures:
Draw RV antifreeze (antifreeze without alcohol) into
the pump by pouring the washer fluid into a 3-foot
section of garden hose connected to the inlet
adapter and pulling the recoil handle twice.
Cover your unit with a suitable protective cover that
does not retain moisture.
LONG TERM STORAGE
If you do not plan to use the Pressure Washer for more
than 30 days, you must prepare the engine for tong term
storage.
AUTION:
Avoid spray
fromslowly.
spark plug
hole
when cranking
engine
IMPORTANT: NEVER cover your pressure washer
while engine and exhaust area are warm.
Note: As always, prepare the pressure washer pump
as you would after each use.
15
J
PROBLEM
Pump has followingproblems:
CAUSE
CORRECTION
1. Nozztein towpressuremode.
1.
Pullnozzle backwardfor high
failureto producepressure,or
erraticpressure,chattering,toss of
2.
Waterinlet is blocked.
2.
pressuremode.
Clear inlet
pressure,Iowwater volume.
&
Inadequatewater supply
3.
Provide adequatewaterflow at least 2.2
4.
Inlet hoseis kinked or leaking
4.
Straighteninlethose, patchleak.
5.
Cloggedwaterinlet screen.
5,
Replace/ clean waterinlet screen,
6.
7.
8.
Watersupplyis over 140°F,
Outlethoseis blocked.
Outlethoseleaks.
6.
7.
Providecooler watersupply.
Clear blocksin outlet hose.
8,
Replaceoutlethoseif leaking,
9.
Gun leaks.
t0.
Nozzleis obstructed.
9. ReplaceO-ringor gun if necessary.
10. Clear nozzle.
t!.
Pumpis faulty.
1t.
1.
Detergentline isnot submerged.
gpm.
Detergentfails to mix with.
spray,
Engine runsgood when not spraying
°
ContactSears ServiceDepartment.
Insert chemicalfine intodetergent.
in detergentspray
2,
Chemicalfilter is clogged.
2.
Cleanor replacefilter/detergent
line.
3.
Nozzleis in high pressuremode.
3.
Pushnozzle forwardfor low pressure
mode.
Enginespeedis too stow.
ContactSears ServiceDepartment.
Enginewi]f not start;er starts
1.
Dirtyair cleaner
and runs rough
2.
Out of gasoline,
t.
2.
Clean or replaceair cleaner.
Fillfuel tank.
3.
Stalegasoline,
3.
Drain gas tank; fill withfresh fuel,
Spark plug wire not connected
4.
Connectwire to sparkplug.
but dieswhen you beginto spray.
4.
to sparkplug.
5.
Badsparkplug.
5.
Replacesparkplug,
6.
Waterin gasoline,
6,
Drain gas tank; fill withfresh fuel.
7.
Overchokingor flooded
7.
Set engine throttlecontrol leverto
8.
Excessivelyrich fuel mixture,
8.
ContactSears ServiceDepartment.
9.
Intake valvestuck open or closed.
9,
ContactSearsService Department.
10. Enginehas lestcompression.
t0.
ContactSears ServiceDeparlment.
Engineshuts down during
t.
Out of gasoline.
1.
Fillfuel tank.
operation
2.
Air filter dirty
2.
ReplaceAir filter.
Enginelackspower.
Dirtyair filter,
fast position,choke in runposition,
Replaceair filter,
16
17
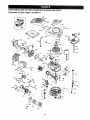
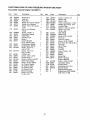
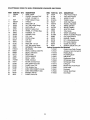
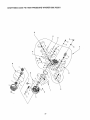
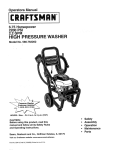
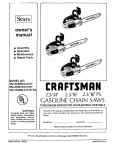
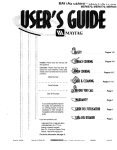
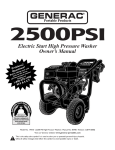
CRAFTSMAN
Tecumseh
2200 PS! HIGH PRESSURE
4-Cycle
Engine
WASHER
580.762201
143.988714
390
900
jb
370A
300
260
298,,_
400
130A
_'/"130
9O
20
_"-292
101
205
2O4
266
266A.
239
"'292
290
1t9
/_
I
11o
t61
238
•
">
245
250
18
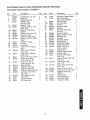
CRAFTSMAN
Tecumseh
Item
2200 PSn HiGH PRESSURE
4_CycRe Engine
WASHER
580,762201
143=986714
Part#
Description
Qty.
1
2
6
7
36835A
26727
33734
36557
1
2
1
12
12A
32447
36558
12B
14
15
t6
17
18
36694
28277
30589
34839A
3t335
651018
19
20
30
40
36281
32600
37208
35544A
40
35545A
40
35546
41
41
35541
35542
41
35543
42
42
42
43
45
35547A
35548A
35549
20381
32B75A
46
48
50
52
32610A
35616
37011
29914
Cylinder (Incl. 2 &. 20)
Dowel Pin
Breather Element
Breather Ass'y.
(inc!. 6 & 12A)
Breather Tube
Breather Cover & Tube
(encl. 12B)
Breather Tube Elbow
Washer
Governor Rod (Incl. 14)
Governor Lever
Governor Lever Clamp
Screw, Torx T-15, 8-32 x
19/64"
Extension Spring
Oil Seal
Crankshaft
Piston, Pin & Ring Set
(Std.)
Piston, Pin & Ring Set
(.010" OS)
Piston, Pin & Ring Set
(.020" OS)
Piston & Pin Ass'y. (Std.)
Pistcrn & Pin Ass'y.
(.0t0" OS) (Incl. 43)
Piston k Pin Ass'y.
(.020" OS) (incl. 43)
Ring Set (Std.)
Ring Set (.010" OS)
Ring Set (.020" OS)
Piston Pin Retaining Ring
Connecting Rod Ass'y.
(Zncl. 46)
Connecting Rod Bolt
Valve Lifter
Camshaft (MCR)
Oil Pump Ass'y.
1
1
t
1
1
1
1
1
t
I
1
1
1
1
1
1
1
1
1
1
1
2
1
2
2
1
I
Item
Part#
Description
Qty,
69
70
37130
37190
1
72
72A
75
80
81
82
36083
28534
28460
30574A
30590A
30591
83
86
89
90
92
93
100
101
103
30588A
650488
610961
611213
650815
650816
34443B
610118
651007
110
119
120
125
36230
36738
36721
36471
125
36472
126
29314B
126
29315C
Mounting Flange Gasket
Mounting Flange
(Incl. 72 thru 83,306)
Oil Drain Plug
Oil Drain Plug
Oi! Seal
Governor Shaft
Washer
Governor Gear Ass'y.
(tncl. 81)
Governor Spool
Screw, 1/4-20 x 1-1/4"
Flywheel Key
Flywheel
Beltevilte Washer
Flywheel Nut
Solid State Ignition
Spark Plug Cover
Screw, Torx T-15,
10-24 x 15(16"
Ground Wire
Cylinder Head Gasket
Cylinder Head
Exhaust Valve (Std.)
(Incl. 15t)
Exhaust Valve (1/32" OS)
(incl. 151)
Intake Valve (Std.)
(Incl. 151 )
Intake Valve (1/32" OS)
(Incl. 151)
Screw, 5/16-18 x f-1(2"
Screw, 5/16-18 x 2-41/64"
Resistor Spark Plug
(RN4C)
Valve Spring
Valve Spring Cap
Push Rod Guide
Rocker Arm Stud
130 650912
130A 650999
!35
34645
150
151
153
154
!9
31672
31673
36649
650913
1
1
1
1
1
1
1
t
6
1
1
t
1
1
1
2
1
1
1
t
1
1
1
4
1
1
2
2
1
1
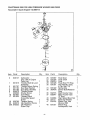
CRAFTSMAN
Tecumseh
Item
2200 PSI HRGH PRESSURE
4-Cycle
Part#
t55
157
15B
159
160
161
35624A
650914
36629
35626
35718
30063
178
29752
182
184
185
t86
187
200
30088A
26756
36579
34337
36580
35727
202
203
204
36482
31342
651029
205
651019
207
209
215
223
224
238
239
241
245
250
260
261
34336
30200
32410
651044
36581
650932
34338
36919
36905
36920
37180
30063
Engine
WASHER
580.762201
143.986714
Description
Rocker Arm
Lock Nut
Push Rod
Rocker Arm Cover Gasket
Rocker Arm Housing
Screw, Torx T-30, 1/4-20
x 1/2"
Nut &. Lock Washer,
1/4-28
Screw, 1/4-28 x 1"
Carburetor Gasket
Intake Pipe
Governor Link
Spacer
Control Bracket
(Zncl. 202 thru 205)
Compression Spring
Compression Spring
Screw, Torx T-10,
5-40 x 7/16"
Screw, Torx T-10,
6-32 x 41/64"
Throttle Link
Screw, !0-24 x 9/16 .....
Control Knob 1
Screw, 1/4-20 x 2-25/32"
Intake Pipe Gasket
Screw, 10-32 x 49/64"
Air Cleaner Gasket
Air Cleaner Collar
Air Cleaner Filter
Air Cleaner Cover
Blower Housing
Screw, Torx T-30,
1/4-20 x 1/2"
Qty.
item
1
1
2
1
1
4
2
2
1
1
1
1
1
1
1
1
1
t
1
1
2
2
1
1
1
1
1
2
20
Part#
262
263A
266
266A
275
276
277
279
650831
37184
651040
650852
36950
36949
65!039
650431
280
285
287
290
292
298
300
301
305
306
307
309
310
313
325
34tA
37210
3500QA
650926
29774
26460
28763
36916
36246
35647
36996
35499
650562
35648
34080
29443
36578
347
370A
370B
380
390
900
900
651038
36261
35t69
640147
590739
0
0
Description
Screw, 1/4-20 x 1/2"
Starter Gritl
Stud, 1/4-20
Nut E Lockwasher, 1/4-20
Muffler (Incl. 276 &. 277)
Locking Plate
Screw, 1/4-20 x 2-47/64"
Screw, Torx T-25,
i0_32 x 5/8"
Heat Shield
Starter Cup
Screw, 8-32 x 21/64"
Fuel Line
Fuel Line Clamp
Screw, 10-32 x 35/64"
Fuel Tank (Incl. 292 & 301)
Fuel Cap
Oil Fill Tube
"0"-Ring
"0"-Ring
Screw, 10-32 x 1/2"
Dipstick
Spacer
Spring Clip
Blower Housing
Support Bracket
Screw, t0-32 x 27/32"
Lubrication Decal
Control Decal
Carburetor (Incl. 184)
Rewind Starter
Replacement Engine
Replacement S/B 750835,
order from 71-999
Qty.
2
1
1
t
1
1
2
1
1
1
2
1
2
2
1
1
1
1
1
1
1
1
1
1
1
2
t
1
1
0
1
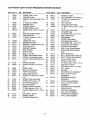
CRAFTSMAN
Tecumseh
2200 PSi HiGH PRESSURE
4-CycRe Engine
WASHER
580.762201
143°986714
F0-
40
Item
Part#
Description
0
640147
1
631615
2
4
5
6
7
16
17
631767
631184
631 !83
640070
650506
631807
651025
Carburetor
ncl. 184of Engine
arts List)
Throttle Shaft & Lever
Assembly
Throttle Return
,
, Spring
Dust Seal washer
Dust Seat (Throttle)
Throttle Shutter
Shutter Screw
Fuel Fitting
Throttle Crack
Screw/Idle Speed
Screw
Tension Spring_
Idle Restrictor Screw
Idle Restrictor
Screw Cap
18
630766
20
640016
20A 640053
Qty.
Item
t
1
1
1
1
1
!
1
t
I
1
1
21
Part#
Description
Qty.
25
27
28
29
30
631867
631024
632019
631028
63102t
1
1
t
I
31
35
631022
36045A
36
37
632745
632547
40
44
47
640083
27110
630748
48
631027
Float Bowl
Float Shaft
Float
Float Bowl "0" Ring
Inlet Needle, Seat,
k Clip (Incl. 31)
Spring Clip
Primer Bulb/Retainer
Ring
a_n Nozzle Tube
Main Nozzle Tube
"0" Ring
High SISeed Bowl Nut
Bowl Nut Washer
Welch Plug, Idle
ixture Well
Welch Plug,
Atmosphenc
Vent
1
1
!
1
2
1
1
1
1
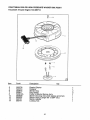
CRAFTSMAN
Tecumseh
2200 PSi HiGH PRESSURE
4-Cycle
WASHER
580.762201
Engine 143.986714
]2
]3
f
f
\
t
Item
0
3
6
7
8
11
12
13
14
Part#
Description
590739
590740
590616
590617
590618A
59063B
590535
590701
590741
Rewind Starter
Retainer
Starter Dog
Dog Spring
.
,
Pulley k Rewind Spr!n.q Ass y
Starter Housing Ass y_(40 degreegrommet)
Starter Rope (Eengti_ 98" x 9(64" clia.)
Starter Handle
Locking Tab
Qty.
22
1
1
2
2
t
1
1
1
1
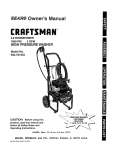
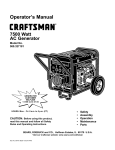
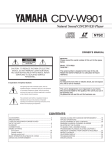
CRAFTSMAN
220G PSti HiGH PRESSURE
WASHER
580.762201
22
15
13
28
14
To A
29
35
23
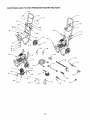
CRAFTSMAN
rt%M
t
2
3
4
5
6
7
8
9
10
11
12
13
14
t5
16
17
18
19
20
21
22
23
24
25
26
27
28
29
30
31
32
33
PART NO.
EB2528
NSP
NSP
EB2534
39414
52858
39287
27007
B2142
75402
B2168
B1460
B1779
B2347
46476
51767
52857
92235
B1631A
B2623
B2626
91373
79552
96307
AI040B
A1041
A1408
B1232
B1288
21782
21781
50190
48031
2200 PSi HiGH PRESSURE
!
t
1
1
3
5
2
2
2
2
1
3
2
2
2
2
2
1
1
1
1
1
!
1
1
1
1
1
1
!
1
2
t
WASHER
DESCRilPTION
BASE, VSPW
ENGINE, Tecumseh OHV
&75HP, 143.986714
PUMP, Medium Frame
HANDLE
HHCS, M8 x 35
NUT, M8 Locking Flange
HHCS, M8 x 45
MOUNT, Rubber Foot
WHEEL, 2" x 9" Black Mag
PUSHNUT, 1/2"
HANGER, Hose
CAP, Vinyt
COVER, Hinge
CAP, End
CAPLUG
HHCS, M6 - 1.0 x 45
NUT, M6 Locking Ftange
GROMMET, Turbo Nozzle
BILLBOARD
DECAL, Craftsman _00 PSI
DECAL, Instructions
DECAL, Data
OVERLAMINATE
DECAL, 1-800 #
HOSE, Chemical
FILTER, Chemical Hose
CAP, Garden Hose Inlet
CLAMP, Hose 7/16"
TAG, Breather Cap
QUICK DISCONNECT, Female
QUICK DISCONNECT, Male
WASHER, M8 Ftat
CLAMP, Hose 3/16"
24
580.762201
ITEM PART NO. QTY.
35
97054
1
36
97100
1
37
B1969
1
38
B1974G
t
39
B2370
1
40
95587E
1
41
97123
1
42
88176A
1
43
88935
!
44
97566
1
45
B 1736
1
46
B 1736A
1
47
96382
1
48
B3370
1
49
B2730
1
5O
97009
1
5!
B3073
1
52
20441
2
Optional Accessories Not
71-75187
71-75197
71-75199
71-764,30
71-76431
71-75115
71-764-50
71-76451
7t-75116
71-76486
71-76400
71-76401
71-76402
71-76403
TAG, Pressure Adjust
CAP, High Pressure
HOSE, 1/4" x 25'
TURBO, Nozzle
GUN, High Pressure
NO77LE, Adjustable
WAND, Extension
BRUSH, Rotating
ADAPTER, Brush
TAG, Nozzle
WASH, Vehicle/Boat
WASH, Hous_J'MuttiPurpose
OIL, Engine SAE 30
MANUAL, Owners
KIT, O-Ring Maintenance
KIT, Nozzle Cleaning
GUIDE, Recoil Rope
SCREW, Self Drill 1/4" x 3/4"
lUustrated
Garden Hose Quick Connect
Accessory Quick Connect Kit
Rotating Brush
Floor/Siding Brush
Utility BruSh i
Replacement Hose
25' Extension Hose
50' Extension Hose
O Ring Kit
Medium Duty Turbo Nozzle
House wash
Deckwash
Vehicle / Boat Wash
Deck Wash
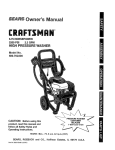
CRAFTSMAN
2200 PS_ HiGH PRESSURE
WASHER
25
580.78220!
CRAFTSMAN
2200 PSi HIGH PRESSURE
item
Part#
Qty.
1
2
3
B22t8
B2260
96542
1
1
2
4
5
6
7
8
97675
97570
95524
B2217
B2261B
1
1
1
4
4
9
t0
12
95435
97671V
93790
1
1
1
t3
14
15
16
17
18
19
20
21
22
23
97568A
96400
99427
94944
99735
93680
93668
93667
93652
95416
93876
I
3
3
3
1
3
3
3
1
1
1
24
26
A1320
40945
1
6
27
28
29
30
31
A2069
A2062
A2060
97931
B2640
1
3
6
3
6
32
33
34
35
36
37
38
97929
97843
A20!7
A1719
B3t84
93656
A3829
6
1
2
t
1
2
1
39
40
4t
A1712
A17!6
A20!6
1
!
1
WASHER
Description
O-RING, 1.625" x 0.103
ADAPTER, Engine
BEARING, Eng_Adptr. Roller Thrust
4x4
C - RING, Cam Retainer
WASHER, Thrust
WASHER, Retainer
O-RING, 0.239 ID x 0.070
SCREW, Button Hd 5/16- 24x 3/4"
Lg
ADAPTER, Engine Shaft 3/4"
CAM, Axial 6.0 Lift
'_/' RING, Crankcase 113.97x
1!9.21 x2.62
CRANKCASE, Pump
SPRING, Piston Return
ASSEMBLY, Ceramic Piston & Cap
SHOE, Piston Pivot
ASSEMBLY, Breather
SEAL, Oil Piston
SPACER, Pilot
SEAL, U - Cup ELF
SPRING, Thermal Relief Actuator
PISTON, Thermal Relief Actuator
"(_' RING, Thermal Relief 2.9 x 6.5 x
1.78
SPACER, Inlet Plate
SCREW, SHC M6 x 1.0 x 20 mm
Lg
GASKET, Head
SEAT, Check Valve inlet
POPPET, Check Valve
CAGE, Check Valve Inlet
'O" RING, Chk Valve 12_4x 15.96 x
1.78
SPRING, Check Valve Outlet
%)" RING, 9.25 x 12.81 x 1.78
PAR -BACK, Backup Ring
PIN, 2.0 Di& Spindle
SPINDLE, Pressure Regulator
"CY'RING, Spindle 6 x t0 x 1.78
'_' RING, Retainer Nut 14 x 17.56 x
1.78
NUT, Retainer - Spindle
SPRING, Unloader
PAR-BACK, Backup Ring
26
580.762201
Item
Part #
Qty.
Description
42
43
44
B3117
A20t3
97840
1
6
3
45
46
47
97841
20002
A3805
3
3
1
48
49
50
51
52
53
54
55
56
57
58
59
A2217
At318
B1758
96053
96015
A17t7
B1757
A1718
93644
95380
95379
A1575
3
I
1
3
3
1
4
1
1
1
1
1
61
62
63
64
65
66
67
68
69
73
74
75
A1713
A2015
A2503
A2756
89138
21123
A17t4
A2014
B2241
B2665
B2015
B3100
1
1
SEAT, Bait Unloader
BALL, Stainless Steel 9/32 Dia.
1
1
1
1
1
1
1
6
0
0
76
B3185
0
77
78
B3183
A2034
0
0
79
B1879
0
80
8t
B2151
B2152
82
83
B2016
B3328
0
0
0
0
SEAT, Trapped Line Pressure
VALVE, Shuttle Piston
SPRING, Check Valve
"O" RING, 3.68 x 7.24 x 1.78 cs
VENTURI, Chemical
SET SCREW, M6 - 1.0 x 8mm
CAP, Plastic
WASHER
SPACER PLATE ASSEMBLY
INLET CHECK VALVE
ASSEMBLY
UNLOADER SPINDLE
ASSEMBLY
PUMP HEAD ASSEMBLY
OUTLET CHECK VALVE
ASSEMBLY
TRAPPED LINE PRESSURE
CHECK VALVE
......
VENTURE ASSEMBLY
BALL SEAT ASSEMBLY
CRANKCASE ASSEMBLY
AXIAL CAM ASSEMBLY
HANDLE, Unloader
BOLT, Head M8 x 1.25x 70mm Lg
'_" RING, Chk Valve Cap15.6 x
19.16 x 1.78
CAP, Outlet Port
CAGE, Check Valve Outlet
"(3' RING, Venturi 10.82 x 14.38
x 1.78
SEAT, Check Valve Outlet
CYUNDER, Head
PLUG, Button M8 x 1.25 x 8 mm
SEAL, High Pressure
RING, Bearing
MAGNET, Bali Deflector
PLUG,Button M6x 1.0x8 rnrn
SET SCREW, M8 - 1.25 x 8 mm
ACTUATOR, Thermal Relief
SPRING, Chemica! injector
BALL, 5.5 dia. Chemical Injector
BARB HOSE, Brass with Nylon
Insert
For the repair or replacement parts you
need delivered directly to your home
Call 7 a.m. - 7 p.m., 7 days a week
1--800-366-PART
(1-800=366-7278)
For in-home major
brand repair service
Call 24 hours a day, 7 days a week
1=800-4-REPAIR
(1-800-473-7247)
For the location of a Sears Parts and
Repair Center in your area
Call 24 hours a day, 7 days a week
1=800=488=1
For information on purchasing a Sears
Maintenance Agreement or to inquire
about an existing agreement
Call 9 a.m.- 5 p.m., Monday-Saturday
-800,-827-6655
The model number of your product is on a
decal attached to the pressure washer.
The model number of the engine is located
on the blower housing of the engine.
When requesting service or ordering parts,
always provide the following information:
• Product Type
o Model Number
- Part Number
• Part Description
America's
Repair Specialists