1
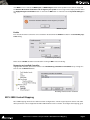
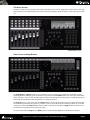
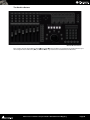
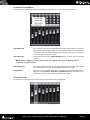
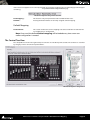
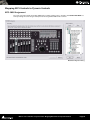
JL Cooper 3x Series
Set-up Guide
No part of this documentation may be reproduced in any form whatsoever or be stored in any
data retrieval system without prior written permission of the copyright owners.
This documentation is supplied on an as-is basis. Information contained within this documentation is subject to change at any time without notice and must not be relied upon.
All company and product names are ™ or Registered Trademarks ® of their respective owners.
Windows Vista, Windows XP and Windows 2000 are trademarks of Microsoft Corporation.
Merging Technologies makes no warranties express or implied regarding this software, its quality, performance, merchantability or fitness for a particular purpose. The software is supplied “as
is” you, the purchaser, are assuming the entire risk of the results of using this Merging Technologies software.
In no circumstances will Merging Technologies, its owners, directors, officers, employees or
agents be liable to you for any consequential, incidental or indirect loss or damages including
loss of time, loss of business, loss of profits, loss of data or similar resulting from the use of or
inability to use the Merging Technologies hardware and or software or for any defect in the
hardware software or documentation.
© Copyright Merging Technologies Inc. 2009. All rights reserved
Merging Technologies
Le Verney 1070 Puidoux Switzerland
Tel: +41 21 946 04 44 • Fax: +41 21 946 04 45
www.merging.com
Contents
Contents
Introduction
3
5
Overview
5
Setup
5
Requirements:
5
Communication
5
Connections
5
Adding an MCS Controller
MCS-3800 Control Mapping
5
7
MCS-3800 Configuration
8
The Control Tree View
13
Mapping MCS Controls to Pyramix Controls
15
MCS-3800 Assignment
15
MCS-Bridge Assignment
16
Index
17
Contents
3
MCS 3x series controller set-up User Guide :
JL Cooper
MCS 3x series controller set-up
User Guide
Document: Pyramix™ JL Cooper Guide 02
Date: 21st July-2009
MCS 3x series controller set-up User Guide :
Page 4
Introduction
Overview
This document details the physical and logical connections required to enable JL Cooper MCS 3x series hardware
control surfaces to control Pyramix Virtual Studio using the optional Remote Control MIDI protocol.
Scope
The JL Cooper Controllers are supported by the Optional Pyramix MIDI Remote Control Protocol feature.
In Pyramix the following MCS series devices are supported:
MCS-3800
MCS-3000
MCS-Bridge
MCS-3000x
For more information on installing and using the MCS family controllers, please consult the MCS-3000 Series User
Reference Manuals.
Setup
Requirements:
Components required for operating a JL Cooper MCS Controller with Pyramix:
•
A supported JL Cooper MCS series controller.
•
Pyramix 5.0 or higher with the Remote Control MIDI Protocol option authorized.
•
The PC Workstation running Pyramix must be equipped with a functioning MIDI interface.
Communication
Pyramix and the DM-2000 communicate via MIDI.
Connections
MIDI
Connecting the controller requires that a hardware device with MIDI port functionality be installed in the computer. An external USB to MIDI interface will also work fine, or a soundcard with MIDI I/O, e.g. a SoundBlaster.
All subsequent set-up information assumes that the MCS controller is properly powered and connected to a functioning MIDI interface.
Adding an MCS Controller
Before the MCS control surface can be used or the controls mapped it must be “added” in Pyramix and the correct
driver selected.
MCS 3x series controller set-up User Guide : Introduction
Page 5
To add a new controller go to the Settings > All Settings > Remote Control : Controller page.
Controller page
If no controllers are installed, or more need to be added, click on the Add button. This opens the Controller Properties dialog window:
Driver Selection combo-box list
Name
Type a suitable, friendly name in the Name field.
Driver
Select MCS 3000 from the Driver combo-box drop down list. For an MCS-3800 controller select the MCS3000
driver.
Properties
Once the MCS3000 driver has been selected, clicking on the Properties button opens the MIDI Configuration
dialog:
MIDI Input and Output selection dialog
Choose the appropriate MIDI Input and MIDI Output device drivers corresponding to the ports your MCS controller is physically connected to. Clicking on OK accepts the changes and Cancel ignores the changes.
MCS 3x series controller set-up User Guide : Adding an MCS Controller
Page 6
If no MIDI driver is installed, the MIDI Input and MIDI Output combo-box dropdown menus will be empty and
the A device ID has been used that is out of range for your system error message will be displayed when either
the Apply Changes to Controller button is clicked or the OK button is clicked to close the Pyramix Settings dialog:
MIDI Warning Info
Enable
Each installed hardware controller can be enabled or disabled with the Enable checkbox in the Controller properties dialog.
Controller Properties dialog
Make sure the Enable checkbox is ticked before clicking on OK to close the dialog.
Removing an Installed Controller
Highlight the controller you wish to remove in the The following controllers are installed: list by clicking on it
then click on the Remove button:
All Settings > Remote Control > Controllers
MCS-3800 Control Mapping
MCS-3800 mapping allows for user defined custom configurations. A wide range of Pyramix controls and audio
effect parameters can be mapped to the MCS-3800 hardware surface controls. To configure the mapping, go to
MCS 3x series controller set-up User Guide : MCS-3800 Control Mapping
Page 7
the Settings > All Settings > Project : Controller Mapping page and select the target controller in the The following controllers are installed: list:
Note: This page can also be accessed by right-clicking on the track arming button in a
Track Header to open the Pyramix Settings dialog and then clicking on Controller Mapping.
MCS-3800 Configuration
Click on the Properties button to open the MCS3000 Configuration dialog:
MCS3800 Controls
This window contains the components that will enable you to map Pyramix control functions onto MCS-3800
physical controls. These components are grouped by area and function as follows.
MCS 3x series controller set-up User Guide : MCS-3800 Control Mapping
Page 8
The Mixer Section
The Mixer section contains controls used in the mixing process that can be mapped to Pyramix controls. The mappable controls are the motorized, touch sensitive faders, push buttons above the faders, and the five rotary encoders.
MCS3800 Mixer Section
Bank, Select and Page Buttons
MCS3800 Bank, Select and Page Buttons
The Page, Bank and Select switches are “hard wired” I.e. they cannot be user mapped. These buttons enable
switching between different layers of controller assignments. The four Bank buttons each select one of four fader
layers. This gives easy access for controlling up to 32 Pyramix mixer strips. Since the faders are motorized, they will
always reflect the position of the control they are actually mapped to.
The Page buttons, in conjunction with the Select buttons, are used to switch the rotary encoders between pages
of controllable parameters. This gives the encoders access to up to 40 control parameters per fader. To access the
assignments, first hit the Select button above any fader and then use one of the 8 Page buttons to select one of
the 8 pages of assignments for the rotary encoders.
For more information on Pages and or Banks, please consult the MCS-3000 Series User Reference Manual.
MCS 3x series controller set-up User Guide : MCS-3800 Control Mapping
Page 9
The Machine Buttons
MCS3800 Machine Buttons
This section contains five buttons labeled M1 through M5. These buttons are automatically mapped to the Pyramix Transport Internal Machine (M1) and M2 to M5 to any installed and enabled External Machines.
MCS 3x series controller set-up User Guide : MCS-3800 Control Mapping
Page 10
The Jog Wheel Buttons
This section contains seven function buttons labeled as W1 through W7.
MCS3800 Jog Wheel Buttons
They are part of the Transport Control section and have the following functions:
M1
M1 + Shift
M2...M5
W1 Set In
Goto In
Set In
W2 Move
Slide
W3 Fade In
Trim In
Nudge + 1 Frame
W4 Jog
Shuttle
Jog
W5 Fade Out
Trim Out
Nudge - 1 Frame
W6 Chase
Freeze
W7 Set Out
Goto Out
Set Out
M2...M5 + Shift
Goto In
Shuttle
Goto Out
Note: these buttons have different actions if M1 (Pyramix Internal Machine) or M2..M5
(possible External Machines connected to Pyramix) are selected.
MCS 3x series controller set-up User Guide : MCS-3800 Control Mapping
Page 11
Contextual Control Menu
The Controls in the MCS-3800 mapping configuration page also have a right-click contextual menu:
MCS Controls Context Menu
Clone this knob
This action takes the current mapped function of the item under the cursor when
right-clicked and attempts to apply the same control function to all other buttons
in the same position related to the subsequent Pyramix mixer strips. It makes more
sense when you actually map a mixer.
Clone this strip
Performs the same action as Clone this knob, but on an entire strip including the
rotaries.
Note: When mapping a mixer from scratch we suggest starting by mapping the first
strip then using this action.
Delete Mapping
Selecting this option deletes the currently assigned control mapping. This option
is not available if no current control mapping exists for the control.
Toggle Mode
This option is only available for buttons. This option changes the button mode
between latching push on - push off and momentary modes. This option is not
available if no current control mapping exists for the control.
Control Tool Tips
As the mouse cursor hovers over an MCS control, the control becomes highlighted.
Highlighted Control
MCS 3x series controller set-up User Guide : MCS-3800 Control Mapping
Page 12
If the control is mappable and is currently mapped,
the
status bar
will display
the corresponding
Pyramix mapped
Project
Information
& Settings
Controllers
page
control E.g.:
MCS3000 Configuration dialog window Status Bar
Load mapping...
This feature is not yet implemented and intended for future use.
Clear All...
Pressing this button deletes all currently assigned control mapping.
Default Mapping
Load and Save
This section enables the current mapping state to be saved from or loaded to the
current MCS device configuration.
Note: Once used, the defined Default mapping will be loaded every time a new controller configuration is created.
The Control Tree View
The collapsible tree view in the right-hand pane contains all available Pyramix controls. The controls are classified
by category and are contained in specific folders.
MCS3000 Configuration dialog window
MCS 3x series controller set-up User Guide : MCS-3800 Control Mapping
Page 13
Navigating in the Tree View
Clicking on a
"plus" icon opens a folder to reveal the sub-folders and controls it contains.
Clicking on a
"minus" icon closes a folder.
Pyramix Controls Tree
MCS 3x series controller set-up User Guide : MCS-3800 Control Mapping
Page 14
Mapping MCS Controls to Pyramix Controls
MCS-3800 Assignment
To assign a Pyramix control to an MCS-3800 surface control, simply select a control in the Control Tree View section by clicking on it then drag and drop it onto the target MCS-3800 surface control.
MCS3000 Configuration dialog
MCS 3x series controller set-up User Guide : Mapping MCS Controls to Pyramix Controls
Page 15
MCS-Bridge Assignment
Another example with an MCS-Bridge device.
MCS3000 Configuration dialog MCS-Bridge page
MCS 3x series controller set-up User Guide : Mapping MCS Controls to Pyramix Controls
Page 16
Index
M
A
Adding an MCS Controller
5
B
Bank, Select and Page Buttons
C
Clone this knob 12
Clone this strip 12
Communication 5
Connections 5
Contextual Control Menu
Control Tool Tips 12
Control Tree View 13
Controller Name 6
D
15
N
Navigating in the Tree View
14
O
12
Overview
5
P
Properties 6
R
Default Mapping 13
Delete Mapping 12
Driver 5, 6
Removing an Installed Controller
Requirements 5
7
S
E
Scope 5
Setup 5
Enable 7
I
Introduction
9
Machine Buttons 10
MCS-3800 Assignment
MCS-Bridge 16
MIDI 5
Mixer Section 9
T
5
Toggle Mode
12
J
Jog Wheel Buttons
11
: Index
Page 17