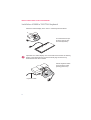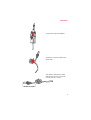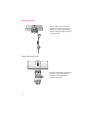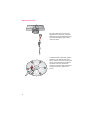
1
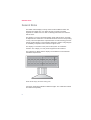
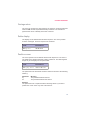
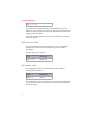
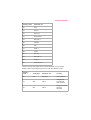
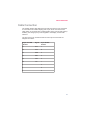
BA66 Cashier Display Product Manual Edition September 2002 Pentium™ is a registered trademark of the Intel Corporation MS-DOS™, Windows 95™, Windows 98™, Windows NT™ and Windows CE™ are registered trademarks of the Microsoft Corporation BEETLE™ is a registered trademark of Wincor Nixdorf International GmbH Copyright© Wincor Nixdorf International GmbH, 2002 The reproduction, transmission or use of this document or its contents is not permitted without express authority. Offenders will be liable for damages. All rights, including rights created by patent grant or registration of a utility model or design, are reserved. Delivery subject to availability; technical modifications possible. Contents Manufacturer’s Declaration and Approval ........................1 FCC-Class A Declaration ............................................................................1 Tested Safety ..............................................................................................2 Notes on Care .............................................................................................2 Warranty ......................................................................................................2 Recycling the BA66 .....................................................................................3 General Notes ......................................................................4 Installation Instructions for the BA66 Cashier Display.................................6 Installation of the Connector ..............................................8 Tube-based ................................................................................................8 Base/ Rotating Plate..................................................................................10 Cashier Display Control ....................................................13 Control Sequences ............................................................14 Backspace (without deleting) ....................................................................14 Line feed....................................................................................................14 Carriage return ..........................................................................................15 Delete display ............................................................................................15 Position cursor...........................................................................................15 Delete to end of line ..................................................................................16 Set country code .......................................................................................16 Call display identification ...........................................................................18 System Connection ...........................................................19 Cable Connection ..............................................................21 Test Functions ...................................................................22 Starting the test by entering a code...........................................................22 Technical Data ...................................................................23 FCC-CLASS A DECLARATION Manufacturer’s Declaration and Approval This device fulfills the requirements of the EEC directives 89/336/EEC “Electromagnetic Compatibility” and 73/23/EEC “Low Voltage Directive”. Therefore, you will find the CE mark on the back of the device or packaging. FCC-Class A Declaration This equipment has been tested and found to comply with the limits for a Class A digital device, pursuant to part 15 of the FCC Rules. These limits are designed to provide reasonable protection against harmful interference when the equipment is operated in a commercial environment. This equipment generates, uses, and can radiate radio frequency energy and, if not installed and used in accordance with the instruction manual, may cause harmful interference to radio communications. Operation of this equipment in a residential area is likely to cause harmful interference in which case the user will be required to correct the interference at his own expense. Le présent appareil numéique n’ émet pas de bruits radioélectriques dépassant les limites applicables aux appareils numériques de la “Classe A” prescrites dans le Règlement sur le brouillage radioélectrique édicté par le ministère des Communications du Canada. Wincor Nixdorf International GmbH (WN) accepts no responsibility for radio and television reception interference resulting from unauthorized modifications to the equipment. Furthermore, neither cables nor devices which have not been approved for use by WN may be connected. The user shall be held responsible for interference caused in this manner. Device repairs must be carried out by authorized personnel. All guarantee and liability claims are automatically excluded if repairs have been carried out by unauthorized personnel. 1 TESTED SAFETY Tested Safety The BA66 has been provided with the symbol for ”Tested Safety”. In addition, the BA66 has received the UL and cUL symbols. Notes on Care Wipe the cashier display with a damp cloth as required. Solvents must not be used under any circumstances as they may damage the plastic. Warranty Wincor Nixdorf guarantees a limited warranty engagement for 12 months beginning with the date of delivery. This warranty engagement covers all those damages which occur despite a normal use of the product. Damages because of n n n Improper or insufficient maintenance, Improper use of the product or unauthorized modifications of the product, Inadequate location or surroundings will not be covered by the warranty. 2 RECYCLING THE BA66 Recycling the BA66 Environmental protection does not begin when it comes time to dispose of the BA66; it begins with the manufacturer. This product was designed according to our internal norm “Environmental conscious product design and development”. The BA66 is manufactured without the use of CFCs und CCHS and is produced mainly from reusable components and materials. The processed plastics can, for the most part, be recycled. Even the precious metals can be recovered, thus saving energy and costly raw materials. Please do not stick labels onto plastic case parts. This would help us to re-use components and material. At this time, there are still some parts that are not reusable. Wincor Nlxdorf guarantees the environmentally safe disposal of these parts in a Recycling Center, which is certified pursuant to ISO 9001. So don’t simply throw your BA66 on the scrap heap when it has served its time, but take advantage of the environmentally smart, up-to-date recycling methods! Please contact your competent branch office for information on how to return and re-use devices and disposable materials. 3 GENERAL NOTES General Notes The BA66 cashier display is mainly used in POS installations which are designed in modular form. It is either securely screwed to the POS keyboard or installed near it so that it is ideally positioned in the cashier’s field of vision. The display is a vacuum florescent display (VFD) with two lines, each with 20 alphanumeric characters. The standard character set and corresponding country code are implemented. Implementation of VFD technology ensures that the cashier display is ergonomically designed to achieve a high degree of readability, irrespective of the cashier’s angle of vision. The display is connection to the point of sale system via a RS232C interface. The voltage (12 V DC) is also supplied via this interface. The following two BA66 cashier displays are available to meet individual installation requirements: BA66 cashier display with base/ rotating plate Connector cables are available in different lengths. The cables are ordered and delivered separately. 4 RECYCLING THE BA66 Cashier display with adapter for tube-based installation 35° 20° Cashier display to TA61 or TA64 5 INSTALLATION OF BA66 TO TA61/TA64 KEYBOARD Installation of BA66 to TA61/TA64 keyboard Attach the cashier display to the TA61 or TA64 keyboard as follows: X Turn both devices upside-down (remove key from the keyboard!). Important! The cashier display must not be disconnected from the base by means of the release button (X) as the internal plug connection may otherwise become disconnected! Pull the keyboard cable out through the metal opening (see arrow). Keyboard cable 6 TUBE-BASED Screw the assembly plate of the cashier display to the rear side of the keyboard with the selftapping, recessed-head screws provided. Then press the keyboard cable downwards and draw it through the metal opening into the cable run of the plastic base. 7 TUBE-BASED Installation of the Connector Tube-based Press the release knob marked with the arrow in the drawing (1) and disconnect the hinge from the customer display (2). Thread the cable through the adapter (3) and then through the hinge (4). 8 TUBE-BASED Connect the hinge and adapter. Secure the connector cable in the strain relief. The distance between the strain relief and the tip of the connector must be 66 mm (± 4 mm). 66 mm +/- 4 mm 9 BASE/ ROTATING PLATE Plug the cable connector into the appropriate socket of the customer display and plug the adapter/hinge into the customer display again until it locks into place. Base/ Rotating Plate 10 Press the release knob marked with the arrow in the drawing (1) and disconnect the hinge from the customer display (2). BASE/ ROTATING PLATE Thread the cable through the base (3) and then through the hinge (4). Connect the base and the hinge. 11 BASE/ ROTATING PLATE Plug the cable connector into the appropriate socket of the customer display and plug the base/hinge into the customer display again until it locks into place. A metal bracket of the strain relief is situated on the bottom side of the base. Loosen one of the screws (see arrow), push the bracket aside and guide the connector cable from inward to outward under the bracket through the recess. Tighten the screw. 12 CASHIER DISPLAY CONTROL Cashier Display Control The cashier display is controlled via software. The commands are entered with the appropriate ESC sequences. The following functions are available: n The cursor can be moved to the desired position; n The cashier display can be deleted; n The characters from the cursor to the end of the line can be deleted; n An identification code can be requested; n Country-specific character sets can be selected; n A self-test can be performed. 13 CONTROL SEQUENCES Control Sequences The cashier display operates in VT100 mode, i.e. it emulates a subset of the VT100 ESC sequences and control bytes. These are illustrated in the following: Backspace (without deleting) BS Line feed LF Carriage return CR Delete display ESC [2J Position cursor ESC [Py;PxH Delete to end of line ESC [0K Set country code ESC Rn Call display identification ESC [0c Backspace (without deleting) The BS command (hexadecimal 08) moves the cursor one space to the left. If there is a character in the position to which the cursor moves, it is not deleted. This command is ignored if the cursor is already at the very start of the line. Line feed The LF command (hexadecimal 0A) moves the invisible cursor down a line if it is positioned in one of the first three lines of the display. The column position remains unchanged. The position of the cursor remains unchanged if it is already in the last line. The contents of the last line are copied to the first line and the last line is deleted. 14 CONTROL SEQUENCES Carriage return The cursor is moved to the start of the line in which it is currently positioned when the CR command (hexadecimal 0D) is entered. The command is ignored if the cursor is already at the start of the line. Delete display The display can be deleted with this ESC sequence. The cursor position remains unchanged. The ESC sequence is as follows: Code Hexadezimal ESC ‘[‘ ‘2’ ‘J’ 1B 5B 32 4A Position cursor The cursor position can be defined with this ESC sequence. The cursor is not visible on the display whilst this is being carried out. The following ESC sequence (for example) can be implemented: Code Hexadezimal ESC ‘[‘ ‘Py’ ; ‘Px’ ‘H’ 1B 5B 31 3B 31 48 The parameters are transferred as ASCII characters and have the following meaning: Parameter Py Px Meaning This parameter defines the line. This parameter defines the column. Example The parameters are to replaced with the following values if you wish to position the cursor at the very start of the first line: 15 CONTROL SEQUENCES ESC ‘[‘ ‘1’; ‘1’ ‘H’ If you select 0 for the parameter value, this is interpreted as 1 by the display. If, on the other hand, you select a value which is greater than the maximum line and column value, the display will interpret this value as the maximum value permissible. The cursor is positioned in the first column of the first line if no parameter values are entered. Delete to end of line This command deletes the characters from the cursor, cursor position included, to the end of the line. The position of the cursor remains unchanged. The ESC sequence is as follows: Code Hexadezimal ESC ‘[‘ ‘0’ ‘K’ 1B 5B 30 4B Set country code The following ESC sequence is implemented in order to select a countryspecific character set: Code Hexadezimal ESC ‘R’ ‘n’ 1B 52 02 The hexadecimal value n corresponds to the country code and defines the country-specific character set. The German character set corresponds to the default setting. 16 CONTROL SEQUENCES Country code Character set 00 USA 01 France 02 Germany 03 Great Britain 04 Denmark 1 05 Sweden 06 Italy 07 Spain 1 08 Japan 09 Norway 0A Denmark 2 0B Spain 2 0C Latin-America Furthermore PC code pages which contain additional country-specific display codes can be selected by ESC R n with the following codes: Country code Code page Character set Country 30 437 Standard Latin-America 31 850 Latin 1 International, Scandinavia, Latin-America 32 852 Latin 2 Hungary, Poland, Czechia, Slowakia 17 CONTROL SEQUENCES 33 857 Latin 5/Turkey Turkey 35 and 29 866 Latin/Cyrillic Russia 37 862 Latin/Hebrew Israel 36 737 Latin/Greek 2 Greece 38 IBM813 Latin/Greek 2 Greece 63 Katakana Katakana Japan In the appendix there are shown all character set tables for BA66 in 5 x 7 matrix display. Call display identification The identification is called with the following ESC sequence: ESC ‘[‘ ‘1’; ‘1’ ‘H’ The following is displayed on the screen when the sequence is entered: Code Hexadezimal ESC ‘[‘ ‘Py’ ; ‘Px’ ‘H’ 1B 5B 31 3B 31 48 Pn1 Pn2 Type of display PROM version = 2 = = currently 00 Pn3 Pn4 Pn5 Character set = 2 Number of lines = 4 Column/line = 20 = i.e. ESC[?2;00;2;4;20c is transmitted. 18 VFD display (depends on approved PROM version) modif. IBM character set SYSTEM CONNECTION System Connection The system is connected via the RS232C (V.24) interface with a voltage supply of +12V DC. The following parameters are set as standard: Transmission rate 9.600 Bit/s Parity on Parity odd Parameters other than these standard values can also be selected. Wire jumpers must be soldered onto the display circuitry in order to do so. Wire jumper IN/OUT Parameter JP1 JP2 OUT OUT 9600 Bit/s JP1 JP2 IN OUT 4800 Bit/s JP1 JP2 OUT IN 2400 Bit/s JP1 JP2 IN IN 1200 Bit/s JP3 OUT IN Parity on Parity off JP4 OUT IN Parity odd Parity even JP5 IN OUT Self-test Normal operation The position of the wire jumpers on the display circuitry is illustrated in the following diagram. The front plate can be removed by pressing both of the 19 SYSTEM CONNECTION exterior housing clips underneath the plate. The wire jumpers are then accessible. Fluorescent display glass front Wire jumpers Print RS232C socket (Rear side) Cashier display circuitry 20 Print CABLE CONNECTION Cable Connection The cashier display cable features a mini DIN connector at one end (which is connected to the cashier display) and a 9-pin D sub connector at the other (which is connected to the COM interface of the point of sale system). Similarly, the voltage (12V) is also supplied to the display via the COM interface. The pins of the 6-pin mini DIN socket and the 9-pin D sub socket are assigned as follows: 6-pin mini DIN Socket Signal 9-pin D-SubSocket 1 RTS 7 2 CTS 8 3 GND 5 4 RXD 2 5 TXD 3 6 12V 1 4 9 6 21 TEST FUNCTIONS Test Functions The internal RAM of the processor and the EPROM are tested during the start-up phase. All display elements light up for approx. 0.5 seconds if no errors are detected during the test. The display remains blank if an error is isolated. Starting the test by entering a code The identification is called with the following ESC sequence: ESC [0c The display runs through the self-test program once when the code is transmitted to the display. Code: ESC [?2;nn;2;2;20c The current version number (00-99) will be indicated in place of nn. The test software performs the following functions: 22 n The microprocessor and the RAM within the processor are tested. Errors detected are displayed. n Formation and comparison of the PROM checksum. Errors detected are displayed. n The display type and version number of the microprogram are displayed. n The parameters of the serial interface are displayed. The baud rate and the parity parameters are output. n Display is tested by generating a rough chess board pattern. n Display is tested by generating a detailed chess board pattern. TECHNICAL DATA Technical Data The technical data of the BA66 cashier display is detailed in the following table: Display technology Vacuum Fluoreszenz Display (VFD) Character display 4 lines each with 20 alphanumeric characters Matrix: 5 x 7 pixel Height: 5 mm Width: 3.2 mm Color: green Self-test function possible via software control using ESC sequences and JP5 wire jumper Interface RSC232C, asynchronous full duplex operation Transmission modes standard 9600 bit/s; parity: on; parity: odd even/uneven parity optional with 9.6/4.8/2.4/1.2 kbit/s adjustable via wire jumpers Voltage supply 12V ± 10% with max. 500mA typ 350mA inpush current: max. 600 mA System connection RS232C (V.24) with + 12V DC voltage supply Dimensions Height (with base): 165 mm Width: 206 mm Depth: 46 mm Weight 0.5 kg 23 Herausgegeben von/ Published by Wincor Nixdorf International GmbH D-33094 Paderborn, D-13629 Berlin Bestell-Nr./ Order No.: 0175 0000 178F Printed in Singapore