1
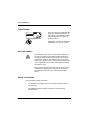
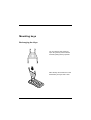
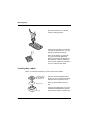
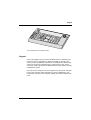
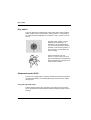
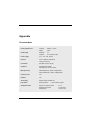
TA61
TA61
POS Keyboard
User Guide
TA61
POS Keyboard
User Guide
Edition April 2000
MS-DOS® and Microsoft® are registered trademarks of the Microsoft Corporation.
BEETLE® is a registered trademark of the Wincor Nixdorf GmbH.
Copyright © Wincor Nixdorf GmbH & Co. KG, 2000
The reproduction, transmission or use of this document or its contents is not permitted without
express authority.
Offenders will be liable for damages.
All rights, including rights created by patent grant or registration of a utility model or design, are reseverd.
Delivery subject to availability; technical modifications possible.
Contents
Manufacturer’s Declaration and Approval.............................................. 1
General Authorization ................................................................................. 1
FCC-Class A Declaration ............................................................................ 1
Tested Safety .............................................................................................. 2
User Information.......................................................................................... 2
Safety Instructions....................................................................................... 3
Cleaning Instructions................................................................................... 3
Scope of supply........................................................................................... 3
Mounting keys ........................................................................................... 5
Exchanging the Keys .................................................................................. 5
Inserting Key Labels.................................................................................... 6
Inserting Key Caps ...................................................................................... 7
The TA61 keyboard ................................................................................... 8
General........................................................................................................ 8
Keypad ........................................................................................................ 9
Key switch ................................................................................................. 10
Swipecard reader (SCR) ........................................................................... 10
Using the swipecard reader ................................................................... 10
Cleaning Instructions .............................................................................. 11
Connection method ................................................................................... 11
Releasing the Cable Connection ............................................................. 12
Self-test ..................................................................................................... 12
Appendix .................................................................................................. 13
Technical data ........................................................................................... 13
Keyboard layout ........................................................................................ 14
Manufacturer’s Declaration and Approval
General Authorization
This device fulfills the requirements of the EEC standards
89/336/EEC “Electromagnetic Compatibility” and
73/23/EEC “Low voltage Directive”.
Therefore, you will find the CE mark on the device or packaging.
FCC-Class A Declaration
This equipment has been tested and found to comply with the limits for a
Class A digital device, pursuant to part 15 of the FCC Rules. These limits
are designed to provide reasonable protection against harmful interference when the equipment is operated in a commercial environment. This
equipment generates, uses, and can radiate radio frequency energy and,
if not installed and used in accordance with the instruction manual, may
cause harmful interference to radio communications.
Operation of this equipment in a residential area is likely to cause harmful
interference in which case the user will be required to correct the interference at his own expense.
Le présent appareil numérique n’émet pas de bruits radioélectriques
dépassant les limites applicable aux appareils numériques de la “Class A”
prescrites dans le Règlement sur le brouillage radioélectrique édicté par le
ministère des Communications du Canada.
GB - 1
User Information
Tested Safety
geprüfte
Sicherheit
The TA61 has been awarded the GS
symbol for “Geprüfte Sicherheit” (tested safety). TA61 fulfills the requirements for ergonomy according to
ZH1/618:1980-10.
Additionally, the TA61 has also been
awarded the cUL- and UL- symbol.
R
User Information
User Information
Wincor Nixdorf (WN) does not accept responsibility for radio and TV interference and faults that are caused by unauthorized changes that have been made to the devices.
Furthermore, cables or other devices that have not been
approved by WN may not be connected to the device. The
user is responsible for any faults and interference that are
caused as a result.
Repair work on the devices should only be carried out by
authorized and specially trained personnel. Improper repairs will lead to the loss of any guarantee and liability
claims.
Safety Instructions
Note the following safety information:
GB - 2
■
Lay all cables and supply lines so that nobody can tread on them or
trip over them.
■
Data cables should be neither connected nor removed during
thunderstorms.
Scope of supply
■
Protect the device from dust, moisture and heat.
■
Take care to ensure that no foreign objects (e.g. paper clips) or
liquids can get into the inside of the device, as this could cause
electrical shocks or short circuits.
■
Place the keyboard on a non-slip surface.
Cleaning Instructions
The keyboard should be cleaned with a germicide from
time to time. Before cleaning in between the keys on the
keyboard with a brush, loosen and remove the key caps
using the key removing device. Do not allow dust to get in
through the open keyboard mechanics.
Scope of supply
Scope of supply
The product includes one TA61 keyboard, one User Guide and one accessories kit containing the following:
■
1 * triple “0" key cap
■
1 * double “0" key cap
■
1 * single “00" key cap
■
2 * quadruple key caps
■
6 * double key caps
■
Transparent plates
■
Blank sheets for labeling
■
1 key cap remover
■
1 set of keys
GB - 3
Scope of supply
The set of keys contains:
Key 1 for key position 1
Key 2 for key positions 1 and 2
Key 3 for key positions 1, 2 and 3
Key 4 for key positions 1, 2, 3 and 4
The following items can be ordered optionally:
Accessories kit 1:
20 dummy keys (1 x 1)
Accessories kit 2:
6 double key caps
2 quadruple key caps
Accessories kit 3:
12 single key caps
Depending on your order, the keyboard may have a swipecard reader.
If damage has occurred during shipping or if the package contents do not
match the delivery note, promptly notify your Wincor Nixdorf sales outlet.
GB - 4
Mounting keys
Exchanging the Keys
You can remove each of the key
caps using the key removal device
enclosed, pulling the key upwards.
Place the key removal device on the
selected key until you hear a click.
GB - 5
Mounting keys
Now remove this key from the keyboard by pulling upwards.
If the key that has been removed has
a number or character on it, you can
change the lettering as follows:
Using a thin object (e.g. paper-clip
etc.), press upwards against the
plastic cover through the opening on
the underside of the key. Please refer to the next chapter for instructions
on how to insert the new label.
Mounting keys
Inserting Key Labels
Inserting Key Labels
Below, you will find instructions on how to insert the key labels:
Transparent key cover with mat and
concave side up
Each key should be labelled individually. You can use the empty labels
delivered with the system to do so.
Label for keys
Place the written label on the key
cap.
Key cap
GB - 6
Insert the transparent key cover with
the mat and concave side upwards
until it clicks into place in the key cap.
Inserting Key Caps
The labels are replaced as follows:
➀
Remove the key cap from the keyboard (see removing the key cap)
and pull the transparent key cap upwards.
➁
The transparent key cover is then released and the label can be
removed.
➂
Replace the label and fit the transparent key cover (with the mat and
concave side facing upwards) back into the key cap.
Inserting Key Caps
Inserting Key Caps
cam
Insert the key cap in the keyboard
and press firmly into place.
rocker plate
When inserting double or triple keys,
please ensure that the guide cylinder
is on the left. The quadruple key
caps are corresponding - with the
guide cylinder arranged on the upper
left.
Ensure while putting on the key
caps that the white cam of the rocker
plate are in the planned bulge of the
keyboard.
If you hear a click, the key caps are
inserted correctly.
quadruple key cap with scissors
GB - 7
The TA61 keyboard
General
The TA61 keyboard has a keypad with maximum 60 usable keys. Except
for the numeric keys (0 to 9), the C key and the 0.00 key, the key layout is
flexible, i.e. any two contiguous keys can be combined to form a double
key and any four keys can be combined to form a quadruple key, either
horizontally or vertically.
The TA61 keyboard is equipped with a key switch with 6 switch positions
and is available with or without a swipecard reader.
A power-up reset and an automatic self-test are performed each
time the POS terminal is switched on. Following these self-tests, the
keyboard is ready for operation. The keyboard receives its power
from the POS system.
TA61 keyboard with swipecard reader
GB - 8
Keypad
TA61 keyboard without swipecard reader
Keypad
Keypad
In the TA61 keypad, two keys can be combined to form a double key and
four keys to form a quadruple key, either horizontally or vertically. Only
one key code is generated by each double or quadruple key. Different key
codes can be set for the multiple keys by rotating the key caps. These
caps have a guide cylinder that is shifted when the cap is rotated, resulting
in different key codes.
Key caps can be changed on the spot using the key cap remover included
in the scope of supply. When using the key caps for multiple keys, note
the position of the pin on the underside, making sure that the desired code
is set.
GB - 9
Key switch
Key switch
Key switch
The TA61 keyboard is equipped with a key switch with 6 switch positions.
Switch position 0 is the basic position; switch positions 1-4 are provided
for customer-specific applications. In positions 0 and 1, the key can be removed.
0
T
1
2
3
(5)
4
The sixth switch position, which is
designated on the lock by T, is
intended for use by Field Engineering. From switch position 0, the key
provided can be turned to position T
only. This key is not included in the
scope of supply.
The key switch has only one
closure, i.e. there is only one set of
keys for all keylocks that includes the
above-mentioned key variants for the
various switch positions.
Swipecard reader (SCR)
The TA 61 is equipped with a swipecard reader which enables all tracks of
the swipecard reader to be read simultaneously when the card is swiped
through once.
Using the swipecard reader
Pull the magnetic card evenly and quickly, from right to left, through the
slot on the swipecard reader. Make sure that the magnetic stripe is facing
the keys.
GB - 10
Connection method
Note the following precautions when handling magnetic cards:
■
Never allow magnetic cards to come into contact with liquids.
■
Never bend or fold magnetic cards.
■
Never expose magnetic cards to a magnetic field.
Insert the magnetic card in the special slot provided on the
reader from the right-hand side only; inserting the card at
another location could damage the read heads.
Cleaning Instructions
In order to ensure that the quality of reading results is maintained, clean
the swipecard reader at least once a week. To do this, use the special
cleaning card that can be ordered from Wincor Nixdorf
.
Connection method
Connection method
The connector for the keyboard is
a standard 6-pin mini-DIN connector.
The cable is 1 meter long. This
cable can be extended an additional
2 meters by means of a standard
cable that can be ordered optionally.
GB - 11
Releasing the Cable Connection
Releasing the Cable Connection
Releasing the Cable Connection
Never remove a cable from a connector socket by simply pulling on the
cable. Always remove the cable by the connector housing. Please follow
the instructions below when removing cables:
■
Turn off all switches to the mains and electrical equipment.
■
Remove all mains cables from the shockproof sockets installed in the
building.
■
Loosen all cables on the electrical equipment.
➀
The mini-DIN connectors are left
plugged in until unlocked.
➁
Using your thumb, pull gently on plastik connector housing ➀, removing
the connector from the socket. This
unlocks the connector. The metal
part of the connector is now visible.
Now remove the connector from the
socket ➁.
Self-test
A self-test of the keyboard is performed each time the POS terminal is
switched on. During this test, the interface to the system is disabled. The
system is informed of the successful completion of the test.
GB - 12
Appendix
Technical data
Housing dimensions
Footprint:
Height:
280mm x 172mm
49mm
Cable length
Standard:
Optional:
1m
2m extension cable
Power supply
5V +/- 10%, max. 220mA
Protocol
PC AT interface, bidirectional,
seriel, synchronous
Connection
Mini-DIN connector (6-pin.)
Keyboard
Keyboard with variable
key assigment, two-Key rollover
Microprocessor
8052 NMOS-CPU, 12MHz, 8-KByte ROM
80C52 CMOS-CPU, 12MHz, 8-KByte ROM
Power-up reset
Yes
Self-test
Yes
Technology
NMOS, CMOS, standard TTL
Key switch
Switch positions:
Swipecard reader
Number of magnetic heads:
Magnetic card coding:
Reading rate:
5, plus insertion position
2 or 3
To ISO 3554
15 to 80 cm/s
GB - 13
Keyboard layout
Keyboard layout
Keyboard layout
C 7 8 9
4 5 6
1 2 3
0
Labelled key, single (fitted at the factory)
9
Key with inscription (numeric keypad)
Freely assignable
GB - 14