1
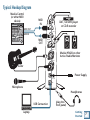
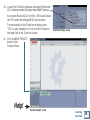
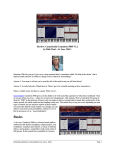
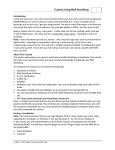
™
G E T T I N G
S T A R T E D
Mackie Control
(or other MIDI
device)
SPDIF
MIDI
IN
IN
OUT
IN
MIDI OUT
DAT, CD/DVD player
or CD-R recorder
MIDI
MIDI IN
OUT
MIDI
OUT
MONITOR
L/R
INPUT 1
Mackie HR624 or other
Active Studio Monitors
INPUT 2
Guitar
Power Supply
9V DC
750mA
USB
Microphone
Headphones
USB Connection
Laptop
(plug into
front panel)
Contents
Getting Started ----------------------------------------- 3
Installing the Software-------------------------------- 4
To install the software on a PC: ---------------------------- 4
To install the software on a Macintosh:------------------ 5
Installing and Connecting the Hardware ---------- 6
Typical Hookup Diagram------------------------------ 7
Making a Recording ------------------------------------ 8
Computer System Requirements------------------- 17
Stop Right There!
It is very important that you
register your Spike, then you
will have access to the latest
drivers, software, firmware updates, and any updates to this
guide. Please visit:
www.mackie.com/spikeauth
“Mackie,” “Spike,” and the “Running Man” figure are trademarks or registered trademarks of LOUD
Technologies Inc. All other brand names mentioned are trademarks or registered trademarks of their
respective holders, and are hereby acknowledged.
Manual Part No. SW0080 Rev. C 07/2004
© 2004 LOUD Technologies Inc. All Rights Reserved.
Getting
Started
2
Getting Started
We hope this guide will help you get started making recordings with Spike. It describes how to install the software, hook up your gear, and make a recording using the XD-2 USB interface and the
Tracktion software.
The information in this guide is also duplicated in the user's guide "Getting Started" chapter. We
recommend that you read over the user's guide whenever you have a spare moment in your busy day.
It contains all manner of useful information regarding safety, software licensing, dire warnings about
stuff, warranty, and repair details, etc.
Read the user's guide safety pages before connecting the XD-2 and hooking up your system.
Iconography
This icon will lead you to some further explanations of features and practical tips.
This icon marks information that is very important, so make sure you have a read.
Getting
Started
3
Installing the Software
• The Spike CD contains an installer which will help you install the various software applications,
plug-ins and drivers.
• Visit www.mackie.com/spikeauth to register your Spike, and download any updates to the software and firmware.
• Your computer must meet the minimum system requirements (shown on page 17).
• The XD-2 software application does not need authorization in order to run.
• Tracktion authorizes the first time it detects the XD-2 hardware attached to your computer.
Mackie Final Mix authorizes with the Tracktion PC version.
• Other software bundled with Spike will need authorization. You will need Internet access, but it
does not have to be from the same machine you install the software on.
• The software titles and offers included with Spike are subject to change without notice.
To install the software on a PC:
1. Turn off any (non-essential) applications.
2. Insert the Spike CD into your PC’s CD drive.
3. The CD should begin automatically, bringing up an installer (StartHere.html). If not, click Start in
the task bar, then click Run. Type: <drive>:StartHere.html (where <drive> is the letter assigned
to your CD drive).
4. Follow the instructions in the installer to load and authorize the various software applications and plug-ins. A basic installation would be to install the XD-2 application, its drivers, and
Tracktion. This will get you going fairly nicely.
Getting
Started
4
5. If you want, go ahead and install Warmer Phaser (and other plug-ins from Nomad Factory), and
Antares plug-ins.
6. You can accept the default directories, or specify different locations. We recommend that you use
the default settings.
Note: Be sure to install the plug-ins into the Tracktion plug-ins folder, so they are accessible to Tracktion. If you have already installed plug-ins, you can direct Tracktion to scan for
these folders as well. Tracktion will default to scan both the "C:/Program files/Tracktion/
plugins/" and "C:/Program files/Steinberg/VSTplugins/" folders.
To install the software on a Macintosh:
1. Turn off any (non-essential) applications.
2. Insert the Spike CD into your Macintosh’s CD drive.
3. Open the disk icon on your desktop.
4. StartHere.html contains the latest instructions for installing the software. Some software is drag
and drop, and some use installers. Follow all instructions for authorizing the software.
Note: For plug-ins, be sure to install them into the "/Library/Audio/Plug-ins/VST" folder,
so they are accessible to Tracktion. If you have already installed plug-ins, you can direct Tracktion to scan for these folders as well. Tracktion will default to scan both the
"/Library/Audio/Plug-ins/VST" and "Users/<your login name>/Library/Audio/Plug-ins/VST"
folders.
Getting
Started
5
Installing and connecting the hardware
• To stand the XD-2 upright, pull the stabilizer bar downwards and
twist it out 90˚ from the body, as shown here. The spring is quite
strong, so be careful not to nip yourself as it snaps back into place.
• Turn down all XD-2 knobs to prevent any loud surprises.
• Connect microphones using the XLR input connectors on the back of the XD-2. Press the 48V button if your microphone needs phantom power (mostly used for condenser microphones).
• Connect guitars or other instruments using the 1/4" input connectors on the back of the XD-2.
Press the front panel INSTRUMENT button (guitar icon) if you are connecting your guitar or instrument directly to the XD-2 without using a preamplifier or direct box.
• Connect a pair of powered monitor speakers, or an amplifier connected to speakers, to the XD-2
rear panel Monitor jacks. You can also plug in headphones to the front panel Phones jack.
• Connect one end of the external power supply to the XD-2's 9 VDC
connector, and the other end to an AC power source. There is no
power switch; the XD-2 is on when the power supply is connected.
The universal power supply can be used with any local AC Mains
voltage between 90 VAC and 264 VAC.
• Connect the XD-2's USB connector to a USB port on your computer
with the USB cable provided.
• Launch the XD-2 software, and an XD-2 icon will appear in your PC
system tray, or Dock on a Mac. Click on the icon to open the program, then you can configure the XD-2 system to your liking.
Getting
Started
6
Typical Hookup Diagram
Mackie Control
(or other MIDI
device)
SPDIF
MIDI
IN
IN
OUT
IN
MIDI OUT
DAT, CD/DVD player
or CD-R recorder
MIDI
MIDI IN
OUT
MIDI
OUT
MONITOR
L/R
INPUT 1
Mackie HR624 or other
Active Studio Monitors
INPUT 2
Guitar
Power Supply
9V DC
750mA
USB
Microphone
Headphones
USB Connection
Laptop
(plug into
front panel)
Getting
Started
7
Making a Recording
The following example of a recording session uses a guitar plugged directly into the XD-2 channel 1
input, and a microphone plugged into the channel 2 input, to record audio tracks in the Tracktion software. We will also record some MIDI data that will trigger a softsynth within Tracktion.
Before starting, make sure you have correctly installed the XD-2 and Tracktion software.
1. Connect your equipment using the diagram on the previous page as a guide.
2.
On the XD-2 front panel, set the GAIN, MONITOR and PHONES knobs to minimum, and the MIX
knob to DIR (direct). Press the 48V button if your microphone needs phantom power. Press the
INSTRUMENT button on Channel 1 if you are not using a guitar preamp or direct box.
3.
On your computer, open the XD-2 software and click the “Overview” button.
You should see input and output meters, along with slide faders and a bunch of other cool stuff.
Make sure the USB and SPDIF buttons are not illuminated.
XD-2 Software Overview Screen
4.
Play the guitar and gently turn up the front panel Ch.1 GAIN knob. You should see the XD-2 front
panel LEDs dance with happiness.
5.
The Overview screen's input meters should dance as well. This means you have signals coming
into your computer. Make sure the OL LED does not light; turn down the GAIN knob if it does. If
the meters do not show any signals present, check your connections to the XD-2. Getting
Started
8
6.
On the XD-2 front panel (with the MIX knob set to DIR) turn the PHONES knob gently to hear
yourself through your headphones. Remember – to avoid feedback, keep your monitor volume
turned down while using a microphone, especially if your mic is close to the monitors.
7.
To eliminate any low-end bass rumble, push in the front panel HP filter button (see user's guide,
page 25 for more details.
8.
On the Overview screen, click the DSP button to bring up the DSP graphic interface.
Fool around with the channel EQ,
Compressor/Limiter, and Gate/Expander
as you see fit. For more details of the mysterious DSP workings, see page 46 of the
user's guide.
Note: The XD-2 has its own DSP
chip, so its processing power is independent of your CPU. This means
you can use as much XD-2 processing
as you like, or need, without causing your
computer to slow, so be creative and have
fun. Your audio recording will be affected by
any changes you make.
9.
When you are happy with the sounds and
are ready to start recording, put down the
guitar and....
XD-2 Software DSP Screen
...continued on the next page...
(rather exciting isn't it?)
Getting
Started
9
10. Launch the Tracktion software and select the Mackie
XD-2 hardware under Settings menu/WAVE devices.
Also select Mackie XD-2 (for Mac), USB Audio Device
(for PC) under the Settings/MIDI devices menu.
For more details of the Tracktion software, press
"F12" on your keyboard, or click the HELP button in
the lower left of the Tracktion screen.
Tracktion Settings screen
11. Click the NEW PROJECT
button in the
Projects Menu.
Help!
Tracktion Project screen
Getting
Started
10
12. Navigate to a good location, enter a wonderful name for the
new project in the pop-up dialog box, then click Save. All of
this project's tracks, clips and edits will be saved here by
Tracktion.
Note: Do not create project folders inside the
Tracktion main folder, or any software main folder.
Otherwise, if you un-install/re-install software, your
project folders will disappear (mine sure did).
13. “New edit #1” appears at the top of the Item List. Do not be alarmed. An Edit is Tracktion's way of
keeping everything related to your song. See Tracktion's Help (F12) for more information.
Getting
Started
11
14. Double click on “new edit #1” to open up the Edit Screen. This new project starts with eight horizontal tracks, stacked vertically. You can add or remove tracks once you get going. Tracks can
also be renamed by selecting them and typing the new name in the Properties area.
The audio icon represents Tracktion's stereo audio input (from your XD-2). The MIDI icon represents its MIDI input. If these icons do not appear, check the input selections in the "Settings" tab,
and make sure the Mackie XD-2 is chosen as your audio input and output device.
INPUT 1 + 2
MIDI Icon
MACKIE XD2
Tracktion Edit Screen
Getting
Started
12
15. As we have a microphone and a guitar connected in this example, we want two independent channels instead of a stereo pair. Click the audio icon and uncheck the "treat as stereo channel pair"
button in the Properties area. Two independent audio icons will then appear.
Ch.1 Icon
INPUT 1
Ch.2 Icon
INPUT 2
MACKIE XD2
Treat as
stereo
channel
pair (off)
INPUT 1
The Properties of whatever is highlighted
Tracktion Edit Screen (with a high-lighted Input 1 Icon, and its properties shown)
Transport Area
Getting
Started
13
16. Click on the Ch.1 icon, hold down your mouse button, and drag it next to the track you want to
record onto. As it gets closer, an arrow pops out and connects the icon to the track. This indicates
the track is armed for recording. To disconnect an icon (disarm the track), drag it to the left and
the arrow will disappear. In the Properties area, set the Bit Depth to 16 bit, or 24 bit as needed.
We will begin by recording the guitar, so go ahead and arm track 1. Leave the icon highlighted, as
the input meters (in the Properties area) will show the signal levels being recorded.
M=Mute
S=Solo
INPUT 1
Channel
Meter
Pan and
volume
INPUT 2
MACKIE XD2
INPUT 1
Play
Record
Bit Depth
Properties Area
Transport Area
Tracktion Edit Screen (with connected Input 1 Icon, shown larger than real size)
Getting
Started
14
17. To record, click the Record button in the Transport area (or press
keyboard R). Tracktion records any armed tracks (icon with arrow).
Play your guitar as the vertical cursor line moves right. A pink bar shows the track recording.
18. To stop recording, click the Record button (or R) again. A squigglywiggle (amplitude vs time waveform) of your recording is displayed.
19. To play back your guitar recording, grab the purple vertical cursor line with your mouse and move
), turn the MIX knob to USB, click Play (green
it to the beginning of your recording (or press
triangle) in the transport area, and gently turn the MONITOR or PHONES knob up to suit. If you
are happy with your guitar recording, drag the Ch.1 icon to the left to disarm the track.
20. To record some vocals, drag the Ch.2 icon to track 2 (the mic is connected to Ch.2 on the XD-2).
To play back your guitar recording and hear the direct input from your microphone, turn the MIX
knob to the 12 o'clock position. Adjust the CH.2 GAIN knob so your vocals do not light the OL
LEDs. Adjust the MIX knob to fine tune the balance between the direct and USB signal. Press Record to record your vocal masterpiece.
21. You can record other instruments, passages, vocals, wax cylinders, CDs and sessions onto other
tracks, and assemble a masterpiece by continuing in a similar fashion. As you record and play
other tracks, Mute any tracks you don't want to hear, (Mute M appears to the right of each
track).
22. When your unique sounds are on the computer, they can be processed in many ways, and optionally sent back through the XD-2 for a final master pass and tweak. Tracktion comes with various
plug-ins, and there are many third party plug-ins available. Tracktion lets you export your masterwork in various formats for distribution, and lets you import previous work.
For more details about using Spike please see page 59 of the user's guide.
Getting
Started
15
23. MIDI data can be recorded
using one of the softsynths
supplied with Tracktion. Drag
the MIDI icon to the left of a
track, and Arm it.
24. Click the "New Filters" button,
and drag down the new filter
to the right of the track, in
front of any existing filters. A
list of plug-ins will appear, and
you can choose the MDA DX10
or other synths. (Synths have
a little keyboard icon). The
properties area shows various
options for the MDA DX10,
including loading presets.
Tracktion Edit Screen (with connected MIDI Icon) and new filter menu
25. Depending on the setting of your
keyboard, enable "end to end"
in the MIDI icon's Properties area and
"e-to-e" in the Transport area, in order
to hear your keyboard through the XD-2.
You can click on the keyboard to test out
the synths.
Properties area (when MIDI Icon is highlighted)
26. Press Record and ...play Maestro play!
27. See Tracktion's Help (F12) for more information on end-to-end and MIDI.
Getting
Started
16
Computer System Requirements
Minimum PC requirements
• WIN XP
• Intel Pentium 3 or 4, or AMD Athlon (750 MHz or better is recommended for Tracktion).
• At least 128 MB RAM; 256 MB or more is recommended for Tracktion work.
• Super VGA (1024 x 768) or higher-resolution video adapter and monitor.
• CD-ROM or DVD drive.
• Keyboard and Wheel Mouse or compatible pointing device.
• USB port
Minimum Macintosh requirements
• Macintosh OS 10.3
• Power Mac G3, or G4, iMac, eMac, Powerbook G3 or G4, or iBook computer with 128 MB of
physical RAM. (The original early PowerBook G3 upgrade cards are not supported by OSX).
Getting
Started
17
LOUD TECHNOLOGIES INC. 16220 WOOD-RED ROAD NE ¥ WOODINVILLE, WA 98072
USA US AND CANADA: 800.898.3211 ¥ EUROPE, ASIA, CENTRAL AND SOUTH AMERICA: 425.487.4333
MIDDLE EAST AND AFRICA: 31.20.654.4000 ¥ FAX: 425.487.4337 ¥ WWW.MACKIE.COM
E-MAIL: [email protected]