1
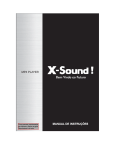
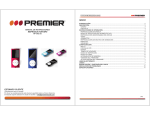
User Manual This player is a new-generation digital personal stereo, supporting audio files in MP1, MP2, MP3, WMA, OGG, WMV, ASF and WAV formats. With its perfect timbre, high dependability, and sophisticated appearance, this player is called a masterwork. We sincerely hope that it can bring you extraordinary enjoyment in the digital era. Declaration Above all, thank you for purchasing our digital player! For better operation, please read this user manual carefully before use. In order to render better service, this use manual is subject to -1- change. This player is subject to change in its performance and function without prior notice. If the actual product installation and use methods are inconsistent with the manual, please visit our website for the latest product information. Content Declaration……………………………………………………………… 1 Content……………………………………………………………… 2 Functions Overview……………………………………………………… 4 Meet player…………………………………………………………… 5 Functions………………………………………………………………… Key the 7 Instruction……………………………………………………………8 -2- Keystroke Music USB Disk Function……………………………………………………… 24 Film Action Definition………………………………………………9 Play……………………………………………………………… Play……………………………………………………………… Record…………………………………………………………………… 10 12 13 Audio………………………………………………………………14 ACT to WAV Conversion……………………………………………… 15 FM Radio(Optional function)………………………………………… 16 Picture 19 System Browse………………………………………………………… Setup…………………………………………………………… 20 Text Reading………………………………………………………… 22 Games (Optional 23 function)…………………………………………… Upgrade…………………………………………………………… 25 Recommendation Highlight……………………………………………… 27 -3- Problems and Power Adapter…………………………………………………… Technical Solutions……………………………………………… Details……………………………………………………… Functions Overview -4- 30 32 33 ● Original creation of MTV-play function. ● JPEG picture browse. ● Outer stereo sound design. ● Sophisticated appearance. ●MP1, MP2, MP3, WMA, WMV audio files supported. ● Firmware upgrade. ● FM stereo radio. ● Inner-microphone recording, record / repeat. ● U-disk function, no need for drive in WIN2000 system and above. ● “Show in” disk mode. ● 7 EQ: Normal, Rock, POP, Classic, Soft, Jazz and Bass. ● Playing modes: normal, single music circular, play music in sequence, repeat to play all music. Meet the Player Power on/off -5- MENU PRE NEXT VOL PLAY Earphone Hole USB Battery If the electricity is 3.7 V, the icon shows full, and the icon bar will decrease during use. -6- •If the electricity is nearly used up, the icon bar will be completely blank, then it should be recharged. When it is necessary to charge, the player must be turned on, otherwise it won’t respond to the rechargeable task. When the player is charging via PC USB port, you should not remove the player. If you want to remove the player, you MUST disconnect the player from USB mode first – use SAFELY REMOVE . When you don’t use the player, please turn off the power. Functions Enter the menu -7- Enter various menus by pressing “Mode” key. Menus are divided into main menu (long press to enter when the player stops), submenus under the playing state (short press to enter) and submenus under the stop state (short press to enter). Browse ○Select to browse songs and menu. ○When songs are playing, fast play backwards or forwards. Enter different function mode Enter different mode under the main menu. Main menu:(enter by long press “Mode”) The interface under the main menu: -8- Key Instruction -9- ● Key Explanation 1. “PLAY”: Turn on the player / play / stop. 2. “MODE”: Select, enter. 3. “ON/OFF”: Power on / power off. 4. “NEXT/VOL+”:Next, fast play forwards; volume adding, fast adding. 5. “PRE/VOL-”:Last, fast play backwards; volume reduces, fast reduce. 6. “VOL”: Enter volume adjusting mode. 7. “USB”: USB port. 8. “Earphone hole”: Standard earphone hole. ● Keystroke Action Definition Keystroke actions include: short press, long press, single press, press without loose. Hereunder, “Press” refers to short press, otherwise specifically stated. - 10 - Short press: It takes effects immediately once you press the key. Long press: It takes effects only if you press the key for more then 1.2 seconds, and only effectuates once. Single press: Press the key, it takes effects only when you put your finger away from the key. Press without loose: Press the key until loose, the events take place at a certain frequency, such as “fast play forwards” and “fast play backwards”. Music Play Simply operation 1. If you want to listen by earphone, please insert the earphone into the earphone hole first. 2. Long press “Play” to turn on the player and enter the main - 11 - menu, select “Music”, and press “Mode” to enter, then press “Play” to start to play music. 3. Select music:Use “PRE” to choose the last song. Use “Next” to choose the next song. 4. Volume control:Press “VOL”, then press “PRE” to reduce volume; Press “VOL”, then press “NEXT” to add volume. EQ mode 1. Play music. 2. Press “Mode” to enter the submenu under the playing state. 3. Press “Next” to select “EQ mode”. 4. Press “Mode” to enter the menu of “EQ mode”. - 12 - Lyric synchronize The player supports “*.LRC” lyric files, and makes the song and lyric play in-phase. How to use lyric files? Make sure the name of the lyric file is the same as that of the music files. For example, Song name: Ah Du - Si Ye.MP3; Lyric name:Ah Du - Si Ye.LRC. If there’s a lyric file matching the music file, then when this music is playing, the lyric will display automatically and play inphase with the song. Film Play The film must be converted into the AMV format first, then follow the operation of “Music Play”. When the film in AMV format is playing, only - 13 - the following keys are effective. PLAY: Stop play; long press this key to turn off the player. MODE: Long press this key to enter main menu. PRE/NEXT: last one/ next one. Record Make sure there’s enough energy when recording. The player supports to store 99 voice files under each directory. In the record mode, 1. Enter the main menu. 2. Press “Next” to select record mode. 3. Press “Mode” to enter record mode. 4. Press “Play” to begin to record. Recorded voice will be stored in the current directory set in the “stop-recording submenu / main disk directory”. - 14 - If the displayer shows “Space fully occupied.” it means no room for recording files, then please delete some other documents to release space. If the displayer shows “Full directory.”, it means there have been 99 files under the current directory, then please choose another directory to store. During recording, only “Play” key is effective. Choose the recording format 1. Enter the stop-recording interface. 2. Press “Mode” to enter recording submenu. 3. Press “Next” to select “record format” submenu, then press “Mode” to enter. 4. Press “Next” to select the suitable recording format, and then press “Mode” to confirm. 5. Press “Play” to begin recording. - 15 - Voice Play 1. Enter the main menu. 2. 3. 4. 5. Press “Next” to select “Audio Mode”. Press “Mode” to enter the playing interface. Press “Play” to begin to play. Select voice files. Use “PRE” to select the last one. Use “Next” to select the next one. 6. Volume control Press “VOL”, then press “PRE” to reduce volume. Press “VOL”, then press “NEXT” to add volume. ACT to WAV Conversion The recorded ACT files can be changed into WAV files by the - 16 - attached installment tool. 1. Run the “Sound Converter” program, and click “Open”. 2. Choose the ACT files that you want to convert. 3. Click “Convert” to convert it into WAV files. Apart from its conversion function to convert ACT files into WAV files, this tool can play WAV and MP3 files. FM Radio When you enter the FM radio mode every time, you have to renew the saved channels before you listen to it. When you enter the FM mode for the first time, it is at the minimum frequency. Listen to the radio 1. Enter the main menu. - 17 - 2. Press “Next” to select “FM Mode”. 3. Press “Mode” to enter “FM Mode”. 4. Radio recording. When listening to the radio, you can record the program you like. Press “Mode” to enter the submenu of FM, select “Radio recording”, and the player will enter the recording interface, then press “PLAY” to record. And press “PLAY” again to stop recording, press “MODE” to store the recording file. 5. Tuning Press “PRE”: move backwards at the pace of 100 KHz. Press “Next”: move forwards at the pace of 100 KHz. 6. Save the channel. Press “Mode” to enter FM submenu. Press “Mode” to store this channel. 7. Listen to the saved channel(s). - 18 - If more than one channel is saved, you may press PLAY and listen to them one by one. 8. Automatic search Press “MODE” to enter submenu, then press “NEXT” to select “Automatic search”. The player will search at the pace of 100 KHz and will stop on the channel it searches. 9.Ordinary band The channels that can be received in the ordinary band are the very common channels. Press “NEXT” to select the next channel and “PRE” to select the last one. The player can receive 20 channels at most. 10.Japanese band All the channels received in the Japanese band are Japanese channels. Press “NEXT” to choose next channel and “PRE” to choose last one. The player can receive 20 Japanese channels at most. - 19 - 11.Volume control Press “VOL”, then press “PRE” to reduce volume. Press “VOL” , then press “NEXT” to add volume. : You can select channels in “Ordinary band” and “Japanese band” according to your preference. Picture Browse (JPEG browser) The player supports picture browse in different JPEG formats used in the internet. File selection - 20 - It’s the file selection state if you enter from the main menu. If there is no file, then it’s an empty directory. Press “Play” to enter picture playing state. Press “Next / PRE” to select the next or the last file. Press “Mode” to enter stop submenu which includes 4 items, namely, “directory selection”, “play setup”, “delete files” and “exit”. There are two playing states: manual broadcast and automatically broadcast. In the automatically broadcast state, you can set the time interval to automatically turn pages from 1 second 8 seconds. All other keys are ineffective. Picture playing Enter the state of picture playing. Press “Next / PRE” to display the next or the last picture. - 21 - Press “Play” to return to the file selection state. Long press “Mode” to return to the main menu. All other keys are ineffective. System setup How to set up? You can set up the system parameter here. The option will change according to firmware upgrade. 1. Enter the main menu. 2. Press “Next” to select “System setup”. 3. Press “Mode” to enter “System setup”. Parameter Instruction (system time) Set up system time. (displayer setup) Set up brightness and darkness of displayer and the blank screen mode. - 22 - (language) Set up different languages. ( power-off setup) (repeat setup) (online mode) Set a countdown time (unit: minute). The player will turn off automatically at the set time. Set up the working state when in the repeat mode. Set up the “show-in” functional options. (storage setup) Check the EMS memory and its usage. (firmware vision) Display the player’s firmware vision. ( firmware upgrade) (exit) For firmware upgrade only. Exit the interface. Skill tips: press “Mode” to finish setup, and then press “Play” to exit the menu. And such way to exit menu works in all the menus state. Text reading - 23 - Enter the main menu, press “NEXT” to select E-Book, then press “Mode” to enter the next menu. ● Main disk directory: Choose the root directory in the removable disk. Press “Mode” to enter “main disk directory”, press “NEXT” or “PRE” to select the directory in which your target text locates. Press “Mode” to return to the upper menu. Note: If your target text is in the root directory of your removable disk, then no need to choose the directory. “Play setup”: Set the text reading playing mode. There are two playing states: manual broadcast and automatically broadcast. Manual broadcast means the user turn the pages by pressing “NEXT” or “PRE”. While in the automatically broadcast state, you can set the time interval (unit: second) - 24 - to automatically turn pages. Select a file name, then press “PLAY” to begin text reading. Games Enter the main menu, press “NEXT” to select “Games”. Press “Mode” to enter the next menu. 1)Russian box Press “NEXT” or “PRE” to select “Russian box”. “Speed setup”: Set up the speed of the game. There are 5 speed grades, from 1-5. If “1” is selected, you choose the slowest speed. The bigger the number is, the faster the speed is. Key instruction: “Last/Next”: Move left or right. “VOL+”: Speedup. - 25 - “PLAY”: Transfigure. Long press “Mode” to exit the game. Game instruction: Scoring: To remove one layer of box, you can get 10 score. Finished: When there is no space between the box and the top, then it will remind you that “Game over.” USB disk function The player supports standard USB function, working in Windows98 ( driver-installation needed ) ,Windows 2K or above (driver-installation needless),Mac OS 10.3 or above, Linux Redhat 8.0 or above. The player supports USB charge mode. It can play without battery. In the “Waiting state”, press “Mode” to return to the main menu, then select the function you want to operate. The player also supports “Suspend” mode. - 26 - After connect with PC, the displayer has three kinds of interfaces. 1.Waiting state 2.Downloading 3.Uploading files files Upgrade The player can use the software in the PC to upgrade its own software or maintain its firmware. 1. Enter the main menu. 2. Press “Next” to select “System setup”. 3. Press “Mode” to enter “System setup”. 4. Press “Next” to select “Firmware upgrade”, the press “Mode” to enter. - 27 - 5. Connect the player with PC. 6. Operate the “MP3 Player Update” program, then click “select the new version of firmware”. 8. Select the new firmware program. (Pick it in the attached CD or download it from the manufacturer’s website.) 9. Click “Begin to upgrade”, then the system will run the upgrade. 10.Once the upgrade finished, the displayer of the player will show as follows. Firmware upgrade is to improve and optimize the player’s - 28 - performance. If users don’t operate the firmware upgrade, the player can still work normally. The misconduction of firmware upgrade may cause the risk that the player could not work normally! Please read the user guide carefully! The operation of firmware upgrade is suitable for users who are equipped with basic PC knowledge. The firmware-upgrade software can not be used in other series of player, vice versa. Recommendation Highlight “Show in” disk function Generally speaking, MP3 users are troubled by “information - 29 - exposure”. They don’t want their “personal data” to be seen. So when lending their MP3 to friends, they must delete all their “privacy”, but it is really troublesome. From today on, the “show in” disk function of the player will solve this problem thoroughly. Users can use the attached tool to divide the USB disk into two parts at arbitrary ratio, (Users can see two disk icons on PC. If it is a Windows 2k system, then SP4 is a must, otherwise only one disk icon can be seen. If users want to see the other disk, then users should select “single common disk” / “single encrypted disk” in the “System setup / online mode”.) and encrypt one disk (of course, if not encrypted, then the two parts can work as two disks.), the data in the encrypted could be locked, without a password, no one can see them. That’s the great “Show in” disk function. 1. Connect the player with the PC. - 30 - 2. Run the attached installation program “MP3 Player Disk Tool”. 3. Select “disk divided and encrypted”, then select a proper capacity for the encrypted disk and select to set a username or password. Input a username in the blank of “New username” and a password in the blank of “New password”, and input the same password in the blank of “Confirm your new password”. Finally, click “begin” to divide the disk. 4. When the disk division finished, a prompt of “confirm or not” displays. 5. Click “confirm”, a prompt of “restart the computer or not” display, then click “confirm” again to restart the computer. 6. When the computer restarts, you can see two disks(only one disk icon shows in Windows 2K system with pre-SP4 vision. Click to check the encrypted disk (the second one), there are three files inside, two are locked ones and the other one is an - 31 - executable file, and the capacity of the disk is only 300 k. 7. Run the executable file “RdiskDecrypt.exe”, and input the username and password in the dialogue box. If the information is correct, then the disk can be opened and you can put your personal data in it. 8. When connecting with the PC, the encrypted disk could be opened only by filling the correct username and password. Note: To divide a disk into two or to combine two disks into one, the date in the disk(s) will be deleted. So please backup your data before hand. Warning: Never forget your username and password, or you can use the encrypted disk, and you can only cancel the - 32 - encrypted disk by combination of the two disks, but data in the encrypted disk will get lost. ● Problems and Solutions - 33 - Power Adapter No electricity No sounds in the earphone. The text on the displayer is in disorder. Poor FM reception. Music can be downloaded. Make sure the battery has been installed correctly. Make sure you have turned on the player. Make sure the volume is not 0, and the earphone has been put in the jack correctly. Make sure the audio file is not damaged or ineffective because the damaged MP3 files may cause different levels of noise or even could not been played. Make sure you have chosen the right language. Adjust the location of the earphone and the player. Turn off the electrical appliance nearby. The earphone can be used as antenna. Make sure the USB cable is not damage and in good connection with PC. Make sure the drive is correctly installed. Make sure there’s enough space left in the - 34 memory of the player. The player has built-in intelligent power management chip. If the player has not been used for along time, or cannot be turned on, please recharge the player for 12 hours. If the player cannot be recharged by the power adapter, please try to charge it by connecting with PC via USB cable for 2-3 hours before using the power adapter to charge. Charge Steps: 1. Make sure to pull the power switch to the “on” position. 2. Connect the power adapter with the USB cable. 3. Connect the power adapter with the power supply, then the red LED light will turn on. It means the power adapter is connecting with the city electricity. 4. Connect the USB cable with the USB port of the player. 5. After correctly connected, the displayer will show “charging”. 6. When it is fully charged, the displayer will show “Charge - 35 - finished.”(Note: if you pull the power switch to the “OFF” position, the displayer will also show “Charge finished.”, so please pull the power switch to the “ON” position.). 7. After charge finished, please take off the power adapter from the power supply jack. 8. Reminder: we kindly suggest you to charge by the our power adapter. If any damage, please contact our company or our dealer. Note: 1. When the player’s capacity is less than nominal capacity, it is a normal phenomenon. 2. Make sure to turn on the player, otherwise it cannot be recharged. ●Technical Details - 36 - Dimensions 91mmX46mmX8mm Displayer 1.8 inch, TFT screen Connect PC High-speed USB2.0 (FS)Flash disk! Storage Flash memory : 64 M-4G Record Sampling Rate 8KHz Format WAV ( 32K bps )、ACT(8K bps) 35 hours ( ACT , 128M Flash) time 技 术 规 格 - 37 - MP3,WMA,OGG,WMV , ASF,WAV FM Radio Audio Files Format Operation Temperature Earphone max output MP3 bit rate WMA,WMV,ASF,OGG , MAV bit rate Frequency response SNR Distortion Frequency ( L ) 10mW + (R)10mW(32Ohm) 8K bps – 320K bps 5K bps – 384K bps 20Hz-20KHz 85dB 76MHz – 96MHz / 87MHz – 108MHz Channel storage 20+20 Earphone max ( L ) 10mW + output (R)10mW(32Ohm) SNR 45dB MP1、MP2、MP3、WMA、WMV、ASF、WAV -5 to 40 ℃ - 38 - Languages (17) System 17 languages, including implied Chinese. English, French, German and so on. Windows98/SE/ME/2K/XP 、 Mac OS 10 、 Linux 2.4.2 Note: Product design and specifications are subject to change without prior notice. Note: The data of our products are huge and they have been carefully checked and corrected by our stuff; if any mistake please kindly excuse and point to us, we will constantly improve our quality. We will never accept any claim based on data, picture or literal description on our manual. Note: The right of final interpretation belongs to our company. - 39 -