1
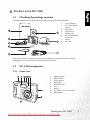
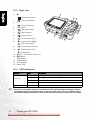
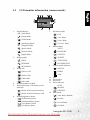
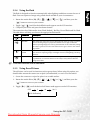
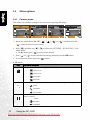
DC C420 Digital Camera
User’s Manual
Welcome
Downloaded from ManualsCamera.com Manuals
Copyright
Copyright 2005 by BenQ Corporation. All rights reserved. No part of this publication may be
reproduced, transmitted, transcribed, stored in a retrieval system or translated into any language or
computer language, in any form or by any means, electronic, mechanical, magnetic, optical, chemical, manual or otherwise, without the prior written permission of this company.
Disclaimer
BenQ Corporation makes no representations or warranties, either expressed or implied, with
respect to the contents hereof and specifically disclaims any warranties, merchantability or fitness
for any particular purpose. Further, BenQ Corporation reserves the right to revise this publication
and to make changes from time to time in the contents hereof without obligation of this company
to notify any person of such revision or changes.
Taking care of your camera
• Do not use your camera in the following environmental range: temperature below 0°C or above
40°C.
• Do not use or store your camera in the environments listed below:
– Direct sunlight
– High and dusty places
– Next to an air conditioner, electric heater or other heat sources
– In a closed car that is in direct sunlight
– Unstable locations
• If your camera becomes wet, wipe it with a dry cloth as soon as possible.
• Salt or seawater may cause severe camera damage.
• Do not use solvents, such as alcohol, to clean your camera.
• If the lens is dirty, use a lens brush or soft cloth to clean the lens. Do not touch the lens with your
fingers.
• To prevent electric shock, do not attempt to disassemble or repair your camera by yourself.
• Water may cause a fire or electric shock. Therefore, store your camera in a dry place.
• Do not use your camera outdoors when it is raining or snowing.
• Do not use your camera in or near water.
• If a foreign substance or water gets in your camera, please turn the power off immediately and
remove the batteries. Remove the foreign substance or water, and send it to the maintenance center.
• Transfer the data to the computer as soon as possible to avoid losing your images and / or video
clips.
Downloaded from ManualsCamera.com Manuals
BenQ DC 5530 User’s Manual
1. Touring your DC C420 ........................................................ 1
1.1 Checking the package contents ....................................... 1
1.2 DC C420 components .................................................... 1
1.2.1 Front view ........................................................... 1
1.2.2 Rear view............................................................. 2
1.2.3 LED indicators ..................................................... 2
2. Preparing Your DC C420 for Use ........................................ 3
2.1 Installing the batteries .................................................... 3
2.2 Inserting and removing an SD memory card ................... 3
3. Using the DC C420............................................................... 4
3.1 Mode dial ....................................................................... 4
3.2 LCD monitor information (camera mode) ...................... 5
3.3 Getting started................................................................ 6
3.3.1 Turning the power on / off ..................................... 6
3.3.2 Choosing the screen language ................................. 6
3.3.3 Setting the date and time ........................................ 6
3.3.4 Using the flash ...................................................... 7
3.3.5 Using the self-timer ............................................... 7
3.3.6 Using the zoom function ........................................ 8
3.3.7 Burst................................................................... 9
3.3.8 Auto exposure bracketing (AEB) ............................. 9
3.4 Menu options ............................................................... 10
3.4.1 Camera menu .................................................... 10
3.4.2 Video mode ....................................................... 12
3.4.2.1 LCD monitor information (video mode) .......... 12
3.4.2.2 Recording video clips .................................... 12
3.4.2.3 Video menu ................................................ 13
3.4.3 Playback mode ................................................... 13
3.4.3.1 LCD monitor information (image playback) ..... 13
Downloaded from ManualsCamera.com Manuals
i
English
Table of Contents
BenQ DC 5530 User’s Manual
English
3.4.3.2 LCD monitor information (video playback) ...... 13
3.4.3.3 Playback mode - the basics ............................. 13
3.4.3.4 Playback menu............................................. 15
3.4.4 Setup mode........................................................ 17
3.4.4.1 Setup menu ................................................. 17
4. PC DEPENDENT FEATURES........................................... 19
4.1 Bundled software.......................................................... 19
4.2 Transferring files to your computer .............................. 19
4.2.1 Step 1: Connect the digital camera to your computer 20
4.2.2 Step 2: Download images or video clips .................. 20
4.3 Connecting to a PictBridge compliant printer (optional
feature) ........................................................................ 20
5. Troubleshooting ................................................................. 22
6. Specifications ...................................................................... 24
7. Service Information ............................................................ 25
ii
Downloaded from ManualsCamera.com Manuals
BenQ DC 5530 User’s Manual
1
TOURING YOUR DC C420
English
1.1
Checking the package contents
Carefully unpack your kit box and ensure that you have the following items.
1.
2.
3.
4.
5.
6.
7.
8.
User’s Manual
DC C420 digital
camera
USB cable
AA batteries
Hand strap
DC C420 software
CD-ROM
Pouch
AV cable
If any of the items are missing or appear to be damaged, contact your dealer. Save the
packaging in case you need to ship your camera for service.
1.2
DC C420 components
1.2.1 Front view
1.
2.
3.
4.
5.
6.
7.
8.
9.
Shutter button
Built-in flash
Power button
Mode dial
Self-timer LED
Lens
Beeper
PC (USB) / AV Out terminal
Microphone
Touring your DC C420
Downloaded from ManualsCamera.com Manuals
1
BenQ DC 5530 User’s Manual
1.2.2 Rear view
English
1.
W
[
] Thumbnail button
] Zoom out button
2.
[
T
3.
[
] Zoom in button
Strap eyelet
4.
5.
[
[
6.
[
] Delete button
7.
[
] Arrow button (Up)
8.
[
] Arrow button (Right)
9.
[
] Self-timer button
[
] Arrow button (Down)
10. [
11.
12.
13.
14.
15.
] Rec-play button
] Menu button
] Arrow button (Left)
[ ] Flash button
Battery / SD memory card cover
OK button
DISP button
Tripod socket
LCD monitor
Status LED
1.2.3 LED indicators
Indicator
Status LED
Self-timer LED
State
Description
Solid red
• The digital camera is powering up.
Solid green
• The digital camera is ready to capture images or record video clips.
Blinking green • The USB communication / transfer is in progress.
Blinking red
• The flash is charging.
Blinking red
• The self-timer function is activated.
• The LCD on the digital camera is manufactured with sophisticated technology; however,
the display may have some light spots or show unusual colors. This is normal and does
not indicate display malfunction, nor will this affect the pictures you take with the camera.
2
Touring your DC C420
Downloaded from ManualsCamera.com Manuals
BenQ DC 5530 User’s Manual
2
PREPARING YOUR DC C420 FOR USE
English
2.1
Installing the batteries
You can use two AA batteries to power up the camera. Make
sure that the power of the digital camera is off before
inserting or removing the batteries.
To insert the batteries:
1. Make sure the camera is turned off.
2. Open the battery cover.
3. Insert the batteries in the correct orientation as shown
in the illustration.
4. Close the battery cover.
To remove the batteries:
1. Make sure the camera is turned off.
2. Hold the camera with the battery cover facing upward, and then open the battery cover.
3. Remove the batteries.
2.2
Inserting and removing an SD memory card
The DC C420 is equipped with 16 MB internal memory,
allowing you to record video clips and capture images. You
can also expand the memory capacity by using an optional
SD (Secure Digital) memory card to store more files.
1. Always make sure the camera is turned off before
inserting or removing a memory card.
2. Insert an SD memory card in the correct orientation as
shown in the illustration.
3. Close the battery / SD memory card cover.
To remove the SD memory card, make sure the camera
is turned off. Press lightly on the edge of the memory card and it will eject.
• Be sure to format the SD memory card with this
camera before the initial use.
• To prevent valuable data from being accidentally
erased from an SD memory card, you can slide the
write-protect tab (on the side of the SD memory
card) to “LOCK”.
• To save, edit, or erase data on an SD memory card,
you must unlock the card.
• SD memory card in the following sizes are supported: 8 MB, 16 MB, 32 MB, 64 MB, 128
MB, 256 MB, 512 MB, and 1 GB. The DC C420 is compatible with SD memory cards manufactured by Panasonic, Toshiba, and Sandisk. Please contact your local dealer for purchase information.
Preparing Your DC C420 for Use
Downloaded from ManualsCamera.com Manuals
3
BenQ DC 5530 User’s Manual
English
3
USING THE DC C420
3.1
Mode dial
You can select from seven shooting modes and setup mode according to shooting conditions
to achieve the desired effect.
No.
Icon
Mode
1
[
Power button Press to turn on / off the power.
2
[ P ] Program
3
[ A ] Auto
4
4
]
Description
Select this mode to access advanced features.
Select this mode to adjust point-and-shoot action automatically.
Video
Select this mode to record video clips.
[
]
5
[
]
Portrait
Select this mode to make people stand out with the background out-offocus.
6
[
]
Landscape
Select this mode to take photographs of distant scenery or landscapes.
7
[
]
Sports
Select this mode to capture fast-moving subjects.
8
[
]
Night
Select this mode to take photographs of people against a dusk or night-time
background.
9
[
]
Setup
Select this mode to adjust the camera settings.
Using the DC C420
Downloaded from ManualsCamera.com Manuals
BenQ DC 5530 User’s Manual
3.2
LCD monitor information (camera mode)
3M
8
English
P
SD
X1
1.5x
1.
Mode indicator
[ A ] Auto Mode
[
] Setup Mode
[
] Video Mode
[
] Landscape Mode
[ P ] Program Mode
2.
3.
4.
5.
7.
Self-timer mode
[
] OFF
[
] 2 sec. delay
[
] 10 sec. delay
[
] Sports Mode
[ 10+2 ] 10+2 sec. delay
White balance
AUTO
[
] Portrait Mode
8.
[
] DAYLIGHT
[
] Night Mode
Image quality
[
] CLOUDY
[
] SUNSET
[
] FINE
[
] TUNGSTEN
[
] NORMAL
[
] FLUORESCENT
Capture mode indicator
[
] ECONOMY
Image size
9.
[
X1
] SINGLE
[
] 2304 x 1728
[
[
] 2048 x 1536
[
] 1280 x 960
[
] AEB
Date
Zoom status
Focus area
Focus indicator
AUTO
[
] 640 x 480
Possible number of shots
Internal memory / SD memory card
indicator
[
6.
2004.09.17
] Status of the internal memory
[ SD ] Status of the SD memory card
Remaining battery status
[
] Full battery power
[
] Medium battery power
[
] Low battery power
[
] No battery power
10.
11.
12.
13.
[
] BURST
] MACRO
[
] INFINITY
14. Flash mode
[
] Auto Flash (Default)
[
] Red Eye
[
] Forced Flash
[
] No Flash
Using the DC C420
Downloaded from ManualsCamera.com Manuals
5
BenQ DC 5530 User’s Manual
3.3
Getting started
English
3.3.1 Turning the power on / off
•
•
Press the [
] button until the digital camera turns on.
To turn the power off, press the [
] button again.
3.3.2 Choosing the screen language
When the camera is turned on for the first time, a language-selection screen will be displayed
on the LCD monitor. Follow the steps below to choose the desired language.
1. Rotate the mode dial to [
camera.
] mode, and then press the [
] button to turn on your
2. Press [
] to select the [CUSTOM] menu.
3. Use [
] to select [LANGUAGE], and then press the OK button.
4. Use [ ] or [ ] to select the language you want.
5. Press the OK button to confirm.
3.3.3 Setting the date and time
Follow the steps below to set the date display style, current date and time.
1. Rotate the mode dial to [
camera.
] mode, and then press the [
2. Press [
] to select the [CUSTOM] menu.
3. Use [
] to select [DATE & TIME].
4. If you wish to switch the date types, press [
5. Press [
•
•
•
]/[
] or [
], and then press the OK button.
] to select Year, Month, Day and Time fields.
To increase a value, press [
].
To decrease a value, press [ ].
The time is displayed in 24 hour format.
6. Press the OK button after all fields are set.
6
Using the DC C420
] button to turn on your
Downloaded from ManualsCamera.com Manuals
BenQ DC 5530 User’s Manual
3.3.4 Using the flash
1. Rotate the mode dial to [A], [P], [
[
], [
], [
] or [
], and then press the
] button to turn on your camera.
2. Toggle [ ] / [ ] until the desired flash mode appears on the LCD monitor.
3. Compose your scene and press the shutter button.
The camera has four flash modes: Auto Flash (default), Red Eye, Forced Flash and No Flash.
The table below will help you choose the appropriate flash mode.
Icon
[
]
[
]
[
]
[
]
Flash mode
Description
AUTO FLASH
The flash fires automatically according to the photographic conditions.
RED EYE
This mode can reduce the red-eye phenomenon when you want to capture
natural-looking images of people and animals in low-light conditions.
When capturing images, the red-eye phenomenon can be reduced by asking
the subject (person) to look at the camera lens or get as close to the camera
as possible.
FORCED
FLASH
The flash will always fire regardless of the surrounding brightness. Select
this mode for capturing images with high contrast (backlighting) and deep
shadows.
NO FLASH
The flash will not fire. Select this mode in a place where flash photography
is prohibited, or when the distance to the subject is beyond the effective
range of the flash.
• The flash cannot be used in Video Mode.
3.3.5 Using the self-timer
The self-timer can be used in situations such as group shots. When using this option, you
should either mount the camera on a tripod (recommended) or rest it on a flat surface.
1. Secure the camera to a tripod or place it on a stable surface.
2. Rotate the mode dial to [A], [P], [
[
], [
], [
] or [
], and then press the
] button to turn on your camera.
3. Toggle [
]/[
] until the desired self-timer mode appears on the LCD monitor.
OFF
2
10
10+2
[No Indication]
Using the DC C420
Downloaded from ManualsCamera.com Manuals
7
English
The flash is designed to function automatically when lighting conditions warrant the use of
flash. You can capture an image using a flash mode suitable to your circumstances.
BenQ DC 5530 User’s Manual
English
4. Compose your image and press the shutter button.
• The self-timer function is activated.
• The image is then captured after the preset time.
• To cancel the self-timer at any time, press the shutter
or [
] button, switch the mode dial to another
mode or press [
] to disrupt the sequence.
• After one shot is taken, the self-timer mode is turned off.
• If you wish to capture another image using the self-timer,
repeat these steps.
3.3.6 Using the zoom function
The camera is equipped with 3X optical zoom. The lens moves during the optical zoom
photography, allowing you to capture telephoto and wide-angle shots. By using the optical
zoom function, images appear closer by pressing T button, or smaller away by pressing the W
button.
Moreover, you can further enlarge the subjects with 4X digital zoom by pressing the T button
continuously. It is activated after your camera reaches its maximum optical zoom factor (3X).
A useful feature as it is, however, the more the image is magnified, the grainer the image may
become.
To capture a zoomed image, perform the following steps.
1. Press the [
] button to turn on your camera.
2. Adjust the magnification ratio by using the T / W buttons.
• To access the optical zoom function, press the T button as far as it can go. Press it
again to activate the digital zoom.
• To exit the zoom photography, press the W button continuously.
• The status of digital magnification is displayed on the LCD monitor.
3. Compose your image and press the shutter button.
• The digital magnification ranges from 1.0X to 4.0X.
• The zoom function cannot be used while a video clip is being recorded. Set the zoom
before you start recording.
8
Using the DC C420
Downloaded from ManualsCamera.com Manuals
BenQ DC 5530 User’s Manual
3.3.7 Burst
1. Rotate the mode dial to [A], [P], [
[
], and then press the [
camera.
2. Press [
menu.
], and then use [
], [
], [
] or
PICTURE FUNCTION
AUTO
] button to turn on your
] to select the [FUNCTION]
2/3
3. Use [ ] to select [CAPTURE MODE], and then press the
OK button.
4. Use [ ] or [
OK button.
] to select [BURST], and then press the
5. To exit from the menu, press the [
CAPTURE MODE
X1
SINGLE
BURST
AEB
] button.
The [
] indicator is displayed on the monitor screen.
6. Press the shutter button halfway to lock the focus.
7. Press the shutter button all the way down to shoot.
Shooting will stop when the shutter button is released.
2/3
• In Burst mode, the flash mode will be set to OFF automatically.
3.3.8 Auto exposure bracketing (AEB)
In this mode, the camera automatically changes the exposure within a set range to take three
shots after you press the shutter button once. AEB settings can be combined with exposure
compensation settings to extend the adjustment range.
1. Rotate the mode dial to [A], [P], [
[
], and then press the [
camera.
2. Press [
menu.
], and then use [
], [
], [
] or
AUTO
] to select the [FUNCTION]
2/3
3. Use [ ] to select [CAPTURE MODE], and then press the
OK button.
4. Use [ ] or [
button.
PICTURE FUNCTION
] button to turn on your
] to select [AEB], and then press the OK
5. To exit from the menu, press the [
CAPTURE MODE
X1
SINGLE
BURST
AEB
] button.
The [
] indicator is displayed on the monitor screen.
6. Press the shutter button to shoot.
3/3
• In AEB mode, the flash mode will be set to OFF automatically.
Using the DC C420
Downloaded from ManualsCamera.com Manuals
9
English
This mode is used for continuous shooting. Pictures are taken continuously while the shutter
button is pressed.
BenQ DC 5530 User’s Manual
3.4
Menu options
English
3.4.1 Camera menu
This menu is for the basic settings to be used when capturing still images.
PICTURE FUNCTION
AUTO
IMAGE SIZE
Q
IMAGE SIZE
5M
QUALITY
Q
AUTO
[ ] FOCUS
PICTURE FUNCTION
QUALITY
SHARPNESS
X1
LOW
EXPOSURE
ISO
1/4
1/5
1. Rotate the mode dial to [A], [P], [
], [
+0.7
W.BALANCE
COLOR
X1
[
PICTURE FUNCTION AE/AWB
AUTO
5M
100
1/3
], [
] or [
1/3
], and then press the
] button to turn on your camera.
2. Press [ ], and then use [
AWB] menu.
•
In [A] Mode, press [
3. Press [
]/[
] to select the [PICTURE] / [FUNCTION] / [AE /
] to access menu directly.
] to select the desired setting, and then press the OK button.
] or [
4. To exit from the menu, press the [
] button.
In [A] mode:
Item
Functional Description
IMAGE SIZE
[
]
QUALITY
[
Q
]
FOCUS
[
10
]
This option sets the size of the image that will be captured.
–
[
] 2304 x 1728
–
[
] 2048 x 1536
–
[
] 1280 x 960
–
[
] 640 x 480
This option sets the quality (compression rate) at which the image will be captured.
–
[
] FINE
–
[
] NORMAL
–
[
] ECONOMY
This option allows you to capture images with the distance to the subject set by auto focus,
macro or infinity.
–
AUTO
–
[
] MACRO
–
[
] INFINITY
Using the DC C420
Downloaded from ManualsCamera.com Manuals
BenQ DC 5530 User’s Manual
[
This option sets the capturing method at the time of taking pictures.
]
In [P], [
–
[
–
[
] BURST
–
[
] AEB
], [
] or [
], [
PICTURE
X1
Item
Refer to the “In [A] mode:” on page 10.
]
QUALITY
[
] mode:
Functional Description
IMAGE SIZE
[
] SINGLE
English
CAPTURE
MODE
Q
SHARPNESS
[
]
COLOR
[
Refer to the “In [A] mode:” on page 10.
]
]
This option sets the level of image sharpness.
–
[
] LOW
–
[
] MEDIUM
–
[
] HIGH
This option sets the color of the image that will be captured.
–
[
] FULL COLOR
–
[
] BLACK & WHITE
–
[
] SEPIA
SATURATION To capture an image, your camera offers you three different degrees of
color to match with your preference.
[
]
Your images will demonstrate different impression by selecting different
degrees of color. This is called “Saturation”.
FUNCTION
Item
] MEDIUM
–
[
] HIGH
Refer to the “In [A] mode:” on page 10.
Refer to the “In [A] mode:” on page 10.
]
METERING
[
] LOW
[
]
CAPTURE
MODE
[
[
–
Functional Description
FOCUS
[
–
]
You can select the metering mode that sets which part of the subject to
measure to determine the exposure.
–
[
] AVERAGE
–
[
] SPOT
Using the DC C420
Downloaded from ManualsCamera.com Manuals
11
BenQ DC 5530 User’s Manual
AE / AWB
Item
Functional Description
English
EXPOSURE
[ EV ]
W. Balance
[
WB
]
ISO
[ ISO ]
This option sets to obtain the correct exposure when the subject is much
brighter or darker than the background.
The EV compensation value can be set in the range from -2.0 EV to +2.0
EV.
This option sets the white balance photographing under a variety of lighting conditions and permits photographs to be taken that approach the
conditions that are seen by human eye.
–
AUTO
–
[
] DAYLIGHT
–
[
] CLOUDY
–
[
] SUNSET
–
[
] TUNGSTEN
–
[
] FLUORESCENT
This option sets the sensitivity for capturing images. When the sensitivity
is raised (and the ISO figure is increased), photography will become possible even in dark locations, but the more pixilated (grainer) the image will
appear.
– AUTO / 50 / 100 / 200
3.4.2 Video mode
3.4.2.1
1.
2.
3.
4.
5.
LCD monitor information (video mode)
Video mode
Recordable movie time available
SD memory card indicator (if present)
Battery power indicator
Focus area
3.4.2.2
00:33
SD
Recording video clips
This mode allows you to record video clips with sound via
built-in microphone.
1. Rotate the mode dial to [
] mode, and then press the [
button to turn on your camera.
2. To start recording, press the shutter button.
3. To stop recording, press the shutter button again.
]
• The zoom function of optical zoom (3X) can be activated before
you start to record video clips.
• Pressing the [
Press the [
the [
12
00:49
] switches the LCD monitor display mode.
] button once to set the indicators OFF. Press
] button again to set the indicators ON.
Using the DC C420
Downloaded from ManualsCamera.com Manuals
[ ]
SD
BenQ DC 5530 User’s Manual
3.4.2.3
Video menu
VIDEO
COLOR
FULL COLOR
COLOR
R
G B
English
This menu is for the basic settings to be used when recording video clips.
BLACK & WHITE
SEPIA
SET :
1/1
EXIT :
1. Rotate the mode dial to [
camera.
2. Press the [
3. Press [
EXIT :
SET :
1/3
] mode, and then press the [
] button, and then press the OK button.
] or [
] to select the desired color setting.
4. To exit from the Playback menu, press the [
Item
] button.
Functional Description
COLOR
[
] button to turn on your
Refer to “In [P], [
], [
], [
] or [
] mode on page 11.
]
3.4.3 Playback mode
3.4.3.1
1.
2.
3.
4.
LCD monitor information (image playback)
Playback mode
SD memory card indicator (if present)
Battery power indicator
Playback information
SD
100-0001
SIZE
EV
EV.
01. 04. '04
1280X960
+1.7
05:22
1
3.4.3.2
1.
2.
3.
4.
5.
6.
LCD monitor information (video playback)
Playback mode
Video mode
SD memory card indicator (if present)
Battery power indicator
Playback indicator
Playback information
3.4.3.3
3.4.3.3.1
SD
100-0001
SIZE
EV
EV.
01. 04. '04
1280X960
+1.5
05:22
1
Playback mode - the basics
Viewing images
You can display the still images you have just captured at a time.
Using the DC C420
Downloaded from ManualsCamera.com Manuals
13
BenQ DC 5530 User’s Manual
1. Press the [
] button to turn on your camera.
SD
English
2. Press the [
] button.
The last captured image appears on the LCD monitor.
3. Use [
•
•
]/[
100-0001
EV.
01. 04. '04
] to select the desired images.
To view the previous image, press the [
To view the next image, press the [
1280X960
+1.5
SIZE
05:22
] button.
1
] button.
• The playback information displayed on the LCD monitor will disappear after seconds of
time.
• If there is no image stored in the internal memory or on the memory card, [NO IMAGE]
message will appear on the monitor.
3.4.3.3.2
Magnifying images
While reviewing your images, you may enlarge a selected portion of an image. This
magnification allows you to view fine details. The zoom factor displayed on the screen shows
the current magnification ratio.
T
1. Press the [
] button.
• The last captured image appears on the LCD monitor.
] button.
T
To view the previous image, press the [
T
•
•
To view the next image, press the [ ] button.
2. Adjust the zoom ratio by using the Zoom [W] / [T]
button.
• To enlarge the selected image, press the [T] button.
• To return to the normal image, press the [W] button.
• The magnification factor is displayed on the LCD monitor.
3. To view different portion of the images, press the [
adjust the display area.
]/[
]/[
2.0X
T
]/[
] button to
• The magnification factors range from 1x to 4x (within 7 stages: 1.0x, 1.5x, 2.0x, 2.5x, 3.0x,
3.5x and 4.0x).
3.4.3.3.3
Thumbnail display
This function allows you to view 9 thumbnail images on the LCD monitor simultaneously so
you may search for a particular image.
1. Press the [
] button.
The last captured image appears on the LCD monitor.
2. Press the [W] / [
] button once.
• Nine thumbnail images are displayed simultaneously.
•
For recorded video clips, the [
will be displayed.
] video mode icon
3. Use the [ ] / [ ] / [ ] / [ ] button to select the
image to be displayed at regular size.
14
Using the DC C420
Downloaded from ManualsCamera.com Manuals
SD
1
2
3
4
5
6
7
8
9
BenQ DC 5530 User’s Manual
4. Press the OK button to display the selected image on full screen.
Slideshow display
The slide show function enables you to play your images back automatically in sequential
order. This is very useful and entertaining feature for reviewing captured images and for
presentations.
1. Press the [
] button.
The last captured image appears on the LCD monitor.
2. Press the [ ] button, and then use [ ] to select
[SLIDE SHOW] and press the OK button.
PLAYBACK
DELETE
SLIDE
SHOW
SLIDE SHOW
PROTECT
QUALITY CHANGE
3. Use [ ] or [ ] to select the playback interval, and then
press the OK button.
• The slide show starts.
• The video clips are displayed from the first frame
image, and not played back.
• To stop slide show, press the OK button.
2/7
SLIDE SHOW
3 SEC.
5 SEC.
10 SEC.
• You can adjust the slide show display interval within the
range of 3 SEC., 5 SEC., 10 SEC.
3.4.3.3.5
RETURN :
SET :
Resizing an image
You can change the image size of a captured image to one of the following sizes: 2048 x 1536
pixels, 1280 x 960 pixels and 640 x 480 pixels.
1. Press the [
] button.
The last captured image appears on the LCD monitor.
2. In [
] mode, use [
images.
•
•
] or [
] to select the desired
To view the previous image, press the [
To view the next image, press the [
3. Press [
] button.
PLAYBACK
R
DPOF
DPOF
COPY
COPY TO CARD
EXIT :
SET :
5/7
] button.
RESIZE
] to access PLAYBACK menu, and then use
[ ] or [
button.
RESIZE
2048 X 1536
] to select [RESIZE] and press the OK
1280 X 960
4. Use [ ] or [ ] to select the desired setting, and then
press the OK button to confirm.
640 X 480
SET :
3.4.3.4
Playback menu
In the [
] menu, set which settings are to be used for playback.
RETURN :
PLAYBACK
R
RESIZE
DPOF
DPOF
COPY
COPY TO CARD
SET :
EXIT :
5/7
Using the DC C420
Downloaded from ManualsCamera.com Manuals
15
English
3.4.3.3.4
BenQ DC 5530 User’s Manual
English
1. Press the [
] button.
The last captured image appears on the LCD monitor.
2. Press the [ ] button, and then use [
the OK button.
] or [
3. To exit from the Playback menu, press the [
Item
] button.
Functional Description
DELETE
[
] to select the desired setting and press
This option allows you to delete one or all images you captured.
]
SLIDE SHOW You can play back captured images sequentially with a selected interval time. This function is useful for checking your images or for presentations. Refer to 3.4.3.3.4 “Slideshow
[ SLIDE
SHOW ]
display” on page 15 for further details.
– 3 SEC. / 5 SEC. / 10 SEC.
PROTECT
[
QUALITY
CHANGE
[
]
RESIZE
[R ]
DPOF
[
DPOF
]
COPY TO
CARD
[ COPY ]
16
This option sets the data to read-only to prevent images from being erased by mistake.
]
This option sets the desired quality (compression rate) at which the image is captured.
–
[
] FINE
–
[
] NORMAL
–
[
] ECONOMY
This option changes the size of a captured image.
–
[
] 2048 x 1536
–
[
] 1280 x 960
–
[
] 640 x 480
This option allows you to select the desired pictures to be printed and set the number of
prints and date displayed in DPOF format. You can print images easily just by inserting
the memory card to a DPOF compliant printer or a print shop.
This option allows you to copy your files from the digital camera’s internal memory to a
memory card. This action can be performed only if you have a memory card installed and
some files in the internal memory.
– YES / NO
Using the DC C420
Downloaded from ManualsCamera.com Manuals
BenQ DC 5530 User’s Manual
3.4.4 Setup mode
Setup menu
This feature allows you to set up the default settings by preference for using your camera.
DATE IMPRINT
3 MIN.
POWER OFF
QUICK
VIEW
SET TO DEFAULT
QUICK VIEW
1. Rotate the mode dial to [
camera.
] or [
CUSTOM
DATE & TIME
TV
Y/M/D
BASIC
USB
CUSTOM
PC
NTSC
LANGUAGE
SET :
2. Press [
ON
BASIC
Y/M/D
NTSC
PAL
FORMAT
ON
DIGITAL ZOOM
CUSTOM
RESET NUMBER
T
1
S
BASIC
LOUDER
ENGLISH
LCD BRIGHTNESS
OFF
5/8
SET :
1/5
] mode, and then press the [
SET :
5/5
] button to turn on your
] to select the [BASIC] / [CUSTOM] menu.
3. Use [ ] or [ ] to select the desired option item, and then press the OK button.
4. To exit from the setup menu, rotate the mode dial to other desired mode again.
BASIC settings
Item
Functional Description
BEEPER
[
]
This option sets whether the startup sound and the camera sound will be muted every
time when you press the camera buttons.
– LOUDER / SOFT / OFF
POWER OFF If no operation is performed for a specific period of time, the power to the camera is automatically turned off. This feature is useful to reduce battery wear.
[
]
– 2 MIN. / 3 MIN. / 5 MIN. / OFF
DIGITAL
ZOOM
[
]
SET TO
DEFAULT
[
D ]
RESET
NUMBER
[
1
]
DATE
IMPRINT
[ DATE ]
FORMAT
[
This option sets whether the digital zoom will be activated at the time of photography.
– ON / OFF
]
This option returns all basic settings to the digital camera’s default settings. The time setting will not be reset.
– YES / NO
This option sets whether the file number when you take photographs will be reset. This
creates a new folder. The captured images are recorded to the newly created folder from
number 0001. If you want to reset the file number, be sure that no images are recorded in
the internal memory or the SD memory card.
– YES / NO
This option allows the date of recording to be printed directly on the still images. This
function must be activated before the image is captured.
– ON / OFF
This option erases all images and reformats the SD memory card loaded in your camera.
Protected images are also erased. The SD memory card cannot be formatted if it is writeprotected.
– YES / NO
Using the DC C420
Downloaded from ManualsCamera.com Manuals
17
English
3.4.4.1
BenQ DC 5530 User’s Manual
English
QUICK VIEW This option allows you to display a photographed image on the LCD monitor immediately
after you have taken a shot.
[ QUICK
VIEW ]
– ON / OFF
CUSTOM settings
Item
Functional Description
DATE & TIME This option sets the date and time. Refer to 3.3.3 “Setting the date and time” on page 6 for
further details.
[ Y/M/D ]
– Y/M/D
– D/M/Y
– M/D/Y
TV
[
NTSC
PAL
]
LANGUAGE
[
]
This option sets the video output system of the video equipment that you are going to
connect to the camera.
– PAL / NTSC
This option sets the language that is displayed on the LCD monitor. Refer to 3.3.2 “Choosing the screen language” on page 6 for further details.
English / French / Germany / Spanish / Italian / Traditional Chinese / Simplified Chinese
LCD
This option sets the brightness of the LCD monitor. The adjustment range is from -5 to
BRIGHTNESS +5.
[
]
USB
[
18
]
This option allows you to choose one of the following modes for further settings.
– PC / PRINT
Using the DC C420
Downloaded from ManualsCamera.com Manuals
BenQ DC 5530 User’s Manual
4
PC DEPENDENT FEATURES
English
4.1
Bundled software
The DC C420 is supplied with the following software. To install the software, refer to the
information supplied with respective CDs.
Ulead Photo
Express
Ulead® Photo Express™ 5.0 SE is a complete photo project software
for digital images. Acquire photos effortlessly from digital cameras
or scanners. Edit and enhance images using easy-to-use editing tools
and cool photographic filters and effects. Assemble creative photo
projects and share results via e-mail and multiple print options.
Ulead Photo
Explorer
Ulead® Photo Explorer™ 8.0 SE Basic provides an efficient way to
transfer, browse, modify and distribute digital media. It is an all-inone tool for owners of digital cameras, webcams, DV camcorders,
scanners, or for anyone who strives to effectively handle digital
media.
4.2
Transferring files to your computer
After using USB cable to establish a USB connection between the camera and your computer,
you can use your computer to share captured images or recorded video clips with your family
or friends via e-mail or post them on the Web. Note that before you begin to install the
software, you need to check your system according to the table as shown below.
System Requirements (Windows)
CPU
Pentium III 600 MHz processor or higher
Operating System
Windows ME / 2000 / XP
RAM
32 MB
(64 MB RAM recommended)
Hard Disk Space
128 MB hard disk space
Required Devices
A CD-ROM drive
An available USB port
Display
Color Monitor (800 x 600, 24-bit or higher recommended)
PC DEPENDENT FEATURES
Downloaded from ManualsCamera.com Manuals
19
BenQ DC 5530 User’s Manual
4.2.1 Step 1: Connect the digital camera to your computer
English
1. Rotate the mode dial to [
], and then press the [
button to turn on your camera.
2. Press [
[
]
] to select the [CUSTOM] menu, and then use
USB
PC
PRINT
] to select [USB].
3. Use [ ] to select [PC], and then press the OK button.
4. Connect one end of the USB cable to an available USB
port on your computer.
5. There will be a new “Removable Disk” icon detected in
“My Computer”, which contains your captured images or
recorded video clips.
1/3
4.2.2 Step 2: Download images or video clips
When the digital camera is turned on and connected to your computer, it is considered to be
a disk drive, just like a floppy disk or CD. You can download (transfer) images by copying
them from the “Removable disk” (“untitled” or “unlabeled” disk on a Macintosh) to your
computer hard drive.
Windows
Open the “removable disk” and double click on the DCIM / DSCIM folder to open it to find
more folders. Your images are inside these folder(s). Select the desired still images or video
clips, and then choose “Copy” from the “Edit” menu. Open the destination location (folder)
and choose “Paste” from the “Edit” menu. You may also drag and drop image files from the
digital camera to a desired location.
Macintosh
Open the “untitled” disk icon, and the destination location on your hard disk. Drag and drop
from the digital camera to the desired destination.
• Memory card users may prefer to use a memory card reader (highly recommended).
• Video playback application is not included with the package. Make sure that video playback application has been installed in your computer.
4.3
Connecting to a PictBridge compliant printer
(optional feature)
Even if you do not have a computer, you can connect the camera directly to a printer that
supports PictBridge to perform image selection and printing using the camera monitor
screen and controls. DPOF support also enables you to specify which images you want to
print and how many copies of each should be printed.
20
PC DEPENDENT FEATURES
Downloaded from ManualsCamera.com Manuals
BenQ DC 5530 User’s Manual
Connecting the camera to the printer
2. Press [
[
]
USB
English
1. Rotate the mode dial to [
], and then press the [
button to turn on your camera.
PC
PRINT
] to select the [CUSTOM] menu, and then use
] to select [USB].
2/3
SET:
SET
3. Use [ ] or [ ] to select [PRINT], and then press the
OK button.
4. Connect your camera and the printer via a supplied USB cable.
The screen turns off automatically and the setting screen will appear on the monitor after
seconds of time.
OK
PC DEPENDENT FEATURES
Downloaded from ManualsCamera.com Manuals
21
BenQ DC 5530 User’s Manual
English
5
TROUBLESHOOTING
Refer to the symptoms and solutions listed below before shipping your camera for service. If
the problem persists, contact your local reseller or service center.
Symptom
Cause
The camera cannot be There is no battery or the battery is
powered up.
not inserted correctly.
The battery has no power.
The battery power is
draining quickly.
Solution
Insert the battery correctly.
Recharge your batteries or replace
with new batteries.
The external temperature is
extremely low.
—
Many shots are being captured in
dark places, requiring a flash.
—
The battery was not fully charged.
Fully charge the battery and disThe battery has not been used for an charge it for at least one complete
extended period of time after being cycle before use.
charged.
The battery or camera The camera or flash was used conis warm.
tinuously over a long period of time.
The flash does not
fire.
The flash does not
recharge.
The camera flash is turned off.
—
Set the flash to Auto Flash.
The light source is sufficient.
—
Even though the flash The distance to the subject is greater Get closer to the subject and shoot.
fired, the image is
than the flash’s effective range.
dark.
The image is too
bright or too dark.
The exposure is excessive or inadequate.
Reset exposure compensation.
I cannot format a
memory card.
The memory card is write-protected.
Remove the write protection.
I cannot download
images.
End of the memory card life.
Insert a new memory card.
The free space on the hard disk of
your computer is insufficient.
Ensure that the hard disk has enough
space for running Windows and that
the drive for loading image files has
free space equal to or greater than the
memory card in the camera.
There is no power being supplied to Recharge your batteries or replace
the camera.
with new batteries if necessary.
22
Troubleshooting
Downloaded from ManualsCamera.com Manuals
BenQ DC 5530 User’s Manual
Cause
Solution
The camera does not
shoot even when
pressing the shutter
button.
The battery is running low.
Recharge your batteries or replace
with new batteries.
The camera is not in Shooting
Mode.
Switch to Shooting Mode.
The shutter button was not pressed
all the way down.
Press the shutter button all the way
down.
The internal memory or memory
card does not have any free space.
Load a new card or delete unwanted
files.
The flash is recharging.
Wait until the flash mode icon, indicated on the screen, stops flashing.
The camera does not recognize the
memory card.
Format the memory card before the
initial use or before using with
another camera.
Troubleshooting
Downloaded from ManualsCamera.com Manuals
23
English
Symptom
BenQ DC 5530 User’s Manual
English
6
SPECIFICATIONS
Item
Description
Image sensor
CCD
Effective pixels
4.0 Mega pixels
Image size
Still image: 2304 x 1728, 2048 x 1536, 1280 x 960, 640 x 480
Video clip: 320 x 240
Image quality
Recording
media
Still image: Fine, Normal, Economy
12 MB internal memory
SD memory card
File format
Motion JPEG (AVI)
Lens
F-no.: Wide: 2.8 / Tele: 4.8
Focal length: 5.4mm-16.2mm (Equivalent to 35mm Camera:
32~96 mm)
Focus range
Normal: 50 cm-infinity
Wide: 6 cm-infinity
Tele: 35 cm-infinity
LCD monitor
1.8 LTPS color LCD
High-resolution 130K pixels display
Self-timer
10 sec delay, 2 sec delay, 10+2 sec delay
Exposure
compensation
-2.0EV~ +2.0EV (in 0.3EV increments)
White balance
Auto, Daylight, Cloudy, Sunset, Tungsten, Fluorescent
ISO
Auto, 50, 100, 200
Interface
USB connector, A / V terminal
Power
2 x AA Alkaline batteries
Dimension
Approx. 91 x 61 x 27 mm
Weight
Approx. 130g (without batteries and the SD memory card)
* Design and specifications are subject to change without notice.
24
Specifications
Downloaded from ManualsCamera.com Manuals
BenQ DC 5530 User’s Manual
SERVICE INFORMATION
Technical Support
If you have any problem or question regarding the DC C420, you can visit the following web
site for further assistance:
http://support.BenQ.com
For free driver updates, product information and news releases, visit the following web site:
http://www.BenQ.com
Service Information
Downloaded from ManualsCamera.com Manuals
25
English
7
BenQ DC 5530 User’s Manual
English
26
Service Information
Downloaded from ManualsCamera.com Manuals