1
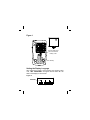
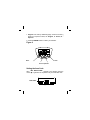
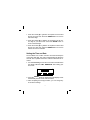
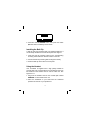
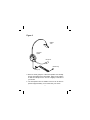
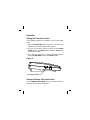
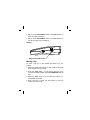
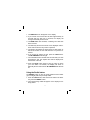
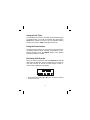
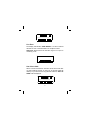
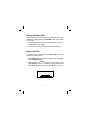
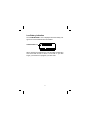
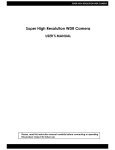
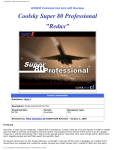
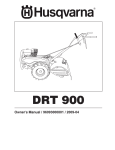
Headset Telephone
with 70 Name and Number
Caller ID
Model: AT-200HT
Owner’s Manual
Please read this Owner’s Manual carefully
© Copyright 1999 Aastra Telecom. All rights reserved
CC 1814 Rev 1.0
Table of Contents
Important Safety Instructions ................................................... 1
Battery Cautionary Instructions ............................................... 3
Features ..................................................................................... 5
Installation ................................................................................. 6
Battery Installation ............................................................... 6
Setting the Display Language .............................................. 7
Setting the Area Code ......................................................... 8
Setting the Time and Date .................................................. 9
Installing the Belt Clip .......................................................... 10
Using the Headset ............................................................... 10
Connecting to the telephone line ......................................... 12
Operation ................................................................................... 14
Setting the Pulse/Tone switch ............................................. 14
Setting the Ringer Off/Low/Hi switch ................................... 14
Making Calls........................................................................ 15
Receiving Calls ................................................................... 16
Using the Redial button ....................................................... 17
Using the Flash button......................................................... 18
Using the Pulse to Tone dialing feature ............................... 18
Using the Mute button ......................................................... 18
Using the Call Timer ............................................................ 19
Using the Pause feature ...................................................... 19
Reviewing Call Records ...................................................... 19
Private Calls ........................................................................ 20
Line Error ............................................................................ 21
Out of Area Calls ................................................................. 21
Erasing Individual Calls ....................................................... 22
Erasing All Calls .................................................................. 22
Low Battery indication ......................................................... 23
Care and Maintenance .............................................................. 24
Troubleshooting ........................................................................ 25
Important Safety Instructions
When using your telephone equipment, basic safety precautions should always be followed to reduce the risk of fire,
electrical shock, and injury to persons including the following:
1. Read and understand all instructions.
2. Follow all warnings and instructions marked on the
product.
3. Unplug this product from the wall outlet before cleaning.
Do not use liquid cleaners, or aerosol cleaners. Use a
damp cloth for cleaning. If necessary, use a mild soap.
4. Do not use this product near water, for example near a
bath tub, wash bowl, kitchen sink, or laundry tub, in a wet
basement, or near a swimming pool.
5. Do not place this product on an unstable cart, stand or
table. The product may fall, causing serious damage to the
product.
6. This product should be operated only from the type of
power source indicated on the marking label. If you are not
sure of the type of power supply to your home, consult
your dealer or local power company.
7. Do not allow anything to rest on the telephone line cord.
Do not locate this product where the cord will be abused
by persons walking on it.
8. Never push objects of any kind into this product through
the cabinet slots as they may touch dangerous voltage
points or short out parts that could result in a risk of fire or
electric shock. Never spill liquid of any kind on the product.
9. To reduce the risk of electric shock, do not disassemble
1
this product, but take it to a qualified serviceman when some
service or repair work is required. Opening or removing covers
may expose you to dangerous voltages or other risks.
Incorrect reassembly can cause electric shock when the
appliance is subsequently used.
10. Unplug this product from the wall outlet and refer to qualified
service personnel under the following conditions:
a. When the power supply cord or plug is damaged or frayed.
b. If liquid has been spilled into the product.
c. If the product has been exposed to rain or water.
d. If the product does not operate normally by following the
operating instructions. Adjust only those controls, that are
covered by the operating instructions because improper
adjustment of other controls may result in damage and will
often require extensive work by a qualified technician to
restore the product to normal operation.
e. If the product has been dropped or the cabinet has been
damaged.
f. If the product exhibits a distinct change in performance.
11. Avoid using a telephone (other than a cordless type) during an
electrical storm. There may be a remote risk of electrical shock
from lightning.
12. Do not overload wall outlets and extension cords as this can
result in the risk of fire or electrical shock.
13. Do not use the telephone to report a gas leak in the vicinity of
the leak.
SAVE THESE INSTRUCTIONS
2
Battery Cautionary Instructions
CAUTION - To Reduce the Risk of Fire or Injury to Persons,
Read and Follow these Instructions.
1.
Use only the following type and size of battery: Four (4)
AAA size 1.5 volt (24A) carbon zinc or alkaline batteries.
2.
Do not dispose of the battery in a fire. The cell may
explode. Check with local codes for possible special
disposal instructions.
3.
Do not open or mutilate the battery. Released electrolyte
is corrosive and may cause damage to the eyes or skin. It
may be toxic if swallowed.
4.
Exercise care in handling batteries in order not to short
the battery with conductor material such as rings,
bracelets, and keys. The battery or conductor may
overheat and cause burns.
5.
Do not attempt to recharge the battery provided with or
identified for use with this product by heating them. The
batteries may leak corrosive electrolyte or explode.
6.
Do not attempt to rejuvenate the battery provided with or
identified for use with this product by heating them.
Sudden release of the battery electrolyte may occur
causing burns or irritation to eyes or skin.
7.
All batteries should be replaced at the same time. Mixing
fresh and discharged batteries could increase internal cell
pressure and rupture the discharged batteries.
8.
When inserting batteries into this product, the proper
polarity or direction must be observed. Reverse insertion
3
of batteries can cause charging, which may result in
leakage or explosion.
9.
Remove the batteries from this product if the product will
not be used for a long period of time (several months or
more) since during this time the battery could leak,
damaging in the product.
10. Discard “dead” batteries as soon as possible since “dead”
batteries are more likely to leak in a product.
11. Do not store this product, or the batteries provided with or
identified for use with this product in high-temperature
areas. Batteries that are stored in a freezer or refrigerator
for the purpose of extending shelf life should be protected
from condensation during the storage and defrosting.
Batteries should be stabilized at room temperature prior to
use after cold storage.
4
Features
Congratulations on your purchase of the AT-200HT headset
telephone with Caller-ID. This product allows you to take advantage of the Caller ID service available from your telephone company. If you do not already have this service, you must contact
the telephone company and have it installed. There is an extra
charge added to your monthly telephone bill for this service.
Caller-ID Features
•
•
•
•
•
•
•
•
•
•
Three line, high resolution LCD display.
Three Language display, English, French and Spanish.
Displays name, number, and time and date of the call.*
Displays total number of new calls and number calls received.
Stores Caller-ID information for the last 70 calls received.
Dual Review buttons allow easy review of call records.
New Call and Repeat Call icons with New Call LED indicator.
Real Time Clock.
Low battery indicator.
Requires four 1.5 Volt, AAA size alkaline batteries (not included).
Telephone Features
•
•
•
•
•
•
•
•
∗
Displays telephone number as it is being dialed.
Flash, Redial, and Pause features.
Tone/Pulse dialing select switch.
Off/Low/Hi Ringer sound level select switch.
Adjustable Receive Level Volume control.
Call duration timer.
Mute button.
In Use/Mute LED indicator.
Requires telephone company provided Caller-ID Name and
Number service.
5
Installation
Getting Started
Unpack the unit and check to make sure you have all the
items that come with your telephone.
•
•
•
•
AT-200HT headset telephone.
Headset with cord.
7 foot long telephone line cord.
Belt Clip
Battery Installation
The AT-200HT requires the installation of four AAA size, 1.5 volt
alkaline batteries (not included). If batteries have not been installed, or require replacement, Caller-ID information will not be
displayed.
WARNING: Always disconnect the AT-200HT from the telephone line before inserting or replacing batteries.
1. Remove the battery cover.
2. Use a ball point pen tip or similar object to lift the battery cover
up and away from the cabinet. See Figure 1
3. Install four AAA size alkaline batteries into the battery compartment.
4. Take care to insure that each battery is installed with the correct polarity. Reinstall the battery cover.
5. The NEW CALL LED will light and the display indicate "70
CALLS" briefly. Then the AT-200HT will go into setup
mode.
Important: Proceed immediately to set the display language and area code as required.
6
Figure 1
Use tip of ball point
pen to remove the
battery cover
Belt clip
Setting the Display Language
After inserting the battery and connecting the handset coiled
cord, "SET LANGUAGE" will appear and the letter "E" will
flash in the display for 30 seconds.
Figure 2
ENGLISH
7
1. English is the factory default language. Press the review q
button as required to select, E - English, F- French, S Spanish.
2. Press the ERASE button to confirm your selection.
Figure 2
Flash
Erase
Review Up/Down
Setting the Area Code
After "SET AREA CODE" appears in the display, press the
review ! or q buttons as required to set your local area code.
FIRST DIGIT
8
1. Press the review ! or q buttons as required to set the first
digit of your area code. Press the ERASE button to move to
the second digit.
2. Press the review ! or q buttons as required to set the second digit of your area code. Press the ERASE button to
move to the third digit.
3. Press the review ! or q buttons as required to set the third
digit of your area code. Press the ERASE button to move to
set the correct time and date.
Setting the Time and Date
The AT-200HT has a built-in real time clock that will keep the
current time and date. The clock is automatically set during the
first call and is updated each time Caller-ID information is received.
1. It is not necessary to enter the correct time and date when
the display indicates "SET TIME/DATE" after setting your
area code.
2. Press the ERASE button as required until the display enters
the Stand-By Screen mode as shown below.
3. After completing the setup procedure, you can change any
of the above settings.
9
4. Press and hold the ERASE button, then press the review
"#button while in Stand-By Screen mode.
Installing the Belt Clip
A belt clip has been supplied with your headset telephone. It
can be easily installed or removed as required. See Figure 1
1. Insert the belt clip mounting tabs into the corresponding
mounting holes located on the rear surface of the unit.
2. Confirm the belt clip mounting tabs are aligned correctly.
3. Press the belt clip to the left to lock it in place.
Using the Headset
Your AT-200HT is supplied with a high quality headset to
provide clear voice communications. Its microphone boom can
be swiveled so the headset can be used on either ear. See
Figures 3 & 4
1. Plug from the headset cord into the modular jack marked
HEADSET on the left side of the unit.
2. Place the headband on your head with the cushioned
speaker over the ear of your preference.
10
Figure 3
Stablizer
T-Bar
Cushioned
Speaker
Microphone
Modular Plug
Clothing Clip
3. With one hand grasp the cushioned speaker and carefully
pull the microphone boom downward. Adjust it into position
so that the microphone is in front of or slightly to the side of
your mouth.
4. The microphone boom is flexible so that it can be bent to
position it approximately 1 to 2 inches from your mouth.
11
Figure 4
5. Do not twist the microphone on the end of the boom as this
may damage the internal wiring.
6. For your safety, use the clothing clip to secure the cord to
your lapel or collar.
7. Always leave enough slack in the headset cord so that you
can move your head freely.
Connecting
to the telephone line
LOW
BATTERY
Plug one end
of the headset cord into the HEADSET jack located on the left side of the unit.
12
1. Connect one end of the telephone line cord (supplied) into
the TEL. LINE jack located at the rear of the unit.
2. Connect the remaining end of the telephone line cord into
an existing telephone wall jack.
Telephone Jack
Figure 5
Tel. Line Jack
Headset Jack
13
Operation
Setting the Tone/Pulse switch
The AT-200HT telephone can operate in tone or pulse dialing
mode.
1. Set the PULSE/TONE switch located on the side of the
telephone to the desired position. See Figure 6
2. If you're not sure which service you have, set the PULSE/
TONE switch to the TONE position. Press the TALK button
and dial your number.
3. If the dial tone continues, you have pulse dialing service,
set the PULSE/TONE switch to the PULSE position.
Figure 6
Tone/Pulse Switch
Setting the Ringer Off/Low/Hi switch
Set the RINGER OFF/LOW/HI switch to the HI position for
normal ringer sound level. See Figure 7
14
1. Set the ringer OFF/LOW/HI switch to the LOW position to
lower the ringer sound level.
2. Set the ringer OFF/LOW/HI switch to the OFF position to
turn off the ringer sound completely.
Figure 7
Ringer Off/Low/Hi Switch
Making Calls
To make a call, put on the headset and adjust it for your
comfort.
1. Adjust the headset microphone so that it is about the width
of two fingers from your mouth.
2. Press the TALK button, you will hear a dial tone in the
cushioned headset speaker and the IN USE/MUTE LED will
light.
3. Adjust the VOL control to set the dial tone volume to a
comfortable sound level.
4. When dial tone is heard, use the keypad to enter the
number you want to call.
15
5. The number being dialed will be appear in the display.
6. When called party answers, begin speaking normally into
the headset microphone.
7. After completing your call, push the TALK button to hang
up. The IN USE/MUTE LED will go out.
Receiving Calls
IMPORTANT: Allow at least two rings to occur prior to answering calls. This assures that the AT-200HT will receive
the Caller-ID information correctly.
When a call is received, the display will indicate the caller’s phone
number and name, as well as the time and date of the call.
Figure 8
New Call Icon
Repeat Call
Icon
In Use/Mute
LED
New Call LED
16
1. The NEW CALL icon will appear on the display.
2. If you choose not to answer the call, after approximately 15
seconds after the last ring is received, the display will
change to Stand-By Screen mode.
3. The NEW CALL LED will flash, confirming new calls have
been received.
4. The Stand-By Screen will continue to be displayed until another call is received or any button is pressed.
5. The display will indicate the total number of calls stored, as
well as the number of new calls that have not yet been reviewed.
6. If you choose to answer the call, press the TALK button.
The IN USE/MUTE LED will light.
7. The call duration timer will start five seconds after you have
answered the call. The elapsed time will be displayed for
the duration of the call.
8. Press the TALK button again to hang up after you finish
your call. Within 10 seconds, the display will return to
Stand-By Screen mode and the IN USE/MUTE LED will turn
off.
Using the Redial button
The REDIAL button is used to quickly redial the last number
(up to 32 digits) that was previously called.
1. Press the TALK button, after dial tone is heard in the headset, press the REDIAL button.
2. The number being called will appear on the display as it is
being dialed.
17
Using the Flash button
You can get a new dial tone to make a new call without hanging up by pressing the FLASH button.
1. The FLASH button can be used to access special telephone company features such as Call Waiting if you are a
subscriber.
2. To answer the Call Waiting call, press the FLASH button to
put the existing call on hold and answer the new call.
3. When you finish the call, press the FLASH button to return
to the original call.
Using the Pulse to Tone dialing feature
If you have rotary service, you can change from pulse dialing
to touch tone dialing during a call by pressing the ! key when
required while dialing. This feature can be useful when accessing long distance or tele-banking services.
Using the Mute Button
Press the MUTE button to prevent the party on the phone line
from hearing a conversation at your end.
1. When the mute function is engaged, the IN USE/MUTE
LED will flash.
2. Press the MUTE button again to turn off the mute.
3. The IN USE/MUTE LED will stop flashing but remain on for
the of your conversation.
18
Using the Call Timer
The AT-200HT has a built in timer that will automatically begin
to indicate length of your call five seconds after pressing the
TALK button to make or receive a call. The call timer will turn
off after you press the TALK button again to hang up.
Using the Pause feature
The pause function allows you to insert a 3.6 second pause in
the dialing sequence when accessing long distance or telebanking services. Press the REDIAL button at the desired
point when dialing the number.
Reviewing Call Records
When you have received new calls, the NEW CALL LED will
flash when the Stand-By screen is displayed. The number of
new calls received, as well as the total number of calls received, will be indicated on the display.
1. Press either the review ! or " button to review incoming
stored call records.
19
2. The NEW CALL icon will be displayed for each new incoming call record and will be removed after you have reviewed
the call.
3. The REPEAT call icon will be displayed if an incoming call
has been received more than once. Only the information for
the most recent call has been recorded in memory.
4. If the NEW CALL LED is still flashing when the display returns to the Stand-By Screen, there are new calls that you
have not yet reviewed.
5. If the telephone number received is more than 10 digits, the
AT-200HT will only store the first 10 digits into memory.
6. When you have reached the end of the call records, the
display will indicate "-END OF LIST-" confirming there are
no more calls stored in memory.
7. When the AT-200HT stored Caller-ID information memory is
full, older calls stored in memory will be replaced as new
calls are received.
Private Calls
If the caller has exercised their option to block their name and
number from being sent, "-BLOCKED CALL-" will be
displayed.
20
Line Error
The display will indicate "LINE ERROR" if a call is received
that has an error in the transmission or reception of data.
Important: Always wait for at least two rings to occur prior to
answering a call.
Out of Area Calls
When a call is received from someone whose area code does
not offer Caller-ID service or does not yet provide Caller-ID
delivery to your area via the long distance network, "OUT OF
AREA" will be displayed.
21
Erasing Individual Calls
When reviewing the call records, any individual call can be
deleted by quickly pressing the ERASE button twice within
one second.
1. The displayed call record will be erased and the new call record will appear in the display.
2. A call record cannot be retrieved once it has been deleted.
Erasing All Calls
To delete all calls, press either the review ! or " button once
to enter the call record list.
1. The ERASE button is temporarily disabled when the display
shows "-END OF LIST-".
2. Press and hold the ERASE button for five (5) seconds until
"-NO CALLS-" appears in the display. This confirms that all
call records have been erased from the call record memory.
22
Low Battery Indication
The "LOW BATTERY" icon is displayed when the battery voltage is low or if the batteries are not installed.
LOW BATTERY Icon
When changing the batteries, the unit will retain programming
and stored call records for about 15 seconds. If you take
longer, you will have to reprogram your area code.
23
Care and Maintenance
Your AT-200HT Caller-ID telephone has been designed to give years
of trouble free service. To assure its longevity, please read the
following maintenance instructions.
1. Keep away from heat, high temperatures can shorten the life of the
electrical components as well as distort or melt its plastic parts.
2. Keep your telephone free of dust and moisture. If it gets wet, wipe
it dry immediately. Liquids can contain minerals that can corrode
electronic circuits.
3. Handle your telephone gently. Dropping it can cause serious
damage to circuitry, or the plastic case, which may result in causing
it to malfunction.
4. Do not use any type of chemical or any abrasive powder to clean the
cabinet. Use only mild detergents on a soft, damp cloth.
5. Your telephone has built-in surge protection circuits that meet or
exceed FCC requirements. However, an incident such as a
lightning strike at or near the telephone lines could cause serious
damage. If the telephone is installed in an area with frequent or
severe electrical storms, it is suggested that the telephone be
disconnected during these storms.
6. In the case of trouble with the AT-200HT, do not attempt to repair
the telephone yourself. It is the responsibility of users requiring
service to report the need for service to our Service Department.
They will make the necessary arrangements for repair or
replacement.
24
Troubleshooting
No Dial Tone.
• The telephone line cord is not plugged in properly at the
telephone jack or at the telephone.
• Test the telephone using a different telephone jack, if it works,
the first jack may be defective.
Have Dial Tone but Cannot Dial Out.
• Check that the PULSE/TONE switch is set to the correct mode.
Display screen is blank.
• Check if the batteries have been installed correctly.
• The batteries need to be replaced.
Unable to Set Display Language.
• "SET LANGUAGE" is displayed for sixteen seconds after the bat-
teries are installed. If you have not completed the setup procedure,
the display will return to Stand-By Screen mode. Press and hold
the ERASE button, then press the review " button. The display
Language, or Area Code can now be programmed or changed.
Does not display Caller-ID information.
• Confirm that your local telephone company has activated
Caller-ID service.
• Caller-ID information is sent by the telephone company be-
tween the first and second rings. If the call is answered before
the second ring, the Caller-ID information may not be received
correctly.
25