1
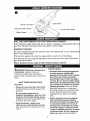
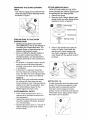
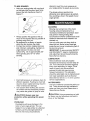
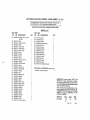
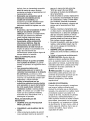
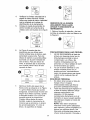
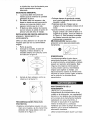
Instruction Manual
4
G
CH A GLE
E
Model No. 172.11502
f_
//
//'_/
I
}
/
-..
i/
"" "\
\
/1"
\
\//
\
//
\
//
\\
II
\\11
/
/
II
(I
, Safety
CAUTION:
• Operation
Before using this product,
read this manual and follow
all its Safety Rules and
Operating Instructions.
Sears, Roebuck
and Co., Hoffman
o Maintenance
Parts List
• Espahol,plO
Estates,
IL 60179 USA
www.sears.com/craftsman
Printed
0M-I1502
in China
--
Slider Switch
Spindle Lock
Depressed Cente
Wheel
Auxiliary Side Handle
Guard
_r
FULL
ONE YEAR
WARRANTY
ON CRAFTSMAN
ANGLE
GRINDER
If this Craftsman angle grinder fails due to a defect in material or workmanship
year from the date of purchase, Sears will replace it free of charge.
WARRANTY
applies
Roebuck
d_, WARNING!
instructions.
legal rights,
and Co., Dept.
817WA,
Read and understand
Failure
return the angle
only while this angle grinder
This warranty gives you specific
vary from state to state.
Sears,
to follow
SAVE THESE
grinder
to your nearest
Sears
is used in the United States.
and you may also have other rights which
Hoffman
Estates,
Electrical
all
IL 60179
Safety
• Grounded tools must be plugged into
an outlet properly installed and
grounded in accordance with all codes
and ordinances. Never remove the
grounding prong or modify the plug in
any way. Do not use any adaptor plugs.
Check with a qualified electrician if you
are in doubt as to whether the outlet is
properly grounded. If the tools should
electrically malfunction or break down,
grounding provides a low resistance path
to carry electricity away from the user.
Applicable only to Class I (Grounded)
tools.
all
instructions
listed below may result in
electric shock, fire and/or serious, personal
injury.
Work
one
SERVICE
To obtain replacement
under this warranty,
store in the United States.
This warranty
within
INSTRUCTIONS
Area
o Keep your work area clean and well lit.
Cluttered benches and dark areas invite
accidents.
* Do not operate power tools in
explosive atmospheres,
such as in the
presence of flammable
liquids, gases,
or dust. Power tools create sparks which
may ignite the dust or fumes.
Double insulated tools are equipped
with a polarized plug (one blade is
wider than the other.) This plug will fit
in a polarized outlet only one way. If
the plug does not fit fully in the outlet,
reverse the plug. If it still does not fit,
contact a qualified electrician to install
a polarized outlet. Do not change the
plug in any way. Double Insulation []
, Keep bystanders,
children,
and
visitors
away while operating
a power
tool. Distractions
can cause you to lose
control.
2
eliminatesthe needforthe threewire
groundedpowercordandgrounded
powersupplysystem.Applicableonlyto
ClassIItools.
safety shoes, hard hat, or hearing
protection must be used for appropriate
conditions.
Tool Use and Care
• Avoid body contact with grounded
surfaces such as pipes, radiators,
ranges and refrigerators. There is an
increased risk of electric shock if your
body is grounded.
o Use clamps or other practical way to
secure and support the workpiece to a
stable platform. Holding the work by
hand or against your body is unstable and
may lead to loss of control.
. Don't expose power tools to rain or
wet conditions. Water entering a power
tool will increase the risk of electric shock.
• Do not force tool. Use the correct
Do not abuse the cord. Never use the
cord to carry the tools or pull the plug
from an outlet. Keep cord away from
heat, oil, sharp edges or moving parts.
Replace damaged cords immediately.
Damaged cords increase the risk of
electric shock.
When operating a power tool outside,
use an outdoor extension cord marked
"W-A" or "W." These cords are rated for
outdoor use and reduce the risk of electric
shock.
Personal
° Do not use tool if switch
• Stay alert, watch what you are doing
and use common sense when
operating a power tool. Do not use tool
while tired or under the influence of
drugs, alcohol, or medication.
A
moment of inattention while operating
power tools may result in serious
personal injury,
does not turn
it on or off. Any tool that cannot be
controlled with the switch is dangerous
and must be repaired.
• Disconnect
the plug from the power
source before making any
adjustments,
changing accessories,
or
storing the tool. Such preventive safety
measures reduce the risk of starting the
tool accidentally.
• Store
Safety
tool
for your application.
The correct tool will
do the job better and safer at the rate for
which it is designed.
idle tools
and other
dangerous
users.
out of reach
of children
untrained
persons. Tools are
in the hands of untrained
Maintain tools with care. Keep cutting
tools sharp and clean. Properly
maintained
tools, with sharp cutting
edges are less likely to bind and are
easier to control.
• Dress properly.
Do not wear loose
clothing
or jewelry. Contain long hair.
Keep your hair, clothing,
and gloves
away from moving parts. Loose clothes,
jewelry, or long hair can be caught in
moving parts.
Check for misalignment or binding of
moving parts, breakage of parts, and
any other condition that may affect the
tools operation. If damaged, have the
tool serviced before using. Many
accidents are caused by poorly
maintained tools.
° Avoid accidental
starting.
Be sure
switch is off before plugging
in.
Carrying tools with your finger on the
switch or plugging in tools that have the
switch on invites accidents.
Use only accessories
that are
recommended
by the manufacturer
for
your model. Accessories
that may be
suitable for one tool, may become
hazardous when used on another tool.
° Remove adjusting keys or wrenches
before turning the tool on. A wrench or
a key that is left attached to a rotating part
of the tool may result in personal injury.
° Do not overreach.
Keep proper footing
and balance at all times. Proper footing
and balance enables better control of the
tool in unexpected
situations.
° Use safety equipment.
Always wear
eye protection.
Dust mask, non-skid
Service
Tool service must be performed
only
by qualified repair personnel. Service
or maintenance
performed by unqualified
personnel could result in a risk of injury.
When servicing
a tool, use only
identical
replacement
parts. Follow
instructions
in the Maintenance
section
of this manual. Use of
unauthorized
parts or failure to follow
Maintenance Instructions may create a
risk of electric shock or injury.
SPECIFIC SAFETY RULES
*
*
-
Always use proper guard with
grinding wheel. A guard protects
operator from broken wheel fragments.
Accessories must be rated for at
least the speed recommended on the
tool warning label. Wheels and other
accessories running over rated speed
can fly apart and cause injury.
Hold tool by insulated gripping
surfaces when performing an
operation where the cutting tool may
contact hidden wiring or its own
cord. Contact with a "live" wire will make
exposed metal parts of the tool "live"
and shock the operator.
ADDITIONAL
SAFETY
RULES
,
•
ALWAYS WEAR EYE PROTECTION.
KEEP GUARDS IN PLACE.
,
Use only grinding wheels having a
maximum operating speed at least as
high as the speed specified in the
warning on the tool's label.
Before using, inspect recommended
accessory for cracks or flaws. If such a
crack or flaw is evident, discard the
accessory. The accessory should also
be inspected whenever you think the
tool may have been dropped.
When starting the tool (with a new or
replacement
wheel installed) hold the
tool in a well protected area and let it run
for one minute. If the wheel has an
•
•
undetected crack or flaw, it should burst
in less than one minute. Never start the
•
,
tool with a person in line with the wheel.
This includes the operator.
In operation, avoid bouncing the wheel
or giving it rough treatment. If this
occurs, stop the tool and inspect the
wheel.
ALWAYS USE GUARDS when grinding.
• Clean your tool out periodically.
,_CAUTION:
Some wood contains
preservatives
such as copper chromium
arsenate (CCA) which can be toxic. When
sanding these materials extra care should
be taken to avoid inhalation and minimize
skin contact.
,_WARNING:
Use of this tool can
generate dust containing
chemicals
known
to cause cancer, birth defects or other
reproductive
harm. Use appropriate
respiratory
protection.
The label on your tool may include
following symbols.
V .............. volts
the
A ..... ........ .amperes
Hz ............ hertz
W ............ watts
min .......... minutes
--
............ alternating
current
........ direct current
no ............ no load speed
@ ............ Class
.../min
II Construction
...... revolutions
or reciprocation
per minute
9
............ earthing
z_ ............ safety
EXTENSION
terminal
alert symbol
CORDS
When using an extension cord, be sure to
use one heavy enough to carry the current
your product will draw. An undersized cord
will cause a drop in line voltage resulting
in loss of power and overheating.
The
following table shows the correct size to
use depending
on cord length and
nameplate
ampere rating. If in doubt, use
the next heavier gage. The smaller the
gage number, the heavier the cord.
Minimum Gage for Cord Sets
Volts
TotalLengthof Cordin Feet
120'7
240V
0-25
0-50
AmpereRating
More Not more
Than
Than
061012-
6
10
12
16
18
18
16
14
26-50
51-100
51-100
101-200
101-150
201-300
AWG
16
16
16
12
16
14
14
12
14
12
NotR_ommended
MOTOR
Be sure your power supply agrees with
nameplate
marking. 120 Volts AC only
means your tool will operate on standard
60 Hz household power. Do not operate
AC tools on DC. A rating of 120 volts
AC/DC means that your tool will operate
on standard 60 Hz AC or DC power. This
information
is printed on the nameplate.
Lower voltage will cause loss of power
and can result in over-heating.
All
Craftsman tools are factory-tested;
if this
tool does not operate, check the power
supply.
Use only grinding wheels having a
maximum operating speed at least as
high as the speed specified in the
warning on the tool's labe =
Place the depressed-center
wheel on
the tool spindle as shown in Figure 4.
.
AUXILIARY SIDE HANDLE (FIG. 1)
An auxiliary side handle is furnished With
your grinder and can be screwed into
either side of the grinder housing. This
handle SHOULD BE USED AT ALL
TIMES to maintain complete control of the
tool.
.
ADJUSTING
WHEEL GUARD (FIG. 2)
TURN OFF AND UNPLUG THE TOOL.
NEVER OPERATE GRINDER WITHOUT
GUARD IN PLACE.
t_--
Backing
Flange
Adjust the guard to protect your hands
and to direct grinding debris. Loosen the
clamp bolt. Position the guard at the
required angle. Always tighten the clamp
bolt.
@--
Outer
Flange
--Spindle
Figure 5 shows the two positions
used for mounting both grinding discs
and cutting discs. For grinding discs,
the outer flange is fitted with the
raised portion facing towards the
disc. For cutting discs, the outer
flange is fitted with the inner portion
facing away from the disc.
.
GRINDING
WITH
DEPRESSED-CENTER
WHEELS
(FIG. 3,4,5,6,)
Your grinder comes equipped with a
depressed-center
wheel, used for
moderate metal removal on flat or
contoured surfaces.
,_, CAUTION:
Never use depressed-
center
without
wheels
TO INSTALL
the proper
guard.
I
DEPRESSED-CENTER
I
L
WHEELS
1.
2.
3.
Be sure tool is disconnected
from
7
power supply and switch is in OFF
position.
Be sure the guard assembly is
securely attached to the spindle
housing.
Put the backing flange onto the tool
spindle as shown in Figure 3.
5
Press in the spindle lock button as
shown in Figure 6 and rotate the
spindle by hand until it locks.
Keeping the lock button pressed in,
tighten the outer flange with the
spanner wrench provided.
J
FITTING ABRASIVE
DISCS
TURN OFF AND UNPLUG THE TOOL.
REMOVING THE GUARD (SANDING
ONLY)
Turn off and unplug the tool. Remove the
clamp bolt and the three retaining screws
as shown in Figure 7.
Use an abrasive disc with the backing pad
for sanding with your angle grinder.
1. Remove the guard.
2. Place the inner flange, backing pad,
abrasive disc and outer flange on the
spindle as shown in Figure 8.
_Outer
Flange
Disc
Backing Pad
PRECAUTIONS
SANDING
•
•
,
.
TO TAKE
,,
°
Backing Flange
PAINT
Sanding of lead based paint is NOT
RECOMMENDED
due to the difficulty of
controlling the contaminated
dust. The
greatest danger of lead poisoning is to
children and pregnant women.
Since it is difficult to identify whether or
not a paint contains lead without a
chemical analysis, we recommend the
following precautions when sanding any
paint:
No children or pregnant women should
enter the work area where the paint
sanding is being done until all cleanup
is completed.
A dustmask or respirator should be
worn by all persons entering the work
area. The filter should be replaced daily
or whenever the wearer has difficulty
breathing.
NOTE: Only those dustmasks suitable
for working with lead paint dust and
fumes should be used. Ordinary painting
masks do not offer this protection. See
your local hardware dealer for the
NIOSH approved proper mask.
ENVIRONMENTAL
°
_---
WHEN
,
SWITCH
position. To turn the tool off, press the rear
of the slider switch. Spring action returns
the switch to the off position.
SAFETY
dust generated.
Areas where paint removal is occurring
should be sealed with plastic sheeting
of 4 mils thickness.
be done in a manner
of paint dust outside
(FIG. 10)
To start the grinder, push the slider switch
forward. For continuous operation, push
the slider switch forward and push the
front down until it locates in the lock
Paint should be removed in such a
manner as to minimize the amount of
Sanding should
reduce tracking
the work area.
Press in the spindle lock button as
shown in Figure 9 and rotate the
spindle until it locks. Keeping the
lock button pressed in, tighten the
outer flange with the spanner wrench
provided.
to
6
TO USE GRINDER
•
Hold your angle grinder with one hand
on the body and the other hand firmly
around the side handle as shown in
• Figure
11.
attempt to exert too much pressure on
your angle grinder to speed up your work.
The abrasive discs operate more
efficiently when light pressure is exerted,
thus avoiding a drop in the speed of your
angle grinder.
CLEANING
Always position the guard so that as
much of the exposed disc as possible is
pointing away from you.
Be prepared for a stream of sparks
when the disc touches the metal.
For best tool control, material removal,
and minimum overloading,
maintain an
angle between the disc and work
surface (Fig. 12) of approximately
30 °
when grinding and 10°-15 ° when
sanding.
Blowing dust and grit out of the motor
housing using compressed
air is a
necessary maintenance
procedure.
Dust
and grit from metal grinding often
accumulate
on interior surfaces and could
create an electrical shock hazard if not
cleaned out.
Use only mild soap and damp cloth to
clean the tool. Never let any liquid get
inside the tool; never immerse any part of
the tool into a liquid.
IMPORTANT:
To assure product SAFETY
and RELIABILITY,
repairs, maintenance
and adjustment should be performed by
Sears Service Centers.
LUBRICATION
•
•
Exert light pressure on abrasive discs for
efficient operation. Pushing too hard will
cause a drop in speed and may result in
motor overload and damage.
Use caution when working into corners
as contact with the intersecting
surface
may cause the grinder to jump or twist.
A
_L CAUTION!
Always wear eye
protection
while operating
this power
tool.
OVERLOAD
Overloading
will cause damage to the
motor of your angle grinder. This can
happen if your angle grinder is subjected
to heavy use for prolonged pedods of
time. Do not in any circumstances,
Sears Craftsman tools are properly
lubricated at the factory and are ready for
use. Tools should be lubricated regularly
every year depending on usage. (Tools
used on heavy duty jobs and tools
exposed to heat may require more
frequent lubrication.) This lubrication
should be attempted only by trained power
tool repair specialists such as those at
Sears Service Centers or in other qualified
service organizations.
ACCESSORIES
Use only Craftsman accessories with your
tool. These accessories are available at
extra cost from your local Sears store or
Sears Service Center.
,_ CAUTION:
Using accessories
by Sears may be hazardous
injury or tool damage.
not sold
and lead to
CRAFTSMAN
119
118
....
4 INCH ANGLE GRINDER - MODEL NUMBER 172.11502
155
':
135 1:
,,3150 160
i.
I02
10:
136
161
134
03
816
10
_146
105
10_
106_
07
Engr:
PSC
4/99TS
CRAFTSMAN
4 iNCH ANGLE
GRINDER
- MODEL
NUMBER,
172.11502
I the
heModel
ModelNumberin
Numberwill
on the Nameplate.Always mention
allbefound
correspondenceregardingyourtool.
SEE BACK PAGE FOR PARTS ORDERING INSTRUCTIONS
PARTS
ITEM
NO.
101
r.D
PART
NO.
DESCRIPTION
QTY
Armature (Incl. 135,140,
155,160)
Field
Switch (On/Off)
Brush
Cord & Plug
Outer Flange
Inner Flange
Screw
Flange
Guard
Screw
Gear Case Cover
Spindle
Cord Protector
Screw
Gear Case
Side Handle
1
1
1
2
1
1
1
1
1
1
4
1
1
1
2
1
1
122 429760-00
123 429753-00
126 429757-00
127 429763-00
128 429746-00
129 429744-00
132 429780-00
133 429781-00
134 429775-00
135 429748-00
136 429785-00
138 429788-00
Flange
Nut
Spindle Lock
Bearing
Sleeve
Baffle
Brush Holder
Brush Spring
Field Case
Bearing
End Cap
Wrench
!
1
1
1
1
1
2
2
1
:1
1
1
140
141
143
145
146
Flange
Actuator
Screw
Screw
Lock-On Button
1
1
2
4
1
102
103
104
105
106
107
108
109
110
112
113
114
116
118
119
121
429740-00
ITEM
429741-00
429742-00
429782-00
429743-00
429771-00
429770-00
429767-00
429766-00
429765-00
429762-00
429761-00.
429764-00
429786-00
429755-00
429754-00
429772-00
429789-00
429776-00
429745-00
429779-00
429777-00
NO.
LiST
PART
NO.
DESCRIPTION
147
148
150
152
155
156
157
158
159
160
161
162
429773-00
429759-00
429752-00
429758-00
429749-00
429756-00
429768-00
429769-00
429778-00
429751-00
429784-00
429774-00
Lead
Gear
Pinion
Retaining
Screw
Screw
Washer
Screw
Spring
Bearing
Screw
Lead
163
164
816
429783-00
429795-00
429787-00
Flange
Screw
Identification
QTY
Ring
Label
1
1
1
1
5
2
3
3
1
1
1
1
1
1
1
PARTS NOT ILLUSTRATED: (Supplied
withUnit)
154794-00 Instruction Manual
1
IMPORTANT! To assure product
SAFETY and
RELIABILITY, repairs, maintenance and adjustment should be performed by Sears Service Centers or other qualified service organizations, always
using Sears replacement parts.
When servicing Double Insulated Tools, it is extremely important that ONLY IDENTICAL
REPLACEMENT PARTS BE USED and that REASSEMBLY OF TOOL IS IDENTICAL
TO THE
ORIGINAL ASSEMBLY.
Model
No.
172.11502
Volts
120
AC
Amps
5.8
Engr:
PSC
RPM
7.700
4/99TS
_._
INTERRUPTORDESLIZABLE
BOTON DE SEGURO DE LA
.-MANGO AUXILIAR
DISCO
GUARDA DELDISCO
GARANTfA
COMPLETA
POR UNA ANO
EN LA ESMERILADORA
ANGULAR
CRAFTSMAN
Si esta Esmeriladora
obra dentro
Angu'lar
del ago siguiente
Craftsman
falla debido
a la fecha
de compra,
a defectos
Sears
en materiales
la reemplazar&
o mano
de
sin cargo
alguno.
SERVICIO
EN GARANT(A
Para obtener un cambio bajo esta garantfa,
Sears m_.s cercana a usted en los Estados
Esta garantfa se aplica
Estados Unidos.
_nicamente
mientras
Esta garantfa le otorga derechos especfficos,
pueden variar de estado a estado.
SEARS
ROEBUCK
& CO., DEPT. 817WA,
envfe la esmeriladora
Unidos.
la esmeriladora
y usted pudiera
HOFFMAN
A ADVERTENCIA:
Lea y comprenda
todas las instrucciones.
No seguir todas
las instrucciones
enlistadas a continuaci6n
•
•
producen
chispas
otros derechos
que
IL 60179
ocasionar
que
ELECTRICA
Las herramientas
con doble
aislamiento
est_n equipadas
con una
clavija polarizada
(con una pata m_s
ancha que la otra.) Esta clavija se
acoplar_
Onicamente
en una toma de
corriente
polarizada
de una manera.
Si la clavija no se acopla al contacto,
invi6rtala.
Si at3n asf no se ajusta,
comunfquese
con un electricista
calificado para que le instalen una toma
de corriente polarizada apropiada. El
limpia y
amontonadas
y las zonas oscuras
propician los accidentes.
No opere herramientas
el_ctricas
en
atmbsferas
explosivas,
corno en
presencia
de Iiquidos,
gases o polvos
inflamables.
Las herramientas
el6ctricas
ESTATES,
SEGURIDAD
DE TRABAJO
Conserve su _rea de trabajo
bien iluminada.
Las bancas
tener
se utilice en los
distracciones
pueden
pierda el control.
CONSERVE ESTAS
INSTRUCCIONES
°
angular
a la tienda
originar la ignici6n de los polvos o los
vapores.
Conserve a observadores,
ni_os y
visitantes alejados mientras opera
una herramienta
el6ctrica. Las
puede resultar en choque electrico,
incendio y(o) lesiones personales
de
gravedad.
AREA
angular
que pueden
10
doble [] aislamientoeliminala necesidad
de cablescontres hilosy sistemasde
alimentaci6ncon conexi6na tierra.
, Evite el contacto corporal con
superficies aterrizadas tales como
•
tuberfas, radiadores,
hornos y
refrigeradores.
Hay un gran riesgo de
choque el_ctrico si su cuerpo hace
tierra.
No exponga
las herramientas
el_ctricas
a la Iluvia o a condiciones
encender
°
°
de mucha humedad.
El agua que se
introduce en las herramientas
aumenta
°
el riesgo de descargas el6ctricas.
No maltrate el cable. Nunca tome
el
cable para transportar
una
herramienta
ni para desconectarla
la toma de corriente. Consdrvelo
de
°
•
°
PERSONAL
°
operan herramientas electricas
ocasionar lesiones graves.
Vfstase de manera adecuada.
,
tenga puestas ropas o artfculos
de
joyerfa flojos. Cubra su cabello si Io
tiene largo. Conserve
su cabello, sus
ropas y guantes alejados de las
piezas m6viles. Las piezas de vestir
flojas, las joyas y el cabello largo
pueden resultar atrapados por las piezas
m6viles.
Evite el encendido
accidental.
DE LA
•
herramienta
apropiada
para su
aplicaci6n.
La herramienta
apropiada
hard el trabajo mejor y de manera m&s
segura bajo las especificaciones
para
las que se dise56.
No utilice la herramienta
si el
•
interruptor
no enciende y apaga.
Cualquier herramienta
que no pueda
controlarse por medio del interruptores
peligrosa y debe reemplazarse.
Desconecte
la clavija de la toma de
corriente
antes de hacer cualquier
ajuste, cambio de accesorios
o de
guardar la herramienta.
Tales medidas
de seguridad preventivas reducir_.n el
riesgo de que la herramienta se
encienda accidentalmente.
Guarde las herramientas
fuera del
°
alcance de los niSos y de otras
personas
no capacitadas.
Las
herramientas
son peligrosas en manos
de personas no capacitadas.
Cuide sus herramientas.
Conserve
las
°
puede
No
Asegerese
que el interruptor
est6 en
posici6n
de apagado antes de
conectar.
Sostener una herramienta con
°
siempre los pies bien apoyados, al
igual que el equilibrio.
La posici6n
correcta de los pies y el equilibrio
permiten controlar mejor la herramienta
en situaciones inesperadas.
Utilice equipo de seguridad. Siempre
utilice protecci6n en los ojos. Se
deben utilizar mascarillas contra polvo,
zapatos antiderrapantes, casco o
protectores
para los ofdos para tener las
condiciones
apropiadas.
°
Est_ alerta, conc_ntrese
en Io que
estd haciendo. Recurra al sentido
comt_n cuando opere una
herramienta el_ctrica. No opere
ninguna herramienta si se encuentra
fatigado o bajo la influencia de
drogas, alcohol o medicamentos.
Un
momento de desatenci6n
mientras se
puede
Utilice prensas
u otros medios
pr_cticos
para asegurar y apoyar la
pieza de trabajo en una plataforma
estable. Sujetar las piezas con la mano
o contra su cuerpo es inestable y puede
originar la p6rdida de control.
No fuerce la herramienta,
utilice la
para uso a la intemperie y para reducir
el riesgo de choques el6ctricos.
SEGURIDAD
Una Ilave
que se deja en una pieza giratoria
ocasionar lesiones personales.
No se sobreextienda.
Conserve
USO Y CUIDADOS
HERRAMIENTA
alejado de calor aceite, bordes
afilados o piezas m6viles. Cambie
inmediatamente
los cables da_ados.
Los cables da_ados aumentan el riesgo
de choque electrico.
Cuando opere una herramienta
el6ctrica
a la intemperie,
utilice una
extensi6n
marcada "W-A" o "W".
Estas extensiones estan clasificadas
la herramienta.
°
el dedo en el interruptor o conectarla sin
fijarse si el interruptor estA en posici6n
de encendido propicia los accidentes.
Retire las Ilaves de ajuste antes de
11
herramientas
de corte afiladas y
limpias.
Las herramientas
que reciben
un mantenimiento
adecuado, con piezas
de corte afiladas, diffcilmente se atascan
y son m#,s faciles de controlar.
Verifique
la alineaci6n
de las piezas
m6viles,
busque fracturas
en las
piezas y cualesquiera
otras
condiciones
que puedan afectar la
operaci6n
de las herramientas.
Siesta
daSada,Ilevesu herramientaa servicio
antesde usarlade nuevo.Muchos
accidentesse debena herramientascon
mantenimientopobre.
o Solamente use accesorios que el
sea por Io menos tan lata como las
"RPM sin carga" (No load RPM)
marcadas en la placa de identificaci6n
de la herramienta.
fabricante recomiende para su
modelo de herramienta. Los
accesorios que est_n diseSados para
una herramienta, pueden volverse
peligrosos cuando se emplean con otra.
SERVICIO
* El servicio a las herramientas Io debe
efectuar t3nicamente personal
calificado. El servicio o mantenimiento
realizado por personal no calificado
puede originar riesgos de lesiones.
* Cuando efectt3e servicio a una
herramienta, utilice Onicamente
refacciones id_nticas. Siga las
instrucciones de la secci6n de
Mantenimiento de este manual. El
empleo de piezas no autorizadas o no
seguir las instruccionesde
mantenimiento puede originar riegos de
choque el_ctrico o lesiones.
REGLAS
ESPECIFICAS
SEGURIDAD
-
•
PRECAUCION:
•
Utilice 0nicamente piedras de esmeril
cuya velocidad m_.xima de operaci6n
o piedra s de
El empleo
de esta
herramienta
puede generar polvo con
contenido de productos qufmicos que se
sabe que pueden producir cancer,
defectos cong6nitos y otros daSos
reproductivos.
CABLES
DE EXTENSION
Cuando utilice una extensi6n, asegQrese
que tenga el calibre suficiente para
conducir la corriente que su herramienta
necesita. Una extensi6n con calibre menor
al necesario causarA una cafda en el
voltaje de la i(nea, resultando en p6rdida
de potencia y sobrecalentamiento.
La
tabla siguiente muestra el calibre correcto
para usarse, de acuerdo con la Iongitud
de la extensi6n y el amperaje en la placa
de identificaci6n.
Si tiene dudas, utilice el
calibre siguiente. Mientras menor sea el
n_mer0 del calibre, mayor serA la
capacidad del cable.
PROTECClON
LAS GUARDAS
de centro hendido
como el arsenato c_prico de cromo (CCA)
que pueden ser t6xicas. Cuando lije estos
materiales debe tener cuidado para evitar
la inhalaci6n de estas sustancias y el
contacto con la piel.
DE
CONSERVE
SITIO.
persona parada en Ifnea con el disco.
Esto incluye al propio operador.
Durante la operaci6n, evite que el disco
rebote y evite tambi6n tratarlo mal. Si
esto ocurre, apague la herramienta y
revise la piedra.
SIEMPRE UTILICE GUARDAS con
,_Limpie
su herramienta peri6dicamente.
PRECAUCION:
Algunos tipos de
madera contienen sustancias t6xicas
hasra que las superficies metAlicas
expuestas de la herramienta "viva" y
descarguen
al operador.
•
Cuando encienda la herramienta (con
un disco nuevo o de repuesto) sujete la
herramienta en un Area bien protegida y
deje que funcione durante un minuto.'
Nunca encienda la herramienta con una
piedras
copa.
clasificados
para por Io menos la
velocidad recomendada
en la etiqueta
de advertencia.
Los discos y otros
accesorios que funcionan a velocidades
mayores a la especificada
pueden salir
despedidos
y causar lesiones.
Sujete la herramienta
por las
superficies
aislantes cuando efect_e
una operaci6n en que la herramienta
de corte pueda hacer contacto con
cableados
ocultos o con su porpio
cable. El contacto con un cable "vivo"
SIEMPRE UTILICE
PARA LOS OJOS.
,
*
DE
.
Antes de utilizar la unidad, inspecciones
los accesorios recomendados
en busca
de cuarteaduras
o fallas. Si tales fallas
son evidentes, descarte el accesorio.
Debe revisar el accesorio
siempre que
piense que la herramienta
se haya
cafdo.
,
Utilice siempre la guarda apropiada
con la piedra de esmeril. La guarda
protege al operador de fregmentos de la
piedra.
Los accesorios
deben estar
REGLAS
ADIClONALES
SEGURIDAD
*
EN SU
12
Calibre mfnimo para cordones de extensi6n
Volts
Longitud total del cord6n en metros
120V
0-7.62 7.63-1524 1525-30.48 30.49-45.72
240V
0-1524 1525-30.48 30.49-60.96 60.97-91.44
AMPERAJE
Mas No m&s
Calbre del cord6n
de de
0 -6
18
16
16
14
6 -10
18
16
14
12
10 -12
16
16
14
12
12
No Recomendado
12 -16
14
INTERRUPTOR
(FIG. 2)
Para encender la esmeriladora,
empuje el,
bot6n deslizable.
Para asegurar el
interruptor en posici6n de operaci6n
continua, deslice el bot6n hacia adelante
y despu_s hacia abajo hasta que se fije
en la posici6n de operaci6n continua.
Para apagar la herramienta,
presione la
parte posterior del interruptor deslizable.
El resorte har_. que el interruptor regrese
a la posici6n de apagado.
La etiqueta de su herramienta puede incluir
los siguientes simbolos.
V .............. volts
A .............. amperes
Hz ............ hertz
W .............. watts
min ............ minutos
_, ............ corriente alterna
.......... corriente directa
/
AJUSTE
Apague
NUNCA
QUE LA
no .............. velocidad sin cargo
[] .............. construcci6n clase II
0 .............. erminales de conexi6n a
tierre
/k ............ simbolo de alerta
Ajuste la guarda para proteger sus manos
y para dirigir los desechos resultantes del
esmerilado. Afloje el tornillo de sujeci6n.
Coloque la guarda en el _.ngulo que se
requiera. Siempre apriete el tornillo de
sujeci6n.
seguridad
...... revoluciones o
.../min
DE LA GUARDA (FIG. 3)
y desconecte la her'ramienta.
OPERE LA ESMERILADORA
SIN
GUARDA ESTE EN SU SITIO.
reciprocaciones por
minuto
MOTOR
Asegerese
que la alimentaci6n
de
corriente concuerda
con la marcada en la
placa de identificaci6n
de ia herramienta.
Una marca de 120 volts, 50/60 Hz, o 120
volts AC significa que la herramienta
est,.
diseSada para operar con corriente
dom6stica
est_.ndar de 120 volts.
CENTRO
Disminuciones
en el voltaje mayores a!
10% causaran perdida de potencia y
sobrecalentamiento.
Todas las
_, PRECAUClON:
ESMERILADO
DE
4,5,6,7)
Nunca
utilice ruedas
de esmerilar de centro realzado
guarda apropiada.
PARA
INSTALAR
CENTRO
1.
m A
(FIGS.
Se pueden emplear ruedas de esmerilar
con centro hendido para la remoci6n
moderada de metal en superficies planas
o contorneadas.
herramientas
Craftsman se prueban en la
fa.brica, si esta herramienta
no funciona,
verifique la alimentaci6n
de corriente.
0=
CON RUEDAS
HENDIDO
0
MANGO AUXILIAR
(FIG. 1)
Hemos provisto su herramienta
con un
mango auxiliar, para su comodidad.
El
mango se puede atornillar de cualquier
lado de la caja de engranes, y DEBE
UTILIZARSE
SIEMPRE para conservar
el
control completo de la herramienta.
2.
3.
13
LAS RUEDAS
sin la
DE
HENDIDO
Aseg_rese que la herramienta
este
desconectada
de la alimentaci6n
de
corriente y el interruptor este en
posici6n de APAGADO.
Verifique que el dispositivo de
guarda se encuentra bien montado
sobre la coraza.
Coloque la arandela de respaldo en
la flecha de la herramienta,
como se
observa en la fig. 4.
.
Verifique los If mites velocidad
de la
piedra de centro hendido. Nunca
utilice una rueda de menor velocidad
que la seSalada en la placa de
identificaci6n
de la herramienta.
,
REMOCION DE LA GUARDA
(SOLAMENTE PARA LIJAR)
APAGUE Y DESCONECTE LA
HERRAMIENTA.
Coloque la rueda de esmerilar de
centro hendido en la flecha de la
unidad,
5.
como se muestra
er_ la figura
1. Retire el tornillo de sujeci6n y los tres
tornillos de retenci6n como se observa en
la Figura
8.
I
°
La Figura 6 muestra las dos
posiciones que se utilizan para
montar ambos tipos de discos, para
esmerilado
y para corte. Para los
discos de esmeril, la arandela (B)se
acomoda
con la parte realzada de
cara al disco. Para los discos de
PRECAUClONES
1.
corte, la arandela (B) se acomoda
con la parte interior hacia el lado
opuesto al disco.
°
PARA
LIJAR
PINTURA
NO SE RECOMIENDA
el lijado de
pintura con base de plomo, por la
dificultad para controlar el po.vo
contaminado.
Los niSos y las
mujeres embarazadas
son las
personas con mayor peligro de sufrir
envenenamiento
por plomo.
2.
Ya que es diffcil identificar si una
pintura contiene plomo sin un
ana.iisis qufmico, recomendamos
seguir las precauciones
que siguen
cuando se lije cualquier tipo de
pintura.
SEGURIDAD
PERSONAL
1.
No deben tener acceso al &rea de
Oprima el bot6n del seguro de la
flecha como se observa en la Figura
7 y gire la flecha hasta que quede
asegurada.
Conservando
el bot6n del
seguro de la flecha oprimido, apriete
la arandela exterior con la Ilave de
horquilla que se le proporciona.
Cuando utilice discos de centro
hendido, sujete la herramienta
de
manera que se produzca un _.ngulo
de aproximadamente
15 ° entre el
disco y la superficie de trabajo.
14
2.
trabajo niSos ni mujeres
embarazadas
hasta que esta se
encuentre
perfectamente
limpia.
Todas las personas que ingresen en
el &rea de trabajo debera.n utilizar
mascara contra polvo o un
respirador.
El filtro deber&
reemplazarse
diariamente
o en el
momento en que el usuario perciba
dificultad para respirar a trav_s del
dispositivo.
NOTA: $61o deben emplearse
ma.scaras contra polvo adecuadas
para vapores y polvos originados
en
pintura que contiene plomo. Las
m_scaras ordinarias
para pintar no
ofrecen _sta protecci6n.
Consulte a
su distribuidorlocal de ferreterfa para
que le recomiendeel equipo
adecuado.
SEGURIDADAMBIENTAL
1.
La pintura debe removersede
maneraque se minimicela cantidad
generadade polvo.
2. Se deben sellar los accesosalas
&reasen donde se est&removiendo
pintura con hojas de pl_.sticocuyo
espesor mfnimosea de 4 mils.
3. El lijado se debe realizarde manera
que se reduzcala salida de polvo de
pinturafuera del _.reade trabajo.
INSTALACIONDE DISCOSABRASlVOS
APAGUEY DESCONECTELA
HERRAMIENTA.
Utilice un disco•abrasivocon la basede
respaldopara lijar con su esmeriladora
angular.
1. Retire la guarda
2. Coloque la arandela,la base de
respaldo,el disco abrasivoy la
arandelaexterioren la flecha, como
se ilustraen la figura 9.
* Coloque siempre la guarda
que la parte expuesta del
opuesta a usted.
° Prep_.rese para las chispas
originan al hacer contacto
metal.
de manera
disco quede
que se
el disco con el
. Cuando esmerile, conserve siempre el
_.ngulo correcto (15 °) entre el disco y la
superficie de trabajo, como se ilustra en
la Figura 12. Esto aumenta la cantidad
de material removido del disco y evita
_sobrecargas
innecesarias.
PRECAUCION!
Siempre utilice
protecci6n en los ojos para operar esta
herramienta.
SOBRECARGA
,
Apriete el disco abrasivo
observa en la figura 10.
La sobrecarga
dafia el motor de su
esmeriladora
angular. Esto puede ocurrir
si usted somete su esmeriladora
a trabajo
pesado por periodos prolongados.
Bajo
ninguna circunstancia
intente ejercer
mucha presi6n sobre su esmeriladora
angular para agilizar su trabajo. Los
discos abrasivos operan de manera mas
eficiente al ejercer presi6n ligera, evitando
asf la cafda en la velocidad de su
esmeriladora.
como se
,
i
MANTENIMIENTO
HERRAMIENTA
O
DE LA
LIMPIEZA:
Un procedimiento
indispensable
de mantenimiento
de su
unidad es la eliminaci6n,
con regularidad,
del polvo y las rebabas que se acur0ulan
en la coraza de la herramienta
mediante
RECOMENDAClONES
PARA
sopleteado
con aire comprimido.
A
menudo se acumulan
en la superficie
interior de 6sta polvo y partfculas
met_.licas que crean el peligro de choque
electrico, por Io que es necesaria su
eliminaci6n
frecuente.
SUS
PROYECTOS
° Sujete su esmeriladora
mano en el cuerpo y
alrededor del mango
muestra en la Figura
angular con una
la otra mano firme
lateral, como se
11. •
Utilice
15
_nicamente
jab6n suave y un trapo
For repair of major brand appliances in your own home...
no matter who made it, no matter who sold it!
1-800-4-MY-HOM
EsMAnytime,
day or night
(1-800-469-4663)
www.sears.com
,,,.. ,,..,.
ii_i!ii!!iiiil
To bring in products such as vacuums,
lawn equipment and electronics for repair, call for
the location of your nearest Sears Parts & Repair Center.
1-800-488-1222
ii_!ilili!iil
i!!iiii_!!i!i:_,:::,:::::
Anytime, day or night
.:-:k:':::
www.sears.corn
........
.......................................................................................................
iiiiiii!;iiiii
!_i_ii.'.'!!:i"
.;::::::.::;::
For the replacement parts, accessories and owner's manuals
that you need to do-it-yourself, call Sears PartsDirectS_ !
1-800-366-PART
6 a.m.-
(1-800-366-7278)
To purchase
_:ii_!!:i!
::.:::.L::::
:: _::.:.::
7 days a week
www.sears.com/part
:;:;k::::',.:
,:::,::::::;:
11 p.m. CST,
::i;i!i!i!iiiii
sdirect
ii!!i:!_
or inquire about a Sears Service Agreement:
_i_i_i
:u-::::::
1..800-827-6655
iiii_ii_iill
7 a
!i_i_i!i_:i:.}i!
Para pedir servicio de reparaci6n
5 p
CST
a domicilio,
Mon
........
Au Canada pour service en frangais:
i'_i::_i:::::!
y para ordenar piezas con entrega a domicilio:
_:_:_...........
1-888-SU-HOGAR
su
i:}i:ii':il}
if!i:
;
Sat
1.877.LE=FOYER
(1-877-533-6937)
s"
(1-888-784-6427)
:
i!i!ii!i
i_iii
.......
;::::'::::::
i
Sears,
Roebuck
and Co.
® Registered Trademark
® Marca Registrada / '_
/ _r_ Trademark of Sears, Roebuck and Co.
Marca de Fabrica de Sears, Roebuck and Co.