1
135.17240
135.17241
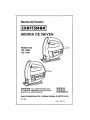
CAUTION: Read, understand and follow
all Safety Rules and Operating Instructions
in this manual before using thinproduct.
oSAFETY
* OPERATION
"MAINTENANCE
ESPAI_OL
Sears, Roebuck and Co., Hoflman Estates, IL 60179 U.S.A.
5-7-02
Safety Instructions .....................................
Description .................................................
Assembly. ...................................................
Operation ...................................................
Maintenance ..............................................
Accessories ................................................
Service Numbers .......................................
Pages
Page
Page
Pages
Page
Page
Page
3_7
8
9
10-15
t6
17
18
FULL ONE YEAR WARRANTY ON CRAFTSMAN SABRE SAW
If this CRAFTSMAN Sabre Saw fails to give complete satisfaction
within one year h'c_ the date of purchase, RETURN IT TO THE
NEAREST SEARS STORE IN THE UNITED STATES, and Sears
will replace it, free of charge,
If this CRAFTSMAN Sabre Saw is used for commercial or rental
purposes, this warranty applies for only 90 days from the date of
purchase.
This warranty gives you specific legal rights,and you may also have
other rights which vary from state to state.
Sears, Roebuck and Co., Dept. 817 WA, Hoffman Estates, IL 60179
SAVE THESE INSTRUCTIONS!
READ ALL INSTRUCTIONS!
2
WARNING: BE SURE to read and understandall instructions. I
Failureto follow Bit instructionslisted below mayresultin electric
shock,fire and/orseriouspersonal injury
i
SAVETHESE INSTRUCTIONS!
WORK AREA SAFETY
Keepyour work area dean and well lit. Clutteredbenchesand
dark areas invite accidents_
DO NOT operate powertools in explosive atmospheres,such as in
thepresence of flammableliquids,gases, ordust. Powertools create
sparkswhichmayignitethedustorfumes,.
Keep bystanders,children,and visitorsawaywhile
operatinga powertool. DistraclJons
cancauseyoutolosecontrol.
ELECTRICALSAFETY
Double insulated tools are equippedwith a polarized plug (one blade
is wider than the other.)This plug will fit in a polarizedoutletonly one
way.if the plug does not fit fully in the outlet,reversethe plug. If it still
doesnot fit, contact a qualifiedelectricianto installa poladzedoutlet.
Do not changethe plugin anyway.Doubleinsulation
[] eliminatestheneed
for the threewiregroundedpowercordand groundedpowersupply system,
Applicableonlyto ClassIt (doubleir_ulated)tools°Beforepluggingin the tool,
be certainthat theoutlet voltagesuppliediswithinthe voltagemarked on the
tool'sdata plate. DO HOTuse "AConly" ratedtoolswith a DC powersupply.
Avoid body contact with groundedsurfaces,such as pipes, radiators,
ranges and refrigerators. Thereis an increasedriskof electricshock ifyour
body is grounded.
If operating the powertoolindamp locations is unavoidable,ALWAYSuse
a Ground Fault Circuit Interrupterto supplypowerto your tool. ALWAYS
wear electrician'srubber glovesand footwearin dampconditions.
Don't expose power tools to rain or wet conditions.Water enteringa
powertool wiltincrease the risk of electric shock
Don't abuse the cowd.NEVERusethe cordto carrythetools or pull
the plug Irornthe outteL Keepcord away from heat,oil, sharp edges
or moving parts.Replacedamaged cordsimmediately.Damagedcords
increase the riskof electric shock,
3
El FCTRICAL SAFETY cont.
When operating a power tool outside, ALWAYS use an outdoor
extension cord marked "W-A" or'q_/". These cordsare rated for outdoor
use and reduce the risk of electric shock. See Accessories section of this
manuaJ [or recommended extension cords,
PERSONALSAFETY
Stayalert,watchwhat you aredoingand usecommonsense
. ..
en operatinga powertool. DONOTusetool whiletir_ or unoerme
influence of drugs, alcohol,or medication.A momentofinattention
while
operatingpowertools may result in serious pemonalinjury.
Dress properly.DO NOTwear looseclothing oL!ewelr]/. P-_ll.backlong
,_if'. K,_p yo_" ,'zaii',do_i,'zg, and glov_ aw'.-_;,ore ,,-,ovh,g._,,_.
Looseclothes,jewelry,or longhaircan be caught,n movingparts.
Avoid accidental starting. BE SURE switchis "Off" beforeplugging In.
Carryingtoolswithyourfinger on theswitchor pluggingin toots Rat have the
switch in the=On"positionin"viresaccidents.
Removeadjusting keys or wrenches before turning the tool "On".
Awrenchor a key thatisleft at*_chedto a rotatingpart of thetool
may resultin persona] injury.
DONOT overreach. ALWAYS keep proper footing and balance at all
times. Proper footingand balanceenablesbettercontrolof thetoolin
unexpectedsituations°
Use safety equipmenL Always wear eye protection.Dust mask,
non-s_dsafetyshoes, hardhat,orheanngprotectionmustbe usedfor
appropriateconditions°
4
TOOL USE AND CARE SAFETY
Use clamps or other practica! ways to secure and support the workpiece
to a stable platform. Holding the work by hand or against your body is
unstable and may lead to toss of control,,
DO NOT force tool. Use the correct tool and blade for your application.
The correct too! and blade will do the job better and safer at the rate for
which it is designed,
DO NOT use tool if switch does not turn it =On" or "Off". Any tool that
cannot be controlled with the switch is dangerous and must be repaired_
Disconnect the pluq from the power source before making any
adjustments, changing accessories,or stodng the tool. Such preventive
safety measures reduce the risk of starting the tool accidentally,
A ....
,_ _JI .....
_ _lL..=lJ
....
J
--_L--..*--A.
=_J
Store idle =oolu _= u, ,_;h u= t,-_muru, i_lI iFd _lltl_dl u..a,:_
_130fi$.
Tools are dangerous in the hands of untmJ,ed users,
Maintain tools with care. Keep cutting tools sharp and clean.
Properly maintained toolswith sharp cuing edges are less likelyto bind
and are easier to control,
Check for misalignment or binding of moving parts, breakage of parts,
and any other condition that may affect the tool's operation. If damaged,
have the tool serviced before using, Many accidentsare
caused by poorly maintained tools,
Use only accessories that are sold by Sears for your model. Accessories
that may I_. suitable for one tool may become hazardous when used on
another tool,
SERVICE SAFETY
Tool service must be performed only by qualified repair personnel.
Service or maintenance performed by unqualified personnel
could result in a risk of injury,
When servicing a toot, use only identical replacement parts. Follow
instructions in the Maintenance section of this manual. Use of
unauthorized parts or failure to follow Maintenance Instructions may create
a risk of electric shock or injury.Certain cleaning agents, such as gasoline,
carbon tetrachloride, ammonia, etc may damage plastic parts
ADDITIONAL SPECIFIC SAFETY RULES FOR SABRE SAWS
Hold tool by insulated gripping surfaces when.Performing an operation
where the cutting tool may contact hidden winng or its own core.
Contact with a 'live" wire wilt make the exposed metal parts of the toot
"live" and shock the operator.
NEVER leave the trigger switch in the Locked "On" position. BEFORE
turning "On" the tool, ALWAYS check the trigger switch to be sure that
it Is"Off". Acc{dantal start-ups could cause injury°
ALWAYS be aware of the location and setting of the Lock On button.
If it is locked =On"during use, ALWAYS be ready to switchit =Off"in an
emergencysituation, by first pushingthe triggerswitchand then immediately
releasing it without preying the Lo_-On button.
Y_,=J_
,_,,,"h....,_'-e
.-w..a,,
_
c-_ing _,,=,,nn _t-q'.r_,_--h_.
,-,-.do,th"
material being cut because the nearn_s of the blade to your hand Is hidden
from your sight,
Keep your hands from between the gear housing and the saw blade
holder. The reciprocating blade holder can pinch your fingers,
DO NOT use dull or damaged blades. Bent blade_ can break
easily, or cause kickback.
BEFORE starting to cut, ALWAYS turn the saw "On" and allow the
bladeto come to full speed. The saw can chatter or vibrate if the blade
speed is too slow at the beginning of the cut and possibly cause kickback
ALWAYS wear safety glasses or eye shields when using this saw, ALWAYS
wear a dust mask or respirator for applications which generate dust.
ALWAYS secure the workplace before cutting. NEVER hold the saw in
your hands or across your legs. Small or thin material may flex or vibrate
with the blade and cause a toss of control.
ALWAYS BE SURE that all adjusting screws and the blade holder are
fastened tightly BEFORE making a col Loose adjuslJng screws and
holders can cause the tool or blade to slip and lossof control may result.
When removing the blade from the tool, ALWAYS avoid contact with
skin and ALWAYS wear pmtscUve gloves when grasping the blade or
accessory. Accessories may be hot after prolonged use.
6
ADDITIONAL SPECIFIC SAFETY RULES FOR SABRE SAWS cont.
WARNING: Some dust particles created by power sanding,
sawing, grinding, drilling and other construction jobs contain
chemicals known to cause cancer, bitth defects or other reproductive
harm. Some examples of these chemicals are:
, Lead from lead-based paints.
• Crystalline silica from brid_e and cement and other maBonry products
• Arsenic and chromium from chemicalty-trealed lumber.
Your risk from these exposures varies, depending upon how often you do
this type of work_Toreduce your exposure to these chemicaJs: Work in a
weB.ventilated area and work with approved safety _uipment, such as those
d,,_t m_
_t _e s_r_'i.'_ly designed to filter out mlcro,_:_pic p,_tides.
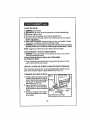
The label on your tool mm/include the following
V ...................................................... Volts
symbols.
A....................................................
Amperes
Hz .......................................................
Hertz
W ...................................................
Wa_
rain .................................................
Mir_tee
•%, ..................................................
Alternating
current
__-===_
.............................................
Directcurrent
no ...................................................
No-loadspeed
[] .........................................................
Class IIconetru_on
..Jmin................................................
Revolutions
or
Strokesperminute
(_1.........................................................
Earthingterminal
L_ ................................................
Alertsueeriowarning message
0 ..................................................
OFF position
1,2,3, ................................................ Selector Settings for ,epeed,
! II m
torque or pRsitJonse_ngs.
",'-'"
Higher number means greater speed
.........................................................
Infinitely Variable Selector Switch
withOff(apeedincreases
from0 setting)
.._ ................................................
Action inthedirection
of arrow
IMPORTANT! READ ALL INSTRUCTIONS
7
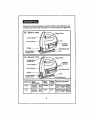
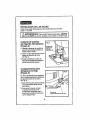
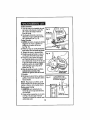
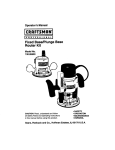
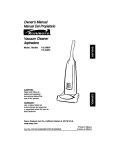
The_e sabre saws are designed to provide maximum cutting efficiency, plus
increased user comfort and convemence in a wide variety of job applications,
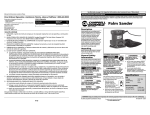
Fig. 1 (Model No. 17240)
Lock.On i
Gear Housir
Openings
Plunger
Change Cover
......................................
'...........
'.....................
Fig. 2 (Model Nor 17241)
--i
iii:: :_L-
or Switch
'variable
Plunger
Toot-Less
Change Cover
...........
......
,/
Orbit Conlrol Lever
I ii
ii] ii
II[I'I'IU'III
....
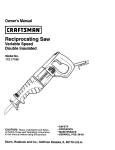
Model No,
Blade
l'hicknesses
Blade
Actlc_n
17240
Minimum ,Srren Standard
Maximum i 5ram
5rd-in.
Wood Aluminum Steel
2 in,
1/2-in,
ll, Fin.
17241
Minirrejm ,Srnm Orbilal
Maximum 15ram
98-in,
Wood Aluminum_ Steel
2 in,
1r2-in. 1/4-in.
8
Slroks Maximum Capacities
Length
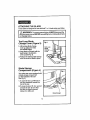
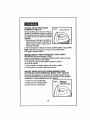
ATTACHING TH E B LADE
These saw_ are designed for use with both T or U-shank sabre saw blades.
.....
I
I
I
IIIII
,I
i1,,11,,11,,
,i,1!
!
'1 '1
:::::::
:
Z_ WARNING: Toprevent personal injury, ALWAYS disconnectthe
plug from power source BEFORE assembling parts, makJng adjustments
or changing blades.
.....
Tool-Less
Blade
Change Cover (Figure 3)
1. Lift too{-less blade change
cover up usi_ your index
and middle fingers°
2. Insert blade to full depth w_ the
teeth facing in thedirection
of the cut (See Fig_3).
3. Release the tooHess blade change
cover to secure the blade in place,,
Blade Storage
Compartment
(Figure 4)
Your sabre saw comes equipped with
a blade storage compartment
(on the backside of the saw
See Fig, 4).
1. To open the door, pull the tab on
the door downward towards the
foot of the saw.
2. To close the door, lift door upward
towards the tool_Be sure _at
the door is dosed to prevent
blades from falling out.
g
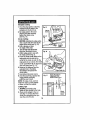
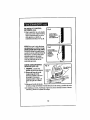
USINGTHE LOCK-ONBUTTON
(Figure 5)
Fig. 6
Lock-On Button
The Lock-On button (see Fig, 5), located
in the handle of your saw, allows you
tun your saw at maximum Stokes per Minute
without squeezing the trigger switch_
1. To lock the triggerswitch ON, squeeze
the trigger switch,push the button in
and then release the trigger switch.
2. To unlock the trigger switch, squeeze
trigger and than release without pushing in button.
NOTE: If the lock-on buttonis continually being pushed,
the trigger switch cannot be released_
USING THE TRIGGER SWITCH TO
CONTROL VARIABLE SPEED (Model 17240 Only')
This saw is equipped with a variable speed trigger switch. The saw can be
turned ON or OFF by squeezing or releasing the trigger switch_
The speed of the blade can be adjusted by the pressure you
apply to the trigger _Nitch.
1. To increase the speed, apply more pressure to the trigger switch.
2. To decrease the speed, apply less pressure_
USING THE VARIABLE SPEED
CONTROL VARIABLE SPEED
DIAL TO
(Model 17241 Only, Figure 6)
This saw is equipped with a variable speed dial. The blade speed
(SPM) can be adjusted dunng the cutting operation
by posi_oning the dial on or between any one of the six numbers:
1. Setting 1-2 for low speed
2. Setting 3-4 for medium speed
2. Setting 5-6 for high speed
10
PLUNGER
SPEED
The blade stroke rate can be adjusted by squeezing the trigger switch
(model !7240)or setting the speed control dial (m_et 17241).
Your experience witl determine the best results for a particular application_
However, as a general rule, use slower speed for harder, denser materials
and faster speed for soft mateda{s,
GENERAL
CUTTING TIPS
l. Place the best side of the material face down and secure it in a
bench vies or clamp it down.
2. Draw your curing _nes or de,aigns on the side facing you.
3. Place front edge of saw foot on the material to be cut and line up the
blade with your cutting line,,
4. Hold saw firmly and turn it on.
5. Press down (to keep saw foot flat against the workpiece)
as you slowly push the saw in the directionof the cut.
6. Gradually buildup the blade speed, cutting as close tothe line as possible
(unless you want to leave enough room for finished sanding).
7. A s you cut, you may need to repos!tionthe vise or
clamps to keep the workpieoe stable+
8. DO NO]" force the saw because the blade teeth may rub and wear
without cutting which may result in breaking the blade.
g. ALWAYS let the saw do most of ',he work.
!0. ALWAYS
cut slowlywhen following curves, so the blade can cut
through cross grain. This will provide an accurate cut and will
prevent the blade from wandering.
ORBITAL ACTION
(Model17241only)
ORBITAL CONTROL LEVER (FIG.7)
This saw _ an orbi_ con_'olfever
(see Rgo 7) that regulates the orbital action.
To activate, turn the lever to fast cut. To
deactivate, rum the orbital control lever
to smooth cut. When minimal splintering
is desired, we recommend using the
smooth cut position.
1. Choose the smooth cuffing posit}on for normal up and down motion
(see Fig. 8).
11
ORBITAL, CONTROL
LEVER cont.
1. Choose the fast cutting
position for maximum
orbital action that witl
provide faster, more
aggressive cutting in
softer materials
(see Fig_9),
Fig,8
Smooth
solt metals
reduced
splintering
cutting
NOTE: In orderto reach full
orbitalaction, theblade
MUST BE FACINGSTRAIGHT
FORWARD.Orbitalact.ion
is not observablewhen the
saw is freerunning, The saw
musthe cuttingfor orbi_ action
to occur,The speed of cutis
easier tosee in thickermateriats.
l
Fastcuing
_ft and
hardwoods
CUTTING WITH A
STRAIGHTEDGE (FIG. 10)
1. ALWAYSuse a rough-cut
blade,wheneverpossible.
2. MarkLheline-of-cut,then
positionthestraightedge
paralleltocutlineandat
the same dietanceas
betweenthebladeand the
sideedge of theeaw foot.
OR
3. Mark thesideedge ofthe
saw foot and then clampthe
straightedgeon the mark and parallel to the cut.
4. Asyou cut, keep the saw foot edgeflushagainst thestraightedge
andflat on the workpiece.
12
PLUNGE
CUTTING
(FIGo 11)
Plunge cutting is useful and time-saving for making rough openings in soft
materials. It makes it unnecessary to drill a hole for an inside or pocket cut
1. Draw lines for the opening°
2. Hold the saw firmly and tilt it
forward so the toe of the saw
foot rests on the workpiece,,
3. Make sure that the blade is
well clear of the workpiece.
4. Start the saw and then very
gradually lower the blade.
5. When the blade touches lhe
workpiece, continue pressing
down on the toe of the saw foot.
"-Toeof Foot
6. Slowly pivot the eaw like a
.........
.......
hinge until the blade cuts through and the foot rests fiat on the workpiece,
7. Then begin sawing on the line-of-cut.
NOTE: We do not recommend using a scroll blade for plunge cuffing,
IMPORTANT: DO NOT try to plunge cut into hard materials, such as steel,
TO MAKE SHARP CORNERS
I. Cut up to the corner, then back up
slightly before rounding the corner.
2, After the opening is complete, 90
back to each corner and cut it from
tile opposite direc*Jon to square it off_
BEVEL OR ANGLE CUTTING
1. Disconnect cord from power
source and remove _ade,
Foot
Release
Tab
2. The foot can be adjusted to cut at
I
i
0° or 45 ° only on the right side
of the foot.
13
TO ADJUST FOOTTO 45 °
1. Push down and hold tab on the
back side of the foot,
2. Slide foot firmly towards frc,nt of tool
and remove foot from 45° mark
notched in base (See Fig. 12),.
45 Slot
3. Align kx_t with 45 ° mark notched in
base, then siide foot firmly towards
back of tooland click intoplace
using the tab (see Fig. 13).
13
............
ot
METAL CUTTING
1. ALWAYS clamp the work down.
2, BE SURE to move the saw along smoothly and use slowerspeeds,
3. DO NOT twist, bend or force the blade°
4. If the saw jumps or bounces, use a blade with finer teeth.
5. If the saw seems clogged when cutting soft metal,
use a blade with coarser teeth°
6. FOR SAFER CUTTING, lubricate the blade with a stick of cutting_wax,
if available, When cutting steel,use cuing oilto lubricate the blade.
7. ALWAYS sandwich thin metal between two pieces of wood or tightly
clamp it on a single piece of wood (place wood on top of the metal).
NOTE: Draw your cut lines or designs on the top piece of wood.
When Cutting Extruded_umlnum or Angle Iron
1, ALWAYSclamptheworkin a benchviseand saw closeto thevisejaws,
When SawingTubing with a Diameter
LargerThan the Depth of the Saw Blade
1. Cut through the wall of the tubingand then inert the blade into the
cut and rotate the tube as you saw.
USING THE EDGE GUIDE AND CIRCLE-CUTTING
GUIDE
This special accessory (sold separately) can be used for
fast, accurate straight and circle cutting (see Fig., 14).
Attaching the Edge Guide
1. Insert bar ofedge ;guide _rough
the slots provided m foot. It can
be inserted from either side of
the foot with the edge guide
facing down (see Fig. 14).
2. Thread the damp screw from
under the foot through the
threaded hole in the clamp
on the left side of the foot.
3. Securely tighten clamp screw
with a screwdriver to clamp
the edge guide bar in place.
14
Straight Cutting
1. Once the edge guide is attached,
measure from the edge of the
work,piece to the line of cut,
2. Set edge guide to the same
distance and then securely
tighten the damp screw
(see Fig 15).
Rg. 15
Ciarq
Lineof
Circle Cutting
1. BEFORE attaching the edge guide,
draw a circle and drill a hole in the
center of the circle (see Fig 16),
2. Drill or plunge cut near
the edge of the cirde_
3. Turrroff s_-anddisconnect
plug from the power source.
4. Attach edgeguide to saw with
the edge guide facing up.
5. Place the meta! center point on the
edge guide into the hole in the
center of the circle. In order for the
Width
,, ,.,,,.,
Fig. 16
edge guide to cut a circle, the metal
center point MUST BE in alignment
with saw blade (see Fig. 17),
6. Measure the distance from the
selected hole to the blade;
this distance is equal to the
circle radius.,
7. Insert plug into power source.
8. Hold the saw firmly, squeeze the
trigger switch and slowly
push the saw forward.
NOTE: To make a hole, cut from
inside the circle;to make wheels
or disc_, cut from the outside,
Cutting Tips
1. ALWAYS cut slowly so the
blade will stay straight in the hole.
2. Place small wedges in the cut
(see Fig.,17) to keep the inner
circle from spreading when you
near the endof the cut.
15
Metal Center
Up
SERVICE
....................
? :
+
_ ....
,,,,
WARNING: Preventive maintenance performed by
unaulhorized personnel may result in misplacing of internal
wires and components, which could cause a serious hazard.
L
+
iiiii iii
'
!
"
!
I!
' LI
'
'11
I' I I
I
1. Tool service MUST BE performed only by Sear_ or other qualified repair
personnel. Service or maintenance performed by unqualified personnel
could result in a risk of injury.
2. When servicing a tool, ALWAYS use only identical replacement parts.
Fotl_v instructions in the Maintenance Section of this manual. Use of
unauthorized partB or failure to follow Maintenance Instructions may
create a risk of electric shock or injury+
TOOL LUBRICATION
Your.CrAFTSMAN
Sabre Saw has b_n properly lubricated and is ready to
gear lubricant whenever brushes are changed.
CARBON BRUSHES
The brushes and commutator in your CRAFTSMAN Sabre Saw have been +
e_ineered to providemany hours of dependable service,To maintain the peak
eff|dency of the motor, we recommend that you examine the brushes every two
to six months depending on the amount of t0ol usage, Only use replacement
brushes lhat are specially designed for use with your CRAFTSMAN Sabre Saw.
BEARINGS
After about 300 to 400 hours of operation, or at every second brash change,
the bearings should be replaced by Sears or other qualified repair personnel.
Bearings which become no+sy (due to heavy load or very abrasive material
cutting)should be replaced immediately to avoid overheating or motor failure.
CLEANING
II'p II1"11'1
I
WARNING:
m
.............
+
Toavoid.tridents,
ALWAYS
disconnectthetoolfrom
the power source BEFORE cleaning or perfomting any maintenance,
The tool may be cleaned very effectively with compressed air.
ALWAYS wear safety goggles when cleaning tools with compressed air,
Ventilation openings and switch levers must be kept clean and free of
foreign matter. DO NOT attempt to clean by inserting pointed objects
through the openings.
IIIIII
................................
iiiii
I
,
II
II,
iiiiiii
,
I
I
,IPII
II IIIIII II II'111
-..
uii
I
I
II
Hill
CAUTION:Certain cleaning agents and solvents cause damage
to the plastic parts. These include gasoline,carbontetrachtoride,
chlorinated
c_eaning_f'¢ents, ammoniaand househdd detergenls that conl_inammonia.
16
Thefollowing
recommended
accessories
arecurrently
available
at your
local Sears Store.
BLADES
Sears has a large selection o! both T or U-shank sabre saw blade_ that are
ideal for all your cutting needs.
EXTENSION CORDS
Seare offers a large selection of extension cords that are ideal for
all your cutting needs_
/_ WARNING: If an extension cordi8 necessary, a cord with adequate
size conductors that is capable of carrying the current necessary for your tool
must be used, This will preventexcessive voltage drop, loss .of power or
overheatin_Gfounded tool_ must use 3,,wife-e_eneton_ords..thathave
3-prong plugs and receptacles.
NOTE:The smaller the gauge number, the greater capacity of the cord°
16 gauge wire has more capacity than 18 gauge wire-
Minimum Gauge for ExtentionCords (AWG)
Total Length of Cord in Feet
Volt_
,l
LLN ,_l,, ....
02GtL
120V
240V
G0I1,
26 _
51 °
tot
SOft.
51 lOOft.
tO0ft.
150fl. .
1ol -
201 -
200IL
300ft,
,,
,j
...........
AWG
AWG
18
16
t6
14
t6
14
12
16
t4
12
Mornthan0
Notmore than 6
Morethan6
.....
.Hotmore then10Morethan10
Notmorethan12
18..........
t8
M0te than 12
Notmore1bant6
14
AWG
12
AWG
NotRecommended
WARNING: The u_e of attachments or accessories that are not
recommended might be dangerous,
17
..........
ii
,J
i
, i
i
,
,,,
....
Get it fixed, at your home or ours!
Your Home
For repairin your home of all major brand appliances,
lawn and garden equipment,or heating and coolingsystems,
no matter who made it, no matter who sold it!
Forthe replacemenl parts, accessories and
owner'smanualsthat you need to do-lt-yoursel[
For Sears proTesstonal
installation o! home appliances
and itemslike garage door openers and water heaters..
1-800-4-MY-HOMEe Anytime, day or night
(!-800,469.4663)
(UoSA. and Canada)
WW'W._.P.¢_'I
WWW.II_a_ r.Jctt
Our Home
For repair of carry-rn products liko vacuums, lawn equipment,
and electronics, call or go on-line for the nearest
Sears Parts and Repair Center.
1-800488-1222
Anytime, day or night (UoSA c,nly)
To pu.rcb_ a F o_ec!bn_reem_nt oj3a product,s_'v'_! by ,S_,re:
1-800-827-6655 (U.S_,)
1-800-361-6665 (C_T,a_)
Para pedrservk:ioder_:_ar",_(Y_ Au f',ar,_la pourseMce en fran_s:
a domidlio,y paraord_ar piezas:
1.800.LE.FOYERMc
1.888.SU.HOGAR
s_
WWW.S_ar,3.c_
® Regt=f._red Trad0mark I r, Tradema_ / sa Service Mark ef 8eat'a. Roebud_ ._nd Co
® M=r¢_ Reg]_'P_da/ TM M_ca de F,,Ixica 1 _ Mar_ de Servido de Seam. Floet_Lid_and Co
Mc M_que de c¢_'nmorcet "_ MarqUed_po_._ do Se_rs, Roebud_ and Go
18
Modelo Nos.
135.17240
135.17241
ATENCION: Lea cutdadosamente todas
las Regtas de Segurldad y las lnstrucclones
antes de usar esta herramienta.
, SEGURIDAD
, OPERACION
• MANTENIMIENTO
Sears, Roebuck and Co., Hoffman Estates, IL 60179 U.S.A.
5-7-02
0M-4281
lnstrucciones de Segurida .......................
Descripci6n ..............................................
Montaje ....................................................
Funcionamiento .......................................
Mantenci6n ..............................................
Acc,esorios ...............................................
N_meros de Servicio T_cnico ..................
P_.ginas
P_,gina
P_gina
P_,ginas
P_.gina
P_.gina
P_.gina
3-7
8
9
10-.15
16
17
18
GARANTtA COMPLETA DE UN AI_O DE LA SIERRA
DE VAIVEN CRAFTSMAN
Si eeta Sierrade VAIVEN CRAFTSMAN no le proporciona completa
8atisfaccien a partir de un a5o desde la fecha de compra, DEVUELVALA
AL ALMACEN SEARS MAS CERCANO EN LOS ESTADOS UNIDOS
y Sears la reemplazar_ gratuitamente_
Si eBta Sierra de VAIVEN CRAFTSMAN se usa para propbsito8
comercides o de alquiler, esta garantia es v_.lida durante 90 dfas desde
la facha de compra,
Esta garantia le otorga derechos tegale_ eepecificos y ueted puede,
adem_,, tenet otros derecho_ que varian de un estado a otro.
Sears, Roe_Jck and Co. Dept. 817 WA, Hoffman Estates, IL 60179
iCONSERVEESTASINSTRUCCIONES!
iLEATODASLAS INSTRUCCIONES!
2
11
ADVERTENCIA:
Leay comprenda todaslas
instnJcciones. El incumptimiento de todas las instruccione8siguientes
puede producirun choque el_bico, incendio y/o lesiones pemonales graves,
iCONSERVE ESTAS INSTRUCCIONES!
SEGUR1DAD DEL AREA DE TRABAJO
Mantenga el lugar de trabajo limpio y bien iluminado. Los bancos de
trabajo desordenados y maJiluminadosfavorecen los acc_dentes
NO use las herramientas el_ctricas en una atm6sfera explosiva,
tal como en la presencia de II'quidos inflamables, gases o polvo, t_as
herramientas el_ricas crean chispasque pueden inflamaret pdvo o vapores_
Mantenga a los es_dores,
nifios o visitantes a una distancia
prudente cuando este utdizando una herramienta de trabajo.
Las distracciones pueden hacerte perder el control
SEGURIDAD ELECTRICA
I.as herramientas con aislarniento doble estdn equipadas con un enchufe
polarizado (una hoja de contacto es rods ancha qua Is olra). Este
enchufe puede colocarse en una toms corriente polarizado snuna sole
direcci6n. Si el enchufe no calza bien con el toms corriente, invierta el
enchufe. Si todavta no calza, pdngase en contacto con un electricista
calificado pars que instals un toms corriente adecuado. No modifique
el enchufe de ninguna manera, El aislamiento _ doble elimina la necesidad
del cord6n el_ctrico trifilarpuesto a tierra y del sistema de aJirnentaci6n de
energia puesto a tierra. Esto s61ose aplica a tas herramientasde Class I1
(deb[e aslamiento). Antes de enchufar la herFarnienta,ASEGURESE qua
el voW_ de/enchufe es el mismo rnarcadoen /a p/aca de la herrarnienta.
NO USE henamientas qua dicen _AConif donde dice fuente de energfa DC.
Evite conlacto del cuerpo con las superficies puestas a tierra tales como
tuberfas, radiadores, cocinas y refrigeradores,Existe mayor riesgo de
sufrir choque el_ctrico sf su cuerpo est_ a tierra. Si tiene que usar la
herramienta en un lugar h_medo, use un interruptor de Circuito de Fatta a
Tierra pars proporcionar energfa a sue herramientas. SIEMPRE use guantes
de etectficistasy calzado en lugares hSmedos.
No exponga las herramientas eldctricas a iluvia ni ambientes hdmedos.
Cuando antra agua a una herramienta el_ctrica, se aumenta el riesgo
de sufrir un choque el_ctrico,
No abuse del cord6n el_ctdco. NUNCA transports las herramientas pot
el cord6n ni tire del cord6n pars desenchufarlas. Mantenga el cord6n
alejado del calor, del aceite, hordes afilados o plazas m6viles.
Reemplace inmediatamente los cordones el_ctricos qua astdn da_ados.
Los cordones dafiados aumentan e[ riesgo de sufrir choque el_ctrico_
3
SEGURIDAD
ELECTRICA
cont.
Cuandouseunaherramienta
el6ctricaal
aire libre, SIEMPRE use un
corddn de extensidn marcado "W-A" o "W". Estos cordoneoeolian
aprobados para use al aire libre y reducen el riesgo de cheque el_ico.
Vea la secci6n Acceooric_ de este manual para los cordonesde
extensi6n recomendados.
SEGURIDADPERSONAL
Mantdngasealerta,mireIo que estdhaciendoy useel sentidocomdn
cuandouseuna herramienta.NOUSE una heriramlenta
cusndoest_
cansadoo bajolairdiuenciade drogas,alcoholo rnedicamentos.
Unmementode distmcci6n
cuandoest&trabajandoconleoherramienla,_
el_h'icas,puede ocasionaruna lesi6npersonalgrave.
Evite la puestaen marchaaccidental. ASEGURESEque el interrupter
estden la poslci6n"Off"(apagado), antesde enchufarla herramienta.
Se puedeproducirun accidentesi transporta
Is herramfentaconsu dedoen
el interrupterosi enchufala herramienta
cuandoel interrupterest&en =a
posici6n"On" (encendtdo)o
Remuevalas Ilaves de ajuste o Ilaves inglesas antes de porteren
marchala hp_amienta.Si oe dejauna llavsmgiesao unaIIavede ajusteen
una piezamovil o en una piezagiratonade la herramienta,se puedeproducir
una lesi6npersona],
No use la herramientaa una distanciademasiadoalejada.Mantenga
siempre un buen equilibrioy u,na posicidnfirme. Etbuenequilibrio
y posici6nfirmepermltenun meiercontrolde la herramientaen
situacionesimprevistas.
Uso de equipodo seguridad. Usesiemprelentes protectores.
Se debeuearrndscara
contrael l_lVO,zapetosde seguridadan_resbaiadizos,
cascode seguridado protecci6naudifivade acuerdoconlaoclrcunstanc_as.
USOYCUIDADO
DELASHERRAMIENTAS
Usemordaza
u otromdtodo prdcticoparaasegumr y apoyar la plezade
trabajoen una plataformaestable. Sl sujetael trabajoconla manoo con_ra
el cuerpoquedainestabley puedeconducir a la p_rdidade control,
No fuercela herramienta,Use la herramientaapropiada pars el trabajo.
La herramlenta
correctahat&el trabajomejory de maneramS eegura,a la
velocidadparsla cua]fue disefiad&
No use la herramientasi el enchufe no funciona debidamente.
Es pellgrososi la herramientano puedeser contmladacon el interruptor
y porIo tantodebe 8er reparad&
Desenchufela herramienta antesdo hacet algdn ajuste,cambiar
accesorios o guardarla. Estasrnedidaspreventivasde seguridadreducen
et riesgodeque la herramientase pongaen marcha accidentalmente.
Mantengalas herramientas lejos del alcance de los ni_os y de otras
personasinexpertas. Las herramientasson peligrosasen manosinexpertas.
Mantengalas hetramientasbien cuidadas. Las herramientascortantss
deben mantenemeafiladasy limpias.Lasherramientasque se mantienen
biencuidadasy bien afiladastienenmenos probabilidades
de atascarsey
se puedencontro]arm&sf&cilmente,
Verifiqueel hay piezas desalineadaso atascadas,si hay piezas
quebrantadaso si exists cualquier otra situaci6n que puedaafectar el
funcionamientode la herramienta.Si estdda_ada II_vela a repararantes
de usarla nuevamente.Muchosaccidentessucedendebidoal realestado
de las herramientas,
Use sdlolopaccesorios vendidos por Sears pars su modelo.
Losaccesonos,quepuedeneer adecuados parsuna herramienta,pueden
serpeliorososs_se Utilizanen olin herramienta
REPARACI()N
La reparaci6n de las herramierdas debe ser efectuada s61o por personal
calificado. La reparaci6n o mantenimiento efectuado por personal no
especiatizado puede causar una lesi6n person_.
Cuando efectde reparaciones en una herramienta, use sdio repuestos
legftimos, Siga las instrucciones indicadas en la secck_n Mantentm|ento
de este manual. El uso de piezas no autorizadas o el incumptimientode
las instrucdones de mantenimiento, puede crest un riesgo de choque
el_ctrico o lesiones,
5
REGLAS DE SEGURIDADESPECIFICASADICIONALES
PARALA NUEVASIERRADE VAIVEN
Sostenga su herramienta per las superficies de sujeci6n aisladae cuando
realice una operacidn donde la herramienta de corte pueae conzaczarse
con alambres escondidos o su propio corddn. El contacto con un alambre
baio "tensi6n" har_ que las piezas de metal expuestas de la herramienta
tambi_ queden bajo "tensiSn" y producir_ un choque el_,ctrico.
NUNCA deje et interruptor dei gatillo en la posici6n de encendldo "On".
ANTES de encender"On" ta herramienta, S1EMPRE revise que
el interruptor del gatillo estd apagado"Off".
El inicio accidental puede causar lesiones,
_S_PRE sepa _
est_ y como funciona el Bot6,'t de Bloqu_ en,i_lar_la.
Siesta trabado On durante el uso, StEMPRE estd listo para apagarlo Off
en una situ_6n de emergencia, Fimero presionando el _nterruptor det gatillo
y luego inmediatamente solt&ndoto sin preslonar el bot6n pa.raTrabar.
SIEMPRE mantenga sus manoe alejadas del _irea donde estd cortando.
No trate de alcanzar el material cortado porquemi_lras m&8se acerca su
mano a la hoja, se aleja de su vista.
Mantenga SIEMPRE sus manos enb'e la envoltura del sn_ranaje y el
sostenedor de ta hoja de la sierra. El sostenedor de la hota a su vez
puede pinchar sue dedos
NO use hoJas en malas condiciones. L_ hojas dobtadas pueden romperse
o devolverse con facilidad,
ANTES de comenzar a cortar, SIEMPRE prenda la sierra "ON" y, deje _ue
la hoja funcione a toda velocidad. Esta sierra puede cnirriar o vlDrat sil_.
veloc=dad de ta hoja estd demasiada lenta al comienzo del corte y puede
que se devuetva.
Use SIEMPRE lentee de seguddad o ..l_ntallas protectoras cuando use
esta sierra. SIEMPRE use una mascariflapara el polvo o respirador para
las apllcaciones que generan polvo.
SIEMPRE asegure su pisza de trabajo antes de cortar. NUNCA sostenga
la sierra en sus manos o sobre sus piemas. Matenalpeque5o o delgado
puede doblarse o vibrar con la hoja y cau_r la perdida del conlrol,
SIE.MPRE ASEGURESE que todos los tornillos y el sujetador de la hoja
e_t_Lnapretados ANTES de cortar.
Cuando est_ sacando la hoja de la herramienta, SIEMPRE evite contacto
con la piel y SIEMPRE use guantes protectores cuando sujete la hoja
o accesorio. Los accesor_ospueden estar catientes despu_ del uso.
6
REGLASDESEGURIDAD
ESPECIFICAS
ADICIONALES
PARA
LA NUEVA SIERRA DE VAIVEN cont.
Z_ ADVERTENCIA: Algunas parlfculas de polvo creadas al usar
energla para lijar, moler, perforar y hacer otros trabajos de construcci6n
contienen quimicos que se sabe pueden producir cdncer, defectos al
nacer u ol_os dafios repmductivos. Algunos ejemplos de estos
qu{micos son los siguientes:
P!omo de las pinturasa babe de plomo
i S=ti,cecriBtalino partir de ladritlos Y cemento Y otros producl_ de albaffteria.
Amenico y cromoa partir de maderas tratada_ con quimico_.
Su ri?sgoa estas ex_iciones varia, depe_jendo la frecuencia con que hace
este bpQde trabaj'o. Para reducir su exposic=ona estos qu_micos: trabaje en
un _ea bien venUlada,y trabaje con equipo de seguridad aprobado, como
por ejemplo m_cams para polvo dise6adas especificamente para filtrar
las part_culasmicroso6picas_
La etiqueta en su herramienta puede incluir los siguientes slmbolos.
V ..................................................... Voltios
A .................................................... Amperes
Hz .................................................. Hertz
W ...................................................... Watts
min ................................................
Minutos
•..-.,_,
........................................................Corriente Alterna
.................................................
Corriente Directa
no ..................................................
Velocidad de Rotaci6n sin Carga
[] .................................................... Con_ruc'oi6nde Cla_e !I
..Jmin ............................................. Revoluciones o golpes pot minuto
por minuto
@ ................................................ Terminal a tierra
Z_ .....................................................Mensaje de advertencia para e! Usuado
O ................................................ Posici6n Off (apagado)
1 93 .............................................. Control pare seteccionar velocidad,
''
'
torque o control de poeick_n.
I,I1,11t
A mawr nurnero mayor velocidad
o_
.............................................. !nfinita,con Off (apagado)., la .
velociGaa aumenta a part_r Gel 0
...................................................Acci6n en direcci6n de la ftecha
ilMPORTANTE! iLEA TODAS LAS INSTRUCCIONES!
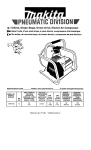
Estas sierras de VAIVEN estd.ndisefiadas para proporcionarla m&xima
eficiencia para cortar, adern_ de aumentar la comodidady conveniencia
on divemos trabajo&
,i ill un ,ml
I ,i ,,
, ;h,,, ;,
Rg. 1 (Modelo No, 17240}
BoI_ de
Ert,_olturadel
Er,,granaje._-.+---+_
Cubk_m
Camblo de hoia
sin herramlen_-----"
.........................
.....
_
iii :i:!¸_ _+'_
i
ii J p ,,,
ii ,,,
Rg.2 (Modelo No, 17241)
Seleclorde
Control de Velocidacl
VariableGaJillo
BorOnde
8Ioq_o
Er-,voltura
det
Enmmajo
OJtierla de
Carr_o de
s_l
Preslllapara
_Ita_ la Base
.................
j
Modelo Gmsorde
No+
laHoja
17240
Jl
I
Acc_6n
dela Hoja
I
_
.
m
_adera Aluminio _ro
M[nimo .Smm Estd.r_ar 5/8i
ill,
M_imo l,,5n'zn
pulgada 2pulgadas2pulgadasll4pdgadas
+7a4.1i M[nimo
,8ram Orbital
M&ximo l+5rrrn
5/8Madera Atuminio Acero
pulgada 2 pulgadas2 pulgadas_/4i:_,_1,_
8
i
II
INSTALACION
DE LAS HOJAS
Estas sierras est&ndisefiadas para set usadas tanto con Lashojas
sabre T o U-shank
_VERTENoIA:
!
Paraprevenir,e'ion2_personales
, S,EMPRE!
,...........i
..........
,,
.......
desenchufe ANTES de montar repuestos, hacer ajustes o cambiar hojas_
Cubierta de Cambio
de Hoja Sin Herramienta
(Figura 3)
Rg.3
1, Levante la cubierta de cambio de
hoja sin herramienta u_,ndo sue
d_os fndice y medio.
2oInserte la h?jahasta el fondo osn los
dientes en dlrecci6n del corte
(Ver Fig. 3)
3. SueltB la cubierta de cambio de
hoja sin herramienta para asegurar
qu_ ia hoja e_t& bien pue_ta.
.._:.
Compartimento
para
Almacenar ta Hoja
(Figura 4)
Su sierra de VAIVEN viene equipada
con un compartirnen.tppara almacenar
(en la parte trasera de su sierra,
VerFig,4)
1. Para abrir ia puerta, abra la pr_illa
de la puerta hacia abajo dei pie
de }a sierra.
2. Pare cerrar la puerta, empuje
la puerta hacia arriba de la
herrarnien_. Asegerese que la
puerta es_ cerrada para prevenir
que se caiga la hojao
9
..................................
:: ::;,;:
USODELBOTONDE BLOQUEO
ENMARCHA(Figura 5)
El botSn de bloqueo en marcha (ver
ubicado en la menilla de su sierra, ie
hacer funcionar su sierra d m&ximo d
dPor
minulo 8in tenor que apretar el interruptor
el gatilloo
1. Para bloquear el interruptor del gatillo en
ON (encendido), apriete el interruptor det
gatillo, empuje et bot6n y luego suelte el
interruptor del gatit!o.
2. Para deaenganchar el btoqueo en marcha, apriete el gatilto y luego eu_lteloo
NOTA: Si el bot6n de bloqueo en marcha 8e usa continuamente,
el del gatillo no puede 8oltame.
USO DEL GATILLO PARA CONTROLAR
LA VELOCIDAD
VARIABLE ($61o en el modelo 17240)
Estasierraest& equipada con un gati!lode veloc_d variable. La sierra 8e puede
prendero apagar al apretar o scltarel ga_Uo,
La veloddad de la hoja puede ajustarse mediante la presi6n
que 8e le da al gatillo
1. Para aumentar la veJocidad, apiique m_s presibn al gati!lo,
2. Para disminuir la velocidad, disminuya la presi6n.
USO DEL SELECTOR DE VELOCIDAD VARIABLE PARA
CONTROLAR
LA VELOClDAD ($6!o Modelo 17241, Figura 6)
Esta sierra e_t& equipada con un selector de velocicladvariable, La hoja
de velocidad (SPM) puede ajustarse durante el proceso de corte poniendo
el selector on, o entre cualquierade Io9 seis nSmeros:
1. Control 1-2 para velocldad baja
2. Control 3°4 para velocidad media
2. Control 5-6 para velocidad alta
10
VELOCIDAD
DEL DESATASCADOR
El nivel de golpe de la hoja puede ajustarse apretando el gatillo
(modelo 9-17240) o fijandoet selector de control de velocfdad (modeto 1724I).
Su experiencia determinar& los mejores resultado8 para una aplicaci6n en
particular, Sin embargo, como regla general, use la velocidad lenta para
materiales m&s duros, densos y la velocidad r,_,pidapara materiales btandos.
DATOS GENERALES
PARA CORTAR
1. Ponga el mejor lado del material hacia abajo y asegerelo con una prensa
de banco o con mordaza_
2. Diagrame o disefe las lineas para cortar en el lado que eat& al frente suyo
3. Ponga el .pie de ta parte del frente de la sierra en el material que va a
cortar y allnee la hoja con ta linea de corte
4. Mantenga la Bierra firme y pr_ndala,
5. Presione hacia abajo (para mantener el pie de la sierra piano conlra ta pieza
de trabajo) a medida que lentamente empuja la sierra en direcci6nal corte.
6. Gradualmente aumente la velocidad de la hoja, cortando tan cerca de la
linea como sea posible (a menos que desee dejar espacio suficiente
para terminar lijando).
7. A medida que corta, puede que necesite acomodar nuevarnente la prensa
de tornillo o mordaza para mantener la pieza de trabajo eatable..
8. NO fderce la sierra porque et dienle de la hoja puede friccbnarse y gastarse
sin cortar to cual puede hacer que se quiebre la hoja..
9. SIEMPRE deje que la sierra haga ta mayoria de! trabajo
10. SlEMPRE corte lentamente en las curvae, de forma que ia siermpueda
cortar a trav_ de ta contra libra° Esto dar& un corte preciso y har_, que
la hoja no e_ doble.
ACCION ORBITAL (S01o Modelo
17241)
PALANCA DE CONTROL ORBITAL
(FIG.7)
Esta sierra tiene una paJam..ade contro! orbital
(vet Fig, 7) que con_'ola la acd6n orbital.
Para activarla, gire la palanca a corte rApido
(fast oJt)_ Para desacUvarla, gire lapalanca
orbital a corte suave (smooth cut)° Cuando
se desea et m_nimo de astillamiento, se
recom[enda usar la posici6n de corte suave.
1. Elija la posici6n de corte suave para el movimiento de corte normal hacia
arriba y hacia abajo (ver Fig_8).
11
PALANCADE CONTROL
DEORBITAcont.
I. Elija la posici6n de corte r&pido
para una acci6n orbital maxima,
que le proporcionar_, un corte
m_ agresivo y r,_pido en
material,as blandos (vet Fig. g).
Corle Suave
Melales blando
ReducckSn
dolasltltamienlo
NOTA:Para que la hoia funcione
compielamente en 6rbita, Jahoja
DEBE ESTAR HACIA DELANTE.
La acci6n orbital no puede verse
cuando la sierra eetb flancionando
libremente. La sierra debe estar
cortando para que la aoci6n
orbital suceda.La ve!oc-idadde
oorte es m&s fficil de vet en
materiales grueso'a_
CORTE CON UN BORDE
DERECHO (FIG. 10)
1, SIEMPRE, cuando sea
po_de use una hoja _pera,
2. Marque la linea de corte,
!uego ponga e! horde
derecho paralelo a la linea
de corte y a ta misma
distancia entre la hoja y el
bords del pie de la _ierra.
O
3. Marque el borde del pie de
la sierray luego amordace el horde derecho en la rnarcay paralelo al oorte,
4, A medidaque corta, mantenga el pie de la sierra ntveladocontra et horde
derecho y plano en la pieza de trabajo,
12
CORTESPENETRANTES(Ver Figura t 1)
Loscortes penetrantesson r_tiles
y ahorran tiempoa! hacer cortes dificiles
en materiale_suaveB,Hace Jnnecesano
perforar unorJficiopara un torte
al interior o un bolsillo.
i
, i
...........................
1. Dibuje las !ineas para el lugar que va a abrir, Rg+1t __
2, Mantenga la sierra firmemente e incl+nela
haoia delante de forma tal que e! dedo de
la sierra descansa en la pieza de trabajo
3. AsegSrese que la hoja no est_ tocando la
pieza on que va a trabajar
4. Ponga en marcha la sierra y
luego gradualmente baje ta hoja.
5. Cuando ta sierra toque la pieza de trabajo,
Dedo d_! Pie
continr_epresionando hama abajo con el
dedo del pie de la sierra.
6. Gire lentarnente la sierra como si fuera una bisagra hasta que la hoja corte
y et pie descanse piano en la pieza de trabajo.
7. Luego comience a cortar en la l[nea de corte.
NOTA: No se recomienda usar hoja de espird para cortee per_,etra.nt_.
tMPORTANTE: No trate de hater cortes penetrantes en materialee duros
tales como e{ acero,
ANGULOS DEFINIDOS
1. Corte basra el &ngulo,luego relmceda
un poco ant_s de redondear el _gulo,
2. Despu_s que ta apertura est_
completan_, te abierta, retr.oct. acada
_julo y c6rtdo desde la _eoci_ opuesta
para que quede _adrado+
CORTES EN BISEL O CORTES
ANGULARES
1, Desenchufe el cord6n y saque ta hoja,
2. El pie puede ajuBt_se a cortes de
0 _ a45 =s6to en et lade derecho del pie+
AJUSTAR EL PIE A 45 °
1, Empuje hacia a]_ajo y sostenga la pr_itla
en la parte de atr_ del pie.
2. De_tice el pie tirme hacia el frente de ta
herramienta y remueva et pie de la marca
45 _ en la base (Ver Fig+12)
3. Alinee el pie en la marca 45Qen la base,
luego de,lice el pie firmemente hacia atr&_
de la herramienta y haga dick usando la presi!la (Ver Fig. 13)
13
CORTE DE METAL
1. SIEMPRE use mordazas
2. ASEGURESE de mover la sierra suavemenle y use la velocidad baia,
3. NO tuerza o doble la hoja.
4. Si ta sierra salta o traquetea, use la hoja de dientes finoB
5. Si la sierra parece obstruida cuando corta metal suave, use una hoja de
dientes rods gruesos.
6, PARA CORTE SEGURO, lubrique ia h0ja con vela, si es posible, Cuando
corte acero, use aceite de cocina para lubricar la hoja,
7. SIEMPRE ponga el metal detgado _ m.pas den_'o de dos piezasde maderas
apretadaefuerta'nente a una pieza de rnadera (p:_ga la rnadera sobreel metal).
NorA,
Diagrams sus lineas de corte o disefio sobre la madera
Code de Aluminio o Acero en Angulo Extrusive
1. SIEMPRE amordace el trabajo en una prensa de banco y con ia cierra
cerca de la prensa de banco.,
Code deTubos de Didmetro Mayor que la Profundidad
de la Hoja de la Sierra
1. Corte a trav_ de la muralla de! tube y luego inserts la hoja en el corte
y gire el tube mientras usa la sierra.
USO DE LA GUIA DEL BORDEY GUIA DE CORTE CIRCULAR
Este accesorio especial (se vends separadamente) puede usarse
para corte circular, r&pidoy agudo derscho (vet Fig, 14).
lnstalacl6n de ta Gu|a de Borde
Rg. t4
1. Inserts la barra de la guia de horde
a tray,s de las ranuras que hay en
st pie. Puede insertarseI__ cualquisr
lade del pie con la guia de horde
hac_aarriba (ver Fig. I4).
2. Pass et torni[lo de la mordaza per
debajo del pie, a tray,s del orificio
en la mordaza en la parts izquierda
del pie
3. Apriete los torniUos de la mordaza
con un destornillader para sujetar
Gula _ Borde Hacta Abajo
la barra guia,
14
Corte Derecho
1, Una vez que 8e ha insta]adola guia
de horde, mida desde el exkemo
de [a pieza de trabajo hasta la
I[nea de corte_
Fig. 15
]orrdllo de
la mordaza
......
2. Fije la _uia de borde a la misma
distancla y luego apriete el tornillo
Llnea de
de la mordaza (ver Fig. 15)
Corte Circular
t. ANTES de poner una guia de horde
diagrame un circulo y perfore un
or_cio en et c_ntro del circulo
(ver Fig, 16)
2. Perfore o haga un corte penetrante
de_le arriba cercadel _
dd drculo.
3. Apague la sierra y desenchdfela.
4. Ponga la gu[a de horde a la sierra
conla gufa de horde hacia arriba
5. Ponga la punta central de! metal,
en ta guia de borde, en el orificio
en el centro del circulo_A fin de que
la gu[a de horde corte un circulo, el
punto de centro de metal D EBE
estar ailneado con la hoja de la
sierra (vet Fig. 17)
6. Mida la distancia de, de et oriticio
__et_ado
I
Ancho
des_ado
II
IIIIIII
IIII
I
_l
:
::1:
a Laboj.a,_,
distar',ciaes iguatd radiodel ctrcuJoo
7. Enchufe
8. Mantenga ta sierra firme, apriete el
Fig, 17
gatillo y lentamente empuje la sierra
hacia detanteo
NOTA: Para hacer un oriflcio, corte
desde adenl_o del ctrcu!o; para hater
ruedas o discos, corte desde afuera,
Datos para Cortar
1. SIEMPRE corte lentamente de
forma tal que la hoja es_ derecha
en el orificio
2. Ponga cu_as pequefias en e{ corte
(verRg,, 17) para que el ci'rculo
centrar no se expanda cuando est_
al final del corte
15
La hoja debe estar
alineada con la Punta
de Gentro de Metal
SERVIClOTECNICO
! _
ADVERTENCIA:
I}/lantenddnp_ventivarear_da
por.L_Fso_l
! no autodzaoo pueae ocaslonar que ca.ruesy componeme.s mzernos
i sean pueslos equivoca(lamente, Io CUal pueoe causar pedgro serio.
1. La reparaci6n de las herrarnientas SOLO debe ser efectuada per personal
¢alificado de Sears u otto personalcalificado.La reparad6n o mantenci6n
efectuada por personalno especializado puede causar una lesi6n personal
2.Cuando
e_-'tSerepar-_one_
a u_ he.amienta,
SIEMPRE,
u_ _o repues
.t_
legitJmos.Siga las insb'ucciones =ndicadasen ta seoci6nde Mantenim=entode
este_.
Elusode piezasno_
o d hcum_
debs ins_,x:dores
de m_t_imienl_ puedecrear un tie, go de choque et_clficoo leeiones,
LUBRICACION DE LAS HERRAMIENTAS
Su Sierra de VAIVEN CRAFTSMAN ha sJdo lubricada adecuadamente y est_
tistapara set usada. 8e recorniendaque las hen'amientascon engranajes sean
engrasadas con un lubricante de engranaje cuando se cambien lae escobillas.
ESCOBILLAS DE CARBON
Las escobillas y el c_mmuladorde su Sierra de VAIVEN CRAFTSMAN ban sido
creadospara proporcionar muchas horas de _r'¢ido flable. Para mantenor la
eficiendadel motoral m&_Jmo,recomendamosclueexamine las escobillas cada
_is mese_ dependiendo en el uso de la herramlenta.Use s61oescobiltae de
recarnbiodisefiadas exclusivamentepara su Sierra de VAIVEN CRAFTSMAN
COJINETES
De_pu_ de 300 o 400 hora_ de funcionamiento, o despu_s del segundo
cambiode cepillos, los cojinetes deben ser reemplazados pot personal de
Sears u otro personal calificado_ Los cojinetes que ee ponen rutdesos (debido
_bcarga_pesada o corte_demateri_iv_
de_t'eempia_des
inmediatamente para evitar e! _obrecalentarniento o falla del rno_or_
UMPIEZA
Z_ AEVERTENCIA: Para evitar acddentes, SIEMPRE desconecte I,t
herramienta antes de limpiarla o hacerle mantenci6n,
La herramienta puede limpiaree muy efectivamente con aire comprimido.
Use SIEMPRE lentes de seguridad cuando limpie la herramienta con
aim comprimido.
Abertur'_de _ntilad_ e ir_errL_es _
ma_J_r_rseimpiosy sinslx:isdad.
NO Izate de Iimpiar insertando objetos puntiagudos a _a'¢_ de las aperturas.
! _ ATENCION:
Ciertos agentes de limpieza y solventes pueden
| de_r las partes de pldstico. Eeto incluyegasolina, carb6n, tetracloruro,
! solventesde limpieza a base de cloro,amoniaco y detergente_ de uso en
| el hogar que contiene amo,n!acoo
16
Lossiguientes
accesorios
recomendados
seencuentran
actualmente
disponibles
ensuAlmac_n
Sears,
HOJAS
Sears tiene una gran selecci6n de hojas de sierra de VAIVEN T o U-shank
que son ideaies para sus necesidades de corte_
CORDONES DE EXTENSION
Sears ofrece una gran selecci6n de cordones de extensi6n ideales para
todas sus necesidades de corte
L_ADVERTENCIA:
Si un cord6n de extensi_ es necesario, debo
usarse un cord6n con conductores de tamaEo adecuado, cspaz de Ilever
Is corriente necssaria a su hsnramienta. Esto evitara la baja de voitaje,
falta de poder o calentamiento, Las herramienta5 a tierra deben usar
cordones de extensi6n de 3 cables que tengan enchufes de tres puntas
y recept_ules_
NOTA: Mientr_ menor el calibre, mayor la capacidad del cord6n.
Un cord6n de calibre 16 tiene m&s capacidad que uno de 18_
i
L
,.
,
, ,,,
,, ,, ,,,
,,,, ,,,.,
_......
.....
Calibre Mintmo para Cordones de Extensidn (AWG)
,,,,,
V01tioe
LargoTotalde la Cumdaan Pies
_)-'"
26'".....
61101:
25
50
100
_ 150
120V
0-
.z4m
Ni-_e!deAmt_r_
M_tsdaO
M_sd_10
- ,too.
201 -
AwG'
AWG
-zoo..
AWG
18
16
16
I6
14
14
18
iHJ
:10i '
AWG
No n-,_isde 6
Mztsde6
No Ir_g de 10
51 - '......
ul,,,
,,
No mds de 12
18
16
Mds de 12
No m_ de 16
14
12
ADVERTENCIA:
.
14
12
......................
12
No sorecomienda
El uso de acce_orios no recomendados
puede ser peligro_o_
17
Get it fixed, at your home or ourst
Your Home
For repair in your home of all major brand appliances,
lawn and garden equipment,or heating and cooling systems,
no matter who made It, no matter who sold it!
For the replacement parts, accessoriesand
owner's manuals that you need to do-it-yourself.
For Sears professionalinstallation of home appliances
and items like garage door openers and water heaters.
1-SO0.4-MY.HOMEe
Anyt)me,dayor nighl
Ow Home
For repair of carry-ln productslike vacuums, lawn equfpment,
and electronics, call or go on-line for the nearest
Sears Parts and Repair Center.
1-800-488-12:22
Anytime, day or night (U.,S,A only)
To purchase a protectionagreement on a productserviced by Sears:
1-800-827-6655 _j.s.A.)
1-800-361-6685 (Canada)
Parape_ serviciodereparack_n Au CanadapoLrserviceen frar_ts:
a dorr_,cilio,
y paraorden_ piezas:
H_0-LE-4tOYERMc
1-888-SLI.HOGAR
m
fl-8oo-s_7)
www se;_rs ca
(_z-78_6427)
_ Sea_, Fo_xx:k mdCo,
Re_st_red Tlradern_ / T_Trademark I _ _-'.,'fce Math, of Jgeam.Roebuck and (30.
® Marc3 R_sltada t TM Marc3 de F' brtca 1_ M_ca _ 8erv_do de Sere'o, Roobud_ and Co.
M_rque de ¢0tTtnerce l _ M_rqua d_pos_,_ de _aam. Roel_Jck and Co
18