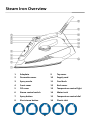
1
Steam Iron
User guide
Model No: GSI101R
For Customer Services & Spare Parts please call 0845 209 7461
Opening times: Monday - Friday 8am – 6pm & Saturday 9am – 1pm
Or visit us at www.productcareuk.com
IMPORTANT:
RETAIN FOR FUTURE REFERENCE
Contents
Page
Safety Instructions
…………………………….….
3
Steam Iron Overview
…………………………………
6
Before Use
…………………………………
7
Using Your Steam Iron
…………………………………
8
Cleaning and Maintenance
…………………………………
15
Guarantee
…………………………………
16
Customer Support
…………………………………
17
Connection to the Mains Supply
…………………………………
18
Thank you for purchasing your Abode Steam Iron.
To get the best from your new iron, take a few moments to read these
instructions, and keep them in a safe place for future reference.
Should you require any further assistance, our friendly Customer
Service team will be happy to help.
For Customer Services & Spare Parts please call 0845 209 7461
Opening times: Monday - Friday 8am – 6pm & Saturday 9am – 1pm
Or visit us at www.productcareuk.com
2
Safety Instructions
IMPORTANT SAFETY INSTRUCTIONS
READ CAREFULLY AND KEEP FOR FUTURE REFERENCE
WARNING:
When using the electrical appliance, the below basic safety
precautions should be followed:
• Read all instructions.
• The appliance must not be left unattended while it is
connected to the mains supply.
• Do not touch hot surfaces. Use the handle or the switch.
• To protect against electrical shock do not immerse cord,
plug, or appliance in water or other liquid.
• Do not let the cord hang over the edge of the worktop or
touch hot surfaces.
• Unplug from the mains outlet when filling with water,
emptying the water tank, before cleaning and when not in
use.
• Do not operate any appliance with a damaged cord or plug,
or after the appliance malfunctions or is dropped or
damaged in any manner. The supply cord cannot be
replaced. If the cord is damaged the appliance should be
scrapped.
• The use of accessory attachments not recommended by
the appliance manufacturer may cause fire, electric shock
or injury.
3
Safety Instructions
• Never remove parts from the appliance, such as the feet,
screws and so on.
• Avoid contact with steam from the Steam Iron while in use
or just after it has switched off.
• Never overfill the Steam Iron. If overfilled, water may leak.
Always take care to pour the water slowly and carefully
when filling.
• This product is only intended for ironing fabrics.
• Do not operate this appliance for anything other than its
intended use.
• This product is intended for household use only. Do not use
outdoors.
Warning:
• It is hazardous for anyone other than a competent person
to carry out any service or repair operation which involves
the removal of a cover which gives protection against
exposure to electrical parts.
• Children should not use this appliance. Close supervision is
necessary when any appliances are used near children.
• The iron should always be turned to ‘Off’ before plugging
or unplugging from outlet. Never yank cord to disconnect
from outlet; instead, grasp plug and pull to disconnect.
4
Safety Instructions
• This appliance is not intended for use by persons (including
children) with reduced physical, sensory or mental
capabilities, or lack of experience and knowledge, unless
they have been given supervision or instruction concerning
use of the appliance by a person responsible for their
safety. Children should be supervised to make sure that
they do not play with the appliance.
• Always disconnect iron from electrical outlet when filling
with water or emptying and when not in use.
• Burns can occur from touching hot metal parts, hot water,
or steam. Use caution when you turn a steam iron upside
down – there may be hot water in the reservoir.
• If the malfunction indicator goes on, the flatiron is not
operating normally. Disconnect from the power supply and
have the flatiron serviced by qualified service personnel.
• PLEASE NOTE:
• Do not use chemical additive, scented substances or
decalcifiers. Failure to comply with the above-mentioned
regulations leads to the loss of guarantee.
We’re here should you need us.
For Customer Services & Spare Parts please call 0845 209 7461
Opening times: Monday - Friday 8am – 6pm & Saturday 9am – 1pm
Or visit us at www.productcareuk.com
5
Steam Iron Overview
1
Soleplate
9
Top cover
2
Decorative cover
10
Supply cord
3
Spray nozzle
11
Cord bush
4
Front cover
12
Back cover
5
Fill cover
13
Temperature control light
6
Steam control switch
14
Water tank
7
Spray button
15
Temperature control dial
8
Shot-steam button
16
Plastic skirt
6
Before Use
Check the iron after unpacking for any visual damage or missing parts
such as:
•
•
•
Misaligned or damaged parts.
Damage to the plug or cable.
If any parts are missing or there is any damage please call customer
services.
Before first use:
A small amount of smoke may be produced during first time use, this is
normal and will quickly disappear.
When using the steam function for the first time, do not direct the
steam towards the laundry, as there could be debris from the steam
vents.
This steam iron must be put on a stable ironing board, away from walls
and cabinets.
When placing the Steam Iron on its stand, ensure that the surface on
which it is placed is stable.
The Steam Iron must be placed away from high temperatures.
We’re here should you need us.
For Customer Services & Spare Parts please call 0845 209 7461
Opening times: Monday - Friday 8am – 6pm & Saturday 9am – 1pm
Or visit us at www.productcareuk.com
7
Using Your Steam Iron
ANTI-CALC SYSTEM
A special resin filter inside the water reservoir softens the water
and prevents scale build-up in the plate. The resin filter is
permanent and does not need replacing.
Please note:
Use tap water only. Distilled and/demineralised water makes the
“Zero-Calc” anti-calc system ineffective by altering its
physicochemical characteristics.
Do not use chemical additives, scented substances or decalcifiers.
Failure to comply with the above-mentioned regulations leads to
the loss of guarantee.
ANTI-DRIP SYSTEM
With the anti-drip system, you can perfectly iron even the most
delicate fabrics.
Always iron these fabrics at low temperatures. The plate may cool
down to the point where no more steam comes out, but rather
drops of boiling water that can leave marks or stains. In these cases,
the Anti-drip system automatically activates to prevent
vaporization, so that you can iron the most delicate fabrics without
risk of spoiling or staining them.
8
Using Your Steam Iron
When using the iron for the first time, you may notice a slight emission
of smoke and hear some sounds made by the expanding plastics. This
is quite normal and it stops after a short time. We also recommend
passing the iron over an ordinary cloth before using it for the first time.
Setting the temperature
Follow the ironing instructions on the garment label. If there are no
instructions but you do know the kind of fabric, please refer to the
following table.
Note: If the fabric consists of various kinds of fabrics, always select the
temperature required by the most delicate fabrics.
Fabric
Temperature
control
Temperature
requirement
Synthetic
●
Low
temperature
Wool, Silk
●●
Medium
temperature
Cotton, Linen
●●●
High
temperature
Garment
Label
Fabric not to be ironed
Start ironing the garments requiring a low temperature.
This reduces the waiting times (the iron takes less time to heat up
than to cool down) and eliminates the risk of scorching the fabric.
9
Using Your Steam Iron
Steam ironing
Filling the reservoir
•
•
Check that the plug is disconnected from the socket.
Move the steam control switch to “min.”
•
•
Open the lid.
Raise the tip of the iron to help the water enter the opening
without overflowing.
Slowly pour the water into the reservoir using a measuring jug and
take care not to go over the maximum level indicated by “MAX” on
the reservoir.
•
•
Close the lid.
10
Using Your Steam Iron
Steam ironing
Selecting the temperature
•
•
•
Put the iron in a vertical position.
Put the plug in the socket.
Adjust the temperature dial according to the international symbol
on the garment label.
•
The plate temperature control light indicates that the iron is
heating up. Wait until the plate temperature control light goes off
before ironing.
Warning:
During ironing, the plate temperature control light comes on at
intervals, indicating that the selected temperature is maintained. If you
lower the thermostat temperature after ironing at a high temperature,
do not start ironing until the plate temperature control light comes on
again.
11
Using Your Steam Iron
Selecting the steam
The quantity of steam is regulated by the steam control switch.
Move the steam selector to a position between minimum and
maximum depending on the quantity of steam required and the
temperature selected.
Warning:
The iron gives off steam continuously only if you hold the iron
horizontally. You can stop the continuous steam by placing the iron in a
vertical position or by moving the steam selector to “min”.
As indicated on the temperature control dial and in the initial table,
you can only use steam at the highest temperatures. If the selected
temperature is too low, water may drip onto the plate.
Burst or vertical steam ironing
Press the shot-steam button to generate a
powerful burst of steam that can penetrate the
fabric and smooth the most difficult and tough
creases. Wait for a few seconds before pressing
again.
By pressing the burst of steam button at intervals
you can also iron vertically . This can be used to
iron items such as - curtains, hung garments, etc.
Note: The burst steam function can only be used at high temperature
and will not work effectively when the pilot light turns on. Do not
press the burst of steam button again until the pilot light turns off,
indicating the soleplate has reached temperature.
12
Using Your Steam Iron
Dry ironing
To iron without steam, follow the instructions in section “steam
ironing”, leaving the steam control switch on “min”.
Spraying
Note: For delicate fabrics, we recommend moistening the fabric
beforehand using the spray function, or putting a damp cloth between
the iron and the fabric. To avoid staining, do not use the spray on silk
or synthetic fabrics.
Press the spray button, slowly for a dense spray or quickly for a
vaporised spray, to spray water onto clothes, as often as required.
Note: When using the water spray function, ensure that there is
enough water in the water tank. You may have to press the spray
button several times during first use in order to start the spray
function.
13
Using Your Steam Iron
Ironing Tips
•
•
•
•
•
•
•
•
•
•
It is recommended to use the lowest temperatures with fabrics that
have unusual finishes (sequins, embroidery, flush, etc.)
If the fabric is mixed (e.g. 40% cotton 60% synthetics), set the
thermostat to the temperature of the fibre requiring the lower
temperature.
If you don’t know the composition of the fabric, determine the
suitable temperature by testing on a hidden corner of the garment.
Start with a low temperature and increase it gradually until it
reaches the ideal temperature.
Never iron areas with traces of perspiration or other marks: the
heat of the plate fixes the stains on the fabric, making them
irremovable.
The size is more effective if you use a dry iron at a moderate
temperature: excess heat scorches it with the risk of forming a
yellow mark.
To avoid marking silk, woolen or synthetic garments, iron them
inside out.
To avoid marking velvet garments, iron in one direction (following
the fibre) and do not press down on the iron.
The heavier the washing machine is loaded, the more garments
come out creased. This also happens when the spin drying
revolutions are very high.
Many fabrics are easier to iron if they are not completely dry.
For example, silk should always be ironed damp.
14
Cleaning and Maintenance
Storing
After using, lift the iron with the filling hole downwards to empty the
remaining water from the water tank.
Insert the plug into the socket, and set the temperature control dial to
‘maximum’ for 1-2 minutes to evaporate the remaining water, and
then unplug the iron and let it cool down before storing.
WARNING: Electrical Shock Hazard.
Do not immerse cord, plug or appliance in any liquid or allow moisture
to come into contact with electrical parts.
Wipe the outer surface of the iron with a damp cloth. Avoid scratching
the plate with steel wool or metallic objects. The plastic parts can be
cleaned with a damp cloth then wiped over with a dry cloth.
Warning: Do not use abrasive cleaners.
Never immerse the iron in water or any liquid for cleaning.
Don’t allow water to seep into the openings or come into contact with
electrical connections.
Ensure all parts are thoroughly dry before storing/reusing.
We’re here should you need us.
For Customer Services & Spare Parts please call 0845 209 7461
Opening times: Monday - Friday 8am – 6pm & Saturday 9am – 1pm
Or visit us at www.productcareuk.com
15
Guarantee
This product is guaranteed for 12 months from the date of the original
purchase. If any defect arises due to faulty materials or workmanship
the faulty product must be returned to the place of purchase.
Refund or replacement is at the discretion of the retailer.
The following conditions apply:
• The product must be returned to the retailer with the original proof
of purchase.
• The product must be installed and used in accordance with the
instructions contained in this instruction guide and any other
instructions for use which has been supplied.
• It must be used for domestic purposes only and for its intended use.
• This guarantee does not cover wear and tear, damage, misuse or
consumable parts.
This does not affect your statutory rights.
We’re here should you need us.
For Customer Services & Spare Parts please call 0845 209 7461
Opening times: Monday - Friday 8am – 6pm & Saturday 9am – 1pm
Or visit us at www.productcareuk.com
16
Customer Support
You can attach your receipt to this page for proof of purchase.
We’re here should you need us
For Customer Services & Spare Parts please call
0845 209 7461
Opening times: Monday - Friday 8am – 6pm &
Saturday 9am – 1pm
Or visit us at www.productcareuk.com
Produced for:
Asda stores Ltd.
Leeds
LS11 5AD
Disposal information
This symbol is known as the 'Crossed-out wheelie bin Symbol'.
When this symbol is marked on a product/batteries, it means
that the product/batteries should not be disposed of with your
general household waste.
Only discard electrical/electronic/battery items in separate
collection schemes, which cater for the recovery and recycling
of materials contained within. Your co-operation is vital to
make sure the success of these schemes and for the protection
of the environment. For your nearest disposal facility, visit
www.recycle-more.co.uk or ask in store for details.
We reserve the right due to possible changes to design to alter
the instruction manual without prior notice.
17
Connection to the Mains Supply
WARNING- THIS APPLIANCE MUST BE EARTHED
This appliance is designed to operate from a mains supply of AC230V 240V ~ 50/60HZ.
Check that the voltage marked on the product corresponds with your
supply voltage.
This product is fitted with a 13A plug complying with BS1363.
If this plug is unsuitable or needs to be replaced, please note the following:
Important: The wires in the mains lead are coloured in accordance with
the following code:
GREEN/YELLOW-EARTH
BLUE-NEUTRAL
BROWN-LIVE
18
Connection to the Mains Supply
For UK use only – Plug fitting details (where applicable):
As the colours of the wires in the mains lead of this appliance may not
correspond with the coloured markings identifying the terminals in your
plug, proceed as follows:
The GREEN/YELLOW wire is the EARTH and must be connected to the
terminal which is marked with the letter E or by the earth symbol or
coloured GREEN or
GREEN/YELLOW.
The BLUE wire is the NEUTRAL and must be connected to
the terminal marked with the letter N or coloured BLACK.
The BROWN wire is the LIVE wire and must be connected to
the terminal marked with the letter L or coloured RED.
Always ensure that the plug cord grip is fastened correctly.
If a 13A (BS1363) fused plug is used it must be fitted with a
13amp fuse conforming to BS1362 and be BSI or ASTA approved.
19
Model number: GSI101R
Site code:
15A.09.14.888
R1