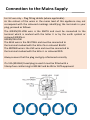
1
Personal Blender
User guide
Model No: GPB101B
For Customer Services & Spare Parts please call 0845 209 7461
Opening times: Monday - Friday 8am – 6pm & Saturday 9am – 1pm
Or visit us at www.productcareuk.com
IMPORTANT:
RETAIN FOR FUTURE REFERENCE
Contents
Page
Safety Instructions
…………………………….….
3
Personal Blender Overview
…………………………………
6
Before Use
…………………………………
7
Using Your Blender
…………………………………
8
Cleaning and Maintenance
…………………………………
9
Guarantee
…………………………………
10
Customer Support
…………………………………
11
Connection to the Mains Supply
…………………………………
12
Thank you for purchasing your Abode Personal Blender.
To get the best from your new blender, take a few moments to read
these instructions, and keep them in a safe place for future reference.
Should you require any further assistance, our friendly Customer
Service team will be happy to help.
For Customer Services & Spare Parts please call 0845 209 7461
Opening times: Monday - Friday 8am – 6pm & Saturday 9am – 1pm
Or visit us at www.productcareuk.com
2
Safety Instructions
IMPORTANT SAFETY INSTRUCTIONS
READ CAREFULLY AND KEEP FOR FUTURE REFERENCE
WARNING:
When using the electrical appliance, the below basic safety
precautions should be followed:
• 1. Read all instructions.
• 2. Before using check that the voltage power corresponds
to the one shown on the appliance nameplate.
• 3. Do not let cord hang over edge of table or counter.
• 4. Do not place on or near a hot gas or electric burner, or in
a heated oven.
• 5. Do not operate any appliance with a damage cord or
plug or after the appliance malfunction or has been
damaged in any manner. Return the appliance to the
nearest authorized service facility for examination, repair
or adjustment.
• 6.If the supply cord is damaged, it must be replaced by the
manufacturer or its service agent or a similarly qualified
person in order to avoid a hazard.
• 7. Avoid contacting moving parts.
• 8. Blades are sharp, so handle carefully.
3
Safety Instructions
• 9. The use of attachment, including jar, jar lid, not
recommended or sold by manufacturer may cause fire,
electric shock or injury.
• 10. The appliance cannot be used for blending hard and dry
substance, otherwise the blade could be blunted.
• 11. Unplug from outlet when not in use, before putting on
or taking off parts, and before cleaning.
• 12. To protect against risk of electrical shock do not put
motor unit or power cord in water or other liquid.
• 13. Do not use outdoors.
• 14. Keep hands and utensils out of container while
blending to reduce the risk of severe injury to persons or
damage to the blender. A scraper may be used but must be
used only when the blender is not running.
• 15. To reduce the risk of injury, never place cutter-assembly
blades on base without jar properly attached.
• 16. Always operate blender with cover in place.
• 17. Always disconnect the appliance from the supply if it is
left unattended and before assembling, disassembling or
cleaning.
• 18. This appliance shall not be used by children. Keep the
appliance and its cord out of reach of children.
4
Safety Instructions
• 19. Appliances can be used by persons with reduced
physical, sensory or mental capabilities or lack of
experience and knowledge if they have been given
supervision or instruction concerning use of the appliance
in a safe way and if they understand the hazards involved.
• 20. Children shall not play with the appliance.
• 21. Warning: never use hot liquids or run the appliance
empty.
• 22. Save this instruction manual.
We’re here should you need us.
For Customer Services & Spare Parts please call 0845 209 7461
Opening times: Monday - Friday 8am – 6pm & Saturday 9am – 1pm
Or visit us at www.productcareuk.com
5
Personal Blender Overview
1
2
3
4
5
6
7
1
Bottle lid
4
Bottle
2
Lid handle
5
Opening End
3
Drinking spout
6
Blade assembly
7
Blender base
6
Before Use
Check the Blender after unpacking for any visual damage or missing
parts such as:
•
•
•
Misaligned or damaged parts.
Damage to the plug or cable.
If any parts are missing or there is any damage please call customer
services.
Before first use:
Mix water in the bottle one or two times then pour out.
Thoroughly wash the bottle and lid in warm water and allow to dry
completely.
Warning: The blade is sharp, handle it carefully.
We’re here should you need us.
For Customer Services & Spare Parts please call 0845 209 7461
Opening times: Monday - Friday 8am – 6pm & Saturday 9am – 1pm
Or visit us at www.productcareuk.com
7
Using Your Blender
1. Place the blender base on a flat surface. Make sure the power outlet
is unplugged.
2. Place the jar on a flat surface with the opening end facing up. Fill the
jar with your favourite ingredients. Be sure not to exceed the 600ml
marking. You can find recipes online should you wish.
Note: The appliance can blend ice cubes. For optimal performance,
place your ingredients in the bottle in the following order: liquids,
fresh ingredients, frozen fruit, yogurt and ice cream.
3. You must peel and core fruit and vegetables, then cut it into small
dices around 15×15×15mm.
Note: Never use boiling liquids or run the appliance empty.
4. Attach the blade assembly on the opening end of the bottle by
turning it clockwise and securing.
5. Once the blade assembly is attached to the bottle, turn the bottle
upside down and insert the blade assembly into the blender base.
Make sure the arrow on the blender base is aligned with the blade
assembly, then turn the bottle clockwise to secure.
6. Plug the unit in to a wall outlet and the blender will begin to
operate.
Note: Do not run the appliance for more than 3 minutes per time.
7. When you have finished blending, turn the bottle anticlockwise and
the blender will stop operating. Lift to remove.
8. Turn the bottle so that the opening end is facing upwards. Carefully
unscrew the blade assembly, turning it anticlockwise and remove.
9. Screw the bottle lid on to the opening end, turning clockwise to
secure. Lift the flap on the bottle lid and drink from the drinking spout.
8
Cleaning and Maintenance
After you have consumed your blended beverage, you can wash out
the bottle and reuse it throughout the day for water or other cold
liquids.
Unplug the appliance before cleaning and ensure the unit is fully cool.
Pour warm soapy water into the bottle, plug in the appliance and mix
for a few seconds.
Turn the bottle anticlockwise, remove and rinse under running water.
Wipe the outer surface of the blender base with a damp cloth.
Warning: Do not use abrasive cleaners.
Never immerse the blender base in water for cleaning.
Parts, apart from the blender base are dishwasher safe and can also be
washed in warm soapy water.
Ensure all parts are thoroughly dry and reattach the blade assembly to
the opening end of the bottle. You can rest the bottle lid on the
bottom end of the bottle and stand it up on the blade assembly for
storage.
If any problems occur, do not try to disassemble the unit, contact
customer services.
9
Guarantee
This product is guaranteed for 12 months from the date of the original
purchase. If any defect arises due to faulty materials or workmanship
the faulty product must be returned to the place of purchase.
Refund or replacement is at the discretion of the retailer.
The following conditions apply:
• The product must be returned to the retailer with the original proof
of purchase.
• The product must be installed and used in accordance with the
instructions contained in this instruction guide and any other
instructions for use which has been supplied.
• It must be used for domestic purposes only and for its intended use.
• This guarantee does not cover wear and tear, damage, misuse or
consumable parts.
This does not affect your statutory rights.
We’re here should you need us.
For Customer Services & Spare Parts please call 0845 209 7461
Opening times: Monday - Friday 8am – 6pm & Saturday 9am – 1pm
Or visit us at www.productcareuk.com
10
Customer support
You can attach your receipt to this page for proof of purchase.
We’re here should you need us
For Customer Services & Spare Parts please call
0845 209 7461
Opening times: Monday - Friday 8am – 6pm &
Saturday 9am – 1pm
Or visit us at www.productcareuk.com
Produced for:
Asda stores Ltd.
Leeds
LS11 5AD
Disposal information
This symbol is known as the 'Crossed-out wheelie bin Symbol'.
When this symbol is marked on a product/batteries, it means
that the product/batteries should not be disposed of with your
general household waste.
Only discard electrical/electronic/battery items in separate
collection schemes, which cater for the recovery and recycling
of materials contained within. Your co-operation is vital to
make sure the success of these schemes and for the protection
of the environment. For your nearest disposal facility, visit
www.recycle-more.co.uk or ask in store for details.
We reserve the right due to possible changes to design to alter
the instruction manual without prior notice.
11
Connection to the Mains Supply
WARNING- THIS APPLIANCE MUST BE EARTHED
This appliance is designed to operate from a mains supply of AC230V 240V ~ 50/60HZ.
Check that the voltage marked on the product corresponds with your
supply voltage.
This product is fitted with a 13A plug complying with BS1363.
If this plug is unsuitable or needs to be replaced, please note the following:
Important: The wires in the mains lead are coloured in accordance with
the following code:
GREEN/YELLOW-EARTH
BLUE-NEUTRAL
BROWN-LIVE
12
Connection to the Mains Supply
For UK use only – Plug fitting details (where applicable):
As the colours of the wires in the mains lead of this appliance may not
correspond with the coloured markings identifying the terminals in your
plug, proceed as follows:
The GREEN/YELLOW wire is the EARTH and must be connected to the
terminal which is marked with the letter E or by the earth symbol or
coloured GREEN or
GREEN/YELLOW.
The BLUE wire is the NEUTRAL and must be connected to
the terminal marked with the letter N or coloured BLACK.
The BROWN wire is the LIVE wire and must be connected to
the terminal marked with the letter L or coloured RED.
Always ensure that the plug cord grip is fastened correctly.
If a 13A (BS1363) fused plug is used it must be fitted with a
13amp fuse conforming to BS1362 and be BSI or ASTA approved.
13
Model number: GPB101B
Site code:
15A.09.14.889
R1