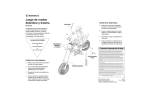
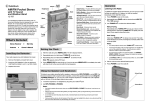
1
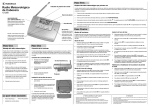
Step Three
Signal Strength Indicator
Bedside Weather
Radio
Using the Weather Radio for the First Time
When you turn on the weather radio the first time, all LCD segments light for a few seconds, and the automatic channel search
begins. When an active channel is found,Ê appears. If no channels are detected, © flashes.
12-260
Alarm Time
1. Connect the weather radio to AC power and install the backup batteries.
2. Extend the weather radio’s antenna.
WEATHER/SNOOZE — Press
to start and stop the weather
broadcast or to enable the
alarm or snooze feature.
3. Press WEATHER/SNOOZE to listen to the weather broadcast.
Clock Time
4. Repeatedly press e or d to adjust the broadcast volume to the desired level. VOLand the volume level (1- 8) appear.
5. Press WEATHER/SNOOZE to turn off the broadcast.
6. Repeatedly press e or d to adjust the weather alert volume to the desired level. VOLand the volume level (1- 8) appear.
Step Four
e and d— Press to adjust
the broadcast and alert
volume, or to set the channel
number, clock time, and alarm
time values.
SET —Hold for two
seconds to enter function
setup mode, or pressto
confirm selections.
Step One
Step Two
Mounting the Weather Radio
Connecting Power
You can place your weather radio on a flat
surface, such as a desk, shelf, or table, or
mount it on the wall. To mount it on the wall,
you need two screws (not supplied) with heads
that fit into the keyhole slots on the bottom of
the weather radio.
Your weather radio uses the supplied 6V, 300 mA AC adapter for power.
You can also install four AA batteries (not supplied) for backup power if AC
power fails or is temporarily disconnected.
1. Use a pencil to mark the mounting screw
locations 311/16-inch (94mm) apart on the
wall.
2. Drill a hole at each marked location.
Thread a screw into each hole, making
sure each screw's head extends about ¼
inch (6.5mm) from the wall.
3. Align the keyhole slots on the bottom of the
weather radio with the screw heads, and
slide the radio down to secure it.
4. Extend the antenna upward.
AC Power Connection
1. Insert the adapter’s barrel plug
into the weather radio's
DC 6V jack.
Function setup allows you to select a channel, and set the alarm
and clock time. You can also enable or disable the signal loss
reminder so that an alert sounds when the radio signal is lost.
DC 6V
Strain Relief
Installing Backup Batteries
1. Slide off the battery compartment
cover to remove it.
2. Press SET to turn on the broadcast audio. NOAA appears.
5. Press SET to confirm. The minute digits flash.
3. Press e or d to manually change the channel. Or, hold down
e or d to automatically search for the strongest channel.
6. Press or hold down e or d to set the clock minutes.
•
Weather Radio
•
AC Adapter
•
Owner’s Manual
The battery icon (0) shows battery
power. When all segments are lit, the
batteries have full power. The number of lit segments decrease as battery
power decreases.
4. Press or hold down e or d to set the hour.
7. Press SET to confirm. % and the current signal loss
reminder setting (On or OFF) appear.
5. Hold down SET to return to the normal display. Or, press SET
to set the alarm time (proceed to number 4 below).
8. Hold down SET to return to the normal display. Or, press
SET to enable or disable the signal loss reminder (proceed
to number 4 below).
Set the Alarm Time
1. Hold down SET until you hear a beep. CH1-7(current channel
number) flashes.
Enable/Disable the Signal Loss Reminder
1. Hold down SET until you hear a beep. CH1-7(current
channel number) flashes.
2. Press e once. The current alarm time flashes
2. Press e three times. The current setting (On or OFF) and
appear.
3. Press SET. The alarm hour digits flash.
4. Press or hold down e or d to set the alarm hour.
5. Press SET to confirm. The alarm minute digits flash.
7. Press SET to confirm. The clock time flashes.
8. Hold down SET to return to the normal display. Or, press SET
to set the clock time (proceed to number 4 in the next section).
Ô BATTERY NOTES Ô
3. Replace the cover.
What’s Included
2. Press e twice. The current clock time flashes
3. Press SET. The clock hour digits flash.
6. Press or hold down e or d to set the alarm minutes.
2. Place four AA batteries in the
compartment as indicated by the
polarity symbols (+ and -) marked
inside.
Set the Clock Time
1. Hold down SET until you hear a beep. CH1-7(current
channel number) flashes.
Set Channel
1. Hold down SET until you hear a beep. CH1-7(current channel
number) flashes.
4. Press SET to confirm the selected channel number. The alarm
time flashes.
2. Plug the other end of the
adapter into a standard AC
outlet.
3. Route the adapter's cord
through the strain relief.
Function Setup
•
•
•
•
•
Dispose of old batteries promptly and properly.
Do not burn or bury batteries.
Use only fresh batteries of the required size and recommended type.
Do not mix old and new batteries, different types of batteries, or rechargeable
batteries of different capacities.
If you do not plan to use the weather radio for a month or more, remove the
batteries. Batteries leak chemicals that can damage electronic parts.
%
3. Press SET. % flashes.
4. Press e or d to toggle between On and OFF.
5. Press SET to confirm. CH and the current channel number
flash.
6. Hold down SET to return to the normal display. Or, press
SET to return to channel setting mode.
Ô NOTES Ô
• PM appears for a PM hour in alarm and clock setting mode.
• The signal loss reminder beep does not sound when the NWS broadcast is on.
• The backlight is always on when operating with AC power. When operating on
battery power, the backlight turns on only when you press a button.
Step Five
FCC Information
Care
RF Signal Strength
FCC Declaration of Conformity
Keep the weather radio dry; if it gets wet, wipe it dry immediately. Use
and store the weather radio only in normal temperature environments.
Handle the weather radio carefully; do not drop it. Keep the weather
radio away from dust and dirt, and wipe it with a damp cloth occasionally
to keep it looking new.
The signal strength indicator (Ê) shows the level
of receiving signal. If the signal is lost and the
signal loss reminder is enabled, the radio emits a
short beep at 30 seconds. The radio then beeps
every 30 second seconds (at 1 minute, 1.5
minutes, and so on) for 5 minutes. It then sounds
every five minutes until you press any key, or
until a signal is received.
If you press any key to silence the reminder, the
reminder beepsstop.If a signal is detected for
more than 10 minutes and then lost again,the
reminder beeps regenerate.
Step Six
You can set the weather radio to respond to an
NWS (NOAA) alert broadcast in two ways:
ON OFF SNOOZE
ALARM
ON OFF
ALERT
This device complies with Part 15 of the FCC Rules. Operation is subject to the following two conditions: (1) this device may
not cause harmful interference, and (2) this device must accept any interference received, including interference that may cause
undesired operation.
Product:
Model:
Responsible Party:
Phone:
Bedside Weather
Radio
12-260
RadioShack
100 Throckmorton
Fort Worth, TX 76102
817-415-3200
The FCC Wants You to Know
This equipment has been tested and found to comply with the limits for a Class B digital device, pursuant to Part 15 of the FCC
Rules. These limits are designed to provide reasonable protection against harmful interference in a residential installation. This
equipment generates, uses and can radiate radio frequency energy and, if not installed and used in accordance with the
instructions, may cause harmful interference to radio communications.
However, there is no guarantee that interference will not occur in a particular installation. If this equipment does cause harmful
interference to radio or television reception, which can be determined by turning the equipment off and on, the user is
encouraged to try to correct the interference by one or more of the following measures:
• Reorient or relocate the receiving antenna.
•
Increase the separation between the equipment and receiver.
•
Connect the equipment into an outlet on a circuit different from that to which the receiver is connected.
•
Consult your local RadioShack store or an experienced radio/TV technician for help.
ON — When ALERT is set to ON and an
alert broadcast is received, an alert sounds
for five minutes. To stop the alert and listen
to the broadcast, press WEATHER/
SNOOZE. Press WEATHER/SNOOZE
again to turn off the weather broadcast.
If you cannot eliminate the interference, the FCC requires that you stop using your weather radio.
Changes or modifications not expressly approved by RadioShack may cause interference and void the user’s authority to
operate the equipment.
OFF — When ALERT is set to OFF and an
alert broadcast is received, an alert sounds
for 10 seconds. The radio then automatically
switches to the weather broadcast for five
minutes. Press WEATHER/SNOOZE to
switch from the alert tone to the broadcast
before the 10 seconds, or to stop the
broadcast before it automatically stops.
Frequency Coverage (MHz):
Channel 1 ...........................................................................................................................................................................162.400
Channel 2 .......................................................................................................................................................................... 162.425
Channel 3 .......................................................................................................................................................................... 162.450
Channel 4 .......................................................................................................................................................................... 162.475
Channel 5 .......................................................................................................................................................................... 162.500
Channel 6 .......................................................................................................................................................................... 162.525
Channel 7 .......................................................................................................................................................................... 162.550
Receiving Sensitivity (at 12 dB SINAD) ................................................................................................................................ 0.3µ V
Signal to Noise Ratio ............................................................................................................................................................ 40 dB
Audio Output Power:
Maximum ...................................................................................................................................................................... 250 mW
At 10% THD .................................................................................................................................................................. 200 mW
Channel Selectivity ................................................................................................................................................ ±25KHz, 40 dB
Power Supply ............................................................................................................................................ 6 V DC 300mA Adapter
DC 6V battery for backup
Antenna ................................................................................................................................................. Telescoping Rod Antenna
Dimensions (HWD) .................................................................................................................................... 35.1 x 117.5 x 140 mm
Weight (without battery) ........................................................................................................................................................ 250 g
Step Seven
Enable/Disable the Alarm
1. Slide ALARM to ON or SNOOZE to enable
the alarm. É appears.
2. The alarm sounds at the preset alarm time,
becoming progressively louder the longer it
sounds.
3. To snooze, press WEATHER/SNOOZE. The
alarm stops for 10 minutes. After 10
minutes, the alarm sounds again until you
slide ALARM to OFF to turn it off.
Specifications
If your weather radio is not performing as it should, take it to your local
RadioShack store for assistance. To locate your nearest RadioShack,
use the store locator feature on RadioShack's website
(www.radioshack.com), or call 1-800-The Shack (843-7422) and follow
the menu options. Modifying or tampering with the weather radio's
internal components can cause a malfunction and might invalidate its
warranty and void your FCC authorization to operate it.
Limited 90-Day Warranty
This product is warranted by RadioShack against manufacturing defects in material and workmanship under
normal use for ninety (90) days from the date of purchase from RadioShack company-owned stores and
authorized RadioShack franchisees and dealers. EXCEPT AS PROVIDED HEREIN, RadioShack MAKES NO
EXPRESS WARRANTIES AND ANY IMPLIED WARRANTIES, INCLUDING THOSE OF MERCHANTABILITY
AND FITNESS FOR A PARTICULAR PURPOSE, ARE LIMITED IN DURATION TO THE DURATION OF THE
WRITTEN LIMITED WARRANTIES CONTAINED HEREIN. EXCEPT AS PROVIDED HEREIN, RadioShack
SHALL HAVE NO LIABILITY OR RESPONSIBILITY TO CUSTOMER OR ANY OTHER PERSON OR ENTITY
WITH RESPECT TO ANY LIABILITY, LOSS OR DAMAGE CAUSED DIRECTLY OR INDIRECTLY BY USE
OR PERFORMANCE OF THE PRODUCT OR ARISING OUT OF ANY BREACH OF THIS WARRANTY,
INCLUDING, BUT NOT LIMITED TO, ANY DAMAGES RESULTING FROM INCONVENIENCE, LOSS OF
TIME, DATA, PROPERTY, REVENUE, OR PROFIT OR ANY INDIRECT, SPECIAL, INCIDENTAL, OR
CONSEQUENTIAL DAMAGES, EVEN IF RadioShack HAS BEEN ADVISED OF THE POSSIBILITY OF
SUCH DAMAGES.
Some states do not allow limitations on how long an implied warranty lasts or the exclusion or limitation of
incidental or consequential damages, so the above limitations or exclusions may not apply to you.
In the event of a product defect during the warranty period, take the product and the RadioShack sales receipt
as proof of purchase date to any RadioShack store. RadioShack will, at its option, unless otherwise provided
by law: (a) correct the defect by product repair without charge for parts and labor; (b) replace the product with
one of the same or similar design; or (c) refund the purchase price. All replaced parts and products, and
products on which a refund is made, become the property of RadioShack. New or reconditioned parts and
products may be used in the performance of warranty service. Repaired or replaced parts and products are
warranted for the remainder of the original warranty period. You will be charged for repair or replacement of the
product made after the expiration of the warranty period.
This warranty does not cover: (a) damage or failure caused by or attributable to acts of God, abuse, accident,
misuse, improper or abnormal usage, failure to follow instructions, improper installation or maintenance,
alteration, lightning or other incidence of excess voltage or current; (b) any repairs other than those provided
by a RadioShack Authorized Service Facility; (c) consumables such as fuses or batteries; (d) cosmetic
damage; (e) transportation, shipping or insurance costs; or (f) costs of product removal, installation, set-up
service adjustment or reinstallation.
This warranty gives you specific legal rights, and you may also have other rights which vary from state to state.
RadioShack Customer Relations, 200 Taylor Street, 6th Floor, Fort Worth, TX 76102
12/99
©2003. RadioShack Corporation.
All Rights Reserved.
RadioShack and RadioShack.com are trademarks
used by RadioShack Corporation.
12-260
Printed in China
08A03
AO0165AAA1