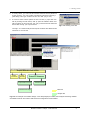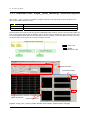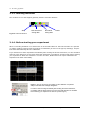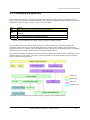
1
A low‐noise multi‐electrode array system for in‐vitro electrophysiology Mobius Tutorial AMPLIFIER TYPE MED-A64MD1 MED-A64HE1 Information in this document is subject to change without notice.No part of this document may be reproduced or transmitted without the expressed written permission of Alpha MED Scientific Inc. While every precaution has been taken in the preparation of this document, the publisher and the authors assume no responsibility for errors or omissions, or for damages resulting from the use of information contained in this document or from the use of programs and source code that may accompany it. In no event shall the publisher and the author be liable for any loss of profit or any other commercial damage caused or alleged to have been caused directly or indirectly by this document. © 2011 Alpha MED Scientific Inc. All rights reserved Version: 1.10; November 1, 2011 Alpha MED Scientific Inc. Saito Bio-Incubator 209, 7-7-15, Saito-asagi, Ibaraki, Osaka 567-0085, Japan E-mail: [email protected] Website: http://www.med64.com Contents Chapter 1 Introduction 1-1. What is MED64 Mobius? ..............................................1 1-2. Important notice for the MED64 Mobius ........................4 General ....................................................................4 Acquire MED64R2 Data w/Stim.....................................5 Replay Raw Data File...................................................5 Extract Spikes / Extract Long Spikes .............................5 Filter Raw Data ......................................................... 6 Compute Measure Averages .......................................6 1-3. Activation .................................................................6 1-4. Getting started ..........................................................7 1-4.1. Building up your own Workflow using Mobius Editor...................................................7 1-4.2. Running workflow.............................................10 1-4.3. Starting with Workflow Templates.......................11 Mobius Tutorial i Contents Chapter 2 fEPSPs Recording 2-1. Recording of fEPSPs ................................................. 13 2-1.1. Overview of the “Single_pulse_recording” workflow template.......................................... 14 2-1.2. Overview of the [Acquire MED64 DataR2 w/Stim] module ........................................................ 15 2-1.3. Running Workflow .......................................... 18 2-1.4. Before starting your experiment ....................... 18 2-1.5. Recording of fEPSPs with single pulse stimulation.19 2-2. Long Term Potentiation (LTP) ..................................... 23 1. 2. 3. 4. Selecting the stimulation channels.......................... 23 Input/Output (I/O) curve ...................................... 23 Making LTP workflow ............................................ 24 Making a workflow for LTP conditioning stimulus (e.g. Theta burst) ................................................ 26 5. LTP experiment.................................................... 27 2-3. Drug testing ............................................................ 28 2-4. Replay and Analysis of acquired data .......................... 32 2-4.1. Replaying acquired data.................................32 2-4.2. Overview of the “Single_pulse_ analysis” workflow template......................................... 34 2-4.3. Analysis of fEPSP signals ................................ 35 2-4.4. Computing averages according to phases.......... 38 2-4.5. Data output .................................................. 40 1. Export raw data......................................... 40 2. Save the measurement chart ...................... 40 3. Save the average chart...............................41 ii Mobius Tutorial Contents Chapter 3 Spike Sorter 3-1. Recording of spontaneous neuronal spikes (single unit) ............................................................ 43 3-1.1. 3-1.2. 3-1.3. 3-1.4. 3-1.5. Setting the acquisition parameters.................... 44 Execution button ............................................ 45 Before starting your experiment ....................... 45 Recording without on-line (real-time) analysis .... 46 Recording with extracting spikes and their frequency analysis....................................49 3-1.6. Recording with on-line (real-time) spike sorting .. 53 3-2. Drug testing ............................................................ 57 3-3. Replay and Analysis of acquired data .......................... 61 3-3.1. Replaying acquired data .................................. 61 3-3.2. Analyzing the spike rate .................................. 63 1. Set the filter menu..................................... 64 2. Set the thresholds.......................................65 3.Set the parameters for computing spike frequency....................................................66 4. Modify the charts in the [Display Spike Measure]...............................66 Data Output .................................................. 68 3-3.3. Computing spike frequency averages according to phase -Making the dose-response-curve-.......... 71 3-3.4. Spike sorting (clustering) ................................ 73 1. Select the filter menu.................................. 74 2. Set the thresholds ...................................... 75 3. Set the menu for spike sorting (clustering) .... 76 4. Display Spike Measure charts ....................... 77 5. Compute spike frequencies .......................... 77 Data output ................................................... 79 Mobius Tutorial iii Contents iv Mobius Tutorial 1-1. What is MED64 Mobius? Chapter 1 Introduction 1-1. What is MED64 Mobius? MED64 Mobius is the data acquisition and analysis software for the MED64 system. It allows MED64 users to acquire signals at 64 channels and analyze on-line (during recording) and off-line (after recording). Mobius consists of various modules, which correspond to task-specific control panels. You can design your own experimental protocol as your own "Workflow" by combining these modules using Mobius Editor, and then run those workflows both for recording and analysis. Pre-defined workflow templates are available so that you can run standard types of experiments immediately or design your own workflow easily by modifying them. The goal of this Mobius Tutorial is that you have a quick, smooth start working. Please refer to Mobius' on-line Help for detailed information about the software. The following chart shows all the modules and their brief explanations. You can see which modules are included in the package you purchased. Representative Mobius packages 1. 2. 3. 4. 5. 6. 7. 8. Basic (MED-MS64MR10) EPSP (MED-MS64MR11) Spike Sorter (MED-MS64MR12) Spike Sorter with stim (MED-MS64MR13) Pro (MED-MS64MR14) QT (MED-MS64MR21) QT with Stim (MED-MS64MR22) Extended (MED-MS64MR02) Mobius Tutorial: Cahper 1-Introducion 1 1-1. What is MED64 Mobius? Modules Module description Acquire MED64R2 Data Set acquisition parameters and acquires spontaneous activities Acquire MED64R2 Data w/Stim Programs stimulation protocols and acquires evoked responses Replay Raw Data File Replays previously acquired data Display All Channels Displays data at all 64 channels Display Single Channel Displays data at a selected single channel Export Raw Data Exports the raw data to a binary or ASCII file Extract EP Measures Extracts evoked responses, computes and plots various waveform analysis (amplitude, slope, time. etc.) Save Measures Data Saves data measured with Extract EP (or Spike Measures) as a “csv” file Compute Measure Averages Computes measure averages and standard deviations for all experimental phases and plots the data Save Measure Averages Saves the Compute Measure Averages data as a “csv” file Extract Spikes Detects and extracts the spikes which cross pre-determined thresholds Cluster Spikes Clusters the extracted spikes Compute Spike Freqs Builds a time chart of spike frequencies Display Spike Measures Displays the process of detecting spikes, extracted spikes waveforms, and spike time charts Save Spikes Saves extracted spikes / Time stamp as a “csv” file Save Spike Freqs Saves the spike frequency data as a “csv” file Extract Long Spikes Detects and extracts the long spikes (>50ms) crossing pre-determined thresholds Display Extracted Spikes Displays the process of detecting spikes and extracted spikes waveforms Compute Beats per Minute Computes beats per minute Display Beats per Minute Graphs the beats per minute Save Beats per Minute Saves the computed beats per minute as a “csv” file Compute Interspike Intervals Builds a time chart of Inter-spike intervals (the time between each successive spikes) Display Interspike Intervals Displays the graph of Interspike Intervals Save Interspike Intervals Saves the computed inter spike intervals as a “csv” file Extract Spike Measures Computes and plots various extracted spike waveform analysis (amplitude, slope, time, etc) of extracted spikes Display Results Table Displays cumulative results from Extracted EP (Spike) Measures and Compute Measure Averages in a table Filter Spike Data Filters extracted spikes Filter Raw Data Filters raw data 2 Mobius Tutorial: Cahper 1-Introduction 1-1. What is MED64 Mobius? Modules / Package Acquire MED64R2 Data Basic EPSP Spike Sorter Spike sorter w/stim Pro QT QT w/stim Extend ed * * * * * * * * * * * * Acquire MED64R2 Data w/Stim * Replay Raw Data File * * * * * * * * Display All Channels * * * * * * * * Display Single Channel * * * * * * * * Export Raw Data * * * * * * * * * * Extract EP Measures * * Save Measures Data * * * * * Compute Measure Averages * * * * * * * Save Measure Averages * * * * * * * Extract Spikes * * * * Cluster Spikes * * * * Compute Spike Freqs * * * * Display Spike Measures * * * * Save Spikes * * * Save Spike Freqs * * * * * * * Extract Long Spikes * * * Display Extracted Spikes * * * Compute Beats per Minute * * * Display Beats per Minute * * * Save Beats per Minute * * * Compute Interspike Intervals * * * Display Interspike Intervals * * * Save Interspike Intervals * * * Extract Spike Measures * * * Display Results Table * * * Filter Spike Data * * * * * * Filter Raw Data * Notice) Acquire MED64 Data / Acquire MED64 Data w/Stim are modules for SU-MED640 amplifier. Mobius Tutorial: Cahper 1-Introducion 3 1-2. Important notice for the MED64 Mobius 1-2. Important notice for the MED64 Mobius Please read and follow the instructions below particularly during data acquisition. General • Connect your PC to the MED64 Head amplifier and Main amplifier and turn on both amplifiers to open [Acquire MED64R2 Data] or [Acquire MED64R2 Data w/Stim] modules, or recording workflows including those modules. • Make sure that your MED64PC's C drive has at least 50% free space. • Make sure that the hard drive has enough free space when you start a long-term recording. Recording with all 64 channels for 1 hour creates a 9.216GB data file. (9.216GB is represented as 9,000,000KB, 8,739.06MB, or 8.58GB in the Windows.) • Avoid saving data to the drive where the OS is installed (usually C drive). Save it to a separate hard drive in the following cases: 1) When trace duration is set to longer than 30 minutes. 2) When trace duration is set to longer than 5 minutes and # Traces is greater than 12. • When a recording workflow is run with Green or Green-Red button for the first time after it is opened (or made), Mobius needs several seconds for the calibration (as seen in the pop-up message). Acquisition starts automatically after the calibration. If you would like to start acquisition immediately after clicking the Green-Red button, run the workflow with the Green button for several seconds, and then stop it before starting your experiment. When the workflow is run the next time, it will not require calibration and acquisition will start immediately. • Fig.1-2.1. Initial calibration (left). Acquisition starts after the calibration (right). When running the [Acquire MED64R2 Data] module after running [Acquire MED64R2 Data w/Stim], the channels previously used for stimulation are disabled (as seen in the Fig. 1-2.2) and will not record. To activate these channels, one of two methods can be used: 1) Open and run a NEW workflow including the [Acquire MED64R2 Data] module. 2) Run the [Acquire MED64R2 Data w/Stim] module for more than one trace while disabling all stimulation options (uncheck all the stimulators, Fig.1-2.3), and then run [Acquire MED64R2] module. 4 Fig.1-2.2. (left) Example of disabled channel (ch26). Fig.1-2.3. (right) Disabling the stimulator. Uncheck the “Stim” box for all stimulators, and then run workflow. Mobius Tutorial: Cahper 1-Introduction 1-2. Important notice for the MED64 Mobius • When a display monitor with a resolution of 1920 x 1080 is used, set the Windows 7 text size ([Control Panel] > [Appearance and Personalization] > [Display]) to “Smaller” (100%). Otherwise, some modules are not displayed correctly. • Set the “Decimal symbol” to “period” (.). Mobius does not work properly with the “comma” (,) setting for the decimal symbol. Go to [Control panel] > [Clock, Language, and Regions]. Open the [Format], and change the “Decimal symbol” to “period” (.). Or. select “English (US)” for the “Language”. Acquire MED64R2 Data w/Stim • • Fig.1-2.4. Selecting. (period) for the Make sure that the STIMULUS CURRENT selection on the “Decimal symbol”. MED64 Head amplifier (MED-A64HE1) is set to [NORMAL] to deliver the stimulus current amplitude set in Mobius. Selecting [x2] doubles the output stimulus current amplitude set in Mobius. (e.g. When 100 A is selected by Mobius while [x2] is selected on the head amplifier, the output stimulus current is 200 A) The maximum number of pulses for a [Step] in the "Stimulus waveform editor" (#12 in the Fig. 2-1.4, page 15) is 21. Replay Raw Data • Opening a large data file can take several minutes. (e.g. Opening a 10GB file takes over 1 minute.) Extract Spikes / Extract Long Spikes • These modules require powerful computation and need to be used carefully during acquisition. Mobius can appear to freeze when it extracts more spikes than it can analyze. This most often happens when non-biological signals cross the spike extraction thresholds on all channels at once. (e.g. unexpected noises cross the thresholds or the baseline fluctuates due to vibration.) Please keep in mind the following instructions when these workflows are used with acquisition. • Avoid using these modules on-line (during signal acquisition) until you are familiar with your experiment(s) and biological assay(s). Particularly avoid using these modules for long-term recordings. • Set the trace duration to less than 10 minutes and the trace interval for longer than the trace duration so that the extracting spikes can catch up with acquisition during the trace interval. • For recording neuronal spikes, make sure to set the low-cut filter to 100 Hz in order to remove low-frequency noise. • Make sure to PAUSE Mobius when drugs are applied. • Minimize the number of recording channels. Mobius Tutorial: Cahper 1-Introducion 5 1-3. Activation Filter Raw Data • Mobius acquires data in 500 msec blocks. Digital filtering can cause small noise spikes to appear at the end of a data block if the baseline is offset from 0 at the end of the data blocks. To eliminate this noise: • While recording neuronal spikes, set the Low-cut filter to 100 Hz. • While recording cardiac signals (low-frequency), avoid using the "Filter Raw Data" module. Instead, use "Filter Spike Data" so that the extracted beating signals (long spikes) are filtered. Compute Measure Averages • Since this module is always at the end of the analysis chain, it can slow down the display of incoming data. Thus, it is not recommended to use this module during acquisition. When it is used during acquisition: • Set the trace duration shorter than 10 minutes while the trace intervals for longer than the trace duration. • Minimize the number of recording channels. 1-3. Activation Mobius needs to be activated with your key-file. 1. 2. 3. 4. Save the key-file in the [Program file] > [WitWerx] >[Mobius] folder. Open Mobius. Click [Help] > [Activation]. You will see your Hardware serial # in the box. Click the box next to the Keyfile box to select your key-file. Click OK for activation. Fig.1-3. Activating Mobius. 6 Mobius Tutorial: Cahper 1-Introduction 1-4. Getting started 1-4. Getting started When Mobius is opened, there is no "Workflow". You must create and run your own "Workflows" for acquisition and analysis. You can create your Workflow by: 1. Building your own workflow using Mobius Editor. 2. Using the pre-defined workflow templates. In this chapter, you will learn briefly how to use Mobius Editor to design your own workflow. The following chapters will instruct you how to start your experiments using some of workflow templates. 1-4.1. Building up your own workflow using Mobius Editor This section will quickly introduce you how to use Mobius Editor. 1. Open Mobius. Select the [Workflow] > [New] > [Blank] to open the “Mobius Editor” window. Fig.1-4.1. Opening the Editor. 2. This window shows a library of available task modules (task specific panels) on its right panel. Click on a module to see its description at the bottom of the screen. A workflow is created by building a list of task-specific modules on the left panel of the Editor. When a module is double-clicked, it is shifted to the left panel and the task-panel for the module appears on the screen. For acquisition, start by double clicking either the [Acquire MED64R2 Data] or the [Acquire MED64R2 Data w/Stim] module. For replaying or analyzing the acquired data, start with [Replay Raw Data File]. Other modules for display and analysis can follow either of these modules. • Fig.1-4.2. Mobius Editor. [Acquire MED64 Data] and [Acquire MED64 Data w/Stim] are acquisition modules for SU-MED640 amplifier. It can NOT be selected for your amplifier (MED-A64MD1) Fig.1-4.3 shows the designed acquisition workflow (top-left), its Editor (middle), and the workflow structure (bottom). Mobius Tutorial: Cahper 1-Introducion 7 1-4. Getting started Acquire MED64R2 Data w/Stim Display All Ch an nels Export Raw data Fig.1-4.3. An example of a designed acquisition workflow. The modules on the Workflow box (left box) are now on the screen. 3. You will see arrows next to the modules on the left. Their meanings are described below; 8 • Gray right pointing arrows: The modules with these arrows can be used AFTER the selected module (highlighted in dark blue) in the Workflow list. Double-clicking a module with this arrow next to it will insert it AFTER the selected module in the workflow. • Green right pointing arrows: The modules with these arrows can be used AFTER the selected module (highlighted in dark blue). • Light blue downward pointing arrows: The modules with these arrows can be used BEFORE the selected module (highlighted in dark blue). • Gray downward pointing arrows: When these arrows appear next to a module name, they indicate that the output of this module can satisfy the input prerequisites of the currently selected module (highlighted in dark blue) in the Workflow list. Double clicking one of these will insert it BEFORE the selected step in the workflow. • Red steps: You may notice that some of module names are written in red text. This means that the step does not meet input prerequisites. Select the red step (click on it once) to see which modules can satisfy its needs (the ones with gray downward arrows next to them) and select the appropriate one to add to the Workflow box (double-click them). Or, right-click the red step and select [Delete] to remove this module from the Workflow box. Mobius Tutorial: Cahper 1-Introduction 1-4. Getting started 4. In many cases, you can not have all the desired control panels on a Tab (screen). You can create new tabs by selecting [Layout] > [Add Tab], then type a name for the new Tab. (Fig.1-4.4) 5. In order to have control panels on the new tab, 1) open the new tab by clicking the tab name, and 2) open the Mobius editor and edit modules on the new tab. You can go back and forth between these tabs during your experiments. Fig.1-4.4. Creating a new tab. The Fig.1-4.5 shows analysis and export modules are added to the workflow on a new Tab. Acquire MED64R2 Data w/Stim Display All Channels Export Raw Data Extract EP Measures Compute Measure Averages Save Measures Data Main tab Save Measure Averages Analysis tab Fig.1-4.5. An example of a workflow design. A new tab (Analysis) is created, then analysis and saving modules are added to this tab. The bottom chart shows the configuration of this workflow. Mobius Tutorial: Cahper 1-Introducion 9 1-4. Getting started 6. Save it as your own Workflow. (Select [Workflow] > [Save as]). Now you are ready to do an experiment. 7. Acquisition with saving data starts by clicking GREEN-RED button. Running a recording workflow by clicking the Green-Red button generates following files automatically at the same folder where the recording workflow (.moflo) file is saved; • • • Fig.1-4.6. Data file (.modat) Analysis workflow file(.moflo) including analysis modules you selected for your recording Acquisition workflow file (.moflo) Data file (.modat) Acquisition workflow file (.moflo) saved automatically Analysis workflow file (.moflo) saved automatically Acquisition workflow file (.moflo) you made Fig.1-4.7. Data and Workflow files generated in a folder after recording (running workflow with Green-Red button). 1-4.2. Running workflow 1. Your workflow can be opened by selecting [Workflow] > [Open]. 2. You can run and stop your workflow with the Execution Buttons. Fig.1-4.8. Stop Run WITHOUT Saving data/ or Exporting Run WITH Saving data / or Exporting Fig.1-4.9. 10 Mobius Tutorial: Cahper 1-Introduction Pause 1-4. Getting started 1-4.3. Starting with Workflow Templates The easiest way to get started with Mobius is to use the predefined workflow templates. You can start your experiments using these workflow templates right away or design your own workflow by editing these templates. The following chapters will instruct you on how to start your experiment using these workflow templates. Folders Templates Noise_check Basic_recording Spontaneous_recording Evoked_recording Single_pulse_recording Paired_pulse_recording EP_recording Theta_burst EPs LTD_conditioning I-O_curve Single_pulse_analysis EP_analysis Paired_pulse_analysis Spike_recording Spike_recording_cluster Spontaneous_recording Spike_recording_filter Spike_recording_filter_cluster Spike_recording_stim Spikes Spike_ recording_and_stimulation Spike_recording_stim_cluster Spike_recording_stim_filter_cluster Spike_frequency_analysis Spike_analysis Spike_frequency_analysis_filter Spike_sorting Spike_sorting_filter Beat_recording Spontaneous_recording QT_recording Simple_recording QT Beat_frequency_analysis Sponaneous_analysis QT_analysis Export_for_propagation_analysis_spontaneous Pacing_recording Pacing_analysis Pacing_recording Pacing_analysis Fig.1-4.10. Available workflow templates. 1. 2. 3. Click [Workflow] > [New] > [Templates]. Select either of [64MD1_1280x1024] or [64MD_1920x1080] folder depending on the size of your display monitor, and then select desired template. You can change parameters and save the template as your own workflow to go directly to your experiment Or, modify the templates with Mobius Editor. Select [Workflow] > [Edit] to open the Mobius Editor. Mobius Tutorial: Cahper 1-Introducion 11 1-4. Getting started 12 Mobius Tutorial: Cahper 1-Introduction 2-1. Recording of fEPSPs Chapter 2 fEPSPs Recording This chapter describes how to record and analyze fEPSPs using Mobius workflow templates. In this chapter, you will learn about 1. Recording fEPSPs from hippocampal acute slices 2. Long Term Potentiation (LTP) 3. Drug testing 4. Replay and analysis of the acquired data 2-1. Recording of fEPSPs The goal of this section is that you be able to record fEPSP signals while measuring their amplitude and slope using "Single_ pulse_recording” workflow template. 1.Open the "Single_pulse_recording" workflow template. 1) Click [Workflow] > [New] >[From Template]. Select either of [64MD1_1280x1024] or [64MD1_1920x1080] folder, depending on the size of your display monitor. 2) Select [EPs] > [EP_recording] folders. Select the “Single_pulse_recording” workflow template. Fig.2-1.1. Opening workflow template. NOTICE: In order to open recording workflows, connect the PC must to the MED64 amplifiers and turn on both amplifiers. Mobius Tutorial: Cahper 2 - fEPSPs Recording 13 2-1. Recording of fEPSPs 2-1.1. Overview of the “Single_ pulse_recording” workflow template The "Single_ pulse_recording" workflow template consists of the following modules located in the “Main” and “EPSP measures” Tabs. Tab Modules Main Acquire MED64R2 Data w/Stim / Dis play All Channels / Export Raw Data EPSP m eas ures Extract EP Meas ures (2) / Save Meaus res Data (2) Evoked signals are acquired with the [Acquire MED64R2 Data w/Stim] module. The acquired signals are sent to the [Extract EP Measures] module, where several types of amplitude, slope, and time are measured and graphed. Raw data can be exported to binary or ASCII ("CSV" formatted text file).The measurement chart can be saved as a "CSV" formatted text file. “Main” Tab “EPSP Measures” Tab Fig.2-1.2. Module configuration for the “Single_pulse_recording” workflow template. Acquire MED64R2 Data w/Stim Export Raw Data Save Measures Data Display All Channels Extract EP Measures Fig.2-1.3. “Single_pulse_recording” workflow template. “Main” tab (left), “EPSP measures” tab (right). 14 Mobius Tutorial: Cahper 2 - fEPSPs Recording 2-1. Recording of fEPSPs 2-1.2. Overview of the [Acquire MED64R2 Data w/Stim] module The acquisition and stimulation parameters are set in this module. (9) (11) (10) (1) (4) (5) (2) (6) (7) (12) (12) (8) (3) (13) (14) (16) (15) (17) Fig.2-1.4. Top shows [Acquire MED64R2 Data w/Stim] module. The bottom shows the stimulus parameters for the Step 2. Acquisition 1. # Traces: Number of Traces (Sweeps). 2. Trace duration: Sampling (Recording) time for each trace. 3. Trace interval: Interval between traces. (From the beginning of the first trace to the beginning of the next trace) 4. Input Range (mV): Maximum input signals level. This setting should be adjusted according to the signal amplitude to achieve the maximal dynamic range. Select 2.3 mV, 2.9 mV, 5.0 mV, 12.5 mV, or 25 mV. 5 mV is recommended for recording of fEPSPs. 5. Low cut freq (Hz): High pass filter. Select 0.1 Hz, 1.0 Hz, 10 Hz, or 100 Hz. If 1.0 Hz is selected, signals with frequencies lower than 1 Hz are filtered out. Usually, 1.0 Hz is recommended for recording of fEPSP. 6. Channels: Select the channels for recording here. When the square box is clicked, the channel selector pops up. The enabled recording channels are colored green. 7. High cut freq (Hz): Low pass filter. Select 1000 Hz, 2500 Hz, 5000 Hz, 7500 Hz, or 10000 Hz. If 5000Hz is selected, signals with frequencies higher than 5000 Hz are filter out. Usually, 10000 Hz is good enough for recording of fEPSP. Values lower than 2500 Hz is NOT recommended for recording of fEPSPs. 8. Save raw data: When Mobius is started by clicking the Green-Red recording button while the [Enable storage] is checked, the raw data is saved. Enter a descriptive file name of your choice. Mobius Tutorial: Cahper 2 - fEPSPs Recording 15 2-1. Recording of fEPSPs Stimulation Each Step is independent and can be programmed with different types of stimulation protocols. Enabled steps will be applied in order (1 to 8) at the intervals set in the Trace Interval. 9. “Enable step” check box: When the box to the left of [Enable step] is checked, the Step becomes valid. The default settings have Step1 and Step 2 are enabled, and Steps 3-8 disabled (shown with # next to each Step). Step1 and Step 2 are applied alternately at 20 second intervals. 10. Stimulator selector and check box: Select the MED64 amplifier’s built-in stimulator (F1 or F2) here. Checking the box on the right of “Stim” activates the selected stimulator. The default settings have F1 enabled both for Step 1 and Step 2. Stimulation is applied alternately at 20 second intervals. F1 and F2 can be enabled at the same Step to stimulate 2 channels simultaneously. 11. Stimulus channel selector: Select stimulus channel here. The stimulus channel can be changed either by the drop-down or the pop-up which appears by clicking the square box. The green shows the stimulus channel. Mobius needs to be stopped (with black button) or paused (with yellow button) for the stimulus channel to be changed. • Stimulus channel can be changed without stopping or pausing by using the pop-up stimulus channel selector. However, the changes are activated on the 2nd trace after the new channel is selected by software since Mobius uses the next trace to reset itself. 12. Stimulus waveform editor: Make your stimulus protocol here by selecting either [Const] or [Pulse] and typing in the desired Length and Amplitude. Refer to Fig.2-1.5 for a schematic representation of a stimulus protocol example. • Make sure that the STIMULUS CURRENT selection on the MED64 Head amplifier (MED-A64HE1) is set to [NORMAL] to deliver the stimulus current amplitude set in Mobius. Selecting [x2] doubles the output stimulus current amplitude set in Mobius. (e.g. When 10 A is selected by Mobius with [x2] selected, the output stimulus current is 20 A. When -10 A is set in the Mobius with NORMAL selected, the output stimulus current amplitude is 10 A) • The maximum stimulus amplitude set by Mobius is 100A. Set the STIMULUS CURRENT selector for x2 when stimulus amplitude with greater than 100 A is applied. • The maximum number of stimulus pulses to be programmed here at a Step is 21. • Do NOT select [Ramp] for the stimulation with the MED64.Only bi-phasic stimulation is recommended. 16 Mobius Tutorial: Cahper 2 - fEPSPs Recording 2-1. Recording of fEPSPs -10A pre stimulation time: 5 msec 0.2 ms post stimulation time: 94.80 msec Fig.2-1.5. Example of a stimulus protocol and its schematic c diagram. 13. Repeat pattern to trace end check box: When this box is checked, the stimulus protocol programed at the Stimulus waveform editor (12) will be repeated to the end of the trace. Useful for LTD conditioning. 14. Reps selector: The stimulus protocol set at the Stimulus waveform editor (12) will be repeated the number of times set here. Useful for multiple pulse stimulation such as LTP conditioning. • Repeat of the stimulus waveforms which durations are longer than 1 minute is not recommended. 15. Stimulus current amplitude increment button: When the + button is clicked, the absolute value of the stimulus current amplitude for the [Pulse] is incremented by the value set it the left box. (16*) For example, if 2 is set in the box (16) and the + button is clicked once, the stimulus amplitude will be changed to -12.00 A from -10 A. This is useful for changing the stimulus amplitude for multiple pulse stimulations (e.g. Theta burst) with just one click. The absolute value of the stimulus amplitude can be decreased sequentially using the same procedure when - button is clicked. • The stimulus current amplitude can be changed even during recording by using this button. However, the changes are activated on the 2nd trace after the change since Mobius uses the next trace to reset itself. 16. See #15 17. Auto Inc check box: When this box is checked, the stimulus current amplitude will automatically increase adding the value (in A) set in the left box (16) to each preceding stimulation pulse. This is useful for making I/O curves. Please refer to section 2-2.3.Input/Output curve (page 23) for details. In the default setting, Step1 (F1) and Step 2(F1) run alternating every 20 seconds in this workflow. NOTICE: In order to open the [Acquire MED64R2 Data w/Stim] module, connect the PC to the MED64 amplifiers and turned on the amplifiers. Mobius Tutorial: Cahper 2 - fEPSPs Recording 17 2-1. Recording of fEPSPs 2-1.3. Running workflow The workflow is run and stopped (paused) with the execution buttons. Stop Run WITHOUT saving data Run WITH saving data Pause Fig.2-1.6. Execution buttons. 2-1.4. Before starting your experiment When a recording workflow is run with Green or Green-Red button for the first time after it is opened (or made), Mobius needs several seconds for its calibration (as seen in the pop-up message). Acquisition starts automatically after the calibration. If you would like to start acquisition immediately after clicking the Green-Red button, run the workflow with the green button for a few traces with both stimulators un-enabled, and then stop before starting your experiment. When the workflow is run the next time, Mobius does not require calibration but acquisition will start immediately. Fig.2-1.7. The top shows pop-up mesage for the calibration. Acquisition always starts after this message disappears. In order to start recording immediately after clicking the Green-Red button, run Mobius with the Green button for a few traces with stimulator un-enabled before starting your experiment in advance. (bottom figure.) 18 Mobius Tutorial: Cahper 2 - fEPSPs Recording 2-1. Recording of fEPSPs 2-1.5. Recording fEPSPs with single pulse stimulation Now you will set the parameters for single pulse stimulation at a single channel and record fEPSPs. 1. [Step1] and [Step2] are enabled in the "Single_pulse_recording" workflow template. Disable [Step2] so that stimulation is applied only through the channel selected in the [Step1]. 1) Click the [Step2] tab and uncheck [Step enabled]. 2) You will see that the # mark appears next to [Step2], indicating that this Step is disabled. (Refer to Fig.2-1.8) 1) Fig.2-1.8. Disabling [Step2 ]. 2. Click on the tab for [Step1] so that parameters for the Step1 appear. How do I change the stimulator at a given Step? F1 is enabled for Step 1 in the default settings. Unless stimulation is applied through 2 channels simultaneously, F1 can be used for all Steps. However, if you would like to use another stimulator (for example, F2 instead of F1, change the stimulator following the procedure below: 1) Uncheck [Stimulator Enabled] for F1 by clicking the check box. 2) Select F2 at the stimulator selector and check [Stim] for F2. Now F2 stimulator is enabled instead of F1 (Fig.2-1.9) • Check both F1 and F2 to stimulate through 2 channels simultaneously. Uncheck the F1 stimulator (left), then check F2 stimulator (bottom) Fig.2-1.9. Changing the stimulator to F2 from F1. Mobius Tutorial: Cahper 2 - fEPSPs Recording 19 2-1. Recording of fEPSPs 3. Make sure that the STIMULUS CURRENT selector on the MED-A64HE1 amplifier is set to [NORMAL]. • Selecting of [x2] doubles the output stimulus current. (e.g. when -10 A is selected in the Mobius with x2 selected, the output stimulus current is -20 A.) 4. 5. Start Mobius with the Green button (Run WITHOUT saving data). Find the best channel for stimulation by looking at the 64 channel display and changing the stimulation channel. You can also change the amplitude during this procedure for optimal stimulation. • Mobius needs to be stopped or paused to change stimulus channels or/and amplitude. • The stimulus channels and/or amplitude can be changed without stop or pause by using the “stimulus channel selector” and/or “the stimulus current amplitude increment button.” However, the changes are activated on the second traces after new channel/amplitude is set. (Mobius uses the next trace to reset itself.) When you find the optimal stimulation channel and amplitude, set the protocol for on-line analysis as follows: (Refer to Fig.2-1.11) 1) Open the "EPSP measures” tab. 2) Set the [Step filter] to Step1 for both measures. 3) Select the channels you want to monitor analysis on-line during your recording. • Channels can be changed even during recording (or running) by scrolling or typing the numbers directly. 3) 2) Fig.2.1-11. fEPSP measurements. 20 Mobius Tutorial: Cahper 2 - fEPSPs Recording 4)-(1) Click this button to Edit measurements 2-1. Recording of fEPSPs 4) The default settings have "Slope 1040 LinerFit (red cursor) and "Amplitude Minimum (blue cursor)” selected for measurement. Change the measurement menu if necessary. (Refer to Fig.2-1.11) • • Mobius must be stopped to change the measurements. Analysis can be done later off-line. (1) Click Edit Measures, and then select the measurement (analysis) you want at the Measure Type column. (The name can be customized by typing it directly into the Custom Name column.) • Please click [Measures Help] for detailed explanations for the measurements. (2) Click [Add Measures] to perform more analysis. (3) To delete a measurement, right click the custom name and select the Delete. (4) Close the Window by clicking the [Hide] button. (2) (1) (4) (3) Fig.2-1.11. Edit measurements. 5) • Set the cursors by clicking on them and dragging them to the desired position. For detailed information on analysis, please refer to section2-4.3. Analysis of fEPSP signals on page 35. How do I adjust the graph scale to zoom in on the waveforms? 1) Left-clicking and dragging while pressing the shift button. 2) Changing the maximum (and/or minimum) numbers for both X (time) and Y (amplitude) axis. Click, then, type in the new value(s) for the maximum and/or minimum. • 6. Double-clicking anywhere on the chart to return to the original axis range. Make sure that [Enable storage] is checked in the [Save raw data] (“Main” tab) to save the data. (The file name can be modified.) Set the # of traces. Mobius Tutorial: Cahper 2 - fEPSPs Recording 21 2-1. Recording of fEPSPs Fig.2-1.12. Workflow for single pulse recording stimulating at 1 channel. Only the F1 stimulator is enabled for [Step1]. [Step2] is diabled. bl d f [ ] [ ] d bl d 7. Save this workflow as your Recording Workflow by clicking [Workflow] > [Save As]. (Fig.2-1.13) 8. Start Mobius with the GREEN-RED button. • Mobius will require you to save the workflow as your own if you try to start Mobius with the Green-Red button without having saved it already. • The data file (.modat file) and analysis workflow including all analysis modules selected for the recording workflow (.moflo file) and [Replay Raw Data] module will be saved in the same folder. Fig.2-1.13. (Refer to Fig.1-4.7 on page 10 for files generated after recording.) 22 Mobius Tutorial: Cahper 2 - fEPSPs Recording 2-2. Long Term Potentiation (LTP) 2-2. Long Term Potentiation (LTP) This section describes how to perform an LTP experiment. This method involves recording baseline activity and LTP with one workflow, whereas conditioning stimuli is applied with another. The following procedures are detailed in this chapter. 1. 2. 3. 4. 5. Selecting the stimulation channels for experimental and control pathways Identifying the appropriate stimulus current amplitude for both pathways with an I/O curve Making the LTP workflow Making Theta burst workflow Recording LTP 1. Selecting the stimulation channels Open the "Single_pulse_recording" workflow template. Determine the 2 different stimulation channels for experimental pathway and control pathways, and the desired channel for on-line monitoring by running the workflow without recording using the Green button. (Please refer to section 2-1.5. Recording of fEPSPs” on pages 19-22) 2. Input/Output (I/O) curve This procedure is carried out to determine the appropriate stimulus current amplitude for recording fEPSPs. The slope or/and amplitude are usually selected as the output parameters. A current amplitude eliciting 30% to 50% of the maximal amplitude is typically selected. For LTP recording, the appropriate stimulus amplitudes need to be identified with I/O curves for the control and experimental pathways. 1. Open the “IO_curve” workflow template. In the default setting, (1)-10 A is selected for the initial stimulus current amplitude, (2) the [Auto Inc] button is checked, and (3)5A is set for the increment value. The current amplitude will increase automatically by 5 A in subsequent trace until the end of the recording (e.g. 10, 15, 20------. 105 A). Modify the stimulus current amplitude, length, and increments depending on your signals and slice viability. Change the stimulus channel to that identified for experimental pathway (or control pathway). Fig.2-2.1. ”IO_curve” workflow template. 2. (3) (2) (1) Open the EPSP measures tab. Change the measurement to analyze if necessary, and then set the cursors. (Refer to section 2-4.3. Analysis of fEPSP signals on page 35) Change the channels to those you selected for on-line monitoring. Mobius Tutorial: Cahper 2 - fEPSPs Recording 23 2-2. Long Term Potentiation (LTP) 3. Save the workflow as your custom I/O curve workflow. Click the Green-Red button to start the recording. (Click on the Green button if you would not like to save data). 4. Determine the 30% (or 50%) for the maximal (saturating) stimulus amplitude. The following example shows a protocol in which the stimulation started at 5 A, and then increased by 5 A in every subsequent trace. The responses saturated at the 12th trace (60 A) at approximately -1900 V. The 30% and 50% of -1,900 V are 633 V and 950 V respectively. The stimulus current amplitude eliciting 30% of the maximal response is 20 A and the stimulus current amplitude eliciting 50% of the maximal response is 25 A. 5 A 10 A 20 A 25 A 60 A 30%, -633V 50%, -950V Saturation -1900V Fig.2-2.2. Determination of the stimulus current amplitude eliciting 30% and 50% of the maximal response. 5. Determine the stimulus amplitude for the experimental and control pathways. • You can do test both pathways simultaneously if Step2 is enabled. In this case, stimulus amplitude increases by 5 A independently for each Step. 6. After you identify the stimulus current for both pathways, close this workflow. 3. Making an LTP workflow In this section, you will learn how to make your LTP workflow using the "Single_pulse_recording" workflow template. Both baseline and LTP will be recorded with this workflow. After recording of the baseline, you will apply theta burst with another workflow, and then come back to this LTP workflow for LTP recording. 1. Open the "Single_pulse_recording" workflow template, and modify the experimental parameters. Keep in mind the following important points: 1) # of traces: set the number so that both the Baseline and LTP recordings will run with this workflow. For example, inputting 300 for the # of traces and 20 seconds for the trace interval will result in a recording 100 minutes long (20 sec x 300 times). 2) Step 1 stimulation: change the stimulus channel to that selected for the experimental pathway, and amplitude to that identified by the I/O curve for the experimental pathway. In Figure 2-2.3, the stimulus amplitude was changed to -20 A and stimulus channel was changed to 30ch. • Make sure that F2 stimulator is NOT enabled in Step1. 3) 24 Step 2 stimulation: change the stimulus channel to that selected for the control pathway, and amplitude to that identified by the I/O curve for the control pathway. In the example, the stimulus amplitude was changed to -25 A and stimulus channel was changed to 32ch. Make sure that F2 stimulator is NOT enabled in Step 2. Mobius Tutorial: Cahper 2 - fEPSPs Recording 2-2. Long Term Potentiation (LTP) 4) • Make sure steps 3-8 are NOT enabled. In this example, Step1 is selected for the experimental pathway through which the theta burst will be applied after recording of the baseline. Step2 is selected for the control pathway. 2) 1) 3) Fig. 2-2.3. Recording parameters for LTP recording. 2. Open the EPSP measures tab and modify the analysis parameters. 1) Change the channel to that identified for on-line monitoring in the previous step. 2) Change the measurements (analysis) as necessary. • The default settings enable Slope1040 Liner Fit and Amplitude Minimum. 3) Run a few traces with the Green button. Once waveforms appear, set the cursors for the measurements. • Refer to section 2-4.5. Analysis of fEPSP signals on page 35 for detail. Step1: Experimental Pathway (Conditioning stimulus will be applied) Step 2: Control Pathway Fig.2-2.4. Running the LTP workflow. Mobius Tutorial: Cahper 2 - fEPSPs Recording 25 2-2. Long Term Potentiation (LTP) 3. Save it as your own LTP workflow (Click [Workflow] > [Save as], and type file name) and leave it open. Fig.2-2.4. Saving the LTP workflow. 4. Making a workflow for LTP conditioning stimulus (e.g. Theta burst) In an LTP experiment, you will need to apply a conditioning stimulus such as a theta burst to the experimental pathway right after recording the baseline activity. The best way to do so is to have the 2 workflows, for baseline/LTP recording and conditioning stimulus, open and ready on your MED64 PC. In this section, you will make a workflow for the theta burst stimulation using the workflow template. 1. Open the “Theta_burst” workflow template. 2. Change the stimulus amplitude at the [Pulse] to the value determined for the experimental pathway. • Use the +/- button to change the amplitude. For example, in order to change to -20 A from -10 A, select 10 A (Figure.2-2.5, (1)), then click the + button once (Figure.2-2.5, (2))so that amplitudes for all 4 "pulses" are changed to -20 A. If you directly type the number at the [Pulse] boxes, you must type it in 4 times for all [Pulse] boxes. 3. Change the stimulus channel to that determined for experimental pathway. (Same to that selected for Step1 at your LTP workflow). 4. Make sure steps 2-8 are NOT enabled 5. Make sure F2 stimulator is NOT enabled at Step1. 6. Save as your own Theta Burst workflow 3 2 (1) (2) Use these buttons so that all numbers at Pulses are increased (or decreased) at one time. Fig.2-2.5. Example of a theta burst conditioning stimulus protocol. 26 Mobius Tutorial: Cahper 2 - fEPSPs Recording 2-2. Long Term Potentiation (LTP) 7. Uncheck the Stim box for F1, and then run this workflow with the GREEN button once, and then stop. • When a recording workflow is run for the first time, Mobius needs several seconds for its calibration before it starts acquisition. This prevent you from applying conditioning stimuli quickly. It is recommended to run this workflow with the stimulator disabled (with the “Stim” check box unchecked, Fig. 2-2.6) before you start your experiment so that conditioning stimuli is applied right after the baseline recording. 8. Fig.2-2.6. Disable the stimulator. Check the Stim box for F1 so that the F1 stimulator is enabled again. Leave it open on your MED64 PC. 5. LTP experiment Now you have 2 workflows (LTP workflow and Theta Burst workflow) open on your MED64 PC, and are ready to start recording. 1. Activate the LTP workflow by clicking the title bar on the LTP workflow. Make sure that [Enable storage] is checked. Make sure that the STIMULUS CURRENT selector on the MED-A64HE1 amplifier is set for [NORMAL]. Start your experiment by clicking the GREEN-RED button. 2. After you finish recording baseline activity, PAUSE the experiment with the YELLOW button. DO NOT stop the recording with the Black button. The experiment will be stopped. Baseline and LTP data can NOT be stored in the same data file. 3. Quickly activate your theta burst workflow by clicking the title bar on the theta burst workflow. Apply the theta burst by clicking the Green button once. (or Green-red button if you would like to save this data.) 4. When the theta burst stimulus protocol is finished, quickly go back to the LTP workflow and restart your experiment by clicking the GREEN-RED button. Fig.2-2.7. LTP experiment. Mobius Tutorial: Cahper 2 - fEPSPs Recording 27 2-3. Drug testing 2-3. Drug testing Mobius' [Compute Measure Averages] module calculates averages and standard deviations for the measurements (waveform analysis) in all experimental phases. This is a useful tool for making a dose-response curve or comparing the results from different phases during drug application. This section will show you how to make a dose-response curve using this module. Since this module is at the end of the analysis chain, it can slow down the data processing and causes Mobius to stop during your experiment if you perform these analyses online. Thus, it is recommended not to use this module during recording unless you are very familiar with your experiment and preparations. All analyses introduced in this section can be performed later off-line. One alternative is just making bars (phase-annotations) at the beginning of phases (e.g. drug1) without on-line analysis. The location of the phase bars are saved to the analysis workflow. To do this, skip steps 1-3 and start with step 4. 1. Open the "Single_pulse_recording" workflow template. 2. Add modules [Compute Measure Averages] and [Save Measure Averages] to this workflow template. 1) Make a new tab. Click [Layout] > [Add Tab], then type in the name for the new tab. (Fig.2-3.1) 2) Open the Editor in the new tab. (Click [Workflow] > [Edit]) (Fig.2-3.2) Fig.2-3.1. Making a new tab. Fig.2-3.2. Editor is opened in the new tab. 3) Click the [Extract EP Measures -step1-], on the left "Workflow" box, and then double-click the [Compute Measure Averages] on the right Available task panels. (Fig.2-3.3). You will see the [Compute Measure Averages] module shift to the left box, under the [Extract EP Measures -step1-] (Fig.2-3.4). The panel for this module will appear in the new tab. Fig.2-3.3. Fig.2-3.4. 28 Mobius Tutorial: Cahper 2 - fEPSPs Recording 2-3. Drug testing 4) Click the [Compute Measure Averages] module on the left “Workflow” box, then double-click the [Save Measure Averages] on the right “Available task panels" so that the [Save Measure Averages] module is shifted to the “Workflow” box under the [Compute Measure Averages]. Averages and standard deviations for the [Extract EP Measures -step1-] (top chart in the EPSP measures tab) will be computed and displayed. If online analysis for the other [Extract EP Measurement-step2-](bottom chart) is necessary, add the same modules under the [Extract EP Measures -step2-]. Fig.2-3.5. Control panels for the [Compute Measure Averages] and [Save Measure Averages] modules (left) and the modules in the completed new workflow (right). 3. Open the [Extract EP Measures] module (in the EP measures tab), select measurements for analysis, and set the cursors (refer to section 2-4.5.Analysis of fEPSP signals on page 35). 4. Save it as your own workflow. 5. Run Mobius with the GREEN-RED button. The first phase (baseline) will start from time 0. Mobius Tutorial: Cahper 2 - fEPSPs Recording 29 2-3. Drug testing 6. Pause Mobius with the YELLOW button when the first phase or baseline recording is completed. Click [Annotations] > [Add New phase]. Type the name for the 2nd phase. (e.g. dose 1,Fig.2-3.6) Do NOT stop with the Black button. If it is stopped, the experiment will end and new phases will NOT be added. 7. 8. When the OK button is clicked, a yellow bar with the chosen name appears on the measurement chart. (Fig.2-3.7) Fig.2-3.6. Making a new phase. Re-start Mobius by clicking the GREEN-RED button. Time in the measurement chart will continue running even during the pause. 9. Pause Mobius with the YELLOW button when the second phase (e.g. dose 1) is completed. Click [Annotations] > [Add New phase] again. Fig.2-3.7. Adding a new phase. 10. Type in the name for the 3rd phase. (e.g. dose 2) When the OK button is clicked, the yellow bar with the name appears on the measurement chart. 11. Start Mobius again with the GREEN-RED button. Add subsequent phases using the same procedure. 12. You can see the table and graph of averages for each phase on the [Compute Measure averages] module (in the “Averages” tab) (Refer to Fig.2-3.8) • 30 The phase annotations (yellow bars) can be shifted by clicking and dragging during off-line analysis. When data is replayed after the phase annotations are shifted, averages and standard deviations are computed again based on the new phase annotations location. Mobius Tutorial: Cahper 2 - fEPSPs Recording 2-3. Drug testing Fig.2-3.8. [Extract EP Measures] module with phase bars (top) and [Compute Measure Averages] module (bottom). Input fields in the [Compute Measure Averages] module 1. Channel: Selects the channel to be displayed. The selection cannot be changed during recording. 2. Use last: If this box is checked, the selected (or typed) number of data points are used for computation. This is mostly for off-line analysis. 3. Hide: You can hide the measurement which is checked from the chart. Note: the chart can be zoomed up or down by clicking and changing numbers of the maximum and/or minimum scale for both X and Y axis. Mobius Tutorial: Cahper 2 - fEPSPs Recording 31 2-4. Replay and analysis of acquired data 2-4. Replay and analysis of acquired data Mobius data files (.modat) are opened and replayed with the [Replay Raw Data File] module and analyzed using the [Extract EP measures] module. In order to run and analyze the acquired data, you need to create and run an analysis workflow. The quickest way to replay and analyze the acquired fEPSP data is using the “Single_pulse_analysis” workflow template (which will be introduced in this chapter). The analysis workflow including the analysis and saving modules you selected for your recording and [Replay Raw Data File] instead of [Acquire MED64 Data w/Stim] are automatically saved to the same directory where your recording workflow is saved. (Refer to page 9) The other quick way is to use those workflows. The analysis workflow is opened by clicking [Workflow] > [Open] and selecting the workflow (.moflo) file. 2-4.1. Replaying acquired data 1. Click [New] > [From Template]. Select either of [64MD1_1280x1024] or [64MD1_1920x1080] depending on the size of your display monitor. Select [EPs] > [EP_analysis] folders, and then “Single_pulse_analysis” workflow template. Fig.2-4.1. Opening the analysis workflow template. 2. Open the acquired data file (.modat) by clicking the box next to the [Filename] and selecting the desired file. When the file appears on the Filename box, the data is ready to be replayed by clicking the Green button or Green-Red button. (Fig.2-4.2) 3. When the Green button is clicked, the acquired data is just replayed. Clicking the Green-Red button executes the enabled Exports or Saves. 32 Mobius Tutorial: Cahper 2 - fEPSPs Recording 2-4. Replay and analysis of acquired data 2 Fig.2-4.2. Opening the data file: When the file name appears in the Filename box, it is ready to be replayed. Fig.2-4.3. Replaying fEPSP data. Input fields for the [Replay Raw Data File] module 1. Traces: Selects the trace(s) for processing. 2. Trace time: Selects the trace time for processing. 3. Channels: Selects the channels for processing. Click the box next to the Filename to open the channel selector. Channels in green will be enabled. 4. Delay: Set this value to a value greater than zero to insert a delay between data "blocks" sent out by this module. It is useful for slowing down data processing. Mobius Tutorial: Cahper 2 - fEPSPs Recording 33 2-4. Replay and analysis of acquired data 2-4.2. Overview of the “Single_ pulse_analysis” workflow template The "Single_pulse_analysis" workflow template consists of following modules. (located in the 3 Tabs). Tab Modules Main Replay Raw Data File/ Display All Channels / Export Raw Data EPSP measures Averages Extract EP Measures (2) / Save Meausres Data (2) Compute Measure Averages (2) / Save Measuure Averages (2) In general, the replayed data is sent to the [Extract EP Measures] module, where evoked signals are extracted and their amplitude, slope, area, and time are measured and graphed. Phase measurement averages are computed and graphed accordingly when phase annotations are added. The raw data can be exported in either binary or ASCII ("CSV" -comma separated values- text file). The measurements and averages chart can be saved by "CSV" formatted text file. Replay Raw Data File “Main” Tab Display All Channels Export Raw Data “EPSP measures” Tab Extract EP Measures Save Measures Data Compute Measure Averages Save Measure Averages Extract EP Measures Save Measures Data Compute Measure Averages Save Measure Averages Fig.2-4.4. Module configuration for the “Single_pulse_analysis” workflow template. 34 Mobius Tutorial: Cahper 2 - fEPSPs Recording “Averages” Tab 2-4. Replay and analysis of acquired data 2-4.3. Analysis of fEPSP signals Amplitude, slope, area, and time of the extracted waveforms are measured (analyzed) in the [Extract EP measures] module. The extracted evoked potential waveforms are displayed at the left-most chart and time course of the selected measurements are graphed on the right charts. 1). Raw Data Chart 3) Measurement Chart 3) Measurement Chart 2) Input fields 1 2 3 4 5 6 7 8 9 Fig.2-4.5. Extract EP Measures module. 1) 1. Raw data chart The raw data chart on the left most shows the extracted evoked responses waveforms. When a measurement chart is clicked, the corresponding cursor appears on the raw data chart. The cursors for the measurements are shifted by left-clicking and dragging. 2. You can zoom in on the raw data chart by 1) left-clicking and dragging while pressing the shift button. 2) changing the maximum (and/or minimum) numbers for both X (time) and Y (amplitude) axes. Click, then, type in the new value(s) for the maximum and/or minimum. (Fig.2-4.6) * Double-clicking anywhere on the chart to return to the original axis range. Fig.2-4.6. 3. The cursor locations can be copied to all and/or specific channels or measurements by right-clicking and selecting the [Copy Cursors].(Fig. 2-4.7) Fig.2-4.7. Mobius Tutorial: Cahper 2 - fEPSPs Recording 35 2-4. Replay and analysis of acquired data 2) Input fields 1. Channel No: Selects the channel(s) for display by scrolling or typing the numbers directly. These can be changed even during recording or replaying. When the channel selector is right-clicked and [Select] is clicked, the Channel selector box appears. The channels of interest are selected here as well. (Fig.2-4.8) This is useful for running the 4-sample system by allowing users Fig.2-4.8. to save charts to 4 different CSV files. 2. Step Filter: Selects the Step to be analyzed here. Step1 is selected for the top chart and Step 2 is selected for the bottom in the default settings. Useful for analyzing acquired LTP data with the “Single_ pulse_recording” workflow template. • In order to analyze Conductor data, ALL must be selected. 3. Shift (ms): For analysis of paired pulse experiments. When a number greater than 0 is selected here, the cursors and chart for the 2nd pulse appear. 4. X Labels: When this check box is clicked, the time point at which the waveform crosses the cursor is displayed on the Raw data chart. 5. Reset: Resets the shifted cursors to the original positions. 6. Hide phases: The phase bar (yellow bars with characters on the measurement chart) is hidden when this button is clicked. Please refer to the "Computing averages for phases" on page 38 for details. 7. Autoscale: When this check-box is checked, the scale for the measurement chart is automatically adjusted. You can zoom in and out in the measurement chart by typing the number directly in the maximal values for both the X and Y axes when the Autoscale button is NOT checked. 8. Averages: When this box is checked, the averaged measurements are computed and graphed. Set the number of traces to be averaged with the selector right to the check box. (e.g. if 2 is input and the box is checked, every two traces (1st and 2nd, 2nd and 3d, 3rd and 4th.) are averaged and graphed.) 9. Edit Measures: Click this button to select or change the measurement menu. 1) Select the analysis (measurements) you desire from the [Measure Type] box to change the default measures. 2) You can name the selected measures by double-clicking and typing directly into the [Custom name] box. 36 Mobius Tutorial: Cahper 2 - fEPSPs Recording 2-4. Replay and analysis of acquired data 3) In order to have more measurements, click [Add Measures] button so another row on the table and new measurement chart appear. 4) You can delete unnecessary measurements by right-clicking the Custom name, and selecting the Delete. (Bottom figure in the Fig. 2-4.9) • Click [Measures Help] button for detailed information on measurements. 5) Click the Hide button to close this editor. 3) 2) 1) Fig.2-4.9. 4) 3) Measurement chart The time course for the selected measurements (analysis) are graphed here. Zoom in or out by changing the maximum (and/or minimum) values for the X and/or Y axis. Click and type the new number directly. Right clicking anywhere in the chart and selecting “Copy Data” allows you to copy the measurement data (only for currently selected channel) into an excel file. (Fig. 2-4.10) Selecting “Capture Image” allows you to copy the chart. Slope1040LinearFit(uV/ms) -265.604 -277.293 -285.283 -273.298 -280.4 -265.16 -268.563 Fig.2-4.10. Copying measurement data. Measurement chart output After you select the analysis parameters, you probably will want to output a measurement chart. When the check box for [Save Measures Data] is checked and the analysis workflow is run with the Green-Red button, the charts are saved as a "CSV" text file. The “Single_pulse_analysis” workflow template is designed so that the charts for Step1 and Step2 are exported as separate file in the default setting. Please refer to section 2-4.5 Data output (pages 40-41) for detail. Mobius Tutorial: Cahper 2 - fEPSPs Recording 37 2-4. Replay and analysis of acquired data 2-4.4. Computing averages according to phases Mobius’ [Compute Measure Averages] module calculates averages and standard deviations for the selected measurements (analysis) according to phases, and graph. This is useful for making a dose-response-curve or comparing the measurements between phases such as baseline and LTP. The “Single_pulse_analysis” workflow template includes the [Compute Measure Averages] module. This section will show you how to make a dose-response curve by using this module in the workflow template. If you would like to add this module to your own analysis workflow, please refer to the step1-2 at the section 3-2. Drug testing on page 28. 1. Open the [Extract EP Measures] module and replay the data by clicking on the Green button. The first phase (baseline) will start from 0. 2. When the first phase (baseline) is finished, Pause Mobius with the YELLOW button. Click [Annotations] > [Add New phase]. (Fig.2-4.11) 3. Type in the name for the 2nd phase. (e.g. dose 1). When the OK button is clicked, the yellow bar with its name appears on the measurement chart in the [Extract EP Measures] module. (Fig.2-4.12) NOTICE: If Mobius is stopped with the Black button, replaying is terminated and a phase bar can not be added. 4. Start Mobius with the Green button again. 5. Pause Mobius with the YELLOW button when the second phase (e.g. dose 1) is finished. Click [Annotations] > [Add New phase] again. 6. Type the name for the 3rd phase (e.g. dose 2). When the OK button is clicked, the yellow bar for the 3rd phase with its name appears on the measurement chart. Fig.2-4.11. Fig.2-4.12. 7. Restart Mobius with the Green button. Add subsequent phases with same procedure and replay the data to the end. 8. You will see the values and graphs for each phase in the [Compute Measure Averages] module. (Fig.2-4.13, bottom) 9. The phase annotations (yellow bars) can be shifted by left-clicking and dragging. When the data is replayed after the phase annotations are shifted, averages and standard deviations are recalculated based on the new phase annotation locations. 10. If you are satisfied with the location of the phase bars, save it as your own analysis workflow. 38 Mobius Tutorial: Cahper 2 - fEPSPs Recording 2-4. Replay and analysis of acquired data 11. In order to save the average chart to a "CSV" file, check the check-box for the [Save Measures Averages] module, then run Mobius with the Green-Red button. Fig.2-4.13. [Extract EP Measures] module with phase bars (top), and the table and charts at the [Compute Measure Averages] module (bottom). Input fields for [Compute Measure Averages] module 1. Channel: Selects the channel to be displayed. The selection can not be changed during replaying. 2. Use last: When this box is checked, the selected (or typed) number of data points are used for computation. For example, if 10 is selected, average and standard deviation are measured for the last 10 data points in each phase. 3. Hide: hides the measurement checked in the chart. • Note: the chart can be zoomed up or down by clicking and changing numbers of the maximum and/or minimum scale(s) for both X and/or Y axis. Mobius Tutorial: Cahper 2 - fEPSPs Recording 39 2-4. Replay and analysis of acquired data 2-4.5. Data output Mobius has several modules for data output of fEPSP signals and their analysis: 1. 2. 3. Raw data (waveforms) Measurement chart Average chart All outputs are executed when Mobius is run by clickikng the GREEN-RED button with the check boxes for the Save or/and Export modules are checked. (The analysis workflow needs to be saved to execute the output.) Channels for output can be selected with channel selector in the [Replay Raw Data File] module. 1. Export raw data The [Export Raw Data] module is used. The raw data (waveforms) is exported either as 1) Binary shorts (2 byte integer values), 2) Binary doubles (8 byte floating point values), or 3) ASCII text in "CSV" format. File Format Version Session Start Time time_ms 20071201 2007/9/05 17:15:56 +09 ch1_mV 0 0.05 0.1 0.15 0.2 0.25 0.3 0.35 0.4 0.45 0.5 0 0.001221 0.003662 0 0.001221 -0.00244 0.001221 -0.00244 -0.00122 -0.00488 0 ch2_mV -0.00244 -0.00366 -0.00366 -0.00122 0.001221 -0.00488 -0.00122 -0.00122 0 -0.00244 -0.00122 ch3_mV -0.00366 -0.00366 -0.00366 0 -0.00244 -0.00244 0.001221 -0.00366 -0.00366 -0.00244 -0.00488 ch4_mV 0 -0.00244 -0.00244 0.001221 -0.00122 -0.00366 -0.00122 -0.00244 0.002441 -0.00244 -0.00122 ch5_mV -0.00488 -0.0061 -0.00366 -0.00244 -0.00244 -0.00122 -0.00122 -0.00488 -0.00244 -0.0061 -0.00488 Fig.2-4.13. Example of raw data (waveforms) exported in ASCII format displayed in Excel. 2. Save the measurement chart The [Save Measures Data] module is used. The measurements values are saved as a "CSV" formatted text file. 40 Mobius Tutorial: Cahper 2 - fEPSPs Recording 2-4. Replay and analysis of acquired data File Format Version Recording Date 20080210 2007/9/05 17:15:56 +09 STIMULATION PARADIGM 1 EPSP Slp (ms/uV) Trace# Step1-1 Step1-2 Step1-3 Step1-4 Step1-5 Step1-6 Step1-7 Step1-8 Step1-9 Step1-10 Phase Baseline Time (s) 0 40.219 80.422 120.625 160.813 201.016 241.219 281.422 321.625 361.813 ch1 ch2 ch3 -1.397 -2.041 -2.321 -1.011 -1.638 -2.49 -1.428 -2.305 -2.876 -1.06 -1.424 -2.953 -1.276 -1.552 -2.323 -1.116 -1.752 -2.665 -0.966 -1.614 -2.191 3.999 -1.436 -2.471 -0.948 -1.595 -2.415 -0.962 -1.716 -2.815 EPSP Amp (uV) Trace# Phase Time (s) ch1 ch2 ch3 Step1-1 Baseline 0 -8.545 -6.104 -7.324 Step1-2 40.219 -6.104 -7.324 -8.545 Fig.2-4.14. Example of the measurment chart saved as an Excel compatible CSV file. The chart of slope liner fit and minimum amplitude for Step 1 are saved. 3. Save the average chart The [Save Measure Averages] module is used. The values for the averages and standard deviations are saved as a "CSV" formatted text file. File Format Version: Recording Date: 20090613 2007/7/13 06:44:04 +09 Slope1040LinearFit(uV/ms) Phase Baseline dose 1 dose2 dose 3 ch1 +/-sd ch2 +/-sd ch3 32.528 5.996 -10.402 50.352 -63.225 32.239 9.716 -28.377 55.214 -61.097 39.948 11.97 -63.761 39.029 -62.029 48.442 5.472 -78.628 1.577 -65.594 EPSP Amp (uV) Phase Baseline dose 1 ch1 +/-sd ch2 +/-sd ch3 -60.092 3.841 -246.416 5.54 -264.615 -59.937 5.853 -250.977 6.666 -260.01 Fig.2-4.15. Example of the measurment chart saved as an Excel compatible CSV file. Mobius Tutorial: Cahper 2 - fEPSPs Recording 41 2-4. Replay and analysis of acquired data 42 Mobius Tutorial: Cahper 2 - fEPSPs Recording 3-1. Recording spontaneous neuronal spikes (single unit) Chapter 3 Spike Sorter This chapter will teach you how to record and analyze spontaneous neuronal spikes (single unit activities) either from neuron cultures or brain slices using available workflow templates. In this chapter you will learn: 1. How to record spontaneous neuronal spikes (single unit activities) 2. How to test drug effects 3. How to replay and analyze spontaneous neuron spikes (single unit activities) 3-1. Recording spontaneous neuronal spikes (single unit) There are 5 workflow templates available for recording spontaneous neuronal spikes (single unit): 1. 2. 3. 4. 5. Spontaneous_recording (Recording WITHOUT any real-time analysis) Spike_recording (Recording with extracting spikes and their frequency analysis) Spike_recording_filter (2 + filter) Spike_recording_cluster (Recording with extracting, clustering spikes, and their frequency analyses) Spike_recording_filter_cluster (4+filter) Opening the workflow template 1. Click [Workflow] > [New] > [From Template]. (Fig.3-1.1) 2. Select either of [64MD1_1280x1024] or [64MD1_1920x1080] folder, depending on the size of your display monitor. Select [Spikes] > [Spontaneous_recording] folders. Select the workflow template. • Go to [Basic_recording] folder for the “Spontaneous_recording” workflow template. NOTICE: Connect your PC to the MED64 amplifiers and turn on both amplifiers to open recording workflows. Fig.3-1.1. Mobius Tutorial: Cahper 3 - Spike Sorter 43 3-1. Recording spontaneous neuronal spikes (single unit) 3-1.1. Setting the acquisition parameters All the recording workflow templates include the [Acquire MED64R2 Data] module. Acquisition parameters are set in this module. (5) (2) (6) (1) (8) (3) (7) (4) (9) 1. #Traces: Number of Traces (sweeps). 2. Auto Pause: Fig.3-1.2. [Acquire MED64R2 Data ] workflow template. Mobius will pause automatically when the current trace is finished if the box is checked. The trace interval set below becomes invalid when this box is checked. Mobius re-starts by clicking either of Green button or Green-Red button. 3. Trace duration: Sampling (Recording) time for each trace. 4. Trace interval: Interval between traces. (from the beginning of the first trace to the beginning of the next trace.) • • In the default setting, signals are recorded for 5 minutes every 30 minutes (as seen in the following figure), which is repeated 48 times. Mobius will run for 24 hours in total. The trance interval becomes invalid when AutoPause is checked. 5 min. 5 min. 30 min. 5. Recording Input Range (mV): Maximum input signal level. This setting should be adjusted according to the signal amplitude to achieve the maximal dynamic range. Select 2.3 mV, 2.9 mV, 5 mV, 12.5 mV, or 25 mV. 2.3 mV is usually good enough for recording of neuronal spikes. 6. Low cut freq (Hz): High pass filter. Select 0.1 Hz, 1.0 Hz, 10 Hz or 100 Hz. If 1.0 Hz is set, the signals with frequencies lower than 1 Hz are filtered out. 100 Hz is recommended for the recording of neuronal spikes. 7. Channels: Select the channels for recording here. When the square box is clicked, the channel selector pops up. The enabled recording channels are colored green. 8. High cut freq (Hz): Low pass filter. Select 1000 Hz, 2500 Hz, 5000 Hz, 7500 Hz, or 10000 Hz. If 5000 Hz is selected, signals with frequencies higher than 5000 Hz are filtered out. 10000 Hz is recommended for the recording of neuronal spikes. 44 Mobius Tutorial: Cahper 3 - Spike Sorter 3-1. Recording spontaneous neuronal spikes (single unit) 9. Save raw data: When Mobius is started by clicking the Green-Red recording button while the [Enable storage] is checked, the raw data is saved. The file name can be modified. NOTICE: In order to open the [Acquire MED64R2 Data] module, connect your PC to the MED64 amplifiers and the their powers are turned on. 3-1.2. Execution buttons The workflow template is run and stopped (paused) with the right execution buttons. Stop Run WITHOUT saving data Run WITH saving data Pause Fig.3-1.3. Execution buttons. 3-1.3. Before starting your experiment When a recording workflow is run with Green or Green-Red button for the first time after it is opened (or made), Mobius needs several seconds for the calibration (as seen in the pop-up message). Acquisition starts automatically after the calibration. If you would like to start acquisition immediately after clicking the Green-Red button, run the workflow with the Green button for several seconds, and then stop it before starting your experiment. When the workflow is run for the next time, it will not require calibration and acquisition will start immediately. Fig.3-1.4. The pop-up message for the calibration. CAUTION: • Make sure that the hard drive has enough free space when you start a long-term recording. Recording with all 64 channels for 1 hour creates a 9.216GB file. (9.216GB is represented as 9,000,000KB, 8,739.06MB, or 8.58GB in the Windows.) • Avoid saving data to the drive where the OS is installed (usually C drive). Save it to a separate hard drive in the following cases: 1) When trace duration is set to longer than 30 minutes. 2) When trace duration is set to longer than 5 minutes and # Traces is greater than 12. • Extracting and/or clustering spikes can slow down Mobius' data processing and appear to freeze when it extracts more spikes than it can analyze. This most often happens when non-biological signals cross the spike extraction thresholds on all channels at once. (e.g. Unexpected noises cross the thresholds or the baseline fluctuates due to vibration.) • It is recommended you start your new experiments WITHOUT on-line (real time) extraction or clustering (using the Spontaneous Recording template or disabling spike detection). Perform your experiments with real-time analysis when you are familiar with your preparation and experiments. When recording is done with extraction, clustering, and filtering, please follow the instructions in section 1-2. Important notice on pages 4-5. Mobius Tutorial: Cahper 3 - Spike Sorter 45 3-1. Recording spontaneous neuronal spikes (single unit) 3-1.4. Recording without on-line (real-time) analysis -Using “Spontaneous_recording” workflow template- Overview of the “Spontaneous_recording” workflow template The “Spontaneous_recording” workflow template consists of following modules located in the 2 Tabs of “Main” and “Monitor”. Tab Modules Main Acquire MED64R2 Data / Dis play All Channels / Export Raw Data Monitor Dis play Single Channel Acquired signals are simply displayed at all 64 channels and an any selected channel. The data can be exported to binary or ASCII (“CSV” formatted text file). “Main” tab “Monitor” tab Fig.3-1.5. Module configuration for the “Spontaneous_recording” workflow template. Acquire MED64R2 Data Export Raw Data Display Single Channel Display All Channels Fig.3-1.6. Control panels in the “Spontaneous_recording” workflow template. 46 Mobius Tutorial: Cahper 3 - Spike Sorter 3-1. Recording spontaneous neuronal spikes (single unit) Recording spontaneous neuronal spikes (single unit activities) without any on-line analysis The online spike extracting can slow-down Mobius’ data processing and cause it to stop when it extracts more spikes than it can analyze. It is recommended to record signals using this template until you are familiar with your preparation and experiment. Analysis and exporting can be done later off-line. 1. Open the “Basic_recording” workflow template. (Refer to page 43) 2. Change the recording parameters in the [Acquire MED64R2 Data] module. (Refer to section 3-1.1.Setting the acquisition parameters on page 44) 3. Make sure that [Export Raw Data] is NOT enabled. • This can be done later. 4. Make sure that [Save raw data] is CHECKED. 5. Save it as your recording workflow. • • Click [Workflow] > [Save as]. (Fig.3-1.7) The workflow will be saved as a moflo. file. The data file (.modat file) will be saved in the same folder as the Recording workflow. Fig.3-1.7. Refer to page 10 for the data and workflow files generated after recording. 6. 7. Run Mobius with the GREEN-RED button. • Mobius will require you to save the workflow as your own if you try to start Mobius with the Green-Red button without having saved it already. You can focus on a specific channel it the “Monitor” tab. Channels can be changed during recording. Mobius Tutorial: Cahper 3 - Spike Sorter 47 3-1. Recording spontaneous neuronal spikes (single unit) Scales can be changed during recording. Scale for amplitude can be changed by clicking and typing in the values for the maximum and/or minimum Channel can be changed here The time scale is changed here The maximum is 10 ms Fig.3-1.8. Recording with “Basic_recording” workflow template, “Main” Tab (top) and “Monitor” tab (bottom). 48 Mobius Tutorial: Cahper 3 - Spike Sorter 3-1. Recording spontaneous neuronal spikes (single unit) 3-1.5. Recording with extracting spikes and their frequency analysis -Using the “Spike_recording(_ filter)” template- Overview of the “Spike_recording(_filter)” workflow templates The “Spike_recording(_filter)” template consists of the following modules. Tab Modules Main Acquire MED64R2 Data / Display All Channels / Export Raw Data Spike Extract Spikes / Compute Spike Freqs / Save Spikes / Save Spike Freqs / Display Spike Measures Filter* Filter Raw Data (2) / Display Single Channel (2) * “Filter” tab is NOT available with the “Spike_recording” workflow template “Main” Tab “Spikes” Tab Fig.3-1.9. Module configuration for the “Spike_recording” workflow template. Spikes crossing over pre-defined thresholds are extracted, and the spike frequency of all extracted spikes is computed and graphed during recording. You can monitor that 1) spikes are extracted, 2) the extracted spikes’ waveforms, 3) the spike frequency chart at the [Display Spike Measures] control panel. In the “Spike_recording_filter” workflow template, 2 sets of [Filter Raw Data] modules are added in the “Filter” Tab. In this workflow template, acquired data can be filtered with selected filter menu before sent to the [Extract Spikes] module. (Refer to Fig.3-1.10). In the “Filter” tab, the top [Display Single Channel] module shows the original non-filtered data while the bottom module shows filtered data. (Refer to the bottom figure on the Fig.3-1-11). Mobius Tutorial: Cahper 3 - Spike Sorter 49 3-1. Recording spontaneous neuronal spikes (single unit) Main Tab Spike Tab Filter Tab Fig.3-1.10. Module configuration for the “Spike_recording_filter” workflow template. Extract Spikes Compute Spike Freqs Compute Spike Freqs Save Spike Freqs Filter Raw Data (1) Display Single channel (Raw data is displayed) Display Spike Measures Spikes are extracted (top), Extracted spikes’ waveform (right), The time course of spike frequency Display Single channel (Filtered data is displayed) (bottom) are displayed. Fig.3-1.11. Control panels in the “Spikes” and “Filter” tab for the “Spike_recording_filter” template. The “Main” tab is same as “Spontaneous_recording”. (Fig.3-1.6). 50 Mobius Tutorial: Cahper 3 - Spike Sorter 3-1. Recording spontaneous neuronal spikes (single unit) Recording spontaneous neuronal spikes with on-line spike extracting and their frequency analysis [Extracting spikes] can slow down data processing and Mobius can even freeze when it extracts more spikes than it can process. (Refer to CAUTION on the page 45) Please follow the instructions below to avoid stopping during recording when this workflow template is used (or this module is used for acquisition.) • Select 100Hz for the low-cut filter. (Accidental low-frequency noise might cause to stop Mobius). • Avoid enabling any [Export] or [Save] modules when raw data is saved. Once raw data is saved, you can export during off-line analysis. • Set the trace duration (recording time) to less than 10 minutes and the trace interval to longer than the trace duration so that the analysis can catch up with the acquisition during the trace interval. Particularly, keep the trace duration short for long-term recording lasting days, weeks, or months. • Decrease the number of recording channels. 1. Open the “Spike_recording(_filter)” workflow template. (Refer to page 43) 2. Change the acquisition parameters in the [Acquire MED64R2 Data]. (Refer to section 3-1.1. Setting acquisition parameters on page 44) 3. Select the channels for recording. Click the box next to “Channel” in the [Acquire MED64R2 Data] module to have channel selector. 4. Make sure that [Export Raw Data] is NOT checked (Uncheck the check-box). • Once raw data is saved, this can be done later off-line. 5. Start Mobius with the Green button and run the workflow template for a few minutes to see signals, and then stop. Set the analysis parameters. 1) Change the filter menu depending on the acquired signals. (If the “Spike_recording” template is used, this is not necessary.) 2) Set the thresholds. • Refer to section 3-3.2 Analyzing the spike rate on pages 63-67 for detail 3) Change the parameters for [Compute Spike Freqs]. 4) Make sure [Save Spikes] and [Save Spike Freqs] are NOT enabled. • It is not recommended to enable these modules during recording with extracting spikes. These can be done later off-line once raw data is saved. 6. Run Mobius with the Green button, then make sure that the thresholds you set are OK. • Thresholds can be changed during recording. But it is not recommended to do so during recording. 7. Save as your own recording workflow.(Refer to page 47) The workflow will be saved as moflo.file. • The data file (.modat file) and the Analysis workflow (including all analysis module selected for the recording workflow and [Replay MED64 Data File] module) will be saved in the same folder. (Refer to pages 9-10) Mobius Tutorial: Cahper 3 - Spike Sorter 51 3-1. Recording spontaneous neuronal spikes (single unit) 8. Make sure that the Save raw data in the [Acquire MED64R2 Data] module is checked, then run your workflow with the GREEN-RED button. • Start recording without on-line extraction to be safe.Check the [Disable] button in the [Extract Spikes] module so that spikes are NOT extracted. (Fig.3-1.12) However, when this button is checked, extracted spikes or spike frequency chart can NOT be displayed during recording. • It is strongly recommended to start recording with the Disable button checked during long term recording over several days or weeks. • Fig.3-1.12. Disable button. Mobius will require you to save the workflow as your own if you try to start Mobius with the Green-Red button without having it already. Fig.3-1.13. Spike extraction and spike frequency analysis. 52 Mobius Tutorial: Cahper 3 - Spike Sorter 3-1. Recording spontaneous neuronal spikes (single unit) 3-1.6. Recording with on-line (real-time) spike sorting -Using the “Spike_recording(_filter)_ cluster template- Overview of the “Spike_recording(_filter)_cluster” workflow templates The “Spike_recording(_filter)_cluster” workflow template consists of following modules. Tabs Modules Main Acquire MED64R2 Data / Display All Channels / Export Raw Data Spike Extract Spikes / Cluster Spikes / Compute Spike Freqs / Save Spikes / Save Spike Freqs / Display Spike Measures Filter* Filter Raw Data (2) / Display Single Channel (2) * ”Filter” Tab is NOT available with “Spike_recording_cluster” workflow template With these workflow templates, spikes crossing the pre-defined thresholds are extracted, and sorted (clustered) based on the waveform shapes. The spike frequencies of each spike cluster are computed and graphed. You can monitor 1) that spikes are extracted, 2) different spike clusters’ waveforms grouped by clusters, and 3) cumulated spike frequencies of each spike clusters during recording. “Main” Tab “Spike” Tab Fig.3-1.14. Module configuration for the “Spike_recording_cluster” workflow template. For the “Spike_recording_filter_cluster” workflow template, 2 sets of [Filter Raw Data] modules are added in the “Filter” Tab. (Fig.3-1.15) The acquired data can be filtered with selected filter menu before sent to the [Extract Spikes] module. (Refer to Fig.3-1.15). In the “Filter” tab, the top [Display Single Channel] module shows the original non-filtered data while the bottom module shows filtered data. (Refer to the bottom figure on the Fig.3-1-11). Mobius Tutorial: Cahper 3 - Spike Sorter 53 3-1. Recording spontaneous neuronal spikes (single unit) “Main” Tab “Spike” Tab “Filter” Tab Fig.3-1.15. Module configuration for the “Spike_recording_filter_cluster” workflow template. Extract Spikes Cluster Spikes Compute Spike Freqs Save Spike Freqs Save Spikes Display Spike Measures Fig.3-1.16. Control panels in the “Spikes” Tab for the “Spike_recording(_filter)_cluster” workflow template. The “Main” and “Filter” tabs are same as “Spike_recording_ filter”.(Refer to Fig.3-1.11) 54 Mobius Tutorial: Cahper 3 - Spike Sorter 3-1. Recording spontaneous neuronal spikes (single unit) Recording spontaneous activities with on-line spike sorting The purpose of clustering spikes is to identify and separate signals referred from multiple cells acquired on a single channel (electrode) based on their waveforms.The extracted spikes are treated as vector inputs to define centroids (center of mass vector). However, the centroids can not be defined unless “frozen” (ignoring any incoming spikes to alter centroids) and will change depending on the incoming spikes. On-line spike clustering does not have much meaning unless it gives you an idea how many different kinds of spikes you have on each channel (electrode). More importantly, clustering can slow down Mobius’ data processing and appear to stop it when the analyzing can not keep up with data processing. Thus, it is recommended to: 1) Use this workflow template to get an idea of how many kinds of spikes you have before starting acquisition. 2) Start acquisition with the [Disable] button checked. Spikes will NOT be extracted during acquisitions. You will not be able to see the extracted spikes’ waveforms or spike frequency chart. It is strongly recommended to do so when recording is performed for long term. When on-line spike sorting (clustering) is performed, please follow the instructions below; • Select 100Hz for the low-cut filter. (Accidental low-frequency noise might cause to stop Mobius.) • Do NOT enable any [Export] or [Save] module when raw data is saved. (Exporting can be done later off-line.) • Set the Trace duration (recording time) to less than 10 minutes and the Trace intervals for longer than the trace duration so that the analysis catches up with the acquisition during the trace interval. Particularly, make the trace duration even shorter for long-term recording lasting days, weeks, or months. • Decrease the number of recording channels. 1. Open the “Spike_recording(_filter)_cluster” workflow template. (Refer to page 43) 2. Change the acquisition parameters in the [Acquire MED64R2 Data] module. (Refer to section 3-1.1. Setting the acquisition parameters on page 44) 3. Select the channels for recording. Click the box next to “Channel” in the [Acquire MED64R2 Data] module to have channel selector. 4. Make sure that [Export Raw Data] is NOT Enabled. • This can be done later off-line once raw data is saved. 5. Run the workflow template (clicking the Green button) for a few minutes to see signals on the screen, then stop it. Set the analysis parameters. 1) Change the filter menu depending on the acquired signals. (Refer to pages 64-65) • If the “Spike_recording_cluster” template is used, this step is not necessary.) 2) Set the thresholds for spike extraction. (Refer to page 75) 3) Modify the parameters for clustering spikes (in the [Cluster Spikes] module). • Refer to section 3-3.3 Spike Sorting (pages 76-78) for detail. Mobius Tutorial: Cahper 3 - Spike Sorter 55 3-1. Recording spontaneous neuronal spikes (single unit) 4) Make sure that [Save Spikes] and [Save Spike Freqs] are NOT enabled. • 6. Run Mobius (clicking the Green button) to make sure that the thresholds you selected are OK. • 7. Thresholds can be changed during recording. But it is not recommended to do so during recording. Save as your own recording workflow. (Refer to page 47). The workflow will be saved as .moflo file. • 8. It is not recommended to enable these while recording and extracting spikes. These can be done later off-line once raw data is saved. The data file (.modat file) and the Analysis workflow (including all analysis modules selected for the recording workflow and [Replay MED64 Data] module) will be saved at the same folder. (Refer to pages 9-10) Make sure that the [Save raw data] is checked, then run the workflow with the GREEN-RED button. • Start recording without on-line extraction to be safe. Check the [Disable] button in the [Extract Spikes] module so that spikes are NOT extracted. (Fig.3-1.17) However, when this button is checked, extracted spikes and/or spike frequency chart can NOT be displayed during recording. • It is strongly recommended to start recording with the [Disable] button checked during long term recording over several days or weeks. Fig.3-1.17. Disable button. Fig.3-1.18. Spike sorting. 56 Mobius Tutorial: Cahper 3 - Spike Sorter 3-2. Drug testing 3-2. Drug testing The [Compute Measure Averages] module calculates averages and standard deviations for the spike frequencies for all the experiment’s phases. This is a useful tool for making a dose-response curves or comparing phases before, during and after drug applications. This section will demonstrate how to make a dose-response curve for spike frequencies using this module. Since this module is at the end of the analysis chain, it can slow down the data processing and cause Mobius to stop during your experiment if you perform these analyses on-line. So, it is recommended not to use this module during recording unless you are familiar with your preparations and experiment. All analysis introduced in this section can be done later off-line. An alternate solution to avoid stopping is to just set the phase-annotations (yellow bars) without on-line analysis during recording, and then analyze later off-line. (The location of the phase bars will be saved in your analysis workflow.) To do this, skip following steps 1-3 and start with 4. 1. Open the “Spike_recording(_filter)” (or any other) workflow template. 2. Add the [Compute Measure Averages] and [Save Measure Averages] to this workflow template. 1) Make a new tab. Click [Layout] > [Add Tab], then type in the new tab’s name. (Fig.3-2.1) 2) Open the Editor in the new tab. (Click [Workflow] > [Edit]) (Fig.3-2.2) Fig.3-2.1. Make a new tab. Fig.3-2.2. Editor is opened in the new tab. 3) Click the [Compute Spike Freqs] in the left “Workflow” box, then double-click [Compute Measure Averages] in the right “Available task panels”. (Fig.3-2.3) You will see the [Compute Measure Averages] module shift to the left box, under the [Compute Spike Freqs] module. (Fig.3-2.4) The control panel for this module appears in the new tab. (Fig.3-2.5) Fig.3-2.3. Fig.3-2.4. Mobius Tutorial: Cahper 3 - Spike Sorter 57 3-2. Drug testing 4) Click the [Compute Measure Averages] module in the left “Workflow box”; then double-click on [Save Measure Averages] in the right “Available task panels” so that the [Save Measure Averages] is moved to the “Workflow box”, under the [Compute Measure Averages] and the control panel for this module appears in the tab. Averages and standard deviations for the spike frequencies will be measured and graphed in the [Compute Measure Averages] control panel. Fig.3-2.5. Control panels for the [Compute Measure Averages] and [Save Measure Averages] modules (topleft) and all modules in the completed new workflow (bottom-right). 3. Open the [Filter] tab. Run Mobius (click the Green button) and modify the filter menu (Refer to page 64), and then stop it by clicking the Black button. Set the thresholds and parameters for [Compute Spike Frequency]. (Refer to pages 65-67) 4. Start Mobius by clicking the Green button. When you are satisfied with the new thresholds settings and other analysis parameters, stop and save it as your own workflow. (Refer to page 47) 5. Run Mobius by clicking the GREEN-RED button. The first phase (baseline) will start from time 0. 58 Mobius Tutorial: Cahper 3 - Spike Sorter 3-2. Drug testing 6. Pause Mobius by clicking YELLOW button when the first phase (baseline) is finished. Click [Annotations] > [Add New phase]. Type in the name for the 2nd phase. (e.g. dose 1.) (Fig.3-2.6) Do NOT stop with the Black button. If it is stopped, the experiment will end and new phases will NOT be added. 7. When OK button is clicked, the yellow bar with the chosen name appears in the [Display Spike Measures] module’s spike frequency chart. (Fig.3-2.7) 8. Re-start Mobius with the GREEN-RED button. Fig.3-2.6. Making a new phase. Time continues running during pausing in the measurement charts. Fig.3-2.7. New phase is added. 9. When the second phase (e.g. dose 1) is finished, pause Mobius with the YELLOW button. Click on [Annotations] > [Add New phase]. 10. Type in the 3rd phase name (e.g. dose 2). The yellow bar with the name appears in the spike frequency chart when the OK button is clicked. 11. Start Mobius again with GREEN-RED button. Add subsequent phases following the same procedure and run Mobius until the end of experiment. 12. You can see the average table and graph for each phase in the [Compute Measure Averages] module (in the “Averages” tab) (Refer to Fig. 3-2.8) • The phase annotations (yellow bars) can be shifted by left-click and dragging during off-line analysis. Averages and standard deviations will be calculated based on the new phase annotations when the data is replayed. Mobius Tutorial: Cahper 3 - Spike Sorter 59 3-2. Drug testing Fig.3-2.8. Computed measure averages. [Display Spike Measures] module with phase bars (top) and [Compute Measure Averages] module (bottom). Input fields in the [Compute Measure Averages] module 1. Channel: Selects the channel to be displayed. The selection can not be changed while running workflow. 2. Use last: When this box is checked, the selected (or typed) number of data points are used for computations. This is mostly used for off-line analysis (Refer to page 72). 3. Hide: hides the measurement checked in the chart. • 60 Note: the chart can be zoomed up or down by clicking and changing numbers of the maximum and/or scale(s) for both X and Y axis. Mobius Tutorial: Cahper 3 - Spike Sorter 3-3. Replay and analysis of acquired data 3-3. Replay and analysis of acquired data The Mobius data files (.modat) are opened and replayed with the [Replay Raw Data File] module, and analyzed using modules such as [Extract Spikes], [Cluster Spikes], and [Compute Spike Freqs]. You will design your Analysis workflow by combining those modules for replay and analysis of the acquired data. The quickest way to replay and analyze the spike data is using the Analysis workflow template, which will be introduced in this chapter. The Analysis workflow with the [Replay Raw Data File] and the analysis modules you selected for your recording will be automatically saved to the same directory when you run recording workflow with the Green-Red button. These analysis workflows can also be used for quickly performing analysis. 3-3.1. Replaying acquired data 1. Open the analysis workflow template. Click [New] > [From Template]. Select either of [64MD1_1280x1024] or [64MD1_1920x1080] folder, depending on the size of your display monitor. Select [Spikes] > [Spike_analysis] folders, then select an analysis workflow template. Four templates are available for analyzing spontaneous neuron spikes (single unit activities). 1) ”Spike_frequency_analysis”: Spikes are extracted and spike frequency is computed and graphed. 2) ”Spike_frequency_analysis_filter”: 1 + filter 3) “Spike_sorting”: Spikes are extracted and sorted (clustered). Spike frequencies of clustered spikes are computed and graphed. Fig.3-3.1. Opening analysis template. • 2. In order to open your own analysis workflow, click [Workflow] > [Open], and then select the workflow file (.moflo). Open the data file by clicking the box next to the “Filename” and select the desired .modat file. When the file name appears in the Filename box as seen on the right figure of the Fig.3-3.2, the data is ready to be replayed by clicking the Green button or Green-Red button. • 3. 4) “Spike_sorting_fiter: 3 + filter Opening large data files can take several minutes. (e.g. Opening 10GB data takes over 1 minute.) The acquired data is just replayed when the Green button is clicked. Clicking the Green-Red button while checking the [Enable] check-box executes the Export or Saves. Mobius Tutorial: Cahper 3 - Spike Sorter 61 3-3. Replay and analysis of acquired data 2 Fig.3-3.2. Opening a data file. When the file name appears in the Filename box, it is ready to be replayed. Fig.3-3.3. Replaying spontaneous data. Input fields for the [Replay Raw Data File] module 1. Traces: Sects the trace(s) for processing. 2. Trace time: Selects the trace time for processing. 3. Channels: Selects the channels for processing. Click the box next to the Filename to open the channel selector. Channels in green will be enabled. 4. Delay: Set this value to a value greater than zero to insert a delay between data “blocks” sent out by this module. It is useful for slowing down data processing. 62 Mobius Tutorial: Cahper 3 - Spike Sorter 3-3. Replay and analysis of acquired data 3-3.2. Analyzing the spike rate This section describes how to analyze the spike rate with the “Spike_frequency_analysis_filter (or, Spike_frequency_analysis)” workflow template. These Analysis templates consist of following modules located in the Tabs of “Main”, “Spike”, “Filter”, and “Averages”. Tab Main Filter* Modules Replay Raw Data File / Display All Channels / Export Raw Data Extract Spikes / Compute Spike Freqs / Save Spikes / Save Spike Freqs / Display Spike Measures Filter Raw Data (2) / Display Single Channel (2) Averages Compute Measure Averages / Save Measure Averages Spike * “Filter” tab is not available with the “Spike_friquency_analysis” workflow template. The raw data is filtered by the selected filter menu. Spikes crossing pre-defined thresholds are extracted. Spike frequencies of all extracted spikes are computed and graphed. Raw data can be exported as a binary or ASCII (“CSV” formatted text) file. Waveforms of extracted spikes, time stamp, and spike frequency charts can be saved as “CSV” formatted text file. The [Compute Measure Averages] module calculates and graphs the spike frequency averages for the different phases. In the “Spike_frequency_analysis” template, the replayed data is sent to [Extract Spikes] module without filtering. “Main” tab “Spikes” tab “Filter” tab “Averages” tab Fig.3-3.4. Module configuration for the “Spike_frequency_analysis_filter” workflow template. Mobius Tutorial: Cahper 3 - Spike Sorter 63 3-3. Replay and analysis of acquired data Extract Spikes Compute Spike Freqs Save Spike Freqs Save Spikes Display Spike Measures Ex * Spikes are extracted (top-left), * Waveforms of Extracted spikes (top-right) * Time course of spike frequencies (bottom) are displayed. Fig.3-3.5. Control panels on the “Spike” tab in the “Spike_frequency_analysis_filter” workflow template. Refer to Fig.3-3.3 for the “Main” tab, Fig.3-3.6 for the “Filter” tab, and Fig.3-3.20 for the “Averages” tab. 1. Set the filter menu Replay data by clicking the Green button. Change the filter menu accordingly. • Select the type of filter in the “Filter Type” drop down menu and the cut-off freqs (or time) scale in the bottom drop down menu below. • The top chart displays the raw data and the bottom chart displays the filtered data.The scale for amplitude (Y axis) can be modified by clicking and typing directly in the maximum and /or minimum amplitude values. (Fig.3-3.6) • The time (X axis) can be changed by selecting numbers in the “Duration” drop down menu. The maximum duration is 10 msec. (Fig.3-3.6) 64 Mobius Tutorial: Cahper 3 - Spike Sorter 3-3. Replay and analysis of acquired data Change the duration (Scale for X axis) here Fig.3-3.6. The filter tab. The top display shows the raw data and the bottom display shows the filtered data. 2. Set the Thresholds Open the “Spike” tab, and set the thresholds and pre/post times for spike extraction in the [Extract Spikes] module (table). The thresholds are displayed on the top-left chart in the [Display Spike Measures] module. Fig.3-3.7. [Extract Spikes] module. 1) The values for thresholds and pre/ post times can be changed by double clicking and typing them in directly. (Fig.3-3.8) 2) The values can be applied to all another channels by right-clicking the number and selecting “Apply to ALL”. (Fig.3-3.9) • Please refer to Mobius User Guide (5.2.3. Extract Spikes) for more information on thresholds and pre/post times. • Disable button: when this check box is checked, spikes are NOT extracted. It is used mostly for acquisition. • Fig.3-3.8. Fig.3-3.9. Channel limit selector: the maximum numbers of spikes to be extracted per 1 second at a channel are selected here. This is useful for preventing crashing due to unexpected high-frequency noise during acquisition. Mobius Tutorial: Cahper 3 - Spike Sorter 65 3-3. Replay and analysis of acquired data 3. Set the Parameters for computing spike frequency Modify the parameters in the [Compute Spike Freqs] module. (Fig.3-3.10) This module creates a cumulative record of spike frequency changes. The default setting has 1 second selected for the Binning window size. Extracted spikes are counted every 1 second. Selecting “Trace” instead of “Arbitrary (s)” means the spikes are counted for the whole trace. Fig.3-3.10. 4. Modifiy the charts in the [Display Spike Measures] The [Display Spike Measures] module consists of 3 charts: 1) Trace chart (top-left): Raw data and thresholds are displayed. Extracted spikes are high-lighted in light green color. 2) Extracted Spikes chart (top-right): Extracted spikes’s waveforms are displayed. 3) Spike Frequency chart (bottom): Spike frequencies are displayed. Zoom in or out the charts module using the following procedure: • [Trace] chart (top-left): The time scale for amplitude can be changed by clicking and typing in the desired minimum and/or maximum values. (Fig.3-3.11) The time duration can be changed in the “Duration” drop down menu. (Fig.3-3.12) • Fig.3-3-11. [Extracted Spikes] chart (top-right): The scale for amplitude and time can be changed by clicking and typing in the desired minimum and/or maximum values. (Fig.3-3.11) • Spike frequency chart: Fig.3-3.12. Can not be changed. 5. Replay data by clicking the Green button with the new parameters. When you are satisfied with the new threshold values, save as your own analysis template. (Refer to page 47) The output will be the data you have selected. 66 Mobius Tutorial: Cahper 3 - Spike Sorter 3-3. Replay and analysis of acquired data Fig.3-3.13. Spikes extractions and their frequencies analysis. Mobius Tutorial: Cahper 3 - Spike Sorter 67 3-3. Replay and analysis of acquired data Data output Now, you are ready to generate data. When the workflow is run by clicking GREEN-RED button with the boxes for the Save and/or Export modules checked, the data are saved and/or exported. Channels for the Saving/Exporting are chosen with the channel selector in the [Replay Raw Data] module. Channels shown with green will be enabled. File names for all Save/Export modules can be modified by directly typing them into the Filename modifier box. 1. Export raw data The [Export Raw Data] module is used. The raw data (waveforms) are exported either as 1) Binary shorts (2 byte integer values), 2) Binary doubles (8 byte floating point values), or 3) ASCII text in “CSV” format. File Format Version Session Start Time time_ms 0 0.05 0.1 0.15 0.2 0.25 0.3 0.35 0.4 0.45 0.5 0.55 0.6 0.65 0.7 0.75 0.8 0.85 20071201 2004/7/28 17:29:48 +09 ch1_mV 0.006348 0.001465 0.001953 0.005859 0.006836 0.006348 0.003418 0.002441 0.005859 0.004395 0.005371 0.005371 0.006348 0.005859 0.007324 0.005859 0.002441 0.004883 ch2_mV -0.00293 -0.00195 -0.00244 -0.00244 -0.00195 -0.00635 -0.00635 -0.00293 -0.00146 -0.00293 -0.00439 -0.00342 -0.00146 -0.00244 -0.00146 -0.00146 -0.00195 -0.00342 ch3_mV -0.00537 -0.00391 -0.00098 -0.00098 -0.00244 -0.00391 -0.00049 0.002441 0.003418 0 -0.00049 -0.00342 -0.00195 -0.00781 -0.00439 -0.00488 -0.00244 -0.00391 ch4_mV 0.001953 0.003906 -0.00244 0.000488 -0.00049 0.001465 -0.00195 -0.00244 -0.00195 -0.00391 -0.00684 -0.00928 -0.00928 -0.01074 -0.00977 -0.00977 -0.00879 -0.01025 ch5_mV -0.00635 -0.0083 -0.00635 -0.00488 -0.00635 -0.00195 -0.00342 -0.00195 -0.00244 -0.00244 -0.00391 -0.00488 -0.00342 -0.00537 -0.00391 -0.00732 -0.00488 -0.00391 Fig.3-3.14. Example of raw data exported with ASCII displayed in Excel. 68 Mobius Tutorial: Cahper 3 - Spike Sorter ch6_mV -0.00391 -0.00684 -0.00977 -0.00781 -0.00732 -0.00342 -0.0083 -0.00391 -0.00049 -0.00342 -0.00586 -0.00391 -0.00293 -0.00635 -0.00342 -0.00488 0.000977 -0.00488 3-3. Replay and analysis of acquired data 2. Save extracted spikes and time stamps The [Save Spikes] module is used. 1) Time stamp only, or 2) Time Stamps, and waveforms of all extracted spikes are saved as a “CSV” formatted text file. File Fo 20071201 Sessio2004/7/28 17:29:48 +09:00 Trace 60262 chan time_of_day nel within_session_time within_s within_trac cluster_i trace pre_ms post_ ession_ti e_time_ms d _num ms me_ms y0_mV y1_mV et 2 17:29:48.326 0d:00:00:00.326 326.9 326.9 none 1 1 2.5 0.00681065 0.006670749 0 2 17:29:48.397 0d:00:00:00.397 397.95 397.95 none 1 1 2.5 0.010181873 0.011403289 0 2 17:29:48.411 0d:00:00:00.411 411.5 411.5 none 1 1 2.5 0.002042739 0.000903023 - 2 17:29:48.437 0d:00:00:00.437 437.45 437.45 none 1 1 2.5 -0.001707017 -0.002345263 - 2 17:29:48.495 0d:00:00:00.495 495.3 495.3 none 1 1 2.5 -0.0084337 -0.011750365 - 3 17:29:48.009 0d:00:00:00.009 9.9 9.9 none 1 1 2.5 0.00425918 3 17:29:48.016 0d:00:00:00.016 16.4 16.4 none 1 1 2.5 -0.007372998 -0.005078022 - 3 17:29:48.027 0d:00:00:00.027 27.5 27.5 none 1 1 2.5 0.002399721 0.000965411 0 3 17:29:48.041 0d:00:00:00.041 41 41 none 1 1 2.5 0.00108115 0.001782467 0 3 17:29:48.056 0d:00:00:00.056 56.25 56.25 none 1 1 2.5 -0.001126919 -0.002629422 - 3 17:29:48.063 0d:00:00:00.063 63.85 63.85 none 1 1 2.5 -0.004111407 -0.004061442 - 3 17:29:48.068 0d:00:00:00.068 68.35 68.35 none 1 1 2.5 0.004206802 0.004814135 0 3 17:29:48.077 0d:00:00:00.077 77.65 77.65 none 1 1 2.5 0.000747327 0.001243812 0 3 17:29:48.095 0d:00:00:00.095 95.75 95.75 none 1 1 2.5 0.001295781 0.001522645 0.002154879 3 17:29:48.099 0d:00:00:00.099 99.35 99.35 none 1 1 2.5 0.001450416 0.000778917 0 3 17:29:48.12 0d:00:00:00.12 120.2 120.2 none 1 1 2.5 -0.005230252 -0.004370654 - 3 17:29:48.13 0d:00:00:00.13 3 17:29:48.134 0d:00:00:00.134 130 130 none 1 1 2.5 -0.000629679 0.000788942 0 134.4 134.4 none 1 1 2.5 0.008337011 0.007848071 0 Fig. 3-3.15. Example of the Time Stamps and Waveforms saved as a “csv” file displayed in Excel. Mobius Tutorial: Cahper 3 - Spike Sorter 69 3-3. Replay and analysis of acquired data 3. Save the spike frequency data The [Save Spike Freqs] module is used. The spike frequency data is saved as a “CSV” formatted text file. File Format Version Session Start Time 20071201 2004/7/28 17:29:48 +09 time_secs phase 1 Baseline 2 3 4 5 6 7 8 ch1 NC ch2 NC 5 2 9 13 6 13 5 1 ch3 NC 20 32 58 20 5 1 14 0 ch4 NC 69 51 37 6 8 2 3 3 1 0 0 0 0 0 0 0 Fig.3-3.16. Example of the spike frequency data saved as a “CSV” file displayed in Excel. 4. Save the average chart The [Save Measure Averages] module is used. The averages and standard deviations are saved as a “CSV” formatted text file. (Refer to section 3-3.3.Compute averages of spike frequency by phases.) File Format Version Session Start Time 20080212 2008/10/01 16:16:43 +09 Channel Number 57 Measure NC Baseline +/-sd dose 1 +/-sd dose 2 0.143 0.655 0.05 0.224 0.895 Channel Number 58 Measure NC Baseline +/-sd dose 1 +/-sd dose 2 0.857 2.833 4.55 9.139 22.211 Channel Number 59 Measure Baseline +/-sd dose 1 +/-sd dose 2 Fig.3-3.17. Example of the average chart saved as a “CSV” file diplayed in Excel. (Only channel 57, 58, and 59 are saved.) 70 Mobius Tutorial: Cahper 3 - Spike Sorter 3-3. Replay and analysis of acquired data 3-3.3. Computing spike frequency averages according to phase -Making the dose-response-curve- The [Compute Measure Averages] module calculates spike frequency averages and standard deviations according for all experimental phases. This is a useful tool for making a dose-response curve. This section will walk you through making a dose-response curve for spike frequencies using the “Spike_ frequency_analysis(_filter)” workflow template in which this module is included. If you would like to add this module to your own analysis workflow, please refer to the step1-2 at the section 3-2. Drug testing on pages 57-58. (If you added phase bars while recording, the location of the phase bars were saved to your analysis workflow.) 1. Set the all analysis parameters according to the previous section 3-3.2 Analyzing the spike rate. (Pages 64-66) 2. Open the “Spike” tab and replay data by clicking the Green button.The first phase (baseline) will start from 0. 3. When the first phase is finished, pause Mobius with the YELLOW button. Click [Annotations] > [Add New phase]. Type in the name for the 2nd phase. (Fig. 3-3.18) When the OK button is clicked, the yellow bar with its name appears on the Spike Frequency chart (Fig.3-3.19). *NOTICE: If Mobius is stopped with the Black button, replaying is terminated and a phase bar can not be added. Fig.3-3.18. Adding a new phase. Fig.3-3.19. The added new phase (dose 1). 4. Start Mobius by clicking the Green button again. When the 2nd phase is finished, pause Mobius with the YELLOW button and make a new phase. 5. Replay the data to the end. Averages and standard deviations are computed and graphed for each phase (dose) in the [Compute Measure Averages] module in the “Average” tab.(Fig.3-3.15) 6. The phase annotations (yellow bars) can be shifted by clicking and dragging. The averages and standard deviations are recalculated once Mobius is run with the Green or Green-Red button after changing the locations of phase bars. 7. If you are satisfied with the location of the phase bar, save it as your own analysis workflow. (Refer to page 47) 8. In order to save the average chart to a "CSV" file, check the check-box for the [Save Measures Averages] module, then run Mobius with the GREEN-RED button. Mobius Tutorial: Cahper 3 - Spike Sorter 71 3-3. Replay and analysis of acquired data Fig.3-3.20. [Display Spike Measures] module with phase annotation bars (top) and the graphs for averages and standard deviations in the [Compute Measure Averages] module (bottom). Input fields for [Compute Measure Averages] module 1. Channel: The channel to be displayed is selected here. Channels can NOT be changed during replay. 2. Use last: When this box is checked, the selected (or typed) number of data points are used for computations. For example, if 10 is selected, average and standard deviation are measured for the last 10 traces in each phase. 3. Hide: hides the measurement checked in the chart. • 72 Note: the chart can be zoomed up or down by clicking and changing numbers of the maximum and/or minimum scale(s) for both X and/or Y axis. Mobius Tutorial: Cahper 3 - Spike Sorter 3-3. Replay and analysis of acquired data 3-3.4. Spike sorting (clustering) The purpose of sorting (clustering) spikes is to identity and separate signals referred from multiple cells acquired on a single channel (electrode) based on their waveforms. This section will teach you how to sort (cluster) spikes and analyze the spike frequency using the “Spike_sorting(_filter)” workflow template. This template include following modules in the tabs of “Main”, “Spike”, and “Filter” Tab Main Spike Filter Modules Replay Raw Data File / Export Raw Data Extract Spikes / Save Spikes / Cluster Spikes / Compute Spike Freqs / Save Spike Freqs Filter Raw Data (2) / Display Single channel (showing original data) / Display Single channel (showing filtered data) “Main” tab “Spikes” tab “Filter” tab Fig.3-3.21. Module configuration for the “Spike_sorting_filter” workflow template. Replayed signals are filtered with the selected flitter menu, and then sent to the [Extract Spikes] module. Spikes crossing the pre-defined thresholds are extracted and sorted based on the waveform shapes. Clustered spikes’ frequencies are computed and graphed. Raw data can be exported to binary or ASCII (“CSV” format text) file. Extracted spike waveforms, time stamp, spike centroids and spike frequency charts can be saved as “CSV” format text file. With the “Spike_sorting” workflow template, the replayed data is not filtered but sent directly to the [Extract Spikes] module. Mobius Tutorial: Cahper 3 - Spike Sorter 73 3-3. Replay and analysis of acquired data Extract Spikes Cluster Spikes Compute Spike Freqs Save Spike Freqs Save Spikes Display Spike Measures 1. Spikes are extracted (top-left) 2. Waveforms of extracted spikes (top-right) 3. Time course of spike frequency (bottom) are displayed. Fig.3-3.22. Control panels on the “Spikes” tab in the “Spike_sorting_filter” workflow template. Refer to Fig.3-3.3 for control panels in the “Main” tab and Fig.3-3.23 for the “Filter” tab. 1. Select the filter menu Open the data file and replay the data with the Green button. Change the filter menu accordingly. • The top chart displays the raw data and the bottom chart displays the filtered data.The amplitude (Y axis) can be changed by clicking and typing values in the maximum and/or minimum amplitude. • The time (X axis) can be changed by selecting numbers in the “Duration” drop down menu. The maximum duration is 10 msec 74 Mobius Tutorial: Cahper 3 - Spike Sorter 3-3. Replay and analysis of acquired data Select filter menu Change the duration (Scale for X axis) with this drop-down menu Fig.3-3.23. Control panels for the “Filter” tab in the “Spike_sorting_filter” workflow template. Top chart shows the raw data and bottom chart shows filtered data. 2. Set the thresholds Click on the “Spike” tab. Set the thresholds and Pre/Post times for spike extraction depending on the sizes of spikes. The thresholds are displayed on the top-left chart in the [Display Spike Measures] module. Fig.3-3.24. Extract Spikes module. 1) Change the values for thresholds by double clicking and typing values directly into the [Extract Spikes] module chart. (Fig.3-3.25) 2) The thresholds and Pre/Post times can be applied to all channels by right-clicking and selecting Apply to All. (Fig.3-3.26) Fig.3-3.25. • Please refer to Mobius User Guide (5.2.3 Extract Spikes) for details on thresholds and pre/post times. • Disable button: When this check box is checked, spikes are NOT extracted. • Channel limit selector: The maximum numbers of spikes to be extracted per 1 second at a channel can be limited here. (This is used mostly for acquisition.) Mobius Tutorial: Cahper 3 - Spike Sorter Fig.3-3.26. 75 3-3. Replay and analysis of acquired data 3. Set the menu for spike sorting (clustering) As mentioned above, the purpose of sorting (clustering) spikes is to identify and separate signals referred from multiple cells acquired on a single electrode based on their waveforms. The sensitivity of the clustering process is changed using (1) Similarity Radius and (2) Min # spikes parameters. The default setting are 30% for the Similarity Radius and 5 is for Min # spikes. This means: when spikes with waveform similarity higher than 30% are proceeded 5 times, a valid cluster is identified and its centroid (an “average” spike shape) is determined. (1) (2) Spikes not assigned to any cluster are not color coded. They will remain green until there are 5 spikes with similar waveforms. Extracted spikes are assigned to a Cluster Fig.3-3.27. Cluster Spikes module. (A,B,C, etc) if their similarity is higher than 30% to the Cluster’s centroid. Spikes with less than 30% similarity to the centroid will remain green. Un-assigned spikes will be assigned as NC in the saved data. Each Cluster (A,B,C, etc in the Mapping chart) has different color code (e.g. A with red) and its waveforms and frequency are displayed with the same color code on the charts in the [Display Spike Measures]. These parameters can be modified to establish valid sets of clusters. (1) Similarity This parameter determines how sensitive the sorting (clustering) is to variations in spike waveforms. Larger numbers > more sensitive to spike shape variations > produce FEWER clusters. Smaller numbers > less sensitive to spike shape variations > produce MORE clusters (2) Min # spikes This determines how many spikes need to come to be recognized as a Cluster. Increasing this value means FEWER clusters. After replaying data to determine centroids, you may see that different clusters (e.g. C and D) really represent the same cell and you may want to merge them. Change the Cell number for Cluster D to 3 by double-clicking and directly typing in this number so that the Cluster D is merged to the Cluster C. (Fig.3-3.28) 76 Fig.3-3.28. Merging Cluster D and C. Mobius Tutorial: Cahper 3 - Spike Sorter 3-3. Replay and analysis of acquired data For another example, you may see that Cluster E is probably just noise and you want to remove it from your analysis. In this case, you can delete this cluster by deleting the number at the Cell column. (Right click the Cell number, then select Delete.) (Fig.3-3.29) Fig.3-3.29. Deleting a Cluster. Those changes can be reset by clicking [Reset Mapping] button. Once you have a valid set of Clusters that you believe represent different cells, you can freeze them by checking the [Freeze centroids] check-box. This means that incoming spikes will NOT alter the definition of the existing clusters (their centroids), nor cause new clusters to form. Centroids must be frozen to be definitely established. Otherwise, centroids are changing whenever new spike is assigned to a cluster. 4. Display Spike Measure charts In the [Display Spike Measures] control panel, the top-left chart shows that spikes are extracted, the top-right chart shows extracted spikes’ waveforms, and the bottom chart shows spike frequency. The waveforms and time course of spike frequency are color coded according to cluster since this module is under [Cluster Spikes] in the “Spike_sorting(_filter)” workflow template. (Refer to Fig.3-3-32) Fig.3-3.30. Extracted spikes. In the Extracted Spikes chart, you will see waveSolid lines show centroid waveforms. forms with solid lines and ones with dot lines. The Dot lines show extracted spikes’ waveforms. waveforms with solid lines are the centroid waveforms and the dotted lines are extracts spikes’ waveforms (Fig.3-3.30). Spikes NOT assigned to any Cluster are displayed in green. (Refer to page 66 for modifications for these charts.) 5. Compute spike frequencies Spike frequency is calculated every second in the default settings. This can be changed by selecting different value for “Arbitray(s)” on the [Compute Spike Freqs] module. When “Trace” is selected, the whole trace’s spikes are counted. Fig.3-3.31. In the “Spike_sorting(_filter)” workflow template, this module is under the [Cluster Spikes] module. Spike frequencies for all Clusters (clustered spikes) will be color coded and displayed in the spike frequency chart. The frequency calculations are reset when the number of clusters changes during replay. The frequency chart is reset whenever a new Cluster is formed. When the check box for [Freeze Centroids] is checked, now the numbers of cluster are fixed and frequency calculations are not reset anymore. The [Freeze Centroids] check box must be checked, when the Spike frequency chart is saved. Mobius Tutorial: Cahper 3 - Spike Sorter 77 3-3. Replay and analysis of acquired data 6. Run the workflow again by clicking the Green button to make sure that you are satisfied with valid clusters and all other analysis parameters, and then stop it. Save it as your own analysis workflow. The output will be the data you have selected. Fig.3-3.32. Spike sorting. 78 Mobius Tutorial: Cahper 3 - Spike Sorter 3-3. Replay and analysis of acquired data Data Output Now, you are ready to generate data. When the analysis workflow is run by licking the GREEN-RED button with the boxes for the Save or/and Export modules checked, the data are saved and/or exported. Channels for the Saving/Exporting are selected with the channel selector in the [Replay Raw Data] module. Channels shown with green color will be saved. File names for all Save/Export modules can be modified by typing directly them into the Filename box. 1. Export raw data The [Export Raw Data] module is used. The raw data (waveforms) are exported either as 1) Binary shorts (2 byte integer values), 2) Binary doubles (8 byte floating point values), or 3) ASCII text in “CSV” format. File Format 20071201 Session St 2010/8/11 19:03:39 +09 time_ms 0 0.05 0.1 0.15 0.2 0.25 0.3 0.35 0.4 0.45 0.5 0.55 0.6 0.65 0.7 0.75 0.8 0.85 0.9 0.95 ch1_mV 0.000488 0.000977 0.000488 0.001465 0.002441 0.001953 0.001465 0.001465 0.001953 0.001953 0.002441 0.001465 0.000977 0 0.000488 0.001465 0.001953 0.001465 0.000977 -0.00146 ch2_mV -0.00049 -0.00293 -0.00391 -0.00342 -0.00342 -0.00195 -0.00146 -0.00146 -0.00244 -0.00195 -0.00195 -0.00195 -0.00293 -0.00391 -0.00391 -0.00293 -0.00342 -0.00342 -0.00293 -0.00195 ch3_mV -0.02002 -0.01953 -0.01807 -0.01465 -0.00879 -0.00439 -0.00146 0.000977 0.001465 0.002441 0.000488 0.002441 0.002441 0.002441 0.001465 0.000977 0.001465 0.00293 0.005859 0.005859 ch4_mV -0.00244 -0.00244 -0.00439 -0.00537 -0.00439 -0.00293 -0.00195 -0.00146 -0.00098 -0.00049 0.001465 -0.00049 -0.00195 -0.00244 -0.00293 -0.00195 -0.00098 -0.00146 -0.00195 -0.00244 ch5_mV -0.00049 0.000977 -0.00049 -0.00146 -0.00244 0 0.001953 0.000977 -0.00146 -0.00293 -0.00391 -0.00439 -0.00391 -0.00391 -0.00293 -0.00049 0.000977 0.000977 0.000488 -0.00049 ch6_mV -0.00098 0 0.000977 0.000488 0.001465 0.00293 0.00293 0.002441 0.001465 0.000977 0 0 0 0 -0.00098 -0.00244 -0.00537 -0.00537 -0.00537 -0.00439 Fig.3-3.33. Example of raw data exported as ASCII displayed in Excel. Mobius Tutorial: Cahper 3 - Spike Sorter 79 3-3. Replay and analysis of acquired data 2. Save extracted spikes and time stamps The [Save Spikes] module is used. 1) Time stamps only, or 2) Time Stamps and waveforms of all extracted spikes (shown with dot line at the [Display Spike Measure] chart) are saved as a “CSV” formatted text file. • In the “Spike_sorting(_filter) “ workflow template, the [Save Spikes] modules is under [Cluster Spikes]. The time stamp and spike waveforms will have cluster IDs in the saved file. • The Centroids MUST be frozen for the data saved correctly. File Form 20071201 Session 2010/8/11 19:03:39 +09:00 Trace Du 10252 channel time_of_day 1 1 1 2 2 3 3 5 5 5 6 6 6 6 6 7 9 9 9 9 9 19:03:39.221 19:03:39.271 19:03:39.344 19:03:39.19 19:03:39.282 19:03:39.021 19:03:39.292 19:03:39.177 19:03:39.217 19:03:39.351 19:03:39.461 19:03:39.468 19:03:39.472 19:03:39.485 19:03:39.492 19:03:39.437 19:03:39.006 19:03:39.011 19:03:39.056 19:03:39.073 19:03:39.113 within_se within_trac within_session_ti ssion_tim e_time_ms me e_ms 0d:00:00:00.221 221.4 221.4 0d:00:00:00.271 271.25 271.25 0d:00:00:00.344 344.55 344.55 0d:00:00:00.19 190.85 190.85 0d:00:00:00.282 282.2 282.2 0d:00:00:00.021 21.3 21.3 0d:00:00:00.292 292.05 292.05 0d:00:00:00.177 177.35 177.35 0d:00:00:00.217 217.35 217.35 0d:00:00:00.351 351 351 0d:00:00:00.461 461.75 461.75 0d:00:00:00.468 468.9 468.9 0d:00:00:00.472 472.9 472.9 0d:00:00:00.485 485.8 485.8 0d:00:00:00.492 492.85 492.85 0d:00:00:00.437 437.75 437.75 0d:00:00:00.006 6.6 6.6 0d:00:00:00.011 11.85 11.85 0d:00:00:00.056 56.6 56.6 0d:00:00:00.073 73.85 73.85 0d:00:00:00.113 113.65 113.65 cluster trace pre_ post_ y0_mV _id _num ms ms 1 1 1 1 1 1 1 1 1 1 none 1 none 1 1 1 1 1 2 2 1 1 1 1 1 1 1 1 1 1 1 1 1 1 1 1 1 1 1 1 1 1 1 1 1 1 1 1 1 1 1 1 1 1 1 1 1 1 1 1 1 1 1 2.5 2.5 2.5 2.5 2.5 2.5 2.5 2.5 2.5 2.5 2.5 2.5 2.5 2.5 2.5 2.5 2.5 2.5 2.5 2.5 2.5 0.00913 0.006259 0.002066 0.003162 -0.00199 0.002024 -0.0154 0.005864 0.002684 0.00163 0.001753 0.004138 -0.00232 0.004636 -0.00255 0.003172 0.005892 -0.00646 0.003823 -0.00664 -0.00189 y1_mV 0.00948 0.005788 0.002188 0.003685 -0.00099 0.002668 -0.01643 0.006522 0.003227 0.002463 0.001386 0.005201 -0.00321 0.004055 -0.00276 0.001977 0.004139 -0.00638 0.00482 -0.00679 -0.00076 Fig.3-3.34. Example of Time Stamps and Waveforms saved as a “CSV” file displayed in Excel. Each Time Stamp and Waveform has cluster ID. 3. Save Centroids The [Cluster Spikes] module is used. The centroid waveforms (shown with solid line at the [Display Spike Measure] chart) are saved as a “CSV” formatted text file. • 80 The Centroids MUST be frozen for the data saved correctly. Mobius Tutorial: Cahper 3 - Spike Sorter 3-3. Replay and analysis of acquired data 4. Save the spike frequency data The [Save Spike Freqs] module is used. The spike frequency data is saved as a “CSV” formatted text file. • In the “Spike_sorting(_filter)” workflow template, [Compute Spike Freqs] module is under [Cluster Spikes] module. The spike frequency chart for spikes with cluster ID (C1, C2) will be saved. • The Centroids MUST be frozen for the data saved correctly. CHANNEL #Centroids Centroid sign ms 0 0.05 0.1 0.15 0.2 0.25 0.3 0.35 0.4 0.45 0.5 0.55 0.6 0.65 0.7 0.75 0.8 0.85 0.9 0.95 1 1.05 1.1 1.15 1.2 1.25 1.3 1.35 1 2 1 -1 File Format 20071201 Session St 2003/12/15 18:13:29 +09 time_secs phase mV 0.0017 0.0051 0.0057 0.0064 0.0071 0.0077 0.0081 0.0083 0.0085 0.0087 0.0085 0.0075 0.0053 0.0017 -0.0031 -0.0088 -0.0151 -0.0215 -0.0272 -0.0313 -0.0332 -0.0331 -0.0311 -0.0279 -0.0239 -0.0198 -0.0157 -0.0116 1 Baseline 2 3 4 5 6 7 8 9 10 11 ch5 NC ch5 C1 0 0 0 0 0 0 0 0 0 0 0 ch5 C2 6 13 1 17 2 9 4 11 3 9 7 ch5 C3 1 0 0 0 0 1 0 1 0 0 0 1 2 0 2 0 3 0 1 0 5 0 Fig.3-3.35. Left: Example of the centroids saved as a “CSV” file displayed in Excel. Right: Example of the spike frequency data saved as a “CSV” file displayed in Excel. Centroids for channel 5 are saved. Mobius Tutorial: Cahper 3 - Spike Sorter 81 3-3. Replay and analysis of acquired data 82 Mobius Tutorial: Cahper 3 - Spike Sorter