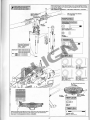
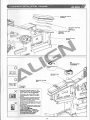
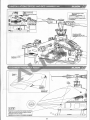
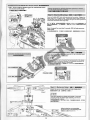
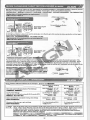
1
f'
L\LI~N
7iiifiV2
TREX
INSTIUCTIIN MINUll
•••••
KX018E12T
Compact
1
INTRODUCTION
ftOg
1-2
3
EQUIPMENT
REQUIRED FOR ASSEMBLY
I3t1U!!:flL
PACKAGE ILLUSTRATION
3 m~~~
4
SAFETY CHECK BEFORE FLYING
mBlrtI~~lfHi
5-17 ASSEMBLY
m~~~
SECTION
18
EQUIPMENT
§JftNfiiIi!BI!l
INSTALLATION
19
.It!l~~7.jUilill
BATTERY INSTALLATION
ILLUSTRATION
INSTALLATION FOR ESC AND BEC
MIiUfJlll!PBEC~~
20
20
.lm.il~~
21
.7~.m.Ii!Bliilm
22
filI~UWEJiI~
CANOPY ASSEMBLY
ELECTRIC EQUIPMENT
ILLUSTRATION
SERVO SETTING AND ADJUSTMENT
~.--
FOR GYRO AND TAIL NEUTRAL SETIING
22 ADJUSTMENTS
I\'em~.cp:ITmlil~
23
24 - 32
PITCH AND THROTTLE SETTING
±~~~WE
3GX FLYBARLESS FL760 MANUAL
MlfH~~~
RCM-BL700MX 510KV POWER COLLOCATION REFERENCE
33
~~
34
6A EXTERNALBEC INSTRUCTION MANUAL
6A 9I-IDtBEC9~
35-36
36-38
3GX FtYBARlESS PREFLIGHT CHECK
IRfi~~
FLIGHT ADJUSTMENT AND SETTING
mBIiJmi'l~
39
3GX FLYBARLESS FLIGHT TEST PROCEDURE
39
m~
Thank you for buying ALIGN products. The T-REX 700E V2 3GX
is the latest technology in Rotary RC models. Please read this manual
carefully before assembling and flying the new
mffir"""~
T-REX 700E V2 3GX helicopter. We recommend that you
SETUP EXAMPLES
keep this manual for future reference regarding tuning and maintenance.
40
TROU BLESHOOTING
~~~~mffl~~~~~~*~~~'~~~.oB~~~mW2m©~~
41
Q&A
mB¢;~
~~
fi.~~~~~m~n~.~~·~~*
••~a~~~~~~
••®~~o
aOO~~~2m'~~©W~~m~~,~~-~.~m.~*ffi~~~M~
,@~.~.*~~~m~~·~~~B
••
~o
Thank you for buying ALIGN Products. The T-REX 700E V2 3GX Helicopter is designed as an easy to use, full featured Helicopter
R/C model capable of all forms of rotary flight. Please read the manual carefully before assembling the model, and follow all
precautions and recommendations located within the manual. Be sure to retain the manual for future reference, routine
maintenance, and tuning.
The T-REX 700E V2 3GX is a new product developed by ALIGN. It provides flying stability for beginners, full aerobatic capability
for advanced fliers, and unsurpassed reliability for customer support.
~~mB~.s:2:j;Q~aa
' ~]"~1mg~1.J~ffil~mT-REX
700EV23GX
@:~lI!' ~1m*~ffillm.~~~~~~2~~j!Hj!\§l&J~)J.Q.1li'j:~~@:~lI!'ioJ~
m1m'Zi~ffil~G~~~~. ' i'j:~E3~liD~~P...l.&*i~ffil$~
0
T-REX
7iJOE
V23GX~E!3s:2:j;Q§DliIf~ffil~lfaa'
l'~im~~>JU~DiI:lEttffilm~i3'~~~*ttl3llffilmD~t!HI', T-REX700EV23GX~~ffllii€Effil~1I
0
WARNING LABEL LEGEND .=fe~lii.
Mishandling
due to failure to follow these instructions
may result in damage or injury.
~.~.~~~~~~'~~mm~~I3ll.~Mlf~~~M~~~o
Mishandling
due to failure to follow these instructions
~.~.~~1l~~~'~~mm~~
••
may result in danger.
~~~o
Do not attempt under any circumstances.
ffff@.~ffil~.~'~~~
IMPORTANT NOTES
R/C helicopters,
•• ~o
m~.~
including the T-REX 700E V2 3GX are not toys.
T-REX700EV23GXl!~@:~lI!ML~FJjj;Jlil
','B~*53]"8'f~~f>'I lfaa,f:iJfal!:~:±l*ffili*OOmaa'
mP...l.imaaffil~ml'~~l'~~W~I3ll~.~~mil~~~
~C'~m2W~~@*~~~~~'[email protected]~~§~~~o
)t~ I ff@l!~@:~.frn~m ' $ll.imlO~Jlim~mUnf!lfm,mi3'~~i!j:~mffil~f6~m~!\§l&1'~J5fT~!±.2~91-~i3:@.ff
' ~~aa~~ft!iK6~1l
i'j:~~~i.fHfll!l\li!.ffil.6tA ,sre~:t€l~J5Zw.r~A m·.~.~tt!l3$l!~mD$mD ' P...l.fii~~~imiil:~.l'j:~m ~aa~:±l~~i}QJ~l'~i3:
@~i'j:fO~m~ltiIJJ::ffil£E.@tt.~~@:.ff
.
0
Fly only in safe areas, away from other people. Do not operate R/C aircraft within the vicinity of homes or crowds of
people. R/C aircraft are prone to accidents, failures, and crashes due to a variety of reasons including, lack of
maintenance, pilot error, and radio interference. Pilots are responsible fortheir actions and damage or injury
occurring during the operation or as of a result of R/C aircraft models.
l!~~~mll!'@:~lI!~.~~ttimaa,mD~~@m~A.'A~!\§l&l'~~.~.~'~~~~.~l'm'P...l.&.~kffill'~~'W~~I3ll~
.mD~~~~.1'~~~ffil~91-,~mDi3'~@~~mD~~'ML~]"M§~~.m.~ff@~91-2.ffo
1
M
LOCATE
AN APPROPRIATE
LOCATION
••
IItBJ.V.~
RlC helicopters fly at high speed, thus posing a certain degree of potential danger. Choose a
legal flying eld consisting of flat, smooth ground without obstacles.
Do not fty ear buildings, high voltage cables, or trees to ensure the safety of yourself, others
and your odel,
For the
reducing
darkness.
ractice, please choose a legal flying field and can use a training skid to fly for
damage. Do not fly your model in inclement weather, such as rain, wind, snow or
~~eae~~~-~~~M·ffiW~~~tt~Bm~·~~~mm~ffiW~~~·~~~~~~$m~8$
~~lR~;;~
~,~~~~~:gA'~.'
~~WJ' ~~~~,
lm;j'<;~~·
i!¥~~r:1!~1'~i'i!jJi.xElc.WflBAM~triJmJi
0
m~~~~·~ ~E~~8$$.mn~~~~~Fc~~~~~~mn·~wmn~~m~~~m~~~
~~B!l~~'
~~-m
'nm~lii\i§l57i::i~--r::~fF
. ~lii~~§}'&'l1l!!~~~
PREVENT
MOISTURE
0
i1liUiBl;iJi
RlC mo e. are composed of many precision electrical components.
It is critical
eep the model and associated equipment away from moisture and other
contaminants. The introduction or exposure to water or moisture in any form can cause the
ction resulting in loss of use, or a crash. Do not operate or expose to rain or
model to
moisture.
~~e
5.~=~~~&triJ~7-~~iH.§~·
,6JT~~,~j':@W~I\lJ.Lt)ijjJiIm~*j\
. i!¥~m§~~~7i::[email protected]:ffl
. I\lJlt;ij(~="1!~P351llffi!IJ~lIi!1='&'fl7-~i!I=c&llllffi51~1'qrmJlll~s9j.
I
Please use e replacement of parts on the manual to ensure the safety of instructor .
This prod ct i for RlC model, so do not use for other purpose.
~~Elfi~l§:::=·
~lii~ ~§~~
Operate'
may cause
tt ~7tiiRiJl(~~ME~' [email protected]:ffl~2Jo~55§~CP~~i!j:
. Wi
.F·[email protected]:ffl·~~ffl~~~'$~9j.K8~$ffl
within your ability. Do not fly under tired condition and improper operation
~~§a.~~
~qr§g~~.
.-~mmm~~~~~~~nll·~~~.'~~1'~~1'~~~·s9j.~~mm
AYS BE AWARE
OF THE ROTATING
BLADES
mu.CIJ*~
'on of the helicopter, the main rotor and tail rotor will be spinning at a
s eed, The blades are capable of inflicting serious bodily injury and damage
e
Be conscious of your actions, and careful to keep your face, eyes,
clothing away from the blades. Always fly the model a safe distance
from yOUI'5e
others, as well as surrounding objects. Never take your eyes off the
modelo
sa _ '. u attended while it is turned on. Immediately turn off the model and
transrni
e you have landed the model.
C
~~~1J!~¥~~1I~l5~
. tJJ~Mi~~~.iH~WJi!j: . ~i!¥~~~Bm.&.m1!
AWAY FROM HEAT
0
iI.~i1!.
de of various forms of plastic. Plastic is very susceptible to damage or
extreme heat and cold climate. Make sure not to store the model near
s ch as an oven, or heater. It is best to store the model indoors, in a
e-<:=tro,=ed,
oom temperature environment.
~~lRft~=~ ~·E~~~0m'C7-~55~~~~m·~~~~.~.~~'8.·~i!¥~~~~lffi
~~€i~~~~?:~~.
2
T
~~;;''1
~._--.•..
.
RADIO TRANSMITTER
AND ELECTRONIC
EQUIPMENT
REQUIRED
E!iI~~&~-T!!:ii
FOR ASSEMBLY
or
lit
Transmitter
(7-channel or more,helicopter
~~(tllJ~J:~ml.itll§)
Receiver(7-channel or more)
mJ&'HtllJ~J:)
system)
22.2V 65 4500-5200mAh
Li-Po Battery x 2pcs
22.2v 6S 4500-5200mAh Li-pci.)tjj x 2
Remote receiver
1fIj~.
Dial Pitch Gauge x 1pc
nit.~!1m x1
Li-Po Battery Charger
Li-Po~)tjj3i'i~H
ADDITIONAL
TOOLS REQUIRED
FOR ASSEMBLY
EiGa:a
Scissors
Needle Nose Pliers
)glJ
~lfIljitl
Philips Screw Driver
+~~~m:r
¢>
3.01 ¢> 1.8mm
RCM-BL700MX Motor x 1
x1
DS610 Digital Servo x 3
RCM-BL700MX!IIUillJ,~jt
700FLT5
Aluminum Tail Boom x 1
j8i3~~~ x 1
3K Carbon Fiber Tail Boom x 1
3K~.~~x1
DS61 OJ)(ULfi'iJij~~x 3
DS650 Digital Servo x 1
DS650J)(ULfi'iJij~~ x 1
Castle ICE HV 120 ESC x 1
Castle ICE HV120 1l\!i.li!U~i:!K~
x 1
6A External BEe w/S.1V Two·way
step-down voltage regulator x 1
6A9H8j\BEC(g5 .1IiOJlIi!!~) x 1
Servo extension cable x2
iciImiHi&~~x2
Canopy
l!~.Il
700EFLZ
700HB1
700NT2
700HG
700FLH
700HB2
700HB3
700HB4
700HB5
700HT1
3GX Flybarless System
3GX!lIPJZ~
3
IUMIJe
,
gg
~
5.SAFETY CHECK]BEF_ORE~'E~MING'mamJ~~~~m
,
,L\UIC:N ~..
m~BmBmrZttt~IU!
CAREFULLY INSPECT BEFORE REAL FLIGHT ••
*Before ftying, please check to make sure no one else is operating on the same frequency for the safety.
*Before Hig
please check if the batteries of transmitter and receiver are enough for the flight.
*Before turn on the transmitter, please check if the throttle stick is in the lowest position. IDLE switch is OFF.
*When turn off the unit, please follow the power on/off procedure. Power ON- Please turn on the transmitter first, and then turn on
receiver. Power OFF- Please turn off the receiver first and then turn off the transmitter. Improper procedure may cause out of
control, so please to have this correct habit.
*Before operation, check every movement is smooth and directions are correct. Carefully inspect servos for interference and
broken gear.
*Check for missing or loose screws and nuts. See if there is any cracked and incomplete assembly of parts. Carefully check main
rotor blades and rotor holders. Broken and premature failures of parts possibly cause resulting in a dangerous situation.
*Check a ball links to avoid excess play and replace as needed. Failure to do so will result in poor flight stability.
*Check if e battery and power plug are fastened. Vibration and violent flight may cause the plug loose and result out of control.
*.~RE-~~~~MRffl~~.~~.~~@A·~~~b§§N@A~~~·
*.~R5~~E~~~~Nm~~~~~~.~tt~~mB~~~·
HU!§Y~~E~~~~~fi1tHljg;15
. :@*~~~Im . :@~~Im(IDLE)~~~lml?JJirr~·
*~ft~
~g~~~Im~~~~·~~~~~~~~~~~·~~~m~~~~:Im~~~~lml?JJm~~~·~~I?JJ~~~m~·
~~~~~~~~~~~~~~~m~·~~§§N@A@~~·~.~~~~~~·
*~~~7&~~~~ft~ei[QIi1Ji'F~~)Ill~
• &D[qJ~~~~
. llt!~~{qJ~~~~i1Ji'F~~~~;W~fj~~'Ift~
.
Rfflm~~~:~~~~~~~~~~~·
*mB§y~~&~il;':l>-5iU~.m~iIm~NiIm~~ . ~~~~n\§~Ho/i;m~m~~~i4-
. i3KffiW~±l!!EJ!H~i§1§~1!.. W8 •••
&~~
m1!.~~~A~~~~~~~~~mB·~~~~~~~~~~~·~~;.~mB®~~~~~'~
~~:~~5~~~~~·
*~~M~: ~~~~~~~.m~m~ ·lIU~@lI~jjj:j~~~~·
~li!U~~~i§[~~jjft,
~~ffiNe;ll!
*~~~j@'&~~§~~~I?jJ:@~~.mBcp@!lan~j~l}i,~@mB'
~ml~~~ilifK.miffi~
0
E&~~.
700HB7
M1Slantthread main
drive gearset
M1!'i1~ii~m
700HB4
700HC1
'i1!t?i0
2W~
700FLT5
Aluminum Tail Boom x 1
3K Carbon Fiber Tail Boom x 1
&S3~iH~~X1
700NT2
M4x4 Set Screw x2
IMx4 JJ:lll** x2
Motor Slant Thread
Pinion Gear 12T x1
~iUi12Tx1
700EFLZ
3K~.~~X1
690 3G Carbon Fiber Blades x 1set
690 3GDU. x HE!
DS610
~~
Digital Servox 3
~
DS610I'J:llijqJ!lil~x3
Castle ICE HV
3GX
CNC
Flybarless System Metalservo homX3 DS650 Digital Servo x 1 120 ESC x 1
CastleICEHV120 !!Umillx 1
3Gxlft!l¥lIi.~~
CNCIiZ.jqJ!lil~mh x 3 DS650J:{lli<ili~x 1
When you see e marks as below, please use glue or
grease to ensure ftying safety.
~~~~~~~~W·~~3L~~L~·~~~Rm2~~M·
,
700FLH6
CA : Apply CA Glue to fix.
AB : Apply AB Glue to fix.
R48 : Apply Anaerobics Retainer to fix.
43 : Apply Thread Lock to fix.
01 : Add Grease.
..
bJ
6AExternaIBECw/5.1V
Two·wayStep-down
voltage regulator
6A\'ImABEC(g5.11J'j~B!i!!1
~
Grease
R48
G
~m~e
G
r;~n
Blue
g~
Self·furnished
IIilIl!lIll(§Iii)
Self·furnlshed
ABIIlI<§lIIi)
T43 Glue width, approx. 1mm
T43..t1l!!JJim:~lnrn
~.:Wl3~r.\l~I?jJ:@
R48 metal tubular adhesive (eg. Bearings). T43 thread lock. apply
~:~AB~I?jJ:@
~.~:~3lZII!i~~I?jJ:@iIi/(.~I?jJ:@
a small amount on screws or metal parts and wipe surplus off.
-~:~m~~
=-:D~~~
When asse
fi g ball links, make sure the "A"
character faces outside.
e~~~F$?
~
. A~~Mi.l9l-·
When disassembling, recommend to heat the metal joint about 15
Seconds. (NOTE ; Keep plastic parts away from heat.)
R48 ff.l,5!IlJJ!iZ.~~(lZDfIlI~)m~j!jIj· T43ff.1,~~~· ~3.~~!iZ.~9l-1!l!alU~ill\\
':l>-_Rffl
.ill\\~~~fflgo~~~~~
•. W\m:ffiJ~~~!iZ.mglSlllli~~nro15fi»
•
()±~
4
I ~~iU¥Si'J~j[[~~)
r
•
6.ASSEMBLY SEClilON
..L\1..JGN
~~IJF.I!
4!
[ 700FLH71
Thrust bearing
ltJ(U!;iJt( $10.2)($ 18x5.5mm) x 2
©D
Thrust bearing and washer for
radial bearing are wear items,
and thus should be inspected for
replacement after evelfY 20 flights.
For flights with high heads peed;
the inspection interval should
be reduced to ensure flight safety.
rr~m~&.mm~.~~ff~~~'
}lile2~J:EJlIlW~&jl!~
,
iii±~K.~mfi~·
~~~J:EJlIl~~2~~,~~~mfi~~·
]ffi~
(OUT)
Smaller ID
P31!UJW'
c)
(IN)
larger ID
P3l!l!~;*::
::rhrust bearing .Ltll.m:oo
Bearing
fiBjJ!:( $10x $ 19x5mm)
Apply grease on thrust bearing.
=~~~~~~;;;~
.LtllQl~.t:l!!l)l!tllll
f.
Metal main rotor holder
lir.;t:llli!M~1lIii
x4
Bearing
fIB;iJt
$10x$19x5mm
©
Spindle bearing spacer
IlQl.LtljUi¥Q]( $10x$16x1mm) x 2
Thrust bearing
.LtllQl;iJt
<l>10.2x$18x5.5mm
Socket collar screw
IlllliIIP3JVi'iJQlUAI1\(M3x6mm)X4
[70'OFLH7AI
@
~
Linkage ball B(M3x4)
J)J1lii'iB(M3x4)($ 5x10.5mm)x2
,
Applya little amount of T43 thread
lock when fixing a metal part.
IRAI1\IlIl!ltt::~.i't~G!:J'fl~.T
43 (IRAI1\fI!J)
Linkage ball B(M3x4)
J)J1lii'iB
(f0i3x4) (<I>
5xlO. 5nJn)
©
Collar screw
llQlillllXIRAI1\(M6x16mm)x 2
(Q)[J
Damper rubber
IlQlIlI!il(!Hl)
<I>
9.9x <I>
17x7mm
Feathering shaft sleeve
llQl~m( $ 10.2x$ 17x21mm) x 2
oD
Damper rubber
llQlIlI!il( $ 9.9x <I>
17x7mm) x 2
Feathering shaft
IlQl
<I>
7x $10x106.5mm
.~.
I &Dd]@[f;JJ
~i~~n
the top
Collar screw
IilQlQlgIRAI1\
M6x16mm
I
5
700FLH7
Washer
Socket screw
.~
$ 3x $ 4.8xO.3mm
.mf';J~~~~
M3x16mm
Collar
JIlI!UlIJ};lIl!g
$3x$4.8x1.5mm
Bearing
~'3x.-
@
Socket
Rlit~
)x4
-=lJ2l<5mm)
x
4
@
Linkage ball B{M3x4) 1
Metal washout control arm
iiZ.t!l!ffilJ~
Socket
~J~~~~~6mm)x2
lllt$B(M3x4)
$5x12mm
L.
r:
700 F L H 4
========-.
@
@
I
~
Linkageball B(M3x4)
QB(M3x4)( $ 5x12mm)x 5
WasheT
;;;qj(¢3x,,~.=..3Iml)x
2
©
Collar
JIl~le~~
0
3x¢4.8x1.5mm)
x2
[--
·1 700FLH7A
@
Socket sere
lI!I$pgl'"
@
1
700FLH7A
1
Imun)x 1
0
Socket screw
@
Head stopper
l~U!l$lIIJI1Jll§
)x2
1I!I$f';J/""
[I
©J
M4Nut
M4~x'
Linkage ball B{M3x4)
Linkage rod{A)
Approx. 83.Smm x 2
llltm;B(M3x4)
$5x12mm
Socket collar screw
65mm
II!lmf';J~~*lIX~~
M4x24mm
50.5mm
im~(A)tI983.5mm x 2
..•
Main shaft
~*lI
$ 8x $ 12x205.5mm
••••
'il
F
o
6
3G Flybarless system
uses 700FL Main shaft.
Standard Flybar
system uses 700 Main
shaft.
3GJ!i\:qzIiJU{.J!t~1!l700FL~fIlI
'ij:qzIi.1iiJ!t~I!l~l\HOO~fIlI
~
I
1700HB3A
@
I
Frame mounting
tI§~~lli
~
0-
@
block
I
700HZ7
Motor
~1I
Socket screw
lliillF'lAA!II!I~(M4x1 Omm)x 4
Socket button head screw
*lIiillF'lAA!II!I~(M3x6mm) x 4
@
Motor mount
~1I~~~
~
M4Washer
M4lJQJ( $4x4> 10x1 mm) x 4
@
III
M4 Setscrew
M4.ttM~(M4x4mm)
x2
Lt.
CAUTI
Make sure the motor mount
is fully fasterned before fastern
the motor pinion gear mount.
Socket button head screw
*DF'lI~~
M3x6mm
)t;!Ufil!gjjE!I!U~jEil' ~:M
U8!1!1l!1'
I
Motor slant Thr
/.l§iUl&1ii
12T
1700HB9A I
I
700HB3
M4 Set screw
M4Jl:~!II!I**
M4x4mm
@
(pm>
~
Socket button head self tapping
screw
*lIiillF'l,.ft.!§lJI:!II!Imn(T2.6x6mm) x 2
Bearing
t!B;i}I:(
$ 12X$24x6mm) x 2
Bearing
tIB;i}I:(
$ 6x 4>12x4mm) x 1
@
@ ~
Socket button head screw
*lIIIiillF'lM.~(M3x6mm)
x4
Socket button head collar screw
*1Ill!iF'l1\ji',jtIBg!ll!l~(M3x8mm) x 8
Socket button head collar screw
*lIiillF'lAAtlBX!II!I~
M3x8mm
Socket button head
screw
*lllliillF'llv:tlU
M3x6mm
Main shaft block
;l:t!B~):E~
Bearing
tIB;i}I:
$ 12x$24x6mm
Bearing
t!B;i}I:
$5x$9x3mm
Main frames(L)
@J1ii1~t1!Ii&m.
2mm Rear canopy
mounting bolt
~tliill~~):Ett
6x31mm
Socket button
head collar screw
*fIlIiillp;j,.ft.!tlBX!II!I~
M3x8mm
Socket button head
screw
*llliilI~
M3x6mm
<.
Socket button head
self tapping screw
*DF'lIv:tl§~
T2.6x6mm
.•...
..•..
".
".
,
Socket collar screw
lI!I1iillF'l1\ji',jtIBX!II!Imn
M3x6mm
Apply a little amount of T43thread
lock when fixing a metal part.
IUll!~l1i.¥Fil!ili2mil.T 43<IIl1!IIJ)
7
+-
Main frame assembly key point:
Main shaft
,Hill
First do not fully tighten the screws of main frames
and put two bearings through the main shaft to check
Press two main frames equally .
.lj!~'fl!lfjtl!l'iN'f~
if the movements are smooth. The bottom bracket
must be firmly touched the level table top(glass surface) :
please keep the smooth movements on main shaft and
level bottom bracket, then slowly tighten the screws.
This assembly can help for the power and flight performance.
lIMH~~iF~~!:i
:
~~~ ~A~~~~·mA±~~g=~~~~~L~~~
~\m~~ =~~~®~fiJl~7J<.qz~iEii
(r8nll'i.qziEii)i'Hi~~,~.o
:~
~m±~~~~~~.qzrr~iEii~m~~~.~·k~~~~m
!Ji!i£<j~JJ~aEfi:§g~IHf~!l1J
Glass surface
~90.
c
I
IrOOHG1A
O····U
@
Socket screw
1!iliii'iP'lJ<=
!3x1Orrrn) x 4
@
1
[:i'OOHB9A
Main frame
l8I~.lj!iE!f
±~tl~'iN
90·
...L..~~..!ii!:!....----L_
I
,
Apply a little amount of T4.3thread
lock when fixing a metal part.
.~I!IIM~i'ii.f.tii!l~mlUT43(i'1~IIJ)
@
Socket collar screw
l!IilIiP'l7\~~K~i\\i(M3x6mm)
@
x2
01110111180111
Socket button head self tapping screw
*-l!!lilliP'l7\~§J&IlI\i\\i(T3x8mm) x 1
@
()nm>
Socket screw
1liii'iP'l7\~IlI\i\\i(M3x14mm)x 2
M3 Washer
M3ijfQJ($3x¢
)x4
@
M3 Set screw
M3Jt)ll!U(M3x
• )x4
Socket button head
self tapping screw
~..5-':J!l£
T3x8mm
Receiver
ml&~~
mount
Socket button head
self tapping screw
!¥EP'l1VE..5-~
T3x12mm
Hex mounting bolt
7\~lII~~a
<f>
2.5x60.5mm
M3 Set screw
M3Jt)ll!~i\\i
M3x4mm
,
i
\)
Skid pipe end cap
1IIl~~~*~K
Socket screw
1!iliii'iP'l7\~IlI\i\\i
M3x10mm
Skid pipe
1Iil~~~
<f>9x325mm
Battery re eas~ latch
installatio
ustration
~il!l~'
Landing
1Iil~!Il1!I
8
mJJ
skid nut
To avoid crimping the elevator
servo wire, position the servo
so that wire exit is at the side
with the deeper hole in the
servo mounting cage.
700HZ5
@
0-
~iH~ltift~ , §!i~~3IJiI!tfjI!D
!<J~1t~~ltift~!!!iYUIID~-im '
'iI!f~~~~3IJi••
Linkage ball C(M2x4)
lil1iJiC(M2x4)( ~ 5x9mm) x 4
@
Apply
a little amountof T43thread
lock whenfixing a metal part.
••• ~i1i.fi!:.{fmll.T 43(II~.)
a,mumw
D
Socket button head self
tapping screw
*lIiJiflg"J'j
§J&II~(T2.6x12mm)
x 12
@
Elevator servo mount
1t1l!i{qj!il~~
M2 Nut
M211!a x 4
DS610 Servo
DS610i<il!il~
3K CF servo plate
3Kili.{qj!il~!!J=i
Socket button head
selftapping screw
*1IIjj'jP3i\~§J&.~
T2.6x12mm
M2 Nut
M2111i
Socket button headself tapping screw
*1II1!i'iP3,,~§M~
3K CF servo plate
3KI;li1.{qj!il~!!J=i
T2.6x12mm
F servo horns :
Compatible with Align
DS6xx series and Futaba
servos.
F{qj!il~Il8J'jJ=i'
illll~S2;oDS6i'1i91J{qj!Iil~J.2.Futaba
jqI!il~o
DS610 Digital Servo'
1.1520,u s standard band 11520,u s ][!llii'liM
2.Stall torque/iIQt:J:jlH1J
' 9.6kg.cm(4.8V)
12.0kg.cm(6.0V)
3.Motion speed/llJfFiil!r '0.10sec/600(4.8V)
0.08secI600(600V)
4.Dimension/R1t ' 40.3 x 20.1 x 36mm
5.Weight/ •• '52.2g
9
I
700HZ5
Recommend sanding the marked position as below illustration with a
waterproof abrasive paper(#800-1 000) to avoid the wires of electric parts
to be cut.
lIii11~l'.~jjU\,ijj;O!&·iieffl#800-10007j(WI1Im~
• llflllJ.ll:.-:frol:tflillltRlBlglJiIll·
@
Linkage ban C(M2x4)
"=
)x3
Waterproof
7j(WKfi
l)J(~C(M2x~
@
abrasive paper
(l1lll/mUUD
Socket b
on head self
tapping sere
!¥lIIfllil'ir=:g::;-
2.6x12mm) x 12
d
@
M2 Nut
M2.",
x3
1700HB3A]
@
Socket b
'" CAUTION
L.L:>
)± ~
on head-collar screw
!¥1!Il!t"'jlv:"~M3x8mm)
x4
Make sure the motor mount
is fully fasterned before fastern
the motor pinion gear mount.
$t~lijj@JIE!UIJll~lEi .
iIi~lijjj!U1Jll'
Motor
!l§il
Socket button head collar screw
!¥I!I~p;j1\FJfJlgRKI1\
~3x8mm
Linkage ball C
(M2x4)
WlIC(M2x4)
q,5x9mm
3KCF
servo plate
3KliiiilljOl!!l&%!!Fi
Socket button
head self tapping screw
$ntii'lp;jM~1\il
T2.6x12mm
05650 Digital Servo'
1.1520.u s standard band 11520.u s ltllili'iil\JC
2.Stall torquelli:!l!!l1J ,4.0kg.cm(4.8V)
5.0kg.cm(6.0V)
3.Motion speecllJJrF~lit ,O.058sec/60'(4.8V)
0.048sec/60· (6.0V)
4.Dimension/R1t ,40.3 x 20.1 x 36mm
5.Weight1~
, 56g
Servo extension cable
~IHN~tR
\
[Ill
I.
![J[]~~~~zrr=l
120mm-===:i
For extend the rudder servo singal cable.
~RB~IHil§~3!UlN~ffl
10
3G Flybarless system uses inner hole(A)
Flybar system uses outer hole(B)
3GlftPJZjliJU'tl\l't«Effl P931,(A)
~ 5JZjliK i'ii!ll«Effl91-31,(B)
,., '. Apply a little amountOfT43th..read
lock whenJixinga.metalpart.
• *'1\iIllifjf~~.¥t;m~l!ljUI43
~~IIJ)
[ 700HB3
[ 700HB3A j
o
0
Ujji:(<1>5x<1>9x3mm)x4
@
a-
@
UB(M3x4)(
Bearing
@
0Linkage ball C{M3x3.S)
QC(M3x3.5)(
@
x2
•
~
x2
CAUTION
•
Please fasten the elevator
ball link and screws all the
way in.
I __ ----t----r;~
rt~.JlW!1II&.IM\~Il~·
<1>
5x12mm) x 2
@ 0Socket screw
IlIil1f13M.NI(M3x8mm)
Socket button head screw
*IIIil1f131\ji';J.KI1\(M3x8mm)
x6
Linkage ball B(M3x4)
Socket button head screw
*II!111f13M.NI(M3x6mm)
<1>
5x8.5mm)
""
Ll.::> ~
@
x 1
~
Washer
@ ~ 01
@
•
O~
~QJ(<1>
3x <1>
5.5xO.3mm)
x2
Bearing
ftjji:( <1>
3x<1>7x3mm)
Washer
x2
.QJ( <1>
5x<1>7xO.2mm)
x2
M4Set screw
H4Jtl!ll.*'1I(M4x4mm)
D
(QJ
x 1
Washer
.QJ( <1>
5x<1>7xO.5mm)
m=n
Control shaft collar
JlIlJWIl:II(
<1>
5x<1>7.5x3mm)
©
Collar
0
rt~JlllJjnJ.U8
(<1>3x <1>
4.5x1.5mm)
x2
x2
Elevator ball link
Linkage rod{E)
Approx. 3Smm x 2
JI~(E)t035mm
x2
rt~.JlWIill
x2
700FLZ4j
o
e
Elevator ball link
Linkage rod{E)
JlW(E> <1>
1.96x10mm
3GFlybariess system uses inner hOle(A)
Flybar system uses outer hole(B)
3GJ!!lSjIIiM**1tiflll PHL(A}
~SjIIi.**1tifIll9nlAB}
rt~t!fJl~IilI
x2
Elevator arm
rt~rl'1tifJ.
Control shaft
lmilJ~
<1>4.7x<1>5x98mm
Washer spare for
gap adjustment.
IIIlIllU!l!lIll.QJ
Washer
$q]
<1>
5x <1>
7xO.5mm
W
.~Sheir
<1>
5x<1>7xO 2mm
Washer
1IIq]
<1>
3x <1>
5.5xO 3mm
Aileron lever
__
~6~~~.
~
Washer spare for
gap adjustment.
Il!IlIiU'lI!Ill~QJ
~-
-
Control shaft collar
i!1lJ~EII
<1>
5x <1>
7.5x3mm
Bearing
Ui.li:
<1>5x<1>9x3mm
Socket button head screw
*I!IIilIfI3M.fI
M3x6mm
Apply a little amountof T43thread
loc.kwhenfixing a metalpart.
• *-1IIl~jjl.j!j:!II~mUT43 (11*-11.)
11
1700FLZ4
1700FLZ4A]
]
@ (IJ
Aileron Control rod Carbon Fiber Shaft
~~(94x95.4x6.5mm)x8
@
Ball link
Aileron Control rod Carbon Fiber Tube
i.I~ili!lx8
~~
. 2.2x93.9x96mm) x 4
o
Linkage rod
i.I~ (f) .2:c1"
x4
-
Aileron Carbon Fiber Linkage Rod Set
Put on AB Glue
AB
L:ill[O~IiiII~.l:.AB~~
97.5mm
1:Mix thoroughly suitable amount of epoxy.
2:Apply generous amount of epoxy on the tips of carbon tube
after sliding over the linkage rod.(Suggest to use the AS glue
that hardened in 30 mins.)
(Note: for quick drying epoxy, work fast as it must be applied
priorto curing)
1 :iiEm~t~,M!'§~~8'iJiI!¥;mi3
2:~8~A~~8'iJ~m~ijjilffij~l:ABlP.I'(}tl\liiEffl30Bilu!1t;8'iJABlP.I')
($~:-E~ffi~~~ABlP.I'~J9!j~\~lP.I'~~il!J*Il.!&~IiX)
[]] =:>
·
V []]
3:Slide the carbon end caps on both sides of the carbon tube.
3a~~~&~B~.A~.~ijjilffij
.
4:Thread the ball links onto the linkage rod until
base length is 97.Smm.
4:~iI~liiH~A~~~~llef.m97.5mm8'iJU:Zri
V
~
••••••
Aileron Control rod Carbon Fiber Shaft
Tt~r2ffi1Ji.I~IiIl1.E
Aileron Control rod Carbon Fiber Tube
Tt~r2ffi1JiI~IiIl1.~
, ,
12
,
'.,
p
! ··100HTh~1
Bearing
Tail boom mount{R)
~~l§JiE~H5)
~jJ:
$Sx$13x4mm
@D
Bearing
~jJ:( $5x$13x4mm) x 2
M1 Front drive gear
assembly
M1~iWilJllJfiii~m
24T
Bearing
Hex mounting bolt
~jJ:( $12x$18x4mm)
x2
1\l'3Il!i<~f.E
<I>
2.Sx60.Smm
embling Umbrella Gear:
e note to push the gear
end at a fixed position,
sure the gears mesh
other smooth.
sJfi@ilUllEilJliEiEUI
• P..J.
Tail boom mount{L)
~~l§JiE~(a:)
m
o
Appiy.aJittieamountofT43 thread
loc~when:fixingametalpart. .
IIltiil!t~~.l'tIlm!m~.f43(g1t_)
•
700NT2
Socket button head screw
IIilllj;JAJ1\l'3.~(M3x6mm) x 4
@
Socket button h
Bearing
Bearing
Tail umbrella gear
*1I!Iliii"iiAJ1\l'3.~(M2
~jJ:(<I> 12x<I>18x4mm) x2
~jJ:($6x<l> 12x4mm)x 2
~iiJ!:j,nU'
<I>
12.
Torque tube drive tail unit
Control arm mounting bolt
~~~J~l§JlE~
~~j5~J!:jm
<I>
21.Sx <I>
27x46mm
4x18xl0mmx 1
".
6x14x20.Smm
Socket button head screw
*1eIiii"iiAJ1\l'3.~
·'.,M2.Sx6mm
Socket button head screw
lIIIi!lJ"Ji\I!lIl*'1l
M3x6mm
Collar
~j5J!:jmI!E
<I>12.4x$18x10mm
Bearing
~jJ:
$12X<l>18x4mm
Metal plate (R)
~l\lim:titltlj&
Socket button head screw
<I>
12x22.5x37mm
leliii"iiAJ1\l'3.~
Tail rotor shaft assembly
~llUSim
Socket screw
leliii"iiAJ1\l'3.~
M3x20mm
Metal plate (L)
Bearing
~jJ:
<I>6x<l>
12x4mm
·~l\lima:tltlj&
<I>
12x22.Sx37mm
13
[ 700NT2C1j
T2F
1700
[700N+2D1j
@ 0
@
Socket screw
Linkage ball C(M2x4)
Collar screw
·~'Y3x8mm)x2
l)Jtiii'lC(M2x4)($ 5x9mm) x 1
~g.l\1\(M2x8mm)(~~3mm)
@
iiliii'lil;i7\~~g.l\1\(M3x20mm)
~g.l\1\(M2x8mm)(~~4.3mm)
x1
Socket screw
iiliii'lil;i7\~.l\1\(M2xBmm) x 2
Washer
-c:.'
©
@ D
Collar A
3Killilllll!lli1EM
l!lil~iii'lliFrl8A( $ 2x $ 3x4mm) x 2
c-
Bearing
@
~:il!:( <f>
3x $ 7x3mm) x 2
Linkage ball A(M2x2.5)
)x2
l)Jtiii'lA(M2x2.S)($ 4.7Sx7.1Bmm) x 1
@
g[
Collar
1!lJ>!'1!iIJL~~If($ 3x $ S.2x9.Smm) x 1
Washer
6oml) x 2
00
©
M4Set scre«
Bearing
~:il!:( $ 8x $ 12x3.5mm) x 2
Tail pitch bell crank sleeve
M4~.~)x1
@
3K CF Tail blade
D
.Q]( $ 3x $ 4.BxO.3mm) x 2
@D
.Q]( <f> 3x .
x2
0-
@
©
Bearing
x2
®
~
Collar screw
01----0-1
Socket collar screw
~*(95xe
ill=-
®
0-
,.
.Apply a little...
a
...m..o.u
...nt ofT43 thread
... • lockwhen Jixing a metal part.
l!!!f;1\1I1W~~IIIjq:illfl!lnJ43
(fIIIU)
[I
Socket collar screw
iiliii'lil;ii\~~~-
~li1EM~1!iIJl)Jtiii'l~
($4.7x$ 7.6x6.2mm) x 1
-
Slide shaft
1!l~~gx1
x16mm) x 2
Q]
@)
M3 Nut
M311J~x2
~
~
CAUT!2N
tt.1i!.
I
Apply grease on thrust bearing.
lfuTo
Collar screw
~g.l\1\(~~4.3mm)
Collar A M2xBmm
l!lil~ili'iliFrlEA
$2x$3x4mm
Control link~
1!l~1!iIJiI~ili'i
T
'0
f'9~'JW\
f'9~f,!~
Ili:~K~.!I!
~Th§!l!l?Ji~!il'!g=~laI~
Bearing
~:il!:
$5x$10x4mm
M4Set screw
M4Jt~.l\1\
M4x4mm
Bearing
~*
:~1\.5
(OUT)
(IN)
Smaller 10 larger 10 Tail rotor holder
Tail rotor hub
~li1EHTll!!~
$ 10x39.6mm
.•m..m,\.I,\I...--_'
Tail rotor holder
~li1EH3iI'~
~\'i'lllt_--<J." Socket collar screw
iilili'iil;i7\~~g.l\1\
M3x16mm
Bearing holder
Slide shaft I!lH~1!iIJ~:il!:1O
~~~g
Tail pitch bell crank
sleeve
I!lli1EMJ>!'1!iIJl)Jtili'ig
($4.7x$7.6x6.2mm)x
Bearing
Metal Tail rotor
control arm
~:il!:
$3X$ 7x3mm
~~ijjJL~
Linkage ball ~
(M2x4)
Collar
l)Jtiii'lC(M2x4)
$5x9mm
,,";a,1jjJL~7ig
:~<f>4.9x5mm'
1
.
.
Please tighten M2x8 socket
screw firmly but not over
tightened. Over tighten the
screw will cause the installation
of tail rotor shaft unsmoothly.
mPl!tM2x8~fieffl~~1.Jii11. ~~m~iii.'§
~1!l.~mA'l'IIli·
Washer
¥¥;j
• 3x 4>4.BxO.3mm
Socket collar screw
iJili'i?;;AA~~:fU'l
M3
14
After complete the tail rotor assembly,
please check if it rotates smoothly.
~li1EMmm~~~~m~I!lli1EH3iI'~.~~~·
Already assembled by factory,
please note to check again.
When assembling into the tail boom, please
apply some oil on the surface, to make it
smooth during the assembling and keep it
vertical with the torque tube for smooth
rotation.
8m~IiX'H@ElB~Ii1E'
~A~~~~'~~~~~'~Ii~~~EA~~~~
~~~~~~~¥~'~~Q~~@'
M3 Nut
When assembling
the tail boom,
please aim at the
fixing hole 4> 5.1
aA~~~~)llHL!l'.t
lJ~~ ~ 5.11§1);E3\,
...:;;;;=~C._
M3~'U'!l§
700NFL Ball link
700NFLiI~ii!
(J
......
Socket self tapping screw
~1IlIii!~1\~ElJ3l:.fft
T.II
"
"";Ei,,,,mm
<,
_
vertical stabilizer
....
3K CF Horizontal stabilizer
-......
:
i
i
......
M3 Specia~;wa5herM3~li'.Ui¥q]
<.}
~3x~8x2mm
Before assembling, please wrap
the tail boom with a scotch tape
(Thickness O.03-0.05mm)
to avoid the mount slipping.
~ail1J~$'tI'lli!OOIfl!!\'l'
(0.03-0.05mm~)
Carbon Fiber Tail boom
0
Tail boom brace se;::t'--~"""",::l.'-...
i~
-_ _ -
Stabilizer mount (Upper)
.....
~.~MI§I);E..tlf
3K~.~~
785mm
!
\
3K!B1.*~.
~l!E~.am);Elll
(;~
mount
¥~~);Elf
'-.
./
g'
§lI~~·ljf~.1l:~);ElfmllJ·
,
.......
.. .. ..
- ---..
700NT1A
Please apply somi}-CA glue,lto fix becir.!llgiPonthe torque tube, avoid CA glue from the dust or may
cause the beaTlng'·stuCk."Wb!.!!J!..sse'rnblinginto the tail boom, please apply some 011 and use the
attached torqu\ tube mount helper to press the bearing holder of the torque tube into the tall boom
horizontally.
ii!iP,,(:,!>.CAlKitIBjJI:~~~.~tIB..t . iiii!eCAicS¥!ItlBjJl:e\J",aiiiiiilillllll:flljJI:"*ge
. IiA~~~~ .~~IlI~jJI:'HI19f~
~~~~~.~
.~.~~~~g~lKi~.IlI~jJI:~~~rrEA~~~~ljf~~·
Torque tube mount helper
(PVC packing tube)
Bearing
Oil
U;iji:&It~aE'I!i
r-r--">; Q;iji:
lI!I)i~
Torque tube
'---V ~8x ~ 14x4mm
0"·-
©
Socket screw
1lii!~)\Ji;I.fft(M3x14mm)
@)
x4
~
M3 Nut
M311'i~.1'iI x4
~iWf1JQ~
CA
!70:ONT2A1-00
©
Tube end
~nIIii
Socket screw
1lii!~1\~.fft(M3
. 6m
Spray Silicone oil inside the tail boom
~~"li9Ifl!~
M3 Specialty
washer
~~~~~m~~~~~~~~~~~.~m&~W
~m-211J~ro\lm•
©
!700FLTS]
.
1IIlii!~1\~.K\\\(M4x12mm)
~ 14x ~ 20. 7x13mm
Skewed Torquetube bearing holder will interfere with
torque tube rotation and cause unusualvibration.
]
@DSocket screw
~ill1JtIB;iji:1!1!:II
~ CAUTION II
L.D. l1 E II
M3~lilUHlJ( ~ 3x ~ 8x2mm) x 2
!700NT2EA
Torque tube bearing holder
x2
0
He,
Socket collar screw
1lii!~1\~~E.fft(M3x22mm)
x2
700NFL Ball link
700N FLiI~ii! x 2
M3 Specialty
M3~\lUHiI(
washer
~ 3x ~ 8x2mm) x 2
!700HT6A
CS2)
M4Washer
M41jHiI(~ 4x ~ 1Ox1mm) x 2
]
~llill
After moving the tail control rod adjustment sleeve
to recommended position, glue the sleeve to
carbon tail control rod with instant glue.
Socket self tapping screw
~lili~1\~ElJ&.IOi\(T4x10mm)x
1
~~~~I§I);E~~g~~~mE~'~lKi~~~~~);E~g
~~&~~~~m.~~~.~~~I§I);E·
15
~~ket
button hea
M3x~~\Ii3~~ll1Ii111
d collar screw
I
[ 700~T1A
@b".~
~~rew
@
on head collar
*illlil!i:l;Ji\Ii3~~
.'"M~'mm},"
~:k"oorewc::.
lil!i:l;Ji\li3ll11i111(M4x8mm) x 1
II ffi C~T~N II
Alread
Facto y assembled b
Pleas?Ch~~~o!e flYin~
are fixed with If
sc;ews
~i&m""~
g ue.
t:
$t;""",,,,,,,,,o:effil,,,,--m
u•••••
~**8"'8- ""mtrw=
Before tl h
'ED
.t!!I;r:1i!""'''' ,.
th
Ig teni
.,"'"
e bearing a ng the screw
the bearing ~d check the • please rotate
on the scre~ hen .apply s~~ncentricity of
the bearing stand tighten it fire glue evenly
Ck
cause Sli:
or heavy 10~IY./O avoid
'JZ ~**il!Jm~.tn.
a one side
rn ~~O!!i~'
0
Please fasten th
screws to the e
~:,o hol.esof the
Ql\,;;'~'"g.".
~nld
~~:Io6iil¢3.0
~IIMf~~Il'i~lfflK1
'~
¥"•••a"f_
~UL
One-way b
¥JCiJ~*
earing
<I>15x<l>23x11mm
One-way
bearing
¥JCiJ~*l'~ount
One-way bearing shaft
¥JCiJ~*~
<I>12x<l> 15x41.5mm
<I>21x <I>6.5x33.1mm
One-way bearing cover
¥JCiJ~~
<I>21x <I>15.8x26mm
One-way
bearing collar
¥JCiJtm*91-lIl
Bearing
~*
<I>15x<I>21x4mm
PI
$6X$23x11.6mm
M1. Auto rot ation
.
tail
I
drive gear
M11ll1ll!!ilJ:Io"'"
not the direction
~~ease
bearing.e
104T
",;3'.~~*:OJCiJ
16
••
When tightening the main blade fixing screw, please tighten it firmly,
but not over tighten, or it may cause the damage of main blade holder
and result in danger.
Apply
a little amount ofT43 thread
lock when fixing a metal part.
iU\\II'lJll!l~iiI.f!1:III«!!!!lHT43(i1U)
~~~~M.~~~~~~~MW~'~~~~
'
•• ~~H.~.m,mB~~~~·
690 3G Carbon Fiber Blades
690 3G
!iIl1I1UM
[ 700FLH3A
@
I
DL------
Socket collar screw
IIMP3/~Q8.~(M5x32mm)
x2
M5 Nut
M51\lJ~.'~
x2
Standard Equipment:
Main shaft spacer(1)
1l$1i8' ~ilJllmF'1(1)
4>12x4>16x1mm
Spare part: Main shaft spacer(1.2)
Main shaft spacer(O,8)
Main shaft spacer(O.5)
fMli8' ~ilJllmi'1(1.2) 4>12x4>16x1.2mm
~filmF'1(0.8)
~Q!!F'1(0.5)
4>12x4>16xO.8mm
4>12x 4>16xO.5mm
Main shaft spacer(1)
~Q!!i'1(1)(4>
12x4>16x1mm)x 1
Spare part:
Main shaft spacer(O.8)
.50 ' ±fHll!!i'i(Q.S)
o~o
($12x$16xO.8mm) x 1
Spare part:
Main shaft spacer(1.2)
f/i!88 '~ilJllmF'1(1.2)
Spare part:
Main shaft spacer(O.5)
tlli8 ' ~ilJllmi'1(0.5)
(4) 12x4>16x1.2mm) x 1
(4) 12x 4>16xO.5mm) x 1
M1 Slant thread main drive
gear set
M1~~aIUI
~
M4 Nut
M41\lJ~.m
.-.,
~--
1700 FLZ4A
I
cQD:J
Ball link
iI~llf!x4
1
700FLZ41
o
Before fastening the M4 set screw, make sure the motor pinion gear
is contacted with the bearing in the motor gear case downward.
~iI~&!J'iJl'rnjUli!ii~&!~I!ajj'(~.j!ij~4.Itj§!tUUI'!~•
Linkage rod (D)
i!~(D)( 4>1.96x39.5mm) x 2
17
Socket screw
ll'!liiIlf'9j\fi'3i1J11g.~
M4x27mm
Battery
of receiver
m!&~UtJlB
Hook and Loop
(fuzzy)
Tape
SlliIi;Ci (II '5 W()
Hook and Loop
(hooked)
Tape
/lIliIi;Ci(~!!*)
3GX
Flybarless
System
3GX lIIlSllftiJt:1fiilt
3GX foam
3GX )Elm
Hook and loop tape
Rjijl,\'l'
x
~§'i\I!
x
1.Consult the following
installation direction,
toward
nose
or
diagram for 3GX
with arrow pointing
tail of helicopter.
3GX needs to be mounted flat on gyro
mounting platform, away from vibration
sources.
2.Two pieces of foam mounting tape can be
used if helicopter experiences vibration
induced flight instability. However, if this
still doesn' t cure the problem,
please check the helicopter mechanics and
minimize mechanical vibrations, or reduce
the headspeed.
3.Please secure with genuine factory issued
double sided anti-vibration mounting tape.
1.3GX.1ill)j!EiJ~$lf;lIl!I<
•
75!EiJ:Fs!I<];';liiHIl!EiJ.IIll'Z•••
~~.m~~.~~~~·~m~m~~·
2.lllllnJJ~~.~.~ii!ijJW
. i.'§1i.UI~IT'f'.~•
llf~3GXl'75.!EII1!I2hjEHlillll'i= • 'i5il.l*al15.
~W~.II.~~~ll'Z~~~~
•• ~·
3.~~m~~~~mma.~~~~~·
18
tape
a.Battery installation illustration
~)t!!~~7.iU~~
Please fix the 2 batteries on the
battery mount evenly.
2~.)t!lffi!jZ~~~~.)t!l~..t
e
Battery mount
.It!ll§llEl&:
Battery
Slide the battery mounting plat
along the rail until a "click" is
heard to make sure the battery
mounting plate is latched.
~.;t!l~:lE~II~~fIi:;t!lmWL~M~t±l
"~~·'n· if~;t!l~:lE~-Fi\-F~.
--f----.lt!l
8IIIli;o(~:t!:)
~~=~
Hook and
Loop TaPIJ<
BlH
Hook and loop tape
(fuzzy)
BlIli;,s(a'l§:t!:)
Mode:lnsert the battery from the front
:O~-:II)t!ltU1J:O.l\
Press this latch to allow the
battery to slide out along the rail.
!It)t!lHll:±ljj1J ~$t;)!U~)t!l!lHO tt P9& .
JIIIH~JiUJl.Hll:±l
Mode:lnsert the battery from the back
~=:
1I,I!!lUt:OBl\
19
ALIGN
Servo extension
cable
lOIt1i!I.H~*i
For extend the ESe singal cable.
ESC!I\;'IiIt1ilIUHII
Brushless
ESe
PHOENIX ICE HV 120
Jll\1iD~&'\l~~ PHOENIX ICE HV 120
6A External
BEC
6A9Hiil:BEC
Canopy
l1l!iifill'l
RPin
Rl!!1lffiWj
6---
o
Keep the hole position
bolt horizontally
for canopy mounting
to make it easier to insert
the R pin to fix the canopy.
l!iliU~~):Et±:R. -'~~*l¥~'fURWjlifjl\~):El!ji~
20
DS610 Servo
DS610icll"U~
Ese
3GX Flybarless System
3GX mI-'l'-IlH11i1tlf
.'.TiAli3!i!§
£::l1JJ~
WlIIIWCWiIll
Carbon fiber tail control pushrod
Approx. 798mm x 1
ii111~P.1!ItiIJlIjH!lJ798mmx 1
I"
6A External BEe
6A9HiitBEC
I"
~""
~I I II
;
I
"~I
·1 ·1
7~8mm
\1
I
liMO
I
•...
C'I
fAR~Jll';N.r1E[~AT'Qlil",Hill~.Ii!i
r:rG)CFlybarles/i
System 3GX1II\-'l'-IlJt11ilii'tK@1
Red
Receiver
lIJ&W
Remote receiver 2
1Qi!1l7<:1Ii! 2
.--
Status LED
Data port
i
~mjllijH!!
Jll~IW.~
I
Governor Indicator
lEilI!lllii\1l1
Setup Indicator
JJJ~~!l(lEjllii\1l1
~I~P.
~(QQQ)~c
l~rtirrW:di:12~
~IOOO)~
,Y"
~\
~
.. ,
00bJ ~
reduce the AIL or ELE gain 10 degrees at a time, until the osC!!!!!!:2!1.S!!I~r~lWi
If helicopter drifts left/right or forward/aft during hover, increase the AIL or ELE gainllrdegrees
(fj!J;S
;~JtWTtIl1tI!!'effil:lmJJIl~1!!lm
' :±lm~!UEi~ilm50%(1!!lmmfCil12~IIDfCil)mf.f~:gf&U~;j:~13\jjJ~iliJ~j3\IIJB\l
' ~7T-~M~~' ~i!EB\lW"i1ill:AIL~EVE~M1!!lm· w.~
~i/IlmKffJ10Me'iJDit,&l!Jm~~~irr~
mf.fB\l:g.u~;j:~.~~iliJ~.~B\l·
~7T-~Miiill:' ~IIJjlB\ljt~~AIL~EVE~M1!!Em • w.~~rr.JmKffJ1oMe'iJDit· 1JIlm~~'Sillf.
~1'ELE)
IRUDI~
~~EV
[THR)
~
ElevatorGain1i-1IiIW8IWlIl!t&llllltIU!l
Aileron Gain IIJMlWlll!tilll!l!tllU!l
SETButton BlUE.
at a time until drifting is eliminated.
0
0
0
To set this option is to turn on the transmitter
U~D~iill~§!~~
and connect to BEC power.
, m.t.BECIlt~IDlOJlifi~i'F•
I JR Transmitter/Servo
JRUH!!IBljqJD~BllfRt
I
Positions of CH2 ' CH6 are exchangeable, After
assembling as photo (Note:Set the transmitter
under CCPM 120 degrees mode), pull throttle
stick (pitch) upward. If one swash plate servo
(or two servos) moves downward, adjust
reverse switch (REV) on the transmitter to
make it moves upward. If three servo move
downward, adjust the travel value (+-) of
SWASH CH6 on the transmitter to make them
move upward. When the actions of Aileron and
Elevator are opposite, adjust travel values of
SWASH CH2 and Ch3.
CH2' CH5~MftG!!!i '
120'+'f'Ur:)
,~'
~1':l1
Elevator: CH3
rt-~'CH3
~
&~,
I FUTABAlHITEC Transmitter/Servo
FUTABAlHITEC~~H!!IBljqJD~HllfRt
I
Positions of CH1 ,CH6 are exchangeable, After
assembling as photo (Note:Set the transmitter
under CCPM ~ord~grees mode), pull throttle
stick (pitch) upward.'lf one swash plate servo
(or two servos) moves downward, adjust r
everse switch (REV) on the transmitter to make
it-moves upward. Ifthree~servo move
downWard>,adjust th~:;trave,1value (+-) of
SWASH CFtS on-the'lransniitter to make them
move upward. When.'the actions of Aileron and
Elevator are o~site,
adjust-travel values of
SWAS CH1 and Gh •
6\H1 'CH6llT:g]!!;~1!!I • ~i11i1~li()±~, H~;jiIDt:<E~
C€PM 120"T,'f'Ur:) , ~JillP~li"(Pitch)l:U:J!!;. :S+'¥'II!!
,i<iI!!l,H1fJ~2i1!11±1'~~ . ~iIIlmli~~elJ&.IlIIIm(REV)1iE
lQ]!Iil~ vE3f1IHOI!Iil~jcJ~1±1'~~, r.RiIIl!l~ll!!
SWAS[;I,CH6
~.elJIE~~
, jflOl!lilll!!jcJ~I±LIjZ.f3i·'
;]H~
~fj!llJfFl!l&~ • ~li!lilll!l SWASHCH1' CH2D~.IEw;'iii •
I TAIL NEUTRAl.
SETTING ~c:pnJOID!:~ I
I HEAD
After setting Head Lock mode, correct setting position of tail servo and tail
pitch assembly is as photo. If the tail pitch assembly is not at the neutral
position, please adjust the length of rudder control rod to trim.
~.lIB!;:Elt~jqaHI!~~Pitch~ltiIHllIEiUg~li1~
~fijJi!~f!!l&~",,~IE'
• EI!§ Pitch~ltiIJm*.ifJ~m!lllm~
LOCK DIRECTION SETTING OF GYRO
I\'8l!ilmJEJ5~m~'~~~~W~.&~~,~~~ft~~.m
i~IE ' ,&~.~t7J~I\'8I1i1.t."mJE,&~"ImIm~IE •
Middle tail
pitch assembly.
~Pitch~ffilJm~ifJ
Tail case set
AI
~aJfiil
f---1
I\'8l!ilmJEJ5~~JEI
To check the head lock direction of gyro is to move the tail
counterclockwise
and the tail servo horn will be trimmed
clockwise. If it trims in the reverse direction, please switch
the gyro to"REVERSE".
B
~
Tail moving direction
lillJ~!lIlJ'jtq]
Tail servo horn
~/QJ!IilJIJt!f
22
GENERALFLIGHT-ftI!:mfftl~
--
_
~~
L_
-: -=::::.:=::;=~==
I GENERAL
FLIGHT
-ft!HRB~i\
5
Throttle
l!!!r~
100%High speed
lOOmii
4
85%
3
60%-65%Hovenng
60%-65%~l!!
Pitch
U
+12°
+5°
40%
2
0% Low speed
1
0'__ 2°
O%i!fii
100%
_.
85%
--------
65%
----.
40%
Stick position at HoveringlThrottle 70%/Pitch+So
m;~~l!I!/l!!!r~70%/Pitch+5°
--o-~----
_~:~.L------
Stick position at lowlThrottle O%/PitchO'!..-t
m;f!I!i!fii/l!!!r~0%/Pitch02.-2°
3D FLIGHT 3D~~mff.~
I
IDLE l'SPORT FLIGHT
Throttle
l!!!r~
5
.Iie
+10_+12°
100%
4
75%
3
70%
2
75%
1
80%
100%
I
Pitch
+5°
-5'
__ ._ .. -.-
-
.
80%
~8~:::::::::::+:==----
i
I
I
1
2
3
4
5
Throttle Curve(Simpie Aerobotic Flight)
~<pIRDtlntl!!!r~iIII~
Stick position at middlelThrottle 90%/Pitch 0°
M<pii/l!!!r~90%/Pitch
I
0°
---~;:T- _~=~
5
--~----
3
3
1
IDLE 2'30 FLIGHT
Throttle
iIllr~
100% High
loom
85% Middle
85%<P
100% Middle
10Q%<P
100% Low
lOO%i!f
I
Pitch
U
+12'
0'
0°
-12'
Stick position at lowlThrottle 100%/Pitch-13°
m;f!I!i!fii/l!!!r~1 00%/ Pitch-13°
1.Pitch range: Approx. ±1S degrees.
2.lf the pitch is set too high, it will result in shorter fight duration
and poor motor performance.
3.Setting the throttle to provide a higher speed is preferable to
increasing the pitch too high.
.
1.!im~2(Pitch)fmB~!\'jJ
± 15°
2
3
4
Throttle Curve(3D Flight)
~IRDllfI\l!!!r~iIII~
2. ~j;:!im~~1E • ~!,!J~IlJ7J~mB~IlllIl!i!f c
3. 1lJ7J~~J~1Jl!~.~OOI~IEDi\• iR1l2!im~2l1.1j;:00I~1E
°
23
5
~~
15 ' 3GX FLY!BARLiESS.MANDAL
FEATURES
~
"
~1jjai(iKUtJfm~1JJ3
,
~.;~ .~l,;;lGN
~ffil~@
l3Axis]
3-axis gyroscopic flybarless system to simulate the stability of mechanical flybar system, yet at the same time achieving
agile 3D performance.
IMEMS]
Utilizes MEMS gyro sensors, which feature small footprint,
3~Il'8~Wi~.IjZIiJUtillC' ~~.~.IjZIi.~kilC9'iJm~tt
112blt]
' ~~IIl)59'iJ3Dtt~
0
high reliability,
1*fflMEMS
(Micro Electro Mechanica 1 Systems) ~!~HISU~~KiltJ'iZj;flj@()ftIJ~
' ~~eil/J\
and excellent stability.
' ~~'i'1jg , .~'i'1fi9'iJill5
0
12 bit processors providing ultra high resolution, resulting in highly precise controls.
1*ffl12m~~~~,~jgmfiM'~~~.~.o
Supports Spektrum and JR satellite receivers.
~
Q:mSPEKTRUM~JR/lj~7,JlR
0
IS.BUS]
Supports Futaba S.Bus architecture.
B3
Software I!Pgradable through PC interface adapter.
~\i;~fHJi!~~itfti§j , ~~~j5&i§(~Wtf}(1I
Simplistic setup process without the need of external devices. Setup is done through 5 steps and 2 sensitivity adjustments.
Q:mFutabaS.BUSJ}]~
0
leasy]
0
~~&~~~i~~fi.~i~~~~~~~~~~I~~~'Rl~~~rt-e~r;a~7r\~~~'
~m8a9:~;mGP780ffi~ ' a9:~@~J: ~
Flyllariess system dramatically il1!proves 3D power output and efficiency, resultingJn reduced fuel or electricity consumption.
0
~.IjZIiH~kiIC'~~~~E3D~~~mfi~.~~,~m~~ft~~9'iJ~n.~§~mw~~~.~no
Highly sensitive gyroscopic sensors combined with advanced controt detection routine providing higher hovering and
aerobatic stability than other flybarless system.
jg~~Il'8~@()ftIJ~&~~$~~~,~~mtt-~.IjZIiH~kiIC~fi9'iJ~~&~~~~'i'1°
Suitable for all CCPM and mechanical mixing system.
jgjffl~ffjqJttf91J2WWtc=jqJ~~~CCPM~kiIC&ilkiIC+~t!III~kiIC
0
Built in speed governor function.
IG-.T"ex]
250-700
~}l~~~J}]~o
Comaptible with helicopter of all sizes from T-Rex 250 to T-Rex 700.
3GXFlybarless~7-a9:~ffig~ffil~~~ft~~~~~ftT-REX250-
T-REX700
0
Innovative pitch gauge as an aid to facilitate pitch adjustments.
~Wta9:gj-9'iJgIIUe:in!l~
' mP.J.~.~.IjZIi.~kilC2~IIUeS:)ftIJ
0
Hig~ frame rate signal output for faster and higher precision servo response,
jglfflll:m.~&Rlifl ' iiejqJ~~~8'jJ&BI~nD~. ' ffi~
Capable to operate between 3.5V to S.4V,compatible with high v.1 ge."servos.
0
~
m-aAV
lIfflt!U!3.5V-8.4V ' Q:mjg.~jqJ~~~
0
Small footprint, light weight, minimalists and reliable des·gn, ..
ftI~/J\ ' m£@ , .~Im~~~' ~m!*~~~'i'1~9'iJmmUi
RoHS certified.
.
0
f,J8RoHSllHfflm~
0
~
A.L1M
A.REV
'
Aileron reverse settings
i!l.IE&i8.J~:lE
LIMIT
NOR/REV
Rudder endpoints settings
~ffiBfi~~:lE
Rudder servo delay, and
helicopter size settings
~ffiB~loI.&;*:/J \~ft.~:ft
~:lE
11.&
CAUTION
i'£ 5:
II While
using 3GX FBL system, be sure to turn off the following functions
t!~3Gxlitln!i•• ~lIft"F3ilJ0.M.~1II@0.
*
*
*
in the transmitter
*
*
Swash Ring
Linka e Compensation
Swash Mix
Mixing
Acceleration
1.Connect the receiver and servos to the flybarless control unit as per diagram found on page 25.
2.Digital servos must be used on cyclic to avoid damage to servos.
commended servo spec: minimum speed 0.10 sec/60, torque 12kg.cm or higher.
3.The trim must be zero when usinp 3GX, and should not be adjusted at anytime. If the helicopter hovering tend one side, it means
the swash plate doesn't keep horizontal when setting. Go to flybarless system "Direct mode bypassing gyro, for mechanical travel
and neutral point setup" to adjust the level of the swashplate and then re-complete the setup.
4.when the 3GX f1ybarless system is installed for the first time, a few simple setup steps and fly tests need to be performed in the
flybarless setup mode. These steps need to be performed only during Initial setup, and does not need to be repeated for subse
quent flights. Just power up the system normally, check the proper servo operations, and fly. The initial setup procedure only
need to be repeated after software upgrade, pitch range reset, or subtrirns are added in the transmitter.
.
1.~ml&~&jqm~il·uIHiR~~lIIl1m (~$~m
25 ~)
2.+~t!III@~~m{qJH~~'
allU~~pxjqJHIi(~m~
}lillmm: l!~O.lO~N60° P.J.~: ItW12kg.crnP.J..t
3.liA~~§1j®~9'iJ9j..~~J;~,
mfi~1'~~~9j..~iJIj' B~~@!1&~~JOJ~-~~I1J'
~~a9:~~+~t!III*~~*.IjZ'
0
•
0
0
~~~"~~+~~~*~'mWt~px~~o
mliA~.IjZIi.~kiIC"ft~fi~
4.m-~i&3GX Flyborless~.IjZIi.~kiIC~' ~\~liA~.IjZIi.~~W;tc'
lifi~JfjJm~9'iJ~i&a9:~~mfi)ftIJ~, ~px~!lD1'~j'ijliAJlta9:~W;tc, RfllEmlj!!ft,
W~jqJH~~M ~!lll~mfi
: Il*~F~~Mtc ' m~~~e~~I1J~~~~~
(sub.trim)~ ' ~\~liAa9:~W;tc~~~.IjZIi.~m
0
24
AlLRed
Ii[
E L E Orange ill
PIT Yellow
RU Green IIi\
GAIN Blue ~
THR Purple :ill
GOY--++-+++h
BATT
1.Connect all wires as shown in diagram. Receiver and 3GX wires are
color coded to distinguish the different connection channels.
Care should be taken to ensure proper wire color to channel connection.
2.Receiver power is achieved by connecting the 3GX "S.BUS/BINO"
port to the ch7 or BATT port on receiver using supplied signal wire.
3.To avoid damage to servos, only digital servos should be used for swashplate.
Recommended spec: 0.1s/60oor faster, with 12Kg or higher torque.
4.3GX has built in speed governor function which can be utilized by
purchasing the optional speed sensor.
Governor setting is done through channel 7 on the receiver.
OUT
set as THR on transmitter,Such
ogram the transmitter to utilize
PIT.
as
IT (6)jj~ifmTHR~' i91J~08FG'
12Z, 14MZ~'
THR(6)jj~ PIT e
)jj~
1.For JR or Spektrum satellite receivers, connect wires as shown in diagram.
2.To avoid damage to servos, only digital servos should be used for swashplate.
Recommended spec: 0.1s/60· or faster, with 12Kg or higher torque.
3.3GX has built in speed governor function which can be utilized by purchasing
the optional speed sensor. Governor setting is done through channel 7 on the receiver.
Channe15/GEAR controls RPM of speed governor, channel7/AUX2 controls rudder gyro gain.
For radios with less than 6 channels,please
use the standard receiver connectivity method
4.For radios with less than 6 channels, channel5/GEAR is used for rudder gyro gain.
Speed governor cannot be used. For safety concern, two satellite receives should be used,
with each antenna perpendicular (90 degrees) from each other. A satellite receiver
should be installed on each side of the frame, separate by minimum distance of 5cm.
5.Should both satellite receivers loose connectivity during flight, LE01 - LE05 will flash
continuously
as warning. A single power cycle of the system will not clear this error.
The system need to be power cycled the second time to reset.
6.default channel/function
mapping when using satellite receiver are:
(1)THR
(2)AIL
(3)ELE
(4)RUO
(5)GOV
(6)PIT
(7)GAIN
1. ~~~
2.+~
ffiliDm*lR' 3GX5ZmSpektru~JR*~mr~7<;~ °
~!&~iD:jq]~~~, el!lU~~pxjq]~~~rnf19:
e
~~
: ~JjiO.10f»/60° ~~ : ffi/J12kg~..t
3.3GX~
:@~~~9<IJ~~ffl
tJ1J&tJ1J~..t~~~(5)GEAR~mU:@~~Q~'
(7)AU
7\J1J~l'~~~~~ffl{ll%m~7J't\
4.ifm~~JI:e~
-~7<;*lR' ~i~~~7<;~J'i'3JjiIl*!.I)\\~¥.gOJji2.9j.,
'§~~!&1F:
~ 5ib1~..t
5.110~mD~
~~jlEJ'jJm~' LED1-LED5~~.~m1iH§'
i'±Jlt~~l'
' LED1-LED5~~.~m1ffilmt$m1~ '
!.I)\\~~mifJT
' :::rq[IE:lf;lii'F
6.~ffl~~7<; m*lR~. ~!iIljj~8ttiJ:@ifm :
(l)THR
(2)AIL
(3)ELE
(4)RUD
(5)GOV
(6)PIT
(7) GAlN
c
c
e
c
e
1.00 not mix satellite receivers of different makes.
2.Even under correct startup sequence, if transmitter is powered off first, LE01-LE05
will also flash.
Thus the receiver should always be powered off before the transmitter.
.
3.3GX supports satellite receiver models currently available on the market. Should new receiver version
comes out with compatibility
issues, firmware will be updated to resolve any incompatibility
that may arise.
1.1'
2.
3.110
~7<;~~~J~.S<.W~
»r.l" 110~7tmJ~~n~, ttl~~~LED1-LED5~.~m1~»t,
~7<;*lR~~1'ffigm~ ' ~~lI1J~~ifJT7J't\1!i¥~
c
c
25
pjf~~ftpx7tmJmJ&~'
~mJ~nEJ'jJ~16~~
c
FLYBARLESS SYSTEM INITIAL SETUP STEPS .ljZ•• ~tUIt~
1. DIR : Dire-ct mode to bypass gyro for mechanical travel
and neutral point setup
DIR ••
nii;Q~rrlOl!I:m.~
I Step1.1 : Enter the DIR settings
t7111.1:.ADIRIIl:~
Press and hold the SET button while powering up the receiver. Release the
button when LED 1-5 begin to cycle. Press power cycle to enter DIR mode.
The DIR green LED will light up indicatingthe the gyro has been bypassed for
neutral and mechanical travel range setup.
Note: if pressed for more than 2 seconds, 3GX will enter governor
setup mode.
&t:Enim~FelIm~2fi»
, 3GX~ll.i\:iE~~~:iE'15t
' ~~Im!l!:~ll.i\DIRa9::iE
Transmitter function to servo mapping
a.lI.fII••••
n.case-e ins;orrect servo movement or no movement at all, please
check fo~ . roper connection between 3GX flybarless connection to
.se1Y.O ,as well as proper setup on transmitter.
Ei'Fi1Jm~~{q]~IR~m!i1Ji'F
' ~l!~3GX
Flybarless {q]~IR~~~~m~
J?I.&li~~~:iE~5:iHi
"
Elevator
Tt~me
STATUS
OGOV
ELIM E REVAUU.REV
.0000
"'.
os
'10
••
N.R
REV
o
G_~!T
I Step1.3:
UO,. "LAY
\...(QQQ)~
~
(@ ~
\. ", •• 'AiL' ~
v""""--'"
t
•••
(@~
"fu~g
fill)~
AIL
~~EV
(!H[)
§
Mechanical Setup
t7111.3:_ilia
Adjust the servo neutral point and main blade pitch.
~~~{q]~IR~t+JII~
' :t:1llE.~J.fl (~DIIl~)
Pitch 0"
Pay extra attention to these setup steps. Incorrect
neutral points will affect flight stability, and worse
lead to loss of control.
~~~~~.~:iE'Et+JII~1'tt~'1'~~.mD~:iEtt'~~~
Horizontally
*¥
~1iX~~8'iJ18;m"
Level
-.-.-------.-
Adjust subtrims on.transmitter
so servo horn is horizontally level
{q]~IR~t+J II!S7J< ¥(S ubtri m)
26
"
IStep1.4:Collectivepitch setup ~.1.4:
=~e.~~
Gauge measuring
arUliaaBmllm
Adjust the maximum collective pitch using the transmitter's
swash plate mixing function (pitch swash AFR).
Recommended pitch range±12', maximum pitch range for advanced
pilot shall not exceed ±14'.
}tra~~eIDt~± 12' '~~«eIf.l~1'~~±
14' 1.m1lH"
rod
4>4
~Cfi'T~N
± 12'pitch range
Do not adjust individual servos endpoints through the servo ATV/AFR
function, use only swashplate mixing adjustments, Should any
changes made to the endpoints or subtrims on the transmitter in the
future, the flybarless system initial setup must be performed again,
CCPM**1t~mB~.~
' ~~li~~Swash+~I!)fe~tt~
(Pitch
swash AFR) ~m ' :w~~moo8UjqJ~&~@ATVB~:!i: •
JI~li~~@P9~~rof§~!I!
' @~miil.iBFlybarlesseli'lID!::lE
e
While using 3GX FBL system, be sure to turn off the followin
functions in the transmitter
I!JiI!I3GX~.8••
l!lIftl'~lJJl!lf.~Il"lJJ.
* Swash Ring * Linkage Compensation * Swash Mix
* Mixing
* Acceleration
Use the included pitch gauge
and the Gauge measuring rod
to aid the adjustment of pitch.
~If.lg~@.~.~~.~
, Uf§ljI~.**1t~
.'
I Step1.5: Cyclivpnch
setup
THR
~.1.5: •••
mllt~
Maximum cyclic\pitch setup; WrtAJT1alnblade,parallel to
helicopter:J.?0Cly,
move tfie-transmitteraileron.stick
all the way
left, and--ai:ljus theAIL mixingpeo;entage in SWASH settings
unljl.mail}J3lade pitch are 12 to 14 aeg~s ..
~.~1itlll~SlAA&ti
: ~Djij!ii~-t!!UI7Jjij;j!j1OJ ' ;mr~~~~ll2:E1$£
MJjN&mHrr~1'flJ
' mJh~~~a:
' ~mG~Swash
CPAILtt~ '
«e±1$£.@~J3lj1.mgj3~~±12
•
*Recommeni:led pitCh ra~e ±12", maximum;pltcnrangefor"""'"
advanced 'lot shaH not exceed ±14 ' ,
~a.~211· _t~JiF~"'D1401!l!!',."
_
±12'pitch range
±12'~IUUe
J:\'-.CAUTION
£§~
•
A.c:I ustments to the CCPMservos endpoints should be done through
f 12':
eeDS610's
R: 75% (12')
shAFR: 75%
"Pitch swash AFR: 44% (±12')
transmitter's swashplate mixing function (AILswash AFR). Do not adjust
individual servos endpoints through the servo ATV/AFRfunction.
Should any changes made to the endpoints or subtrims on the transmitter
in the future, the flybarless system initial setup must be performed again.
CCPM**1tifclmB~.~
' ~li~~Swash+~I!)fe~tt~f1&~m
' :W~
ifclmi~8UjqJ~IR~@ATVB~•• JI~li~~P9~iJll(lOf§~~
' @\mmifli
fiFlybarlesse li'lID!::lE
"
Ji-(~Ift.ie~:@12·!.m~J '
'Fataba 12ZH FoftG DS610 x3
Aileron swash AFR , 75% (12]
E'levatorswash AFR' 75%
Pitch swash Af'R» 44% (±12')
2.E.LlM swas plate mixing type recognition and
elevator endpoint setup:
E,LIM+~.III!M.~H.lea
•• m~.1t:
~~-.-.-.-.-.-.-.-
IStep2.1: Entering E.LlM setup mode ~.2.1:
BJ\E.LlM.
While keeping swashplate level and main pitch at zero degrees,
press the SET button to register the neutral point and enter E.LlM
setup mode. The E.LlM LED will lit up after DIRturns off.
~~+~1!1.m7J<ljI , 1$£KJ3lj&1.m~&@~l' ' m~niT'SET"fIIDIRm~~
j£ , E.LlM m~~~Jre ' lV\"E . LlM7tJ\ilm£~."~:lEtl:t\
"
0'
~~Cfi'T~N~
The throttle stick position where main pitch is 0 degree must
be maintained through this setup process.
;mr~~~~~ll2:E1$£HJ3lj&O&@[Z~ ' 1'5]~f3IllJ "
._._._._._._.-.0'
r
27
Step2.2 : Swashplate mixing type recognition and elevator
endpoint setup
~.2.2:
+~.lI!!M
•••Tt-.tefJ.aI!U!
With all channels stationary, move the transmitter elevator stick
forward, and then back to center position. This completes the
f====~~~~~:q~~§Crf~§;;;=::======
swashplate
recognization
process.
The
control mixing
unit willtype
determine
the CCPM
mixing ratio or traditional
mechanicalmixing maximum elevator endpoints.
~l!~~ft~m£ifEEM:rtJ1.J(~~IlJ¥lmftBm£~llJfF) . ~~ft~m£~~til([QJ
cplmllill·7't;P.tlltit:tta2:lE°
~3GX Flybarlessm.CCPMJfe~ttf91J~i5l\1t+¥I!~:tt&M~ errmfi'f£ °
I
CAUTION
l:t~
Throttle stick position where main pitch is 0 degree must be
maintained through this setup process.
)ffir9~~ffl:~~±1i!E.~lJ!OlJ!ffiJllil!!!
• l'err~iIJ
°
Throttle stick must be maintained
ldIP~.~I!I~
~lIE.l.IMsettings
."'·· ••E.LlM_
3. E.REV elevator reverse setup mode:
E.REVfl-IIIUell'tl••
Press the SET bu
will lit up a
.L
gyro dire
1. .
iEBfjqJIU!a:s::
shown in Clia§ram. and check if
toward the back.
e wrong direction. move the
STATUS LED changes color. and
Iting direction.
:ttlil\"E.REV ft~m8~2~iiIE&[qJ"a2:lE~:tt.
.REVm~~ . 1lt~:ttID/::lEft~JB8~2~iii~IE1.J[qJ
°
[qJM~lii:~'H¥l!ffiJi~IE:O[qJ~aIElii:°
1!:O[qJi~IE~~ . ~mllJft~m£~~c&~STATUSmM~~ . ~~
lii:1i'H¥I!~IE:O[qJ~aIElii: °
-, -~"""-.
..-....,-L""' ..ss.. ~~~
"",E:REVsettings
·iE.REV~:tI:
.=~-"
1I1Ulilti~,;j:O
[qJ
D
Helicopter tilting
direction
~Ilnl~
ericopter tilting
direction
*'I:0 [qJ
4. A.UM ailerpn endpoints
A.LlM ••
ffl!al!ll!a:s:
setup:
Press the SET button to enter A.L1M setup mode. The A.L1M LED
will lit up after E.REV turns off. With all channels stationary,
move the transmitter aileron stick to the right, and then back to
center position. This completes the aileron endpoint setup
process. The control unit will determine the maximum aileron
endpoints
:
m~n'lT'SET"m . 8I~:lE~:ttlil\"A.LlM~tlHfi'f£."a2:lE~:tt . Ilt~E.REV
m~~ . A.LlMm~~ ° ~~tlH~~(qf~¥IJ{t . 7't;P.t~~~~~cp . 7't;P.tIlt~
:ttID/::lE
. ~3GX Flybarlessm.~tl.errmfi'f£ °
=
=
~
The throttle stick position where main pitch is 0 degree must be
maintained through this setup process.
6
)ffir9mi~ffl:~~±1i!E.~lJ!OMffiJlli~. l'err~J1J
E5
Throttle stick must be maintained
=
=
ldI~.~I!I~
AIL
28
°
Press the SET button to enter A.REV setup mode. The A.REV LED
will lit up after A.LlM turns off. Tilt the helicopter right as shown
in diagram, and check if swashplate is tilting correctly toward the
left. If the swash plate is tilting at the wrong direction, move the
transmitter aileron stick until STATUSLED changes color, and
re-check the swash plate tilting direction. Press the SET button
again, and the control unit will restart with all LED's flashing.
This completes the flybarless portion of the setup process.
5. A.REV aileron reverse setup mode:
A.REV 1J.1IB
•• iE§Rlm~.lt :
~
Helicopter tilting
direction
~
lI.fU!:01i'!J
Swash plate correction
direction
+~M!{fiE:01i'!J
m~mT'SET"m ' iR~~~~5\liJ\"A.REViiiU.Il'8~iiiIE&iOJ"8l!:~~:IC ' Jlt~
A.LlMm~j£ , A.REVm~Jte • Jlt~:IC8l!:~iiiU.ll'8~iii~IE1.JiOJ' ~~~~~ft
t±:o~ ' 3GX FlybarlessBi~+~~iOJ~~~IE
' !/O~&iOJ' ~iOJ~~iOJ:O:J!Ei1J
iiiUHm~ ' ~~ "STATUS"1'15.I~~m~ ' !l!~Il'8~lif~IE1.JiOJ •
m~mT'SET" m~px~!!p:p:~H*m8l!:~ ' pfT~LED~r;.'jJ1J' ~Wflmft •
3GX Flybarless system must remain stationary
during startup. Do not move the helicopter
until the swashplate jumps up and down
slightly 3 times, indicating the completion
of initialization. (please refer to page 35 step 3)
A.REV settings
A.REV~'st
3GXFlybarless IlIItIi'IlJ!ifi~l\WYil{~
• !ltIJ!i~IlJII§
.
SWYilH:.~Atm·
+~M!~~*ljZ..trc/J~3:;J(·
i'<jf-1lII
tIi'I~At· (~~35j;[*1l3)
Helicopter tilting
direction
~
lI.m~:o1i'!J
~
OOLpDER"GYRgch§.ELLJe ..•••Il~ •.•
~_
.•.•.
±Ilil
~,
After the system reboots, flybarless setup is completed. Now the rudder gyro needs to setup witti simjlar
GP780 gyro. Push and hold the SET button for 2 seconds to enter the rudder gyro setup moa
If your transmitter has the following settings, please disable it or set the value to"Zero.
~PXlmftW:FlybarlesslS!l7Jo88l!:~~PX ' m~~8l!:~~~Il'8.iii
' PfT~8l!:~~I5.IGf!780• ~mft:tAmr::~sET~ftJ>~J\~ft8ilB~iii8l!:~
~~11I18'illi~~~r::9UJ}Jtre~
' ~8l!::@1Imrmf1l:l(OFF)~rxm8l!::@1Im~
•
• ATS
• Pilot authority mixing
• Throttle to rudder mixing
•
•
•
•
Rudder to gyro mixing
Pitch tcutftlder ~lxin9
Revolutiontmixiirl9
0"1:.
3GX Flybarless rudder gyro has the factory:settirw of 1520# andDS digital servo. Double check your servospec an
change the gyro setting as needed to avoid damag s to the servo.
3GXFlybarless ~~JI'8l*lMfll~:@i~1Im : 1520 ~ S~~DSmllifqJIl&Htt
' ~~Ifij~~~11I18'ilfqJll&~m~ ' H8l!::@i~l'l5.Iilii~pxfqJlHll§~~ •
1.1520 f.l. s (standard) or 760 f.l. s(narrow band) servo.frame-tate setup.
1520 u s (.~)~~&-oiJ. s (~.)~BI.It~
3GX Flybarl
ystem;i~'compatib1~ with D()]Jthe,.:760f1 s narrow frame rate servos (such as Futaba 59256, 59251, BLS251), as well
as the stand
5~0.Jls"frame rate s rvos (most others). Proper frame rate must be selected based on your servo's specifications.
To enter the setup mo e : Press and hold the SET button for 2 seconds until STATUS LED flashes. The 1520/760 LED will
light up indicating servo frame rate..setup mode. Push the transmitter rudder stick left or right to select the frame rate. For
example, if liudder is pushed 0 tile left (or right) and STATUS LED turns green, the frame rate is set to 1520 f1 s. To set it to
760 u s, the rudder stic nee.d to be pushed from the center to the opposing end 3 times for the STATUS LED to turn red, indic
ating frame rate se~ 0 I 0 f1 s.
.
3GX Flybarless panel: Each setting value is labeled on the 3GX f1ybarless control unit with either green or red lettering,
which corre$P!l"ds to the STATUS LED color. Subsequent setup mode is entered by a single press of the SET button.
Setup mode~i11 exit if no activity is detected in 10 seconds.
3GX Flybarless;f§~~H~~)EtI:JSgffiiJ*m' ~11I1flEm8'ilfqJHIil~.l%760
u s*m (!/OFutaba S9256 , S9251 ,BLS251) ,
fliJ~\~~3GX Flybarless~:@l%7608'il~:IC ' JtIt!!*~5j'(760 ~ sm~8'iliQ)HIil~' -!tit~1Im1520 u s**1t ' ~~~1Im 15208'il~t\ •
~J\J;lJJg!U~.it
: ~mi§j~..t8'il"SET"8l!::@mMiJ2li»• Jlt~"STATUS":tAlmfej5j'(m~rm~r;.'j~' .§"15201760·8'ilJ}JIlli~~fej5j'(m~~m ' ~5j'(~J\~$/
~~fqJHIR~~:ij1j, fUmli~~1.JiOJ~m~8'il~£1.JiOJ*~li~~i~'
i91J~1.JiOJft8m~t±~ (~:o) ~"STATUS'fej5j'(m1lmiolk~' ~5j'(&l::@f@:1Im1520~s*
m ; ~~~~1Im~~760
~ s*m~ ' ~\~~m~EI3£tlrr!iit±;f§.&1.JiOJi.I.lBllJ~
' flE"STATUS"fej5j'(m!ffin~' ;t~liJ\760
~ s*m •
3GX Flybarless9Slilii~ : ~m..t8flEmiolk/n~8'il~e~5j'("STATUS"m~pfTf~~8'il&l::@f~·
iO'Xf~@~:@, **1C~§J1J~Im8l!::@~:IC •
8l!:JE~pxW:W'SET"m-~~~J\
r::-flQl~~'
~~10li»PH
Green LED : 1520,us standard band
Red 1.1:0 : 760,u s narr.owband
~~m : 1520 11sii:MijqJD&~
~..,{[m: 760 u s~MijqJD&~
"
Select by moving the rudder stick left and right
a::O.~1.Jll!Iae ••
RUD
29
-2.05 (digital) / AS (analog) servo selection
DS.ro:/ASJlJ::tfPJI ••••
There is a direct correlation between servos' speed to gyro's performance. Faster servos are able to execute commands from the gyro
at faster and higher precision. Oue to the high performance gyro sensors used in the 3GX flybarless system, premium high speed digital
rudder servos are mandatory for optimal tail performance. Some of the recommended rudder servos include Align OS650, OS620,
OS520, OS420, Futaba S9257, S9256, S9254, S9253, or other servos with similar specifications.
Setup method: Press and hold the SET button for 2 seconds to enter the setup mode, then press the SET button to select OS/AS setup
mode, as indicated by the lighting of OS/AS LEO. Using the transmitter's rudder stick, select either digital servo OS mode (STATUS LEO
is green),or analog servo AS mode (STATUS LEO is red).
jQJH~~iiJfF~M1&ImIlB~jj8'iJ~1re ' jQJH&~iiJ1'Fi&!~' littIreTIIDl&BlIlB~ii~tt:l8'iJ:Fs~ ' ~.~~~$8'iJ5&~
: 83~3GX Flybarless~fH§~~~8'iJ&BI
~1lll~!U&M ' pfi~}!lliijlmgftG~~li!il'Al12jQJH&~' roALIGN OS650, OS620 . OS520 . OS420· Futaba S9257 . S9256 • S9254 • S9253~Jl;ftM§A1
m~jQJH&~ ' ~~~~€E5&§g
•
!!!:~:oJ:t : m~"SET"m2f»li.i\JJJIre~JE~n
' j'ij~"SET"m~ltDS/AS~ll'i
' (OS/AS:Fsmm~i1E)'
fUffl:oIijJll'8~~~ltI'HITOS (STATUSf.m~m)
~littAS
(STATUSf.m1iiIm)jQJH~~
•
Using an analog servo in OS mode will
Green LED: DS digital servo
cause damages to the servo.
'Red L"EO: AS analog servo
i':EDS~n""film"ASliltjQJH&~"~l;!J¥.:\(jQJH~~m
liiRm : DS.Ul®H&~
~
i!t.
~KiI:m : AS~lt®H&~
Select by moving the rudder stick left and right
ti:e•• ~ICiIE••
Middle tail
pitch assembly.
~PitchjggIliJm.l!!l'cp
Tail case set
A
B
~efiiim.
4.Gyro NOR/REV setting
NOR/REVJe •• iE&!q)IJIIIIIJI!:~
Lift up the helicopter by hand, and turn it to the left (yaw). Check if the rudder servo is applying correct compensation to the
right. If reversed, set the NOR/REV setting as follow.
Setup method: Press and hold the SET button for 2 seconds to enter the setup mode, then press the SET button to select
NOR/REV setup mode, as indicated by the lighting of NOR/REV LED. Using the transmitter's rudder stick, select either NOR
(STATUS LED is green),or REV (STATUS LED is red).
llUe~~m ' ~e~;lJ:lIfJJ
• a~~jQJH~~8'iJlIi1JDIij~lI!j~~8'iJDIij~M:!TE~A1DIij~
!!!:~r.jj:t : m~"SET"m2f»i!L\JJJ~~JE~n
' ~ltNOR /REV~ll'i ' ~DIij~~ltNOR(
• ~mllB.jj8'iJl1JfFDIija2JE:iHi • a1'IEIii~~~a\nE&Iij~JE
STATUSf.m~m ) ~REV ( STATUSf.m1iiH~)
e
Green LED : normal direction ~
Red LED: reverse direction ~~
~m : NORiEioJ ..:
'";''''"
REV.&ioJ • ,
.'
. =
nm :
Select by moving
the rudde.r stick left and right
a:~.11T.i!q).a1l.
RUD
30
c
5.LlMIT rudder servo endpoint setting
LIHITJlte~ ••
ff ••••
Press and hold the SET button for 2 seconds to enter the setup mode, then press the SET button repeatedly to select LIMIT setup
mode, as indicated by the lighting of LIMIT LED. Push the transmitter rudder stick left until tail pitch slider reaches the end, then
center the rudder stick and wait 2 seconds for the STATUS LED to flash red. Then push the rudder stick right until tail pitch slider
reaches the end, then center the rudder stick and wait 2 seconds for the STATUS LED to flash red. This completes the left and right
endpoint limit adjustment of servo travel. Insufficient servo travel will degrade helicopter performance, while excessive travel will
cause binding and damage rudder servo.
~w"sET"m2~liAJJJlre~:lE1I:t'C
. JIt~~jQJH&~~~~1:Ecprr.~9'ilmn . MLiMITlWm. mD7JjOJ~mm9'ill1~~ih
. iie~~f!llJM§l!~J~iIl!I9'il;l\:~
IlHM~• ~m;~[Q]~cpTIl)l'i1J. ~2'»~"STATUS"Fs5nm.;;j\G~tl11 . ~5n~iQ!J~.88G1'I : m~~~GjOJ£~ih~Jm~;I\:~IlHM~
. j:Ij~m;~
[Q]~cprrl5l'ih . ~2'»~ "STATUS"~~7.i'Wf1~~tl11
• 1l07'[;PX~£~.8lI::lE. ~.l',(E~.Mll'8m~~m!OOIre
. fflH:~;I\:~~pxjQJH&~mlll
0
A
RUD~
RUD~
1 Mode 11
1 Mode 21
Tail gears
~Q'Biim
IMode
11
IMode
21
Push the transmitter rudder stick left until tail pitch slider reaches
the end,then center the rudder stick and wait 2 seconds for the
STATUS LED to flash red. This completes the rudder endpoint limit
adjustment for the left side.
Push the rudder stick right until tail pitch slider reaches
the end, then center the rudder-stick and wait 2 seconds
for the STATUS LED to flas red. his completes the
rudder endpoint limit adjustmentfor the right side.
~7JjOJ!II£mtll1~i1J . iie~f!llJmjj~J~!II£jl;l\:m~IlHM~
. ~m;~[Q]~cprrl5
l'ih . ~2'»~"STATUS"li\l:i~~tl11~5n~~~8Gm:E:7'[;px
~7JjOJ~~~l1£mih·~~m~~£~~;I\:rr~IlHM~·~m;~
[Q]~CP:rr!Ol'ih. \:;2~·STATUS~5nm~5n£~rr~8GIr!.7'[;px
0
ode
avel limit setting lower than 50% will not be
regis ered. Mechanical fix (moving link ball closer to
-center of servo horn) is needed for excessive servo travel
when LIMIT function is below 50%.
~!II£rr~.ffil:lE1'01!£~50% . 6~U3GXFlybarless~l':Y8Gm .
• ~rr~:E:ffil:lE~·~~~m~.~~~;I\:rr~·~~~jQJ~~9'il
~~jOJ~~ih·~~rr~l',(E~.ll'8m~ttlreo
6.Helic()pter~i;ze-aJ1.d ELAY settings
_". ••
itPQD.EL mftilJiiE ••••
This setting i c udes two functions :
(1) For small helicopters such as T-Rex 250/450, set this setting to small helicopter (STATUS LED red).
For larger helicopters such as T-Rex 500/550/600/700 set this setting to large helicopter (STATUS LED green).
JltBlUE158JliHfiWIlIl
:
(1) 3GXFlybarlesS5Zm/J\l!lI./lit{ml!ll.~~~~. ~BX11!1~~.9'illll!ll.~lt~i39'illl:t'C .
llO : T-REX250/450~lWlt/J\l!lI./lit{ml!ll.lI:t'C
(8lI::lE~"STATUS"
Fs~ml.mIRI1"9):
T-REX500/550/600/700~~CP;l\:l!lI.~~.tI:t'C
(8lI::lE~"STATUS"Fs~ml.m~1"9)
Select by moving the rudder stick left and right
ti£ ••
75Ifi£II11
RUD
31
Y function is utilized when slower rudder servo causes tail hunting (wagging). This can be observed after a
g pirouette comes to a stop. If tail hunting occurs, gradually increase DELAY value to eliminate it. For best
rmance, DELAY value should be kept as low as possible without tail hunting.
Setup etnod : Press and hold the SET button for 2 seconds to enter the setup mode, then press the SET button to select DELAY setup
mode, as' dicated by the lighting of DELAY LED. The choice of small or large helicopter is done by moving the transmitter rudder stick
left Of'
while observing the color of the STATUS LED. For small helicopters STATUS LED will be red, and large helicopter will be green.
The am
t of servo delay is set by how far you push the rudder stick, followed by pushing the SET button.
(2~~ffiJ~~jqJH~~~~~~~~ifjH~~
~'~DD~mtJ~~ffiJ~~.'
' ~l!ll:~11@~~ ' n1.JiCiJf»g«el!ll:~lI~~ElM ' ~1.JiCiJ~[Q)¥IJcpTII'i«el!ll:[email protected].~' Ilt~~~~~
-mlffi~i'f1'~~~ilIEm~ffiJ~IlUl'~mtJ~~ffiJ~~.m(lJ\~!6'
allU~f»gffiJilJj~~~l~~*i·
~:
fflni:"SET"m2t!>lil\J}JIlli~~~tC, mm~DELAYmm:' ~1.JiCiJ~~j!j!mm/J\~/l*jm~~l!ll:'
(STATUS~KiIJ~) ,~cpj;:~l!ll:~1I110T-REX500/550/600/700 (STATUS~liIiRm) '~~fOJ~~~DELAY~mtJ:ii~'
llmffl1.JiCiJf»g~j!j!
@fil~:lE'
~j!j!EI3cpTIl'im~"DELAY"mFT!ll1l5~m!~~O%'
m~it;l;:rr~~~mtJ.~100%'
~~j!j!m~J5fT~ffiJ~~.~~ffl1'ilJ'
iitLni:T'SET"mlii:8iN'
li!JOJlOJ~~:lEl!ll:~lI~tC~~~:E:·
ro : T-REX250/450
Gradually movethe transmltterrudder.stlckunttl
DELAY LEDbegins toflash, the delayvaJue
0%;'
at th is pOint.·
mB;~·!IBB!~1!IB'~III;;I:~2:!BI~B~;<,1
~remuM"DELAY".1RI1I8,".Bi
•
o.aO%
7.Sensitivity
n be adjusted directly. For example, 50%-100% setting on the radio translates to
; 50%-0% setting on the radio translates to 0%-100% gain in the normal (non-heading) lock
For radio with
0% ·100% ga
mode.
st servos and helicopters. The goal is to find the maximum gain without tail hunting. This can only
ests.
ing point for transmitter's gyro gain setting should be 70-80% for hovering, 60-70% for idle-up. Value should
I flight conditions by increasing to the maximum gain without tail hunting.
-m~~Il'8~ii@(m'~:lEJ}JllliffiJ~~~ ' qr~mlil\GYROJ}Jlllimm:lirr@(m'j~ffiJ~~ ' ~:lEj~50%IlUIl'8~iiffiJ@(m'~0' ~~j~50%-100% ' llU~2filii@(m'j~
~~:lEJtl:llliffiJO-100%: ~:lEj~50%-0% ' llU~2filii@(m'i~~~F~~JtI:~ffiJO-100%•
@(m'i~ffiJj;:/J\~I\!~jqJH~~l!ll:~lIffiJ1'fOJlffi~J5fT~~' -mlffi~ ' i'f1'~~~ilIEm~ (~~lI~ffilt!:lm~E~JljffiJ~55t)
ffiJirtJ~l'@(m'j~~~~!6 ' J5fT~RIlli
~~;r~mrrffiJJtl:55t*lirrfJiil~·
lil\~~~@(m'~:lEffiJmm:' IiIIUFT!ll1l5@~~lt~5t~:lEi'f70-80%~E' Idlle upmrr~~~i'f60-70%~E'
2~j'ijm;r~mrrffiJJtI:~j'ijrrj~IE'
110~~~~ilIE
m~~~~qrj'ijtl!l~~@(m' ' E~~~ilIEm~~
' llUtI!l{t!;@(m'
•
II&C~T~NII For
radios (IE Futaba) using 0-100% as heading lock gain scales, the recommended gain setting is 30% to 35%.
For radio that uses the 50 -100% scale(such as JR and Hitec), the recommended gain setting is 70% to 75%.
m5'ES!l!Ji:~O-100%8\J~$ . ~Futaba ·lt~~~i':E30-35%1I:tJ : m~ral\!l!i[[~50-100%8\Jjl!H~$
, ~JR
'
HITEC' lt~~!l!i[[iil1:~i':E70-75%1I:tJ·
S~ecifications &lZmf!
1.0perating voltage range:
DC 3.5V-S.4V
2.0perating current consumption:
<[email protected]
3.Rotational detection rate: ±300·/sec
4.Rudder yaw detection rate: ±600·/sec
5.Sensor resolution: 12bit
6.0perating temperature: ·10·C-60·C
7.0perating humidity: 0%-95%
8.DimensionlWeight :
36.5x25.5x15.6mm/11g
eRoHS certification stamp
32
1.~ffl~m : DC 3.5V-8.4V
2.)~~U!:)Jffi: <80mA@ 4.8V
3.~~~~&irtJ~~~m':
±300·/sec
4.~~~f»g~~m' : ±600·/sec
5.@(IJI~M;tfim': 12bit(12lli7t)
6.:tij'F~m' : -20·C-65·C
7.:tij~~m' : 0%-95%.
8.R1/mii: :
36.5x25.2x15.6mm/11
.mgRoHS~fflm'§ji
9
BATTERY"~ : ALIGN Li-Poly 44.4V 5200mAh
Motor Pinion Gear
~lI6fiB
Main Rotor Blade
~1Jii.m~
Hover~~
690 Carbon
Fiber Blades
12T
Current(A)
approx.
~i1ffi(A);;I;:*'iJ{i
Pitch
_liE
Idle
690~B~1Jii.
+5'
15
0/50/60/85/100%
1700-1800
O·
19
85%Middle~
2240
O·
25
100/100/100/100/100%
±12'
NOTE:
RPMapprox.
~1JiiIU8lm;;l;:*'iJ{i
Throttle Curve
iIllr~lIII**
59
2250
Please use a pitch gauge to adjust the pitch value. Incorrect excess pitch setting
helicopter performance
and reduce ESe's life and battery's life.
will result poor
RCM-BL700MX MOTOR RCM-BL700MXM~J~JI
Specification
R"trm~
KV
Stator Arms
12
i%"~
-r
Max continuous cUI'(ent~;;I;::m*,Uli:int 90A
y'
Max continuous power fi:;;I;::mlllJJ~
R-rr
Dimension
Illustration
4000W
Input voltage
DC 11.1-50.4V
Magnet Poles
10
Maxinstantaneouscurrent~;;I;:§i!relliltint
150A(5sec)
Maxinstantaneouspower~;;I;:§i!FelllJJ~
6600W(5sec)
Shaft 6x52x57.5mm Weight
Approx. 4059
j~H~~~1II
Brushless
Motor
Red
IiiI
Blue
mlnn~~lI
Black
~
Throttle Signal
(Receiver)
~
;mr~iJ\ ~(m 1& ft)
The motor rotates in different direction with different brand ESCs. If the wrong rotating direction
please switch any two cables tomake the motor rotates in right direction.
ffi~~~~~~~~~~~~~~.~~~~~'fi~~.~~~~'~~~~~~~~~~~m~ff~~~~W~o
33
2440
happens,
-
-
,
:~7:~_~,,"-_: - --,~:~':'i:L\UIGN
-17.6AEXTERNAL~"E~!INSTRUCT~ON~~UAl~A~~~~ECfiE~~~,
.Input voltage: DC7.4V 2cell Lithium battery .Output vOltage: DC5.8V .Max. Continuous Current: 6A
.Integrated
power switch and voltage indicator meter .Utilizes
a linear design, resulting in no interference
the receiver .• Including a 5A 5.1V two-way step-down Voltage Regulator .Size: 60x34x15mm
.Weight: 31g(including wire set)
efilA Ji&: DC 7, 4V 2CELL~iI[ e.:±::./£:
DC 5, BV e~~lI.1lJ:±::
el*~t1~gj'
• J!!!'fJlm!&l!OOJ3iUl ell!!l5A 5, 1V!UjJllff-m~eR1t:
to
.)fit: 6~t§ e~ tli:~11J~1m ;JJ!iUI:&fei7jU~JJJ§g
60x34x15mm em.:
31g
(g**ml
WIRING ILLUSTRATION:
Connect a 5, 1V two-way step-down voltage regulator between the gyro and the rudder servo,
1ia~melil :
5. 1V ~1c!J1ll,l!l:~3mm~II'B!UiWfj§Ma~DIR~21Ml
•
RedlightKUmEmpty-------.
Orangelight mm 7.6V------,
Green light fjm 7.BV------,
Greenlight fjl!f B.OV
Green lightfjm Full
oo o
OSTATUS OGOV
1520
76'
~
~--...
DS
AS
~
BATT
~
SET,
AIL
~l::~~::+
(000) ~
10 ••••. 0
o~
IO.
,-
'00
•
1III1IIl
~@QQ)~
AUMAREV
NOR40
Power switch
••
ELEV
,u ~
~
6
1L---1J::=~==============I
7,4V
Lithium Battery
II_it!!
(RUD)
~ I=:;;:C::J----...,
=> S RUD
~
m
S.1V Two·way Step-down l-"<:----=:,--{
Voltage Regulator
5.1VIlJQJJt!1!1II!
Instruction:
1. Auto-detecting voltage meter di5'~la
"",,~fftlie entire five-light array is illuminated, the battery is fully charged.
"
',YII'"
When the voltage- T~~beJow7.6 ,
'e green lights will be turned off. Use caution, the battery can only be safely
used for a single.flight.he,n
only,Jhe red light is on, the battery voltage is drained, and must be fully reCharged before
use. Do not atte~pt to operate theAllodel during this condition!
2. Some servos su.cl:!as Futaba servo models 9241,9251,9253,9254,9255,9256 and other digital servos are not capable of
handling 6V.Please e nnec a
5.1V two-way step-d wn voltage reg ulator to avoid the servo damaged. If you are usi ng a servo that can accept 6V in put,
the regulator is no' required.
3. When using ~speed controller with BEC output, you must remove the red wire of BEC output on the speed controller.
4.lfthe receiver does not have enough channels or an available socket, you can use a V-type servo harness to share any
channel with an existing connection.
1. 4>~~~~,I!l:feiml1J§g . ~mJJc!mOOJ.)t!!B\llimfeimm~~
• ~m2;51!lttFull2;.ft.lEJtl:mrF
; ~mcp~.,I!l:lllftt~7.
6VB\l(3m!'im~fi) . ~on:fC~~m
~rrllJl~~)t!!ft~
~~!l~~)t!!
; ffijl1O~IHI~*ImB\l~mEmpty~.'l'.lE . 'l'1J9i~~~mlli I
2. ffili9£m~DIR~l1O
: Futaba 9241.9251.9253.9254.9255.9256~ . J1t~l!!100J~D&~'l'lMg~il!~£m~,I!l:l'tlfF . JiJil-:l.~mJlt~l!!100J~D&~B\l~g9HJDit5.1V
Ill~~ . ~~~ll&~~!1
; ;,!H8~m)IE~6VfijjA£m~DIR~IlU'l'~~mlll!!~ •
3. ~m~Eciii:±::2~~~B\l
. @~lt~'HJII~~ BECSi:±::OOJ*It9*lRmll*
I
q5m!&~8M~B*£m~~t~HLB\l'
onfum-~~DIRYl!!13mm*lR' m!Um!&~£m1f-lmm· ~~$'~m BECWml'OOJlml.m:-~mttYl!!1*lR.t·
NOTE: When fixing the wire, please do not over tighten to avoid the connector come off or the wire broken when the
helicopter rotates (vibration);
do not operate in rain or moisture environment to avoid the electric parts short circuit and damaged.
34
--------------~----
--------_
..•
_-----
4L:IGN
'18 .. 3GX 'FLYBARLESS PREFLIGHT ·CHECK moiifll!lU~
~.1
~.2
~~~~~=:J[~PTI~~~~~~~~~==
o
~.3
IStep1
Turn on Transmitter,
and then receiver power.
~OO~~~~c~,~~~m~~.~·
IStep2
3GX Flybarless system will go through initialization process, as
indicated by flashing of all LED's. Do not move the helicopter or
transmitter sticks until initialization process completes.
1lt1Ji!j3GX Flybarless~1IJIJ~ffi~mSTATUS&DIR-A.REV~~11J '
Swash plate jumps up/
down 3 times horizontally
+~K7J<.ljI~~i1J31R..
~o/.J~i1J~¥fI!~lii1Jm~
=
D
=
, p..aull'e~jj~BI~lii\m~H~~~
•
IStep3
The completion of initialization process is indicated by the rapid
up and down motion of swashplate 3 times while remaining level.
Should the swash plate jumps up and down at a tilted position,
the flybarless system initial setup need to be performed again.
(Refer to page 26: Flybarless system initial setup)
~
The pitch of helicopter will remain locked until successful
initialization.
If the initialization process is unable to complete, with
STATUS LED blinking red, Re-check all connections, and perform
( another reboot with helicopter remain stationary.
Following successful initialization
indicates rudder is in heading lock
( normal non-heading mode. (Refer to
, green STATUS LED
ile red LED indicates
in Adjustment)
=1R..'~~~.6X1m
Jm.ljIIlH*I!1CW:
o
rml!~~STATUS
'Oi~~mwr~lI·
f.mil!tiE~tC' ;%nmf.m~Fm~~tC •
o
Green = rudder in'heading lock mode
Red = rudder in normal mode:':
>
&m~~lel!lE~it
- ""<;:::-:;
nm~~fZ~FitlIlE~it .'
-
I
Step4
~.4
I
Tilt the helicopter forward and swash plate should tilt back to
compensate. If reversed, perform the f1ybarless initial setup again and
adjust the elevator reverse setting (Refer to page 28 E:REV setup)
~~~l!jUuM
' ll'e~jjBl~+~M![5J~~IE
' jzD~&[5J, mwrlii\Flybarless
~~~tC~~ft~MeIl'e'lmjj~IED[5J·
(~$~m28~
E.REVft~m8We~IWHi
IE&[5J~~~tC)
Helicopter
tilting
I!RM~D[5J
D
Helicopter
I!ltjtl!~D[5J
tilting
direction
.
.
35
direction
I
Helicopter tilting
direction
StepS
~.5
~.6
~.7
I
Tilt the helicopter to the right and swash plate should tilt left to
compensate. If reversed, perform the f1ybarless initial setup again
and adjust the aileron reverse setting (Referto page29A:REVsetup)
fnl~~.lI1.J1C!I
¢=J
JRtmH~f.a:£~
. Ilt:l!iiBlJRt+~MlC!lx~lE
• m~&1C!I
. mWilii\Flybarless
~lEm~~IE;UHIlt:~iil~lE1.JlC!I·
(:llOxlllJ5JTm:
$~~29:!'[ A.REViiiUHIlt:
.iilE&IC!I~lEm~)
I
Swashplate correction
direction
Step6
I
With throttle stick all the way up (and down), and cyclic stick all
the wayleft/right and up/down, check for any binding on the
swash plate. If binding occurs, perform the f1ybarless initial
setup again and adjust the endpoint limits.
3!~~-DIC!I
JRt)ffiP~mi~:JI£~J~~&S}{jf
. i1tlJRtmi~x£&M"~:JI£~J~
. +~Mi!Ji'F~a
Jnt~ . m~1'~~\~mwrlii\ Flybarless~lEm~~~lEfi~ •
I
Step7
I
Check the center of gravity (CG) and adjust component placement
until CG point is right on the main shaft of the helicopter.
~mil1[ft.e~I~~a~~~$Ii;1fq]~il1[~.~~I~llit;~:Ulicpll1\*,~l'1.Jllit; •
I
Helicopter tilting
direction
Step8
~1I8
I
With all above steps checked, restart the system and begin flight test.
.Ellii~.lI1.J1C!I
~IEM~W~lEm·mwr~.·~~~.~~~lii\mfi~~·
HELICOPTER CG CHECK PROCEDURE-RJr. •••••
I1!.I.U:l75lt .
After installed the battery, hold the helicopter as shown.
Once the helicopter stops rotating, the helicopter's
CG can be seen at where the head is pointing
relative to the main shaft .
• ~~IE~·JRtil1[~.m~m.~·wmil1[~~rr.i!J~~m
.BIl1.JIC!I
. lE~~Il!'\di':E.§- (:UffiIlffiQr)
llit; •
.
~
,-
-=-"
~~'"
~~--;:::'"
.~~-
-~
-"
':-"''''~c<
""
;, ·~.9
..F.LIGHT ·AD~USmMENiF~~p.15ETmU·:J.G
~fi~~~_~W~AE'
..
~
,-
Please practice simulation flight before real flying
-
"''''"~
·."'"''-tk.~:=-i?''",;'&'
••.
.~"~'
~ '.:
.
mBirtl~~~.lI6\lmIUI~B
A safe and effective practice method is to use the transmitter flying on thecomputer through
simulator software sold on the market. Do a simulation f1ightuntil you familiarize your fingers
with the movements of the rudders, and keep practicing until the fingers move naturally.
:l
1. Place the helicopter in a clear open field ( Make sure the power OFF) and the tail of helicopter
point to yourself.
2. Practice to operate the throttle stick(as below illustration) and repeat practicing
"Throttle highllow", "Aileron left/right", "Rudder left/right", and "Elevator up/down".
3. The simulation flight practice is very important, please keep practicing until the fingers
move naturally when you hear operation orders being call out.
i':E~~~m~~!l!fii!J~@~~1.J~M"·~~~.mB·~$Ii;liB~II6\l~~mB@~~·-~~~~,~~~@~~1.J~·
~~~~ffiii3ill&~@~f)ZE . p"(~~~i':E~II6\l..t~~mB. ~;mfi§1.JIC!I@~~
. Mz1'I'i@m~. il1[¥U~reCiJ~~@~%lJ
fillQli1Ji'F&1.J1C!I
•
1.JRt~~.l&?£~~@it!l1.J
(m~.~f.mIUJWJ)
•.MzJRt~~.@.~~$§i3 •
2.**~~i'F~~@fi~(fii!Ji~@~i'F1.J~:llOl'liD
. Mz&II~~)81P~~/{jf,~U.X/£, ftIlilJBEirtl/~&1.JIC!IJBEx/£~
~1.J~.
3.~~mB@~~;f§~m~·
~~IHI~~~¥U1'm,l1!I~'~re§,§§??\ItI~IJlt:±l@re~~i!J~%lJ·
36
c;;;c"~--"';:~-->-~<\'
·::.~.·:'~i\l.!IGNi
~
Mode 1
Mode 2
Illustration
Il~
Move left
Move right r--"-.
£~
~
Rotate
~II!left
Rotate
£II!right
Fly forward
Fly backward
~~
.-.••...
W~
r'-'",-
~~
....,.-0>
r----"--..
~
-~~~-~
~
.••...
backward rotate
Forward rotate
~I!
WII!
c::::::~~
t
@OAO~
Throttle )ffir~
~;O~
f!0~ f#o~
Rudder D[Q]
*When arriving at the flying field.
*~l!tl!mfiij$
~
~~~~~-,,~M-~""~"'/.F~.:"/-"~
~.&.C~T~N~
If there are other radio control aircraft at the field, make sure to check their frequencies and tell them what frequency you are using.
Frequency inte erence can cause your model, or other models to crash and increase the risk of danger.
~iiemfiij$~~iI!lll§~tFHI!! . ~fii~iI!lil'~e'9Jj;fji¥
• il:H59<!JiI!lil'~iJJllEi'fjfme'9Jj;fj~
. ~15.Ie'9Jj;fj~~~/i.Hl!j}jf($\::~f!l1\1\iI!lj~WDm~
0
STARTING AND STOPPING THE MOTOR ~ilJffi~.Ltli!fill
~ -1'-
~~
I Mode 1 I
CAUTION ~
)±
s ~
First check to make sure no one else is operating on the same
frequency. Then place the throttle stick at lowest position and
turn on the transmitter.
Check if the throttle stick is set at
the lowest position.
m~Br~~~~~~e'9llil[
.
~%m~~fi~.~.~~~.e'9iiem·.~rr~~~~~BM~~m
!U~!O •
*Check
l
@Are the rudders moving according to the controls?
@Follow the transmitter's instruction manual to do a range test.
the movement.
d1.JfFm~
©75IoJI!IB~s~~~lIl!J75IoJ~!tJ?
©t&!lI~~~~B,Ej~~fiJi!emg~•
(~
ON! Step1
First turn on the transmitter.
%Im~~~~
ON! Step2
Connect to the helicopter power
1iLE!i:n.1i~
37
OFF! Step3
•
Reverse the above orders to turn off.
~M~~~~~L~~fF!tJfF&~fi'
This proced re is best performed on soft surfaces such as grass. The use of rubber skid stopper is recommended on hard
surface to event vibration feedback from the ground to 3GX, resulting in over-corrections.
~~7te~~jjgl§j.t
. !Uiti!jjg~mlDl~~.tB21l1l!!l
0
B~ft~lmlil1l~~~n!9'iJjjgl§j!U1J~j;;::&.¥I!§?.t9'iJ3GX·
~=mt~OOJH~
tI&~~~mE°
Rubber skid stoppers
installed
~.tID;1l1l!!l
If swashplate should tilt prior to lift off, do not try to manually trim the swash plate level. This is due to vibration feedback to the
3GX, and will disappear once helicopter lifts off the ground. If manual trim is applied, helicopter will tilt immediately after liftoff.
~~l!lItjjglm . +~fllrqrm1~3GX~2i1J9'iJ&
•. lie+~fll!~iIfi*'l9'iJ1ft~. Jlt~~~~Js~+fll!ilJIE;rM<~:t!:1m • Jltm~R~lItjjgft~~rrIlDf¥i!1l* •
CIT~l!ft~ ; E~J~~+~fll!ilJIE1.m7J<~~ . &1ffi1l~IiXI\\l\81~~llii~IE. -1It!t!lIlDiittilJIED"iE!J9'iJiBlln
0
1.Before adjusting, apply a red piece of tape on one blade, or paint a red stripe with a marker or paint to identify on blade.
2.Raise the throttle stick slowly and stop just before the helicopter lifts-off ground. Look at the spinning blades from the side of the
helicopter.
3.Look at the path of the rotor carefully. If the two blades rotate in the same path, it does not need to adjustment.
higher or lower than the other blade, adjust the tracking immediately.
If one blade is
1.~~§ij5ti':El§tcp-3ZaJl9'iJ.1i1fij
. J!O.t~Iit'98'!J~.o!'it~
• .tIit'9~~ . D"@tt~~~¥11¥~
2.~~8'!JU5ffi~~m~ilJ~l!iilti.§~.lt• i':Eml!lItlmjjgl§j§ij
. 1IEm.illIl!l~±l!nU5i1J
3.f:mIl!~I~nUJ\~(®m~3Z1llEM~i1JW~m~!WI~
. I!U1'm~&I\l~;CIT~m*-3Z1llEJU~~
0
0
A.when rotating, the blade with higher path means the pitch too
B.When rotating, the blade with lower path means the pitch t
@Ouring the operation of the helicopter, please stand approximately 10m diagonally behind the helicopter.
©mfJB\¥. ~iiQtt]lH'I-~~J5ftg,-10~R
F... WARNING
0
DO not attempt until you have some experiences with the operation of helicopter.
Lh.~ ~~mt~~~~mfJ~~~~~mfJo
STEP 1 THROTTLE CONTROL PRACTICE )[Er~~mtJ~~
@When the helicopter begins to lift-off the ground, slowly reduce the throttle to
bring the helicopter back down. Keep practicing this action untilyou control
the throttle smoothly.
©~~~l!rml!i:!lItjjg~ . ~ti~f!f;m~~~ml!llill~
~ilJfl.Jl.l~;m~~~~J~1l
0
~.~~mI!1IE!t!ll§j.tftffi"f~
0
38
•••••
1
With the helicopter hovering, observe for any rapid left/right or forward/aft oscillations. If forward/aft oscillation is observed, land the
helicopter, turn the ELE gain dial counterclockwise gradually, and test again. Do this until oscillation disappears.
$t~i§i:~tI!~~l?!rRrr ' 1l!~i§i:~tI!?:ctJ&im~~6'~:;FiE:%~~:t>lf1J~~, ~lili!im~~:t>lil1~~, llU~IJjjH~~rt~m£~~~~tlllm' ~~0-IlB!b'l!liim~~IE~~
Set the dial to 12 o'clock position as starting point
m~m~UI~D~~12Iiil1.J[i5j
Elevator
gai;';~i'ljustment
d:i:al·,
-'~
:'h%'"~i/' ,;
7T.aelS!!.!llIIUIl~,,,,,
Forward/back oscillation
im~3Uh
Decrease ELE gain
I!I~ELESM
If left/right oscillation is observed, land the helicopter, turn the AIL gain dial counterclockwise
Do this until oscillation disappears.
gradually, and test again.
110lili!~?:ctJf-If1J
' ~1Jjj~t~~~U.~~1JIl~~m' ~jJ9Ii0-~B@;ii?:ctJi~IE~~
e
Set the dial to 12 o'clock
m~ID~UftD~~12!oilD[i5j
Aileron;gain
position
adjustment
dial - _
~R.!!.~~m
as starting
point
:
'
Decrease AIL gain
IlI~AIL@lM
AOOOOOOOO
~
Using Futaba
12ZH transmitter
as an example
FC!rwa~dFlight
imiirRh
~Fataba 12ZH.~R~~J
With emphasis on stability
With emYlasis on agility
Main blade pitch: 10°-12°
~~H@;~e: 10°-12°
swash pitch: 38%-44%
Cyclic Pitch 1O· i1§~@;~10°
swash Aileron : 65%
Elevator : 65%
Main blade pitch: 12°-14°
~~H@;~e: 12°-14"
swash pitch : 44%-50%
Cyclic Pitch 12° ~lil1lllf:~e12°
swash Aileron: 75%
Elevator: 75%
swash Aileron : ~65%
Elevator: ~65%
swash Aileron : ~ 75%
Elevator : ~ 75%
12 o'clock direction(50%)
12fOil1.J[qj(50%
)
11 o'clock direction(40%)
11fO~1.J[qj(40%)
.~mf
Main blade pitch Settings(Coliective Pitch Settings)
=E1lOIIRI!eU
(.ItHB!!:~)
Cyclic pitch settings
(Adjust while in DIR mode using AILIELE swash AFR)
MIftHU
(~ttDIR~""F!!t~)
Aileron and Elevator swash plate mixing ratio settings
IJIUmMllUliI*U
Aileron and Elevator gyro gain settings
IJ.mt~mem~M!!t~
]5~tt
,
..
While In DIR setup mode, the transmitter s CCPMswash mixing values for aileron and elevator represent CYCLICpitch
values. These values affect the cyclic roll rates on the aileron and elevator in flying condition. Higher values translate
to faster cyclic roll rates. If cyclic roll rate is not improved with Increased swash mixing values, this is due to
insufficient cyclic pitch. When this happens, cyclic pitch can be increased through the flybarless setup procedure.
Maximum cyclic pitch should be limited at 14 degrees.
ji~;3§Lfl'jJCCMP+~Il)f!l~SWASH~"DIR"~:tC~J:E~lji~~1Jjj
, Aileron~Elevatortt~j@:fl'jJ1\.IJ\M~~~~~~fl'jJ1\.IJ\
, tt~~~~lil1~~e
fl'jJ~~w1\.: ffili'±rRrr~:tCl'Aileron~Elevatortt~j@:fl'jJ1\.IJ\MjtU5~~fl'jJ1\.IJ\
' tt~w~iR.~~Jal~
, j§:stt~rJill~j}J1!!{$jjHtiR.~~~
~~i1§li~£nel'.lE ' ~ii.i\1!!{.lfIitiiUf~~~J:E~:tC' ~jI§~~l@J01\.,j§~1'~~14
°
o~~
39
°
Cause
Problem
~
Blade
Tracking
1rfiIj
~
l5t
Solution
lit
~
Pitch linkage rods are not even
length
Tracking is Off
~~
Adjust length of pitch linkage rods (A)
[J1J~it~(A)~lli
PITCHit~~lli8ll~1'lfZ~
Adjust pitch linkage rods (A) to reduce pitch
by 4 to 5 degrees. Hovering heads peed
should be around 1700-1800RPM.
Excessive pitch
±lllI!.9'jJPITCHiIii~
Headspeed too low
~.
[J1J~it~(A)[J1Jill:Pitchl'fjJ
+ 4-5lli
(~l?!~±IGi'M~~l'fjJ1700-1800RPM)
±1Gi'
•• lfilliiill:
Hovering
Hover
throttle
curve is too low
[J1J~~!\!o)ffir~iIllli!l!(l'fjJ60%)
Not enough pitch
[J1J~it~(A)[J1JiiiPitchl'fjJ
+ 4-5lli
(~l?!~±IGi'.~~l'fjJ1700-1800RPM)
Hovering
throttle
curve is too high
~!\!O;mr~iIll~~~
Rudder
Response
~re&Bi
~.~¥-lIiS~'UI1J7J~1re
iiJcpn!O~ , ~.~~E;lIi!
,fiJi~ltiIJ[IZ.t•
'
lm5n
Tail oscillates (hunting, or wags)
at hover or full throttle
~!\~~;mr~~~.;>j::O*@~lI
Forward/aft oscillation
elevator is applied
•
point
Adjust pitch linkage rods (A) to increase
pitch by 4 to 5 degrees. Hovering headspeed
should be around 1700-1800RPM.
±1Gi'
•• lfilii~
Drifting of tail occurs during
hovering, or delay of rudder
response when centering rudder
stick.
Increase throttle curve at hovering
on transmitter
(around 60%)
~!\!o)ffir~iIllli!l!~ill:
±1Gi'lt:9'jJPITCHiliiill:
Headspeed too high
m
Decrease throttle curve at hovering point on
transmitter (around 60%)
[J1Jill:~!\!o)ffir~iIllli!l!(l'fjJ60%)
Rudder neutral point improperly
set
Reset rudder neutral point
m:62:ijlCPnl!i
ijlCP:l1Il62::iE1'm"
Rudder gyro gain too low
~1re\l'8.IiSlliiliiill:
Rudder gyro gain too high
.~1re\l'8.IiSlliiS~
when
7t ~lren lrelhi'F~ , IUI ilU~f-Ilh
Helicopter front bobbles (nods)
during forward flight.
\
~li!l!mB~'.~!O~
Replace servo, ball link, or linkage balls.
Ufq]!~~, it~~ , f))t~
Leftlright csclllatlcrrwhen
aileron is applied
Turn the AIL gain dial on control box
counterclockwise,
10 degrees at a time
until oscillation is eliminated.
Oscillation
during flight
mfi~ii.J
i!I.nlrelhi'F~
, H~f-Ilh
~~£t8ll!r£~ltiIJ~.t9'jJiiJ.Slli[J1JHm
l'fjJ10lli9'jJ7Jrc,
[J1J~~lI~[I~
Worn servo, or slack in control links
' w.iij~1ffl~
Replace servo, ball link, or linkage balls.
, f))t~
1CiI!~~i~, ~WJKi5flii~I1ii1
Ufq]!~~, it~~
Elevator gyro gain too low
Turn the ELE gain dial on control box
clockwise, 10 degrees at a time until drifting
is eliminated.
7t~Ire\l'8!1mmlliiliiill:
Drifting
during flight
mfill~
Aileron input causes helicopter to
drift
~.l1Ji'F.~
Turn the AIL gain dial on control box
clockwise, 10 degrees at a time until drifting
is eliminated.
Aileron gyro gain too low
iUM\l'8!1mSlliiliiill:
1~~£t8ll~~lIJIJ~.t9'jJ7t~IreSlli1rolHm ' w.~~&\'l
~mJ10M9'jJ7Jrc,[J1J~~~[I~
Roll rate too low
Increase the swashplate
;IUllf~iliiill:
[J1J~l!!l~~P9SwashAFRiili:' ~iiijf{.lf~
AFR in ransmitter
Roll rate still slow after swash afr
adjustment, cyclic pitch too low
Go back through the DIR setup procedure
and increase the cyclic pitch.
8~~~~lf~ID~~l1JiIii~'~~lli
iMill:
~ml.il\DIRllrc
Slow Forward/AftlLeftlRight
input response
ilU~;>j::omBl1Ji'F&BUU~
Control
Response
' IDl::iE~j;:9'jJ~Ift!il!l~§~lli
IIlfF&.
Sensitive Forward/AftlLeftlRight
input response
Roll rate too high
Decrease the swashplate
jf{.lf~iIii~
[J1J!I£l!!l~~P9Swash
AFRiili:' ~ill:~.lf~
AFR in transmitter
Roll rate still too fast after swash afr
adjustment, cyclic pitch too high
Go back through the DlR setup procedure
and decrease the cyclic pitch.
8~~~~.~~ID~~I1J~~,~m~lliilii~
~mlil\DIRllrc,
ilU~;>j::ommhi'F&Biilii~
If above solution
does not resolve.your
issues,
please check with experienced
pilots or contact
*i'fil&jgw..t[J1Jm~ , ill?tl\m\$~H»t1Ji!i ' [email protected]!iEJ'§~~I!Hl'iJfll'¥-m~!:il(lI~ft!.!B'il*~f¢lil!i·
40
~:iE~/J\9'jJ~Ift!il!l~§~lli
your Align dealer.
Pitches up during fast forward flight.
(1)Elevator gyro gain too low, increase the elevator gain by gradually turning the ELE dial clock\ . e.
(2)Elevator trim not centered. Check if helicopter is tilting backwards during hover.
~lIfRfj~."
•• Im.H'i'
(1)ELESgpl'.fE ' ~mW4~ELESIJt~mN!!l~~tBiClJ1Illi!i·
(2)ELEI:lJII;5'l'tt ' ~Jll!J~~IPll!~, rnHfMI:lJIIro£a~~
•
Insufficient gain during flight, but increasing gain results in oscillation.
(1)Check and resolve possible mechanical vibration from helicopter.
(2)Use softer 3GX mounting foam, or double up the stock 3GX foam.
(3)Relocate the 3GX to location less prone to vibration.
fRfj~.~~~,~m~
•••
~.W.~~'i'
(1)W1!!:[HfM~a~~:%~IlJ'
llOlili!£~$'t~~MGI·
(2)mf11!uiI~liX~):!'-~ii3l~;mm~~3GX •
(3)~3GX~!&~~¥l-Mt.H.ItJS'lJllil!!
•
Drifting during 3D maneuvers.
(1)Increase AIL and ELE gain by turning both dials clockwise.
(2)Check if cyclic servos are too slow (minimum 0.1sec 160 degrees)
3DfRfj~~1I8B!a
'i'
(1)~7t~WiU.Il!i\IJt~mllil~~tBiClJ~~
•
(2)W1!1IEmtJ+~I!S'lJ{qJ~Iil~£a~'tI (Jt~~jfmtJi'F~IJtO.1sec/601Jt~~m~)
•
Unstable hover, control inputs are too sensitive.
Decrease the aileron and elevator ATV(AFR) value on the transmitter. For CCPM machines, decrease swashplate mixing
percentage on the transmitter. In addition, exponential can be added to aileron and elevator channels.
~.~~.~'fi~~B.e~a'i'
i5jm.l1!Ull~~AIL&ELES'lJATV
(AFR) i~ (CCPMiJ:'I'C' ~~~Swashtt~)
'iltilil7JOEXPS'lJ~~' ~i!i~IPll!.
After increasing the ATV(AFR) of aileron and elevator, 3D roll rates are still not enough.
Go back through the DIR setup procedure and use larger cyclic pitch.
B •• AIL&ELEiI\)ATV
(AFR) '@3DfRfjil\)ift.l!.WlIftlii~~
'i'
m:~lil\DIRiJ:'I'C ' H!l:~t.iI;;,\:S'lJl1§:lI.u~~e~1Jt
•
Q&
3GX fJybarless sy'stem unable to power up.
(1)Check 'PropeM'oltage source.
(2)C~eckAll::IELEiPlT connections between f1ybarless control unit and receiver.
(3)CHeck1he power connection of 3GX and receiver.
3GX F,lybar:JessllftliiIHlII
'i'
(1)W~~l!ICC~£alE:% •
(2)W~AIL • ELE&PITS'lJIDH,\'2~ffimJ&~~alE:%j!IHi
•
(3)W1!!:3GXWmJ&~re\lili~~~alE:%lim •
Q&AO
3GX flybarless system powers up with LED flashing, but swash plate did not jump 3 times, pitch is locked, unable to
complete the initialization process.
(1)Possible movement during initialization process. Make sure helicopter is absolutely stationary,
(2)lf STATUS LED flashes red, check the connection between controller and receiver.
3GX FlybarlesslHl
•• l!Ill!lE~ , +~IU<1It1tJ ' PI~II~ , 1II!lii.~J~Ii!IlIl.ltJfF'i'
(1)mlM~~~M~I@H'''~iI¥.It ' ;;fi5jJjjfUmlM·
(2)W1!!:llOlili!STATusKiI~m5l!i-m:l:~~
, ~W~Jllj~~wmJ&~£alE:%
0
Q
1
I noticed swashplate tilts Slightly at extreme pitch due to servo interactions, should I make efforts to level it out?
No. Level the swashplate at a degrees using subtrims ONLY in DIR setup mode. (please refer to page 26 step1.3)
End point swashplate interactions are automatically compensated by the 3GX system while in flight.
+~.8~m
•• w~m.~.~~~M~,fi~.~~g.lE
•• m*~.'i'
a tEDIRm'I'C~;ftJffl~W4fl1l(Subtrims)!Ri+~I!OIJtIlMllm~l.J<ljZ($rsam26&
:!;!7W1,3)
, liI'll!lHlm~ , 3GXj1i'd\it~§mtJ~IE+~I!®~~lli~·
0
What adjustments can I make on the transmitter after the DIR setup has been completed?
You can adjust the trim tabs, dual rates, exponential, collective pitch, and aillelev swash AFR (for roll rate). Again do NOT adjust
the subtrims unless followed by repeating of DIR setup steps.
tEIIlIHID
IR.~ •. finll!~•• J;/Jtm~fi~fiI!ffliI\)'i'
-li!!litIttm'I'Cl' ' i!]lIDf&l'!TW,1iEffl~l'l8!il9lJ}Jtm~mig[7tM:
ffi£l§j;;,\:/JIIlJ(dual
rates, exponential) . ~1lI!ilR~e(coliective
pitch)•
7t~/IiIU.~~Ja!~(
ail/elevswash AFR(forrollrate»
0
Q
During step 5 of DIR setup mode, only aileron swashmixing was mentioned. Should I set elevator swash mixing as well?
No. The 3GX system automatically calculates a cyclic ring based on the aileron swash mix percentage. Setting of elevator swash
mix has no affect on the 3G system. Set the cyclic pitch by the aileron swash mix & just use the same value for elevator.
tE~1Hi __ 1II.1ie1!t~~
,lW@RilI!I.lJ.iI\)11ifI~'?
3GX~l!ICtEl!I~URB~, ~§IlJ~~+~MHIQI~~i1!B
' pfi~tEJll!J.IiI~Kij~B;!ilR~~Jjt~, ~~~i6Jmi~®7t~il~H;~Jjt!lOl'!T
0
41
www.align.cor
wwv
www.aiign.co
www.align.com.
tw
vWVv.
www.alia
w rw.allqn.com.tw
"
Specifications
'\Ii.O
-
9".C
& Equipment/m~~1Fm:
Length/.§i:Bt:
1328mm
Heightl.§iiii:
408mm
Main Blade Length/:E1lJ£K:Bt:690mm
Main Rotor Diameter/:EliHi§[~:
Tail Rotor Diameter/~1lJ£Hi§[~:
1562mm
281 mm
Motor Drive Gearl,lilfjjldfRB: 12T
Main Drive Gear/:EdfRB: 112T
Autorotation
Tail Drive
Tail Drive
Gear/~~itJ:E~:
104T
Gear/~Hi!itJd:24T
Drive Gear Ratio/dfRBi!I1JJ:t;: 1:9.33:4.33
Weight(With
Motor)/~.m:(~/liI§jI):
Flying Weight/~!2m::
2830g
Approx. 4700g
1562mm
1328mm
fim~ii&JJflfH~Bmfli5]
·ALlGNCORPORATION
LIMITED
MADE IN TAIWAN
20 11.J un .28 G00563