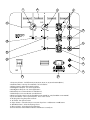
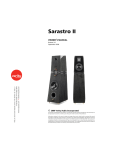
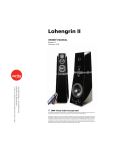
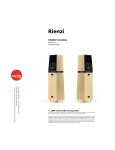
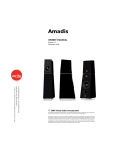
1
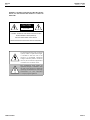
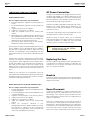
ROCCO
Active subwoofer
OWNER’S MANUAL
Release 1.0
February 2004
© 2004 Verity Audio Incorporated
This manual is copyrighted by Verity Audio Inc. with all rights reserved. Under the copyright laws, this manual may
not be reproduced in any form, in whole or part, without prior written consent of Verity Audio Inc.
Information contained in this manual is subject to change without notice. Verity Audio has reviewed this manual
thoroughly in order that it will be an easy-to-use guide to your Verity Audio Product. All statements, technical
information, and recommendations in this manual and in any guides or related documents are believed reliable, but
accuracy and completeness thereof are not guaranteed or warranted, and they are not intended to be, nor should they
be understood to be, representations or warranties concerning the products described. Your Product has been sold to
you subject to the limited warranty set forth in the warranty card enclosed with your product.
ROCCO
OWNER’S GUIDE
February, 1st, 2004
V.01
CONTENT
Safety Instruction . . . . . . . . . . . . . . . . . . . . . . . . . . . . . 3
Using this Manual . . . . . . . . . . . . . . . . . . . . . . . . . . . . . 5
Product Overview . . . . . . . . . . . . . . . . . . . . . . . . . . . . . 5
Features and Benefits . . . . . . . . . . . . . . . . . . . . . . . . . . 5
Force canceling system (5)
Effortless Neutrality (5)
Long-lived Reliability (5)
Great flexibility (5)
Exquisite Finishing (5)
Compact Design (5)
Description . . . . . . . . . . . . . . . . . . . . . . . . . . . . . . . . . . 5
Connection . . . . . . . . . . . . . . . . . . . . . . . . . . . . . . . . . . 6
TWO-CHANNEL SYSTEM (6)
MULTICHANNEL OR HOME-THEATER SYSTEMS (6)
CONFIGURING YOUR ROCCO SETTINGS (7)
Room Acoustics . . . . . . . . . . . . . . . . . . . . . . . . . . . . . . . 8
flutter echo (8)
reverberation (8)
Standing waves (8)
Early reflections (8)
Multichannel . . . . . . . . . . . . . . . . . . . . . . . . . . . . . . . . . 8
Mains (8)
Center (9)
Surrounds (9)
Subwoofer . . . . . . . . . . . . . . . . . . . . . . . . . . . . . . . . . . . 9
Cabinet Resonance . . . . . . . . . . . . . . . . . . . . . . . . . . . . 9
Care of the Finish . . . . . . . . . . . . . . . . . . . . . . . . . . . . . 9
Maintenance . . . . . . . . . . . . . . . . . . . . . . . . . . . . . . . . . 9
Troubleshooting . . . . . . . . . . . . . . . . . . . . . . . . . . . . . 10
OPERATIONAL PROBLEMS (10)
AC Power Connection . . . . . . . . . . . . . . . . . . . . . . . . . . 7
Replacing the Fuse . . . . . . . . . . . . . . . . . . . . . . . . . . . . . 7
Break-in . . . . . . . . . . . . . . . . . . . . . . . . . . . . . . . . . . . . . 7
Room Placement . . . . . . . . . . . . . . . . . . . . . . . . . . . . . . 7
VERITY AUDIO
Customer Service . . . . . . . . . . . . . . . . . . . . . . . . . . . . 10
Specifications . . . . . . . . . . . . . . . . . . . . . . . . . . . . . . . 11
Limited Warranty . . . . . . . . . . . . . . . . . . . . . . . . . . . . 11
PAGE 2
ROCCO
OWNER’S GUIDE
February, 1st, 2004
V.01
Safety Instruction
12.
Packing and Unpacking Instructions — The product
should be packed/unpacked only as indicated on the
packing/ unpacking instruction sheet;
13.
Object and Liquid Entry — Do not expose the unit to
liquid or moisture, or spill liquids on or near it. Do not
place the unit on a wet surface. Never put objects of any
kind into the unit’s openings, as they may touch
dangerous voltage points or cause short-circuits that could
result in a fire or electric shock;
14.
Power source — A label on the unit indicates the
correct power source for this equipment. Operate the unit
only from an electrical outlet that has the voltage and
frequency indicated on the label. Do not overload
electrical outlets or extension cords, as this can result in
a risk of fire or electrical shock.
15.
Power cord and interconnects protection — Arrange
all connecting cables so that people cannot walk on the
cables, or place object on or against the cables, as this
may damage them. Pay particular attention to cords that
are at plugs, at electrical outlets, connected to accessories,
and at the place where the cords exit the unit.
16.
Servicing — This unit is covered by a one year
warranty. Opening the unit will void your warranty. Refer
all servicing to an authorized Verity Audio technician.
Contact your nearest dealer for instructions. Service
should be referred to an authorized Verity Audio
technician when any of the following occurs:
a. There is damage to the power cord or plug;
b. Liquid enters the unit, or there is exposure to rain or
water;
c. A heavy object falls on the unit, or you dropped the
unit or damaged the cabinet;
d. Operation is not normal (the instructions in this guide
describe the proper operation);
e. The unit exhibits a distinct change in performance;
17.
Damage Requiring Service — Turn off the power on
the active module and unplug it from the main outlet.
Then, disconnect all signal cables from the unit, and refer
servicing to an authorized Verity Audio technician.
In these safety instructions the word "unit" refers to the Verity
Audio Rocco and all its accessories.
1.
Read Instructions — All the safety and operating
instructions should be read before the unit is operated;
2.
Retain Instructions — The safety and operating
instructions should be retained for future reference;
3.
Head Warnings — All warnings on the unit and in the
owner's manual should be followed;
4.
Follow Instructions — All operating and maintenance
instructions should be followed;
5.
Cleaning — Unplug the unit and clean it with a damp
cloth. Do not use a liquid or aerosol cleaner, or a
magnetic/static cleaning device. The unit should be
cleaned only as recommended in this manual;
6.
Accessories — Do not use accessories unless
recommended in this manual. Do not connect or play the
unit before making sure that the associated accessories are
in good condition;
7.
Placing or moving — Do not place the unit on an
unstable cart, stand, tripod, bracket, or table. The unit may
fall causing serious injury, and serious damage. A unit
with cart combination should be moved with care. Quick
stops, excessive force, and uneven surfaces may cause the
unit cart combination to overturn;
8.
Ventilation — The unit control plate has openings for
ventilation that protects it from overheating.
a. Avoid obstructing these openings;
b. Do not place the unit close to a radiator or heat
register.
9.
Grounding — The active module unit has a threeprong plug. Properly ground the unit by inserting the plug
into a grounded electrical, three-socket outlet.
10.
Spikes — The underneath unit spikes assure a tight
coupling with the floor. They are razor-sharp and must be
manipulated with extreme care. Do not move the product
while the product spikes are installed. The product spikes
should be removed before moving the product;
18.
Replacement Parts — When replacement parts are
required, be sure the service technician has used
replacement parts that are specified by Verity Audio.
Unauthorized substitution may result in fire, electric shock
or other hazards;
11.
Moving when Packed — The unit comes packed in
an air-transportation-approved flight case. This case is
heavy and cannot be carried by a single person.
Attempting to move it alone could cause serious injury;
19.
Safety Check — Upon completion of any service or
repairs to this product, ask the service technician to
perform safety checks to determine that the product is in
safe operating order.
VERITY AUDIO
PAGE 3
ROCCO
OWNER’S GUIDE
February, 1st, 2004
V.01
WARNING: TO REDUCE THE RISK OF FIRE OR ELECTRIC
SHOCK, DO NOT EXPOSE THIS PRODUCT TO RAIN OR
MOISTURE.
CAUTION
RISK OF ELECTRIC SHOCK
DO NOT OPEN
CAUTION: TO REDUCE THE RISK OF ELECTRIC SHOCK,
DO NOT REMOVE COVER (OR BACK).
NO USER-SERVICEABLE PARTS INSIDE.
REFER SERVICING TO QUALIFIED SERVICE PERSONNEL.
The lightning bolt flash with arrowhead
symbol, within an equilateral triangle,
is intended to alert the user to the
presence of uninsulated “dangerous
voltage” within the product’s enclosure
that may be of sufficient magnitude to
constitute a risk of electric shock.
The exclamation point within an
equilateral triangle is intended to alert
the user to the presence of important
operating and maintenance (servicing)
instructions in the literature
accompanying the appliance.
VERITY AUDIO
PAGE 4
ROCCO
OWNER’S GUIDE
February, 1st, 2004
V.01
Using this Manual
Features and Benefits
Please take the time to carefully read this instruction manual
prior to installation or use of your Rocco. Your reading efforts
will be rewarded by the satisfaction of getting a full
performance achievement and a long service life. We believe
that a thorough understanding of your new high performance
subwoofer can save you a lot of anxiety.
The Rocco’s ability to reproduce low frequencies with a high
degree of sound intelligibility comes from many useful
features.
This manual will guide you for setting up and operating your
subwoofer and will teach you how to unpack, repack, clean
and service your product. Furthermore, we have included a
few informative sections for the benefit of your own Rocco
familiarization.
We are pleased to count you among the most privilege owners
of a unique product that will yield a very enjoyable experience
for years to come.
Product Overview
Your new Rocco is a mature-engineered high-precision audio
component. It is the cornerstone of a design association
between worldwide audio professionals and acoustic
engineers. It has been specifically designed to provide an aweinspiring level of musical satisfaction in any domestic
environment. The Rocco brings a substantial improvement to
any audio or home theater system and gives its full potential
when associated with the finest ancillary equipment.
The Rocco is an innovative design integrating proprietary
components, state-of-the-art electronics and cabinet of
exquisite finishing quality and rigid structure.
It combines two high-power and low-distortion 12-inch woofer
drivers. Both are firmly secured in a vibration-cancellation
system. They are powered with advanced digital amplification
and processed with highly-linear active filtering circuitry. The
amplifier can deliver up to 700 watts at minimal heat
dissipation. The active circuit uses high-quality and highreliability components and integrates advanced protection
circuitry. All of that, grants the Rocco a capacity to reach high
summits of 120 dB SPL of acoustic pressure at very low
distortion.
The result is a high-resolution subwoofer that gives a great
sense of liveliness, scale, and presence in the listening space.
Your Rocco, without any doubt, will sound natural and
powerful even throughout a seemingly unlimited dynamic
range even at the lowest frequencies. It will give you hours of
enjoyable performance without fatigue.
VERITY AUDIO
Force canceling system
Highly effective noise canceling system that reduces more than
30 dB the cabinet parasitic noise transmission and eliminates
the pendulum effect which can create important output losses.
Effortless Neutrality
High-headroom and low-distortion transducers are used in a
unique Bessel-ported cabinet, along with a high-power digital
amplifier for high dynamics at low frequency reproduction.
Long-lived Reliability
High-performance protection circuitry along with highreliability components allowing an extensive use for years to
come.
Great flexibility
Ingenious crossover design for a high level of flexibility in all
situations.
Exquisite Finishing
Splendid Italian finishing (top quality polyester) of sumptuous
brilliance and impeccable coating that will last for years.
Compact Design
Accommodating size with no performance impairment that
grants dazzling sound in any listening environment.
All these features synthesize Verity Audio’s commitment for
bringing the music foundation back to its essence: Pure and
exalted emotions.
Description
The Rocco is a high-performance active subwoofer composed
of two 12-inch high-power transducers configured in a bassreflex cabinet. Both transducers are firmly attached together via
a vibration canceling system. The active system is composed
of a state-of-the-art high-power digital amplifier, and highquality filter and processor. All that is packaged in a solid
cabinet lacquered with exquisite Italian lacquer.
The vibration canceling system consists of four 5/8-inch
damped-steel rods that firmly link both woofers together. The
summation of the forces created by the acceleration and mass
product of each individual woofer cone will be zeroed because
of their opposite directions. This topology greatly reduces inner
cabinet vibrations. It then stabilizes the complete cabinet and
improves reference to ground. High-diameter and long-throw
drivers usually create enough accelerating forces to rock the
complete cabinet and create distortion and energy leakage.
PAGE 5
ROCCO
OWNER’S GUIDE
February, 1st, 2004
V.01
The Rocco cabinet is tuned fourth-order Bessel. This unique
topology enhances the bass performance with the room
reinforcement characteristics. It offers a flat and linear
frequency response down to the low 16 Hz. Due to its
performing design, the Rocco does not need any active
frequency equalization. It’s a purist design capable of high
dynamic impacts, very low distortion and high reliability.
The Rocco amplifier is based on modern digital amplification
— providing a transparent and musical path to the original
performance. It presents a naturally extended sound quality
that transcends older amplifier technologies in both efficiency
and sonic quality.
The combination of low output impedance and a massive
multi-wave rectified power supply provides stable power under
the most demanding and dynamic conditions.
Advanced overload management and circuitry protection
eliminate system worries, allowing maximum performance on
demand.
It is a fully balanced differential amplifier reducing low
frequency power supply noise and increasing common mode
rejection, to improve the signal-to-noise ratio.
Sophisticated dual-zone star grounding and a double-sided
ground plane fill combined with ground bounce correction to
maintain the quietest system reference possible.
The Rocco 500 VA transformer at maximum power is at the
core of the power supply. Combined with amplifier technology
that is 90% efficient, it provides a power supply that exceeds
demand, maintaining a constant and cool temperature.
Connection
Setting-up typical subwoofer can be laborious. But the Rocco
is designed to be easy to install. Before connecting and settingup your Rocco, review the layout diagram located at the end
of this manual. It will further guide you in properly connecting
and configuring your Rocco subwoofer.
Turn off your Rocco subwoofer before
making any signal connection!
TWO-CHANNEL SYSTEM
How to Connect One Rocco
1. Connect your preamplifier left output to the left subwoofer
input;
2. Connect your preamplifier right output to the right
subwoofer input;
3. Adjust the Rocco RCA/XLR control to the selected input.
Connecting the left and right channel to the same unit will
down-mix the input left and right signals to mono.
How to Connect Two Roccos
1. Connect your preamplifier left output to your left
subwoofer left input;
2. Connect your preamplifier right output to the right
subwoofer right input;
3. Adjust the Roccos RCA/XLR control to the selected input.
The Rocco amplification delivers a remarkable 700 watts of
short-term continuous power to the two 12-inch woofers.
Also, nothing has been neglected in the active processing
stages. The Rocco is equipped with high-quality RCA and XLR
connectors, high precision controls, precise electronic
components and a high-performance dynamic processor that
give state-of-the-art protection. It makes the Rocco extremely
reliable under the most demanding conditions.
MULTICHANNEL OR HOME-THEATER SYSTEMS
The Rocco accepts RCA or balanced inputs. It can be true or
inversed polarity. It offers lowpass slopes of 12 to 24 dB per
octave. The lowpass frequencies can be selected from 30, 35,
40, 45, 50, 56, 63, 71, 80 Hz and 250 Hz when “Movie” is
selected. The “Movie” position bypasses the lowpass filter. The
amplitude level control can offer a +6dB gain to compensate
for main speakers amplifier gain. “LFE” input is provided for
home-theater applications. “Left” and “Right” inputs are
provided for stereo applications. If both should be used
together, they are down-mixed mono.
How to Connect Two Roccos
1. When two LFE outputs are available:
a. Connect your preamplifier/processor left LFE output
to your left subwoofer LFE input;
b. Connect your preamplifier/processor right LFE output
to your right subwoofer LFE input;
2. When only one LFE output is available, connect your
preamplifier/processor LFE output to your two subwoofer
LFE inputs;
3. Adjust the Roccos RCA/XLR control to the selected input.
VERITY AUDIO
How to Connect One Rocco
1. Connect your preamplifier/processor LFE output to the LFE
subwoofer input;
2. Adjust the Rocco RCA/XLR control to the selected input.
PAGE 6
ROCCO
OWNER’S GUIDE
February, 1st, 2004
V.01
CONFIGURING YOUR ROCCO SETTINGS
STEREO REPRODUCTION
How to Configure with Small or Large Loudspeakers
1. For large loudspeakers, adjust the crossover frequency to
35 Hz;
2. For small loudspeakers, adjust the crossover frequency to
50 Hz;
3. Adjust the phase selector to 0 degrees;
4. Adjust the crossover slope to 12 dB/oct;
5. Adjust the amplitude control to the twelve-o’clock
position;
6. While playing music, adjust the volume control until you
get a well-balanced ample and deep bass. Be very careful
not to increase the bass level too much, as it will be very
detrimental to the overall sound performance;
7. Play with the phase selector to get the best loudness.
Readjust the volume control as needed;
Even though we normally recommend adjusting the crossover
slope to 12dB/oct, you can still adjust the slope to 24dB/oct.
You will have to experiment to find out which one is best
suited for your loudspeakers. Larger loudspeakers may give
better results with the crossover frequency adjusted lower than
35 Hz.
To better match your Rocco sensitivity with your main speaker
sensitivity you will need a standard level meter and a white
noise generator. Many audiophile record companies offer a
test CD that includes a track with white noise reproduction.
Play white noise and adjust for the same sensitivity at the
listening position. Compare your two main speakers with all
your Rocco(s). If you don’t have any level meter, simply do it
by ear.
Should you use your Rocco in a home-theater system, the
above adjustments could be done by following the instructions
included in your processor manual. Most processors come with
an automatic level adjustment feature.
AC Power Connection
The power cord should be firmly plugged to the Rocco power
receptacle and plugged to an electrical outlet that has the
specified voltage and frequency. The power switch located at
the bottom left of the control module is wired to the AC main
and commute the power going to the Rocco.
Your Rocco should be configured to comply with your country
frequency and voltage. Should they be different, do not
connect the Rocco and refer immediately to an authorized
technician for service.
The frequency and voltage ratings are specified both on your
packaging and near your Rocco electrical inlet.
Should you move to another country, ask an authorized
technician for frequency and voltage compliance. Connecting
to improper frequency or voltage may cause permanent
damage or result in a risk of fire or electric shock.
The power cord should not be plugged or
unplugged from the unit when associated
accessories are still powered.
Replacing the Fuse
Turn off your Rocco and unplug the power cord. Replace with
a specified fuse as indicated on the Rocco control plate. For
220-240 VAC use 2.5 amperes, slow-blow and for 100-120
VAC use 5 amperes, slow-blow.
Break-in
Your Rocco requires approximately 75 hours of break-in time
before reaching 63% of its full performance. 500 hours will be
required to reach 99%.
HOME-THEATER & MULTICHANNEL REPRODUCTION
How to Configure with Small or Large Loudspeakers
1. For large loudspeakers, setup the preamplifier/processor
to large loudspeakers;
2. For small loudspeakers, setup the preamplifier/processor
to small loudspeakers;
3. Adjust the crossover frequency to the “Movie” position;
4. Adjust the phase selector to 0 degrees;
5. Adjust the crossover slope to 24 dB/oct;
6. Adjust the amplitude control to the twelve-o’clock
position;
7. Follow the instructions indicated in your
preamplifier/processor user guide to complete your setup.
You will have to calibrate your main, surround and
subwoofer(s) for proper delays, levels and speaker-size
within your preamplifier/processor setup;
VERITY AUDIO
Room Placement
A proper room installation of your Rocco subwoofer(s) may
significantly enhance the overall performance of your system.
Even though, some companies propose products that selfbalance their frequency response, there is no replacement for
proper room placement.
Your Rocco is equipped with two 12-inch drivers located on
each side, and a control panel and vent located at the rear.
Knowing that a subwoofer generally gives more output when
located near a room corner and less output when moved closer
to the room center, position your Rocco with the vent facing a
room corner. Leave a minimum distance of 18 inches. None of
PAGE 7
ROCCO
OWNER’S GUIDE
February, 1st, 2004
V.01
the 12-inch woofer drivers should be near a boundary. Stiff
walls may allow closer proximity. Make sure the spikes are
properly installed. For home-theater systems, complete your
preamplifier/processors setup.
Once your system has been properly installed and adjusted,
should the bass sound muddy or boomy, try to move the
subwoofer twelve inches toward the room center. Readjust
your setup and repeat until you get a good performance.
While keeping the same distance with the rear or front wall,
you can also move the subwoofer step-by-step away from the
side wall. It should change the bass tonal balance without
lowering the bass strength.
Your Rocco subwoofer is a refine audio product that will
highly benefit from the care and attention invested in the setup.
We recommend starting with the above recommendations. The
more familiar you will get with your Rocco and its integration
with your system, the more you will develop the knowledge
and skills to better optimize your system. Your efforts will be
rewarded in creating an awe-inspiring performance.
Room Acoustics
A listening room should always be considered as an inherent
and inclusive part of any performing sound system. It is a
complex and high-order variable that has significant influence
in the overall sonic performance. The acoustic behaving of a
listening room is even more critical for low frequencies.
A room dimension sustains and reinforces a fundamental
frequency or harmonics that correspond to wavelength
multiples. Because of its length, width and height, a listening
room will exhibit several modes related to multiple dimension
combinations. It is a good practice to select room dimensions
that scatters apart the room modes. As an example, a cubic
room would create the worst conditions, as all dimensions are
equal. Acoustically, the role of a room would be to neither
cancel nor reinforce any frequency. However, most rooms will
do it in some degree. The idea is to properly control your room
by using different treatment tools.
The following definitions may be useful to identify some room
acoustic behaving:
A flutter echo is a rapid (usually regular) succession of
reflected pulses resulting from a single pulse. They can be
easily identified by tapping your hands while walking in the
room. They are frequently located at the ceiling corners or at
the center of the ceiling-wall intersections.
The room reverberation is a tendency for room sound level to
persist after direct sound ceases. The optimum reverberation
time for a room depends upon room volume, sound frequency,
and the type of sound or reproduced music.
VERITY AUDIO
Standing waves are reflections from opposing parallel surfaces
resulting in serious peaks in the reverberation-time / frequency
curve. In properly proportioned rooms, resonances can be
effectively reduced and standing waves practically eliminated
by introducing numerous sound treatment devices. The object
is to prevent sound reflection back to the point of origin until
after several reflections and/or after being considerably
attenuated.
Early reflections are the first sound reflections heard at the
listening position. They are usually intense and annoying. In
order of importance, they usually come from the floor, the side
walls and the ceiling. They can either be controlled by placing
diffusors or absorbers at their image location.
If one of the above phenomenons is prominent, please consult
your dealer to get proper assistance.
Multichannel
It has long been a practice for audio enthusiasts to connect a
stereo system with a television to get a better sonic
performance. From the late 70's to the early 80's two new
home-movie formats became widely available: VCR and
laserdisc. Meanwhile, TV sets got better definition and larger
screens. By 1985, both formats were improved by the
introduction of higher quality audio-video sources. But the real
surround sound as found in large theaters was not yet
available. The format density was not high enough to encode
the surround information until the DVD format was released.
Lately, SACD and DVD-A formats were lunched to offer highresolution stereo and multi-channel audio. A multi-channel
system designed for high-resolution audio will be excellent for
music as well as movies.
A surround sound system is dependant on complex room and
acoustic parameters. We recommend that you consult your
Verity Audio dealer to get proper recommendations and
assistance. Verity Audio dealers were carefully selected to give
you the best support.
Your Rocco subwoofer was designed to perfectly match with
the Verity Audio Tamino loudspeaker line. You will also get
outstanding results combining it with Fidelio and Parsifal. Each
piece of a multi-channel system can be purchase separately.
Take your time and buy quality components.
Following, is a brief nomenclature that outlines important
points and specifications to be considered for each of the
surround system loudspeakers.
Mains: The mains are the front left and right speakers. For
home-theater, they mostly reproduce music and surround
information. If you plan to use them also for stereo or multicannel music playback, they should be high-quality. A good
practice is to use mains that go below 80Hz and reach 105 dB
SPL.
PAGE 8
ROCCO
OWNER’S GUIDE
February, 1st, 2004
V.01
Center: Experts agree that this the most important speaker in a
home-theater system as, it reproduces the dialogues and most
action information. The center should blend seamlessly with
the main speakers in order to create a believable sound field.
It should possess the same characteristics (frequency response,
phase response and dispersion) as the main speakers.
Care of the Finish
Surrounds: The surrounds are the rear and side loudspeakers.
They reproduce special effects or ambiance information. They
are usually much less solicited than the mains and center.
Because of that, custom installers will often install mini
monitors or wall mounted speakers. Nevertheless, for best
performance, it is strongly recommended to use all identical
loudspeakers in a manner to get a homogeneous and coherent
sound field. Surround speakers should be able to reproduce
frequencies below 60 Hz. Verity Audio does not recommend
“diffuse” surround speakers. They are good for movies, but
inadequate for multi-channel music.
Unplug the unit and clean with a lint-free moistened cloth. Do
not use a liquid or aerosol cleaner.
Subwoofer: Any good surround system needs a high quality
subwoofer. It is the foundation for all movie soundtracks as
well as for most multi-channel SACD or DVD-Audio.
Cabinet Resonance
Even though your new Rocco is capable of outputting a
tremendous amount of energy, it runs dead quiet. Sounds like
science fiction? Hardly. The Rocco is equipped with a
complementary noise reduction system. It consists of four 5/8inch steel rods that firmly attach the two 12-inch woofer drivers
together. The mass-acceleration forces created by both drivers
are equal and in opposite directions. The mechanical energy is
then canceled. Even on the most demanding material you will
hardly notice that your Rocco is working. But you will certainly
ear strong, accurate and fast decay bass. Moreover, the Rocco
cabinet was designed to shape any resonance well over its
lowpass cutoff frequency. In other words, none of the Rocco
subwoofer reproduced frequencies will be able to excite the
enclosure cabinet. Your Rocco cabinet will stay quiet all the
time, giving you an amazing sonic experience.
Your Rocco subwoofer is available in two standard finishes.
High-gloss black piano and high-gloss silver finish. They are
high-quality Italian finishes. They need little care and will last
for a long time.
Use a cloth brush to dust the black velvet underneath the
grilles or tempered glass. A piece of packing tape works also
very well.
Maintenance
Verity Audio products are offering years of trouble-free
performance. If for any reason, your speaker needs servicing,
contact your authorized Verity Audio dealer or call the Verity
Audio service department at (418) 682-9940 or email us at
[email protected]. Help is available from Monday
through Friday from 8:30 A.M. to 5:00 P.M. Eastern Standard
Time (EST), except on holidays.
If you seem to have an operational problem, try to solve it by
referring to the information in the Troubleshooting section of
this manual. If you cannot quickly resume normal operation,
contact an authorized Verity Audio technician.
Before contacting your authorized Verity Audio technician,
make sure you have the following information in hand.
O
O
O
O
Serial numbers;
Place of purchase;
Nature of the problem;
Steps you have taken to solve the problem and the obtained
results.
A return authorization number is required for servicing any of
our products and it should be clearly identified on the
packaging before any shipment to our facilities. Every unit
shipped without return authorization number will be returned
to sender.
Attempting to repair the product by nonauthorize technicians may void the warranty
VERITY AUDIO
PAGE 9
ROCCO
OWNER’S GUIDE
February, 1st, 2004
V.01
Troubleshooting
Customer Service
This section describes how to solve common problems you
may encounter when using your subwoofer. Many problems
have simple solutions, so try these suggestions before you call
your dealer or Verity Audio.
Verity Audio provides customer support and service for all
Verity Audio products. If you have any questions regarding
your new product, call the Verity Audio help desk at (418) 6829940 or email us at [email protected]. Help is
available Monday through Friday from 8:30 A.M. to 5:00 P.M.
Eastern Standard Time (EST), except on holidays.
OPERATIONAL PROBLEMS
This section contains problems and solutions related to the
operation of your hardware. Try the solutions in the order
listed within each section.
I hear no sound coming out of the subwoofer
1. Make sure all your audio apparatuses are plugged into a
power source and that they are turned on. Check that their
respective power indicator indicates that the power is on;
2. Make sure the Rocco power switch is “on”;
3. Make sure every interconnecting cable are connected
properly and firmly;
4. Make sure your audio equipment selectors and controls are
suitably adjusted (selector(s), volume control(s), mute
switch(es), etc.);
5. Make sure the control level on your Rocco is not turned all
the way down;
6. Make sure your software material (CD, LP, tape etc.) is
properly installed and currently running;
If you seem to have an operational problem, try to solve it by
referring to the information in the Troubleshooting section. If
you cannot quickly resume normal operation, contact your
dealer or Verity Audio.
The bass is muddy
1. Verify the placement. Try moving the subwoofer closer to
the front wall and side wall. You can also try moving it
closer to the middle of the front wall (about 1/3 of the
width);
2. Make sure the spikes are properly installed underneath
your subwoofer;
3. Make sure your amplitude level is not too high;
4. Make sure your processor setup has been properly
executed;
5. If the problem persists, contact your dealer.
Hums or unusual sounds
1. Turn off your Rocco, unplug all signal inputs, then turn on
your Rocco and increase the output level. If the problem
disappears, the hum is originating from another piece of
equipment;
2. If the problem persists, contact your dealer.
VERITY AUDIO
PAGE 10
ROCCO
OWNER’S GUIDE
February, 1st, 2004
V.01
Specifications
Bandwidth
Crossover frequencies
Woofer
Limited Warranty
18 Hz to 100 Hz ± 3.0 dB
30 • 35 • 40 • 50 • 56 • 63 • 71 • 90
• 250 Hz (Movie)
12 inch • fiber-reinforced cone
• rubber surround
Level Range (RCA inputs)
- infinite to + 6 dB
Level Range (XLR inputs)
- infinite to +12 dB
Maximum Output
Break in time
Electronic THD and noise
Damping factor
Inputs
120 dB SPL
75 hours (63%)
400 hours (99%)
< 1 % THD at rated power
> 100 below 100 Hz
700 watts
Idle Power Draw
65 watts
35 dB (RCA inputs) 41dB(XLR inputs)
Width
416 mm (16.4 in)
Depth
716 mm (28.2 in)
Height
559 mm (22.0 in)
Net Weight
64.5 kg (141 lbs.)
Gross Weight
The product shipped for services under this warranty shall be
delivered by the owner to the factory with a return
authorization number clearly written on the box. Products
shipped without return authorization number will be returned
to sender.
The included warranty registration card should be properly
filled and returned to the factory within ten (10) days from the
date of purchase.
XLR and RCA
Available power
Amplification Gain
The Verity Audio Rocco is covered by a limited warranty
against defects in material and workmanship for a period of
one year from the date of shipment to the authorized Verity
Audio dealer.
77 kg (170 lbs.)
Standard Finish
Italian High-Gloss Black Piano
Optional Finish
Italian High-Gloss Makore
High-Gloss Metallic Silver
Damages resulting from negligence, misuse or accident,
improper repair procedures or alterations, or operation that is
contrary to the manufacturer’s instructions are excluded from
this warranty.
Verity Audio reserves the right to modify or change the
equipment, all or in part, at any time, in order to include any
refinements deemed appropriate by Verity Audio.
This warranty is expressly in lieu of all other warranties,
expressed or implied and all other obligations or liabilities on
the part of Verity Audio. No other person (s), including dealer,
agent, representative are authorized to assume for Verity Audio
any liability on its behalf or on its name except to refer
purchasers to the present warranty.
Verity Audio liability to any purchaser shall be to replace any
part of the product itself because of defective materials or
workmanship, and Verity Audio shall not be liable for any
consequential damage as a result of defects in material or
workmanship.
Notes
VERITY AUDIO
PAGE 11
1
2
3
15
4
PUSH
1
2
3
5
NEUTRIK
PUSH
1
2
3
14
NEUTRIK
6
PUSH
1
2
3
13
NEUTRIK
7
12
8
CAUTION:
RISK OF ELECTRIC SHOCK
DO NOT OPEN
ATTENTION:
RISK DE CHOC ELECTRIQUE
NE PAS OUVRIR
9
11
10
1: Frequency Selector -Scaled from 30, 35, 40, 45, 50, 56, 63, 71, 80, 90 and 250 Hz (Movie)
2: Ventilation Holes - Air traps for ventilation - Do not obstruct
3: Volume Control - Adjust the output level here
4: XLR Right & Left Inputs - For stereo applications
5: RCA Right & Left Inputs - For stereo applications
6: RCA LFE Input - For home-theater or multichannel
7: XLR LFE Input - For home-theater or multichannel
8: Main Fuse Holder - Replace by 5A, Slow Blow at 100-120 VAC or 2.5A, Slow Blow at 210-240 VAC
9: Spare Fuse Holder - Store a spare fuse here - This is not in circuit.
10: AC plug inlet - Plug the power cord here
11: AC switch - Turn power on here
12: Slope Selector - Select the low-pass crossover slope here - 12dB/octave or 24dB/octave
13: RCA/XLR Selector - Select the input type here
14: Phase Selector - Select the phase polarity here
15: Power indicator - Blue LED that indicates if the Rocco is actually on.
VERITY AUDIO
1005 Saint-Jean-Baptiste Avenue, suite 150, Quebec (Quebec) G2E 5L1 Canada
Phone: (418) 682-9940
w w w .verityaudio.com
© 2003 Verity Audio, All rights reserved
Fax: (418) 682-8644
[email protected]