1
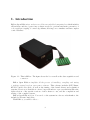
E4Box Open Edition Reference Manual
Linux RTAI Code generation in minutes
Version: 1.0
May 20, 2013
About Evidence S.r.l.
Evidence is a company operating in the field of software for embedded real-time systems.
It started in 2002 as a spin-off company of the Real-Time Systems (ReTiS) Lab of the
Scuola Superiore Sant’Anna (Pisa, Italy). Today, Evidence is a dynamic company having
collaborations in the field of electronics, telecommunications, automotives, and industrial
automation.
People at Evidence are experts in the domain of embedded and real-time systems, with
a deep knowledge on the design and specification flow of embedded software, especially
for the embedded market.
Besides providing consultancy services, Evidence also provides: BSPs based on Linux
for embedded devices, evaluation boards featuring most innovative 8, 16 and 32-bit
microcontrollers for the embedded market, development tools for making embedded
software development easier, and tools for the schedulability analysis of real-time tasks
running on your final product.
For more information see: http://www.evidence.eu.com
Contact Info
Evidence Srl,
Via Carducci 56
Località Ghezzano
56010 S.Giuliano Terme
PISA Italy
Tel: +39 050 99 11 224
Fax: +39 050 99 10 812
For more information about Evidence products, please send an e-mail to the following address: [email protected]. Other information about the Evidence product
line can be found at the Evidence web site at: http://www.evidence.eu.com.
This document is Copyright 2011-2012 Evidence S.r.l.
Information and images contained within this document are copyright and the property of Evidence
S.r.l. All trademarks are hereby acknowledged to be the properties of their respective owners. The
information, text and graphics contained in this document are provided for information purposes only by
Evidence S.r.l. Evidence S.r.l. does not warrant the accuracy, or completeness of the information, text,
and other items contained in this document. Matlab, Simulink, Mathworks are registered trademarks
of Matworks Inc. Microsoft, Windows are registered trademarks of Microsoft Inc. Java is a registered
trademark of Sun Microsystems. in the USA. and other countries, and are used under license. All
other trademarks used are properties of their respective owners. This document has been written using
LATEX.
2
Contents
1. Introduction
1.1. E4Box Professional Edition . . . . . . . . . . . . . . . . . . . . . . . . .
1.2. Requirements . . . . . . . . . . . . . . . . . . . . . . . . . . . . . . . . .
1.3. Use Cases . . . . . . . . . . . . . . . . . . . . . . . . . . . . . . . . . . .
1.3.1. Simulation, Rapid Prototyping, Code Generation ad Calibration
of Control Algorithms . . . . . . . . . . . . . . . . . . . . . . . .
1.3.2. Signal generation . . . . . . . . . . . . . . . . . . . . . . . . . . .
1.3.3. Data Acquisition . . . . . . . . . . . . . . . . . . . . . . . . . . .
1.3.4. Direct control of the Data Acquisition Card . . . . . . . . . . . .
1.4. Documentation . . . . . . . . . . . . . . . . . . . . . . . . . . . . . . . .
1.5. Licensing . . . . . . . . . . . . . . . . . . . . . . . . . . . . . . . . . . . .
1.6. Technical support . . . . . . . . . . . . . . . . . . . . . . . . . . . . . . .
1.7. Acknowlegments . . . . . . . . . . . . . . . . . . . . . . . . . . . . . . .
11
11
12
12
12
13
13
13
2. Hardware/Software Description
2.1. Version 1.0 . . . . . . . . . . . . . . . . . . .
2.1.1. Hardware . . . . . . . . . . . . . . .
2.1.2. Software . . . . . . . . . . . . . . . .
2.1.3. Data Acquisition card: NI PCI-6221
2.2. Other Data Acquisition boards . . . . . . .
.
.
.
.
.
14
14
14
14
15
15
.
.
.
.
.
.
.
.
.
.
16
16
16
18
19
20
22
24
25
27
28
3. E4Box Startup
3.1. Unpacking E4Box 1.0 . . . . . . . . . . . .
3.2. Booting E4Box . . . . . . . . . . . . . . .
3.3. Loading the Kernel modules . . . . . . . .
3.4. Starting ScicosLab . . . . . . . . . . . . .
3.5. Creating your first design . . . . . . . . . .
3.6. Generating Code . . . . . . . . . . . . . .
3.7. Running the generated code . . . . . . . .
3.8. Running QRTAILab . . . . . . . . . . . .
3.8.1. Data visualization with QRTAILab
3.8.2. Data Calibration with QRTAILab .
.
.
.
.
.
.
.
.
.
.
.
.
.
.
.
.
.
.
.
.
.
.
.
.
.
.
.
.
.
.
.
.
.
.
.
.
.
.
.
.
.
.
.
.
.
.
.
.
.
.
.
.
.
.
.
.
.
.
.
.
.
.
.
.
.
.
.
.
.
.
.
.
.
.
.
.
.
.
.
.
.
.
.
.
.
.
.
.
.
.
.
.
.
.
.
.
.
.
.
.
.
.
.
.
.
.
.
.
.
.
.
.
.
.
.
.
.
.
.
.
.
.
.
.
.
.
.
.
.
.
.
.
.
.
.
.
.
.
.
.
.
.
.
.
.
.
.
.
.
.
.
.
.
.
.
.
.
.
.
.
.
.
.
.
.
.
.
.
.
.
.
.
.
.
.
.
.
.
.
.
.
.
.
.
.
.
.
.
.
.
.
.
.
.
.
.
.
.
.
.
.
.
.
.
.
.
.
.
.
.
.
.
.
.
.
.
.
.
.
.
.
.
.
.
.
.
.
.
.
.
.
.
.
.
.
9
10
10
10
4. ScicosLab Blocks
30
4.1. RTAI-Lib Palette . . . . . . . . . . . . . . . . . . . . . . . . . . . . . . . 30
4.1.1. Mathematical functions . . . . . . . . . . . . . . . . . . . . . . . . 30
4.1.1.1. SINE block . . . . . . . . . . . . . . . . . . . . . . . . . 30
3
Contents
4.1.2.
4.1.3.
4.1.4.
4.1.5.
4.1.6.
4.1.7.
4.1.1.2. SQUARE block . . . . . . . . . . . . . . .
4.1.1.3. STEP block . . . . . . . . . . . . . . . .
Interaction with the Comedi Libraries . . . . . . .
4.1.2.1. COMEDI A/D block . . . . . . . . . . . .
4.1.2.2. COMEDI D/A block . . . . . . . . . . . .
4.1.2.3. COMEDI DI block . . . . . . . . . . . . .
4.1.2.4. COMEDI DO block . . . . . . . . . . . . .
4.1.2.5. COMEDI Encoder block . . . . . . . . . .
RTAI-Lab blocks . . . . . . . . . . . . . . . . . .
4.1.3.1. LED block . . . . . . . . . . . . . . . . .
4.1.3.2. SCOPE block . . . . . . . . . . . . . . . .
4.1.3.3. METER block . . . . . . . . . . . . . . . .
Generic Sensors . . . . . . . . . . . . . . . . . . .
4.1.4.1. SENSOR block . . . . . . . . . . . . . . .
4.1.4.2. ACTUATOR block . . . . . . . . . . . . . .
Realtime Communication and concurrency control
4.1.5.1. FIFO IN block . . . . . . . . . . . . . .
4.1.5.2. FIFO OUT block . . . . . . . . . . . . . .
4.1.5.3. MBX RCV BLK block . . . . . . . . . . . .
4.1.5.4. MBX RCV NO BLK block . . . . . . . . . .
4.1.5.5. MBX SEND IF block . . . . . . . . . . . .
4.1.5.6. MBX SEND OVW block . . . . . . . . . . .
4.1.5.7. SEM WAIT block . . . . . . . . . . . . . .
4.1.5.8. SEM SIGNAL block . . . . . . . . . . . .
File system input/output . . . . . . . . . . . . . .
4.1.6.1. EXTDATA block . . . . . . . . . . . . . .
4.1.6.2. LOG block . . . . . . . . . . . . . . . . .
Miscellaneous . . . . . . . . . . . . . . . . . . . .
4.1.7.1. EXTCLOCK block . . . . . . . . . . . . . .
4.1.7.2. C RTAI block . . . . . . . . . . . . . . .
A. E4Box configuration
A.1. Adding a New User . . . . . . . . . . .
A.2. Changing the Display Resolution . . .
A.3. Changing the Keyboard Layout . . . .
A.4. How to configure the Network address
A.5. Configuring E4Box for remote access .
.
.
.
.
.
.
.
.
.
.
.
.
.
.
.
.
.
.
.
.
.
.
.
.
.
.
.
.
.
.
.
.
.
.
.
.
.
.
.
.
.
.
.
.
.
.
.
.
.
.
.
.
.
.
.
.
.
.
.
.
.
.
.
.
.
.
.
.
.
.
.
.
.
.
.
.
.
.
.
.
.
.
.
.
.
.
.
.
.
.
.
.
.
.
.
.
.
.
.
.
.
.
.
.
.
.
.
.
.
.
.
.
.
.
.
.
.
.
.
.
.
.
.
.
.
.
.
.
.
.
.
.
.
.
.
.
.
.
.
.
.
.
.
.
.
.
.
.
.
.
.
.
.
.
.
.
.
.
.
.
.
.
.
.
.
.
.
.
.
.
.
.
.
.
.
.
.
.
.
.
.
.
.
.
.
.
.
.
.
.
.
.
.
.
.
.
.
.
.
.
.
.
.
.
.
.
.
.
.
.
.
.
.
.
.
.
.
.
.
.
.
.
.
.
.
.
.
.
.
.
.
.
.
.
.
.
.
.
.
.
.
.
.
.
.
.
.
.
.
.
.
.
.
.
.
.
.
.
.
.
.
.
.
.
.
.
.
.
.
.
.
.
.
.
.
.
.
.
.
.
.
.
.
.
.
.
.
.
.
.
.
.
.
.
.
.
.
.
.
.
.
.
.
.
.
.
.
.
.
.
.
.
.
.
.
.
.
.
.
.
31
31
32
32
32
33
33
34
34
34
35
35
36
36
36
37
37
37
37
38
38
39
39
40
40
40
41
41
41
41
.
.
.
.
.
.
.
.
.
.
.
.
.
.
.
.
.
.
.
.
.
.
.
.
.
.
.
.
.
.
.
.
.
.
.
.
.
.
.
.
.
.
.
.
.
43
43
44
45
46
47
B. Performance
49
B.1. Latency Tests . . . . . . . . . . . . . . . . . . . . . . . . . . . . . . . . . 49
C. Opensource projects included in E4Box
50
D. Ubuntu repositories
51
4
List of Figures
1.1. This is E4Box. The figure shows the box as well as the data acquisition
card connector. . . . . . . . . . . . . . . . . . . . . . . . . . . . . . . . .
9
2.1. National Intruments PCI 6221 pinout - “DAQ M Series - M Series user
Manual” from National Instruments. . . . . . . . . . . . . . . . . . . . .
15
3.1.
3.2.
3.3.
3.4.
At boot time, you need to select the RTAI kernel. . . . . . . . . . . . . .
The E4Box login screen. . . . . . . . . . . . . . . . . . . . . . . . . . . .
You are now logged in E4Box. . . . . . . . . . . . . . . . . . . . . . . . .
You can open a shell from Applications→Accessories→Terminal on the
main menu. . . . . . . . . . . . . . . . . . . . . . . . . . . . . . . . . . .
3.5. You can open ScicosLab selecting Application→Science→ScicosLab on
the main menu. . . . . . . . . . . . . . . . . . . . . . . . . . . . . . . . .
3.6. The ScicosLab screen. Please note that the RTAI libraries are loaded by
default. Please type scicos(); to start Scicos. . . . . . . . . . . . . . .
3.7. The Scicos window. . . . . . . . . . . . . . . . . . . . . . . . . . . . . . .
3.8. How to show the Scicos Palette Tree. . . . . . . . . . . . . . . . . . . . .
3.9. The sine wave generator application after selecting the block identification
property. . . . . . . . . . . . . . . . . . . . . . . . . . . . . . . . . . . . .
3.10. Converting the selected region to a Super Block. . . . . . . . . . . . . . .
3.11. Scicos diagram obtained by grouping the blocks in a Super Block. . . . .
3.12. Selecting the target. . . . . . . . . . . . . . . . . . . . . . . . . . . . . .
3.13. Set Target properties window. . . . . . . . . . . . . . . . . . . . . . . . .
3.14. Starting the code generation process. . . . . . . . . . . . . . . . . . . . .
3.15. Code generation properties window. . . . . . . . . . . . . . . . . . . . . .
3.16. Output generated on the ScicosLab console by a successful code generation. . . . . . . . . . . . . . . . . . . . . . . . . . . . . . . . . . . . . . .
3.17. Output on the shell console generated by executing the real-time application.
3.18. QRTAILab main window. . . . . . . . . . . . . . . . . . . . . . . . . . .
3.19. QRTAILab Connected to Target. . . . . . . . . . . . . . . . . . . . . . .
3.20. Scope Manager. . . . . . . . . . . . . . . . . . . . . . . . . . . . . . . . .
3.21. QRTAILab main window displaying data generated by the real-time application. . . . . . . . . . . . . . . . . . . . . . . . . . . . . . . . . . . . .
3.22. Setting block parameters on QRTAILab. . . . . . . . . . . . . . . . . . .
4.1. The RTAI-Lib Palette. . . . . . . . . . . . . . . . . . . . . . . . . . . . .
4.2. The SINE block. . . . . . . . . . . . . . . . . . . . . . . . . . . . . . . . .
4.3. The SQUARE block. . . . . . . . . . . . . . . . . . . . . . . . . . . . . . .
5
17
17
18
18
19
19
20
21
21
22
22
23
23
24
24
25
25
26
27
27
28
29
30
31
31
List of Figures
4.4. The
4.5. The
4.6. The
4.7. The
4.8. The
4.9. The
4.10. The
4.11. The
4.12. The
4.13. The
4.14. The
4.15. The
4.16. The
4.17. The
4.18. The
4.19. The
4.20. The
4.21. The
4.22. The
4.23. The
4.24. The
4.25. The
4.26. The
STEP block. . . . . . . .
COMEDI A/D block. . . .
COMEDI D/A block. . . .
COMEDI DI block. . . .
COMEDI DO block. . . .
COMEDI ENCODER block.
LED block. . . . . . . .
SCOPE block. . . . . . .
METER block. . . . . . .
SENSOR block. . . . . .
ACTUATOR block. . . . .
FIFO IN block. . . . . .
FIFO OUT block. . . . .
MBX RCV BLK block. . .
MBX RCV NO BLK block.
MBX SEND IF block. . .
MBX SEND OVW block. .
SEM WAIT block. . . . .
SEM SIGNAL block. . . .
EXTDATA block. . . . . .
LOG block. . . . . . . .
EXTCLOCK block. . . . .
C-RTAI block. . . . . .
.
.
.
.
.
.
.
.
.
.
.
.
.
.
.
.
.
.
.
.
.
.
.
.
.
.
.
.
.
.
.
.
.
.
.
.
.
.
.
.
.
.
.
.
.
.
.
.
.
.
.
.
.
.
.
.
.
.
.
.
.
.
.
.
.
.
.
.
.
.
.
.
.
.
.
.
.
.
.
.
.
.
.
.
.
.
.
.
.
.
.
.
.
.
.
.
.
.
.
.
.
.
.
.
.
.
.
.
.
.
.
.
.
.
.
.
.
.
.
.
.
.
.
.
.
.
.
.
.
.
.
.
.
.
.
.
.
.
.
.
.
.
.
.
.
.
.
.
.
.
.
.
.
.
.
.
.
.
.
.
.
.
.
.
.
.
.
.
.
.
.
.
.
.
.
.
.
.
.
.
.
.
.
.
.
.
.
.
.
.
.
.
.
.
.
.
.
.
.
.
.
.
.
.
.
.
.
.
.
.
.
.
.
.
.
.
.
.
.
.
.
.
.
.
.
.
.
.
.
.
.
.
.
.
.
.
.
.
.
.
.
.
.
.
.
.
.
.
.
.
.
.
.
32
32
32
33
33
34
34
35
35
36
36
37
37
38
38
39
39
39
40
40
41
41
42
A.1. Menu option to add a new user. . . . . . . . . . . . . . . . . .
A.2. This Dialog Box can be used to add and remove users. . . . .
A.3. Menu option to change the Screen resolution. . . . . . . . . .
A.4. This Dialog Box can be used to change the screen resolution. .
A.5. Menu option to change the Keyboard Layout. . . . . . . . . .
A.6. This Dialog Box can be used to change the Keyboard Layout.
A.7. Menu option to change the Network settings. . . . . . . . . . .
A.8. This Dialog Box can be used to change the Network Settings.
A.9. Menu option to enable remote desktop. . . . . . . . . . . . . .
A.10.Remote Desktop Preferences window. . . . . . . . . . . . . . .
.
.
.
.
.
.
.
.
.
.
.
.
.
.
.
.
.
.
.
.
.
.
.
.
.
.
.
.
.
.
.
.
.
.
.
.
.
.
.
.
.
.
.
.
.
.
.
.
.
.
.
.
.
.
.
.
.
.
.
.
43
44
44
45
45
46
46
47
47
48
B.1. Latency test results. . . . . . . . . . . . . . . . . . . . . . . . . . . . . .
49
6
.
.
.
.
.
.
.
.
.
.
.
.
.
.
.
.
.
.
.
.
.
.
.
.
.
.
.
.
.
.
.
.
.
.
.
.
.
.
.
.
.
.
.
.
.
.
.
.
.
.
.
.
.
.
.
.
.
.
.
.
.
.
.
.
.
.
.
.
.
.
.
.
.
.
.
.
.
.
.
.
.
.
.
.
.
.
.
.
.
.
.
.
.
.
.
.
.
.
.
.
.
.
.
.
.
.
.
.
.
.
.
.
.
.
.
.
.
.
.
.
.
.
.
.
.
.
.
.
.
.
.
.
.
.
.
.
.
.
.
.
.
.
.
.
.
.
.
.
.
.
.
.
.
.
.
.
.
.
.
.
.
.
.
.
.
.
.
.
.
.
.
.
.
.
.
.
.
.
.
.
.
.
.
.
.
.
.
.
.
.
.
.
.
.
.
.
.
.
.
.
.
.
.
.
.
.
.
.
.
.
.
.
.
.
.
.
.
.
.
.
.
.
.
.
.
.
.
.
.
.
.
.
.
.
.
.
.
.
.
.
.
.
.
.
.
.
.
.
.
.
.
.
.
.
.
.
.
.
.
.
.
.
.
.
.
.
.
.
.
.
.
.
.
.
.
.
.
.
.
.
.
.
.
.
.
.
.
.
.
.
.
.
.
.
.
.
.
.
.
.
.
.
.
.
.
.
.
.
.
.
.
.
.
.
.
.
.
.
.
.
.
.
About this document
This document is the Reference Manual of E4Box Open Edition, a ready to use GNU/Linux
RTAI box including all the open source software needed to perform code generation and
control tasks.
Function of the document
The function of this document is to provide a Reference Manual for the various functionalities offered by E4Box Open Edition.
Document history
Version
0.1
1.0
Date
Author
Company
Change Description
Feb 28, 2013
May 16,2013
Riccardo Schiavi
Paolo Gai,
Riccardo Schiavi
Evidence Srl
Evidence Srl
Released version 0.1
Released version 1.0
7
List of Figures
Acronyms
Acronym Meaning
Comedi Comedi project (Linux control and
measurement device interface) develops
driver, tools, and libraries for data
acquisition.
E4Box E4Box is a ready to use all-in-one
embedded computing box which includes
all hardware and software needed to
perform automatic generation of code, and
rapid prototyping of control algorithms.
E4Coder E4Coder is a factorized acronym meaning
“Evidence Erika Enterprise Embedded
Coder”. Initially meant as a code
generation tool supporting the ERIKA
Enterprise RTOS, it is now a general
purpose code generation toolset. In that
sense, it can be now also interpreted as
“Evidence For Coder”, as a set of tools for
simulation and code generation of complex
designs.
E4Coder GUI E4Coder GUI is the GUI editor for fast
prototyping of graphical user interfaces.
GUI Graphical User Interface.
8
1. Introduction
E4Box Open Edition is a ready to use all-in-one embedded computing box which includes
all hardware and free/open-source software needed to perform automatic generation of
code, rapid prototyping of control algorithms, allowing you to simulate and run complex
control schemes.
Figure 1.1.: This is E4Box. The figure shows the box as well as the data acquisition card
connector.
E4Box Open Edition simplifies all the process of installing, compiling and tuning
a working system based on open-source software. This software includes GNU/Linux,
RTAI, Comedi, ScicosLab, as well as the tuning of the kernel drivers and acquisition
systems. Please note that this is often a long trial-and-error process which includes the
right selection of the specific versions of the software to use, and the compilation and
testing of the complete system.
E4Box Open Edition is fast. You can boot the systems in a few seconds thanks to the
included solid state hard drive.
With E4Box, you will be able to:
9
Chapter 1. Introduction
• Acquire data from both analog and digital devices;
• Design, simulate and run control algorithm;
• Simulate complex plants, both on sinchronized and real-time mode.
The following Chapters will describe the main functionalities of E4Box Open Edition,
as well as its integration with ScicosLab, RTAI, and Comedi.
1.1. E4Box Professional Edition
In addition to the E4Box Open Edition described in this manual, E4Box is also available
in conjunction with the E4Coder Toolset under the name E4Box Professional Edition.
With E4Box Professional Edition you will have access to additional tools such as:
• E4Coder Code Generator, allowing optimized code generation with support for
multithread code generation.
• SMCube, allowing the design of parallel finite state machines.
• E4CoderGUI, allowing the simulation of interactive GUI panels, as well as code
generation of Qt applications running on E4Box including both GUI and control
part.
For more information about E4Coder and E4Box Professional Edition, please refer to
http://www.e4coder.com
1.2. Requirements
E4Box Open Edition is not provided with display, keyboard and mouse. We tested the
system both with USB and PS2 keyboards / mices. The standard resolution of the
display is set to 1600x1200 pixels.
1.3. Use Cases
E4Box Open Edition can be successfully used in a number of scenarios, like the ones
described in this Section. In all these cases, E4Box Open Edition can be used to simulate
and generate code using ScicosLab, and then the generated code can be run immediately on the target board. in other words, the E4Box Open edition is a self-contained
data acquisition and control system that will enable you to test, tune, and deploy your
embedded control algorithms.
10
Chapter 1. Introduction
1.3.1. Simulation, Rapid Prototyping, Code Generation ad
Calibration of Control Algorithms
E4Box Open Edition can be used to perform a complete control prototyping round,
composed by the following steps:
• A discrete time control algorithm can be designed using ScicosLab, together with
a continuous time model of a plant.
• After that, the control algorithm can be simulated to tune the control parameters
on the simulated plant.
• The diagram can then be modified by removing te control plant and adding the
data acquisition card custom blocks (the need to remove the simulation part of
the design is not present when using E4Box Professional Edition, since it is based
on the E4Coer Toolset), in order to generate a standalone RTAI application implementin the behavior of the control algorithm.
• Finally, QRTAILab can be used to tune the control parameters of the design while
the RTAI generated application is running locally on E4Box, in this way enabling
a run-time calibration of the control algorithms.
1.3.2. Signal generation
E4Box Open Edition can be used to easily create a signal generator directly integrated
with the data acquisition board. The typical steps in this case are:
• A ScicosLab design generating a reference signal is created, and the generated
signals are connected with the data acquisition board outputs.
• The application is generated from the ScicosLab design, and it is then run on
E4Box.
• QRTAILab is then used to:
– display the signal generated by the application;
– calibrate the output signal by changing the parameters online.
In case you are going to use E4Box Professional Edition, please note that the dispay
and tuning of the application parameters can also be done using an E4CoerGUI block;
moreover, signal generation can be enhanced with complex logic thanks to the usage of
SMCube state machines.
11
Chapter 1. Introduction
1.3.3. Data Acquisition
E4Box Open Edition can be used to easily create a signal acquisition application that
directly reads from the data acquisition platform and post-process it for visualization
on the ScicosLab or on the QRTAILab plot windows.
In case you are going to use E4Box Professional Edition note that the postprocessing
can include postprocessing using SMCube state machines, as well as visualization using
E4CoderGUI blocks.
1.3.4. Direct control of the Data Acquisition Card
E4Box Open Edition is a complete ready to use machine including RTAI and Comedi,
and thus can be also used to develop standalone applications (without the usage of
ScicosLab or E4Coder) that directly uses the RTAI and Comedi API to implement
customized control algorithms and realtime applications.
1.4. Documentation
E4Box includes various open-source software projects. Additional documentation can
be found at the following web sites:
• For the documentation on E4Box Open Edition, please refer to:
http://www.e4coder.com/e4box
http://www.e4coder.com/content/documentation-and-videos
• For the documentation of ScicosLab please refer to:
http://www.scicos.org/documentations.html
(and in particular to the ScicosLab book).
• For the documentation of the code generator for ScicosLab please refer to:
http://www.dti.supsi.ch/~bucher
then choose the menu option “Scicoslab, Comedi and realtime control”.
• For the documentation of Comedi please refer to:
http://www.comedi.org/doc/index.html
• For the documentation of RTAI please refer to:
http://www.rtai.org
• For the documentation of NI PCI-6221:
http://sine.ni.com/nips/cds/view/p/lang/en/nid/202004
12
Chapter 1. Introduction
1.5. Licensing
E4Box Open Edition integrates free and open-source software from various sources. Full
source code is available from the web sites of the various projects, or is available on
request from Evidence. Deatails on the Open Source projects used in E4Box is available
in Appendix C.
1.6. Technical support
Up to date information on E4Coder is available at the following website:
http://www.e4coder.com
For sales, pricing, technical support and general information, please contact Evidence
Srl directly at the address and phone numbers available at the following web page:
http://www.evidence.eu.com/en/contact-us.html
1.7. Acknowlegments
We would like to acknowledge the work of Roberto Bucker (SUPSI Lugano) and Simone
Mannori (ENEA Research Center Brasimone branch) for their continuous support to
the RTAI / ScicosLab community, as well as for providing constant help an suggestions
for improving E4Box.
13
2. Hardware/Software Description
This chapter describes the Hardware/Software pre-installed on the various versions of
E4Box Open Edition.
2.1. Version 1.0
The following sections describes the hardware and software composing E4Box 1.0. For
further informartions or requests on personalized hardware configurations please contact
[email protected].
2.1.1. Hardware
• Mother Board: Intel D2550MUD2;
• RAM 2Gb;
• Solid State HD 60 Gb;
• Data acquisition card: National Instruments NI PCI-6221 equipped with CB-68LP
connector block and RC68-68 connection cable;
• Power supply;
• Not included: display, keyboard, mouse.
2.1.2. Software
• Linux distribution: Ubuntu 10.04;
• RTAI 3.9;
• Comedi 3.9;
• Comedilib 0.7.1.6;
• ScicosLab 4.4.1;
• RTAILab 3.9 an QRATIlab 0.1.9 .
14
Chapter 2. Hardware/Software Description
2.1.3. Data Acquisition card: NI PCI-6221
E4Box 1.0 includes a National Instruments PCI-6221 equipped with a CB-68LP connector block and an RC68-68 connection cable. The board users manual and the connector
pinout could be fount at http://sine.ni.com/nips/cds/view/p/lang/en/nid/14132.
Figure 2.1.: National Intruments PCI 6221 pinout - “DAQ M Series - M Series user
Manual” from National Instruments.
Figure 2.1 shows the pinout of the NI PCI 6221. For electrical details please refer to
“DAQ M Series - M Series User Manual”. http://www.ni.com/pdf/manuals/371022k.
pdf
2.2. Other Data Acquisition boards
Integrating E4Box with other Comedi-supported data acquisition boards, or communication board such as CAN peripherals, is possible. If interested, please contact
[email protected].
15
3. E4Box Startup
This chapter contains a step by step guide which describes a first startup procedure from
scratch. In particular, we will discuss:
• How to power-on E4Box and start ScicosLab;
• How to create and simulate a simple design;
• How to generate code for the design and compile a simple target application;
• How to start QRTAILab to analyze the data taken from the target code running
on E4Box;
3.1. Unpacking E4Box 1.0
The E4Box package contains the following items:
1. The E4Box PC;
2. The NI RC68-68 connection cable;
3. The NI CB-68LP connector block;
4. A power cable;
5. An Ethernet Cable;
3.2. Booting E4Box
E4Box is developed as a “ready to use”, control-oriented, dektop PC. All the needed
software and driver are properly installed and configured as to reduce the time needed
to enable users develop their own applications.
In order to be able to run the code generated by ScicosLab, you need to select the
RTAI Kernel at boot time (this is the default choice, see Figure 3.1). The typical line
that must be selected in the boot options is similar to the following:
Linux-Kernel 2.6.38.8-rtai kernel
16
Chapter 3. E4Box Startup
Figure 3.1.: At boot time, you need to select the RTAI kernel.
The other options available in the boot menu are related to the default installation of
the Ubuntu distribution.
After the boot, the system will prompt a graphical login such as the one visible in
Figure 3.2.
Figure 3.2.: The E4Box login screen.
The default username and passwords are the following:
Username: e4box
Password: evidence
Please notice that E4Box default keyboard layout is “Italy”. Please refer to Section A.3
if you want to change the default keyboard layout. Moreover, please refer to Appendix
A.1 if you want to add a new user able to compile and execute the code generated by
ScicosLab.
You are now logged in and ready to start ScicosLab to design your control algorithms
(see Figure 3.3).
17
Chapter 3. E4Box Startup
Figure 3.3.: You are now logged in E4Box.
The default monitor resolution is 1600x1200 pixels. Please refer to Appendix A.2 for
more information how to change the display resolution.
3.3. Loading the Kernel modules
Once logged in, you need to load the necessary Linux Kernel modules. In particular,
this step loads all the RTAI and Comedi Modules which are used when running the code
generated from the ScicosLab diagrams. To simplify this step, E4Box provides you a
script to load all the necessary modules. To execute the script you can open a shell by
selecting on “Applications→Accessories→Terminal” on the main menu (see Figure 3.4)
and enter:
$ sudo ./load modules.sh
Figure 3.4.: You can open a shell from Applications→Accessories→Terminal on the
main menu.
18
Chapter 3. E4Box Startup
You will then be asked for the user password (the default one is evidence as described
in Section 3.2). After inserting it the all the necessary modules will be loaded1 .
To run code interfacing with the NI PCI-6221 board you will need to also register the
DAQ service. To perform this operation you can open a shell terminal and type the
command:
$ sudo modprobe ni pcimio
3.4. Starting ScicosLab
After loading the Kernel Modules, you are ready to start ScicosLab. ScicosLab can be
started from the Applications→Science→ScicosLab menu, as shown in Figure 3.5 and
Figure 3.6.
Figure 3.5.: You can open ScicosLab selecting Application→Science→ScicosLab on the
main menu.
Figure 3.6.: The ScicosLab screen. Please note that the RTAI libraries are loaded by
default. Please type scicos(); to start Scicos.
1
An error will be returned if you try to load the modules twice.
19
Chapter 3. E4Box Startup
Once started, you can type
scicos();
to start Scicos. The Scicos window will appear as in Figure 3.7.
Figure 3.7.: The Scicos window.
3.5. Creating your first design
After loading all the necessary modules on the kernel (see Section A.2), and opening
ScicosLab and Scicos (see Section 3.4) an empty Scicos windows as in Figure 3.7 is
displayed. To be able selecting the block consituting the application the palette tree
have to be opend by selecting Palette →Pal Tree on the Scicos window (See Figure 3.8).
After that, please perform the following steps:
1. Open the Sources Palette, then select the Clock block. Drag and drop it on the
diagram. You can specify the clock frequency by double clicking on the block. In
this example, we suppose to use the default frequency of 0.1 seconds.
2. Open the RTAI-Lab Palette, then insert in the diagram a Sine block (see Section
4.1.1.1) and a Scope block (see Section 4.1.3.2).
3. After placing the three blocks you need to connect them as shown in in Figure
3.9. Please notice that two blocks could be easly connected by simply pressing “L”
on the keyboard when the pointer is over an output port or a wire, and the right
clicking on the destination input port.
20
Chapter 3. E4Box Startup
Figure 3.8.: How to show the Scicos Palette Tree.
4. To enable the visualization of the blocks name on QRTAIlab/XRTAIlab (see Section 3.8) the “Set Identification” property have to be enabled on each block. To
perform this operation in this example please left-click on the sine block and select on the contextual menu Block Properties→Identification, then on the resulting
window type “sine” and click on “Ok”. The resulting Scicos diagram is illustrated
in Figure 3.9.
Figure 3.9.: The sine wave generator application after selecting the block identification
property.
21
Chapter 3. E4Box Startup
5. You can now save the diagram by selecting File→Save. You will be requested a
filename for the diagram (we used “sine” on this example).
At this point, you are ready to generate code for your first ScicosLab design. In the
following Sections, we will refer to this simple design which is made of a clock, a Sine
generator and a Scope, for performing the code generation and the various analysis steps.
3.6. Generating Code
In order to be able to generate code, the ScicosLab code generator requires that all
blocks in the diagram except the clock must be included in a Super Block.
To perform this operation all the block and wirings, with exception for the Clock block,
have to be selected and then converted to a Super Block by selecting Diagram→Region
to Super Block as illustrated in Figure 3.10. The resulting Scicos diagram is illutrated
in Figure 3.11.
Figure 3.10.: Converting the selected region to a Super Block.
Figure 3.11.: Scicos diagram obtained by grouping the blocks in a Super Block.
22
Chapter 3. E4Box Startup
After that, you need to select the superblock, and then go to the menu option RTAI
→ Set Target (see Figure 3.12). A Dialog box appears (see Figure 3.13), where you will
be able to select the target toolchain. Moreover, you can specify the ode function and
the step between sampling; in this example, we will use the default values provided by
the system.
Figure 3.12.: Selecting the target.
Figure 3.13.: Set Target properties window.
Finally, to start the code generation process, the RTAI → RTAI CodeGen item on
the RTAI menu has to be selected (see Figure 3.14). A dialog box appears (see Figure
3.15), where you can specify:
• the name of the generated application (SuperBlock in this example).
• the path where the generated code is placed
(/home/e4box/Desktop/Examples/SuperBlock scig in this example).
23
Chapter 3. E4Box Startup
Figure 3.14.: Starting the code generation process.
Figure 3.15.: Code generation properties window.
By selecting Ok on the properties window, Scicos starts the code generation process.
The ScicosLab console reports the log produced by the code generation process. Figure
3.16 shows the output produced by a successful code generation.
Please note that the application is automatically compiled as part of the code generation process, and inserted in the directory one level below the one specified for code
generation (in our case, the generation will generate a SuperBlock executable placed in
/home/e4box/Desktop/Examples/).
3.7. Running the generated code
As a result of the code compilation step, a RTAI real-time application is generated, with
the name specified by the code generation properties window (see Figure 3.15).
24
Chapter 3. E4Box Startup
Figure 3.16.: Output generated on the ScicosLab console by a successful code generation.
The application can be executed by opening a shell and typing the following commands
(the destination directory is the one specified in the code generation dialog box in Figure
3.15):
cd /home/e4box/Desktop/Examples
./SuperBlock -v
The commandline option -v is used to make the application “verbose”. Figure 3.17
illustrates the output on the shell generated by the running application.
Figure 3.17.: Output on the shell console generated by executing the real-time
application.
3.8. Running QRTAILab
QRTAILab (http://qrtailab.sourceforge.net/), a QT-based port of XRTAILab,
is a user interface for RTAI that can be used as monitoring application and virtual
25
Chapter 3. E4Box Startup
oscilloscope for interacting with real-time application generated by ScicosLab. With
QRTAILab, you can:
• inspect the data exchanged by the various blocks in a graphical form (a scope, a
led, ...);
• change the parameters of the various blocks (useful for calibrating the parameters
of a control algorithm).
To Open QRTALab you need to open a shell, and type:
qrtailab
As a result, an empty window is displayed as illustrated by Figure 3.18.
Figure 3.18.: QRTAILab main window.
After that, please select the Target Manger icon as highlighted in Figure 3.18. A Dialog
box to setup the parameter to connect to the real-time application is then displayed (see
Figure 3.19).
You need now to specify the IP Address for the Target machine. In this example, we
can specify 0 (zero), because the Host 2 and the Target 3 are the same machine.
Finally, you can press the Connect button. Once pressed, the QRTAILab executable
is connected to the RTAI application generated from the ScicosLab Diagram.
2
3
The host is the development machine, running ScicosLab and QRTAILab.
The target is the machine running the application automatically generated by ScicosLab.
26
Chapter 3. E4Box Startup
Figure 3.19.: QRTAILab Connected to Target.
3.8.1. Data visualization with QRTAILab
We can now proceed in graphically showing the data coming from the target application.
To do that, please select View → Scopes. A dialog box will appear containing the blocks
which are present in the ScicosLab diagram that generated the target application. In
our example, we have a single Scope block. You can then use the option Show/Hide
on the Scope tab (see Figure 3.20) to show the Scope widget in the main QRTAILab
window (see Figure 3.21).
Figure 3.20.: Scope Manager.
27
Chapter 3. E4Box Startup
Figure 3.21.: QRTAILab main window displaying data generated by the real-time
application.
3.8.2. Data Calibration with QRTAILab
Please note that QRTAILab can be used not only to display the data coming from the
target, but also to modify (calibrate) the control parameters. To open the Parameters
Manager window please select View → Parameter. The Parameter Manager allows to
modify, store, and load all the parameters defined by the blocks included in the original
Scicos diagram. Figure 3.22 illustrates an example where both the amplitude and the
bias of the code corresponding to the Sine block have been modified. Please notice that
by checking/unchecking the “batch mode” option is it possible to choose if the changes
have to be sent one-by-one or all togheter while pressing the “Download” button.
28
Chapter 3. E4Box Startup
Figure 3.22.: Setting block parameters on QRTAILab.
29
4. ScicosLab Blocks
In addition to the standard Scicoslab blocks, the following are the Scicos Block that can
be used for code generation purposes. The list of all available blocks is available in the
Palette Tree (see Figure 3.8 to show the Palette Tree).
4.1. RTAI-Lib Palette
The RTAI-Lib Palette is available as the last one in the Palette Tree (see Figure 4.1).
The RTAI-Lib Palette contains a set of blocks which are useful for interfacing data
acquisition cards. This Section presents a quick list of the available blocks.
Figure 4.1.: The RTAI-Lib Palette.
4.1.1. Mathematical functions
4.1.1.1. SINE block
The Sine block (see Figure 4.2) models a real time sine wave generator. The parameters
of the block are:
Amplitude This parameter gives the maximum amplitude of the generated sine wave;
Frequency This parameter gives the frequency of the generated sine wave.
30
Chapter 4. ScicosLab Blocks
Figure 4.2.: The SINE block.
Phase This parameter gives the pahse of the generated sine wave.
Bias This parameter gives the bias of the generated square wave.
Delay This parameter gives the delay on the real time generation.
4.1.1.2. SQUARE block
Figure 4.3.: The SQUARE block.
The Square block (see Figure 4.3) models a real time square wave. The parameters
of the block are:
Amplitude This parameter gives the amplitude of the generated square wave.
Period This parameter gives the period of the generated square wave (msec).
Impulse width This parameter gives the width of the generated square wave.
Bias This parameter gives the bias of the generated square wave.
Delay This parameter gives the delay on the real time generation.
4.1.1.3. STEP block
The Step block (see Figure 4.4) models a real time step. The parameters of the block
are:
Amplitude This parameter gives the amplitude of the generated step.
Delay This parameter gives the delay on the real time generation.
31
Chapter 4. ScicosLab Blocks
Figure 4.4.: The STEP block.
4.1.2. Interaction with the Comedi Libraries
4.1.2.1. COMEDI A/D block
Figure 4.5.: The COMEDI A/D block.
The COMEDI A/D block (see Figure 4.5)models an analog input data channel. The
parameters of the block are:
Channel This parameter gives the phisical channel on the device.
Device This parameter gives the name of the comedi device.
Range This parameter gives the range of the analog converter.
Aref This parameter gives the type of voltage reference.
4.1.2.2. COMEDI D/A block
Figure 4.6.: The COMEDI D/A block.
The COMEDI D/A block (see Figure 4.6) models an analog output data channel. The
parameters of the block are:
32
Chapter 4. ScicosLab Blocks
Channel This parameter gives the phisical channel on the device.
Device This parameter gives the name of the comedi device.
Range This parameter gives the range of the generated signal.
Aref This parameter gives the voltage reference type.
4.1.2.3. COMEDI DI block
Figure 4.7.: The COMEDI DI block.
The COMEDI DI block (see Figure 4.7) models a digital input data channel. The
parameters of the block are:
Channel This parameter gives the phisical channel on the device.
Device This parameter gives the name of the comedi device.
4.1.2.4. COMEDI DO block
Figure 4.8.: The COMEDI DO block.
The COMEDI DO block (see Figure 4.8) models a digital output data channel. If the
input value is greater than the threshold value the corresponding channel is set to 1.
The parameters of the block are:
Channel This parameter gives the phisical channel on the device.
Device This parameter gives the name of the comedi device.
Threshold This parameter gives the conversion threshold.
33
Chapter 4. ScicosLab Blocks
Figure 4.9.: The COMEDI ENCODER block.
4.1.2.5. COMEDI Encoder block
The COMEDI Encoder block (see Figure 4.9) models an encoder data channel. The
parameters of the block are:
Counter No This parameter gives the index of the used counter.
Device This parameter gives the name of the comedi device.
A PFI This parameter gives the line connected to the encoder A channel.
B PFI This parameter gives the line connected to the encoder B channel.
Z PFI This parameter gives the line connected to the encoder Z channel.
Initial Value This parameter gives the initial value of the counter.
Enable Index This parameter gives the possibility to use the index signal. 0→index
disabled, 1→index enabled.
Mode This parameter gives the possibility to select the quadrature mode: 0 →up/down,
1→X1, 2→X2, 4→X4.
Map on channels This parameter gives the possibility to map on channel: 0→no,
1→yes.
4.1.3. RTAI-Lab blocks
4.1.3.1. LED block
Figure 4.10.: The LED block.
34
Chapter 4. ScicosLab Blocks
The LED block (see Figure 4.10) models a real time LED. The parameters of the block
are:
Input Ports This parameter gives the number of LEDs.
Led Name This parameter gives the name of the LED.
4.1.3.2. SCOPE block
Figure 4.11.: The SCOPE block.
The SCOPE block (see Figure 4.11) models an XRTAIlab/QRTAIlab scope. The parameters of the block are:
Scope name This parameter gives the name of the scope.
Name of traces This parameter gives the number of inputs.
4.1.3.3. METER block
Figure 4.12.: The METER block.
The METER block (see Figure 4.12) models an XRTAIlab/QRTAIlab meter. The parameters of the block are:
Meter Name This parameter gives the name of the meter.
35
Chapter 4. ScicosLab Blocks
Figure 4.13.: The SENSOR block.
4.1.4. Generic Sensors
4.1.4.1. SENSOR block
The SENSOR block (see Figure 4.13) models a generic RTAI input block parameter. The
parameters of the block are:
Output port This parameter gives the number of outputs.
Identifier This parameter gives the identifier of the sensor.
To enter the C code to be compiled and linked the Block Option dialog block have to
be opened, e.g. by double clicking, than selecting ok a dialog presenting a skeleton fo
the C function will be opened.
4.1.4.2. ACTUATOR block
Figure 4.14.: The ACTUATOR block.
The ACTUATOR block (see Figure 4.14) models a generic RTAI output block parameter.
The parameters of the block are:
Input Port This parameter gives the number of inputs.
Identifier This parameter gives the identifier of the actuator.
To enter the C code to be compiled and linked the Bock Option dialog block have to be
opened, e.g. by double clicking, than selecting ok a dialog presenting a skeleton fo the
C function will be opened.
36
Chapter 4. ScicosLab Blocks
4.1.5. Realtime Communication and concurrency control
4.1.5.1. FIFO IN block
Figure 4.15.: The FIFO IN block.
The FIFO IN block (see Figure 4.15) models a multicannel FIFO input. The parameters of the block are:
Number of Signals This parameter gives the number of FIFO signals.
FIFO Nr This parameter gives the FIFO number.
Dimension This parameter gives the FIFO dimension.
4.1.5.2. FIFO OUT block
Figure 4.16.: The FIFO OUT block.
The FIFO OUT block (see Figure 4.16) models a multichannel FIFO output. The
parameters of the block are:
Number of Signals This parameter gives the number of FIFO signals.
FIFO Nr This parameter gives the FIFO number.
Dimension This parameter gives the FIFO dimension.
4.1.5.3. MBX RCV BLK block
The MBX RCV BLK block (see Figure 4.17) models a blocking receiving message box. The
calling task will be blocked until all the requested bytes are received or an error occur.
The parameters of the block are:
37
Chapter 4. ScicosLab Blocks
Figure 4.17.: The MBX RCV BLK block.
Output ports This parameter gives the number of message output ports.
MBX Name This parameter gives the message box name.
IP Addr This parameter gives the message box IP address [127.0.0.1] localhost.
4.1.5.4. MBX RCV NO BLK block
Figure 4.18.: The MBX RCV NO BLK block.
The MBX RCV NO BLK block (see Figure 4.18) models a non blocking receiving message
box. The block receives a message only if the whole message can be processed without
blocking the calling task; only if the mailbox is on a remote host, the calling task may
be blocked. The parameters of the block are:
Output ports This parameter gives the number of message output ports.
MBX Name This parameter gives the message box name.
IP Addr This parameter gives the message box IP address [127.0.0.1] localhost.
4.1.5.5. MBX SEND IF block
The MBX SEND IF block (see Figure 4.19) models a non blocking sending message box.
The block sends a message only if the whole message can be processed without blocking
the calling task; only if the mailbox is on a remote host, the calling task may be blocked.
The parameters of the block are:
Output ports This parameter gives the number of message output ports.
MBX Name This parameter gives the message box name.
38
Chapter 4. ScicosLab Blocks
Figure 4.19.: The MBX SEND IF block.
IP Addr This parameter gives the message box IP address [127.0.0.1] localhost.
4.1.5.6. MBX SEND OVW block
Figure 4.20.: The MBX SEND OVW block.
The MBX SEND OVW block (see Figure 4.20) models a sending message box. The message will be sent possibly overwriting old messages already presents. The parameters of
the block are:
Input Ports This parameter gives the number of message output ports.
MBX Name This parameter gives the message box name.
IP Addr This parameter gives the message box IP address [127.0.0.1] localhost.
4.1.5.7. SEM WAIT block
Figure 4.21.: The SEM WAIT block.
The SEM WAIT block (see Figure 4.21) models a semaphore wait action. The block
decrement a semaphore value and wait for a signal event; the calling task will wait until
the semaphore value is negative. The parameters of the block are:
39
Chapter 4. ScicosLab Blocks
Semaphore name This parameter gives the name of the semaphore.
IP Addr This parameter gives the semaphore IP address [127.0.0.1] localhost.
4.1.5.8. SEM SIGNAL block
Figure 4.22.: The SEM SIGNAL block.
The SEM SIGNAL block (see Figure 4.22) models a semaphore signal event. The block
increments a semaphore value, if the resulting value is not positive the first task on the
semaphore queue is allowed to run. The parameters of the block are:
Semaphore name This parameter gives the name of the semaphore.
IP Addr Semaphore name This parameter gives the name of the semaphore.
IP Addr This parameter gives the semaphore IP address [127.0.0.1] localhost. semaphore
IP address [127.0.0.1] localhost.
4.1.6. File system input/output
4.1.6.1. EXTDATA block
Figure 4.23.: The EXTDATA block.
The EXTDATA block (see Figure 4.23) models a loading data action. The file have to
be composed by a single column containing the ASCII representation of a value at each
sampling time. The parameters of the block are:
File Name This parameter gives the name of the file containg the data (max 29 chars).
Nr. of Points This parameter gives the number of data points contained by the file.
40
Chapter 4. ScicosLab Blocks
Figure 4.24.: The LOG block.
4.1.6.2. LOG block
The LOG block (see Figure 4.24) models an RTAI log block. The parameters of the block
are:
LOG Name This parameter gives the name of the log file.
4.1.7. Miscellaneous
4.1.7.1. EXTCLOCK block
Figure 4.25.: The EXTCLOCK block.
The EXTCLOCK block (see Figure 4.25) models an external clock source. The parameters
of the block are:
Expected Sample Time [s] This parameter gives the expected sample time from the
external clock source.
4.1.7.2. C RTAI block
The C RTAI block (see Figure 4.26) models external C code to be compiled and linked
with the generated application. The parameters of the block are:
Simulation function This parameter gives the name of the main function.
Is Block Implicit y→yes, n→no.
Input Ports Sizes This parameter gives the input ports dimensions.
41
Chapter 4. ScicosLab Blocks
Figure 4.26.: The C-RTAI block.
Output Port Sizes This parameter gives the output ports dimensions.
Input Event Ports Sizes This parameter gives the input event ports dimensions.
Output Event Ports Sizes This parameter gives the output events ports dimensions.
Initial Continuous State This parameter gives the column vector describing the initial state conditions.
Real Parameter Vector This parameter gives the column vection containing any real
parameter used in the block.
Integer Parameter Vector This parameter gives the column vection containing any
integer parameter used in the block.
Initial Firing Vector ¡0 no firing.
Direct Feedthrough y→yes, n→no.
Time Dependance y→yes, n→no.
42
A. E4Box configuration
A.1. Adding a New User
To add a new user and enable it for code generation with ScicosLab, you need to follow
these two steps:
• Create the user from the menu option System → Administration →Users and
Groups, as shown in Figure A.1. As a result, the Dialog box in Figure A.2 is
displayed, giving the possibility to add and remove users.
• Once the user is created, you need to login as the user, and run few commands to
automatically configure ScicosLab for the user. The commands are as follows:
$ cd /usr/src/rtai-3.9/rtai-lab/scicoslab/macros
$ make user
Figure A.1.: Menu option to add a new user.
43
Appendix A. E4Box configuration
Figure A.2.: This Dialog Box can be used to add and remove users.
A.2. Changing the Display Resolution
The Screen Resolution can be changed using the menu option System → Preferences
→Monitors, as shown in Figure A.3. As a result, the Dialog box in Figure A.4 is
displayed, giving the possibility to change the Display resolution.
Figure A.3.: Menu option to change the Screen resolution.
44
Appendix A. E4Box configuration
Figure A.4.: This Dialog Box can be used to change the screen resolution.
A.3. Changing the Keyboard Layout
The Keyboard Layout can be changed using the menu option System → Preferences
→Keyboard, as shown in Figure A.5. As a result, the Dialog box in Figure A.6 is
displayed, giving the possibility to change the Keyboard Layout.
Figure A.5.: Menu option to change the Keyboard Layout.
45
Appendix A. E4Box configuration
Figure A.6.: This Dialog Box can be used to change the Keyboard Layout.
A.4. How to configure the Network address
E4Box is configured by default to use DHCP for gathering its IP address. If you need to
change that settings, for example because you need to provide a static IP number, you
can use the menu option System → Preferences →Keyboard, as shown in Figure A.7.
As a result, the Dialog box in Figure A.8 is displayed, giving the possibility to change
the Network configurations.
Figure A.7.: Menu option to change the Network settings.
46
Appendix A. E4Box configuration
Figure A.8.: This Dialog Box can be used to change the Network Settings.
A.5. Configuring E4Box for remote access
The default installation of E4Box included the necessary software to enable remote
access. If you need to enable remote desktop connection, for instance to enable desktop
sharing or to remote control E4Box, you can use the menu option System → Preferences
→Remote Desktop, as shown in Figure A.9. As a result, the Dialog box in Figure A.10
is displayed, giving the possibility to change the remote desktop configurations.
Figure A.9.: Menu option to enable remote desktop.
47
Appendix A. E4Box configuration
Figure A.10.: Remote Desktop Preferences window.
48
B. Performance
B.1. Latency Tests
Figure B.1 illustrates the latency tests results obtained by E4Box 1.0.
To run the test please enter the following command in a shell:
$
$
$
$
$
sudo -s
cd ~
./load modules.sh
cd /usr/realtime/testsuite/latency
./run
Figure B.1.: Latency test results.
Plaese notice that those results could not be considered as wroste case as latency results
depends on computer load and number and type of active tasks.
49
C. Opensource projects included in E4Box
E4Box integrates the following Open Source projects / GNU/Linux Distributions:
Project
GNU/Linux Distribution: Ubuntu
RTAI
Comedi
ScicosLab
ScicosLab Code generator
QRTAILab
Version
10.04 LTS
3.9
0.7.16
4.4.1
-1
0.1.9
50
Reference Website
http://www.ubuntu.com
http://www.rtai.org
http://www.comedi.org
http://www.scicos.org
http://www.dti.supsi.ch/~bucher
http://qrtailab.sourceforge.net
D. Ubuntu repositories
E4Box follows a default Ubuntu installation, with the addition of the software packages
listed in Appendix C. Installing of packages presented by the Ubuntu Update Manager
are possible and should not break the functionality of E4Box, with the exception of the
kernel updates.
As an important remark, please note that the updates to the kernel performed by
the Ubuntu Update Manager may alter the order of the kernel lists at boot, making
the default kernel not the RTAI. For that reason, if you want to run code generated by
ScicosLab you need to always boot E4Box with the RTAI kernel as noted in Section 3.2.
51