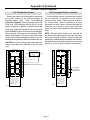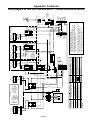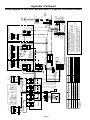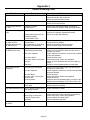
1
20LCi and w20LCi
Heat and Energy
Recovery Ventilators
Installation, Operation and Service Instructions
VB0036
HRV 20LCi
VB0037
ERV w20LCi
09/00
04629
Contents
1 Safety Considerations . . . . . . . . . . . . . . . . . . . . . . . . . . . . . . . . . . . . . . . . . 3
2 General Specifications . . . . . . . . . . . . . . . . . . . . . . . . . . . . . . . . . . . . . . . . . 3
3 Installation
3.1 Check Equipment . . . . . . . . . . . .
3.2 Mount Unit . . . . . . . . . . . . . . . . .
3.3 Ductwork Information . . . . . . . . .
3.4 Install Drain Line For Condensate
3.5 Systems Integration . . . . . . . . . .
3.6 Make Electrical Connections . . .
.
.
.
.
.
.
.
.
.
.
.
.
.
.
.
.
.
.
.
.
.
.
.
.
.
.
.
.
.
.
.
.
.
.
.
.
.
.
.
.
.
.
.
.
.
.
.
.
.
.
.
.
.
.
.
.
.
.
.
.
.
.
.
.
.
.
.
.
.
.
.
.
.
.
.
.
.
.
.
.
.
.
.
.
.
.
.
.
.
.
.
.
.
.
.
.
.
.
.
.
.
.
.
.
.
.
.
.
.
.
.
.
.
.
.
.
.
.
.
.
.
.
.
.
.
.
.
.
.
.
.
.
.
.
.
.
.
.
.
.
.
.
.
.
.
.
.
.
.
.
.
.
.
.
.
.
.
.
.
.
.
.
.
.
.
.
.
.
.
.
.
.
.
.
3
4
4
5
5
6
4 Start Up
4.1 Controls And Defrost . . . . . . . . . . . . . . . . . . . . . . . . . . . . . . . . . . . . . . 6
4.2 Sequence Of Operation . . . . . . . . . . . . . . . . . . . . . . . . . . . . . . . . . . . . 6
4.3 Airflow Balancing . . . . . . . . . . . . . . . . . . . . . . . . . . . . . . . . . . . . . . . . . 7
5 Service
5.1 Quarterly Maintenance . . . . . . . . . . . . . . . . . . . . . .
5.2 Annual Maintenance . . . . . . . . . . . . . . . . . . . . . . . .
5.3 Testing And Replacement Of The Damper Actuator
5.4 Motor And Blower Removal . . . . . . . . . . . . . . . . . .
5.5 Motor And Blower Service . . . . . . . . . . . . . . . . . . .
5.6 Adjusting Belt Tension . . . . . . . . . . . . . . . . . . . . . .
5.7 Cassette Removal (ERV only) . . . . . . . . . . . . . . . .
5.8 Cassette Service (ERV only) . . . . . . . . . . . . . . . . .
5.9 Belt Tension Adjustment/Replacement (ERV only) .
.
.
.
.
.
.
.
.
.
.
.
.
.
.
.
.
.
.
.............7
.............8
.............9
.............9
.............9
.............9
.............9
.............9
. . . . . . . . . . . . .10
Appendix A - Equipment Data . . . . . . . . . . . . . . . . . . . . . . . . . . . . . . . . . . . . .11
Appendix B - Typical Installation . . . . . . . . . . . . . . . . . . . . . . . . . . . . . . . . . . . .12
Appendix C - Electrical Data . . . . . . . . . . . . . . . . . . . . . . . . . . . . . . . . . . . . . .12
Appendix D - HRV 20LCi Dimensions . . . . . . . . . . . . . . . . . . . . . . . . . . . . . . . .13
Appendix E - ERV w20LCi Dimensions . . . . . . . . . . . . . . . . . . . . . . . . . . . . . . .14
Appendix F - Airflow Performances . . . . . . . . . . . . . . . . . . . . . . . . . . . . . . . . . .15
Appendix G - Enthalpy Wheel Pressure Drop Chart for ERV w20LCi Rotor . . . .15
Appendix H - Terminal Control Diagrams . . . . . . . . . . . . . . . . . . . . . . . . . . . . .16
Appendix I - Wiring Diagrams . . . . . . . . . . . . . . . . . . . . . . . . . . . . . . . . . . . . . .18
Appendix J - Trouble Shooting Chart . . . . . . . . . . . . . . . . . . . . . . . . . . . . . . . .22
Page 2
1 Safety Considerations
3 Installation
Hazards may exist within this equipment because it
contains electrical and powerful moving components.
Only qualified service personnel should install or
service this equipment. Untrained personnel can
perform basic maintenance such as maintaining filters.
Observe precautions marked in literature and on labels
attached to the unit. Follow all safety codes.
WARNING
Disconnect main power switches to unit before
performing service or maintenance. Electric shock
can cause personal injury or death.
2 General Specifications
These ceiling series are a successful solution to
ventilation and indoor air quality problems. Intended for
installation within a suspended ceiling space or
mechanical room, these ventilators provide 100%
outdoor air ventilation. This series consists of commercial
interior heat and energy recovery ventilators.
HRV 20LCi
This ventilator tranfers the heat from the exhaust
airstream to the supply airstream. The Heat Recovery
Ventilator (HRV) uses a flat plate heat exchanger which
may be more suited to some applications requiring
stringent cross contamination control.
ERV w20LCi
This ventilator provides energy recovery between
the exhaust and supply airstreams. The Energy
Recovery Ventilator (ERV) uses an enthalpy wheel for
total energy recovery providing superior efficiency in
hot and humid climates.
Both models are also effective in cold climates and
use various types of frost control or defrost to ensure
operation when outside temperatures are extremely
low.
See Appendix A for more detailed equipment data.
3.1 Check Equipment
Move the unit to its installation location and remove
packaging. See Appendix A for unit weight and
specifications.
Remove all internal packaging (ERV w20LCi only)
Remove access panels and remove all packaging
from the unit. Note that there is packaging for the wheel
support during shipping. Removal of all this packaging
is critical.
Inspection
Inspect the equipment, exterior and interior, for
damage. Ensure that there is no damage to the internal
components such as fans, motors, dampers, flat plate
heat exchangers or enthalpy wheel, insulation, drains
(if applicable) and structures. File a claim with the shipping
company if the unit is damaged.
System Requirements
Consult National Electrical Code and local building
codes for special installation requirements. Note
additional requirements in Appendix A and in the Start-Up
Section (page 7). Also, see Appendix C for more
electrical data information.
The unit should be installed to allow easy access
for maintenance. Appendix D and E show minimum
clearance requirements between front access and any
obstruction to allow for removal of components (fans,
filters, flat plate heat exchangers or enthalpy wheel).
The front of the unit is defined in relation to the inlet
ports and outlet ports on the unit. Port location and
overall dimensions shown in Appendix D and E.
In cold climates with -5°F (-20°C) design, the unit
must be mounted in a dry area (not exceeding 30% RH)
to avoid water condensation on the cabinet during winter
operation. Alternatively, accommodation must be made
for condensation on the cabinet exterior. Heat recovery
model (20LCi) should be mounted in a heated space to
prevent drain lines from freezing. Do not mount units in
an area where exposure to hot chimneys, electrical
panels or other hazards will occur.
A mounting location close to an exterior partition will
minimize the length of insulated ductwork required.
Appendix B illustrates ductwork through exterior partitions.
These should be separated by a minimum of 8 feet
(2438mm) to avoid outside cross contamination.
Page 3
3.2 Mount Unit
Location
Maintain clearance around and above the unit to
provide proper airflow and service access. The fresh
air intake hood must be positioned away from sources
of contamination such as chimneys, exhaust vents, etc.
Positioning the fresh air intake opposite to the
prevailing winds will reduce entry of snow or moisture
during periods of high winds.
Ceiling Mount
These units must be mounted level and may be hung
with threaded rod (field supplied) through the protruding
frame at the base of the units. Hole centers are shown
in the dimension drawings in Appendix D and E. Do not
block access to panels as indicated in Appendix B.
Rubber or seismic vibration isolation may be required
in some regions (field supplied and specified).
Electric preheat, if used as frost control, must be
installed in the outdoor air duct at a minimum distance
from the unit port of 24" (610mm).
Ductwork Design Consideration
The discharge ductwork immediately downstream
from the fan is critical for successful applications.
Poorly designed ductwork can degrade fan performance
and contributes to excessive pressure drop and noise.
When designing ductwork in the field, it is important to
use a straight discharge duct of the correct dimensions
to obtain maximum fan performance. The straight section
of ductwork helps the airflow to develop a uniform
velocity profile as it exits the fan and allows the velocity
pressure to recover into static pressure. See the figure
below.
Floor Mount
These units may be secured to the floor using
isolation/vibration pads. The pads may be located on
each corner of the unit’s frame (all mounting
hardware is field supplied and specified).
Space is required beneath the heat recovery model
(20LCi) to make drain connections.
3.3 Ductwork Information
For 100% recovery of velocity pressure into static
pressure, the straight portion of the discharge duct
must be at least 2.5 times the discharge diameter to
the length of the straight portion of ductwork.
Make Duct Connections
Locations, sizes and labels of the ports for the units
are shown in Appendix D and E.
As an example of how to size the straight portion of
duct, assume the fan has a 13.5" x 9.5" discharge
outlet = 0.89 ft2.
For HRV 20LCi only: A section of straight duct
approximately 36" (914mm) long [10" x 14" (254 x 356mm),
minimum 3 duct diameter long] must be used immediately
after the fans to achieve good fan performance.
Refer to this table for the effect of undersized equivalent
duct diameter.
For all models: Transitions (field supplied) may be
required to make connection with ductwork that is
properly sized for minimum noise and pressure loss.
Both duct connections to outside must be insulated to
avoid condensation and heat loss. A continuous integral
vapor barrier must be used over the duct insulation.
Airflow rate balancing dampers are recommended
for both supply and exhaust ducts to allow for
adjustment of airflows. Flexible connectors should be
installed close to the unit in the duct leading to occupied
spaces to minimize noise transmission.
For HRV 20LCi only: All ports have 1" (25mm)
flanges to facilitate duct connection.
For all models: Ensure that the fasteners used to
make duct connection do not interfere with fans or
dampers in the unit.
No
Duct
Pressure
Recovery
0%
12%
Effective
Duct
50%
25%
Effective
Duct
80%
50%
Effective
Duct
90%
100%
Effective
Duct
100%
NOTE:
This information is referenced from AMCA Fans and
Systems Publication 201-90.
Calculate Equivalent Duct Diameter
The equivalent duct diameter of the fan outlet:
= (4ab ÷ π)0.5
= (4 x 13.5 x 9.5)0.5
π
= 12.75 = ~13
So the straight duct length required would be:
= 2.5 x 13
= 32.5" long (2.7 feet)
Page 4
3.4 Install Drain Line For Condensate
(For HRV 20LCi unit only)
48644 POWER CONTROL BOARD
6
9
3/4“ NPT Diameter Drain
1
4
7
N/C
Unit Insulation
Sikaflex Seal
N/O
J1
3 2 1
COMM.
This unit requires a drain line because condensate
occurs during heating seasons. The 3/4" NPT (19mm)
drain connections are located at the bottom of the unit.
Make sure that the drain connection is tight before
installing the unit. This unit must have an external trap
for the condensate drainage. The drain trap must be at
least 4" (102mm) deep and be protected against freeze
up. Do not use pipe smaller than the unit connection.
J2
J4
JU1
:
ABCDEFG
1 2 3
F F I OC OL Y R G B
J3
FAN INTERLOCK
CONTACTS
VE0025A
Fan Interlock for ERV w20LCi
1/4“
4“ Min.
(102 mm)
12“
Thermal Insulation
P-Trap By Contractor
VD0053A
Drain Lines
Drain lines must be field fabricated and supplied. Do
not solder connections when they are attached to the
unit because high temperature may damage the plastic
fittings on the unit.
3.5 Systems Integration
Forced Air System
When the heat recovery (or the energy recovery)
ventilator is installed in conjunction with a forced-air
system, the air handler and the network of ducts
associated with it are used to distribute fresh air inside
the building. If this type of system is used, the main fan
of the air handler must operate continuously when the
unit is on. Fan Interlock (see following diagrams) can
be connected in the unit control box to the integrated
control board terminals J3-1 and J3-2 (for low voltage
Class II circuit only). The controller makes relay contact
between these terminals when the unit is operating.
48644 POWER CONTROL BOARD
4
7
N/C
6
9
1
COMM.
N/O
J1
3 2 1
J2
J4
JU1
::: : : : :
ABCDEFG
1 2 3
F F I OC OL Y R G B
Fresh air from the heat recovery (or energy recovery)
ventilator should be introduced into the return duct of
the air handler at a point no less than 6 feet (1829mm)
upstream of the air handler. The duct connection for
stale air to the unit should be made on the return air
duct at least 2 feet (610mm) upstream of the fresh air
duct connection.
Separate Systems
Select locations for exhaust grills and supply
diffusers to provide effective ventilation and avoid short
circuiting airflows through the space. Adjustable
dampers should be provided at every grille and diffuser
to make balancing of the system possible.
Exterior Hoods (Field Installed)
The outside air intake hood must be positioned away
from sources of contamination. It should also be a
minimum of 8 feet (2438mm) from the exhaust hood or
according to local building code to prevent cross
contamination.
A screen grid is recommended to prevent intake of
debris and pests. It should be removable in cold
climates where frost blockage may occur.
Backdraft Damper
A backdraft gravity damper is supplied with
defrost (or recirculation defrost) units to be installed in
the exhaust air to outside duct. This damper is
necessary to prevent air from entering the building
through the exhaust duct when the unit is in defrost (or
recirculation defrost) mode. The size of the damper is
12" x 26" (305 x 660mm). Mount the damper in the
exhaust air to outside duct as shown in Appendix B.
J3
FAN INTERLOCK
CONTACTS
VE0026A
Fan Interlock for HRV 20LCi
Page 5
3.6 Make Electrical Connections
WARNING
Unit cabinet must have an uninterrupted, unbroken
electrical ground to minimize the possibility of personal
injury if an electrical fault should occur. Failure to
follow this warning could result in the installer
being liable for the personal injury of others.
Elecrical requirements
Location of wire connections required are shown in
Appendix D and E. Units are available in 208/230 volts,
1 phase. Please see Appendix C for electrical data.
For ERV w20LCi only
A junction box or disconnect switch must be field
supplied where line voltage connections are made.
Consult the local building electrical codes for the proper
selection of power disconnect device(s).
For HRV 20LCi only: Power Supply
This unit may or may not have a factory installed
disconnect switch. If disconnect is field supplied, provide
a disconnect per NEC. Use copper conductors only.
All field wiring must comply with NEC and local
requirements. In Canada, electrical connections must
be in accordance with CSA C22.1 Canadian Electrical
Code Part One.
High Voltage Field Connection
A high voltage connection is located on the
outside of the unit with knockout. See Appendix D and
E. A wiring diagram is located on the control box cover
inside of the unit.
Electrical Data
For more specific information including MCA, MOP
and HP options, see Appendix C.
4 Start Up
4.1 Controls And Defrost
A low voltage remote control wiring interface is provided
on the unit. The installer must provide wiring for the
controls that may be supplied optionally. The optional
wall controls require a four wire LVT-24 gauge (or
equivalent). This control is 12VDC. Other terminals are
24VAC or dry contact control. Terminals are available
for the following controls:
LOW-COM-HIGH
Makes dry contact for speed setting
Wall Control
4-wire LVT-24 gauge minimum (12VDC)
Occupied Timer/Sensor
24VAC, needs dry contact (Do not use with Venta,
Supra, Basic or Electro controls)
Remote Fan Control (control wiring option)
24VAC (requires single pole, double throw switch)
Unoccupied Recirc Contacts (with recirculation option
only)
Makes dry contact
Defrost
The unit functions are controlled by integrated controls
including exhaust only or recirculation defrost (optional).
In cold temperatures, defrost cycles will remove frost
from the flat plate heat exchanger (HRV unit) or from the
enthalpy wheel (ERV unit) to maintain proper operation.
This removal of frost occurs when a damper closes the
outside air port and allows room air to pass through the
flat plate heat exchanger (HRV unit) or through the
enthalpy wheel (ERV unit). Each unit has different
defrost requirements and the schedules are shown in
Appendix A.
Exhaust Only
Supply fan is de-energized, exhaust fan is energized,
exhausts return air to outdoors. There is no outdoor air
ventilation for the duration of defrost. Also, on w20LCi
units, the ERV enthalpy wheel maintains rotation.
Recirculation (Option)
Exhaust fan is de-energized, supply fan is energized
and circulates return air through the flat plate heat
exchanger (HRV unit) or through the enthalpy wheel
(ERV unit) and back to the building. There is no outdoor
air ventilation for the duration of defrost. The ERV
enthalpy wheel stops rotating.
Controls
For more information on the controls available on
the 2000 cfm ventilators, see the following Appendix H
references:
H-1
H-2
H-3
H-4
Wall Control Connection
Occupied Timer/Sensor Connection
Remote Fan Control
Unoccupied Recirc Contacts
4.2 Sequence Of Operation
IMPORTANT
On ERV unit only, on initial power up, the unit will
perform a system check and operate at high
speed for 5 seconds.
Before start-up, check the unit for obstructive
packaging, objects near or in blowers, dampers, flat
plate heat exchangers (HRV unit) or enthalpy wheel
(ERV unit), etc. Once installation is complete, check all
modes of operation to ensure that the unit is working
properly. Close the doors and check for operation on
'LOW-COM-HIGH' (HRV unit) or on LOW, OFF and
HIGH modes (ERV unit). Use a wall control or the dry
contact switching to run fan speeds, see Appendix H-1
and H-3.
Page 6
Unit check points:
___ Power connected, no ventilation call - Both fans
are off, defrost damper (if equipped) closes off
fresh air from outside.
___ Power connected, low speed call (if equipped) Both fans on low speed, defrost damper closes (if
equipped) recirculation opening. If unit is single
speed, it will come on that speed on a call for low
or high.
___ Power connected, high speed call. Both fans on
high speed, defrost damper (if equipped) closes
recirculation opening. If unit is single speed, it will
come on the speed on a call for low or high.
___ Power connected, occupied timer/sensor
connection open (unoccupied mode) - Both fans
are off, defrost damper (if equipped) opens
recirculation opening.
___ Power connected, recirculation defrost option is
factory installed. Recirc contacts are closed,
exhaust fan is de-energized, supply fan runs and
recirculation damper closes.
4.3 Airflow Balancing
For maximum performance the unit must operate
with equal supply and exhaust flow rates. Flow
Measuring Stations (FMS) and Magnehelic gauges
can be used to measure and compare supply flow with
exhaust flow. Appendix B shows proper installation of
the FMS in the 'exhaust from space' and 'supply to
space' ducts for measuring exhaust and supply flows
respectively. It is important to locate the FMS in the
'warm side' ductwork as described above to minimize
the effect of differences in air density, especially when
balancing during extreme cold outside conditions. Air
density variations can affect the FMS by more that 15%.
The FMS should be located downstream from
straight sections of duct and not immediately after fans
or obstructions that will cause turbulent flow. See
Appendix B which illustrates minimum distances from
fan elbows for best operation.
Flow control dampers should be installed downstream
from the FMS so flow through the FMS is not disturbed.
Dampers can then be adjusted to equalize flow rated in
the ducts.
For ERV unit only:
Setting Flow Rate
Flow rates should be balanced with units operating
on high speed. A damper must be used to establish
minimum duct pressure required so that fans do not
operate in overload regions. See Appendix F for fan
performance rates of the units. Set the dampers to
establish the minimum duct pressure required. Further
adjust the dampers to reduce flow to the desired,
balanced rate.
5 Service
5.1 Quarterly Maintenance
WARNING
Disconnect power to the unit before performing
maintenance procedures.
Quarterly maintenance should include:
Air Filters
The standard medium efficiency filters are
disposable and should be replaced every 3 months.
More frequent replacement may be required under
extremely dirty operating conditions. For filter
specifications see Appendix A.
Filter Service for HRV unit (20LCi)
To remove the filters, first remove the filter access
door. The filters can be removed simply by sliding them
forward out along the filter tracks. There are two filters
per airstream.
Filter Service for ERV unit (w20LCi)
To replace the filters, you must remove the support
wires from the filter frame before removing the filter, as
shown.
Support Wires
NOTE: Remove support wires from
filter frame, then remove filter.
VD0055A
Another method of airflow balancing is to measure
the pressure drop across the enthalpy wheel and
correlate it to an airflow. See Appendix G for Enthalpy
Wheel Pressure Drop Chart.
Page 7
ERV Exhaust Filter Service (w20LCi)
To remove the exhaust filters in the ERV w20LCi,
remove the screw holding the filter access door and
slide the exhaust filter access door down to the bottom
of the unit. The filters are set in frames and can be
removed by pulling on the filter tabs and sliding them
forward and out of the unit. First, the right filter must be
removed, then the left filter must slide over to where
the right filter was, then pull it forward and out of the
unit as shown below.
HRV 20LCi Flat Plate Heat Exchanger
Remove the flat plate heat exchanger by sliding it
out from the tracks holding it in place.
CAUTION
The flat plate heat exchanger must be correctly
positioned when replaced in unit. Failure to do so
may result in damage to the exchanger. Follow
instructions on the flat plate heat exchanger label.
The flat plate heat exchanger must be handled with
care. It is recommended that they be washed once a
year following the season of most intense use, in order
to ensure maximum efficiency of the plastic or aluminum partitions. Allow the flat plate heat exchangers
to soak for 3 hours in warm water and mild soap. Rinse
under a heavy stream of water.
CAUTION
Hot water and strong cleaning agents could damage
the polypropylene flat plate heat exchangers.
VD0056A
HRV 20LCi Drain Pans and Interior of Unit
With the filters removed from the unit, the foil-faced
insulation surfaces and drain pans should be wiped
clean with a soft cloth and mild cleaning solution. Also
ensure that the drain fittings are free from dirt and are
draining freely.
ERV w20LCi Cassette Panels and Interior of Unit
Remove the filters from the unit. Wipe the foil-faced
insulation surfaces and cassette panels with a soft
cloth and mild cleaning solution.
ERV Enthalpy Wheel (w20LCi)
No cleaning of the enthalpy wheel is required. The
wheel is self-cleaning due to the opposing airflows. If
the enthalpy wheel is cleaned; use compressed air, low
pressure steam or non-polarized solvents. Wash the
cassette panels (See Figure 3 in Section 5.8) with a
soft cloth and mild cleaning solution. Visually inspect
the cassette wiper seals (shown below), perimeter
seal, and drive belt (See Figure 4 in Section 5.8) for
proper operation.
Correct
Operation
5.2 Annual Maintenance
WARNING
Disconnect power to the unit before performing
maintenance procedures.
ROTOR
Wiper
Seal
Air Filters
Replace filters.
HRV 20LCi Drain Pans and Interior of Unit
Wash the foil-faced insulation surfaces and wipe the
drain pans with a soft cloth and mild cleaning solution.
Check the drain fittings to ensure that they are draining
freely.
ERV w20LCi Interior of Unit
Wash the foil-faced insulation surfaces with a soft
cloth and mild cleaning solution.
VD0057A
Fans
The blower wheels and fan housing should be
checked for dirt build-up. If they are dirty, it will be
necessary to remove the blower assembly to clean the
dust out through the fan mouth.
System Operation Check
Verification of all control modes should be checked
to ensure proper operation. Refer to Start-Up Section.
Page 8
5.3 Testing And Replacement Of The
Damper Actuator (ERV only)
After disconnecting the power from the unit, determine
if the damper is defective. Disconnect the 24V power
source. Connect the actuator directly to a 24V power
source with an appropriate cable. If the damper operates
correctly, the problem is either in the wiring connections
or main circuit board.
If the damper does not work, it must be replaced.
Take out the two mounting screws to remove the
assembly. Install a new actuator assembly, connect all
linkages and test for proper operation.
5.4 Motor and Blower Removal
1. Disconnect power from the unit.
indicates that the belt is too tight, resulting in noise
from excessive vibration, premature bearing failure and
short belt life. Tight belts may overload a motor that
would otherwise be adequate. Fan RPM can be adjusted
to achieve the desired airflow by setting the adjustable
sheave on the motor shaft (See Figure 1). Pulley set
screw torque setting 110 in•lbs to 130 in•lbs.
5.7 Cassette Removal (ERV only)
After disconnecting the power from the unit, remove
the access door and the filters located above the wheel
shown below. Disconnect the drive motor harness (See
Figure 5). Slide the panel located below the cassette
(with the label "Exhaust Filter Access") downward until
it clears the cassette beam (See Figure 2). Pull the
cassette out partway (approximately 1/3).
2. Disconnect the 4-wire service connector between
the motor and control box.
Filters
"Exhaust Filter
Access" Label
3. Remove the fan assembly by loosening the back
two 3/8" x 1 1/2" (10 x 38mm) bolts and removing
the front two 3/8" x 1 1/2" (10 x 38mm) bolts. The
fan base is slotted and will slide forward on the rails
and out of the cabinet.
Adjustable sheave
for fan RPM
VD0060
Figure 2: Cassette
Belt tension
adjusting bolts
5.8 Cassette Service (ERV only)
To replace or adjust the wiper seal, remove the five
#8 type B screws as shown below.
Service
connector
Cassette And Drive
Loosen back bolts
Remove four 3/8" x 1 1/2" bolts
1/4" x 3/4" Socket
Head Cap Screws
VD0058
Figure 1: Typical Motor and Blower
5.5 Motor and Blower Service
UHMW Bearing
Wiper Seal
#8 Philips Screws
Belt tension is adjusted by two 5/16" (8mm) bolts. Set
adjustment nuts to the proper belt tension. Belt size A-46.
Drive Motor
#10 16 x 1/2"
Self Drill Screws
5.6 Adjusting Belt Tension
Excessive belt tension is the
number one cause of blower bearing
failure. Proper belt tension and pulley
alignment are essential for trouble
free operation. A simple rule of
thumb for checking belt tension is
illustrated here. When the belt is
grasped as shown, a total deflection
of approximately 1" (25mm) (1/2"
(13 mm) each side) should be easily
attained. Insufficient deflection
Cassette Panels
VD0065A
Figure 3: Cassette and Drive
To replace the UHMW bearing, remove the four 1/4" x 3/4"
(6 x 19mm) socket head cap screws. Lift the cassette
support beam off of the cassette and the bearing can
then be pushed out of the beam after removing the #6
type B screws that hold the bearing in place.
VD0059
Page 9
To access the cassette drive area, loosen the left
side 1/4" x 3/4" (6 x 19mm) socket head cap screws
and remove the bottom left cassette panel by prying it
up and away from the Velcro tabs.
Drive Motor
Harness
To remove the drive pulley, gently slide the drive belt
up and off of the pulley, being careful not to kink the belt
in any way. Loosen the pulley set screw and slide the
pulley off of the drive motor shaft.
To remove the drive belt, remove the four 1/4" x 3/4"
(6 x 19mm) socket head cap screws and lift the
cassette support beam off of the cassette. Remove the
other three cassette panels by prying it up and away
from the Velcro tabs. Slide the belt up and off of the
rotor.
VD0063
Figure 5: Drive Motor Harness
Loosen the four 11/32" adjustment plate nuts (shown
below) two or three turns.
11/32" adjustment
plate nuts
To remove the perimeter seal, locate the Velcro
seam and pull apart. The seal can then be pulled away
from the rotor by prying the two Velcro surfaces apart
as shown below.
Belt tension
adjustment plate
CASSETTE AND DRIVE
CAPACITOR
REMOVE FOUR
8/32" NYLOCK NUTS
VD0062
Turn the belt tension adjustment bolt (shown below)
clockwise to tighten or counterclockwise to loosen.
Belt tension
adjustment bolt
VELCRO SEAL
DRIVE PULLEY
PERIMETER SEAL
DRIVE BELT
VD0066A
Figure 4: Cassette Drive Close-Up
To remove the drive motor, remove the four 11/32"
(8mm) nylock nuts and disconnect the motor wiring
from the capacitor.
5.9 Belt Tension Adjustment/Replacement
(ERV only)
VD0061
After disconnecting the power from the unit, remove
the access door and the filters located above the wheel
(See Figure 2). Disconnect the drive motor harness
shown below. Slide the panel located below the cassette
(with the label "Exhaust Filter Access") downward until it
clears the cassette beam (See Figure 2). Pull the cassette
out partway (approximately 1/3).To adjust the belt tension,
the lower left plastic panel on top of the cassette must
be removed.
Adjust the tension as required. Tighten the adjustment
plate nuts to secure the belt tension adjustment plate in
place. Re-fasten the cassette metal panel and re-connect
the power harness to the cassette motor. Push the cassette
back into place.
NOTE:
The belt tension is factory set and should only be
adjusted when replacing the belt or when the belt de-rails.
See Appendix I for more
trouble shooting information
Page 10
Appendix A
Equipment Data
Shipping weight
Net weight
Shipping dimensions
lxwxh
Openings
location
size w x h
- supply inlet
- exhaust outlet
Fans (standard)
Supply
impeller (fwd centrifugal)
high speed
motor
HRV 20LCi
750 lbs (341 kg)
700 lbs (318 kg)
94" x 52" x 36"
2388 x 1321 x 914mm
ERV w20LCi
725 lbs (330 kg)
700 lbs (318 kg)
94" x 52" x 36"
2388 x 1321 x 914mm
ends of unit
ends of unit
12" x 26" (305 x 660mm)
10" x 14" (254 x 356mm)
12" x 26" (305 x 660mm)
10" x 14" (254 x 356mm)
12.75" dia x 7.0" width
(324 x 178mm)
1200 rpm
1.5 HP, 2 speeds (standard)
2 HP, 1 speed (optional)
12.75" dia x 7.0" width
(324 x 178mm)
1200 rpm
1.5 HP, 2 speeds (standard)
2 HP, 1 speed (optional)
Exhaust
impeller (fwd centrifugal) 12.75" dia x 7.0" width
(324 x 178mm)
high speed
1200 rpm
motor
1.5 HP, 2 speeds (standard)
2 HP, 1 speed (optional)
Filters
Supply: quantity 2 MEF 12" x 24" x 4" disposable
(305 x 610 x 102mm)
Exhaust: quantity 2 MEF 12" x 24" x 4" disposable
(305 x 610 x 102mm)
Defrost Cycle (if equipped) Standard
Extended
activation, stage 1
23°F (-5°C)
recirculation
6 min. (defrost) 10 min. (defrost)
ventilation
32 min. (vent) 28 min. (vent)
activation, stage 2
-22°F (-30°C)
recirculation
6 min. (defrost) 10 min. (defrost)
ventilation
19 min. (vent) 15 min. (vent)
Drains
quantity ... size (NPT) 2 - 3/4" outside thread NPT
3/4" inside thread fit required
Backdraft Damper
size (recirculation defrost) 12.00" x 26.00"
(305 x 660mm)
Page 11
12.75" dia x 9.0" width
(324 x 229mm)
1200 rpm
1.5 HP, 2 speeds (standard)
2 HP, 1 speed (optional)
24" x 24" x 2" disposable
(610 x 610 x 51mm)
24" x 24" x 2" disposable
(610 x 610 x 51mm)
Standard
5°F (-15°C)
6 minutes
30 minutes
N/A
preheat required
below -21°F (-30°C)
N/A
12.00" x 26.00"
(305 x 660mm)
Appendix B
Typical Installation and Minimum Distance Requirements
SUPPLY
TO SPAC
E
TSIDE
ST OU
EXHAU
Balancing
Damper
Flow
Measuring
Station
2 D F
T MIN
Backdraft
Damper
5 D F
T MIN
STRAI
TO AC GHT DUCT S
SEE S HIEVE GOOD ECTION RE
ECTIO
Q
N 3.3 AIR FLOW UIRED
RATES
.
EXHAUST
FROM
SPACE
m
minimu
cf in.
TO
QUIRED
RE
E
NC
CLEARA COMPONENTS
REMOVE TENANCE
FOR MAIN
FROM
INTAKE E
OUTSID
ALL C
WITH ONNECTIONS
MINIM
SUPPL FLEXIBLE C MADE
8 ft. UM DISTANC
IED B
E BET
OR AC
Y OTH OLLARS
W
CORDI
ERS
NG TO EEN EXTERI
OR
LOCAL
BUILD HOODS
ING C
ODES
Balancing
Damper
2 D F
T MIN
2 D F
T MIN
Flow
Measuring
Station
5 D F
T MIN
IF EL
LOCAT ECTRIC PRE
(MINI E IT HERE HEAT IS U
MUM 2
SED
4” FR
OM TH
E UNI
T)
VD0068A
Legend
"D" - equivalent round duct diameter for determining minimum lengths
"Cf" - front clearance required for maintenance.
8" x 20" (203 x 508mm) duct D = 13.5" (343mm)
12" x 26" (305 x 660mm) duct D = 19.0" (483mm)
Minimum clearance required for access:
front clearance - Cf
back clearance
HRV 20LCi
ERV w20LCi
28" (711mm)
48" (1219mm)
none required but 24" (610mm) for none required but 24" (610mm) for
simplified access to service exhaust fan simplified access to service exhaust fan
Appendix C
Electrical Data
Motor HP
208/1/60
230/1/60
MCA MOP MCA MOP
1 1/2
22.38 31.88 21.25 30.25
2
30.70 43.90 30.25 43.25
NOTE: Based on full load motor consumption. Values shown are for the complete unit and include both motors.
Selection With Different Size Supply And Exhaust Motors
Example:
For different motor HP:
1) Select the MCA and MOP for each motor.
2) Add the two numbers together and divide by 2.
1 1/2 HP motor
2 HP motor
Total
Real value
Page 12
208/1/60
MCA MOP
22.38
31.88
30.70
43.90
53.08
75.78
26.54
37.89
Page 13
14.000" SUPPLY
AIR
[356] OPENING
A
VK0035A
10.000"
[254]
7.625"
[194]
10.000"
[254]
6.000"
[152]
7.625"
[194]
C
4.500"
[114]
5.250"
[133]
LEFT SIDE
EXHAUST
AIR
OPENING
4.500"
[114]
D
12.750"
[324]
14.000"
[356]
6.000" [152]
B
36.500"
[927]
85.000"
[2159]
88.500"
[2248]
E
D
FRONT
48.500"
[1232]
26.000"
[660]
30.000"
[762]
FILTER
ACCESS PANEL
23.250"
[591]
26.000"
[660]
PLATE HEAT EXCHANGER
4.000"
[102]
12.000"
[305]
Low voltage connection
D
26.000"
[660]
RIGHT SIDE
26.000"
[660]
1.250"
[32]
14.000"
[356]
20.375"
[518]
17.250"
[438]
12.000"
[305]
2.000"
[51]
Condensate drain
Low voltage connection (reversed door option)
C
E
Line power supply knockout
Line power supply knockout (reverse door option)
CONNECTION TABLE
HRV2000i
Kg
LBS
84.47
186.22
149.35
67.74
202.24
91.73
162.19
73.57
700.00 317.50
A
B
PTS
A
B
C
D
TOTAL
OUTDOOR AIR
OPENING
RETURN AIR
OPENING
44.375" 46.000" 48.500"
[1168]
[1232]
[1127]
A MINIMUM OF 26.000" [660] CLEARANCE FROM ANY OBSTRUCTION IS REQUIRED
FOR REMOVAL OF PLATE HEAT EXCHANGERS, FANS, AND FILTERS.
SUPPLY FAN
CONTROL BOX
ACCESS PANEL
12.250"
[311]
TOP
91.000"
[2311]
SUPPLY AIR
50.500"
[1283]
RETURN
AIR
C
OUTDOOR
AIR
B
FILTER
ACCESS
PANEL
EXHAUST AIR
A
EXHAUST FAN
ACCESS
PANEL
NOTES:
Dimensions in [ ] are in millimeters
Center of gravity
Direction of airflow
3/4" NPT
7/8 or 1 1/8
7/8 or 1 1/8
CONNECTION SIZES
Appendix D
HRV 20LCi Dimensions
Page 14
VK0036A
12.750"
[324]
14.000"
[356]
14.000"
[356]
13.251"
[337]
10.000"
[254]
SUPPLY
AIR
OPENING
5.380"
[137]
LEFT SIDE
7.625"
[194]
EXHAUST
AIR
OPENING
10.000"
[254]
10.750"
[273]
2.000"
[51]
7.625"
[194]
5.250" [133]
LOW VOLTAGE
CONNECTION
4.000"
[102]
A
SUPPLY AIR
TO BUILDING
EXHAUST AIR
TO OUTSIDE
C
A
EXHAUST FAN
ACCESS PANEL
FRONT
CASSETTE,
FILTER
ACCESS PANEL
48.500"
[1232]
12.000"
[305]
2.845"
[72]
ENERGY
RECOVERY MODULE
48.000"
[1219]
B
3.500"
[89]
1.750"
[44]
12.000"
[305]
1.000"
[25]
RIGHT SIDE
26.000"
[660]
RETURN AIR
OPENING
OUTDOOR AIR
OPENING
175.43
700.00
CONNECTION TABLE
D
TOTAL
192.62
158.22
A
C
LBS
173.73
PTS
Kg
79.57
317.52
87.37
71.76
78.80
30.000"
[762]
7/8" or 1 1/8"
Connection Sizes
ERV2000i
Direction of airflow
Center of gravity
NOTES:
Dimensions in [ ] are in millimeters
Line power supply knockout
26.000"
[660]
A
44.375" 46.000" 48.500"
[1168] [1232]
[1127]
23.000"
[584]
OPTIONAL SUPPLY
DAMPER FOR
NON-DEFROST UNITS
2.750"
[70]
OUTDOOR
AIR
RETURN
AIR
A MINIMUM OF 48.000" [1219] CLEARANCE FROM ANY OBSTRUCTION IS
REQUIRED FOR REMOVAL OF ENERGY RECOVERY MODULE, FANS AND FILTERS.
SUPPLY FAN
CONTROL BOX
ACCESS PANEL
36.500"
[927]
TOP
91.000"
[2311]
88.500"
[2248]
85.000"
[2159]
44.625"
[1133]
D
B
FILTER
ACCESS PANEL
Appendix E
ERV w20LCi Dimensions
Appendix F
Airflow Performances
HRV 20LCi Fan Performance - Supply (in. wg.)
Airflow
0.0
(cfm) RPM BHP
1300
1400
1500
1600
1700
1800
1900
2000
2100
2200
2300
2400
2500
2600
2700
1020
1050
1090
1125
1150
1210
1225
1.03
1.15
1.29
1.43
1.58
1.73
1.89
0.2
RPM BHP
1050
1075
1100
1150
1175
1210
1250
1.07
1.20
1.33
1.47
1.62
1.78
1.94
0.4
RPM BHP
1075
1100
1125
1175
1200
1230
1275
1.10
1.23
1.37
1.51
1.66
1.82
1.98
0.6
RPM BHP
1100
1150
1175
1200
1225
1250
1.13
1.25
1.39
1.53
1.69
1.84
0.8
RPM BHP
1100
1125
1160
1200
1225
1260
1275
1.02
1.14
1.27
1.41
1.55
1.70
1.86
RPM
1.0
BHP
1125
1160
1200
1225
1250
1275
1300
1.02
1.14
1.28
1.41
1.56
1.71
1.87
1.2
RPM BHP
1.4
RPM BHP
1085
1200
1225
1260
1275
1300
1325
1143
1225
1275
1310
1340
1375
1.02
1.14
1.27
1.41
1.56
1.71
1.87
1.13
1.26
1.40
1.55
1.70
1.87
1.6
RPM BHP
1115 1.11
1201 1.24
1250 1.38
1350 1.53
1375 1.69
1390 1.85
HP
Fan Pulley
1.5
2.0
ERV 20LCi Supply and Exhaust (in. wg.)
Airflow
0.0
(cfm) RPM BHP
1400
1500
1600
1700
1800
1900
2000
2100
2200
2300
2400
2500
2600
2700
2800
738
758
784
807
1.09
1.20
1.31
1.43
0.2
RPM BHP
755
773
798
816
841
863
1.05
1.16
1.27
1.38
1.51
1.63
0.4
RPM BHP
775
798
813
830
853
870
894
915
1.01
1.11
1.22
1.33
1.45
1.57
1.70
1.84
0.6
RPM BHP
796
831
853
868
882
905
921
945
1.06
1.16
1.27
1.39
1.51
1.63
1.76
1.90
0.8
RPM BHP
839
849
885
905
919
923
955
969
1.09
1.20
1.31
1.43
1.55
1.68
1.82
1.95
RPM
1.0
BHP
850
874
891
899
935
955
967
980
1001
1.02
1.12
1.23
1.35
1.47
1.59
1.72
1.86
2.00
1.2
RPM BHP
883
900
924
940
947
982
1002
1013
1.03
1.14
1.25
1.37
1.49
1.62
1.75
1.89
1.4
RPM BHP
912
931
947
971
986
992
1028
1047
1.04
1.15
1.27
1.39
1.51
1.64
1.77
1.91
1.6
RPM BHP
950 1.04
958 1.15
977 1.27
993 1.39
1016 1.52
1030 1.65
1035 1.79
1071 1.93
Enthalpy Wheel Pressure Drop Chart for ERV w20LCi Rotor
4’’ Depth
fpm
286
310
334
357
381
405
429
453
477
501
524
548
572
596
620
644
668
Page 15
1.5
2.0
Appendix G
42’’ Dia.
cfm
1200
1300
1400
1500
1600
1700
1800
1900
2000
2100
2200
2300
2400
2500
2600
2700
2800
HP
Fan Pulley
Pressure Drop
in W.G.
0.13
0.15
0.17
0.18
0.19
0.20
0.21
0.22
0.24
0.25
0.26
0.28
0.29
0.30
0.32
0.34
0.35
Appendix H
Terminal Control Diagrams
H-1: Wall Control Connection
H-2: Occupied Timer/Sensor Connection
Two types of remote wall controls are available:
1. Venta or Basic with fan switch and dehumidistat
control
2. Supra or Electro with fan mode selection,
dehumidistat control, and maintenance indicator
The remote wall controls work with the integrated
electronic controls within the unit to control ventilation
sequences. Each wall control above has different
features and require 4-wire connection to the unit as
shown below. Without the wall control, fans can be
operated with dry contacts or a switch as in control
diagram H-3.
Occupancy control is achieved by connection to
the terminal interface shown below. These terminals
require a dry contact which could be provided by a
number of types of controls such as a timer, light
sensor, occupancy sensor, building management
system, or other. The unit will not operate unless
these contacts are closed!!
The drawing below shows a factory installed
jumper and programmable timer option.
NOTE: An occupied timer or sensor device cannot be
used with the Supra or Electro wall controls.
NOTE: An occupied timer or sensor device cannot be
used with the Supra or Electro wall controls.
OCCUPANCY CONTROL
(field installed)
JUMPER
(factory installed)
NOTE: The factory installed jumper across terminals
3 and 4 must be in place.
CONTROL CONTACTS
1
BLACK
2
RED
CONTROL CONTACTS
GREEN
11
YELLOW
12
1
BLACK
2
RED
WALL CONTROL
JUMPER
1
CONTROL CONTACTS
1
BLACK
GREEN
11
WALL CONTROL
2
RED
Wall
Control
3
4
5
4
5
LOW
OCCUPIED
TIMER/
SENSOR
HIGH
(-) 24 VAC
3
4
HIGH
15
5
16
6
17
7
18
8
19
9
20
10
7
13
14
10
15
17
(RECIRC UNITS)
8
UNOCC.
RECIRC
CONTACTS
9
10
A
FIELD WIRED
TERMINALS
B
13
14
HIGH
15
(-) 24 VAC
(40 VA)
(+) 24 VAC
(RECIRC UNITS)
8
16
(+) 24 VAC
LOW
COMMON
OCCUPIED
TIMER/
SENSOR
16
(+) 24 VAC
12
(40 VA)
6
11
12
5
14
(-) 24 VAC
UNOCC.
RECIRC
CONTACTS
9
COMMON
4
COMMON
7
3
3
13
(40 VA)
6
YELLOW
2
LOW
OCCUPIED
TIMER/
SENSOR
GREEN
YELLOW
WALL CONTROL
M
VE0028A
18
19
20
CLASS 2 VOLTAGE
NOTE:
Connections are all dry contacts
except wall control, wheel alarm
contacts and 24 VAC power contacts.
Use of 24 VAC circuit requires
isolating contacts (ex. thermostat)
to prevent interconnection of
Class 2 outputs.
VE0027A
Page 16
A
FIELD WIRED
TERMINALS
B
17
(RECIRC UNITS)
UNOCC.
RECIRC
CONTACTS
A
FIELD WIRED
TERMINALS
B
CLASS 2 VOLTAGE
CLASS 2 VOLTAGE
NOTE:
Connections are all dry contacts
except wall control, wheel alarm
contacts and 24 VAC power contacts.
NOTE:
Connections are all dry contacts
except wall control, wheel alarm
contacts and 24 VAC power contacts.
Use of 24 VAC circuit requires
isolating contacts (ex. thermostat)
to prevent interconnection of
Class 2 outputs.
Use of 24 VAC circuit requires
isolating contacts (ex. thermostat)
to prevent interconnection of
Class 2 outputs.
18
19
20
Appendix H Continued
Terminal Control Diagrams
H-3: Remote Fan Control
H-4: Unocupied Recirc. Contacts
Remote fan control can be achieved by connecting
dry contact controls to the terminal interface at
terminals labeled: LOW - COM - HIGH (Not all
units have 2 speeds). Placing a jumper across the
'LOW' and 'COM' terminals will put the unit in low
speed ventilation or placing a jumper across the
'HIGH' and 'COM' terminals will put the unit into high
speed. DO NOT jumper all three terminals together.
These controls could also be the following: SPDT
switch, dehumidistat, CO2 sensor, light sensor, heat
sensor, timer, building management system, etc. The
drawing below represents a switch connected to the unit.
On recirc defrost units, an unoccupied recirc control
can be achieved by connection to the terminal
interface shown below. These terminals require a
dry contact which could be provided by a timer,
thermostat or other. Closure of these terminals will
cause the unit to go into a 'recirc mode' where the
supply fan runs on high speed and the exhaust fan
stops.
CAUTION: Do not use a wall control and remote fan
switch at the same time. Damage to the unit may
occur.
CONTROL CONTACTS
1
BLACK
GREEN
3
4
5
RED
YELLOW
CONTROL CONTACTS
REMOTE FAN SWITCH
1
11
WALL CONTROL
2
NOTE: Although these contacts are intended for
use during unoccupied periods, they are still active
during an occupied condition. Therefore, the field
supplied dry contacts should be installed such that they
are disabled during occupied periods as to not cause
the unit to go into a recirc condition unnecessarily.
12
LOW
2
13
3
COMMON
14
4
HIGH
15
5
(-) 24 VAC
16
(+) 24 VAC
7
(RECIRC UNITS)
8
UNOCC.
RECIRC
CONTACTS
9
10
A
RED
YELLOW
12
LOW
13
COMMON
14
HIGH
15
OCCUPIED
TIMER/
SENSOR
(-) 24 VAC
(40 VA)
(40 VA)
6
11
WALL CONTROL
HIGH
LOW
OCCUPIED
TIMER/
SENSOR
GREEN
BLACK
FIELD WIRED
TERMINALS
B
6
NOTE: Not all units have two speeds
17
7
18
8
19
9
10
20
16
(+) 24 VAC
17
(RECIRC UNITS)
UNOCC.
RECIRC
CONTACTS
A
FIELD WIRED
TERMINALS
B
CLASS 2 VOLTAGE
CLASS 2 VOLTAGE
NOTE:
Connections are all dry contacts
except wall control, wheel alarm
contacts and 24 VAC power contacts.
NOTE:
Connections are all dry contacts
except wall control, wheel alarm
contacts and 24 VAC power contacts.
Use of 24 VAC circuit requires
isolating contacts (ex. thermostat)
to prevent interconnection of
Class 2 outputs.
Use of 24 VAC circuit requires
isolating contacts (ex. thermostat)
to prevent interconnection of
Class 2 outputs.
VE0030A
VE0029A
Page 17
18
19
20
24 VAC Required
DRY CONTACTS
(Supplied by others)
T4 1
W/Y
3
1
W/Y
G
BK/Y
G
T4 1
VOLTAGE
Page 18
230 / 1 / 60
VE0031A
WHEEL DRIVE
MOTOR
INHERENT PROTECTION BUILT IN
208/ 230/ 1/ 60 1.5 or 2 HP
INHERENT PROTECTION BUILT IN
208/ 230/ 1/ 60 1.5 or 2 HP
INHERENT PROTECTION BUILT IN
208/ 230/ 1/ 60 1.5 or 2 HP
SUPPLY MOTOR
EXHAUST MOTOR
120V PRIM, 24V SEC, 40VA
0.5 A
115V
J1 1
F2
W
X2
H1
24V
C
BL
J1 3
C
W
CONTACTOR C2 120VAC COIL, 2 POLE, 5HP, 230VAC,
2HP 120VAC, FLA 30A
BK
BK
G
5- THE FIELD WIRING MUST COMPLY WITH APPLICABLE
CODES, ORDONNANCES AND REGULATIONS.
4- IF ANY OF THE ORIGINAL WIRE, AS SUPPLIED, MUST BE
REPLACED, USE THE SAME OR EQUIVALENT WIRE.
J4
-t
DEFROST
TEMP.
SENSOR
11
12
13
14
15
16
17
18
19
20
3- FOR SINGLE PHASE MOTORS WITH 2 HP, A CONTACTOR IS USED.
2- SUPPLY AND EXHAUST MOTORS MAY NOT BE EQUIPPED
WITH ‘‘WIRED’’ T’STATS BUT MAY HAVE AUTO OVERLOADS.
IF SO, CONNECTOR T2 IS ELIMINATED.
120VAC COIL, DPST 3HP, 240VAC
RELAY 3
#18 AWG WIRE
#14 AWG WIRE
#12 AWG WIRE
POWER LINE ANY V / 3 / 60
115 VOLT
LOW VOLTAGE
NOTES
1- 3 POLE DISCONNECTION SWITCH OPTIONAL.
FIELD CONNECTIONS TO TERMINALS ON SWITCH.
SINGLE PHASE REQUIRES A NEUTRAL WIRE WITH L1 & L2.
G
BK
Y
24VAC COIL, DPDT 10A, 240VAC
W
BL
G
O
G
3.9K
120VAC COIL, DPDT 1/2HP, 240VAC
1
2
3
4
5
6
7
8
9
10
R
C
RELAY 2
BLACK
RED
OCC./
UNOCC.
24V 24V +
ENTHALPY
ALM 24V
ALM COM
FW A
R1-1
ENTHALPY
RELAY 1
ORANGE
RED
WHITE
WHITE/BLUE
WHITE/RED
WHITE/YELLOW
YELLOW
X1
TRANSFORMER TR2
H2
W/R
BL
C
DAMPERS
R2-1
3 NO 4
5 COM 6
3 NO 4
5 COM 6
1 2 3 4 5 6 7 8 9
F F I OC OL Y R G B
COLOR CODE
BL
BLUE
O
BLACK
R
BK
W
BK/BL BLACK/BLUE
BK/R BLACK/RED
W/BL
BK/Y BLACK/YELLOW W/R
GREEN
W/Y
G
G/R
GREEN/RED
Y
123456
BK
W
R
W
BL
BK/R
1
N/O
N/C
CONTROL
BOARD
202252
COMM.
GREEN
YELLOW
LOW
COM
HIGH
DIRTY
FILTER
UNOCC
RECIRC
FW B
2
1
208 / 1 / 60
G
W
C
BL
2
1 NC 2
W/R
T2
1 NC 2
1
AB C D E F G
208 / 230 / 1 / 60
G
J1 6
J1 4
C
DEF DAMPER
R2-2
3 NO 4
5 COM 6
1 NC 2
2
JU1
SEE NOTE 1:
T5
BK/Y
R
R3/C2-2
EXHAUST
C
C
5 COM 6
W
T3 3
1
2
NOT T3 3
INCLUDED
WITH
NON-DEF
UNITS
J3
L1 C L2
L1 C L2
BK
4
G1 L1 L2
9 8 7
J4
DISCONNECT OPTION
T1
W
BK
NO 2
G
3
O N
C
EX DAMPER
MOTOR
NOT INCLUDED
WITH HRV UNITS
2 3
TRANSFORMER
TR2
5 COM 6
R3/C2-1
SUPPLY
C
C
NO 2
1
W/Y
2
G
G
W/R
EX DAMPER
G/R WIRES
MOTOR
NOT INCLUDED
WITH SPRING
RETURN DAMPERS C O N
(INCLUDES BOTH
DEF AND EXH)
W/R
WHEEL DRIVE
MOTOR
J2 1
FUSE F2
4
G
BK/Y
BK/Y
2
BK
L2
R
L1
W
W/Y
G
W/R
L2
J1 8
L1
J1 9
BK/Y
R
G/R
BK/R
BK/Y
BK
W
J1 2
BK/R
DEF DAMPER
MOTOR
J1 7
EXHAUST
MOTOR
J1 5
G/R
BK/BL
SUPPLY
MOTOR
W/BL
G/R
G/R
BK/R
BK/BL
W/BL
W
DAMPER OPTIONS
O
SUPPLY DAMPER
OPTION
G
NOTE 3
4
: :: :: ::
R
R
6
T7
J1
3 2 1
T7
NOTE 3
Appendix I
Wiring Diagram for HRV 20LCi and ERV w20LCi (1 speed, exhaust defrost)
R/Y
R/Y
BK/Y
W/Y
NO 2
R
T5
Page 19
WHEEL DRIVE
MOTOR
EXHAUST MOTOR
INHERENT PROTECTION BUILT IN
208/ 230/ 1/ 60 1.5 or 2 HP
INHERENT PROTECTION BUILT IN
208/ 230/ 1/ 60 1.5 or 2 HP
INHERENT PROTECTION BUILT IN
208/ 230/ 1/ 60 1.5 or 2 HP
SUPPLY MOTOR
0.5 A
230 / 1 / 60
R
120V PRIM, 24V SEC, 40VA
208 / 1 / 60
G
R
C
C
115V
J1 1
F2
W
R
H1
W
X2
X1
TRANSFORMER TR2
H2
W/R
BL
C
C
DAMPERS
R2-1
BL
J1 3
W
#18 AWG WIRE
#14 AWG WIRE
#12 AWG WIRE
POWER LINE ANY V / 3 / 60
115 VOLT
LOW VOLTAGE
BK
BK
G
5- THE FIELD WIRING MUST COMPLY WITH APPLICABLE
CODES, ORDONNANCES AND REGULATIONS.
4- IF ANY OF THE ORIGINAL WIRE, AS SUPPLIED, MUST BE
REPLACED, USE THE SAME OR EQUIVALENT WIRE.
J4
-t
DEFROST
TEMP.
SENSOR
11
12
13
14
15
16
17
18
19
20
3- FOR SINGLE PHASE MOTORS WITH 2 HP, A CONTACTOR IS USED.
2- SUPPLY AND EXHAUST MOTORS MAY NOT BE EQUIPPED
WITH ‘‘WIRED’’ T’STATS BUT MAY HAVE AUTO OVERLOADS.
IF SO, CONNECTOR T2 IS ELIMINATED.
120VAC COIL, DPST 3HP, 240VAC
CONTACTOR C2 120VAC COIL, 2 POLE, 5HP, 230VAC,
2HP 120VAC, FLA 30A
G
BK
Y
RELAY 3
W
BL
G
O
G
3.9K
NOTES
1- 3 POLE DISCONNECTION SWITCH OPTIONAL.
FIELD CONNECTIONS TO TERMINALS ON SWITCH.
SINGLE PHASE REQUIRES A NEUTRAL WIRE WITH L1 & L2.
1
2
3
4
5
6
7
8
9
10
R
C
24VAC COIL, DPDT 10A, 240VAC
BLACK
RED
OCC./
UNOCC.
24V 24V +
ENTHALPY
ALM 24V
ALM COM
FW A
C
ENTHALPY
R1-1
3 NO 4
5 COM 6
3 NO 4
5 COM 6
ORANGE
RED
RED/YELLOW
WHITE
WHITE/BLUE
WHITE/RED
WHITE/YELLOW
YELLOW
24V
COLOR CODE
BL
BLUE
O
BK
BLACK
R
BK/BL BLACK/BLUE
R/Y
W
BK/R BLACK/RED
BK/Y BLACK/YELLOW W/BL
G
GREEN
W/R
G/R
GREEN/RED
W/Y
Y
123456
BK
W
C
3 NO 4
5 COM 6
R2-3
NC 2
BL
BK/R
1
120VAC COIL, DPDT 1/2HP, 240VAC
J1 6
1
C
BL
2
1 NC 2
W/R
T2
1 NC 2
1
RELAY 2
J1 4
BK/Y
C
DEF DAMPER
R2-2
3 NO 4
5 COM 6
1 NC 2
2
RELAY 1
W
C
EXHAUST HI
R3/C2-4
W
G/R
T3 3
N/O
N/C
CONTROL
BOARD
202252
COMM.
GREEN
YELLOW
LOW
COM
HIGH
DIRTY
FILTER
UNOCC
RECIRC
FW B
2
1
208 / 230 / 1 / 60
G
G
C
NO 2
5 COM 6
1
W/Y
1
AB C D E F G
SEE NOTE 1:
L1 C L2
L1 C L2
C
EXHAUST LO
G
2
NOT T3 3
INCLUDED
WITH
NON-DEF
UNITS
1 2 3 4 5 6 7 8 9
F F I OC OL Y R G B
DISCONNECT OPTION
T1
W
C
SUPPLY HI
C
NO 2
5 COM 6
R3/C2-3
1
R/Y
4
G1 L1 L2
EX DAMPER
MOTOR
9 8 7
JU1
TRANSFORMER
TR2
C
NO 2
5 COM 6
R3/C2-2
1
G
3
O N
C
W/R
EX DAMPER
C/R WIRES
MOTOR
NOT INCLUDED
WITH SPRING
RETURN DAMPERS C O N
(INCLUDES BOTH
DEF AND EXH)
NOT INCLUDED
WITH HRV UNITS
J3
J4
FUSE F2
VOLTAGE
C
SUPPLY LO
5 COM 6
R3/C2-1
1
W/Y
BK/Y
2
R/Y
T4 1
G
WHEEL DRIVE
MOTOR
2 3
VE0032A
R
G
4
BK
3
BK
2
R
BK/Y
R
R
T4 1
BK
BK/Y
LO LINE HI G
W/R
W/R
W/R
LO LINE HI G
W
J1 9
W/Y
BK
J1 8
J1 8
W
J1 2
DEF DAMPER
MOTOR
J1 7
EXHAUST
MOTOR
J1 5
G/R
BK/BL
SUPPLY
MOTOR
W/BL
G/R
BK/R
BK/R
BK/BL
W/BL
W
DAMPER OPTIONS
O
SUPPLY DAMPER
OPTION
G
NOTE 3
4
: :: :: ::
BK/R
J1 9
J2 1
BK/R
6
T7
J1
3 2 1
T7
NOTE 3
Appendix I Continued
Wiring Diagram for HRV 20LCi and ERV w20LCi (2 speeds, exhaust defrost)
T4 1
W/Y
2
3
BK/Y
G
C
W
T5
G
5 COM 6
Page 20
WHEEL DRIVE
MOTOR
EXHAUST MOTOR
SUPPLY MOTOR
CONTACTOR C2
INHERENT PROTECTION BUILT IN
208/ 230/ 1/ 60 1.5 or 2 HP
INHERENT PROTECTION BUILT IN
208/ 230/ 1/ 60 1.5 or 2 HP
INHERENT PROTECTION BUILT IN
C
NO
9
6
J1 4
J1 9
#18 AWG WIRE
#14 AWG WIRE
#12 AWG WIRE
POWER LINE ANY V / 3 / 60
115 VOLT
LOW VOLTAGE
120VAC COIL, DPDT 1/2HP, 240VAC
120VAC COIL, DPST 3HP, 240VAC
24VAC COIL, TPDT 10A, 240VAC
0.5 A
C
H1
24VAC COIL, DPDT 10A, 240VAC
R4-1
R
BK/R
R
X2
W/BL
W/R
W
X1
TRANSFORMER TR2
H2
BL
T3 3
W/R
BK/R
1
2
BL
C
C
DAMPERS
R2-1
BL
J1 3
BLACK
RED
OCC./
UNOCC.
24V 24V +
ENTHALPY
ALM 24V
ALM COM
FW A
C
W
1
2
3
4
5
6
7
8
9
10
G
W
BL
R
C
ENTHALPY
R1-1
3 NO 4
5 COM 6
1
3 NO 4
5 COM 6
2
1 NC 2
W/R
T2
1 NC 2
1
2
Y
G
BK
O
G
G
5- THE FIELD WIRING MUST COMPLY WITH APPLICABLE
CODES, ORDONNANCES AND REGULATIONS.
4- IF ANY OF THE ORIGINAL WIRE, AS SUPPLIED, MUST BE
REPLACED, USE THE SAME OR EQUIVALENT WIRE.
J4
-t
DEFROST
TEMP.
SENSOR
11
12
13
14
15
16
17
18
19
20
3- FOR SINGLE PHASE MOTORS WITH 2 HP, A CONTACTOR IS USED.
2- SUPPLY AND EXHAUST MOTORS MAY NOT BE EQUIPPED
WITH ‘‘WIRED’’ T’STATS BUT MAY HAVE AUTO OVERLOADS.
IF SO, CONNECTOR T2 IS ELIMINATED.
BK
BK
3.9K
NOTES
1- 3 POLE DISCONNECTION SWITCH OPTIONAL.
FIELD CONNECTIONS TO TERMINALS ON SWITCH.
SINGLE PHASE REQUIRES A NEUTRAL WIRE WITH L1 & L2.
24V
BL
G/R WIRES
NOT INCLUDED
WITH SPRING
RETURN DAMPERS
(INCLUDES BOTH
DEF AND EXH)
J1 5
RELAY 1
C
8
3
115V
J1 1
F2
W
C
COM
5
2
7
NC
4
1
BK
W
R2-3
W/BL
FUSE F2
120V PRIM, 24V SEC, 40VA
RELAY 2
120VAC COIL, 2 POLE, 5HP, 230VAC, RELAY 3
2HP 120VAC, FLA 30A
RELAY 4
208/ 230/ 1/ 60 1.5 or 2 HP
230 / 1 / 60
BK/Y
NC 2
T3 3
1
2
N/O
N/C
CONTROL
BOARD
202252
COMM.
GREEN
YELLOW
LOW
COM
HIGH
DIRTY
FILTER
UNOCC
RECIRC
FW B
2
1
208 / 1 / 60
J1 6
C
3 NO 4
5 COM 6
1
C
DEF DAMPER
R2-2
3 NO 4
5 COM 6
1 NC 2
123456
W
NOT T3 3
INCLUDED
WITH
NON-DEF
UNITS
AB C D E F G
208 / 230 / 1 / 60
G
4
G1 L1 L2
EX DAMPER
MOTOR
1 2 3 4 5 6 7 8 9
F F I OC OL Y R G B
SEE NOTE 1:
G
W
3
O N
C
O N
C
O N
EX DAMPER
MOTOR
9 8 7
L1 C L2
L1 C L2
C
2
C
SUP DAMPER
MOTOR
NOT INCLUDED
WITH HRV UNITS
J3
JU1
DISCONNECT OPTION
T1
BK/Y
C
L1 L2 G
DEF DAMPER
MOTOR
W/R
BK/R
WHEEL DRIVE
MOTOR
J4
TRANSFORMER
TR2
C
T4 1
NO 2
EXHAUST
BK
1
W/Y
G
R3/C2-2
BK
G
SUPPLY
NO 2
BK
5 COM 6
R3/C2-1
1
W/Y
VOLTAGE
4
W
DAMPER OPTIONS
G/R
EXHAUST
MOTOR
W/Y
RECIRC. DAMPER
OPTION
O
NOTE 3
2 3
VE0034A
R
BK/R
W/R
L1 L2 G
BK/Y
BK/Y
RED
RED/YELLOW
WHITE
WHITE/BLUE
WHITE/RED
WHITE/YELLOW
YELLOW
BK
G
BK/R
BK/Y
BK/Y
R
R
G/R
G/R
BK/BL
SUPPLY
MOTOR
R
R/Y
W
W/BL
W/R
W/Y
Y
G
COLOR CODE
R
W/R
BLUE
BLACK
BLACK/BLUE
BLACK/RED
BLACK/YELLOW
GREEN
GREEN/RED
ORANGE
J1 7
G/R
J1 8
J1 8
BK/R
W/R
BK/BL
G/R
W/BL
W
BL
BK
BK/BL
BK/R
BK/Y
G
G/R
O
4
: :: :: ::
W
J1 2
J2 1
W/R
6
T7
J1
3 2 1
T7
NOTE 3
Appendix I Continued
Wiring Diagram for HRV 20LCi and ERV w20LCi (1 speed, recirculation defrost)
R/Y
R/Y
BK/Y
3
W/Y
G
NO 2
Page 21
T5
230 / 1 / 60
G
WHEEL DRIVE
MOTOR
EXHAUST MOTOR
SUPPLY MOTOR
CONTACTOR C2
W
C
C
INHERENT PROTECTION BUILT IN
208/ 230/ 1/ 60 1.5 or 2 HP
INHERENT PROTECTION BUILT IN
208/ 230/ 1/ 60 1.5 or 2 HP
INHERENT PROTECTION BUILT IN
C
NO
9
6
C
J1 4
J1 9
120VAC COIL, DPDT 1/2HP, 240VAC
120VAC COIL, DPST 3HP, 240VAC
24VAC COIL, TPDT 10A, 240VAC
#18 AWG WIRE
#14 AWG WIRE
#12 AWG WIRE
POWER LINE ANY V / 3 / 60
115 VOLT
LOW VOLTAGE
W/R
R
X2
X1
TRANSFORMER TR2
H1
0.5 A
R4-1
R
BK/R
BL
BL
BL
C
C
DAMPERS
R2-1
BL
J1 3
BLACK
RED
OCC./
UNOCC.
24V 24V +
ENTHALPY
ALM 24V
ALM COM
FW A
C
W
1
2
3
4
5
6
7
8
9
10
G
W
BL
R
C
ENTHALPY
R1-1
3 NO 4
5 COM 6
1
3 NO 4
5 COM 6
2
1 NC 2
W/R
T2
1 NC 2
1
2
Y
G
BK
O
G
G
5- THE FIELD WIRING MUST COMPLY WITH APPLICABLE
CODES, ORDONNANCES AND REGULATIONS.
4- IF ANY OF THE ORIGINAL WIRE, AS SUPPLIED, MUST BE
REPLACED, USE THE SAME OR EQUIVALENT WIRE.
J4
-t
DEFROST
TEMP.
SENSOR
11
12
13
14
15
16
17
18
19
20
3- FOR SINGLE PHASE MOTORS WITH 2 HP, A CONTACTOR IS USED.
2- SUPPLY AND EXHAUST MOTORS MAY NOT BE EQUIPPED
WITH ‘‘WIRED’’ T’STATS BUT MAY HAVE AUTO OVERLOADS.
IF SO, CONNECTOR T2 IS ELIMINATED.
BK
BK
3.9K
NOTES
1- 3 POLE DISCONNECTION SWITCH OPTIONAL.
FIELD CONNECTIONS TO TERMINALS ON SWITCH.
SINGLE PHASE REQUIRES A NEUTRAL WIRE WITH L1 & L2.
24V
W
T3 3
W/R
BK/R
1
2
G/R WIRES
NOT INCLUDED
WITH SPRING
RETURN DAMPERS
(INCLUDES BOTH
DEF AND EXH)
J1 5
24VAC COIL, DPDT 10A, 240VAC
C
8
3
115V
H2
W/BL
W
J1 1
F2
W
C
COM
5
2
7
NC
4
1
BK
W
R2-3
123456
BK/Y
NC 2
RELAY 1
J1 6
C
3 NO 4
5 COM 6
1
C
DEF DAMPER
R2-2
3 NO 4
5 COM 6
1 NC 2
T3 3
1
2
FUSE F2
W
EXHAUST HI
R3/C2-4
RELAY 2
120VAC COIL, 2 POLE, 5HP, 230VAC, RELAY 3
2HP 120VAC, FLA 30A
RELAY 4
208/ 230/ 1/ 60 1.5 or 2 HP
120V PRIM, 24V SEC, 40VA
208 / 230 / 1 / 60
G
G
C
NO 2
5 COM 6
1
W/Y
W
NOT T3 3
INCLUDED
WITH
NON-DEF
UNITS
G1 L1 L2
EX DAMPER
MOTOR
N/O
N/C
CONTROL
BOARD
202252
COMM.
GREEN
YELLOW
LOW
COM
HIGH
DIRTY
FILTER
UNOCC
RECIRC
FW B
2
1
SEE NOTE 1:
L1 C L2
L1 C L2
C
EXHAUST LO
G
4
O N
C
O N
C
O N
EX DAMPER
MOTOR
AB C D E F G
DISCONNECT OPTION
T1
BK/Y
C
SUPPLY HI
C
NO 2
5 COM 6
R3/C2-3
1
R/Y
3
C
SUP DAMPER
MOTOR
NOT INCLUDED
WITH HRV UNITS
9 8 7
1 2 3 4 5 6 7 8 9
F F I OC OL Y R G B
208 / 1 / 60
C
NO 2
5 COM 6
R3/C2-2
1
G
2
T4 1
LO LINE HI G
DEF DAMPER
MOTOR
W/R
BK/R
EXHAUST
MOTOR
G/R
WHEEL DRIVE
MOTOR
J3
JU1
VOLTAGE
C
SUPPLY LO
5 COM 6
R3/C2-1
1
W/Y
BK/Y
R
DAMPER OPTIONS
J4
TRANSFORMER
TR2
4
R
SUPPLY DAMPER
OPTION
O
NOTE 3
2 3
VE0033A
R
2
BK
T4 1
BK
BK/R
W/R
LO LINE HI G
R
BK/BL
SUPPLY
MOTOR
W
RED
RED/YELLOW
WHITE
WHITE/BLUE
WHITE/RED
WHITE/YELLOW
YELLOW
R
R
R/Y
W
W/BL
W/R
W/Y
Y
G
COLOR CODE
BK
R/Y
BK/Y
BK/Y
BK/Y
R
R
G/R
G/R
G
BK/R
W/Y
BK
W/R
BLUE
BLACK
BLACK/BLUE
BLACK/RED
BLACK/YELLOW
GREEN
GREEN/RED
ORANGE
J1 7
G/R
J1 8
J1 8
BK/R
W/R
BK/BL
G/R
W/BL
W
BL
BK
BK/BL
BK/R
BK/Y
G
G/R
O
4
: :: :: ::
W
J1 2
J2 1
W/R
6
T7
J1
3 2 1
T7
NOTE 3
Appendix I Continued
Wiring Diagram for HRV 20LCi and ERV w20LCi (2 speeds, recirculation defrost)
Appendix J
Trouble Shooting Chart
Problem
Cause
Solution
Unit will not turn on.
Occupied timer contacts open.
Check external wiring.
Check the wiring in the control box.
Check the control board for power.
Unit will not turn off.
External terminal strip wiring.
Check if high or low speed control contacts are
closed on the terminal strip.
Air from supply diffusers
too cold.
Imbalance of supply
and exhaust air.
Check filters and heat exchanger for blockage.
Check balance of airflows. Install post heat module.
Unit makes an annoying
noise.
Blower wheel out of alignment.
Remove the motor/blower assembly
(see Service Section). Adjust blower wheel.
Enthalpy wheel wiper seal not
functioning properly.
(on ERV w20LCi only)
Check for proper seal operation.
Imbalance of supply
and exhaust air.
Defrost damper not functioning.
Pre-heater not functioning.
Check
Check
Check
Check
Heat exchanger freezing
(on HRV 20LCi) or
Enthalpy Wheel freezing
(on ERV w20LCi)
Enthalpy Wheel not running Enthalpy control contacts closed.
(on ERV w20LCi only).
Electrical supply interrupted.
Drive motor capacitor.
Drive motor failure.
Drive motor relay in control box.
Drive belt.
Drive pulley.
Motor and blower not
functioning.
Electrical supply interrupted.
Fan motor capacitor.
Fan
Fan
Fan
Fan
motor failure.
motor relay in control box.
drive belt.
drive pulleys.
filters and heat exchanger for blockage.
balance of airflows.
for operation of damper actuator.
the heat module circuit breaker.
Check jumper wiring for proper operation.
Check unit circuit breaker. Check two wire service
connector on motor.
Check capacitor connections, Check motor operation
with a new capacitor.
Check the drive motor.
Check relay wiring. Check relay operation.
Check for drive belt derailment off of drive pulley or
failure.
Check for securely fastened pulley on motor shaft.
Check unit circuit breaker. Check four wire service
connector on each motor.
Check capacitor connections. Check motor operation
with new capacitor.
Check fan motor.
Check relay wiring. Check relay operation.
Check for failure.
Check for securely fastened pulley(s) on motor or fan
shaft(s). Set screw setting at 110 in • lbs to 130 in • lbs.
Only supply fan will turn on. Unit is in recirc defrost.
(recirc units)
Wait until unit is out of defrost.
Defrost relay is not working.
Only exhaust fan will turn on. Unit is in defrost (exhaust units)
Motor wiring incorrect.
Check connection to motor.
Damper will not open.
Defrost relay in control box.
Electronic control board.
Thermistor.
Check wiring on damper actuator.
Check three wire service connector on control box.
Check relay wiring. Check relay operation.
Test the defrost on control board.
Test the thermistor operation.
Wires are reversed.
Reverse wires #2 and #3 should on damper actuator.
Damper opens when it
be closed.
Electrical supply interrupted.
Page 22