1
User’s Guide
StarTAC clipOn
Organizer,
Synchronization,
and TrueSync Desktop
www.starfish.com
www.mot.com
Copyright (c) 1999 Starfish Software, Inc. All rights reserved. Starfish,
TrueSync, Sidekick, EarthTime and the Starfish logo are trademarks of
Starfish Software, Inc. For TrueSync Plus: U.S. patent nos. 5,519,606 and
5,778,346; other patents pending. For TrueSync Desktop: U.S. patent nos.
5,519,606, 5,778,346, 5,845,257, and D388,776; other patents pending. For
the StarTAC clipOn Organizer device: U.S. patent no. 4,369,516. The
furnishing of the Software Product, any accompanying product, or any related
documentation or materials does not give you any license to any patents.
Motorola and StarTAC are trademarks of Motorola, Inc. Any other trademarks
are the property of their respective owners.
Important:
This device complies with part 15 of the FCC rules.
Operation is subject to the following two conditions:
(1) This device may not cause harmful interference; (2) This
device must accept any interference received including
interference that may cause undesired operation.
Contents
Introduction
1
Introducing the StarTAC® clipOn Organizer . . . . . . . . . . . . . . . 1
About Starfish TrueSync technology . . . . . . . . . . . . . . . . . . . 2
Connecting the clipOn to your StarTAC. . . . . . . . . . . . . . . . . . 2
Chapter 1
Getting started
3
Turning on the StarTAC clipOn Organizer
Getting started with the Setup Wizard . . .
Using the clipOn Home screen and views .
Synchronizing with the clipOn . . . . . .
.
.
.
.
.
.
.
.
.
.
.
.
.
.
.
.
.
.
.
.
.
.
.
.
.
.
.
.
.
.
.
.
.
.
.
.
.
.
.
.
.
.
.
.
.
.
.
.
.
.
.
.
.
.
.
.
.
.
.
.
.
.
.
.
3
4
7
8
Chapter 2
Using the StarTAC
clipOn Organizer
Calling with the StarTAC clipOn
Using Contacts . . . . . . . . . .
Using the Calendar. . . . . . . .
Using To Do Lists . . . . . . . .
Using Memos . . . . . . . . . .
Using Time Zones . . . . . . . .
Using Preferences . . . . . . . .
9
.
.
.
.
.
.
.
.
.
.
.
.
.
.
.
.
.
.
.
.
.
.
.
.
.
.
.
.
.
.
.
.
.
.
.
.
.
.
.
.
.
.
.
.
.
.
.
.
.
.
.
.
.
.
.
.
.
.
.
.
.
.
.
.
.
.
.
.
.
.
.
.
.
.
.
.
.
.
.
.
.
.
.
.
.
.
.
.
.
.
.
.
.
.
.
.
.
.
.
.
.
.
.
.
.
.
.
.
.
.
.
.
.
.
.
.
.
.
.
.
.
.
.
.
.
.
.
.
.
.
.
.
.
.
.
.
.
.
.
.
. 9
10
15
18
21
23
25
Chapter 3
Product care
Removing the clipOn from the phone . . . . .
Installing new batteries . . . . . . . . . . . .
Resetting the clipOn . . . . . . . . . . . . . .
Charging the phone with the clipOn connected
Screen care . . . . . . . . . . . . . . . . . . .
i
27
.
.
.
.
.
.
.
.
.
.
.
.
.
.
.
.
.
.
.
.
.
.
.
.
.
.
.
.
.
.
.
.
.
.
.
.
.
.
.
.
.
.
.
.
.
.
.
.
.
.
Contents
.
.
.
.
.
.
.
.
.
.
.
.
.
.
.
27
27
28
29
29
i
Chapter 4
TrueSync Desktop
and TrueSync Plus
Introducing TrueSync technology .
Requirements . . . . . . . . . . .
Installing the product . . . . . . .
Uninstalling your product . . . . .
Starting TrueSync Desktop . . . .
Starting TrueSync Plus. . . . . . .
About the documentation . . . . .
31
.
.
.
.
.
.
.
.
.
.
.
.
.
.
.
.
.
.
.
.
.
.
.
.
.
.
.
.
.
.
.
.
.
.
.
.
.
.
.
.
.
.
.
.
.
.
.
.
.
.
.
.
.
.
.
.
.
.
.
.
.
.
.
.
.
.
.
.
.
.
.
.
.
.
.
.
.
.
.
.
.
.
.
.
.
.
.
.
.
.
.
.
.
.
.
.
.
.
.
.
.
.
.
.
.
.
.
.
.
.
.
.
.
.
.
.
.
.
.
.
.
.
.
.
.
.
.
.
.
.
.
.
.
31
32
32
34
34
35
35
Chapter 5
Synchronizing
37
Starting TrueSync: . . . . . . . . . . . . .
Setting up TrueSync . . . . . . . . . . . .
Changing the TrueSync setup . . . . . . .
Changing your preferences . . . . . . . .
Using the TrueSync Log . . . . . . . . . .
Setting up multiple users. . . . . . . . . .
Staying up to date with TrueSync Central .
.
.
.
.
.
.
.
.
.
.
.
.
.
.
.
.
.
.
.
.
.
.
.
.
.
.
.
.
.
.
.
.
.
.
.
.
.
.
.
.
.
.
.
.
.
.
.
.
.
.
.
.
.
.
.
.
.
.
.
.
.
.
.
.
.
.
.
.
.
.
.
.
.
.
.
.
.
.
.
.
.
.
.
.
.
.
.
.
.
.
.
.
.
.
.
.
.
.
.
.
.
.
.
.
.
37
37
40
44
45
45
46
Chapter 6
TrueSync Desktop
47
Using TrueSync Desktop’s features . . . . . . . . . . . . . . . . . . . 47
Customizing the Toolbar. . . . . . . . . . . . . . . . . . . . . . . . . 48
Setting preferences. . . . . . . . . . . . . . . . . . . . . . . . . . . . 48
Chapter 7
TrueSync Desktop:
Calendar view
Using the Calendar view. . . . . . . .
Viewing your Calendar . . . . . . . .
The Weekly and Monthly views . . . .
The Yearly View . . . . . . . . . . . .
Scheduling events . . . . . . . . . . .
When you travel: changing time zones
Entering To Do items and calls . . . .
ii
Contents
51
.
.
.
.
.
.
.
.
.
.
.
.
.
.
.
.
.
.
.
.
.
.
.
.
.
.
.
.
.
.
.
.
.
.
.
.
.
.
.
.
.
.
.
.
.
.
.
.
.
.
.
.
.
.
.
.
.
.
.
.
.
.
.
.
.
.
.
.
.
.
.
.
.
.
.
.
.
.
.
.
.
.
.
.
.
.
.
.
.
.
.
.
.
.
.
.
.
.
.
.
.
.
.
.
.
.
.
.
.
.
.
.
.
.
.
.
.
.
.
51
52
53
54
54
55
56
Chapter 8
TrueSync Desktop: Contacts view
Using the Contacts view .
Cardfile basics . . . . . .
Creating a cardfile . . . .
Adding cards . . . . . . .
.
.
.
.
.
.
.
.
.
.
.
.
.
.
.
.
.
.
.
.
.
.
.
.
.
.
.
.
.
.
.
.
.
.
.
.
.
.
.
.
.
.
.
.
.
.
.
.
.
.
.
.
.
.
.
.
.
.
.
.
.
.
.
.
57
.
.
.
.
.
.
.
.
.
.
.
.
.
.
.
.
.
.
.
.
.
.
.
.
.
.
.
.
.
.
.
.
57
57
59
59
Chapter 9
TrueSync Desktop: Memos view
Using the Memos view . . . . .
Memo files, folders, and memos.
Creating memos . . . . . . . . .
Changing margins and tabs . . .
.
.
.
.
.
.
.
.
.
.
.
.
.
.
.
.
.
.
.
.
.
.
.
.
.
.
.
.
.
.
.
.
.
.
.
.
.
.
.
.
.
.
.
.
61
.
.
.
.
.
.
.
.
.
.
.
.
.
.
.
.
.
.
.
.
.
.
.
.
.
.
.
.
.
.
.
.
.
.
.
.
61
62
63
63
Chapter 10
TrueSync Desktop: EarthTime view
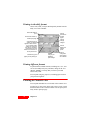
The EarthTime map . . . .
Selecting cities . . . . . . .
Changing the Local Time .
Changing the Home Clock.
.
.
.
.
.
.
.
.
.
.
.
.
.
.
.
.
.
.
.
.
.
.
.
.
.
.
.
.
.
.
.
.
.
.
.
.
.
.
.
.
.
.
.
.
.
.
.
.
.
.
.
.
.
.
.
.
.
.
.
.
.
.
.
.
65
.
.
.
.
.
.
.
.
.
.
.
.
.
.
.
.
.
.
.
.
.
.
.
.
.
.
.
.
65
66
67
67
Chapter 11
TrueSync Desktop: Printing
Using the Printing options .
Calendar printing . . . . .
Printing in Contacts view .
Printing in the Memos view
.
.
.
.
.
.
.
.
.
.
.
.
.
.
.
.
.
.
.
.
.
.
.
.
.
.
.
.
.
.
.
.
.
.
.
.
.
.
.
.
69
.
.
.
.
.
.
.
.
.
.
.
.
.
.
.
.
.
.
.
.
.
.
.
.
.
.
.
.
.
.
.
.
.
.
.
.
.
.
.
.
.
.
.
.
.
.
.
.
.
.
.
.
69
69
70
72
Glossary
73
Index
77
iii
Contents
iii
iv
Contents
Introduction
Chapter 0
Introducing the StarTAC® clipOn Organizer
Congratulations on your purchase of the StarTAC clipOn
Organizer. Attaching directly to your StarTAC phone, the
StarTAC clipOn enables you to store, view, and edit thousands
of names, numbers, appointments, notes, and tasks in a space
smaller than the average wallet.
When the clipOn is attached to the StarTAC phone, placing a
call is easy: select a contact on the clipOn and press the
button. The clipOn promptly dials the number for you.
Customize the clipOn to work the way you do. For example,
select right-handed or left-handed operation with one easy
choice on the Preferences screen.
Add contacts, names, tasks, and events on your clipOn, and
then synchronize to a personal information manager (PIM)
such as TrueSync® Desktop. TrueSync Desktop is an easy-touse personal information manager that is included with your
purchase. To learn more about TrueSync Desktop and
synchronization, see Chapters 5 and 6.
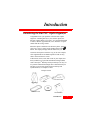
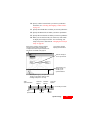
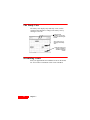
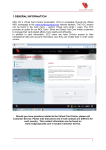
Package Contents
Connector cable
clipOn
Belt holster
Protective cover
1
CD-ROM
Documentation
Introduction
1
About Starfish TrueSync technology
TrueSync’s unique architecture provides one-step
synchronization support for many popular PIMs, devices, and
services (referred to as accessors). Starfish provides frequent
free accessor updates, to ensure that customers can synchronize
with the most recent releases of supported software and
devices. See “Introducing TrueSync technology” on page 31 to
learn how to obtain free updates.
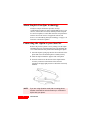
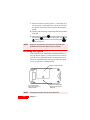
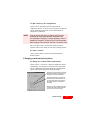
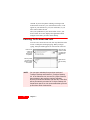
Connecting the clipOn to your StarTAC
Remove the protective plastic cover by turning over the clipOn
and sliding the cover toward the spring clip. Lift and detach the
cover. Turn off the StarTAC phone before attaching the clipOn.
1 Insert the clipOn’s spring clip into the slot on the back of the
phone that is used to attach the phone’s auxiliary battery.
2 Slide the clipOn toward the opposite end of the phone.
3 Insert the connector on the bottom of the clipOn into the
accessory connector on the bottom of the StarTAC
telephone, and apply light pressure to ensure that it is firmly
attached.
NOTE
2
If you are using vibration mode with an analog phone,
vibration mode will be turned off when you connect the
clipOn with your phone.
Introduction
1
Getting started
Chapter 1
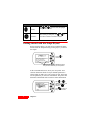
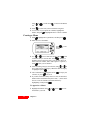
Turning on the StarTAC clipOn Organizer
Turn on the StarTAC clipOn by pressing any key. The seven
clipOn keys are described here:
Key
Name
Description
Home
Press
to go up one level; press and hold again
to return to the main (Home) screen. At the Home
screen, turn off the clipOn by pressing and holding
for one second.
View
Press
to see a menu of current options, such
as Daily, Weekly, and Monthly views in the
Calendar.
Select
Press
to choose an option.
Press
events.
to add or edit contacts, tasks, or
Edit
Call
3
With the phone attached and turned on, press
, select from the list of the last 10 numbers
called, and press
to dial. Or, highlight a valid
phone number in the Contacts, Calendar, or To Do
views, then press
to dial the number.
Getting started
3
Key
Name
Description
Back/Up
Use
and
to scroll or move the highlight
through a list or screen.
Next/Down
or
When adding or editing text, use
move from one letter or number to another.
to
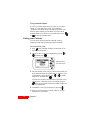
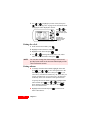
Getting started with the Setup Wizard
Before using the clipOn, you will need to complete the Setup
Wizard. Start the Setup Wizard by pressing any key to turn on
the clipOn.
Press
to
continue.
The status bar displays labeled icons that
tell you which functions you can perform.
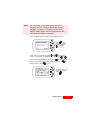
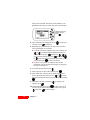
In the second Wizard screen, select your user profile. Your
selection determines which set of pre-defined QuickLists is
offered when you add a new event, contact, or task. These lists
will be updated as you enter new information. The profile also
determines which fields will be used for contact information.
Use
or
to
highlight a profile, and
then press
to
select it.
Press
to return to
the previous screen.
4
Chapter 1
NOTE
You can change your selected user profile later. To
change it, open the TrueSync window (see “Starting
TrueSync:” on page 37 for details), choose Client |
StarTAC clipOn options, click the QuickLists tab, then
click Reset and choose a new profile.
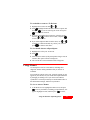
The next Wizard screen confirms your profile selection.
Press
if you
want to change your
profile, then press
to continue.
Next, enter your first name, using
and
to select the
letters of your name. To scroll quickly, hold down
or
.
After you have highlighted a choice, press
. If you make an
error, select Erase. If you want to enter numbers, press
. To
return to letters, press
again.
When your first name
is spelled correctly,
press
.
5
Getting started
5
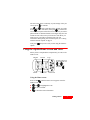
Now enter your last name, using the keys described previously.
When your last name
is spelled correctly,
press
.
After checking your entries to make sure they are correct, press
.
The next task is to customize the time zone setting. Use
and
to select a city in your time zone.
Press
to
continue with the
Wizard.
To enter the correct date, use
and
to select the month,
then press
. Then use
and
to select the correct day,
and press
to enter your choice. Follow this same
procedure to enter the year.
Press
to enter
your choice.
After you have entered the year, select the time, then press
when you have finished. Note that the date and time on the
clipOn are updated from your PC when you synchronize.
6
Chapter 1
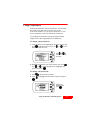
The next screen shows a summary of your settings. If they are
correct, press
to continue.
Use
and
to select each digit of the “default” area code.
Press
to enter each choice, then press
to confirm the
area code. The clipOn will use this area code when you select a
phone number to dial that includes seven digist only (does not
include an area code). Enter your local area code unless you
make most of your calls to a different area code. For
information about placing calls with the clipOn, see “Calling
with the StarTAC clipOn” on page 9.
Now press
clipOn.
, and you are ready to start using the StarTAC
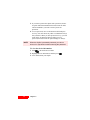
Using the clipOn Home screen and views
When you have completed the Setup Wizard, you will see the
Home screen:
Calendar
Contacts
To Do
To enter a view, such
as the Calendar, use
or
to
highlight its icon,
then press
.
Memos
Time Zones
Preferences
Using the Home screen:
Press or hold
until the Home screen appears. From the
Home screen, use:
7
and
to highlight the icons.
to enter a module.
to check the owner information.
Getting started
7
Synchronizing with the clipOn
After you have completed the clipOn’s Setup Wizard,
described in “Getting started with the Setup Wizard” on
page 4, you can quickly and easily synchronize data between a
desktop application, such as TrueSync Desktop or Outlook,
and the clipOn. Note that you must turn on the clipOn before
starting synchronization. For details about TrueSync
synchronization and using TrueSync Desktop, see
“Synchronizing” on page 37 and “TrueSync Desktop” on
page 47.
Getting connected for synchronization
To set up your clipOn for TrueSync synchronization:
1 Plug the 9-pin end of the clipOn’s connector cable into your
computer’s serial port and the other end into the side of your
clipOn.
2 Turn on the clipOn before starting communications between
the clipOn and the computer.
For details about system requirements on your computer,
please read “Requirements” on page 32.
NOTE
8
If you have a password enabled on the clipOn, when you
start synchronization you will be prompted to enter the
five-key password combination on your computer. For
details about enabling and setting a password, see
“Using Preferences” on page 25.
Chapter 1
2
Using the StarTAC
clipOn Organizer
Chapter 2
Calling with the StarTAC clipOn
To place a telephone call from the clipOn when it is attached to
the StarTAC phone (for attachment instructions, see
“Connecting the clipOn to your StarTAC” on page 2):
1 Turn on the StarTAC phone.
2 To dial, either:
highlight a valid telephone number in the Contacts,
Calendar, or To Do views, and press the clipOn’s
key once.
press the clipOn’s key in any view to see a list of the
ten most recently dialed telephone numbers. To call one
of those numbers, highlight it, and then press
.
NOTE
9
Telephone numbers that begin with “011” or “+” are
dialed as international calls. All other telephone numbers
are dialed as long distance domestic calls.
Using the StarTAC clipOn Organizer
9
You will then see a dialog displaying the telephone number
being dialed, as shown below.
View the number that
is being dialed.
To end a call, press the clipOn’s
key again, press the
phone’s End key, or close the phone.
Using Contacts
Using Contacts, you can view and create contact information
such as names, phone numbers, and addresses.
You can also make telephone calls quickly and easily, as
described in “Calling with the StarTAC clipOn” on page 9. To
enter the Contacts module from the Home screen, highlight the
Contacts icon, and press
.
Changing views
You will see either a category name or “All Cards” at the top
right of the screen. “All Cards” means that you are viewing all
the categories in your clipOn. If you have only one cardfile
category (or no categories), “All Cards” will not appear.
Now you can:
Scroll through the alphabetical tabs with
Go to a specific lettered tab by pressing
or
.
, and then using
or
. You can view a specific card by pressing
,
and then using
or
. Press
again to view the
details, and
to switch among the address, number, and
note views of the card (the Contact information determines
which views are available). The selected view is indicated
10
Chapter 2
in the top right corner by a house, telephone, or notebook
icon.
If you have more than one category, choose a category by
pressing
, highlighting the desired category with
, and then pressing
to make your choice.
or
The
telephone
icon indicates
that you are
viewing
telephone
information.
If the contents of a cardfile field are too long to display, you
will see three dots (...) at the end of the text to indicate that
additional information can be viewed. To view the entire field
if it is a number, highlight the number, and press
. If it is a
text field, use
or
to scroll.
Sorting cards
You can sort cards in cardfiles alphabetically by last name, first
name, or company.
To sort cards:
1 In the Contacts module, press
. The menu appears.
Highlight Sort Order, then press
.
2 Use
or
to move the highlight to the field by which
you want to sort. Press
to choose the sort order.
Changing the telephone number display
You can determine which telephone numbers, e-mail
addresses, and Web site addresses appear on the alphabetically
tabbed cardfiles view.
11
Using the StarTAC clipOn Organizer
11
To change the information displayed in the Contacts
index view:
1 In the Contacts module, use
specific lettered tab.
or
, then
to go to a
2 Press
, and then use
or
to highlight a specific
card. Press
again to view its details.
3 Use
or
to highlight the field that you want. You
may need to press
to move to the correct field. (You are
in the telephone field if you see a telephone icon at the
upper right corner of the card).
4 Press
, and select “Select As Default.” This option
appears only if there are multiple entries.
The selected item now appears after the name in the tabbed
cardfiles view.
Editing your Contacts
You can create, edit, and delete Contacts by selecting Edit
mode and using the clipOn’s Wizards. In addition, you can set
up a meeting or a telephone call from within a contact in Edit
mode.
To create a new Contact:
1 Press
2 Use
press
in Contacts, or in the Home screen.
or
.
to highlight the New Contact option, and
Press
after
highlighting New
Contact.
3 Use
or
to select the type of Contact that you want.
The Contact types are Business Contact, Personal Contact,
12
Chapter 2
and Company; the fields will vary, depending on the type of
contact that you choose.
Choose the Contact
type, and then press
.
4 Now enter the contact’s first name or, if the contact is a
Company, enter the name of the company. Use
or
to move from letter to letter, then press
to enter each
choice. To change to numbers, press
. Press
again to
move back to letters. When you are finished, press
.
5 Enter the Contact’s last name and press
when you are
finished. (If you are entering a Company contact, this screen
will not appear.)
6 Now choose the category for your new Contact. If there are
no categories, or only one category, this Wizard screen will
not be displayed.
7 Confirm the contact name by pressing
make a change, press
.
. If you want to
8 Depending on your selections, you may be asked to enter
company information for the new Contact. Choose how to
specify the company, then press
:
If you choose “Company in Contacts” use or to
scroll through the alphabetical tabs of a cardfile. You can
press
, and then use
or
to go to a specific
lettered tab. Press
, and then use
or
to go to
the card for the company. To enter your choice, press
.
If you choose “New Company” enter the company name,
and press
when you are finished.
Confirm the company name by pressing
make a change, press
.
13
. If you want to
Using the StarTAC clipOn Organizer
13
9 Next, enter the contact’s phone, e-mail, or Web information.
Use
or
to scroll and select the desired contact
method, such as “Work Fax.” Then enter the phone number,
e-mail address, or Web site address. If you enter a telephone
number without hyphens or parentheses, such as
“18315553000”, the clipOn will auto format it for you,
adding hyphens and parentheses as needed, such as “1 (831)
555-3000”. Press
when you are finished.
NOTE
If the phone number is an international number, be sure
to prefix it with “011” or “+”. All other numbers will be
dialed as domestic calls.
10 Confirm the contact information by pressing
change it, press
or
.
11 At the Contact Summary page, press
contact and add it to the clipOn.
. To
to accept the new
To remove a Contact:
1 Highlight the Contact, and then press
.
2 Use
to move the highlight to Remove, and press
.
You will be asked to confirm the deletion of this contact.
Highlight Yes and press
to complete the removal, or
highlight No and press
to keep the Contact.
To set up a meeting or telephone call with a Contact:
1 Highlight the Contact, and then press
.
2 Choose “Meet” or “Schedule Call” from the menu, and then
press
.
3 If you are scheduling a call, highlight High, Medium, or
Low priority, and then press
.
4 Next, select a meeting date or a due date for a call (you can
specify “No due date” for a call but you must select a
meeting date). To choose the meeting date or if you select
“Specific Date” for a call, choose the month, date, and year,
using
or
to scroll through each field; move from
14
Chapter 2
field to field by pressing
. For example, if you have used
or
to move the month to “Jan,” and then press
,
the highlight will move to the day field. Press
to undo
your selection in a field.
5 If you are scheduling a meeting, after you enter the date,
select a meeting start time. Then select the end time.
6 Press
to confirm the date (and time for a meeting).
7 If you are scheduling a meeting, you have the option of
choosing a reminder for a meeting. Then press
to confirm.
8 The Summary screen will then conclude this task. Press
or, if you want to make a change, press
. Calls are listed
in To Do lists and Events in the Calendar.
Using the Calendar
Using the Calendar, you can view, modify, delete, and create
appointments, birthdays, holidays, and other events. To enter
the Calendar module from the Home screen, highlight the
Calendar icon, and press
.
Changing views (Daily, Weekly, Monthly)
To move from the Daily to the Weekly to the Monthly areas of
your Calendar, press
. You will see a menu of your options.
Highlight the desired view, and press
.
Viewing events
Press:
15
or
to move to the next or previous day, week, or
month, depending on the view.
and then
view.
or
to change months in the month
, and then use
or
to highlight a Calendar event.
To see the details of a highlighted event, press
again.
Use
or
to scroll through the details.
to bring up a menu of options.
Using the StarTAC clipOn Organizer
15
Using reminder alarms
If you set a reminder alarm when you create an event in the
clipOn, or set an alarm for an event in your PIM and
synchronize, the clipOn alarm will remind you of that event.
When an alarm sounds, go to the Home screen to read the
reminder details. Press any key to turn off the alarm. Press
or
to clear the reminder notice.
Editing your Calendar
You can create, modify, and delete Calendar events by
changing to Edit mode and using the clipOn’s Wizards.
To create a new event:
1 Press
in the Calendar module or in the Home screen,
then choose New Event.
2 Choose the new event type by highlighting it using
, and then press
.
or
Select the Event
Type from the list.
3 The next Wizard screen will vary, based on the profile you
chose during the StarTAC clipOn Setup. It will show a preset QuickList of event subjects. Use
or
to choose
from the list, and then press
.
To create an event that is not listed in the QuickList, select
“Other Event.” Then specify the event subject and press
when you are finished. This subject will be added to the
top of your QuickList.
4 Confirm the event’s type and subject by pressing
.
5 Select an event participant (or None if there is no other
participant). If you choose:
16
Chapter 2
to select a person or company from your Contacts, use
or
to scroll through the alphabetical tabs of a
cardfile. Press
, and then use
or
to go to a
specific lettered tab. Press
, and then use
or
to go to the card for the participant whom you want to
add. Press
to enter your choice.
to schedule the event with a new person or company,
specify the name and category as described in steps 4–6
on page 13.
6 To confirm the participant, press
.
7 Next, select the event date with
or
. Use
to tab
from the month to the day to the year. Press
again
when the date is correct. If you are creating an event with a
time, you will also need to select the start and end times.
8 To confirm the date, press
.
9 If you are creating a recurring event, such as a weekly
meeting, choose the recurrence pattern. The future
occurrences of the event are automatically added to the
Calendar, based on the recurrence pattern you select.
Use
or
to scroll through the list and highlight a
recurrence pattern. Press
to enter your choice.
If you select a recurrence pattern, select the duration, such
as “2 Weeks.” Highlight a duration, and press
to enter
your choice. Confirm the recurrence pattern by pressing
.
10 Depending on the event, you may have the opportunity to
set a reminder alarm. (See “Using reminder alarms” on
page 16.)
11 Press
to accept the Event summary.
To follow up, reschedule, or cancel an event:
1 Highlight the event in your Calendar. Press
details if you wish.
17
to view the
Using the StarTAC clipOn Organizer
17
2 Press
, and then highlight the desired option: “Follow
up” creates a new meeting; “Reschedule” moves the
original meeting’s date. Press
.
3 If you are:
following up or rescheduling an event, choose the new
date and/or time, and press
to enter your selection.
canceling an event, you will be asked if you are certain
that you want to delete the event. Select Yes to remove
the event or No to keep the event.
To view details about an event participant:
1 Highlight the event in your Calendar.
2 Press
.
3 Select “Find in Contacts” (if the participant no longer exists
in Contacts, this option will not be displayed).
Using To Do Lists
Using the To Do lists, you can view tasks, calls, and
deliverables. You can also create, reschedule, delete, and check
off To Do items. In addition, you can make calls using phone
numbers in To Do lists.
To view To Do items:
1 From the Home screen, highlight the To Do icon, and press
.
2 You will see a list of your To Do items. Highlight a To Do
item, and press
to see the details of that item.
To see the details,
highlight an item, and
press
.
18
Chapter 2
3 After viewing the details, press
list.
to return to the To Do
4 To see a list of your options in the To Do module, press
. Use
or
to choose which To Do items you want
to view, and then press
.
Checking off completed items
You can check off a To Do item as completed. Then, when you
synchronize to your desktop application, your To Do item will
be checked off there as well.
To check off a completed To Do item:
1 Highlight the item by pressing
to view the item’s Details.
or
2 Press
to check off the item (or press
remove the completion check).
, then press
again to
3 If the item that you check off was overdue, it will be
removed from the Overdue Tasks List.
Creating To Do items
You can create To Do items using the clipOn, including tasks,
calls, and deliverables.
To create a To Do item:
1 Press
, highlight “New To Do”, and then press
.
2 Highlight the type of To Do from the menu, and press
.
3 If you are creating a task or deliverable To Do, select the
subject. The list of subjects will vary, based on the To Do
type and the profile you chose during the clipOn Setup.
Press
or
, then
to enter your choice.
To create a task or deliverable subject that is not listed,
select Other. Then specify the event subject and press
19
Using the StarTAC clipOn Organizer
19
when you are finished. The subject will be added to your
QuickList for this type of To Do item (task or deliverable).
Highlight the To Do’s
subject, and then
press
.
4 The Confirmation screen appears. Press
selection or press
to change it.
to accept your
5 Depending on your selections, you may now be asked to
select a participant. If you decide:
to choose a person or company from your Contacts, use
or
to scroll through the alphabetical tabs of a
cardfile. You can press
, and then use
or
to
go to a specific lettered tab. Press
, and then use
or
to go to the card for the participant whom you
want to add. Press
to enter your choice.
to choose a new person or company as the To Do
participant, specify the name and category as described
in steps 4–6 on page 13.
6 To confirm the participant, press
.
7 Select a priority for the To Do and then press
.
8 Select a due date, if desired. If you chose Specific Date,
choose the month, date, and year. Use
or
to scroll
through each field, and move from field to field by pressing
.
9 Confirm the due date by pressing
selection, press
.
. To change your
10 At the Summary screen, press
to enter your new To
Do item. If you want to return to a previous screen, press
. Then press
to make changes.
20
Chapter 2
To reschedule or remove a To Do item:
1 Highlight the To Do item with
or
.
2 Press
, highlight the Reschedule or Remove option, and
then press
. If you are removing the To Do item, press
to confirm the removal.
3 If you are rescheduling the To Do item, select the priority,
then use
or
to choose the new date, and press
to enter your selection.
4 If you selected Specific Date from the menu, use
or
to change to a different month, day, and/or year, and then
press
to confirm each choice.
To view details about a call participant:
1 Highlight the Call in your To Do lists.
2 Press
.
3 Select Find in Contacts (if the participant no longer exists in
Contacts, this option will not be displayed).
4 The card for the Contact included in that Call appears.
Using Memos
Use the clipOn to read or create Memos, including short
single-line memos called QuickNotes that you can use as
reminders.
You can add to a Memo at any time. Using the clipOn you can
append to your Memos, but you cannot edit completed Memos
by changing or deleting text. If you want to edit a Memo,
synchronize it to TrueSync Desktop or another PIM. Edit it in
that information manager, and then resynchronize.
To view or remove Memos:
1 At the Home screen, highlight the Memos icon, and press
. A list of your Memos, including your QuickNotes, will
appear. Highlight an item, and then press
to read it,
21
Using the StarTAC clipOn Organizer
21
using
list.
or
2 Press
to scroll. Press
to return to the Memos
to select from your list of Memo categories.
3 To see a list of your options for a Memo, highlight the
Memo, and press
. Highlight Remove to delete a Memo.
Creating a Memo
1 Press
, highlight New QuickNote, and then press
.
2 Enter the text of the Memo.
Press
to enter
each letter or
number.
3 Use
or
to move from letter to letter. Press
after
each letter that you want to enter. Press
to change to
Numbers, and to return to Letters. You can also choose to
Erase a letter or number, and to add a Space or a period (.).
Press
when you are finished.
4 Select the Filing Category from the list, using
or
to
move from category to category. When the desired category
is highlighted, press
.
5 The Confirmation screen appears. Press
selection, or press
to revise it.
to accept your
6 If you have entered too many letters to view, the truncated
Memo will be listed followed by three dots (...) at the end of
the text. View the contents of truncated Memo by
highlighting it and pressing
.
To append to a Memo:
1 Highlight the Memo using
the details if you wish.
22
Chapter 2
or
. Press
to view
2 Press
NOTE
and highlight the Append option, then press
.
Appending to a Memo adds new text; you cannot edit
existing text by selecting Append.
Using Time Zones
The clipOn has two clocks: the Home clock, which shows the
time and date in your home city, and the World clock, which
can show the times and dates in other cities around the world.
To display the clocks, highlight the Time Zones icon, and then
press
.
Select a clock by highlighting it and then pressing
. The
selected clock’s time becomes your Local Time. The status bar
time will change accordingly, as will the times for scheduled
events.
NOTE
When you synchronize, the clipOn time and date are
updated to the time and date on your computer.
Understanding time zones and travel
When you travel to a different time zone, change the time zone
of the currently selected clock, and your calendar events will
automatically change to reflect the new time zone. For
example, an appointment scheduled for 2 p.m. in New York
changes to 11 a.m. when you select Los Angeles.
Changing cities and time zones
You can change both the Home and World clocks to show
different cities and/or time zones.
1 Move from the Home Clock to the World Clock by using
or
.
2 Press
23
to change to a different city or time zone.
Using the StarTAC clipOn Organizer
23
3 Use
or
to highlight your new choice, then press
. See “Selecting cities” on page 66 for information about
changing the cities displayed in the list.
Use
to
or
select the new time
zone, and then press
.
The bell icon
indicates that the
Alarm Sound is
turned on.
Setting the clock
1 In the Time Zones module, press
.
2 Highlight Time Preferences and press
3 Highlight Clock Time and press
.
.
4 Use
or
to change the month, date, year, and/or
time. To move from field to field, press
.
NOTE
You can also change the alarm settings, alarm sound,
and the format used for the time and date displays in the
Time Preferences screen.
Setting alarms
To change when the alarm sounds, highlight Alarm and
press
. Use
or
to move through the list to the
alarm frequency that you desire. Then press
. If you
select Daily, an alarm will sound every day at the time you
specify in Alarm Time. If you select Once, an alarm will
sound only at the next occurrence of the specified time.
To specify the time the alarm will sound, highlight Alarm
Time and then press
. Use
or
to change the
hours, minutes, and/or PM or AM entries. Press
to
move from field to field.
Highlight Alarm Sound and press
alarm sound choices.
24
Chapter 2
to choose from
Using Preferences
Preferences include the Contrast, Orientation, Auto Shut-Off,
Key Clicks, Day Start, and Area Code. Also use the
Preferences module to set your password and clock, or view
device information, such as the amount of free memory.
If you change the Orientation setting, the clipOn instantly
adapts itself to either right-handed or left-handed use.
To change your preferences:
1 From the Home screen, highlight the Preferences icon, then
press
. In the Preferences screen, use
or
to move
from one field to the next.
Use
or
to
move from one field
to another.
2 Highlight the field that you want to change, then press
Use
or
to scroll through the list. Highlight your
choice, then press
.
.
To change your password:
1 Press
in the Preferences module.
2 Press
.
to highlight the Set Password option, then press
Highlight Set
Password, then
press
.
25
Using the StarTAC clipOn Organizer
25
3 If you want to protect the clipOn with a password, choose
an option other than Disabled in the Password Lock field.
Choose Disabled if you want to remove password
protection.
4 To set a password, move to the Password field and press
five keys. You can choose any order or combination of keys
that you desire. When you have pressed five keys, you will
return to the Set Password Screen. When you set a
password, the Password Lock option changes to Always.
NOTE
When the clipOn is password-protected, you cannot
access it or synchronize without entering the password.
To view the device information:
1 Press
in the Preferences module.
2 Highlight Device Information, and then press
3 View details about your clipOn.
26
Chapter 2
.
3
Product care
Chapter 3
Removing the clipOn from the phone
1 Slide the clipOn down and swing it away from the phone.
2 Lift the clipOn’s hook out of the slot on the back of the
phone.
Installing new batteries
The clipOn is powered by two CR2430, 3-volt lithium
batteries, which can last for up to nine months of average use.
NOTE
If you see a message, “Low Battery,” it is important to
replace the batteries promptly. Do not replace batteries
during synchronization or sorting.
To remove the old batteries and install new batteries:
1 If the clipOn is attached to the phone, detach it.
2 Turn the clipOn over.
3 If the clipOn’s plastic cover is attached, remove it by sliding
the cover toward the spring clip. When the opposite end
slides free, swing up the cover.
4 Slide the battery compartment door open.
5 Remove the old batteries.
6 Wait at least 5 seconds before inserting the new batteries.
27
Product care
27
7 Insert new batteries, with the positive (+) side facing up. If
you do not hear a confirmation tone, you may need to reset
the clipOn as described in the next section, “Resetting the
clipOn”.
8 Carefully slide the battery compartment door back in until it
snaps shut.
9 Set the clock by pressing
to display Time Preferences,
then pressing
again to choose Clock Time. Use
and
to make your selection in each field, then press
to
confirm each choice.
NOTE
When you synchronize, the clipOn time and date are
updated to the time and date on your computer.
Resetting the clipOn
If the clipOn does not respond after you change batteries, or
does not function properly, you may need to reset it. To do so,
insert the end of a paperclip into the reset button hole next to
the battery compartment door. Press gently. When the clipOn
resets, you will hear a confirmation tone.
Battery compartment door
Do not use a sharp
object, such as a pin, to
reset the clipOn.
NOTE
28
Press the Reset button
gently with the end of a
paper clip.
Resetting the clipOn will not cause data loss.
Chapter 3
After resetting, set the clock by pressing
to display Time
Preferences, then pressing
again to choose Clock Time.
Use
and
to make your selection in each field, and then
press
to confirm each choice.
Charging the phone with the clipOn connected
When the clipOn is connected to your phone, charge your
StarTAC by plugging the charger cable into the accessory
connector on the bottom of the clipOn (the cable’s release tab
should face up toward the phone’s keypad).
NOTE
The clipOn will not function without batteries, even if it is
plugged into the StarTAC charger.
Screen care
If the screen of the clipOn becomes smudged or dusty, gently
wipe it clean with a soft, dry cloth.
29
Product care
29
30
Chapter 3
4
TrueSync Desktop
and TrueSync Plus
Chapter 4
TrueSync Desktop is a full-featured personal information
manager (PIM) for your contact names and addresses, calendar
events, tasks, calls, and memos. TrueSync Plus provides direct
synchronization among your desktop applications, devices,
and/or services. Both software programs accompany your
purchase.
Introducing TrueSync technology
Both TrueSync Desktop and TrueSync Plus use Starfish’s
TrueSync technology to synchronize your information, so you
keep it current and accessible anywhere.
TrueSync supports the most popular desktop applications,
devices, and services (referred to as accessors). Starfish
continually provides free software updates, such as accessors
for the most recent versions of popular desktop applications.
To check the Starfish Web site for software updates, click the
Windows Start button. Choose Programs | TrueSync Plus |
Product Updates or Programs | TrueSync Desktop | Product
Updates. TrueSync's Component Install program will start.
Check the Internet checkbox in the first screen and click Next.
Instructions for setting up TrueSync and synchronizing are
provided in “Synchronizing” on page 37.
31
TrueSync Desktop and TrueSync Plus
31
Requirements
Before you install TrueSync Desktop or TrueSync Plus, make
sure that you have the necessary hardware and software listed
here. Some features may require special configurations.
To use TrueSync Desktop or TrueSync Plus, you need:
A computer running Windows 95, Windows 98, or
Windows NT 4.0 workstation (U.S. English version)
A minimum of 15 MB hard disk space for installation of
either TrueSync Desktop or TrueSync Plus (includes 1 MB
of temporary space on the same drive as your Windows
directory for installation)
256-color VGA video adapter and compatible monitor
An MPC 2 Compatible CD-ROM drive
A pointing device compatible with Windows 95, Windows
98, or Windows NT 4.0
A sound card and speakers, required to play sounds (.WAV
files) for appointment alarms
A printer supported by Windows 95, Windows 98, or
Windows NT 4.0, required to print from TrueSync Desktop
Microsoft Internet Explorer 3.01 or greater, or Netscape
Navigator 3.0 or greater, required to view TrueSync
Central. A browser is also required to view the
Troubleshooter Guide.
Synchronization with a device may require an available
communications port.
Installing the product
As with any product, Starfish recommends backing up your
data files before installation and periodically as you continue to
use the product. For help backing up your data, please visit the
Starfish Web site:
http://www.starfish.com/service/backup/
32
TrueSync Desktop and TrueSync Plus
Upgrade information
TrueSync Information Manager users: Installing TrueSync
Desktop upgrades TrueSync Information Manager to TrueSync
Desktop.
Sidekick 99 users: If you decide to use TrueSync Desktop
instead of Sidekick 99, you must uninstall Sidekick 99 before
installing TrueSync Desktop.
Installing TrueSync Desktop or TrueSync Plus:
Insert the TrueSync Desktop CD-ROM into your CD-ROM
drive.
NOTE
When you insert the TrueSync Desktop CD-ROM into
your CD-ROM drive, the installation should launch
automatically. If it does not, follow the steps below.
If the installation does not launch automatically:
1 Click Start on the Windows taskbar, then choose Run.
2 Click the Browse button.
3 Browse to locate the program SETUP.EXE on the CD-ROM.
4 To begin the installation, double-click SETUP.EXE.
The Readme file
Any last-minute changes or additions to TrueSync Desktop or
TrueSync Plus are documented in a Readme file. View the
TrueSync Desktop Readme file by clicking the Windows Start
button and choosing Programs | TrueSync Desktop | Readme.
To see the TrueSync Plus Readme file, click the Windows Start
button and choose Programs | TrueSync Plus | Readme.
Registering
Be sure to register TrueSync Desktop and TrueSync Plus so
that you can receive product information and support.
33
TrueSync Desktop and TrueSync Plus
33
Uninstalling your product
If you want to remove TrueSync Desktop and/or TrueSync
Plus from your computer, use the uninstall program, which
permanently removes the product’s program components. If
you have data files in the TrueSync Desktop folder (usually
Program Files\Starfish\TrueSync Desktop\Userdata), it does
not remove them. You can save these files or remove them
manually.
To remove the software from your computer
1 Click Start on the Windows taskbar. Choose Settings |
Control Panel.
2 Double-click Add/Remove Programs.
3 Choose TrueSync Products from the listed applications.
4 Click the Add/Remove button.
5 Choose the components you want to uninstall.
6 Back up any data you want to keep, and then delete the
TrueSync folder (usually Program Files\Starfish\TrueSync).
7 Restart Windows.
Starting TrueSync Desktop
After you complete the installation, TrueSync Desktop starts
automatically. The first time TrueSync Desktop starts, the
Setup Wizard prompts you for information about your name,
company, and time zone.
Fill in the information in each panel of the Setup Wizard and
click Next to continue. You can click Back if you need to
change the information in an earlier panel. If you need
assistance, click the Help button in any Wizard panel.
To start TrueSync Desktop later:
Click the Windows Start button and choose Programs |
TrueSync Desktop | TrueSync Desktop.
34
Chapter 4
Starting TrueSync Plus
Instructions for using TrueSync Plus are provided in
“Synchronizing” on page 37.
About the documentation
This User’s Guide provides installation instructions, a guide to
synchronizing, and an overview of TrueSync Desktop.
The Troubleshooter Guide helps you get started and provides
access to online resources, including technical support
information. To view the Troubleshooter Guide, choose Help |
Troubleshooter from the TrueSync Desktop menu or click Start
in the Windows Taskbar and choose Programs | TrueSync Plus
| Troubleshooter. The Troubleshooter is an HTML document
and starts in your Internet browser.
NOTE
The illustrations in this guide are intended as examples.
What you see on your screen may differ, depending on
factors such as the software version and information that
you have entered.
Using online help
Both TrueSync Desktop and TrueSync Plus include detailed
online help systems. To open Help, press F1, or choose Help |
Topics from within either program.
For more information
For technical support and additional information, refer to the
Readme file (see “The Readme file” on page 33).
35
TrueSync Desktop and TrueSync Plus
35
36
Chapter 4
5
Synchronizing
Chapter 5
Use Starfish TrueSync technology to synchronize your contact
information, calendar events, tasks, and memos quickly and
easily among your desktop applications, devices, and services.
Synchronize directly from TrueSync Desktop or, if you prefer
to synchronize data from another personal information
manager such as Outlook, use TrueSync Plus. Either choice
provides complete and reliable synchronization.
Starting TrueSync:
TrueSync Desktop users:
Open TrueSync Desktop, and then click the TrueSync icon
on the Deskpad or select View | TrueSync.
TrueSync Plus users:
Right-click the TrueSync icon in the Windows taskbar, and
click Configure.
Setting up TrueSync
The first time you start TrueSync, a Setup Wizard assists you in
specifying:
the clients you will synchronize (a client is any device,
service, or desktop application supported by TrueSync). In
some versions, the initial clients are preselected for you.
details about each client, such as where to find the data for a
desktop application or how you connect your device to your
computer.
37
Synchronizing
37
which files, folders or categories you want to synchronize.
NOTE
You can modify your selections after completing the
Setup Wizard.
Using the TrueSync Setup Wizard
1 Click Next in the Welcome screen.
2 Select your desktop application, such as TrueSync Desktop
or Outlook. Depending on your installation, the desktop
application may be pre-selected.
3 Specify the location of your application’s data. Depending
on the application, you may have the option of specifying a
different folder.
4 Select the device that you want to synchronize, if prompted.
Depending on your installation, the device may be preselected.
5 Depending on the device, you may need to specify how you
will connect your device to your computer.
6 If you use a service, you may be asked whether you want to
synchronize with that service.
7 Depending on the service, you may need to enter your user
ID for the service, password, and connection method.
8 You are prompted to connect your device to your computer.
After the device is connected, and turned on if required,
click Next.
TrueSync reads the data from the clients you have chosen.
No data transfers or changes take place during this step.
9 If prompted, select your country and city to indicate your
time zone.
The next step begins your selections of files, folders and
categories to synchronize, starting with Contacts data. To learn
how to select items to synchronize, see “Selecting files, folders,
or categories” on page 42. You can change your choices at any
time after you have completed the Setup Wizard.
38
Chapter 5
10 Specify which Contacts fields you want to synchronize.
For details, see “Selecting and mapping Contacts fields”
on page 43.
11 Specify the Calendar files or folders you want to synchronize.
12 Specify the Memos files or folders you want to synchronize.
13 Specify the To Do list files or folders you want to synchronize.
14 When you are satisfied with your selections, click Finish
to display the TrueSync window. You can change your
setup at any time as described in “Changing the TrueSync
setup” on page 40.
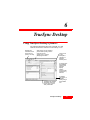
Select View | TrueSync Central to display
TrueSync Central, which provides free
TrueSync services and synchronization over
the Internet. For details, see page 46.
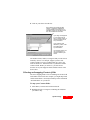
The TrueSync window
displays your selections.
Click the TrueSync
icon to synchronize.
The TrueSync Log
shows you the
results of your
synchronizations.
Click the plus signs (+) to expand the
TrueSync Log entries. Select an error
message and press F1 for help.
Start
Synchronization
Timezone
Options
Calendar
Options
To Do List
Options
The TrueSync Toolbar.
Stop
Synchronization
39
Contacts
Options
Memos
Options
Synchronizing
39
When you perform the first synchronization between two
clients, it is recommended that you overwrite the data in one
of the clients to avoid duplicate records. To learn how, see
“Changing synchronization options” on page 41.
To synchronize:
1 Connect your device to your computer. Some devices may
require that you turn them on before synchronizing.
2 Click the TrueSync icon in the center of the TrueSync
window.
3 If you are synchronizing with a client that is passwordprotected, you may be prompted to enter your password.
NOTE
Do not disconnect your device from your computer
during a synchronization.
See the TrueSync Log for status and information about the
synchronization. See “Using the TrueSync Log” on page 45.
NOTE
If you cancel an in-progress synchronization by clicking
the Stop Synchronization toolbar button, wait until the
synchronization has halted before closing TrueSync
Desktop or the TrueSync window. The cancellation
process may take some time to complete.
Changing the TrueSync setup
At any time after you have completed the TrueSync Setup
Wizard, you can:
add or remove clients.
change the synchronization options for each client.
select the data types to synchronize (data types are
Calendar, Contacts, Memos, and To Do items).
change the files, folders, or categories to synchronize.
specify which Contacts fields to synchronize and how those
fields map to corresponding fields in other clients.
40
Chapter 5
To add a client to your configuration:
Choose Client | Add, then select the client from the
Application, Device, or Service lists. You will be prompted to
specify details about the client, such as which folders or
categories to synchronize.
NOTE
If you do not see the client you want to add, check for
availability by clicking the Windows Start button and
choosing either Programs | TrueSync Desktop | Product
Updates or Programs | TrueSync Plus | Product Updates.
After installing a new accessor, add it as a TrueSync client.
After you add a client, it is represented in the TrueSync
window with an icon, which you can click to change options.
To remove a client:
Choose Client | Remove. Select the client and click the
Remove button.
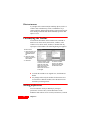
Changing synchronization options
To change how a client will be synchronized:
Choose Client | <clientname> options to display the client’s
Options Page. Use this page to specify how the client’s data
will be synchronized. For details about the synchronization
options, click the Help button on the Options Page.
Select Do not synchronize to exclude
the client (TrueSync Desktop in this
example) from synchronizations.
Select Synchronize to synchronize
this client’s data with data from one
or more other clients. Records may
be added, deleted, or modified on
this client.
Select one of the overwrite options to
overwrite this client’s data with data
from one or more other clients.
41
Synchronizing
41
Selecting what to synchronize
All data types (Calendar, Contacts, Memos, To Do items) will
be synchronized unless you specifically exclude them.
To exclude a data type from synchronization, choose Data |
<datatype>, and check the “Do not synchronize <datatype>”
option. The data type will be excluded from each
synchronization until you uncheck the option.
To limit the range of Calendar event dates that will be
synchronized to a device, choose Data | Calendar and click the
Options tab. Limiting the range of dates speeds up
synchronization and saves space on your device.
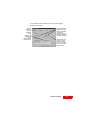
Selecting files, folders, or categories
Select a data type by choosing Data | <datatype>.
To select items to synchronize between clients:
1 Find the row for the item that you want to synchronize.
2 Click in the same row under the other client. A down arrow
displays at the right of the column.
3 Click the down arrow to open a list of item choices on that
client.
42
Chapter 5
4 Click on your choice from the list:
Each client’s column lists the files,
folders, or categories available for
synchronization on that client. If you
add items and do not see them in the
list, click the Refresh List button.
If you align <not mapped>
in one column with an
item in another column, it
means that item will not
be synchronized.
If you select an item
followed by <add>, it will
be created during
synchronization.
The number of items you
can synchronize to a
device is limited by the
device.
The number of files, folders, or categories that you can select is
limited by devices. For example, suppose you have four
Contacts folders set up for synchronization to a device, the
limit for that device. You then decide to synchronize another
Contacts folder. Before you can do so, you will need to
deselect one of your mapped Contacts folders because of the
device limit.
Selecting and mapping Contacts fields
The term “mapping fields” refers to matching one client’s field
with another client’s field. For example, you might map a field
called “Home Phone” on TrueSync Desktop with a field called
“Personal Phone” on your device.
To map your Contacts fields:
1 Select Data | Contacts and click the Fields tab.
2 Highlight the files or categories containing the fields that
you want to map.
43
Synchronizing
43
3 Specify how to map the fields. You can choose:
SmartMap™ mapping by clicking the SmartMap button.
SmartMap automatically maps your Contacts fields. All you
have to do is choose one of the SmartMap options; your
choice determines which fields to synchronize. For
information about each of the SmartMap options, click the
Help button.
Customized mapping by clicking the Customize Mapping
button. This option lets you map each pair of fields. To
change mapping, click a field, click the down arrow at the
right, and select the new mapping from the drop-down list.
To save space on your device, unmap any fields you do not
normally use.
Changing your preferences
To change the preferences for any client, choose Client |
<clientname> options or click on the client’s icon in the
TrueSync window. This displays the client’s Options Page
described in “Changing synchronization options” on page 41.
Depending on the client, there may be additional client
preferences; click the additional tab(s), and change the options
as desired. For assistance, click the Help button on each page.
Using QuickLists
Depending on the device that you are using, you may have the
option to customize your QuickLists. When you are adding or
changing data, QuickLists present you with choices, such as
event subjects, task names, or short reminders, that reflect the
profile you chose in your device's setup wizard. As you enter
new items, the QuickLists include your additions. To change
your QuickLists, choose Client | <devicename> options, and
then click the QuickLists tab. If you need assistance, click the
Help button.
44
Chapter 5
Using the TrueSync Log
The TrueSync Log displays messages about your recent
synchronization sessions. The messages provide details about
the progress and results of the synchronizations.
View or hide the
TrueSync Log by
choosing View |
Log.
Select Synchronize | Options to specify how TrueSync displays
TrueSync Log entries. Click the Help button for details.
To get help on error messages, highlight an error and click F1.
Setting up multiple users
If you use more than one synchronization configuration, or if
more than one person uses the same computer to synchronize,
set up an additional user to define each configuration.
To create an additional user:
1 Select Synchronize | Options, and then click the Users tab.
2 Click the New button and use the Setup Wizard to specify
the synchronization preferences for the new user.
3 Select client preferences for the new user by choosing
Client | <clientname> options.
To specify the user:
1 Choose Synchronize | Set User.
2 Select a user name from the list.
The current user name is shown on the TrueSync window title bar.
45
Synchronizing
45
Staying up to date with TrueSync Central
TrueSync Central is your place on the Internet to:
register your product electronically.
get free software updates; accessories for your connected
devices such as batteries, cables, and software; and the
latest news about TrueSync synchronization.
sign on to a free Internet Synchronization service, which
provides access to secure, Web-based versions of your
calendar, contacts, and notes.
To display TrueSync Central in the TrueSync window, make
sure the View | TrueSync Central menu option is checked.
To register for a TrueSync Central account:
1 Go to TrueSync Central and register your product
electronically.
2 Choose a user name and password for secure access to
TrueSync Central and the Internet Synchronization service,
TrueSync.com.
3 A setup wizard will help you add the TrueSync.com
accessor to your synchronization setup.
To use Internet Synchronization after registering:
1 Go to TrueSync Central.
2 Use your TrueSync Central password to sign on to the
Internet Synchronization service.
3 Use the Internet Synchronization service, TrueSync.com, to
view and manage your data. If you need assistance while
using TrueSync.com, click the Help button.
4 When your Internet data is ready to synchronize, click the
TrueSync icon in the TrueSync window.
46
Chapter 5
6
TrueSync Desktop
Chapter 6
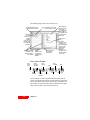
Using TrueSync Desktop’s features
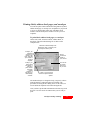
The following illustration shows the Calendar view and
identifies the features common to most Desktop views.
Highlight any
command on the
menu bar and
press F1 for help.
Click buttons on the Toolbar to
perform tasks quickly, without
using the menus.
Pause to see a ToolTip
identifying the button.
Click an icon
on the
Deskpad to
change to a
different
Desktop view.
To change how
the Deskpad
appears and
set other
display
options,
choose Tools |
Preferences |
General.
The Status bar displays
information about the
current view. Choose
View | Status Bar.
47
To delete a
card, memo, or
calendar
activity, drag it
to the Delete
icon.
TrueSync Desktop
47
Shortcut menus
If you right-click certain TrueSync Desktop objects, such as a
Contact card, Calendar entry, memo, or EarthTime city, a
context-sensitive shortcut menu appears. These menus provide
basic editing commands and other commands specific to that
object or view.
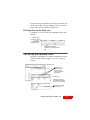
Customizing the Toolbar
To customize the buttons on the Toolbar in the Calendar or
Memos view, choose Tools | Preferences | Toolbar; in the
Contacts view, choose Tools | Toolbar; or double-click any
open space on the Toolbar. The following dialog box appears:
To add a button
1 Click the button you
want to add in the
Available buttons
list.
2 Click the Toolbar
button you want to
add it before.
3 Click Add.
To move a button, click
its name in the Toolbar
button list, then click
Move Up to move the
button to the left or
Move Down to move it
to the right.
To remove a button,
click it in the Toolbar
buttons list, then click
the Remove button.
To return the Toolbar to its original view, click the Reset
button.
Any changes affect only the Toolbar for the current view.
To customize a different Toolbar, select the desired view
and make your changes there.
Setting preferences
You can customize TrueSync Desktop by setting its
preferences. Choose Tools | General Preferences in the
EarthTime and Contacts views or Tools | Preferences | General
48
Chapter 6
in the Memos and Calendar views for overall TrueSync
Desktop preferences.
Choose
where you
want the
Deskpad
icons.
Change the
display fonts
for the
Contacts and
Memos views.
49
Click Password at
Start-Up and set a
Start-up password
so that only
someone with the
password can open
TrueSync Desktop.
Select which view
you want for the
default, or check
the box to return to
the last view used
before exiting.
TrueSync Desktop
49
50
Chapter 6
7
TrueSync Desktop:
Calendar view
Chapter 7
Using the Calendar view
The Calendar view is a powerful tool for helping you organize
your appointments and other events. Use the Calendar to
schedule events, set reminders, and maintain a list of To Do
items and phone calls.
To change to the Calendar view, click the Calendar icon on the
Deskpad, press F6, or choose View | Calendar.
51
TrueSync Desktop: Calendar view
51
The following figure illustrates the Calendar Daily view.
Special days and Multiday events appear at the
top of the Events pane.
A magnified view of
the Toolbar is shown
below.
Change the Local
Time with the
Time Zone dropdown list.
The Events pane
shows all the
scheduled events
for today.
The To Do pane
shows the tasks you
need to accomplish—
including any you did
not complete
yesterday.
Click a tab to
select the view
of the Calendar
you want.
The Calls pane
shows the calls
you need to
make.
The Calendar Toolbar:
Save
Calendar
Schedule
An Event
Special Day
Event
Print
TrueSync
Desktop
Daily Format
MultiDay
Event
Recurring
Event
Go To
Today
Viewing your Calendar
To go directly to today’s calendar:
Click the Calendar icon on the Deskpad.
52
Chapter 7
Find
Switch Event
View
If you have changed to another date, clicking the Calendar icon
returns you to today. Click the Calendar icon twice to return to
today’s daily view from another Calendar view.
Selecting dates in the Daily view
In the Daily view, the selected date is highlighted in the minicalendar.
Change to the
previous or next
month by
clicking the left
and right arrows.
Click a date in the minicalendar to go directly to that
day.
The Weekly and Monthly views
The Weekly and Monthly views display scheduled activities in
standard calendar formats. Change to a view by clicking its
view tab.
Monthly view
Change to the
previous or next
week or month
using the left and
right arrows.
Weekly view
Double-click a day in
the Weekly or Monthly
views to go to that day.
Click a tab to change
to another view.
53
TrueSync Desktop: Calendar view
53
The Yearly View
The Yearly view displays only multi-day events, such as
vacations and conferences. Change to the Yearly view by
clicking its View tab.
Change to the
previous or next year
using the left and right
arrows.
Click a day to go to
that day in the Daily
view.
Drag the mouse over
a range of dates to
schedule multi-day
events.
Scheduling events
Enter your appointments and scheduled events on the Events
list. You can have a maximum of 288 events scheduled
54
Chapter 7
throughout the day, and a maximum of three overlapping
events starting at the same fifteen minute time slot.
Create an event by
typing in an empty
time slot, or click the
starting time to open
the Schedule an
Event dialog box.
Change the
Local Time
using the Time
Zone dropdown list.
The bell icon
indicates an alarm.
To change an
event’s starting
time, drag its
clock icon up or
down.
Click an event
and drag its
bottom edge to
change its
ending time.
Double-click an
event, or right-click
an event and
choose Edit, to edit
its details.
Overlapping
events appear
side-by-side.
To create multi-day, special
day, or recurring events,
choose Calendar | Events and
select one of the options.
When you travel: changing time zones
When you schedule events for a trip to a different time zone,
select the time zone of your destination in the Schedule an Event
dialog box, which opens when you click a starting time.
When you arrive, change the Local Time to your destination,
using the Time Zone drop-down list at the top of the Events
pane. All events you have scheduled for your trip will appear
in the Local Time. In addition, you will be able to see any
events back home in “real time,” adjusted for your current
location.
For example, when you enter each appointment for a trip to
New York, select the USA Eastern time zone. When you arrive
in New York, change the Local Time to New York time. Your
events adjust to display in New York time, whether those
events are in New York or elsewhere. Thus an event you need
to attend in New York at 10 a.m. will appear at 10 a.m. on your
55
TrueSync Desktop: Calendar view
55
calendar. If you need to phone in during a meeting in San
Francisco that occurs at 2 p.m. (San Francisco time), it will
appear on your calendar at 5 p.m. (New York time), so you
know when to make the call.
After you synchronize to your device and/or service, your
device and/or service also displays the appointment times
using the Local Time you chose on the desktop.
Entering To Do items and calls
To create a new To Do item or Call, click any blank line in the
To Do or Calls panes and begin typing. When you begin
typing, TrueSync Desktop places an icon in front of the text.
Click the left
column to
check off
items when
completed.
Click the right
column to add
or change the
details for an
item.
Click any blank
line and begin
typing to create
a new item.
Right-click an
item to modify
it.
NOTE
56
You can open calendars from previous versions of
TrueSync Desktop and Sidekick in TrueSync Desktop
2.0. In the Calendar view, choose File | Open Calendar,
then navigate to the previous version’s Userdata
directory. Choose the calendar, and click OK. These files
will be permanently converted to TrueSync Desktop 2.0
format when opened, so it is recommended that you back
up files from earlier versions first.
Chapter 7
8
TrueSync Desktop:
Contacts view
Chapter 8
Using the Contacts view
Use the Contacts view to manage personal information stored
in cardfiles, each of which can contain full address information
and numerous other details about your contacts. Once you have
updated your cardfiles, you can use the TrueSync window to
transfer them to your device.
To open the Contacts view, click its Deskpad icon, choose
View | Contacts, or press F5.
Cardfile basics
In the left pane of the Contacts view is the card list, your visual
index to the cards in the active cardfile—the cardfile whose tab
is selected. In the right pane is the current card in the cardfile,
which you can edit directly. Each cardfile can contain up to
30,000 cards.
57
TrueSync Desktop: Contacts view
57
The following figure shows the Contacts view.
A magnified view of the
Toolbar is shown below.
Type characters in the Look
For box to find a card.
The index
lines of
cards in the
current
cardfile.
Click one to
see the card
or modify its
contents.
Click the scroll bar
or letters in the
scale to move in
the cardfile.
Enter and edit
Contact Log
information.
Click a
cardfile’s tab
to change to
another open
cardfile.
The index line
is at the top of
each card. It
can contain any
three fields in
the cardfile and
is used to sort
the cards.
The current
card.
To make
changes, click
the field you
want to edit and
type the new
information.
Carriage
returns are
allowed only in
the last field of
each card.
The Contacts Toolbar:
Add
New
Card
Close
Current
Cardfile
Open
Cardfile
Print
Cards
Save
Current
Cardfile
Copy
Cut
Sort
Cardfile
Paste
Find
Card View
You can display Contact Log information under the current
card by clicking the paperclip icon in the index line. Each card
has its own Contact Log, which can store up to 24 kilobytes of
data. When you enter and edit Contact Log information, rightclick to insert a date or time stamp into the log.
58
Chapter 8
Creating a cardfile
When you create a cardfile, first decide what fields you want
on each card. You can create all these fields yourself, or you
can use a template—an empty cardfile that already has fields in
place. If you select a template, you can customize it, keeping
some or all of its fields and adding your own.
To create a new cardfile
Choose File | New Cardfile. Choose the template you want
from the list that appears, as shown below.
If you want to
customize a
cardfile, you may
find it easier to
edit the provided
field names of a
cardfile template
rather than to
create all of the
field names.
1 Click the arrow and
choose each template
individually from the
list.
2 You can see the
predefined fields for
each template. When
you find the best
template for your
needs, click OK. If you
want to define all your
own fields, choose
None from the Cardfile
Template list.
The new cardfile contains the field names from the template,
but no information until you add cards.
NOTE
If no cardfiles are open, use Cards | Define Fields to
open the Select Cardfile Template dialog box.
.
Adding cards
To add a card to the cardfile, choose Cards | Add, or click the
Add New Card button on the Toolbar. The Add Card dialog
59
TrueSync Desktop: Contacts view
59
box appears with a list of the fields that are set up in the
cardfile.
1 Type the
information for
each field in the
list. To move
from one field to
the next, use the
up and down
arrow keys or
the Tab key.
60
Chapter 8
2 Click Add to
insert the card
in the cardfile.
You can then
begin entering
information for
another new
card, or click
Close.
9
TrueSync Desktop:
Memos view
Chapter 9
Using the Memos view
The Memos view lets you create memos, organize them in
folders, and save them as files. You can apply formatting to
your memos, and you can even create memos to merge with
names from a cardfile.
To open the Memos view, click the Memos Deskpad icon,
press F7, or choose View | Memos.
61
TrueSync Desktop: Memos view
61
The following figure shows the Memos view.
The date the memo
was created appears
here.
Click to change between
Index View and fullscreen Memo View.
A magnified view of
the Toolbar is shown
below.
The Memos
list displays
the subject
lines of all
memos in
the current
folder. Click
a subject to
display that
memo.
Use the
Ruler to set
margins
and tabs.
The
currently
selected
memo
appears
here.
Click the
tab of the
folder you
want.
To make changes or
additions, type directly into
the memo.
Here is a magnified view of the Memos Toolbar:
Add
New
Memo
Print
Memos
Italic
Font
Save Current
Memo File
Undo
Underline
Bold
Find
Quick
Letter
Color
Size
Alignment
Clipboard Tools
Memo
View
Memo files, folders, and memos
Memo files help you organize your memos by topic. A Memo
file can contain many folders, and each folder contains one or
more memos. Folders in an open Memo file are identified by
tabs at the bottom of the Memos screen.
62
Chapter 9
By using folders, you can organize memos according to
projects, tasks, people, subject, or any other grouping.
Creating memos
To create a memo
1 Click the tab of the folder into which you want to place the
memo.
2 Click the Add New Memo button or choose Memos | Memo |
Add. A new, blank memo appears, with the insertion point in
the subject line.
3 Type a subject, and then press the Enter key to move into
the body of the memo.
4 Type and format your text.
Changing margins and tabs
Use the ruler when you want to change margins or set a tab
stop. To change more than one paragraph, select the
paragraphs before you adjust the ruler.
63
TrueSync Desktop: Memos view
63
If you do not see the ruler below the Subject, choose View |
Ruler.
Drag to change the
left margin after the
first line of a
paragraph.
Drag to move
both left margin
markers
together.
If you create a new paragraph by
pressing Enter at the end of an
existing paragraph, the new
paragraph retains the margins and
tabs of the existing paragraph.
64
Chapter 9
Drag to change the
left margin for the
first line of a
paragraph.
Drag to
change the
right margin.
Tab stop
To add a tab stop: click on the ruler
where you want it.
To move a tab stop: drag it along the
ruler.
To delete a tab stop: click it, and drag
downward, away from the ruler.
10
TrueSync Desktop:
EarthTime view
Chapter 10
EarthTime displays a map showing daylight and nighttime
around the world, and shows the current time in eight different
cities you select. You can use EarthTime to calculate the
difference in time between two locations, and you can
configure it to show both your home location and the local time
as you travel.
To open EarthTime, click the EarthTime icon in the Deskpad
or choose View | EarthTime. The Deskpad icon shows the
current time.
Depending on the device, your EarthTime settings, such as the
Home clock, Local time, and the other world clock settings,
may be transferred to your device when you synchronize.
The EarthTime map
When you click the EarthTime icon, you see a map of the
earth. Light areas are in daylight, and the shading represents
nighttime.
65
TrueSync Desktop: EarthTime view
65
City clock for
Scotts Valley.
Double-click on the map to
center it at that location.
Icon
indicating
Local City,
where you
are currently
located.
Icon
indicating
Home
City,
where you
live.
Icon
indicating
that
daylight
saving time
is in effect.
Icons
indicate
location of
other
selected
cities.
Selecting cities
To change one of the displayed cities:
Click the panel containing the city you want to change.
1 Click the city panel
and choose Select
a Different City
from the shortcut
menu.
2 Specify a
country, or
view cities
from all
countries.
EarthTime
has a
database of
over 540
cities from
which you
can select
world city
clocks to
display.
3 Choose a city
from the list.
NOTE
66
Complete your first synchronization before changing the
displayed EarthTime cities. If you change an EarthTime
city before that initial synchronization, your device's city
selections may overwrite your EarthTime city choices.
Chapter 10
Changing the Local Time
Change the Local Time when you travel to display all your
events in the current local time. For more details, see “When
you travel: changing time zones” on page 55.
To change the Local Time when you change time
zones:
1 Set one of the eight city panels to display the local city.
2 Click the panel containing the local city and click Set as
Local Time from the shortcut menu.
An icon appears, to indicate the Local Time city.
Changing the Home Clock
Your Home Clock indicates the time where you live. It should
be set automatically when you first start TrueSync Desktop.
To change your Home Clock
1 Set one of the eight city panels to display your home city.
2 Click the panel containing your home city and click Choose
As Home Clock from the shortcut menu.
An icon appears in the Home Clock panel.
67
TrueSync Desktop: EarthTime view
67
68
Chapter 10
11
TrueSync Desktop:
Printing
Chapter 11
Using the Printing options
You can print from the Contacts, Calendar, or Memos views to
a variety of formats, using either preprinted or customized
forms. Preview your output before you print it to save time and
materials.
Calendar printing
Select from a variety of formats for printing calendar activities,
including TrueSync Desktop’s daily, weekly, monthly, and
yearly views. You can also print to paper forms for several
popular organizers.
69
TrueSync Desktop: Printing
69
Printing in the daily format
Choose File | Print | Truesync Desktop Daily Format from the
Daily view of the Calendar.
Select the dates to
print.
Click to
preview the
printed
pages.
Choose the number of
columns per page.
Click to
change
margins.
Choose the type of
activity you want to
appear in each column.
If you pick the same
activity for more than
one column, text flows
continuously from the
bottom of one column to
the top of the next.
Choose the type of
paper you are printing to.
Click to
display the
options
panel.
Click to
change your
Windows
print settings.
Click to
change the
fonts used in
the calendar.
Printing different formats
To print different calendar formats, including one-, two-, and
six-week, monthly and yearly calendars, change to the view
(Weekly, Monthly, or Yearly) that you want to print and
Choose File | Print.
You can print using any paper size, including paper sized for
your personal organizer.
Printing in Contacts view
You can print individual or several cards in the Contacts view.
To print one or more cards, choose File | Print | Cards, or click
the Print button on the Contacts Toolbar. You can specify how
many cards to print per page.
70
Chapter 11
Printing labels, address book pages, and envelopes
You can also print Contact information using almost any label,
address book page, or envelope size. Templates let you print in
a variety of popular label, index card, and address book
formats. You can modify these formats or create your own
templates.
To print labels, address book pages, or envelopes
Choose File | Print, and select Labels, Address Book, or
Envelopes. The Print Labels dialog box is shown in the
example below.
Follow the numbered steps in the
dialog box. Step 1 prompts you to
specify the cards to print.
In Step 2, you
determine
placement of
labels on the
page. Click Set
up to create or
modify a
template.
In Step 3, you
specify what
text, fields, or
pictures to
print. Choose
previously
created
contents, or
click Set up to
define/modify
contents.
Click to
preview the
results of
your choices.
You can see
the overall
layout here
as you work.
In Step 4, you specify the
number of copies and other
options.
The numbered steps are designed to help you specify what to
print and arrange it within the print area available. The
procedures for using all three dialog boxes are the same, but
involve different templates and content arrangements.
Once you have specified the information in the four steps, click
Preview to see the result. Click Print when you are ready to
print.
71
TrueSync Desktop: Printing
71
Printing in the Memos view
To print memos, choose File | Print from the Memos view, or
click the Print button on the Memos Toolbar. The Print Memos
dialog box appears.
You can print a single memo, all of the memos filed in specific
folders, selected memos, marked memos, or, after a search
operation, memos listed in the Found window.
72
Chapter 11
Glossary
A
accessor A software module that provides
synchronization support for a specific TrueSync client. For
example, when you add the Outlook accessor, you can
synchronize your Outlook data with your other TrueSync
clients.
application
An information manager program, such as
Outlook and TrueSync Desktop, that runs on your PC.
C
client Any TrueSync-supported application, device, or
service that you can add to your TrueSync configuration.
Before you can add a client, you must have that client’s
accessor installed on your PC.
D
data type In this guide, any of the information types you
can synchronize, including Calendar, Contacts, Memos, and To
Do items.
A handheld information manager, such as a Palm™
Organizer, REX PRO™, and StarTAC® clipOn Organizer.
device
M
map The process of matching one client’s contact fields or
categories with another client’s fields or categories for
synchronization. For example, you might map a field called
“Home Phone” on TrueSync Desktop with a field called
“Personal Phone” on a device, and the data in the two fields
will be synchronized. TrueSync’s SmartMap feature performs
mapping for you, or you can customize the mapping for any or
all of your client fields.
73
Glossary
73
P
PIM
Personal Information Manager. Used in this guide to
refer to an organizer program that runs on your PC.
S
An online information manager, such as Yahoo!™
and TrueSync.com.
service
SmartMap™
The technology used by TrueSync to map
your client contact fields automatically for synchronization.
You have the choice of minimum, typical, or maximum
mapping levels; these determine how many fields will be
synchronized.
synchronization The process of replicating and
reconciling your contact, calendar, calls, to do list, and/or
memo information among two or more TrueSync clients. If
you make changes in one place and then synchronize, those
changes are reflected in all your other clients.
T
TrueSync®
The technology that provides simultaneous,
one-step synchronization among popular devices, applications,
and services.
TrueSync Central
The Internet site that you access from
the TrueSync window, where you can register your product, get
the latest TrueSync accessor updates and information, and sign
on to a TrueSync.com account.
TrueSync.com The Internet home for the TrueSync
Service (http://www.truesync.com/).
TrueSync Desktop The full-featured PC organizer that
manages your contacts, calendar, calls, to do items, and
memos. Synchronize information from TrueSync Desktop with
any or all of your other TrueSync clients.
74
Glossary
TrueSync Log A display for viewing messages resulting
from your synchronization session that display in the Log pane
at the bottom of the TrueSync window (if you don’t see it,
check View | Log). The messages provide details on the
progress and results of your synchronization.
TrueSync Plus
The TrueSync interface used for setting
up and starting synchronizations among client applications,
devices, and services without opening TrueSync Desktop.
TrueSync Service
A free, web-based information
manager (http://www.truesync.com/) that also provides
synchronization services over the Internet with any TrueSync
clients. Also called TrueSync Server.
TrueSync window The window that displays when you
go to the TrueSync view in TrueSync Desktop or when you
start TrueSync Plus.
75
Glossary
75
76
Glossary
Index
A
adding
cards 59
icons to Toolbars 48
memos 63
tab stops 64
address book, printing 71
addresses 57
alarms 16, 55
alphabetical tabs 10
altering time zones 23
appointments, scheduling 54
arranging cards 11
B
Back key 4
batteries 27
removing and installing 27
reset after changing 28
battery icon 27
bell icon, clipOn 24
buttons (Toolbar)
changing 48
removing 48
C
Calendar 51
Calls pane 52, 56
changing dates 53
changing time zones 55
Daily view 53
events 54
Events pane 52
printing 69, 70
synchronizing events 42
To Do pane 52, 56
views 53
views, clipOn 15
77
call memory 9
calls
ending 10
making 9
Calls pane (Calendar) 52, 56
canceling, events 17
card list (Contacts) 57
card views 10
cardfiles 57
creating 59
selecting 11
cards, adding 59
changing
Calendar dates 53
cities 23
client preferences 44
clipOn password 25
Contact cards 58
EarthTime clocks 67
EarthTime locations 66
fonts, TrueSync Desktop 49
memo margins 63
print settings 70
synchronization options 44
time zones 23, 55
To Do items and Calls 56
Toolbar buttons 48
TrueSync Desktop 48
charging phone 29
checking off To Do items 19
cities, EarthTime 66
cleaning 29
cleaning screen 29
clients, changing preferences 44
clipOn. See StarTAC clipOn
Organizer
clock, clipOn
setting 24, 29
time display 24
Index
77
time zones 23
clocks, EarthTime 67
connecting clipOn
to phone 2
with PC 8
Contacts 57
adding 12
adding cards 59
creating new files 59
editing 58
icons, clipOn 10
Log 58
printing cards 70
removing 14
synchronizing 42
tabs 10
templates 59
creating
cardfiles 59
Contacts, clipOn 12
events 54
events, clipOn 16
memos 63
Memos on clipOn 22
To Do items and Calls 56
To Do items, clipOn 19
customizing
Toolbars 48
TrueSync Desktop 48
D
Daily view
Calendar 53
clipOn 15
date display, clipOn 24
dates, changing 53
default
directories 49
views 49
deleting
Contacts, clipOn 14
Delete icon 47
78
Index
To Do items, clipOn 21
Deskpad 47
device information,clipOn 26
dialing numbers 9
directories, default 49
displaying telephone numbers 11
Down key 4
E
EarthTime
resetting clocks 67
selecting cities 66
Edit key 3
editing 5
Calls 56
contacts 58
events 55
text, clipOn 5
To Do items 56
e-mail addresses 11
ending a call 10
ending times, events 55
entering text, clipOn 5
envelopes 71
events
canceling 17
creating 16
maximum scheduled 54
overlapping 55
rescheduling 17
scheduling 54
synchronizing 42
viewing 15
Events pane (Calendar) 52, 54
F
files, memo 62
folders, memo 62
fonts 49
full-screen view, memos 62
G
getting started, clipOn setup 4
globe, EarthTime 65
Go to today shortcut 52
H
hardware requirements 32
help 35
Home Clock 23, 67
Home key 3
house icon 10
I
icons
clipOn contacts 10
clipOn views 7
Toolbars 48
index cards, printing 71
Index View, memos 62
installation 32, 33
requirements 32
upgrading 33
installing batteries 27
international time zones 65
Internet Synchronization 46
K
keys, clipOn 3
map, EarthTime 65
margins 63
meetings, scheduling 14, 51
Memos 61
creating memos 63
creating on clipOn 22
formatting memos 63
memo files 61, 62
printing 72
removing on clipOn 21
synchronizing 42
viewing on clipOn 21
menu bar, TrueSync Desktop 47
menus, shortcut 48
mini-calendar 53
Monthly view
Calendar 53
clipOn 15
multi-day events, viewing 52
N
new
batteries 27
Contacts, clipOn 12
events 16
Next key 4
notebook icon 10
O
labels 71
lettered tabs 10
letters 61
Local Time 23, 67
changing 55
online help 35
opening
Calendar 51
Contact cardfiles 58
EarthTime 65
Memos view 61
organizing, tasks 51
overview, TrueSync Desktop 47
M
P
mailing labels 71
making a call 9
password
clipOn 25
L
79
Index
79
synchronizing when enabled 8
TrueSync Desktop 49
phone calls 9
phone numbers, last 10 dialed 9
phone, charging 29
placing a call 9
preferences
client 44
clipOn 25
general 48
previewing printing 71
printing
address books 71
calendar formats 69, 70
Contacts cards 70
envelopes 71
index cards 71
labels 71
memos 72
previewing 71
product care, screen 29
product requirements 32
profile, selecting 4
protecting 29
Q
QuickLists 44
QuickLists, on clipOn 4, 16, 20
QuickNotes, clipOn 21
R
Readme file 33
recently dialed numbers 9
registering products 33
reminder alarms 16
removing 21, 27
clipOn from phone 27
Contacts 14
rescheduling
events 17
To Do items 21
80
Index
resetting
clipOn 28
EarthTime clocks 67
re-sorting cards 11
ruler (memos) 63
S
scheduling
calls 14
events 54
screen, cleaning 29
Select key 3
selecting profiles 4
setting
alarms 16
clock display 24
default directories 49
default views 49
margins 63
preferences 48
setting up
calls 14
meetings 14
Setup Wizard
clipOn 4
TrueSync 37
TrueSync Desktop 34
shortcut menus 48
sorting cards 11
special days, viewing 52
StarTAC clipOn Organizer
basics 3
batteries 27
bell icon 24
Calendar 15
charging phone 29
cleaning screen 29
connecting 8
connecting to phone 2
Contacts 10
device information 26
editing text 5
keys 3
making a call 9
Memos 21
password 25
Preferences 25
product care 29
removing from phone 27
resetting 28
Setup Wizard 4
synchronizing 8
To Do items 18
turning off (Home key) 3
turning on 3
starting
clipOn 3
TrueSync Desktop 34
starting times, events 55
starting TrueSync 37
start-up password, TrueSync
Desktop 49
status bar
clipOn 4
TrueSync Desktop 47
synchronization
clipOn 8
Internet 46
options, changing 44
selecting data types 42
setting up 37
starting 40
stopping 40
TrueSync log 45
T
tab stops (memos) 63
telephone
calls with clipOn 9
icon 10
number display 11
templates (Contacts) 59
text
entering on clipOn 5
81
margins 63
tabs 63
time display, clipOn 24
time zones 23, 65
changing 23, 55, 67
To Do items 18, 21
checking off 19
creating 19
removing 21
rescheduling 21
synchronizing 42
To Do pane (Calendar) 52, 56
Toolbars 47
Calendar view 52
changing buttons 48
Contacts view 58
customizing 48
removing buttons 48
TrueSync window 39
traveling, scheduling events 55
TrueSync 37
log 45
Setup Wizard 37
starting 37
stopping synchronization 40
TrueSync Central 39, 46
TrueSync Desktop
customizing 48
installing 32
overview 47
registering 33
setting up 34
starting 34
TrueSync Plus, starting 37
turning off alarms 16
U
uninstalling TrueSync Desktop 33
Up key 4
user profile, selecting 4
Index
81
V
View key 3
viewing
events, clipOn 15
multi-day events 52
special days 52
time zones 65
To Do items 18
views
Calendar 53
Contacts 58
customizing 48
EarthTime 65
Memos 62
printing Calendar 70
setting default 49
TrueSync Desktop 47
W
Web site addresses 11
Weekly view
Calendar 53
clipOn 15
Wizard
clipOn Setup 4
TrueSync Desktop Setup 34
TrueSync Setup 37
World clock 23
world map 65
Y
Yearly view, Calendar 54
Z
zones
changing time 23
82
Index
Software License Agreement, Disclaimer, and Limitation of Liability
IMPORTANT. READ CAREFULLY. As with any product, Starfish recommends backing up your data files before
using this product, and then periodically as you continue to use it. For help backing up your data, please visit
the Starfish Web site at: http://www.starfish.com/service/backup/
In this document TrueSync Plus, TrueSync Desktop, and TrueSync Component Install are together called "PC
Software". All software on the StarTAC clipOn Organizer device are together called "Device Software".
This Software License Agreement, Disclaimer, and Limitation of Liability (together called "Agreement") is a legal
agreement between you (an individual or a single entity) and Starfish Software, Inc. ("Starfish"). This Agreement covers
the PC Software, the Device Software, and all software and files that are downloaded or installed at any time (including
the future) using the TrueSync Component Install or TrueSync Plus programs. The PC Software includes components
known as "Accessors" that may be used with TrueSync Plus. The downloaded or installed software and files may
include without limitation TrueSync Plus, TrueSync Desktop, Accessors, and/or updates. All such PC Software, Device
Software, and downloaded or installed software and files, and any associated media, printed materials, and/or "online"
or electronic documentation, are together called the "Software Product" in this Agreement.
By downloading, installing, copying, or otherwise using the Software Product, you acknowledge that you have
read this Agreement and agree to be bound by its terms. If you do not agree to the terms of this Agreement, do
not download, install, copy, or otherwise use the Software Product.
A. License for Individual Use
The Software Product is licensed, not sold, to you for your own individual use only. You may install the PC Software on
a single computer for use by a single, particular user. You may make a single copy of the PC Software, for archive
purposes only.
Each Accessor is licensed only for use with, and on a same computer as, a compatible version (if one exists) of
TrueSync Plus (or TrueSync Desktop) that you have validly licensed from Starfish.
The Software Product is protected by U.S. and international copyright law and treaties, as well as other intellectual
property law and treaties, and cannot be copied or otherwise made available to more than one person at the same time
without violating the law. Starfish reserves all rights not specifically granted in this document.
B. Other Limits on Your Use
Except as otherwise specifically described in this Agreement, you may not transfer, rent, lease, lend, copy, modify,
translate, sublicense, time-share, or electronically transmit or receive the Software Product. The Software Product is
licensed as a single product. The PC Software's component parts may not be separated for use on more than one
computer. The Device Software may not be used in any device other than the particular device in which it originally
came. You acknowledge that the SoftwareProduct in source code form remains a confidential trade secret of Starfish.
You agree not to modify or attempt to reverse engineer, decompile, or disassemble the Software Product, except and
only to the extent that such activity is expressly permitted by applicable law notwithstanding this limitation.
C. Disclaimer of Warranties
YOU EXPRESSLY AGREE THAT USE OF THE SOFTWARE PRODUCT IS AT YOUR SOLE RISK. THE SOFTWARE
PRODUCT IS PROVIDED ON AN "AS IS" AND "AS AVAILABLE" BASIS. TO THE MAXIMUM EXTENT PERMITTED
BY APPLICABLE LAW, STARFISH AND ITS SUPPLIERS EXPRESSLY DISCLAIM ALL WARRANTIES AND
CONDITIONS, EITHER EXPRESS OR IMPLIED, INCLUDING, BUT NOT LIMITED TO, IMPLIED WARRANTIES OF
MERCHANTABILITY, FITNESS FOR A PARTICULAR PURPOSE, TITLE, AND NON-INFRINGEMENT, WITH
REGARD TO THE SOFTWARE PRODUCT AND THE PROVISION OF OR FAILURE TO PROVIDE SUPPORT
SERVICES.
Starfish makes no representation or warranty regarding the content of the Software Product, including its
computer software and documentation. For example, Starfish does not warrant that the computer software or
documentation are "error-free" or will meet the needs and requirements of a particular user. All information in
the Software Product,including the software and documentation, is subject to change without notice.
D. Limitation of Liability
To the maximum extent permitted by applicable law, Starfish and its suppliers expressly disclaim any liability for
damages arising from the use of this Software Product or any other damages, including (though not limited to) lost
profits or data, special, incidental, consequential, indirect, or other damages or claims, even if Starfish or its suppliers
has been specifically advised of the possibility of such damages or claims. Regardless of the form of the damage or
claim, the only liability Starfish or its suppliers will have to you or any other person will be limited to the amount actually
paid for your product of which the Software Product is a part, or $100 (U.S.), whichever is greater. Because some states
and jurisdictions do not allow the exclusion or limitation of liability, the above limitation may not apply to you.
E. Miscellaneous
This Agreement can only be modified in writing signed by you and an authorized officer of Starfish. If any part or
provision is found to be unenforceable or void, the remainder shall be valid and enforceable. If any remedy
provided is determined to have failed of its essential purpose, all limitations of liability and exclusions of
damages shall remain in effect. Use, duplication, or disclosure of the Software Product and documentation by
the U.S. Government is subject to the restricted rights applicable to commercial computer software (under FAR
52.227-19 and DFARS 252.227-7013). Export or re-export of the Software Product is subject to the U.S.
Commerce Department export restrictions. The Software Product is intended for use in the country in which the
product or package of which the Software Product is a part is first sold (or the EEC if first sold in the EEC).
This Agreement shall be construed under the laws of California, U.S.A. You have specific legal rights under this
document, and may have other rights that vary from state to state and country to country.
83
83
84