1
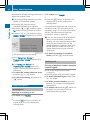
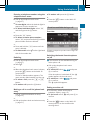
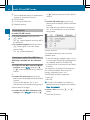
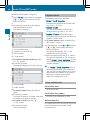
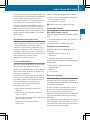
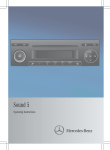
Audio 20
Operating Instructions
Symbols
$
%
!
+
X
YY
(Y page)
Display
Warning
Environmental note
Possible vehicle damage
Tip
Action required
Continuation symbol
Page reference
Messages in the display
Registered trademarks
RBluetooth®
is a registered trademark of Bluetooth SIG Inc.
Media® is a registered trademark of the Microsoft Corporation in the USA and
other countries.
RWindows
Vehicle dealer
In the USA:
In Canada:
Mercedes-Benz USA, LLC
One Mercedes Drive
Montvale, NJ 07645-0350
www.mbusa.com
www.mbsprinterusa.com
Customer Assistance Center:
1-877-762-8267
Mercedes-Benz Canada, Inc.
98 Vanderhoof Avenue
Toronto, ON M4G 4C9
www.mercedes-benz.ca
Customer Relations Department:
1-800-387-0100
Mercedes-Benz USA, LLC and Mercedes-Benz Canada, Inc. are Daimler enterprises.
Canada only:
"Authorized Sprinter Dealer" is defined as an authorized Mercedes-Benz Sprinter dealer.
Thank you for choosing the new Sprinter
Familiarize yourself with your Audio 20
system. Read this manual, particularly the
safety and warning notices, before you drive
off. This will allow you to fully enjoy your
Audio 20 system and help you to avoid
endangering yourself and others.
The features and functions of your Audio 20
system may differ according to:
Rmodel
Rorder
Rcountry
specification
We are constantly updating our systems to
the state of the art.
We therefore reserve the right to make
modifications in the following areas:
Rdesign
Requipment
Rtechnology
Therefore, you cannot base any claims on the
illustrations or descriptions in this manual.
Please consult an authorised Sprinter Dealer
if you have any questions.
The Operating Instructions and all other
manuals are an integral part of the vehicle.
You should always keep them in the vehicle
and pass them on to the new owner if you sell
the vehicle.
We wish you safe and pleasant motoring.
0065843881 É00658438811ËÍ
Contents
Index ....................................................... 4
At a glance ............................................. 9
Introduction ........................................... 6
System settings .................................. 19
Telephone ............................................ 25
Audio .................................................... 35
3
4
Index
1, 2, 3 ...
911 emergency call ............................. 27
A
Autostore ............................................. 38
11
16
15
16
21
22
21
27
23
21
20
27
C
Call lists ................................................
CD
Copy protection ...............................
Data medium ...................................
General information .........................
Inserting ..........................................
Mode, switching to ..........................
Multisession ....................................
Selecting a medium .........................
Channel presets ..................................
Character entry ...................................
Clear button .........................................
Copy protection
CD ...................................................
40
11
20
20
20
E
B
Back button .........................................
Balance
Setting .............................................
Basic functions ....................................
Bass
Setting .............................................
Bluetooth®
Activating/deactivating ...................
Authorizing devices ..........................
Connecting ......................................
Interface ..........................................
Revoking authorization ....................
Searching for devices ......................
Settings ...........................................
Telephony ........................................
Disc
Ejecting ............................................
Display ..................................................
Adjusting the brightness ..................
Selecting the design ........................
Switching on/off ..............................
33
46
46
46
38
41
44
42
37
14
11
46
D
Data medium
MP3 ................................................. 44
Deleting
Call lists ........................................... 33
Example of operation .......................... 14
F
Fader
Setting ............................................. 16
Fast forward
CD mode .......................................... 43
Frequency input
Manual ............................................. 37
M
Menu
Overview ..........................................
Menu item
Selecting ..........................................
Mobile phone
External authorization ......................
MP3
Bit/sampling rates ...........................
Copyright .........................................
Data medium ...................................
File systems .....................................
Formats ...........................................
Mode, switching to ..........................
Notes ...............................................
Selecting a medium .........................
Multifunction display ..........................
Multifunction steering wheel .............
Audio ...............................................
Selecting a track ..............................
Setting a station ..............................
Multisession CDs .................................
12
14
22
45
45
44
44
45
41
44
42
17
16
46
46
46
44
O
Operating system
Audio 20 .......................................... 10
Operation ............................................. 13
Index
P
Pause function .....................................
Phone book ..........................................
Deleting an entry .............................
Making a call to an entry .................
Playback options (CD mode) ..............
42
30
33
32
44
R
Radio mode .......................................... 36
Switching to ..................................... 36
Reception problems .............................. 6
Redial .................................................... 29
Reset .................................................... 24
Rewind
CD mode .......................................... 43
S
Safety notes
Operating safety ................................ 6
Using the telephone ......................... 26
Single call
Functions ......................................... 29
Sound
Switching on/off .............................. 15
Sound settings ..................................... 15
Station
Selecting .......................................... 36
Storing ............................................. 37
Station list ............................................ 36
Station search ..................................... 37
Switching on/off ................................. 15
System language
Setting ............................................. 23
System settings ................................... 20
Menu overview ................................. 13
T
Telephone
Accepting/ending a call ...................
Ending an active call ........................
Function restrictions ........................
Incoming call ...................................
Operating using the multifunction
steering wheel .................................
Outgoing call ....................................
28
29
27
28
34
28
Redialing ..........................................
Rejecting/accepting a waiting
call ...................................................
Sending DTMF tones ........................
Setting the reception and
transmission volume ........................
Switching the hands-free
microphone on/off ..........................
Telephone book
Calling up .........................................
Telephone mode
Operating options ............................
Tone settings
Balance and fader ............................
Treble and bass ...............................
Track
Selecting ..........................................
Treble
Setting .............................................
29
30
30
27
29
31
26
16
16
43
16
U
Using the telephone ............................ 28
V
V-Cards
Receiving ......................................... 30
Volume
Adjusting ......................................... 15
Phone calls ...................................... 15
W
Waveband
Switching (radio) .............................. 36
5
6
Introduction
Operating safety
General notes
G WARNING
Your attention must always be focused on the
traffic conditions. Only operate Audio 20 or
the telephone when traffic conditions permit.
Operation of the audio equipment or the
telephone distracts you from the traffic
conditions and could cause you to lose
control of your vehicle and cause an accident.
Bear in mind that at a speed of just 30 mph
(approximately 50 km/h), your vehicle covers
a distance of 44 feet (approximately 14 m)
every second.
This device complies with Part 15 of the FCC
Rules. Operation is subject to the following
two conditions:
1. This device may not cause harmful
interference, and
2. this device must accept any interference
received, including interference that may
cause undesired operation.
G WARNING
Change or modification not expressly
approved by the party responsible for
compliance could void the user's authority to
operate this equipment.
! Note: This equipment has been tested
and found to comply with the limits for a
Class A digital device, pursuant to Part 15
of the FCC Rules. These limits are designed
to provide reasonable protection against
harmful interference when the equipment
is operated in a commercial environment.
This equipment generates, uses and can
radiate radio frequency energy and, if not
installed and used in accordance with the
instruction manual, may cause harmful
interference to radio communications.
G WARNING
This equipment complies with FCC radiation
exposure limits set forth for uncontrolled
equipment and meets the FCC radio
frequency (RF) Exposure Guidelines in
Supplement C to OET65.
This equipment has very low levels of RF
energy that is deemed to comply without
maximum permissive exposure evaluation
(MPE). But it is desirable that it should be
installed and operated with at least 8 inches
(20 cm) and more between the radiator and a
person's body (excluding extremities: hands,
wrists, feet and legs.)
! Electronic devices that you bring into the
vehicle yourself can cause significant
problems with the radio reception.
Correct use
Always observe the following when using
Audio 20:
Rthe safety notes in this manual
Rnational road traffic regulations
i Improper work on electronic components
or systems (e.g. radio, CD changer) and
their software may result in malfunction or
failure. Even systems that have not been
modified could be affected because the
electronic systems are connected.
Electronic malfunctions can seriously
jeopardize the operational safety of your
vehicle.
G WARNING
Modifications performed on electronic
components or software can cause
malfunctions. The radio, amplifier, CD drive
and telephone are linked together.
If one of the components is inoperative or was
not properly removed or replaced, the
function of the other components may be
impaired.
This could considerably compromise the
operating safety of your vehicle.
Introduction
We therefore recommend always having
service work on electronic components
performed at an authorized Sprinter Dealer.
i Protection against theft: this device is
equipped with technical provisions to
protect it against theft. Detailed
information on protection against theft is
available at your authorized Sprinter
Dealer.
If you have questions about equipment and
operation, consult any authorized Sprinter
Dealer.
Qualified specialist workshops
i Read the information on qualified
specialist workshops in the vehicle
Operator's Manual.
Information on copyright
General information about Bluetooth®
Bluetooth® technology is the standard for
short-range wireless data transmission of up
to approximately 10 meters.
Bluetooth® is a registered trademark of
Bluetooth Special Interest Group (SIG) Inc.
Equipment on your audio device
i These Operating Instructions describe all
the standard and optional equipment of
your audio device, as available at the time
of going to print. Country-specific
deviations are possible.
Please note that your audio device may not
be equipped with all the features
described.
This also applies to safety-relevant systems
and functions. Therefore, the equipment on
your audio device may differ from that in
the descriptions and illustrations. The
original purchase contract documentation
for your vehicle contains a list of all of the
systems in your vehicle.
Z
7
8
Operating system ...............................
Operation .............................................
Basic functions ....................................
With the multifunction steering
wheel ....................................................
Multifunction display ..........................
10
13
15
16
17
At a glance
9
10
Operating system
At a glance
Operating system
Overview
Example: CD changer
Function
:
;
=
?
A
Function
Page
D
$
Switches to radio mode
Switches wavebands
36
36
i
Calls up the system
settings
13
h
Selects CD mode
41
%
Selects telephone mode
28
V
Eject/load button (CD
changer)
38
B
Disc slot
38
C
Display
11
Number keypad
Radio mode:
Manual frequency entry
Station preset
Audio CD/MP3 mode:
Track selection
Telephone mode:
Passcode entry
Phone number entry
Page
37
37
43
22
28
E
k Back button
13
F
2 Clear button
11
G
9 Confirmation button
13
H
Arrow buttons to navigate
within a menu or to exit a
menu
=, ;, 9, :
Selects a station
Selects a track
13
36
43
Operating system
Page
o Control knob
Adjusts the volume
15
J
q Switches on/off
15
K
E
Selects a station
Selects a track
36
43
F
Selects a station
Selects a track
36
43
~
Ends a call
Rejects a call
28
28
I
L
M
N
Back button
X
X
Function
To move up one menu level: briefly press
the k back button.
Audio 20 changes to the next higher menu
level in the current operating mode.
To switch to the basic menu: press and
hold the k back button.
Audio 20 changes to the basic menu of the
current operating mode.
O
P
6
Accepts a call
Initiates a call
Redial
28
28
29
8
Mute
Pause function
15
42
J
Calls up sound settings
15
Display
Display overview
The Audio 20 display shows the function
currently selected and its associated menus.
The display is divided into three areas:
Clear button
X
To delete individual characters: briefly
press the 2 clear button.
X
To delete an entire entry: press and hold
the 2 clear button.
: Menu bar
; Display/selection window
= Status bar
The active menu item is highlighted.
Function overview
You can use Audio 20 to operate the following
in your vehicle:
Raudio functions in radio and disc (audio CD
or MP3) modes
telephone
Rthe
Page
At a glance
Function
11
12
Operating system
At a glance
Menu overview
Structure of the main functions and the
corresponding basic menus
Menu
Submenu
Radio
Radio
WB (Weather Band)
Presets
Sound
Telephone
Telephone
Name
Call list
Disc
CD/MP3
Track list (audio CD)
Folders (MP3)
Sound
System
Calls up the system
menu
Each main function has a basic menu. Each
item in the basic menu has several submenu
items.
Operation
13
Settings
Display off
Setting the language
Switching off the display
Display settings
Activating/deactivating Bluetooth®
Restoring the settings (reset)
Operation
General notes
Calling up the menu of a main function
Overview
The system can be operated:
Rusing
the Audio 20 system itself
the multifunction steering wheel
You can also operate many of the Audio 20
functions using the buttons on the
multifunction steering wheel (Y page 16).
The respective Audio 20 functions, e.g. the
selected radio station or CD track, are then
shown in the multifunction display provided
that you have selected the corresponding
menu (Y page 17).
Rusing
Selecting a main function
X
Press the $, h or % function
button.
The corresponding basic menu appears.
: Status bar
; Display/selection window
= Menu bar
Navigating within the menu bar
X
Press the = or ; button.
Selecting a menu item
X
Press the 9 button.
Exiting the menu bar without making a
selection
X
Press the 9 or : button.
or
X
Press the k button.
At a glance
System menu overview
Operation
14
At a glance
Selecting a menu item
Overview
X
Navigating within a menu
X
Press the 9 or : button.
Selecting a menu item
X
Press the 9 button.
To switch to the menu bar: press
the : button.
The active menu item is highlighted.
X To select a menu item: press the =
or ; button until Presets is
highlighted.
X To confirm your selection: press the 9
button.
The station list appears.
Exiting a menu without making a
selection
X
Press the = or ; button.
or
X
Press the k button.
X
Example of operation
The paths to the individual menu items are
always described starting from the main
function.
Example:
You want to select the Station List menu
item from the Radio submenu.
To select an item: press the 9
or : button until the desired station is
highlighted.
X To confirm your selection: press the 9
button.
Character entry
i You will see the previously called up
submenu for each basic menu in the
display.
If one of the submenus is already shown on
the screen (e.g. the Radio submenu), the first
steps are not required.
The following section describes the steps for
the example above.
X Press the $ function button.
The radio basic menu appears.
Example: entering a telephone number
Basic functions
To switch to the number bar: press the
9 or : button.
X To select a digit: press the = or ;
button.
X To confirm your selection: press the 9
button.
or
X Enter the digits directly using the number
keypad on the Audio 20 control panel.
X
To delete individual digits: select 2
and press the 9 button.
or
X
Press the 2 button.
X To delete an entire entry: press and hold
the 2 button until the entire entry has
been deleted.
or
X Select 2 and press the 9 button.
X To finish digit entry and dial the
number: select ö and press 9.
or
X Press the 6 button.
Basic functions
General notes
i Information about the controls and
operating principles of Audio 20 can be
found in the "Operating system" section
(Y page 10) and the "Operation" section
(Y page 13).
Switching on/off
X
Press the q control knob.
Audio 20 calls up the previously selected
menu.
i If you switch off the audio equipment,
playback of the current audio source will
also be switched off.
Switching the sound on/off (mute)
Switching the audio source on/off
X
Press the 8 button.
The sound from the audio source is
switched on or off.
i When the sound is switched off, you will
see the x symbol in the status bar. If
you change the audio source or adjust the
volume, the sound is automatically
switched on.
Adjusting the volume
Adjusting the volume
X
Turn the o control knob.
or
X
Press the W or X button on the
multifunction steering wheel.
The volume of the audio source currently
selected changes.
Adjusting the volume for phone calls
You can adjust the volume for hands-free
mode during a telephone call.
X
Turn the o control knob.
or
X
Press the W or X button on the
multifunction steering wheel.
Adjusting the sound settings
Calling up the sound menu
X
Press the J sound button on the control
panel.
The Sound menu appears.
You can also access the sound menu via the
submenu in which you wish to change
settings.
At a glance
X
15
With the multifunction steering wheel
16
Example:
At a glance
X
Press the $ function button.
X Press the : button to switch to the
menu bar.
X Press the = or ; button to select
Sound and press 9 to confirm.
The Sound menu appears.
X
Press the = or ; button to select
Sound and press 9 to confirm.
X Press the 9 or : button to select
Bal/Fad and press 9 to confirm.
Adjusting treble and bass
X
Press the = or ; button to select
Sound and press 9 to confirm.
X Press the 9 or : button to select
Treble or Bass and press 9 to confirm.
X
To change the setting: press the
9, :, = or ; button until the
balance and fader are set as desired.
X To store the setting: press the 9 or
k button.
The setting is stored and you exit the menu.
With the multifunction steering wheel
X
To change the setting: press the 9
or : button until the desired treble and
bass levels are set.
X To store the setting: press the 9 or
k button.
The setting is stored and you exit the menu.
or
X Press the :, = or ; button.
Adjusting the balance and fader
Balance and fader settings apply to all audio
sources.
The balance and fader determine whether the
sound is louder on the right or left, or in the
front or the rear of the vehicle.
i The fader can only be set on vehicles with
loudspeakers in the rear.
G WARNING
A driver's attention to the road and traffic
conditions must always be his/her primary
focus when driving.
For your safety and the safety of others,
selecting features through the multifunction
steering wheel should only be done by the
driver when traffic and road conditions permit
it to be done safely.
Bear in mind that at a speed of just 30 mph
(approximately 50 km/h ), your vehicle is
covering a distance of 44 feet (approximately
14 m) every second.
multifunction display in the instrument
cluster must be set to the respective radio,
CD or telephone function.
Switching the multifunction display
X
On the multifunction steering wheel, press
the V or U button repeatedly until
the desired menu appears.
The following displays are shown as
examples.
Radio mode display
Function
Page
:
Multifunction display
17
;
W Increases the volume
X Reduces the volume
15
15
=
6 Accepts a call
~ Rejects or ends a call
34
34
?
Selects a menu
V Scrolls up
U Scrolls down
(see the vehicle Operator's
Manual)
A
Selects a submenu or list
entry:
& Scrolls up
* Scrolls down
(see the vehicle Operator's
Manual)
Multifunction display
General notes
: Station name (if transmitted) or frequency
; Waveband with memory position number
(if transmitted)
CD mode display
: Current CD
; Current track
Telephone mode display
You will see the Bluetooth Ready text in the
basic display (Bluetooth® telephony).
The text field in the multifunction display
shows values, settings and display messages.
To operate Audio 20 functions with the
multifunction steering wheel, the
Z
17
At a glance
Multifunction display
Multifunction display
At a glance
18
X
To switch from the basic display to the
list display: press the 6 button on the
multifunction steering wheel.
In the list display, you will see one of the
last dialed calls in place of Bluetooth®
ready.
X
To return to the basic display: press the
~ button on the multifunction steering
wheel.
The telephone basic display is now shown.
19
Bluetooth® settings ............................ 20
System language ................................. 23
Reset function ..................................... 24
System settings
Audio equipment features ................. 20
Display settings .................................. 20
Bluetooth® settings
20
Audio equipment features
System settings
i These Operating Instructions describe all
the standard and optional equipment of
your audio device, as available at the time
of going to print. Country specific
differences are possible.
Please note that your vehicle might not be
equipped with all the functions described
here.
Display settings
Setting the display design
X
Press the i function button.
The system basic menu appears.
X Press the = or ; button to select
System and press 9 to confirm.
X Press the 9 or : button to select
Display and press 9 to confirm.
X Select Day Mode, Night Mode or
Automatic and press 9 to confirm.
The # dot indicates the current setting.
i In the Automatic setting, Audio 20
evaluates the readings from the automatic
vehicle light sensor and automatically
switches the display designs.
Setting the brightness
i Audio 20 has a light sensor which detects
brightness; this affects the settings
available for this function.
X
Press the i function button.
The system basic menu appears.
X Press the = or ; button to select
System and press 9 to confirm.
X Press the 9 or : button to select
Display and press 9 to confirm.
X Select Brightness and press the 9
button to confirm.
Switching the display on/off
X
Press the i function button.
The system basic menu appears.
X To switch off the display: press the
= or ; button to select Display
off and press 9 to confirm.
The display is switched off.
X To switch on the display: press the 9,
k, =, ;, 9 or : button.
or
X Press the q button.
The display is switched on.
i You can also press one of the function
: Needle showing the current setting
X
To set the brightness: press the 9
or : button.
The needle moves up or down.
X To confirm your selection: press the 9,
=, ; or k button.
buttons, e.g. the h button. This
switches on the display and takes you to
the respective function.
Bluetooth® settings
Requirements for a Bluetooth®
connection
i Bluetooth® devices must support
Hands-Free Profile 1.0 or higher to be
connected to Audio 20. Every Bluetooth®
device has its own Bluetooth® name.
Bluetooth® settings
X
Press the i function button.
The system basic menu appears.
X Press the = or ; button to select
System and press 9 to confirm.
X Press the 9 or : button to select
Bluetooth and press 9 to confirm.
X Select Activate Bluetooth and press the
9 button to confirm.
This switches Bluetooth® on O or off ª.
Connecting Bluetooth® devices
General information
i To connect a Bluetooth® device, the
X
Press the i function button.
The system basic menu appears.
X To call up a list: press the = or ;
button to select System and press 9 to
confirm.
X Press the 9 or : button to select
Bluetooth and press 9 to confirm.
X Select Bluetooth Device List and press
9 to confirm.
The device list appears.
X To start a search: select Update and press
9 to confirm.
Audio 20 starts the search for devices
within range. The device list appears after
a short while.
i If you call up the device list again at a later
time, it will contain all devices authorized
so far. In this case, start a new search to
update the device list.
Bluetooth®
function must be activated on
Audio 20 and on the device concerned. The
Bluetooth® device must also be "visible" to
Audio 20 in order for Audio 20 to find and
display it. For the setting procedures,
please see the operating instructions for
the Bluetooth® device.
It is possible to establish a Bluetooth®
connection between Audio 20 and the mobile
phones.
i Bluetooth® mobile phones must
correspond to particular profiles to be
connected to Audio 20.
The volume of telephone conversations may
change after the phone has been connected.
You can connect up to ten devices to
Audio 20.
The connection process includes searching
for the device and its subsequent
authorization.
Searching for Bluetooth® devices
i To call up the Bluetooth® device list, you
must first activate Bluetooth®.
X
To cancel the search: select Cancel and
press 9 to confirm.
The device list can contain the following
devices:
Rall
(available) devices detected, whether
authorized or not
Rall authorized devices, whether they have
been detected (are available) or not
i If the device list already contains 10
authorized devices, you must revoke (deauthorize) the authorization for one of the
authorized devices. Then, switch this
device off and restart the search.
Otherwise, any new devices for which you
wish to search will not appear in the list.
If you call up the device list again at a later
time, it will contain all devices authorized
so far.
System settings
Activating/deactivating Bluetooth®
21
Bluetooth® settings
22
Authorizing (registering) a Bluetooth®
device
System settings
X
Call up the Bluetooth® device list
(Y page 21).
X Press the 9 or : button to select
Update and press 9 to confirm.
X Select the device that has not yet been
authorized (no symbol) and press 9 to
confirm.
X Select Options and press the 9 button to
confirm.
X Select Authorize and press the 9 button
to confirm.
The input menu for the passcode appears.
i The passcode is any one to sixteen-digit
number which you can set yourself. Some
mobile phones require a passcode of at
least four digits. You must enter the same
number on Audio 20 and the device to be
authorized. Please also note the
information in the operating instructions
for your mobile phone.
X
In the telephone basic menu: press the
= or ; button to select Telephone
and press 9 to confirm.
X Press the 9 or : button to select
Bluetooth Phones and press 9 to
confirm.
X Select Update and press 9 to confirm.
X Select Options and press 9 to confirm.
X Select External Authorization and
press 9 to confirm.
X
X
X
Select Audio 20 (VAN Bluetooth) on your
mobile phone.
X When requested to do so, enter the
passcode on the mobile phone and then in
the Audio 20 system.
i On some mobile phones it is necessary to
re-establish the connection to Audio 20
after entering the passcode (see the mobile
phone operating instructions). Otherwise,
the mobile phone cannot be authorized.
X
To enter the passcode on Audio 20:
select the digits one by one.
X To cancel an entry on Audio 20: press the
k button.
X To confirm an entry on Audio 20: select
¬ or press 9.
X Enter the same passcode on the
Bluetooth® device (see the operating
instructions for the device).
The device is authorized.
External authorization
If Audio 20 is unable to detect your mobile
phone, this may be due to the security
settings on your mobile phone. In this case,
check whether your mobile phone can locate
the Audio 20 system.
The Bluetooth® device name of the
Audio 20 system is "VAN Bluetooth".
Start the Bluetooth® search on the mobile
phone (see the mobile phone operating
instructions).
Displaying the details of a
Bluetooth® device
X
Call up the Bluetooth® device list
(Y page 21).
X Select the desired device and press 9 to
confirm.
X Press the 9 or : button to select
Options and press 9 to confirm.
X Select Details and press 9 to confirm.
The detailed display for this device
appears.
X To close the detailed display: press the
=, ;, :, 9, k or 9
button.
System language
Audio 20 always searches for the last mobile
phone connected.
If no connection can be made to the most
recently connected mobile phone, the system
searches for the mobile phone which was
connected before that one.
Connecting another mobile phone
If you have authorized more than one mobile
phone, you can switch between the individual
phones.
i You can only switch to another authorized
phone if you are not currently making a call.
X
Select De-Authorize and press 9 to
confirm.
A prompt appears asking whether you
really wish to revoke authorization for this
device.
X Select Yes or No and press 9 to confirm.
If you select Yes, the authorization for the
device will be revoked.
i If you revoke authorization for a device
that has been authorized in the past and
that is not detected in the search, this
device will no longer be displayed in the
device list. Devices that have been
authorized in the past but that are not
detected in the search are either not
switched on or not in the vehicle.
X
In the telephone basic menu: press the
= or ; button to select Tel and
press 9 to confirm.
X Press the 9 or : button to select
Bluetooth Phones and press 9 to
confirm.
X Select the mobile phone from the list and
press 9 to confirm.
If the selected mobile phone is within
Bluetooth® range and Bluetooth® is
activated, a search is started and the phone
is connected.
Only one mobile phone can be connected
at any one time. The currently connected
mobile phone is indicated by the # dot in
the phone list.
De-authorizing (de-registering) a
Bluetooth® device
X
Call up the Bluetooth® device list
(Y page 21).
X Select the authorized device and press 9
to confirm.
X Press the 9 or : button to select
Options and press 9 to confirm.
System language
This function sets the display menu language.
X Press the i function button.
The system basic menu appears.
X Press the = or ; button to select
System and press 9 to confirm.
X Press the 9 or : button to select
Language and press 9 to confirm.
The list of languages appears. The # dot
indicates the current setting.
X To select a language: press the : or
9 button.
The list scrolls downwards or upwards.
X To confirm your selection: press the 9
button.
Audio 20 loads the selected language and
stores the setting.
If you select Synchronize Languages,
Audio 20 sets the language to that which is
used by the multifunction display.
i The language selection affects the input
options in the character bar.
System settings
Automatic reconnection
23
24
Reset function
System settings
Reset function
You can reset Audio 20 to the factory
settings. All data is deleted, including
personal settings (e.g. station presets).
Resetting is recommended before selling or
transferring ownership of your vehicle, for
example.
X Press the i function button.
The system basic menu appears.
X Press the = or ; button to select
System and press 9 to confirm.
X Press the 9 or : button to select
Reset and press 9 to confirm.
A prompt appears asking whether you wish
to reset.
X Select Yes or No and press 9 to confirm.
If you select Yes, a prompt will appear again
asking whether you really wish to reset.
X Select Yes or No and press 9 to confirm.
If you select Yes, a message will be shown.
Audio 20 is reset and restarted.
25
Bluetooth® interface telephony .........
Reception and transmission volume .
Using the telephone ...........................
Using the phone book ........................
Using call lists .....................................
Operating the telephone using the
multifunction steering wheel .............
27
27
28
30
33
34
Telephone
Audio equipment features ................. 26
General notes ...................................... 26
26
General notes
Audio equipment features
Telephone
i These Operating Instructions describe all
the standard and optional equipment of
your audio device, as available at the time
of going to print. Country specific
differences are possible.
Please note that your vehicle might not be
equipped with all the functions described
here.
General notes
Introduction
With Audio 20, telephony via the Bluetooth®
interface is available using a Bluetooth®capable mobile phone. Using the Bluetooth
interface and a suitable mobile phone, you
can use the Audio 20 hands-free function and
receive vCards.
Detailed information about suitable mobile
phones and connecting Bluetooth®-capable
mobile phones to Audio 20 is available at your
authorized Sprinter Dealer.
Important safety notes
G WARNING
You must observe the legal requirements for
the country in which you are currently driving
when operating mobile communications
equipment in the vehicle.
If it is permitted to operate communications
equipment while the vehicle is in motion, you
must only operate it when road and traffic
conditions permit. You may otherwise be
distracted from the traffic conditions, cause
an accident and injure yourself and others.
G WARNING
Excessive electromagnetic radiation may
constitute a health hazard to yourself and
others.
There is scientific discussion surrounding the
possible health risks posed by
electromagnetic fields. You can reduce this
risk by using an exterior aerial.
Therefore, only use mobile communication
equipment if it is connected to the exterior
aerial of the vehicle.
G WARNING
Two-way radios and fax machines without
exterior antennas may interfere with the
vehicle electronics and thereby compromise
the operational safety of the vehicle and
thereby your safety as well. Therefore, only
use mobile communication equipment if it is
connected to the exterior antenna of the
vehicle.
Call disconnection while the vehicle is
in motion
A call may be disconnected if:
Rthere is insufficient GSM network coverage
in certain areas.
move from one GSM transmitter/
receiver area (GSM cell) into another and
no channels are free.
Ryou use a SIM card which is not compatible.
Ryou are using a mobile phone with
"Twincard" and the mobile phone with the
second SIM card is already logged into the
network.
Ryou
Operating options
If the mobile phone is inserted in the bracket,
you can operate the phone in the following
ways:
Rwith
the 9, :, ;, = and 9
buttons
Rwith the ~ or 6 button and number
keypad of Audio 20
Rwith the multifunction steering wheel
Reception and transmission volume
Function restrictions
You will not be able to use the telephone, or
you may have limited operation, in the
following situations:
Rif
the mobile phone is not switched on
the mobile phone is not logged into a
mobile phone network The telephone
automatically tries to log on to a network.
If no network is available, you will not be
able to make a "911" emergency call. If you
attempt to make an outgoing call, the No
Service message will appear for a short
while.
Rif the Bluetooth® function on Audio 20 or
on the mobile phone is switched off.
Rif Audio 20 is switched off during a call in
hands-free mode, the call is disconnected.
This can be avoided by taking the following
measures:
Before switching off Audio 20 on the mobile
phone, change to "Private Mode" (see the
separate instructions for the mobile
phone).
Bluetooth® interface telephony
Telephone basic menu (Bluetooth®
interface)
X
In telephone mode, press the k button
repeatedly until the telephone basic menu
appears.
Telephone
The descriptions in this section assume that
the mobile phone is inserted in the bracket.
Exceptions to this are expressly stated.
If the mobile phone is ready for use, the
following display appears:
Rif
911 emergency call
The following conditions must be fulfilled in
order to make a 911 emergency call:
Rthe
mobile phone must be switched on.
network must be available.
If you cannot make an emergency call, you
must arrange rescue measures yourself.
The 911 emergency call number is a public
service. Any misuse is punishable by law.
Ra
27
Telephone basic menu (example: telephony via
Bluetooth® interface)
The following information is displayed in the
status bar:
of the Bluetooth® device name, for
example: blue_mobile
Rdisplay of the r signal strength of the
mobile phone network. The bars show the
signal strength of the mobile phone
network. If all the bars are filled, you have
optimum reception. If all the bars are
empty, there is very poor reception or none
at all.
The 6 or ~ receiver symbol
indicates whether there is a currently
active call.
RREADY indicates that calling is possible.
RNO SERVICE indicates that there is no
connection to any mobile phone network.
Rdisplay
Reception and transmission volume
It is generally not recommended that you
change the settings for reception and
transmission volume, as the preset values are
set to suit most mobile phones. To find out
Z
Using the telephone
28
about the best possible settings, contact your
authorized Sprinter Dealer.
X
i The wrong settings may have a serious
X
impact on transmission quality.
Telephone
X
Press the % function button.
The telephone basic menu appears.
X Press the = or ; button to select
Tel and press the 9 button to confirm.
X Press the 9 or : button to select
Adjust Volume and press 9 to confirm.
To accept: select Accept.
or
Press the 6 button on the Audio 20
control panel or on the multifunction
steering wheel.
Once you have accepted the call, you can use
hands-free mode. The call volume can be
adjusted (Y page 15). For more information,
see the "Functions during a single call
connection" section (Y page 29).
i You can also accept a call as described
above, even if the Audio 20 display is
showing one of the other operating modes.
Once you have accepted the call, the
display switches to telephone mode. After
the call has been ended, the Audio 20
display shows the previously selected
mode again.
: Bar showing the current setting
X
X
Select Reception Volume or
Transmission Volume and press 9 to
confirm.
i The Reception Volume and
Transmission Volume options only
appear if the selected mobile phone is
authorized.
X
To adjust the volume within the scale:
press the 9 or : button.
X To confirm the setting: press the 9 or
= button.
Using the telephone
Incoming call
Rejecting or accepting a call
X
To reject: select Reject.
or
X
Press the ~ button on the Audio 20
control panel or on the multifunction
steering wheel.
To switch the display to telephone
mode: press the % function button.
Making a call
Entering a telephone number using the
number keypad
X
Call up the telephone basic menu
(Y page 27).
X Enter the digits using the number keypad.
X To delete individual digits: briefly press
the 2 button.
X To delete an entire number: press and
hold the 2 button until all digits have
been deleted.
X To make a call: press the 6 button on
the Audio 20 control panel or on the
multifunction steering wheel.
Using the telephone
Entering a telephone number using the
telephone basic menu
X
X
X
To make a call: press the 9 button.
or
Press the 6 button on the Audio 20
control panel.
Functions available during a call
Telephone
Call up the telephone basic menu
(Y page 27).
X To enter digits: select the desired digits in
sequence from the number bar.
X To delete individual digits: select 2
and briefly press the 9 button.
or
X Press the 2 button.
X To delete an entire phone number:
select 2 and press and hold 9 until the
phone number has been deleted.
or
X Press and hold the 2 button until the
entry is deleted.
X To make a call: select ° on the right-hand
side of the number bar.
Overview
Example of telephone operation with a single call
connection
Redialing
Switching the hands-free microphone
on/off
X
i This function is also available during an
Call up the telephone basic menu
(Y page 27).
X Select °.
or
X When the telephone basic menu is shown,
press the 6 button on the Audio 20
control panel.
The list of dialed numbers appears. The
most recently dialed number is at the top.
X To select a call: press the 9 or :
button.
X To make a call: press the 9 button.
Making a call to a call list/phone book
entry
X
Call up a call list and select an entry
(Y page 33).
or
X
Call up the phone book and select an entry
(Y page 31).
29
active phone call.
X
Call up the telephone basic menu
(Y page 27).
X To switch off: select Mic Off and press
9 to confirm.
If the microphone is switched off, the Q
symbol appears in the main area.
X To switch on: select Mic On and press
9 to confirm.
The Q symbol disappears.
Ending an active call
X
If necessary, switch the display to
telephone mode (Y page 10).
X To end a call: select ¢ and press 9 to
confirm.
or
X Press the ~ button on the Audio 20
control panel or on the multifunction
steering wheel.
Z
30
Using the phone book
Rejecting or accepting a waiting call
i The call waiting function must be
Telephone
supported by the network provider and be
enabled.
If you have an active call and you receive
another call, the call waiting display will
appear. You also hear a tone.
X To reject: select Reject and press 9 to
confirm.
or
X Press the ~ button on the Audio 20
control panel or on the multifunction
steering wheel.
X To accept: select Accept and press 9 to
confirm.
or
X Press the 6 button on the Audio 20
control panel or on the multifunction
steering wheel.
This ends the active call.
Sending DTMF tones
i This function is not supported by all
mobile phones.
You can use DTMF tones to control answering
machines or other devices, e.g. for remote
query functions.
X To send individual characters: during
connection, select the desired characters
and press 9 to confirm each character.
or
X Press the corresponding button on the
Audio 20 control panel.
Every character selected will be
transmitted immediately.
X
To send a phone book entry as a string
of characters: select Name and press 9
to confirm.
X Select the desired phone book entry and
press 9 to confirm.
The entry is immediately sent as a
character string.
X To return to the call display: press the
k button.
Using the phone book
Introduction
The Audio 20 phone book contains imported
external entries from mobile phones.
i The imported entries are retained even if
you use another mobile phone with
Audio 20. For this reason, you should
delete any call lists before handing over or
selling the vehicle.
Receiving vCards (via the Bluetooth®
interface)
You can import vCards from external
Bluetooth®-capable phones into the address
book. Please bear the following in mind:
RBluetooth®
must be active on
Audio 20(Y page 22) and on the external
Bluetooth®-capable telephone (see the
operating instructions of the respective
mobile phone).
Rthe external Bluetooth® phone must be
able to send vCards via Bluetooth® (see the
operating instructions of the respective
mobile phone).
Rthe external Bluetooth® phone in the
vehicle is switched on and authorized
(Y page 22).
i If you switch to another main function
during vCard reception, such as the radio,
vCard reception is canceled.
Using the phone book
Press the % function button.
The telephone basic menu appears.
X Press the = or ; button to select
Tel and press 9 to confirm.
X Press the 9 or : button to select
Import Contacts and press 9 to
confirm.
X Select Receive Business Card(s) and
press 9 to confirm.
The Bluetooth® connection between
Audio 20 and your active mobile phone is
interrupted. Audio 20 is now ready to
receive vCards from other mobile phones.
X Start data transfer on the external
Bluetooth® phone (see the operating
instructions of the respective mobile
phone).
The data on the vCards is automatically
transferred to the address book. The
number of vCards received is displayed.
X
To end reception: press the 9 button.
or
X
Press the k back button.
Deleting contacts
This function allows you to delete personal
data from the phone book.
X Press the % function button.
The telephone basic menu appears.
X Press the = or ; button to select
Tel and press the 9 button to confirm.
X Press the 9 or : button to select
Delete Contacts and press 9 to
confirm.
A query appears: From Mobile Phone,
Received Business Cards or Delete
All
X
Select the contact data to be deleted and
press the 9 button.
A prompt appears asking whether the data
should be deleted.
X Select Yes or No and press 9 to confirm.
Calling up the phone book
Overview
X
Call up the telephone basic menu
(Y page 27).
X Select Name and press 9 to confirm.
You see the Audio 20 phone book.
Telephone
X
31
Example: Audio 20 phone book with character bar
shown
If a phone book entry has the G symbol next
to it, this indicates that there are several
numbers stored in this entry. You can select
these sub-entries.
The p symbol can be used to change the
character set on the character bar.
Depending on the previous setting, it
switches to letters with special characters or
numbers with special characters.
The f symbol can be used to change the
character bar language.
X To exit the phone book: press the k
button.
Switching from the character bar to the
list
X
Press the 9 button repeatedly until the
character bar disappears.
Switching from the list to the character
bar
X
Press the k button.
Z
Using the phone book
32
Searching for a phone book entry
Telephone
With character bar
Selecting sub-entries
X
Searching
X Switch from the list to the character bar if
necessary.
X To enter characters: select the
characters in sequence for the entry you
are searching for.
Select a phone book entry with the G
symbol from the list and press the 9
button.
The G symbol changes to I and the subentries are displayed.
Deleting
X To delete individual characters: briefly
press the 2 button.
Each time you enter or delete a character,
the closest match will be displayed at the
top of the list.
X To delete an entire entry: press and hold
the 2 button until the entry has been
deleted.
: Expanded phone book entry
Canceling a search
X Switch from the character bar to the list.
The entry at the top of the list is
automatically highlighted.
Displaying details for an entry
i The search switches automatically to the
list if the information entered cannot
unambiguously match an entry.
Selecting an entry directly from the
list
Selecting main entries
X
Switch from the character bar to the list if
necessary.
X Press and hold the 9 or : button
until the desired entry is highlighted.
X To confirm the selection: press ¬ in
the character bar or press 9.
X
Press and hold the 9 or : button
until the desired entry is highlighted.
X To confirm the selection: press ¬ in
the character bar or press 9.
Audio 20 can also show a shortened entry in
full.
X Select an entry and press 9 to confirm.
X Select Options and press 9 to confirm.
X Select Details and press 9 to confirm.
The detailed display appears.
X To exit the detailed view: press the
= or ; button repeatedly until the
entry is highlighted again.
or
X Press the 9, :, 2 or k
button.
Making a call to an entry
To make a call, the mobile phone must be
inserted in the mobile phone bracket or the
Bluetooth® interface must be connected to
Audio 20.
Using call lists
Select an entry.
X Press the 9 button.
or
X Press the 6 button.
A list appears if the entry contains subentries.
X Select the desired sub-entry.
X Press the 9 button again.
or
X Press the 6 button.
Opening the call list and selecting an
entry
X
Press the % function button.
The telephone basic menu appears.
X Press the = or ; button to select
Call Lists and press 9 to confirm.
X Press the 9 or : button to select
Calls Received or Calls Dialed and
press 9 to confirm.
The corresponding list appears.
Deleting an entry from the phone
book
X
To delete: select an entry and press 9 to
confirm.
X Press the = or ; button to select
Options and press 9 to confirm.
X Press the 9 or : button to select
Delete and press 9 to confirm.
A prompt appears asking whether the entry
should be deleted.
X Select Yes or No and press 9 to confirm.
If you select Yes, the entry is deleted from
the Audio 20 phone book.
Using call lists
Introduction
Audio 20 shows the calls received (including
missed calls) during telephone operation and
the previously dialed numbers in two
separate lists.
i The respective menu item can only be
selected if calls have been received or
dialed using Audio 20.
Calling up the missed calls in the
Audio 20 display is not supported for every
type of mobile phone.
i Missed calls that you either could not or
did not want to accept are marked with a
symbol before the name or the number.
X
To select an entry in the list: press the
9 or : button.
X
To make a call to the list entry: press the
6 or 9 button.
Deleting call lists
i The stored call lists are retained even if
you use another mobile phone with
Audio 20. For this reason, you should
delete any call lists before handing over or
selling the vehicle.
X
Press the % function button.
The telephone basic menu appears.
X Press the = or ; button to select
Call Lists and press 9 to confirm.
i A list of previously dialed numbers is
displayed in the multifunction display.
Z
Telephone
X
33
Operating the telephone using the multifunction steering wheel
34
Telephone
X
Press the 9 or : button to select
Delete Call Lists and press 9 to
confirm.
A prompt appears asking whether you wish
to delete all call lists.
X Select Yes or No and press 9 to confirm.
The call lists will either be deleted or not,
depending on your selection.
Operating the telephone using the
multifunction steering wheel
Selecting the telephone number from
the phone book
X
Press the V or U button on the
multifunction steering wheel to select the
Tel menu.
X Press the & or * button on the
multifunction steering wheel to select
Name.
Selecting an entry
X
Telephone menu
Introduction
Basic information about operation with the
multifunction steering wheel can be found in
the "At a glance" section (Y page 16).
You can operate the telephone using the
functions in the Telephone menu if you have
connected it to the hands-free system.
The display in the Telephone menu depends
on the status of the telephone.
X Switch on the telephone and Audio 20.
X Press the V or U button to select the
TEL display.
Accepting a call
For an incoming call:
X
Press the 6 button on the multifunction
steering wheel.
Press and hold the & or * button
until the desired entry is highlighted.
i If you press the & or * button for
longer than a second, the on-board
computer shows the names in the
telephone book in rapid scroll. After four
seconds, rapid scroll accelerates and
shows only the first entry beginning with
each letter. Rapid scroll stops when you
release the button again or when the end
of the list is reached.
Making a call to an entry
X
Select an entry and press 6.
If there are several numbers for this name,
you see a list of sub-entries.
X Press the & or * button on the
multifunction steering wheel to select the
desired number.
X Press the 6 button again.
Redialing
Rejecting or ending a call
X
Press the ~ button on the multifunction
steering wheel.
X
Press the V or U button on the
multifunction steering wheel to select the
Tel menu.
X Press the 6 button on the multifunction
steering wheel to open the list of dialed
numbers in the multifunction display.
X Press and hold the & or * button
until the desired entry is highlighted.
X Press the 6 button again.
35
36
36
38
46
Audio
Audio equipment features .................
Radio mode ..........................................
Audio CD and MP3 mode ....................
Audio operation using the multifunction steering wheel .....................
Radio mode
36
Audio equipment features
Audio
i These Operating Instructions describe all
the standard and optional equipment of
your audio device, as available at the time
of going to print. Country specific
differences are possible.
Please note that your vehicle might not be
equipped with all the functions described
here.
Radio mode
= Frequency and station preset of the
station set
? Display/selection window with frequency
display
Switching wavebands
You can switch the radio between the FM,
MW, and WB wavebands.
X Press the $ button on the control panel
repeatedly until the desired waveband
appears in the display.
Introduction
i Information about the Audio 20 controls
and basic operation can be found in the "At
a glance" section (Y page 10) and
(Y page 13).
Switching to radio mode
X
Press the $ function button.
The radio display appears. You will hear the
last station played on the last waveband
selected.
By pressing the function button repeatedly,
you can switch between different wavebands
in this order: FM (VHF), MW, WB (Weather
Band). Pressing the button again takes you
back to FM radio mode.
Example: radio display
: Status bar with station information and
mobile telephone operational readiness
symbol
; Station name or other information about
the station set
Selecting a station
Notes
Stations may be selected in the following
ways:
Rvia
the search function
the station presets (not WB)
Rvia the station list (only WB)
Rvia manual frequency entry (not WB)
Rvia
Selecting a station from the station list
The station list is available in the FM
waveband. It contains all the stations that can
currently be received, and is sorted
alphabetically. For stations without a
program service, the list shows the frequency
instead of the name.
X Press the = or ; button to select
Radio in the radio basic menu and press
9 to confirm.
X Press the 9 or : button to select
Station List and press 9 to confirm.
The station list appears.
X
To select a station: press the : or
9 button.
X To set a station: press the 9 button.
Radio mode
X
Press the E or F button.
or
X
Press the = or ; button.
Station search scans up or down and stops
at the next station found.
Selecting a station via the station
presets
X
Press the = or ; button to select
Presets in the radio basic menu and press
9 to confirm.
The station preset display appears. The
# dot in front of a preset position
indicates that the currently selected
station is stored there.
X To scroll in the list: press the : or
9 button.
X
To select a station: press the 9 button.
or
X
Once stations have been stored in the
station presets, press a number button,
e.g. 4, on the control panel.
Selecting stations by entering the
frequency manually
X
Press the = or ; button to select
Radio in the radio basic menu and press
9 to confirm.
X Press the 9 or : button to select
Enter Frequency and press 9 to
confirm.
An entry menu appears.
or
X Press the l button on the control panel.
X To enter a frequency: press the number
buttons on the control panel.
Audio 20 sets the frequency entered.
i You can only select currently permitted
frequencies.
i If you enter a frequency which is outside
the frequency range, Audio 20 selects the
next available frequency.
Waveband
Frequency
FM (VHF)
87.7......107.9 MHz
MW (medium wave)
530.......1710 kHz
WB (Weather Band)
Weather report
channels
Storing stations
Notes
Ten stations can be stored for each
waveband.
Storing stations manually
Storing directly using the number keypad
X Press and hold a number button, e.g. 4, in
the radio display until you hear a tone.
The currently set station is stored in the
selected preset position 4.
By calling up the station preset list
X Press the = or ; button to select
Presets in the radio basic menu and press
9 to confirm.
or
X Press the 9 button when the display/
selection window is selected.
In both cases, the station presets appear.
The # dot in front of a preset position
indicates that the currently selected
station is stored there.
Audio
Setting a station using the station
search function
37
Audio CD and MP3 mode
38
X
Audio
To select a preset position: press the
9 or : button.
X To store the station in the selected
preset position: press and hold the 9
button until you hear a tone.
or
X Press and hold a number button, e.g. 4, in
the radio display until you hear a tone.
The station is stored.
Storing stations automatically
This function automatically stores receivable
stations in order of their reception quality.
Any stations stored manually in the preset
memory will be lost.
X Press the = or ; button to select
Presets in the radio basic menu and press
9 to confirm.
X Press the 9 button to select
Autostore and press 9 to confirm.
i If the process is interrupted by a traffic
announcement, you must repeat it.
X
To cancel the storing process: select
Cancel and press 9 to confirm.
Audio CD and MP3 mode
Important safety notes
G WARNING
The CD drive is a class 1 laser product. There
is a risk of damage to the eyes due to
exposure to invisible laser radiation if you
open the casing, or if the casing is faulty or
damaged.
You must not open the casing. The unit
contains no parts on which you can carry out
maintenance. For safety reasons, all
maintenance work must be carried out by
qualified aftersales technicians.
Notes on handling compact discs
ROnly
hold discs by the edge.
discs carefully to prevent playback
problems.
RAvoid getting scratches, fingerprints and
dust on discs.
RClean discs from time to time with a
commercially available cleaning cloth.
When cleaning CDs, you should wipe in
straight lines from the center outwards
rather than in a circular motion.
RWhen labeling discs, only use a pen
designed for that purpose.
RPlace discs back in their cases after use.
RProtect discs from heat and direct sunlight.
RHandle
Inserting a disc
Notes
G WARNING
Insert discs only when the vehicle is
stationary. There is a risk of being distracted
from the road and traffic conditions if you
insert or eject a disc while the vehicle is in
motion.
i If the disc has a printed side, this must
face upwards when the disc is inserted.
If neither side is printed, the side to be
played should face downwards. The system
may not be able to play discs with copy
protection.
Inserting discs into the CD changer
Overview
The CD changer has an integrated magazine
with six trays.
: Eject/load button (all magazine trays)
; Disc slot
Filling a single magazine tray
X Press the V eject button.
A menu shows the current load status of
the magazine trays. The last tray selected
is identified by a red digit.
X
Insert a disc into the slot with the printed
side facing upwards.
The CD changer draws the disc in and loads
it into the selected magazine tray. The
Loading Disc <x>... message appears.
i It may take some time for the disc to be
loaded, depending on the type of disc. If
you do not insert a disc, the display will
return to the magazine menu after
approximately 20 seconds.
The CD changer plays the first disc you loaded
if it has been inserted correctly and it is a
permissible type.
Magazine menu
X
To select a magazine: press the =
or ; button.
X To start loading: press the 9 button.
or
X Press a number key (1 – 6).
The CD changer switches to the selected
magazine tray. You see the Please
Wait... message.
When the magazine tray is ready, you see
the Please Insert Disc <x> message.
: Magazine tray contains a disc; eject
i Only insert a CD when Audio 20 prompts
or
you to do so. Only insert one CD per
magazine tray.
function is available
; Magazine tray is empty; loading function
is available
X
X
To exit the menu: press the V load
button again.
Press the k button.
Z
39
Audio
Audio CD and MP3 mode
Audio CD and MP3 mode
40
Audio
Loading empty magazine trays
X Press the V load button.
The magazine menu appears. The last tray
selected is identified by a red digit.
X In the menu bar, select Fill Empty
Slots using the = or ; button and
press the 9 button to confirm.
You see the message: Please Insert
Disc <x>
Ejecting discs from the CD changer
Note
i If you eject one disc while playing another
disc, the CD changer interrupts playback.
Playback continues once the disc has been
ejected.
Ejecting a disc
i Only insert a CD when Audio 20 prompts
you to do so. Only insert one CD per
magazine tray.
X
Insert a disc into the slot with the printed
side facing upwards.
You see the Please Wait... message. If
the disc has been loaded, the CD changer
switches to the next empty magazine tray.
You see the message: Please Insert
Disc <x>
X Repeat this step until all trays are loaded.
The CD changer plays the last disc you
loaded if it has been inserted correctly and
it is a permissible type. If the loading
process is not completed, Audio 20 plays
the data carrier that was loaded first.
X
: Eject/load button (all magazine trays)
; Disc slot
X
Press the V eject button.
The magazine menu appears. The magazine
tray with the current disc is highlighted.
To complete loading: press the V load
button again.
or
X
Press the k button.
: Magazine tray contains a disc; eject
function is available
Ejecting a disc
Important safety note
G WARNING
Only eject a disc when the vehicle is
stationary. Otherwise, you may be distracted
from the traffic conditions and could cause an
accident.
; Magazine tray is empty; loading function
is available
X
To select a magazine tray containing a
disc: press the = or ; button and
confirm by pressing the 9 button.
or
X
Press the number of a loaded magazine tray
on the number keypad.
You see the Ejecting Disc <x>...
message.
Afterwards, you will see the following
message:
Audio CD and MP3 mode
41
X
Take the disc out of the slot.
If you do not take the disc out of the slot,
Audio 20 will draw it in again automatically
after a short while.
Ejecting all discs
X Press the V eject button.
The magazine menu appears.
X Select Eject All.
The CD changer ejects the last disc
selected. You see the Ejecting Disc
<x>... message.
X Remove the disc from the slot when this
message appears.
The CD changer switches to the next
loaded magazine tray and ejects the disc.
: Media type
; Magazine tray number (CD changer only)
= Track number
? Track name (only if stored on the disc as
CD text)
A Track time
B Graphic time and track display
C Sound settings
D Magazine tray selection (CD changer only)
E Current playback option (no display when
playing in "normal track order")
F Disc name (only if stored on the disc as
CD text)
G To call up the track list
H Playback options
Switching to audio CD or MP3 mode
Notes
X
Example display: MP3 mode
Insert a CD (Y page 38).
Audio 20 loads the inserted medium and
playback starts.
or
X
Press the h function button.
i The function button takes you directly to
the previously set disc mode (audio CD or
MP3 CD).
: Media type
; Magazine tray number (CD changer only)
= Track number
? Track name (only if stored on the disc)
A Track time
B Graphic time and track display
C Sound settings
D Magazine tray selection (CD changer only)
Z
Audio
Example display: audio CD mode
Audio CD and MP3 mode
42
or ; button and press the 9 button to
confirm.
E Current playback option (no display when
playing in "normal track order")
F Current folder
or
G To call up the folder list
X
H Playback options
Audio
Pause function
In audio CD/MP3 mode
In audio CD mode only: press the 9
button when the display/selection window
is active.
The magazine tray selection list appears.
The # dot indicates the current medium
being played.
X
To pause playback: briefly press the
8 button.
The x symbol appears at the top left in
the status bar.
X To continue playback: briefly press the
8 button again or turn the volume
control briefly.
The x symbol disappears.
Selecting an audio CD or MP3 disc
Selecting a medium via the selection
list
X
In audio CD and MP3 mode with Media
Interface: select Media using the =
or ; button and press the 9 button to
confirm.
or
X
In audio CD mode only: press the 9
button when the display/selection window
is active.
The media list appears. The # dot
indicates the current medium being played.
Vehicles with CD changer:
X
In audio CD and MP3 mode with a CD
changer: select Changer using the =
Example: media list
The media list shows you the currently
available discs:
Rin
the CD changer (magazine trays 1 to 6)
or in the single CD drive (the following discs
are readable: audio CD and MP3 CD)
Rin a device that is connected to the Media
Interface
The magazine tray selection list shows you
the currently available discs in the CD
changer (magazine trays 1 to 6).
The following media are supported:
Raudio
RMP3
CD
CD
i If a disc is unreadable, the following
appears next to the magazine tray number:
Disc Unreadable.
X
Select a disc: press the 9 or :
button.
X Press the 9 button.
Audio CD and MP3 mode
X
In audio CD and MP3 mode only: briefly
press number key 0-7 when the display/
selection window is active.
(0 = Media Interface, 1 – 6 = CD changer,
7 = AUX)
X
Only in audio CD and MP3 mode with
CD changer: briefly press number key 1-6
when the display/selection window is
active.
The disc in the corresponding magazine
tray is selected.
X
Press the 9 button when the display/
selection window is active.
The track list appears. The # dot indicates
the current track.
X To select a track: press the 9
or : button.
X Press the 9 button.
i In MP3 mode, the list shows all the tracks
in alphabetical order.
Audio
Selecting a disc via the number keypad
Selecting a track using the number
keypad
X
Selecting a track
Selecting by skipping to a track
X
To skip forwards or backwards to a
track: press the ; or = button.
or
X
Press the F or E button.
i The skip forward function skips to the
next track. The skip back function skips to
the beginning of the current track if the
track has been playing for more than eight
seconds. If the track has been playing for
less than eight seconds, it skips to the start
of the previous track.
If you have selected the Random Tracks or
Random Folder playback options, the
track order is random.
Press the l button on the number
keypad.
A numerical entry field appears. The
number of positions offered corresponds to
the number of tracks on the CD. Only
numbers that correspond to a track
number on the CD can be entered.
X Enter the desired track number.
i Pressing and holding a number button for
two seconds or more completes entry and
the corresponding track is played. This
makes the next step (pressing the 9
button) unnecessary.
X
In audio CD mode: select Tracks using
the = or ; button and press the
9 button to confirm.
X In the MP3 mode: select Folder and
press the 9 button to confirm.
or
To complete entry: press the 9 button.
The track is played.
Fast forward/rewind
X
Selecting by track list
X
43
When the display/selection window is
active: press and hold the = or ;
button until the desired position is reached.
or
X
Press and hold the E or F button
until the desired position is reached.
Selecting a folder
i This function is only available in MP3
mode.
Z
Audio CD and MP3 mode
44
X
Audio
Switch to MP3 mode (Y page 41).
X Select Folder in the menu bar using the
= or ; button and press the 9
button to confirm.
or
X Press the 9 button when the display/
selection window is active.
The folder list appears.
: Current folder name
; Symbol for next folder up
= Current track
? Track symbol
X
To switch to the next folder up: select
the U symbol.
X Press the 9 button.
The display changes to the next folder up.
Playback options
The following options are available:
RNormal
Track Sequence
The tracks are played in the normal order
(e.g. track 1, 2, 3, etc.).
RRandom Tracks
You hear all the tracks on the CD in a
random order (e.g. track 3, 8, 5, etc.).
RRandom Folders (only in MP3 mode)
The tracks in the currently active folder are
played in random order.
X To select options: switch to audio CD or
MP3 mode (Y page 41).
X In the menu bar, select CD or MP3 using the
= or ; button and press the 9
button to confirm.
The options list appears. The # dot
indicates the option selected.
X Select an option and press 9 to confirm.
The option is switched on. For all options
except Normal Track Sequence, you will
see a corresponding display in the display/
selection window.
i The Normal Track Sequence option is
automatically selected if you change the
disc you are currently listening to or if you
select a different medium. If an option is
selected, it remains selected after
Audio 20 is switched on or off.
: Current folder
; Folder symbol
X
To select a folder: select the desired
folder.
X Press the 9 button.
The folder is opened. The folder name and
the tracks it contains are shown.
X To select a track: press the 9
or : button.
X Press the 9 button.
The track is played.
Notes on MP3 mode
Permissible discs
RCD-R
and CD-RW
Permissible file systems
RISO
9660/Joliet standard for CDs
Multisession CDs
For multisession CDs, the content of the first
session determines how Audio 20 will
process the CD.
Audio CD and MP3 mode
If the first session contains data in audio CD
format and the second session contains MP3
tracks, Audio 20 will treat the CD as a
conventional audio CD. This means that it is
not possible to access the MP3 tracks.
If the first session contains MP3 tracks, for
example, and the second session contains
data in audio CD format, Audio 20 will not
treat the disc as a conventional audio CD. This
means that it is only possible to access the
MP3 tracks.
Audio 20 does not recognize MP3 tracks if:
File structure of a data carrier
Rfixed
When you create an MP3 disc, the MP3 tracks
can be organized in folders. A folder can also
contain subfolders. A disc can contain a
maximum of 255 folders. Each folder can
contain a maximum of 255 tracks and 255
subfolders. A disc can contain a maximum of
500 tracks. An MP3 CD may contain no more
than eight directory levels. Files in
subsequent levels are ignored.
Track and file names
When you create an MP3 disc, you can assign
names to the MP3 tracks and folders.
Audio 20 uses these names for the display in
MP3 mode. Audio 20 does not display files
that are not supported.
If MP3 files are stored in the root directory
itself, the root directory will also be treated
as a folder. Audio 20 will show the name of
the root directory as the folder name.
You must observe the following when
assigning track names:
Rtrack
names must have at least one
character.
Rtrack names must have the extension
"mp3" or "wma".
Rthere must be a full stop between the track
name and the extension.
Example of a correct track name:
Track1.mp3
45
Rthere
is not a full stop between the track
name and the extension.
Rthe extension is missing.
i Audio 20 does not support ID3 tags.
MP3 (MPEG1 Audio Layer 3)
Audio 20 supports the following types of MP3
files:
and variable bit rates from 32 kbit/s
to 320 kbit/s
Rsampling rates of 24 kHz to 48 kHz
WMA (Windows Media Audio)
Audio 20 supports the following types of
audio files:
Rfixed
bit rates of 8 kbit/s up to
384 kbit/s
Rsampling rates of 8 kHz to 48 kHz
Audio 20 does not support the following types
of WMA files:
RDRM
(Digital Rights Management)
encrypted files
RWMA Pro
R5.1 Surround
Notes on copyright
MP3 tracks that you create or play back are
generally subject to copyright protection in
accordance with the applicable international
and national regulations.
In many countries, reproductions, even for
private use, are not permitted without the
prior consent of the copyright holder.
Make sure that you know about the applicable
copyright regulations and that you comply
with these.
If you own these rights yourself, e.g. for your
own compositions and recordings, or if the
copyright holder has granted you permission,
these restrictions do not apply.
Z
Audio
Permissible formats
Audio operation using the multifunction steering wheel
46
Notes on compact discs
X
i Discs with copy protection are not
Audio
compatible with the audio CD standard.
Consequently, it may not be possible to
play them on the Audio 20 system.
You may encounter playback problems
when playing copied discs. There is a wide
range of data carriers, disc-writing
software and writers available. This variety
means that there is no guarantee that the
system will be able to play discs that you
have copied yourself.
There may be playback problems if you play
CDs that you have copied yourself with a
storage capacity of more than 700 MB. CDs
of this type do not conform to the currently
applicable standards.
or
X
! Do not affix stickers or labels to the discs.
They could peel off and damage the drive.
The drive is designed to hold discs which
comply with the EN 60908 standard. For
this reason, you can only use discs with a
maximum thickness of 1.3 mm.
If you insert thicker discs, e.g. those that
contain data on both sides (DVD on one
side and audio data on the other), they
cannot be ejected and can damage the
drive.
Do not use discs with a diameter of 8 cm,
even with an adapter. Only use round discs
with a diameter of 12 cm.
Audio operation using the
multifunction steering wheel
Selecting a radio station
X
X
Switch Audio 20 to radio mode.
Select the radio display using the V or
U button on the multifunction steering
wheel.
Press the & or * button briefly on
the multifunction steering wheel.
You will hear the previous or next station in
the station presets.
Press and hold the & or * button on
the multifunction steering wheel for longer
than three seconds.
FM/WB: the station/weather channel is
selected from the alphabetically sorted
station list:
Rthe & button: the selection moves up
within the station list. The needle in the
Audio 20 radio display jumps to the left
at the same time.
Rthe * button: the selection moves
down within the station list. The needle
in the Audio 20 radio display jumps to the
right at the same time.
AM: station search scans up or down and
stops at the next station found.
: Station name (if transmitted) or frequency
; Waveband with memory position number
(if transmitted)
Selecting a track
X
Switch Audio 20 to audio CD or MP3 mode.
Use the V or U button on the
multifunction steering wheel to select the
DISC display.
X Press the & or * button on the
multifunction steering wheel.
You will hear the previous or next track. The
skip back function skips to the beginning of
the current track if the track has been
playing for more than eight seconds. If the
track has been playing for less than eight
X
Audio operation using the multifunction steering wheel
47
Audio
seconds, it skips to the start of the previous
track.
X To fast forward/rewind: press and hold
the & or * button on the
multifunction steering wheel until the
desired position has been reached.
Example display: audio CD mode
: Current disc
; Current track
Z
48
Publication details
Internet
Further information about Mercedes-Benz
vehicles can be found online at:
www.mercedes-benz.com
Editorial office
Questions or suggestions concerning this
Operator's Manual may be directed to the
technical documentation team at the address
given on the inside of the front cover.
© Mercedes-Benz USA, LLC
© Mercedes-Benz Canada, Inc.
Mercedes-Benz USA, LLC and MercedesBenz Canada Inc. are Daimler companies.
Not to be reprinted, translated or otherwise
reproduced, in whole or in part, without
written permission.
Printed in the USA.
As at 25.03.2011
É00658438811ËÍ
0065843881
Order no. 6462 2667 76 Part no. 006 584 38 81 Edition C MY 2012 MB