1
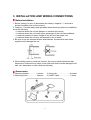
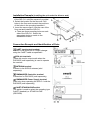
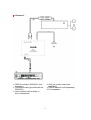
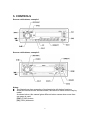
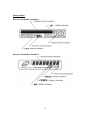
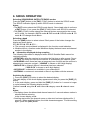
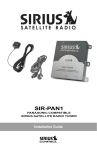
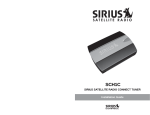
SIRIUS Satellite Radio
User Manual
Thank you for purchasing this product.
Please read this user’s manual in its entirety before operating this equipment.
After reading this manual, be sure to keep it in a handy place (e.g., glove compartment).
Check the contents of the enclosed warranty card and keep it carefully with this manual.
Contents
1. FEATURES ................................................................................................................... 1
2. PRECAUTIONS ........................................................................................................... 2
3. INSTALLATION AND WIRING CONNECTIONS ................................................. 4
4. SYSTEM EXAMPLES................................................................................................. 7
5. CONTROLS .................................................................................................................. 9
6. SIRIUS OPERATION .................................................................................................11
7. SPECIFICATIONS..................................................................................................... 15
1. FEATURES
CeNET Connection
RCA Output
Switching for Headunit or Commander operation
Connection of DSC920S (Exclusive Commander) for operation when
using with other line level input devices
Single Antenna Terminal
18 Channel presets when used with CeNet devices
CD-Changer pass-through function
1
2. PRECAUTIONS
1.
2.
3.
4.
5.
6.
7.
Upon initial startup or when starting
after turning off the backup power
supply, the receiver will take longer to
play audio and may take up to 30
seconds after reception of the SIRIUS
signal before audio is heard.
Channel names are stored in memory
30 to 60 seconds after start of normal
operation. If the power is turned off
before the text data is written, it may
not be correctly displayed on the next
power up. Perform a reset operation if
no text data is displayed.
If the receiver ever stops functioning or
appears unresponsive, reset it.
Resetting: Disconnect the SIRIUS
Receiver power cable (the CeNET
cable if connected to the CeNET and
the 4-pin power cable during
standalone operation), wait 10
seconds and connect it again. The last
channel, preset memory and other
data stored in the receiver are deleted
returning it to its default settings.
A CeNET and standalone operation
switch is provided on the underside of
the receiver. The switch is set to
CeNET position at the time of
shipment. Do not set this switch to the
standalone position when using the
CeNET cable (headunit operation).
The receiver becomes warm during
operation; this is normal and not a
cause for concern.
Do not touch the connector pins on the
receiver as this may damage the ICs
inside the unit.
No station is selected when the [adj] or
[disp] button is pressed quickly after a
channel is changed. This is because
button operations are not accepted
until the channel is confirmed. It takes
between 1.5 to 5 seconds to change
channels.
This equipment has been tested to comply
with the limits for a Class B digital device,
pursuant to Part 15 of the FCC Rules.
These limits are designed to provide
reasonable protection against harmful
interference in a residential installation.
This equipment generates, uses, and can
radiate radio frequency energy and, if not
installed and used in accordance with the
instructions, may cause harmful
interference to radio communications.
However, there is no guarantee that
interference will not occur in a particular
installation.
If this equipment does cause harmful
interference to radio or television reception,
which can be determined by turning the
equipment off and on, the user is
encouraged to consult the dealer or an
experienced radio/TV technician for help.
CAUTION
USE OF CONTROLS, ADJUSTMENTS, OR
PERFORMANCE OF PROCEDURES OTHER
THAN THOSE SPECIFIED HEREIN, MAY
RESULT IN HAZARDOUS RADIATION
EXPOSURE.
THE COMPACT DISC PLAYER or
COMMANDER SHOULD NOT BE
ADJUSTED OR REPAIRED BY ANYONE
EXCEPT PROPERLY QUALIFIED SERVICE
TECHNICIANS.
CHANGES OR MODIFICATIONS NOT
EXPRESSLY APPROVED BY THE
MANUFACTURER FOR COMPLIANCE
COULD VOID THE USER’S AUTHORITY TO
OPERATE THE EQUIPMENT.
INFORMATION FOR USERS:
CHANGES OR MODIFICATIONS TO THIS
PRODUCT NOT APPROVED BY THE
MANUFACTURER WILL VOID THE
WARRANTY AND WILL VIOLATE FCC
APPROVAL.
2
SIRIUS employs S>PLEX technology
(statistical multiplexing), which
optimizes the fidelity on each channel
to give you superior digital sound. So
rock really soars, jazz really jams and
country really sings.
What is SIRIUS Satellite
Radio?
Over 100 streams of the best in-car
entertainment and completely
commercial-free music
Only SIRIUS has 60 original music
streams, from today’s hits to R&B
oldies to classical masterpieces. From
authentic country and real bluegrass to
cool jazz, hot latin, reggae, rock, and
many more. Best of all, it’s all
commercial free, a Sirius exclusive.
Sirius also has over 40 streams of
world-class sports, news and
entertainment, like ESPN, NHL, NBA,
MLB, CNBC, Fox News, Radio Disney
and E! Entertainment Radio.
Once you experience over 100
streams of digital entertainment, you’ll
never want to leave your car. For more
information, visit www.sirius.com.
To receive SIRIUS Satellite Radio on
this receiver
This receiver contains a SIRIUS ID for
user identification. All you have to do to
become a subscriber and enable
reception of SIRIUS Satellite Radio is
to call the SIRIUS Call Center at
(888-539-SIRI) and provide the
SIRIUS ID and a few other details.
With SIRIUS, the emphasis is on the
music and entertainment you want.
The music is hosted by Sirius Stream
Jockeys, who are true experts. They
back up the music with compelling
information about the song being
played, and they understand that
sometimes it’s best to just let the music
speak for itself.
Verifying your SIRIUS ID
1. Press and hold the [ADJ] button
for 1 second or longer to enter the
Adjust mode.
Note:
The [ADJ] button is described in the
source unit instruction manual either as
the [T] (TITLE) button or [A-M] button.
This refers to the function of the button
labeled “ADJ” on the source unit panel.
Rely on SIRIUS rocket science for
superior coverage
Only SIRIUS has three powerful
satellites that fly directly over the US
ensuring coast-to-coast coverage with
high elevation angles. This gives the
satellites a “clear line of sight” to your
car or home with much less concern for
buildings, trees or other objects that
might block conventional satellite
signals.
2.
3.
4.
Count on S>PLEX technology for
superior sound resolution
3
or
to select the
Press the
“ESN DISP” (SIRIUS ID).
Press the
button to display
the SIRIUS ID.
The source unit displays the first 6
digits of the 12 digit SIRIUS ID in
the display.
Turn the [ROTARY] knob
clockwise to change to the last 6
digits of the SIRIUS ID.
3. INSTALLATION AND WIRING CONNECTIONS
Before Installation
1. Before starting, be sure to disconnect the battery’s negative “–” terminal to
prevent accidents due to short-circuits.
2. Location – Consider safety and operability when selecting a place for installation.
Avoid the following.
• Locations where the unit will hamper or interfere with driving.
• Locations where the unit could injure passengers if the car stops suddenly.
• Locations exposed to direct sunlight or hot air from the heater, etc.
• Locations where the unit may be exposed to rain or water.
3. Be sure to use the included screws and brackets. Screws other than those
supplied could damage the unit.
4. When drilling holes to mount the receiver, be sure to check beforehand that
there are no obstructions or items on the other side that could be damaged (fuel
tank, wire harnesses or other electronic devices).
Accessories
Mounting bracket .............. 2 pieces
Mounting screw ................. 4 pieces
Canoe clip ......................... 4 pieces
CeNET cable ..................... 1 piece
4
Installation Example (Installing the unit under the driver’s seat)
1. Attach the mounting brackets to the sides
of the SIR-CL1 using the screws provided.
2. Select the location on the floor mat. Drill
holes in the floor mat to match the positions
of the holes in the mounting brackets .
3. Insert the canoe clips from the rear of the
floor mat and install the SIR-CL1.
There are three mounting holes on each
side of the SIR-CL1. Select the
appropriate holes to match to the
installation location.
Connection Example and Identification of Parts
CeNET input/output terminal
Connect to the main unit or CD/MD changer
using the CeNET cable as specified .
RCA pin terminals
These are used to output audio when the
DSC920S (sold separately) is used to operate
the receiver.
ANTENNA terminal
Connect to the SIRIUS antenna (sold
separately)
COMMANDER Controller terminal
Connection for DSC920S (sold separately)
COMMANDER Power Supply terminal
Used only when operating the SIR-CL1 with the
DSC920S (sold separately)
CeNET/STANDALONE switch
This switch is used to select the operating type:
CeNET (headunit) or STAND ALONE
(DSC920S)
5
How to Connect
1. CeNET Cable
Orient the CeNET cable in the direction
shown in the figure and insert it until it is
locked in position. To remove the
CeNET cable, pull it by lightly grasping
in your fingers.
the slide cap
2. SIRIUS antenna
Make sure power is “Off”.
Connect a SIRIUS antenna (sold
separately) to the SIRIUS antenna
terminal and press until locking tab
engages.
To disconnect, make sure power is “Off”,
then press the rear of the locking tab
to release.
6
4. SYSTEM EXAMPLES
Example 1
Main unit compatible with CeNET
connection
CD changer compatible with CeNET
connection
CeNET cable (provided with the
SIR-CL1)
Using this cable, connect the
SIR-CL1 to the main unit.
CeNET cable (provided with the CD
changer)
SIRIUS antenna (sold separately)
Front speakers
Rear speakers
7
Example 2
SIRIUS controller (DSC920S, sold
separately)
Connection cable (provided with the
DSC920S)
Audio systems with auxiliary or
line-in connections
RCA pin (audio) cable (sold
separately)
SIRIUS antenna (sold separately)
Front speakers
8
5. CONTROLS
Source unit buttons, example 1
Source unit buttons, example 2
Notes:
The illustrations show examples of two headunits with button functions.
Since this manual covers several models, the names of some buttons vary by
model.
As shown below, this manual gives different button names when more than
one name is used.
[FNC] (FUNC) button,
[SC] (SCN) button etc.
9
Display Items
Source unit display, example 1
Source unit display, example 2
10
6. SIRIUS OPERATION
Selecting SIRIUSSIRIUS SATELLITE RADIO modes
Press the [SAT] button or the [FNC] (FUNC) button to select the SIRIUS mode.
The SIRIUS indication lights up when SIRIUS mode is selected.
Notes:
• The [SAT] button selects the SIRIUS mode directly. Some head units do not have
a [SAT] button. If not, press the [FNC] (FUNC) button until SIRIUS is selected.
• The [FNC] (FUNC) button selects the external devices connected to the source
unit in order, for example: AM/FM mode
DAB mode
SIRIUS mode
CD
mode
CD changer mode
etc.
Selecting a band
Press the [BND] button to select a band. Each press of the button changes the
display as shown below.
SR1
SR2
SR3
SR1 …
The currently received band is displayed in the function mode indication.
Models without a function mode indication display the band name and channel
number in the display.
Information displayed during reception
The following information is displayed when SIRIUS Satellite Radio cannot be
received normally.
• UPDATING: when the receiver is turned on the first time or after a reset. Do not
turn power off during this time as the receiver is downloading the channel guide.
• ACQUIRING: when there has been a temporary loss of signal and the receiver is
attempting to reacquire a signal. (“LINKING” is shown on an 8-digit display)
• INVALID CH: a channel without a broadcast has been selected
(“INVLD CH” is shown on an 8-digit display)
• NO SIGN-UP: a channel not available in your subscription
• ANTENNA: no antenna is connected or there is a problem with the antenna
Switching the display
1. Press the [DISP] (D) button to select the desired display.
The main display or the clock display appears each time you press the [DISP] (D)
button.
2. In the main display, press and hold the [DISP] (D) button for 1 second or longer
to cycle between the following display modes:
Channel name song title
artist name
category name
channel name
…
Notes:
• The display shows the abbreviated channel name for 2 seconds when a station is
selected before returning
to the chosen display mode.
• Scrolling starts when the channel name or other text has been displayed for 2
seconds. When scrolling finishes, the initial characters appear. To start scrolling
again, press the [ADJ] button.
11
• The [ADJ] button is described in the source unit instruction manual either as the
[T] (TITLE) button or [A-M] button. This refers to the function of the button labeled
“ADJ” on the source unit panel.
Channel selection
Channels are selected with the following buttons.
or
button (Seek Tuning)
• The
• A [DIRECT] button
• The [SCN] (SC) button
• The [CAT] (RDM) button
For details, see the following operation descriptions.
Notes:
The audio output is muted and other button operations are not accepted during
the channel selection process (tuning).
Seek Tuning
or
button. The receiver seeks the next available channel
1. Press the
below or above the current channel.
2. Press and hold the
or
button for rapid or continuous channel selection.
The receiver moves to seek channels below or above the current channel. If the
channel found when either button is released is available, that channel is received.
Otherwise, seeking continues until an available channel is found.
Recalling a preset station
A total of 18 SIRIUS stations can be stored (6-SR1, 6-SR2 and 6-SR3). This allows
you to select your favorite SIRIUS stations and store them in memory for later
recall.
1. Press the [BND] button and select the desired SIRIUS band (SR1, SR2 or SR3)
to store the channel in.
2. To recall a stored SIRIUS station, press the desired [DIRECT] button to select
that station.
Storing a preset station
1. Press the [BND] button and select the desired SIRIUS band (SR1, SR2 or SR3)
to store the channel in.
2. Select the desired station with seek tuning, manual tuning or preset tuning.
3. Press and hold one of [DIRECT] buttons for 2 seconds or longer to store the
current station into preset memory.
12
Notes:
• When the name of a channel stored in memory is changed by SIRIUS, the display
will show the new channel name immediately. It will not be removed from the
preset channel location.
• A channel stored in memory may be discontinued at the option of SIRIUS. If you
attempt to access this channel from the preset location, the receiver will give you
the “INVALID CH” or “INVLD CH” response. At that time, you may select
another station to store in memory.
Category selection function
SIRIUS allows you to select broadcast channel by category.
Receiving stations selected by category
1. Press the [RDM] (RD) button to enter the category selection mode.
2. Turn the [ROTARY] knob clockwise or counterclockwise to select a category. Or,
press a [DIRECT] button if the category is preset.
or
button to tune in a station from the Category. The “CA”
3. Press
indicator is displayed in the function mode indication during seek tuning. The
CAT indicator lights on models without a function mode indication.
4. Press the [RDM] (RD) button again to cancel.
Notes:
• When the category selection mode is entered, the category of the current or last
received channel is displayed first.
or
button within 7 seconds after a category has been set to
• Press the
continue seeking channels up or down. The category selection mode is
canceled and normal reception is resumed if no operation is performed for 7
seconds.
Presetting a category
A category can be preset by registering specific categories in [DIRECT] buttons 1
to 6. Then the desired category can be recalled by pressing the corresponding
[DIRECT] button.
1. Press the [RDM] (RD) button to enter the category mode.
2. Turn the [ROTARY] knob clockwise or counterclockwise to select a category.
3. Press and hold one [DIRECT] button for 2 seconds or longer to store the current
category in the preset memory.
Notes:
• When the name of a channel stored in memory is changed by SIRIUS, the display
will show the new channel name immediately. It will not be removed from the
preset channel location.
• A channel stored in memory may be discontinued at the option of SIRIUS. If you
attempt to access this channel from the preset location, the receiver will give you
the “INVALID CH” or “INVLD CH” response. At that time, you may select
another station to store in memory.
13
Scan function
There are two scan modes: a category scan mode and a preset scan mode. During
scanning, channels are displayed in abbreviated form and the display mode
cannot be switched.
Category scanning
In a category scan, broadcast channels in the same category as the current
channel are selected about every 10 seconds.
1. Press the [SCN] (SC) button to start a category scan.
or
button to cancel
2. Press the [SCN] (SC) button, a [DIRECT] button, the
a category scan.
Note:
• Category scanning is not available when no category is defined for the current
channel.
Preset scan
A preset scan scans the channels (up to 18 channels) stored in the preset memory
and changes about every 10 seconds.
1. Press and hold the [SCN] (SC) button for 1 second or longer to start a preset
scan.
or
button to cancel
2. Press the [SCN] (SC) button, a [DIRECT] button, the
a preset scan.
14
7. SPECIFICATIONS
Receiving Frequencies
Satellite
Terrestrial
Power
Power supply (Stand-alone
mode only)
Power consumption
Physical Interface
Commander
Antenna
CeNET connector
2322.293/2330.207 MHZ
2326.250 MHZ
4-pin input jack for power and ground
Less than 1A
8-pin connector
K-code FAKRA SMB connector
Two 13-pin jacks for CeNET compatible
Clarion head units or CD Changers
Audio output
1 pair of gold-plated RCA jacks
Mode switch
Stand alone/ CeNET mode selectable
Mechanical dimension (L*W*H) 182(mm)*128(mm)*29(mm)
EMC regulation
Complies with FCC Part 15
Note:
• Specifications and design are subject to change without notice for further improvement.
15