1
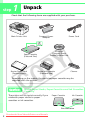
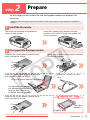
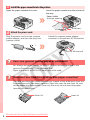
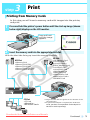
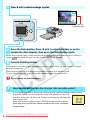
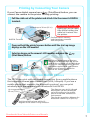
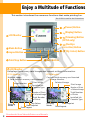
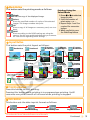
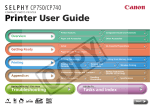
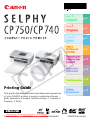
step
1
Unpack
step
2
Prepare
step
3
Print
p. 2
p. 3
p. 5
Enjoy a
Multitude of
Functions
p. 8
Connecting the
Printer to Your
Computer
p. 11
Separately
Sold Items
p. 12
Troubleshooting p. 13
Printing Guide
This guide describes the basic and advanced operations
of your SELPHY printer in easy to understand terms.
Basic operation is simple! Just three steps: 1. Unpack, 2.
Prepare, 3. Print.
Safety
Precautions
p. 15
ENGLISH
Downloaded from ManualsPrinter.com Manuals
CDI-E315-010
XXXXXXX
© 2007 CANON INC.
PRINTED IN JAPAN
step
1
Unpack
Check that the following items are supplied with your purchase.
Main Printer Unit
Compact Power
Adapter
CD-ROM:
Compact Photo
Printer Solution Disk
Paper Cassette
(Postcard Size)
Starter Paper Pack
(Postcard Size)
Power Cord
Starter Ink Cassette
(Postcard Size)
Cleaner
Depending on the region, the card size paper cassette may be
supplied with the printer.
Caution!
Match Paper Stocks, Paper Cassettes and Ink Cassettes
Correctly
The printer will not print correctly if you
mismatch paper stocks to paper
cassettes or ink cassettes.
Paper Cassette
Ink Cassette
Size Indication
2
Downloaded from ManualsPrinter.com Manuals
step
2
Prepare
In this step you will insert the ink and paper cassette to prepare for
printing.
Although these illustrations show the SELPHY CP750, the procedures apply equally to the SELPHY
CP740.
1
Install the ink cassette.
Open the ink cassette compartment
cover on the printer.
2
Insert the starter ink cassette into the
printer until it clicks firmly into place and
close the cover.
Place paper into the paper cassette.
Slide the lid of the paper cassette back
until it comes to a stop.
While firmly holding the paper cassette,
lift the lid upward.
Insert the paper into the paper cassette
with the shiny side facing up.
Align the paper beneath the tabs.
Close the lid until it clicks
shut.
For postcard size paper,
the address portion on the
bottom face should be
oriented toward the tabs.
Slide the lid of the paper cassette back
until it comes to a stop.
Correct Position
The lid is
slanted.
Slightly open
Downloaded from ManualsPrinter.com Manuals
Continued
3
3
Install the paper cassette into the printer.
Open the paper cassette slot cover.
Insert the paper cassette into the printer all
the way.
Paper visible
through opening
Hold here.
4
Attach the power cord.
Plug the power cord into the compact
power adapter, and then the plug into
a power outlet.
Attach the compact power adapter
connector to the printer’s DC IN terminal.
DC IN terminal
Can I use general printer paper or postcards?
No. Always use paper specific to SELPHY CP series printers included in the
genuine Canon brand “Color Ink/Paper Sets”.
Paper sets specific to SELPHY ES series cannot be used.
How can I use Card Size or Wide Size paper cassettes?
Card Size and Wide Size paper cassettes are shaped a little differently from the
Postcard Size and L Size paper cassettes. Open the outer lid and inner lid, and
set the paper into the cassette. Close only the inner lid and insert the paper
cassette into the printer.
Outer lid
4
Downloaded from ManualsPrinter.com Manuals
Inner lid
step
3
Print
Printing from Memory Cards
In this step you will insert a memory card with images into the printer,
and print.
1
Press and hold the printer’s power button until the start-up image (shown
below right) displays on the LCD monitor.
Press and hold
until the image
appears.
2
Insert the memory card into the appropriate card slot.
With the label side facing up insert the memory card fully.
SD Slot
• SD Memory Card
• miniSD Card*1
• microSD Card*2
• SDHC Memory Card
• miniSDHC Card*1
• microSDHC Card*2
• MultiMediaCard
• MMCplus Card
• MMCmobile Card
• MMCmicro Card*2
• RS-MMC Card
MS Slot
• Memory Stick
• Memory Stick PRO
• Memory Stick Duo
• Memory Stick PRO Duo
• Memory Stick Micro*2
CF Slot
• CF Card
• Microdrive
• xD-Picture Card*2
*1 Align the card with the guides on the bottom of the
slot and insert.
*2 A specialized adapter is required (For xD-Picture
Cards, purchase a CompactFlash card Adapter for
xD-Picture Cards separately.)
Downloaded from ManualsPrinter.com Manuals
Continued
5
3
Press W or X to select an image to print.
XXXXXXX
Installed Ink
Cassette Type
4
Press the Date button. Press W or X to select whether or not to
include the date imprint, then press the Date button again.
When the bottom right of the monitor shows
, the date does not print. When it
shows
, the date will print in the [month/day/year] format.
5
Press the Print/Stop button.
Printing will start. The paper will pass in and out four times. Do not touch the paper
during this process.
After confirming that the image has printed, remove the memory card.
To turn the printer off, press the power button again for a moment.
Do not print on printed paper.
How many prints can the starter ink cassette print?
It can make five prints, the same number as the supplied starter paper sheets.
A symbol similar to the one at the right will appear on the LCD
monitor when the ink runs out. Please exchange the ink cassette
with a new one.
Note that unlike inkjet printers, SELPHY series printers cannot
print any more prints than those noted on the color ink/paper
set packages.
6
Downloaded from ManualsPrinter.com Manuals
Printing by Connecting Your Camera
If your Canon digital camera has a
(Print/Share) button, you can
connect the camera to the printer for easy printing.
1
Pull the cable out of the printer and attach it to the camera’s DIGITAL
terminal.
Extends up to 30 cm (12 in.)
Retracting the Cable
Lightly pull on the cable,
then while holding the
cable let it retract into
the printer.
Confirm that all memory
cards have been removed
from the printer.
DIGITAL Terminal
2
Press and hold the printer’s power button until the start-up image
displays on the LCD monitor.
3
Select an image on the camera’s LCD monitor and press the
(Print/Share) button.
Non-Canon brand cameras that are
compliant with PictBridge can also be
used. If the connector on the cable does
not fit your camera’s terminal, use the
USB cable supplied with your camera.
Refer to your camera’s operation
manual for further details.
Printing from Mobile Phones
The CP750 can print without a cable connection from a mobile phone
that supports infrared data transmission (IrDA, IrSimple). If you use a
mobile phone that supports the Bluetooth protocol, you can print
wirelessly with the separately sold Bluetooth Unit BU-20.
Up to approximately
20 cm (7.9 in.)
The distance over which infrared
data signals can be transmitted
varies according to the mobile
phone model and transmission
environment.
The signal transmission distance for
Bluetooth is about 10 m (32.8 ft.).
Hold the mobile phone within 10
degrees of the sensor in any direction.
Downloaded from ManualsPrinter.com Manuals
7
Enjoy a Multitude of Functions
This section introduces the numerous functions that make printing fun.
The CP750 is used for the illustrations.
c LCD Monitor
d Mode Button
e Layout Button
l
(Power) Button
k
(Display) Button
j
(Trimming) Button
(CP750 only)
i
(Red-Eye
Correction) Button
h
f Print/Stop Button
(My Colors) Button
g Date Button
c LCD Monitor
It displays the memory card images and current settings information.
CP740 Monitor
CP750 Monitor
Selected Image
Card slot with memory card inserted
Print Image
Image Number
Installed Ink
Cassette Type
Printing
Mode
8
Card slot with memory card inserted
Image Number
Selected Image
Print Image
Number of Prints
of Selected Image
Number of Prints
of Selected Image
Total Number
of Prints
Total Number
of Prints
Installed Ink
Cassette Type
My Colors
Date Imprint
Print Layout
Printing
Mode
Downloaded from ManualsPrinter.com Manuals
Date Imprint
Print Layout
d Mode Button
This button sets the printing mode as follows:
Printing Using the
Select Mode
1. Press W or X to select an
Single
Prints one copy of the displayed image.
image to print.
Select
2. Select the number of
Prints the specified number of copies of the selected
prints using + or -.
images. The image numbers also print.
3. Repeat Steps 1 and 2 as
All
required for successive
Prints a copy of all images on a memory card, one to a
images.
sheet.
4.
When
you finish, press
DPOF
the Print/Stop button.
Prints according to the DPOF settings set using the
camera. See the user guide included with your camera
for instructions regarding DPOF settings.
e Layout Button
This button sets the print layout as follows:
Borderless
Bordered
Index
The image number
also prints.
xxxxxx
xxxxxx
xxxxxx
xxxxxx
xxxxxx
xxxxxx
xxxxxx
xxxxxx
2 Images
Borderless
8 Images
Bordered
2 Images
Bordered
8 Images
Borderless
4 Images
Borderless
4 Images
Bordered
When using card sized paper, 8 Images Bordered cannot be selected, and image
numbers do not print for the Index layout.
f Print/Stop Button
Press this button to start printing.
Pressing this button while printing is in progress stops printing. It still
consumes one print’s worth of ink even when printing is stopped.
g Date Button
This button sets the date imprint format as follows:
No Date
Year/Month/Day
Month/Day/Year
Downloaded from ManualsPrinter.com Manuals
Day/Month/Year
Continued
9
h
(My Colors) Button (CP750 only)
This button sets the My Colors function as follows:
i
Off
Black and White
Positive Film
Neutral
Sepia
Vivid
(Red-Eye Correction) Button
This button lets you set red-eye correction, which corrects the red-eye in an
image shot with a flash and prints out the corrected image.
j
(Trimming) Button (CP750 only)
This button enters the trimming mode, which lets you
enlarge a portion of an image for printing. (The trimming
feature can only be used in the
(Single) mode.)
How to Select the Trimming Area
1. Press the
(Trimming) button, followed by the
(Display)
button.
2. Press + and - to adjust the print area size, and W and X to
rotate the print area frame.
3. Press the
(Display) button again, followed by +, -, W and
X to move the print area as desired.
4. Press the
(Trimming) button.
5. Press W or X to select
(OK) or
(Cancel), and
press the
(Trimming) button again.
k
(Display) Button
Press this button to display the
image at a larger size. Press it again
to restore it to its original size.
10
Downloaded from ManualsPrinter.com Manuals
l
(Power) Button
Press and hold this button to turn
the power on.
Press and hold it again to turn the
power off.
Connecting the Printer to
Your Computer
Installing the Printer Driver
The following explains the installation procedure for Windows.
• Do not connect the printer to the computer yet.
• You must login to the computer as an administrator before
beginning installation.
1
Place the supplied Compact Photo Printer Solution Disk into the computer’s
CD-ROM drive.
In addition, double-click the
2
(CPSD Installer) icon in the CD-ROM window.
Click [Select Printer] in the printer driver window and select your printer.
In addition, click [Agree], select [Easy Install], followed by
[Install].
3
Follow the onscreen instructions.
When you are prompted to attach the printer, attach the printer to the computer and
turn the printer on.
USB Terminal
Restart the computer when
prompted. After restarting the
computer, attach the printer to
the computer and turn the
printer on.
USB Cable Connector
Commercially available USB Cable
for Computers
4
Click the [Finished] or [Restart] button when it appears.
This completes the driver installation.
Open the [Utilities] folder on the start-up disk and double-click
the [Printer Settings Utility] icon. Click [Add (Printer)] and
select [USB] followed by your printer. Finish by clicking the
[Add] button and closing the window. This completes the
driver installation.
Downloaded from ManualsPrinter.com Manuals
11
Separately Sold Items
Expand the capabilities of your SELPHY printer by using separately sold items.
Some items are not sold in some regions.
Paper Size
Postcard Size
Card Size
L Size
Wide Size
Content
36-sheet package
72-sheet package
108-sheet package
Paper Cassette
36-sheet package
18-sheet package (Full-page labels)
18-sheet package (8-label sheets)
Paper Cassette
36-sheet package
Paper Cassette
24-sheet package
Paper Cassette
Product Name
Color Ink/Paper Set KP-36IP
Color Ink/Paper Set KP-72IP
Color Ink/Paper Set KP-108IP
Paper Cassette PCP-CP200
Color Ink/Paper Set KC-36IP
Color Ink/Full-Size Label Set KC-18IF
Color Ink/Label Set KC-18IL
Paper Cassette PCC-CP100
Color Ink/Paper Set KL-36IP
Paper Cassette PCL-CP200
Color Ink/Paper Set KW-24IP
Paper Cassette PCW-CP100
Other Accessories
Battery Pack
Bluetooth Unit
NB-CP2L (CP750 only)
Bluetooth Unit BU-20
• Use a paper cassette and ink cassette specific to SELPHY CP series
printers. (Do not use ES series paper and ink cassettes.)
• Do not print on printed paper.
The CP750 Enables On-Site Printing Using a Separately Sold Battery Pack
1. Remove the battery
compartment cover.
c Press and hold down
the switch.
d Remove the cover.
2. Attach the battery pack.
3. Charge the battery.
(Approx. 2.5 hours to
fully charge a depleted
battery pack).
Indicator
Orange: Charging
Off: Charge complete
Blinking Orange: Low battery
To a power outlet
Number of prints (while using the battery pack)
Postcard: approx. 36, L: approx. 36, Card: approx. 72, Wide: approx. 24
Canon shall not be liable for any damage to this product and/or accidents such as fire, etc., caused
by the malfunction of non-genuine Canon accessories (e.g., a leakage and/or explosion of a battery
pack). Please note that this warranty does not apply to repairs arising out of the malfunction of
non-genuine Canon accessories, although you may request such repairs on a chargeable basis.
12
Downloaded from ManualsPrinter.com Manuals
Troubleshooting
Solutions for when you cannot print as expected, or think the printer is not
operating properly.
Power will not turn on…
Did you press and hold the power button until the start-up image displayed?
Check the compact power adapter, the main printer unit and the power cord to
ensure that they are correctly connected.
Cannot print…
Have you run out of ink sheets? SELPHY series printers cannot print any
more than the number of prints indicated on the color ink/paper
cassette packages. The starter ink cassette can be used to print 5 sheets.
Check that you are using the correct paper, paper cassette, and ink
cassette combination.
I have extra paper but the ink ran out…
Some ink may be consumed even if you don’t print if you tug on the ink sheets
or needlessly turn the power on/off repeatedly. Also, the ink can be wasted if
you take out the ink cassette when the paper sheets run out during a multiple
print run. Remove the paper cassette and replenish the paper without removing
the ink cassette.
Cannot print cleanly…
Did you set paper specific to SELPHY CP series printers in the
cassette with the shiny side upward as required? If the ink
sheet becomes dusty, blow it clean with a blower brush or
similar device. If narrow stripes appear, remove the ink
cassette and slide the supplied cleaner in and out two or
three times to clean the interior of the printer.
Images will not appear even with a memory card
inserted…
Confirm that the memory card is inserted all the way into the correct slot. Also
confirm that the images conform to the Design rule for Camera File system.
Downloaded from ManualsPrinter.com Manuals
Continued
13
Cannot set the mode, print layout, date imprint and print
number as expected…
Some categories cannot be selected or are disabled with certain combinations
of print mode, print layout, date imprint and print numbers.
Experiencing numerous paper jams…
Placing 19 or more sheets in the paper cassette (13 or more Wide size sheets)
will lead to mis-feeds or paper jams. Moreover, do not let 10 or more sheets of
printed paper collect on top of the paper cassette.
List of Error Symbols
Cannot display image
Ink cassette error
No images on memory card
Low battery (CP750 only)
Cannot read image
Communication error
Paper Error/No paper
Connection broken
Paper jam
Unsupported USB device
No ink
USB hub has been connected
Ink cassette and paper stock are mismatched
Other error
Indicator Status (CP750 only)
Green: (Power On) Standing By, Blinking Green: Printing, Red/blinking Red: Error
Refer to the Printer User Guide for more detailed instructions
The Printer User Guide is included in the supplied CD-ROM. Refer to this guide for details on
operating procedures and troubleshooting suggestions.
Double
Click
Click to Install
* The Adobe Reader program is required to view the Printer User Guide.
* If using Windows, the Printer User Guide is copied to [Documents] or [My Documents].
14
Downloaded from ManualsPrinter.com Manuals
Safety Precautions
• Use this equipment correctly according to the following precautions to avoid the risk
of injury, fire, electrical shock, malfunctions and other hazards. Equipment refers to
the printer, compact power adapter, ink cassette, paper cassette, or paper.
• Please also read the “Safety Precautions” and “Handling Precautions” sections of the
electronic manual (Printer User Guide) contained on the supplied CD-ROM.
WARNINGS
• Do not play the supplied CD-ROM(s) in any CD player that does not support data CDROMs. Playing the CD-ROM(s) in an audio CD player (music player) could damage the
speakers. It is also possible to suffer from hearing loss from listening with headphones
to the loud sounds of a CD-ROM played on a music CD player.
• Store the equipment in a place where it cannot be reached by children.
• Do not disassemble or modify the equipment.
• If the equipment is dropped or the casing becomes damaged, do not continue operation.
• Stop operating the equipment immediately if it emits smoke or noxious fumes.
• Do not allow water or other liquids to enter the interior of the equipment.
If the equipment is subjected to water droplets or damp salty air, gently wipe it with a
soft, absorbent cloth.
• Do not insert or drop metallic objects or flammable substances into the equipment
interior. Immediately switch off the printer power and disconnect the plug of the
compact power adapter from the electrical outlet. (If powering it by battery, remove
the battery pack.)
• Do not touch metal parts of the equipment or the power plug during thunderstorms.
Immediately stop using the equipment and distance yourself from it.
• Do not use flammable solvents such as alcohol, benzine, or paint thinner to clean the
equipment.
• Do not rest heavy objects on the power cord or plug, pull on it with excessive force or
damage it.
• Do not use a power source (compact power adapter, battery) that is not specified for
the equipment.
• Remove the power cord on a regular periodic basis and wipe away the dust and dirt
that collects on the plug, the exterior of the power outlet and the surrounding area.
• Do not handle the power cord if your hands are wet.
• No part of this guide may be reproduced, transmitted, transcribed, stored in a retrieval system, or translated
into any language in any form, by any means, without the prior written permission of Canon.
• While every effort has been made to ensure that the information contained in this guide is accurate and
complete, no liability can be accepted for any errors or omissions. Canon reserves the right to change the
specifications of the hardware and software described herein at any time without prior notice.
• Canon makes no warranties for damages resulting from corrupted or lost data due to a mistaken operation or
malfunction of the camera, the printer, the software, the memory cards, personal computers, peripheral
devices, or use of non-Canon memory cards.
• The SDHC logo and miniSDHC logo are trademarks.
Downloaded from ManualsPrinter.com Manuals
15
FCC Notice
(Printer, Model CD1025/CD1026 Systems)
This device complies with Part 15 of the FCC Rules. Operation is subject to the
following two conditions;
(1)this device may not cause harmful interference, and
(2)this device must accept any interference received, including interference that may
cause undesired operation.
Note: This equipment has been tested and found to comply with the limits for Class B
digital devices, pursuant to Part 15 of the FCC rules. These limits are designed to
provide reasonable protection against harmful interference in a residential
installation. This equipment generates, uses and can radiate radio frequency energy
and, if not installed and used in accordance with the instructions, may cause harmful
interference to radio communications. However, there is no guarantee that
interference will not occur in a particular installation. If this equipment does cause
harmful interference to radio or television reception, which can be determined by
turning the equipment off and on, the user is encouraged to try to correct the
interference by one or more of the following measures:
• Reorient or relocate the receiving antenna.
• Increase the separation between the equipment and receiver.
• Connect the equipment into an outlet on a circuit different from that to which the
receiver is connected.
• Consult the dealer or an experienced radio/TV technician for help.
The cable with the ferrite core provided with the digital camera must be used with
this equipment in order to comply with Class B limits in Subpart B of Part 15 of the
FCC rules.
Do not make any changes or modifications to the equipment unless otherwise
specified in the manual. If such changes or modifications should be made, you could
be required to stop operation of the equipment.
Canon U.S.A., Inc.
One Canon Plaza, Lake Success, NY 11042, U.S.A.
Tel No. (516) 328-5600
Canadian Radio Interference Regulations
This Class B digital apparatus complies with Canadian ICES-003.
Réglementation canadienne sur les interférences radio
• Cet appareil numérique de la classe B est conforme à la norme NMB-003 du Canada.
Downloaded from ManualsPrinter.com Manuals