1
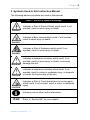
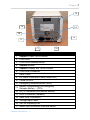
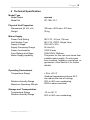
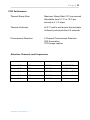
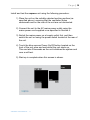
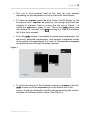
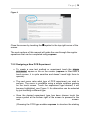
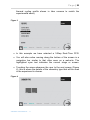
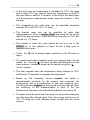
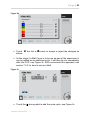
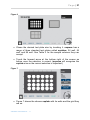
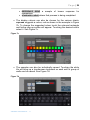
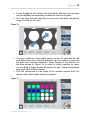
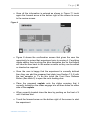
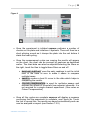
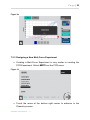
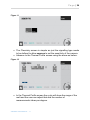
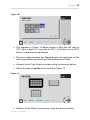
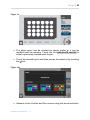
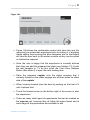
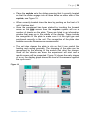
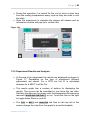
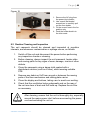
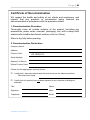
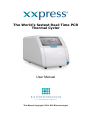
The World’s fastest Real-Time PCR
Thermal Cycler
User Manual
This Manual Copyright © 2014 BJS Biotechnologies
Page |2
xxpress, xxplates, xxsealer, and their respective logos are registered
trademarks of BJS Biotechnologies Ltd. or one of its affiliated
companies in the UK and other countries. All rights reserved.
No part of this manual may be reproduced, stored in a retrieval system,
or transmitted, by any means or in any form, without the prior
permission of BJS Biotechnologies Ltd (BJS Bio).
The information contained in this manual is subject to change without
notice. BJS Bio assumes no responsibility for any errors that may
appear in this or related documentation.
Document:
Revision:
XP-5001-01-1
1.1 May 2014
xxpress xxplates, and xxsealer are the brand names for BJS
Biotechnologies own range of PCR thermal cycler products and
accessories. For further details please visit our web site.
www.xxpressPCR.com
All sales and technical enquiries should be addressed to:
BJS Biotechnologies Ltd
65 Bideford Avenue
Perivale
Greenford
Middlesex
UB6 7PP
United Kingdom
+44 (0)203 021 3750
[email protected] or [email protected]
XXPRESS USER MANUAL - 1.1
Page |3
Contents
1
2
3
4
5
6
7
7.1
7.2
8
8.1
8.2
8.3
8.4
9
10
Glossary of Terms and Abbreviations ............................................................. 4
Symbols Used in this Instruction Manual ........................................................ 5
Unit Description ............................................................................................... 6
Technical Specification .................................................................................... 9
Safety Precautions and Limitations of Use .................................................... 11
Unit Installation .............................................................................................. 15
Unit Operation ............................................................................................... 17
User Touch Screen Display and Controls ..................................................... 17
Operation of the xxpress qPCR system ........................................................ 17
7.2.1
Turning on xxpress ............................................................................ 17
7.2.2
Designing a New PCR Experiment.................................................... 19
7.2.3
Designing a New Melt-Curve Experiment .......................................... 33
7.2.4
Running the Experiment .................................................................... 38
7.2.5
Experiment Results and Analysis ...................................................... 40
Maintenance and Servicing ........................................................................... 43
Replacing the Unit Fuse ................................................................................ 43
Routine Cleaning and Inspection .................................................................. 44
Decontamination Procedure .......................................................................... 45
Transportation and Storage ........................................................................... 45
Warranty and Returns ................................................................................... 47
Product Disposal ........................................................................................... 48
Tables
Table 1: Advisory Symbol Meanings ..................................................................... 5
Table 2: Unit Features ............................................................................................. 7
Table 3: xxpress Sample Plates and Accessories ............................................... 8
XXPRESS USER MANUAL - 1.1
Page |4
1 Glossary of Terms and Abbreviations
ANSI
BJS Bio
American National Standards Institute
BJS Biotechnologies Limited, UK Company
Number 02959160
Deepwell Plate
Plate with an SBS footprint featuring 48, 96 or
384 wells with a larger volume than microplates
Deepwell plate
Electro-Magnetic Compatibility
DWP
EMC
Microtitre Plate
MTP
PCR
PPE
Real-Time PCR
SBS
Plate with an SBS footprint featuring 24, 48, 96
or 384 wells
Microtitre plate
Polymerase Chain Reaction
Personal Protective Equipment
Polymerase Chain Reaction where the result is
delivered through the PCR process by the
capturing of fluorescence emitted by the
reaction.
Society for Bio molecular Screening
Semi-skirted PCR
Plate
PCR plate with an outer surrounding half edge
Skirted PCR Plate
PCR plate with an outer surrounding edge
Thermal Cycler
A machine that moves samples from one precise
temperature to another repeatedly
PCR plate without an outer surrounding edge
Un-skirted PCR
Plate
Well
xxplate
XXPRESS USER MANUAL - 1.1
A single sample cavity in a Microtitre plate, PCR
plate or Deepwell plate
BJS Bio PCR test plate for the xxpress real-time
thermal cycler. Available in 24, 54, and 96 well
formats.
Page |5
2 Symbols Used in this Instruction Manual
The following advisory symbols are used in this manual.
Table 1: Advisory Symbol Meanings
Indicates a Risk of Electric Shock which could, if not
avoided, result in serve injury or death.
DANGER
Indicates a Burn Hazard which could, if not avoided,
result in serve injury or death.
DANGER
Indicates a Risk of Explosion which could, if not
avoided, result in serve injury or death.
DANGER
WARNING
CAUTION
CAUTION
Indicates a hazardous situation which could, if not
avoided, result in serve injury or death; or severely
damage the unit.
Indicates a hazardous situation which could, if not
avoided, result in minor or moderate injury; or degrade
or impair the functionality of the unit.
Indicates a Risk of Crush hazard due to moving parts
which could, if not avoided, result in minor or moderate
injury.
Advisory note or other useful information.
NN
Refer to “Section NN” for more details.
XXPRESS USER MANUAL - 1.1
Page |6
3 Unit Description
The xxpress Real-Time Thermal cycler provides a safe and controlled
method heating and cooling the test samples placed within the xxplates
whilst measuring the level of fluorescence emitted by the samples.
xxpress has five fluorescence measurement channels that enable
fluorophores with a wide range of excitation and collection frequencies to
be used.
To protect the samples from evaporation and contamination during the
heating and cooling of a PCR process the xxplates are sealed using a
clear film.
The xxpress unit has the following external features:
5
7
3
4
2
8
9
1
XXPRESS USER MANUAL - 1.1
6
Page |7
12
15
14
16
13
17
11
10
Table 2: Unit Features
1
2
3
4
5
6
7
8
9
10
xxpress Power On/Off Button
Front Door
Front Door Release Button
xxplate location
xxpress Display and Touch Screen
Front USB Connector
Rear Cover
Air Intake Vents and Filters (under unit)
Power on LED
Emergency Release Button (ECR)
Battery Compartment for Emergency
11 Release Battery – (PP9)
12 DVI-D Connector for External Monitor
13
14
15
16
17
RJ45 Connector (Network)
Rear USB Connectors
Voltage Input Label
Unit Air Expelling Fan
Mains Input connector fuse and switch
XXPRESS USER MANUAL - 1.1
Page |8
The xxpress unit is designed to be used with a range of sample plates
and accessories – some of which are listed below:
Table 3: xxpress Sample Plates and Accessories
Picture
Description
BJS xxplate 24 well
(sample volume 10-40 uL)
BJS xxplate 54 well
(sample volume 4-15 uL)
BJS xxplate 96 well
(sample volume 1-5 uL)
xxsealer
xxpress centrifuge
Other specialist accessories may be available at request. Please contact
your distributor for details.
XXPRESS USER MANUAL - 1.1
Page |9
4 Technical Specification
Model Type
Model Name
Model No
xxpress
XP-1001-01-1
Physical Unit Properties
Dimensions (W x D x H)
Weight
300 mm x 520 mm x 315 mm
35 kg
Mains Supply
Power Cord Rating
Inlet Module Type
Supply Voltage
Supply Frequency Range
Power Consumption
Fuse Ratings and Sizes
Mains Supply capability
Operating Environment
Temperature Range
Relative Humidity Range
Maximum Operating Altitude
Storage and Transportation
Temperature Range
Relative Humidity Range
XXPRESS USER MANUAL - 1.1
IEC C13, 3-Core, 10A min
IEC C14, DPST, Single Fuse
230 VAC ±10%
50 Hz ±5%
1000 W max
T8AH 250V 20x5mm
The power for this unit must come from
a stable mains supply. Do not power
from inverters, frequency convertors, or
generators. (See Section 5 for further
details)
+18 to +30 °C
(Ambient temperatures above 25°C
can reduce the rate of cooling)
20% to 80% non-condensing
2000 m above sea-level
-10 to +50 °C
20% to 95% non-condensing
P a g e | 10
PCR Performance
Thermal Ramp Rate
Maximum Ramp Rate 10°C per second
Adjustable from 0.1°C to 10°C per
second in 0.1°C steps.
Thermal Uniformity
±0.3°C well to well across the test plate
Uniformity achieved after 0.5 seconds
Fluorescence Detection
5 Channel Fluorescence Detection
LED illumination
CCD image capture
Detection Channels and Frequencies
Channel
Excitation (nm)
Emission (nm)
Common Dyes
Channel 1 Blue
470
513-531
FAM/SYBR Green
Channel 2 Green
530
569-588
NDE/TAMRA
Channel 3 Amber
590
600-617
ROX/Texas Red
Channel 4 Red
627
662-685
Cy 5
Channel 5 Red
627
694-734
Cy 5.5
XXPRESS USER MANUAL - 1.1
P a g e | 11
5 Safety Precautions and Limitations of Use
It is essential that all users of this equipment have fully read and
understood the following safety precautions and limitations of use before
installing or operating the xxpress unit.
IMPORTANT
The protection provided by this equipment may be impaired if
it is not used in a manner described in this manual.
WARNING
It is essential that the user of this equipment is aware of the
potential hazards associated with the unit and its accessories.
WARNING
All operators should be familiar with the safety precautions and
warnings given in these instructions before attempting to
operate the unit.
Improper use of this unit or its accessories may impair their
functionality and invalidate the manufacturer’s warranty.
Unit Handling Precautions
CAUTION
Care should be taken not to drop the unit or subject it to rough
physical handling, both during normal use and during
transportation and storage.
The unit should be supported using the base of the unit when
being lifted or moved. Do not lift the unit by any other part of
the casework.
WARNING
Care should be taken when lifting the unit due to its weight.
Care should be taken not to knock the LCD display.
CAUTION
Do not use excessive force when touching the touch screen or
operating the buttons.
XXPRESS USER MANUAL - 1.1
P a g e | 12
Unit Installation and Operating Environment
The xxpress unit is designed for indoor laboratory use only.
DANGER
WARNING
The acceptable operating temperature range is 18ºC to 30ºC,
with a relative humidity of 20% to 80% non-condensing, at a
maximum altitude of 2000m above sea level.
If the unit is stored in conditions outside of these ranges, it
must be left to stand unpowered until it has acclimatised to
within these environmental limits before being powered.
Use only the AC mains power cord provided with the unit or as
specified Section 4.
DANGER
WARNING
The unit must be connected to a suitably earthed mains
supply, with appropriate earth-leakage and over-current
protection.
Always ensure that the mains power connector is securely
inserted into the rear of the unit, and any excess power cord
does not pose a potential trip or pull hazard.
The power for this unit must come from a stable mains supply.
Do not power from inverters, frequency convertors, or
generators.
WARNING
DANGER
WARNING
This unit requires a power supply with both a stable voltage
and stable frequency. Inverters, frequency convertors, and
generators do not provide acceptable stability and the unit can
perform outside its specification, or fail to perform, or be
damaged by the use of these forms of power supply.
Do not operate the unit in any area which is, or has been, or is
thought to have been exposed to explosive or flammable
gases, vapours or liquids.
The unit must be installed and operated on a solid, stable and
level working surface; ensuring that the ventilation holes under
the unit and at the rear of the unit are not obstructed.
XXPRESS USER MANUAL - 1.1
P a g e | 13
General Operating Precautions
DANGER
Ensure that the power is switched off at both the AC mains
supply outlet and at the back of the unit before inserting or
removing the mains power cord.
The xxplate can reach temperatures of over 100°C and can
remain hot for a time after the xxpress system is turned off.
DANGER
If conditions are set such that the experiment is finished with
the plate at a high temperature it will exit the unit with the
potential to burn the operator and care should be taken.
The unit is intended for use with plates containing biological
samples only.
DANGER
Never use the unit to seal any explosive, volatile or highly
reactive substances or chemicals.
There is a possible finger crush hazard due to the moving
parts of the door. Care should be taken when closing the door.
CAUTION
XXPRESS USER MANUAL - 1.1
P a g e | 14
Unit Maintenance and Serviceability
There are no user or operator serviceable parts inside the unit.
DANGER
Do not remove the unit casework.
Removal of the unit's casework will void the manufacturer’s
warranty and may expose the user to a Risk of Electric Shock
resulting in serious injury or death.
WARNING
DANGER
Once installed, the externally accessible unit fuse will only
blow under a fault condition. This fuse should only be changed
after the unit has been thoroughly inspected by a qualified
engineer. See Section 8.1 for details.
Always switch off the unit and disconnect the power cord
before performing any cleaning or decontamination procedure.
DANGER
CAUTION
If liquid is spilt into or over the unit, switch off and disconnect
the power from the AC mains outlet before attempting to deal
with the spillage.
Ensure that the xxpress unit has cooled down to room
temperature before performing any cleaning operation and
before moving or storing the unit.
The use of harsh chemicals and cleaning agents may damage
the unit and degrade its performance.
CAUTION
Always follow the cleaning and decontamination procedures
specified in Sections 8.2 and 8.3 of this instruction manual.
Do not autoclave any part of the unit or its accessories.
CAUTION
XXPRESS USER MANUAL - 1.1
P a g e | 15
6 Unit Installation
Before installing the xxpress unit, please check that the delivery is
complete and that the unit and any accessory parts are intact and free
from any signs of transportation damage. Also ensure that all external
and internal packaging has been removed from the unit before
installation.
Please retain all packaging for future transportation and
storage of the unit and its accessories.
The xxpress unit should be installed in a location which meets the
following requirements:
• Safe and suitable operating environment (see Section 5)
• Solid, stable, level working surface
• At least 10cm clearance around the unit to adjacent objects and
walls
• Earthed AC mains power connection (see Section 4)
WARNING
WARNING
WARNING
WARNING
Please also observe and abide by the Unit Installation and
Operating Environment safety precautions and preconditions
listed in Section 5.
The power for this unit must come from a stable mains supply
that matches the specification on the back panel of the unit.
Do not power from inverters, frequency convertors, or
generators (see Section 5).
Ensure that the correct fuse type has been fitted in the mains
inlet fuse holder as detailed on the back of the unit.
See Section 4 for details.
If the unit has been stored in a cool environment, it must be
left to stand unplugged until it has acclimatised to the new
room temperature before being powered.
XXPRESS USER MANUAL - 1.1
P a g e | 16
Install and test the xxpress unit using the following procedure:
1) Place the unit on the suitably selected working surface (as
specified above), ensuring that the ventilation holes
underneath and on the rear of the unit are not obstructed.
2) Connect the unit to the AC mains power outlet using the
mains power cord supplied or as specified in Section 4.
3) Switch the mains power on at supply outlet first, and then
switch the unit on using the power switch located at the rear of
the unit.
4) Touch the blue xxpress Power On/Off button located on the
front of the unit once and wait whilst the unit starts up.
This can take 30seconds as the unit initialises the system and
runs a self-test.
5) Start-up is complete when this screen is shown.
XXPRESS USER MANUAL - 1.1
P a g e | 17
7 Unit Operation
WARNING
Please ensure that you have read and fully understood all of
the Safety Precautions and Limitations of Use listed in
Section 5 before attempting to operate the xxpress unit.
7.1 User Touch Screen Display and Controls
The unit’s user interface consists of a large high definition colour LCD
display which has an integrated touch screen that will support multifinger gestures. (The touch screen is designed to operate when wearing
standard laboratory gloves.)
The unit is controlled through an application that runs on the xxpress unit
that has been designed to match the operation of the Real-Time PCR
Thermal Cycler to the normal experimental procedures used by
Biotechnologist’s so that it is intuitive and so easy to use.
A version of the software that runs on the xxpress instrument will be
available to run on a standard PC. This will enable the design and
analysis of experiments away from instrument so enabling effective use
of the platform. The notes about this use of the software therefore apply
to both versions of this software.
The software will be regularly updated as will the user instructions, you
can find details of the latest versions at www.xxpressPCR.com
7.2 Operation of the xxpress qPCR system
7.2.1 Turning on xxpress
• Before connecting xxpress to the mains electrical connection
make sure that the voltage and frequency detailed on the label at
the rear of the unit (see table 2) matches the supply voltage.
• Connect the supply using the IEC cable provided with the unit.
Turn the power on at the wall (if switched) then turn the power
input switch on the mains input connector on (see table 2).
XXPRESS USER MANUAL - 1.1
P a g e | 18
• The unit is now powered and so the rear fan may operate
depending on the temperature of the unit and the environment.
• To wake-up xxpress press the blue Power On/Off Button on the
front panel once. xxpress will wake up, run through a self-test and
initialise its systems. Once a screen like the one in Figure 1 is
visible the xxpress is ready to use. This is the HOME screen and
can always be returned to by
touching the logo at the bottom
left of the other screens.
• From the HOME screen it is possible to create new experiments, run
previously designed experiments, and analyse completed results
of previously run experiments. For each of the operations xxpress
will guide the user through the steps required.
Figure 1
• To check the version of the software running on xxpress, from the
HOME screen touch the xxpress logo in the bottom left of the
screen. A pop-up information window will appear listing the version
and also the software licence terms. See Figure 2.
XXPRESS USER MANUAL - 1.1
P a g e | 19
Figure 2
Close the screen by touching the symbol in the top right corner of the
screen.
The next sections of this manual will guide the user through the regular
operations that can be completed using xxpress.
7.2.2 Designing a New PCR Experiment
• To create a new test method or experiment touch the DESIGN
EXPERIMENT square or tile on the screen (xxpress is fitted with a
touch screen, it is quite sensitive and doesn’t need high force to
operate).
• The next menu asks what type of PCR experiment you wish to
perform. The menu is scrollable using a simple up/down gesture
on the touch screen. Touch the experiment type desired, it will
become highlighted, see Figure 3. An alternative can be selected
by just touching a different type.
• Once the desired experiment type has been chosen touch the
arrow symbol at the bottom right of the screen to proceed to the
next
screen.
(Choosing the PCR type enables xxpress to structure the starting
XXPRESS USER MANUAL - 1.1
P a g e | 20
thermal cycling profile shown in later screens to match the
experimental need).
Figure 3
• In this example we have selected a 3-Step Real-Time PCR.
• You will also notice running along the bottom of the screen is a
navigation bar similar to that often seen on a web-site. The
highlighted cyan text indicates the current stage or screen.
• Touching the arrow advances the user to the next screen (Figure
4), this is where the details of the chemistry type that will be used
in the experiment is chosen.
Figure 4
XXPRESS USER MANUAL - 1.1
P a g e | 21
• The first selection is to choose between a PROBE based test or one
the uses SYBR GREEN based signalling, this information enables
xxpress to preselect the camera sensitivity. Touch the selection
required.
Figure 4a
• Here we have selected SYBR GREEN see Figure 4a.
• Next there are two specific selections that identify the chemistry
supplier and the specific product that will be used, (this information
is used to prepopulate the thermal profile with a suggested set of
parameters).
xxpress is so much faster than traditional thermal cyclers that the
team at BJS Bio have developed some typical profiles to help the
user move quickly to an optimised assay. The figures are only a
starting point and all the parameters are adjustable in later
screens.
• If the chemistry the user wants to use is not listed on the screen
then they can chose a similar product as their starting point and
edit the values on the later screens.
With each new software release BJS Bio will add new chemistry
options, in between releases application notes for other
chemistries can be found on the xxpress web-site,
www.xxpressPCR.com .
If a user wants specific advice on setting a profile for a chemistry
they can email [email protected] with their question.
XXPRESS USER MANUAL - 1.1
P a g e | 22
• Once the chosen supplier and type of chemistry is selected (Figure
4b) then the user proceeds to the next screen by touching the
arrow at the bottom right of the screen as before.
Figure 4b
• The next screen controls the thermal profile required for the
experiment, see Figure 5. From the information already input into
xxpress the system pre-populates this screen with the correct
experiment structure and recommended starting values.
Figure 5
XXPRESS USER MANUAL - 1.1
P a g e | 23
• Looking at our example 3-Step PCR, we chose a SYBR Green
based test and Kapa SYBR 2G Fast Hot Start chemistry. In Figure
5 the thermal profile reflects this with an initial hot start at 95°C for
20 seconds followed by a 3-Step cycle which is repeated 40 times.
Finally there is a cooling step to bring the plate down close to
ambient enabling safe removal from the unit.
• Touching each part of the profile will pop-up a screen allowing the
parameters to be modified, see Figure 5a.
Figure 5a
• Select the parameter to be changed, here we have selected the
dwell time on the second step of the cycle which is now
highlighted. Then type in the desired value or select the option
required using the keypad on the right of the display.
Once the user is happy with their changes they can save them by
touching
the tick symbol or cancel and lose their changes
by touching the cross.
• In the example in Figure 5a there are 3 steps to the PCR. Initially
the temperature is raised to 95°C at a ramp rate of 10°C per
second. Then the temperature is held at that value for 1 second.
• In the second step the temperature is reduced to 60°C, the ramp
rate is again 10°C per second. Once the temperature is at 60°C
then this value is held for 5 seconds.
XXPRESS USER MANUAL - 1.1
P a g e | 24
• In the third step the temperature is increased to 72°C, the ramp
rate is again 10°C per second. Once the temperature is at 60°C
then this value is held for 5 seconds. At the end of this dwell there
is a fluorescence measurement made using the channel 1 filter
settings.
• The temperatures for each step can be specified anywhere
between 40°C and 99°C in 0.1°C steps.
• The thermal ramp rate can be specified for each step
independently or set as a GLOBAL RAMP rate using the tile on the
right of the pop-up screen. Value can be set from zero to 10°C per
second in 0.1°C steps.
• The number of times the cycle should be run in is set in the
REPEAT tile, in the example in Figure 5a the 3 step cycle is
repeated forty times.
• Touch the
reject.
tick to accept these conditions or the cross to
• For experiments where multiple cycles are required these can be
added by touching
the “plus” symbol and editing them in the
same manner. Unwanted steps can be deleted using the
“minus” symbol
• The final segment sees the temperature being reduced to 45°C
and held for 10 seconds to complete the experiment.
• Based on the chemistry choice xxpress will select a
recommended sensitivity for the camera that measures the
fluorescence, this is a combination of gain and exposure time.
Touching the blue CAMERA tile will pop-up a window that will allow
the sensitivity of the measurements in each of the five
fluorescence channels to be individually adjusted, see Figure 5b.
• To adjust touch the circle and then drag it to the position along the
line that gives the desired value. The value range is from zero to
100. (To drag the circle maintain finger contact with the touch
screen.)
XXPRESS USER MANUAL - 1.1
P a g e | 25
Figure 5b
• Touch
before.
the tick or cross to accept or reject the changes as
• At this stage if a Melt Curve is to be run as part of the experiment it
can be added as an additional cycle. It will then be run immediately
after the PCR, see Figure 5c. BJS recommend this approach, see
section 7.2.3 for how to set-up a Melt.
Figure 5c
• Touch the
plus symbol to add the extra cycle, see Figure 5c
XXPRESS USER MANUAL - 1.1
P a g e | 26
Figure 5d
• Touch the MELT tile to add a Melt Curve cycle to the experiment,
see Figure 5d.
• The Melt cycle is then added to the list of cycles and can be edited
by touching. See section 7.2.3 for how to set-up a Melt
Figure 5d
• Once all the conditions are as required touch the forward arrow on
the bottom right of the screen to advance to the Tray Selection.
XXPRESS USER MANUAL - 1.1
P a g e | 27
Figure 6
• Chose the desired test plate size by touching it. xxpress has a
range of three standard test plates called xxplates, 24 well, 54
well, and 96 well. See Table 3 for the sample volumes they can
accept.
• Touch the forward arrow at the bottom right of the screen as
before once the selection is correct. (xxpress will recognise the
xxplate size so the correct selection is important.)
Figure 7
• Figure 7 shows the chosen xxplate with its wells and the grid they
are on.
XXPRESS USER MANUAL - 1.1
P a g e | 28
• These wells can be labelled with information to help the analysis of
the results. To select a group of wells to edit touch them
individually or draw your finger over them. Touching them again
will de-select them, or touch DESELECT ALL to clear the complete
selection.
Figure 7a
• With the required wells highlighted touch EDIT and a screen will
pop-up, see Figure 7b.
Figure 7b
• In the screen that pops up the type of sample that is to be put in
the selected wells can be chosen.
SAMPLE refers to the Sample to be tested.
NTC to a No Template Control sample.
XXPRESS USER MANUAL - 1.1
P a g e | 29
REFERENCE GENE a sample of known response for
comparison.
STANDARD CURVE where that process is being completed
• The display colours can also be chosen for the various charts,
xxpress suggests a colour, red as shown in the example in Figure
7b. To change the suggested colour touch the coloured rectangle
and further pop-up screen will appear. Touching the desired colour
select it. See Figure 7c.
Figure 7c
• The samples can also be individually named. Touching the white
tile will bring up a touchscreen keyboard so each well or group of
wells can be named. See Figure 7d.
Figure 7d
XXPRESS USER MANUAL - 1.1
P a g e | 30
• Touch the
tick will accept the information and then the process
can be repeated as necessary to label the rest of the plate.
• You can clear the well selection or even reset the plate completely
using the tiles on the right.
Figure 7e
• To make selection of the wells easier on the 54 well and the 96
well plates then two fingered gestures can be used to zoom into
the plate area and pan around it. Move fingers in the direction of
the blue arrows in Figure 7e to zoom in, pinch together to zoom
out and drag a finger across the screen to pan. These movements
also work on the chart screens.
• The cell references on the edge of the window ensure that it is
always clear which wells are being viewed.
Figure 7f
XXPRESS USER MANUAL - 1.1
P a g e | 31
• Once all the information is entered as shown in Figure 7f, touch
again the forward arrow at the bottom right of the screen to move
to the review screen.
Figure 8
• Figure 8 shows the confirmation screen that gives the user the
opportunity to review their experiment prior to running it. If anything
needs editing then touching the blue navigation bar on the bottom
will take the user back to the earlier screens so they can be edited
or checked as required.
• Once the user is happy that the experiment is correctly defined
then they can add the prepared test plate (see Section 7.2.4) with
the test samples in. To do this touch the Front Door Release
Button (See table 2) to open the units loading door.
• Place the prepared xxplate onto the slides ensuring that it
correctly located so the slides engage into all three holes on either
side of the xxplate.
• When correctly located close the door by pushing on the front of it
until it latches shut.
• Touch the forward arrow on the bottom right of the screen to start
the experiment.
XXPRESS USER MANUAL - 1.1
P a g e | 32
Figure 9
• Once the experiment is initiated xxpress performs a number of
checks on the plate and initialises it systems. There will then be a
short whirring sound as it clamps the plate into the unit before it
starts the heat cycling.
• Once the measurement cycles are running the results will appear
on the chart, the chart can be zoomed by gestures as described
earlier. The chart data can also be adjusted selecting the filters on
the right, touch the tiles to toggle these filters on and off.
BASELINE SUBTRACT uses the early readings to set the initial
level of the trace at zero to make it easier to compare
multiple traces.
SMOOTH creates a best fit curve to the data which helps in
comparing the results.
COLOUR COMPENSATION is used for multiplex assays and
reduces the effects of cross-talk from adjacent channels. It is
not required for a single channel experiment. (See notes on
Colour Compensation)
• Once all the cycles are complete xxpress will display a measure
confirming that the experiment is complete, see Figure 9a. Touch
the tick to accept this, the results are saved automatically and can
now be analysed or export (see Section 7.2.5).
XXPRESS USER MANUAL - 1.1
P a g e | 33
Figure 9a
7.2.3 Designing a New Melt-Curve Experiment
• Creating a Melt-Curve Experiment is very similar to creating the
PCR Experiment. Select MELT from the PCR menu.
Figure 10
• Touch the arrow at the bottom right corner to advance to the
Chemistry screen.
XXPRESS USER MANUAL - 1.1
P a g e | 34
Figure 11
• The Chemistry screen is simpler as just the signalling type needs
to be defined to allow xxpress to set the sensitivity of the camera.
• Advance to the Thermal Profile screen using the arrow as before.
Figure 12
• In the Thermal Profile screen the cycle will show the range of the
melt and the user can adjust that and the number of
measurements taken per degree.
XXPRESS USER MANUAL - 1.1
P a g e | 35
Figure 12a
• The example in Figure 12 above shows a Melt that will start at
40°C after a dwell of 5 seconds at 40°C. It will then rise to 95°C
taking 1 measurement per degree.
• The more measurements per degree greater the resolution on the
melt temperatures and the longer the experiment will take.
• Advance to the Tray Selection screen using the arrow as before.
• Select the type of xxplate to be used, see Figure 13
Figure 13
• Advance to the Plate Layout screen using the arrow as before
XXPRESS USER MANUAL - 1.1
P a g e | 36
Figure 14
• The plate layout can be created as shown earlier or it can be
recalled from the memory. Touch the tile LOAD PLATE LAYOUT to
select a previously created plate layout.
• Touch the desired layout and then accept the selection by touching
the tick.
Figure 14a
• Advance to the Confirm and Run screen using the arrow as before.
XXPRESS USER MANUAL - 1.1
P a g e | 37
Figure 14b
• Figure 14b shows the confirmation screen that gives the user the
opportunity to review their experiment prior to running it. If anything
needs editing then touching the blue navigation bar on the bottom
will take the user back to the earlier screens so they can be edited
or checked as required.
• Once the user is happy that the experiment is correctly defined
then they can add the prepared test plate (see Section 7.2.4) with
the test samples in. To do this touch the Front Door Release
Button (See table 2) to open the units loading door.
• Place the prepared xxplate onto the slides ensuring that it
correctly located so the slides engage into all three holes on either
side of the xxplate.
• When correctly located close the door by pushing on the front of it
until it latches shut.
• Touch the forward arrow on the bottom right of the screen to start
the experiment.
• There are many other types of experiments that can be created on
the xxpress unit, however they all follow the same format and at
each stage all the parameters are available to edit.
XXPRESS USER MANUAL - 1.1
P a g e | 38
7.2.4 Running the Experiment
• Before running an experiment the sample xxplate needs to be
prepared. All xxplates required to have a heat sealed film applied
to them to seal the contents and prevent evaporation during the
experiment. Details of how to seal the xxplates can be found in
the xxsealer manual.
• NEVER PUT A XXPLATE IN THE XXPRESS SYSTEM WITHOUT
IT BEING HEAT SEALED. Only heat seal the xxplates with the
recommended heat sealing film.
• NEVER PUT A LABEL ON THE BOTTOM OF THE XXPLATE.
Keep the bottom “black” surface of the xxplate clean and
never obstruct it by sticking a label on it as the unit measures
the temperature of the samples using the radiation emitted
from this surface.
• To place the prepared and sealed xxplate into the xxpress
system touch the Front Door Release Button (See table 2) to open
the units loading door.
Figure 15
XXPRESS USER MANUAL - 1.1
P a g e | 39
• Place the xxplate onto the slides ensuring that it correctly located
so that the slides engage into all three holes on either side of the
xxplate, see Figure 15.
• When correctly located close the door by pushing on the front of it
until it latches shut.
• Once the experiment has been started by touching the forward
arrow on the RUN screen then the xxpress system will run a
number of checks on the plate. These are listed in an information
window that pops up in the middle of the display. These include
the recognition of the plate to make sure it is the right type and
positioned correctly in the unit. The recognition of the plate also
enables accurate fluorescence measurement.
• The unit also clamps the plate in situ so that it can control the
heating and cooling precisely. The clamping of the plate can be
recognised by the whirring of the motors that drive the clamps.
Once all the checks are done the experiment will start and a
results screen will be presented. Figure 16 shows the early stages
of a run, the display graph shows the level of fluorescence against
the cycle count.
Figure 16
XXPRESS USER MANUAL - 1.1
P a g e | 40
• During the operation it is normal for the unit to issue a short hum
from the cooling compressors every cycle as they are used to cool
the plate
• Once the experiment is complete the clamps will release and an
information window will pop up to confirm this.
Figure 16a
7.2.5 Experiment Results and Analysis
• At the end of an experiment the results are displayed as shown in
Figure 17. Depending on the type of experiment different
parameters are shown. For a PCR run the Ct is calculated
whereas for a MELT it will be Tm.
• The results graph has a number of options for displaying the
results. The curves can be smoothed or just show the raw data.
Similarly the data can be shown with the background fluorescence
removed (BASELINE SUBTRACT) or not. Touch the tiles on the right
to toggle these filters on and off.
• The PCR or MELT and ANALYSIS tab tiles on the top left of the
screen change the view from the graph to a results template.
XXPRESS USER MANUAL - 1.1
P a g e | 41
• There is a manual adjustment that can be used to adjust the Ct
threshold value by eye. Touch the red circle and slide it up and
down to adjust the threshold, the value is shown in the menu bar
on the right of the screen.
Figure 17
• When looking at a Melt there is the option of looking at the
differential of the curve which helps identify the Tm more easily.
Figure 17a shows an example of a Melt in it standard form.
Figure 17a
XXPRESS USER MANUAL - 1.1
P a g e | 42
• Touching the DIFFERENTIATE tile on the right will give a display like
the one shown in Figure 17b.
Figure 17b
• Results can be export in a CSV format so they can be analysed in
other ways as required. Select the blue EXPORT TO CSV tile to do
this. Note, if the smoothing filter or background filter is active when
the data is exported the values will include this filtering.
Figure 17c
• For Multiplex experiments where data is gathered on more than
one fluorescence channel then this data can be viewed using the
coloured channel tiles at the bottom of the screen, see Figure 17c.
• Where there may be cross talk between adjacent fluorescence
channels touching the COLOUR COMPENSATE filter tile activate the
filter and will enhance the results.
XXPRESS USER MANUAL - 1.1
P a g e | 43
8 Maintenance and Servicing
Although the xxpress unit does not require any scheduled maintenance
or servicing, the operator should regularly clean and inspect the unit for
any detects, as described in Section 8.2 below.
DANGER
WARNING
Please observe and comply with all of the Unit
Maintenance and Serviceability precautions listed in
Section 8.
Never removed the unit casework. There are no user or
operator serviceable parts inside the unit.
Always switch off and unplug the unit before performing
any cleaning or disinfecting tasks.
For technical and service related enquiries, please contact your
distributor or BJS Bio at the address given on Page 2 of this manual.
8.1 Replacing the Unit Fuse
The unit fuse should only be replaced by a suitably qualified technician.
DANGER
The unit fuse will only blow as a result of an internal unit fault
or if the voltage selector switch has been incorrectly set (see
Section 5). This fuse should only be changed after the unit has
been thoroughly inspected, and must be replaced with the
exact type specified in Section 4.
Thoroughly inspect the unit for any signs of damage, loose components
or liquid spillage or ingress. If in doubt, please contact BJS Bio on the
number given on Page 2 of this manual.
The fuse holder is removed by disconnecting the mains cord
and then using a small flat bladed screwdriver to carefully pull
open the fuse holder, see Figure 18 and remove the old fuse.
DANGER
After replacing the fuse with the corrected rated one for the
operating voltage being used (Section 4), push the fuse holder
firmly back into the inlet module.
The unit must be electrically safety tested for excess leakage
current before being repowered from the mains supply.
XXPRESS USER MANUAL - 1.1
P a g e | 44
Figure 18
1. Remove the AC plug from
the power inlet module
2. Use a small flat bladed
screwdriver to carefully pull
out the fuse holder
3. Fit the correct fuse in the far
position only
4. Push the holder back into
the inlet mode
8.2 Routine Cleaning and Inspection
The unit casework should be cleaned and inspected at regulator
internals, and whenever contamination or spillage occurs, as follows:
1.
Switch off the unit and disconnect the power before performing
any inspection checks or cleaning.
2.
Before cleaning, always inspect the unit casework, heater plate
and moving parts for any signs of wear, damage, cracks or other
defects.
3.
Clean the casework using a damp cloth soaked with a
disinfectant solution (such as Virkon), whilst wearing suitable
PPE.
4.
Remove any debris or fluff from around or between the moving
parts of the door mechanism and sliding plate carrier.
5.
Clean the display and buttons, taking care to avoid over wetting.
6.
Check that the ventilation holes underneath and on the rear of
the unit are clear of dust and fluff build-up. Replace the air filter
as necessary
DANGER
After cleaning, ensure that the unit is thoroughly dry, especially
around the mains power inlet, before reconnecting the power
cord and switching the unit on.
XXPRESS USER MANUAL - 1.1
P a g e | 45
8.3 Decontamination Procedure
The unit and accessories should be decontaminated using the following
procedure before being stored or transported.
Decontamination Procedure
Thoroughly clean all outside surfaces of the product (including any
accessories, power cords, manuals, packaging, etc) with a damp
cloth soaked with suitable disinfectant solution (such as Virkon).
8.4 Transportation and Storage
The xxpress unit and its accessories should be thoroughly
decontaminated using the procedure detailed in Section 8.3 before being
placed in its original packaging for transportation or storage.
Refer to Section 4 for the acceptable range of Storage and
Transportation environmental conditions.
WARNING
Always ensure that the unit and accessories are completely
dry and free of any condensation before being packed.
XXPRESS USER MANUAL - 1.1
P a g e | 46
Certificate of Decontamination
We respect the health and safety of our clients and employees, and
request that any products or accessories being returned are
decontaminated in accordance with the procedure below.
1. Decontamination Procedure
Thoroughly clean all outside surfaces of the product (including any
accessories, power cords, manuals, packaging, etc) with a damp cloth
soaked with suitable disinfectant solution (such as Virkon).
Allow to dry fully before packing.
2. Decontamination Declaration
Company Name:
Address:
Product Code:
XP-1002-01-1
Serial Number:
Reason For Return:
Where Product Used:
Please tick the appropriate option(s) below:
I certify that I have decontaminated the product as per the above procedure.
Decontaminant Used:
I certify that the product has not been exposed to any chemical or biological
materials.
Title:
Name:
Signature:
Date:
Telephone:
Email:
XXPRESS USER MANUAL - 1.1
P a g e | 47
9 Warranty and Returns
BJS Biotechnologies Ltd. warrants the xxpress product, when
purchased new and installed and operated in accordance with the
instructions of this manual, to be free from defects in materials and
workmanship, and will repair or replace, at their discretion, any unit or
accessory which exhibits such defects.
In no event will BJS Biotechnologies be liable for any indirect, incidental
or consequential damages resulting from any defect or warranty claim.
NOTE
Unspecified use or unauthorised modification of any part of the
xxpress unit or its accessories or the use or attachment of any
adaptor or peripheral not supplied, specified or sanctioned by BJS
Biotechnologies will invalidate this warranty.
This warranty is provided to the original purchaser of the product for one
year from the date of purchase.
Under the terms of this warranty, the product must be returned in its
original packaging, transportation prepaid by the sender, with a copy of
the Proof of Purchase and a detailed description of the problem.
WARNING
The product must be decontaminated using the procedure
detailed in Section 8.3 and a Certificate of Decontamination
supplied with any return. If the product is considered too
hazardous to be shipped, please contact BJS Biotechnologies
on the number given on Page 2 of this manual for further
instructions.
Please contact your distributor (or BJS Biotechnologies on the number
given on Page 2 of this manual) to assess the defect and arrange the
return the product if necessary.
XXPRESS USER MANUAL - 1.1
P a g e | 48
10 Product Disposal
At end-of-life, this product must be disposed of in accordance with your
local authority regulations for the disposal of potentially hazardous waste
and electronic equipment.
The unit and its accessories should be decontaminated using the
procedure detailed in Section 8.3 before disposal or shipping.
Do not dispose of this product into unsorted municipal waste
or public landfill.
Please contact your distributor (or BJS Biotechnologies at the address
on Page 2 of this manual) for details of how to correctly dispose of this
product.
XXPRESS USER MANUAL - 1.1