1
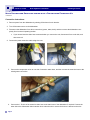
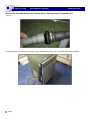
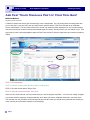
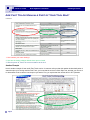
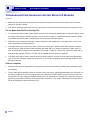
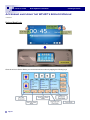
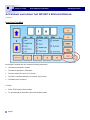
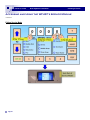
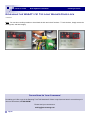
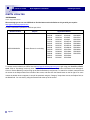
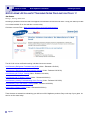
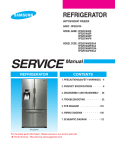
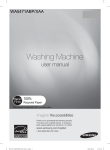
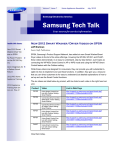
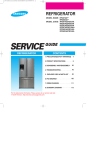
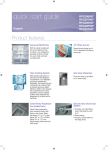
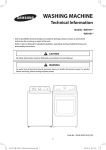
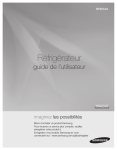
Volume 7, Issue 5 Home Appliances Newsletter May, 2012 Samsung Electronics America Samsung Tech Talk Your source for service information Samsung Soft Skills Training Now Live on Plus 1! Inside this issue: Jim Foster Samsung Soft Skills 1 Training Now Live on Plus 1! The New Samsung SC- 9670 Canister Vacuum 2 Make Dishwasher Servicing Easier with a Dishwasher Extension Kit 4 Are Fast Track Manuals Part of Your Tool Bag? 7 Troubleshooting Samsung Heated Mold Ice Makers 10 Accessing and Using the WF457’s Service Module 13 Releasing the WA5471/51 Top Load Washer Door Lock 19 GSPN Updates 21 2012 RTC Home Appliance Training 22 2012 Home Appliance Training Now On Line on Plus 1! 23 Manager, Training Let’s face it, sometimes the most challenging part of your job is your everyday interaction with customers. We at Samsung understand this and want you to have the skills and confidence you need to deal with any customer and situation. With this in mind, we’ve developed our Soft Skills videos. These videos show you best customer relations practices and demonstrate - using realistic scenarios - how to interact with customers in an effective and positive way. Take your customer interaction skills to the next level. Represent Samsung at your very best. Learn the secrets of successful customer relations. Log on to Plus 1 and get started today! https://my.plus1solutions.net/clientPortals/samsung/ Volume 7, Issue 5 Home Appliances Newsletter Samsung Tech Talk The New Samsung SC-9670 Canister Vacuum Tony Perkins Regional Technical Trainer Although they’ve been out in other markets for several years, Samsung vacuums have just arrived in the USA this year. The new SC-9670 Canister Vacuum is now making its 2012 debut. Below are some service cautions and disassembly/reassembly tips for the vacuum’s Flexible hose with Control Handle. First note that this unit is comprised of three serviceable sections: the Flexible hose with Control Handle, the Canister, and the Power Brush assembly. There is also a telescopic wand (pipe), however, it is replaced as an entire assembly and is not serviceable. Flexible Hose w/Control Handle The first thing you should be aware of is that the Flexible hose has two conductor pins at each end which carry electrical power down to the Power Bush assembly. Be sure not damage or break them during assembly/disassembly or the Power Brush assembly will be unusable. Second, the control handle uses RF technology to communicate with the canister’s control board. It has a built-in RF transmitter and utilizes two “AA” batteries to operate properly. Should the unit appear non-operational, you should suspect dead batteries. To replace them, locate the compartment access door on the front of the handle (Look for the Samsung logo) and lift the tab to release the door. Replace the batteries, noting the proper polarity, and then replace the door. See the pictures below for clarification. Flexible Hose and Conductor Pins Handle and Battery Compartment Page 2 Volume 7, Issue 5 Home Appliances Newsletter Samsung Tech Talk The New Samsung SC-9670 Canister Vacuum continued For additional technical information on the SC-9670 Vacuum Cleaner, please check out the training video located on the plus1solutions.net website (https://my.plus1solutions.net/), in the “on-demand” training section under appliances. See the screen shot below. Page 3 Volume 7, Issue 5 Home Appliances Newsletter Samsung Tech Talk Make Dishwasher Servicing easier with a Dishwasher Extension Kit Keith Robinson Manager, HA Product Support Troubleshooting dishwashers can be a frustrating experience: Dishwashers, in their normal, under-the-counter operating space, do not provide easy access to areas that techs need to view operations and troubleshoot problems. A dishwasher’s overall placement in the kitchen, and the length of the hookup lines for power, water, and drainage, can severely limit a techs ability to actually SEE WHAT IS GOING ON. With these issues in mind, we would like to suggest a solution: An Extension Kit that allows you to operate a unit completely outside of its normal, under-the-counter location. The Dishwasher Extension Kit’s Parts One 5 to 8 foot stainless steel dishwasher extension supply hose. One 6 to 8 foot 16-3 heavy duty extension cord. A drain extension hose. A 3/8th inch compression union. Page 4 Volume 7, Issue 5 Home Appliances Newsletter Samsung Tech Talk Make Dishwasher Servicing easier with a Dishwasher Extension Kit continued Connection Instructions: 1. Remove power from the dishwasher by shutting off the home’s main breaker. 2. Turn off the water source to the dishwasher. 3. Disconnect the dishwasher from all its connections (power, water, drain) and then remove the dishwasher completely from its normal operating location. If you cannot leave the drain hose connected when you remove the unit, disconnect it from under sink, and then remove it. 4. Connect the power extension cable using wire nuts. 5. Connect the compression union to one side of extension water hose, and then connect the extension hose to the existing water connection. 6. Connect the 1“ ID side of the extension drain hose to the drain hose of the dishwasher if required. Connect the other side to the dishwasher drain extension hose under the sink or secure the hose so it drains into the sink. Page 5 Volume 7, Issue 5 Home Appliances Newsletter Samsung Tech Talk Make Dishwasher Servicing easier with a Dishwasher Extension Kit continued This setup will give you access to areas that are not available when the unit is in its normal under cabinet position. Page 6 Volume 7, Issue 5 Home Appliances Newsletter Samsung Tech Talk Are Fast Track Manuals Part of Your Tool Bag? Nicholas Webert Regional Technical Trainer Located on GSPN under service tips are Samsung’s Fast Track Manuals. Are you printing these and taking them with you on each job? If you said “NO”, then you really need to read this article! Fast Track manuals are an invaluable source of information. The Fast Track manual for a unit not only shows the faults displayed on a unit, but also explains how to access internal controls to operate each individual part for testing. Would you drive your car without a key? Then why would you test a Samsung appliance without a Fast Track manual? Follow the steps below to locate the manuals on GSPN. STEP 1. Click Knowledge. STEP 2. Enter the model number, and then click the magnify glass. STEP 3. Click the number below “Service Tips”. STEP 4. Select the document labeled “Fast Track”. Inside our Fast Track manuals, we’ve put all the tools you need to diagnose a problem. You’ll see ohm ratings, voltages, error codes and their diagnoses, wiring breakdowns, quick tests, flow charts, installation information, and much more. The manuals even tell you where each metering lead goes and the values you should see for parts that are working correctly. See the door lock switch example on the next page. Page 7 Volume 7, Issue 5 Home Appliances Newsletter Samsung Tech Talk Are Fast Track Manuals Part of Your Tool Bag? continued 1. Here’s where your meter leads go. 2. Here are the testing voltages with the door open or closed. 3. With the power off, here’s the correct resistance at the lock. Another Example Here’s another example of how useful Fast Tracks can be. A customer tells you that their washer shakes badly when it starts the spin cycle. Having read the Fast Track, you know that the unit has a Quick Spin Test, and that you can use it to demonstrate to the customer how the spin cycle works. First, you explain that the unit has built in VRT (vibration Page 8 Volume 7, Issue 5 Home Appliances Newsletter Samsung Tech Talk Are Fast Track Manuals Part of Your Tool Bag? continued reduction technology) that uses metal ball bearings and advanced electronics to locate the sweet spin spot when the drum reaches 300 rpm. Next, you tell the customer that at that point, the unit becomes very steady and balanced. Finally, you start the “Quick Spin” mode. The washer’s LCD panel displays the machine’s rpm’s as the customer watches it speed up. The customer will see the unit settling in at 300 rpm, confirming that it’s working correctly and that you understand the product completely! This will build customer confidence in you and the product! To close, the Fast Track manuals are among the most valuable tools you can add to your tool bag. They are the key to quick, accurate diagnoses of all Samsung appliances. What’s more, they’re FREE. Make it a habit: Before you run any service call, download the Fast Track manual for that unit and print it out. You’ll be glad you did. Samsung Electronics America 85 Challenger Road Ridgefield Park, NJ 07660 Phone: 201-229-4251 The information in this bulletin is published for experienced repair technicians only and is not intended for use by the public. It does not contain warnings to advise non-technical individuals of possible dangers in attempting to service a product. Only experienced professional technicians should repair products powered by electricity. Any attempt to service or repair the product or products dealt with in this information by anyone else could result in serious injury or death. Information provided in this bulletin is subject to change or update without notice. Page 9 Volume 7, Issue 5 Home Appliances Newsletter Samsung Tech Talk Troubleshooting Samsung Heated Mold Ice Makers Wes Sirois Assistant Manager, HA Product Support 7 Cube 9 Cube Troubleshooting a No Ice Condition All troubleshooting should begin with verification that the freezer temperature is low enough for ice to be produced. A freezer should maintain a temperature at or below 1°F for proper cooling and ice making. Verify with the customer that the unit has been on for 24 hours and the freezer is cooling properly. The freezer temperature should be 1°F or less, which can be checked by pressing the “Fridge temp” button. The display will show the fridge section “set” temperature on the right and the “actual” freezer temperature on the left. On models with a bar graph display, the freezer display should show the lowest bar only. Check the icemaker sensor at the Main PCB. The Main PCB supplies constant DC voltage to the sensor. At 1°F, the voltage should be approximately 3.7 VDC. To check the resistance of the sensor, remove the sensor harness from the Main PCB and check the resistance. At 1°F, the sensor should read approximately 50K Ωs. Verify that your readings are correct by checking the temperature at the ice maker sensor, which is located in the ice maker head, right next to the last ice cube (see picture). Sensor Find the temperature on the conversion chart on the next page. If the resistance and voltage readings you took are correct compared to the temperature reading, the ice maker sensor and wiring are good. For example, if the temperature at the sensor is 10.5°F, the voltage reading should be about 3.45 VDC and the resistance of the sensor should be about 40K Ωs. A 10% variation is acceptable. If the voltage and resistance are not correct based on the temperature, the sensor is bad and the ice maker must be replaced. Page 10 Volume 7, Issue 5 Home Appliances Newsletter Samsung Tech Talk Troubleshooting Samsung Heated Mold Ice Makers continued Heated Mold Ice Maker Temperature vs. Resistance and Voltage Chart Temperature -5.8°F -4.0°F -2.2°F -0.4°F 1.4°F 3.2°F 5.0°F 6.8°F 8.6°F 10.4°F 12.2°F 14.0°F 15.8°F 17.6°F Resistance (Ω s) 60818 58014 55354 52830 50438 48168 46012 43965 42021 40176 38421 36752 35167 33656 On models with a separate ice room, activate Forced Compressor run mode. Forced Compressor mode activates all fans. Page 11 Voltage (VDC) 3.858 3.816 3.773 3.729 3.685 3.64 3.594 3.548 3.501 3.453 3.405 3.356 3.307 3.258 Volume 7, Issue 5 Home Appliances Newsletter Samsung Tech Talk Troubleshooting Samsung Heated Mold Ice Makers continued Defeat the door open switch to keep the fans running and verify the ice room fan is sending cold air up from the freezer out onto the icemaker. If no cold air is being supplied to the ice room, check the ice room fan located behind the freezer evaporator cover. The Ice Maker Does Not Fill or Partially Fills To check the fill mode, you will need to initiate a harvest cycle manually by pressing the ice maker test button. Once the harvest cycle begins, it will take less than 1 minute for the ice maker to complete harvesting. Watch for proper up and down movement of the ice sensing lever at the beginning of this test harvest. After harvest, the ice maker should take in water, filling each cube compartment. If the water level is correct, the water components are working properly. If the water level is low or there is no water, check for air in the system. Models with a water dispenser usually include a reservoir, which should be filled completely with water and no air. Check the water lines, water valve, fill tube, and water filter, making sure all connections are air tight. If water fill is still too low, remove the water and try filling again with the filter removed. The filter may be clogged and may need to be replaced. If no water enters the ice maker, initiate a harvest cycle and check for 120 VAC to the fill valve at the appropriate time. If 120 VAC is present, replace the water valve. If no 120 VAC is supplied, suspect the Main PCB or a loose harness connection. Slow Ice Complaint Always use the minimum expectation of ice production for a 24 hour period as a guideline when evaluating a slow ice complaint. The ice maker should average at least 12 harvests in a 24 hour period, yielding approximately 84 to 108 cubes. Under optimal conditions, the harvest mode should occur between 60 and 90 minutes. However, when you take into account defrost cycles, usage and ambient conditions such as temperature or humidity, the refrigerator is likely not performing under optimal conditions and ice production could suffer. Also, keep in mind that the ice maker will turn off via the sensing lever when the bucket is full. Page 12 Volume 7, Issue 5 Home Appliances Newsletter Samsung Tech Talk Accessing and Using the WF457’s Service Module Juan Morales Regional Technical Trainer Service Mode lets you verify the operation of a Samsung washing machine and perform troubleshooting. On Samsung’s new WF457 Wi-Fi washing machine, you can access the Service Mode two ways : With the unit powered on, but not running a cycle. During all washing cycles Instructions for accessing the Service Mode under both conditions are below. Unit Powered On Only Page 13 Volume 7, Issue 5 Home Appliances Newsletter Samsung Tech Talk Accessing and Using the WF457’s Service Module continued During a Wash Cycle Once the unit is in Service Mode, you can access various modes by tapping the following keys: Page 14 Volume 7, Issue 5 Home Appliances Newsletter Samsung Tech Talk Accessing and Using the WF457’s Service Module continued Diagnostic Code Check Mode Diagnostic Code Check Mode is used to bring up the stored diagnostic codes (error codes for service technicians). To Enter: 1. Press “3” while in Service Mode. 2. To cycle through the error codes, press the up/down arrows. Page 15 Volume 7, Issue 5 Home Appliances Newsletter Samsung Tech Talk Accessing and Using the WF457’s Service Module continued Board Input Test Mode Board Input Test Mode lets you access the following information: The water temperature in Celsius. The water temperature in Fahrenheit. The door status (OP if open, CL if closed). The Door Lock Switch status (UL if unlocked, LO if locked). The Water Level Frequency To Enter: 1. Press “TEST” while in Service Mode. 2. To cycle through the information, press the up/down arrows. Page 16 Volume 7, Issue 5 Home Appliances Newsletter Samsung Tech Talk Accessing and Using the WF457’s Service Module continued Quick Spin Test The Quick Spin Test lets you manually spin the motor so that it reaches maximum RPM. To Enter: 1. Press “SPIN” while in Service Mode. 2. Once the Spin speed reaches the maximum RPM, the speed drops immediately. 3. If you press the Start/Pause button during Quick Spin Test Mode, the washer will stop accelerating and hold its spinning speed for 10 minutes before going back to Quick Spin Test Mode. 4. To cancel the hold and allow the Quick Spin Test Mode to continue, press the SPIN Key. Page 17 Volume 7, Issue 5 Home Appliances Newsletter Samsung Tech Talk Accessing and Using the WF457’s Service Module continued Exiting Service Mode Page 18 Volume 7, Issue 5 Home Appliances Newsletter Samsung Tech Talk Releasing the WA5471/51 Top Load Washer Door Lock Tony Perkins Regional Technical Trainer The scenario: You arrive at a service call to find a Top Load washer full of musty water, clothing and, of course, the lid is locked and will not release. Ordinarily, this would lead you to get out the big tool box and begin disassembly. However, that may not be necessary on the new Top Load washers (WA5471 or WA5451). The door lock assembly (DC3400025A) on these models is driven by a small 12V DC motor. Knowing that and a little information about the main board can make dealing with this situation a lot easier. 1. Locate the Main control board behind the top console cover, on the base next to the water valve assembly, and then remove the PCB cover to access the Main control board. 2. Locate CN3, white 6-pin connector, pins 1 & 2, (Brown and Black, respectively), and then insert a small safety pin into each. 3. To release the door lock, apply a 9v transistor battery to the ends of the safety pins, (+) to the Black wire and (-) to Brown wire. You should hear a confirmation “click-clunk”, and then should be able to open the door. Page 19 Volume 7, Issue 5 Home Appliances Newsletter Samsung Tech Talk Releasing the WA5471/51 Top Load Washer Door Lock continued Note: You can also use this procedure to check both the lock and unlock functions. To lock the door, simply reverse the battery poles, and then reapply. Please Send Us Your Comments! Something you’d like to see in the Samsung Tech Talk Newsletter? If there a topic/issue we haven’t covered that you’d like us to write about, LET US KNOW! Please send your comments to: [email protected] Page 20 Volume 7, Issue 5 Home Appliances Newsletter Samsung Tech Talk GSPN Updates Jeff Brutman Senior Staff, Publications We encourage you to use our GSPN site to find the latest service bulletins to aid you with your repairs: http://gspn3.samsungcsportal.com/ HA Service Bulletins uploaded to GSPN in April, 2012: Bulletin Number ASC20120409001 Subject Freezer Drawer is not closing. Applicable Models RF197AB RF197AC RF217AB RF217AC RF263AE RF265AA RF265AB RF265AD RF266AA RF266AB RF266AC RF266AE RF266AZ RF267AA RF267AB RF267AC RF267AD RF267AE RF267AF RF267AZ RF268AB RF268AC RF26VAB RF26VAC RF26VAD RF26XAE RF26XAZ RF4267HA RF4287AA RF4287HA RF4289HA RFG237AA RFG238AA RFG293HA RFG295AA RFG295AB RFG296HD RFG297AA RFG297AB RFG297HD RFG298AA RFG298HD RFG299AA RFG299AB RFG29PHD RFG29THD To access service bulletins on GSPN, first visit http://gspn3.samsungcsportal.com/ Login using your User ID and Password. Click on “Knowledge” at the top, then “Product Info” in the left column. The Product Information menu will appear. Click on “Service Bulletin (Local) to bring up the Service Bulletins (Local) screen. To search for a bulletin, enter the bulletin number in the Subject field on the left side of the screen, and then click the Search button on the far right. If for some reason the bulletin does not appear, it can still be searched using the “Category” drop-down menus, the Subject field, or the Model field. You can also try using the Search field at the top of the screen. Page 21 Volume 7, Issue 5 Home Appliances Newsletter Samsung Tech Talk 2012 RTC Home Appliance Training Samsung HA Training 2012 Being held at one of our Regional Training Centers! For 2012, Samsung introduces a new way of training. To help you with your demanding schedule, updated training on new 2012 products will be two days long. To be eligible to attend the two day training session, techs must have attended and successfully completed 2011 HA product training in one of our training centers. Samsung will still hold 3 day Basic classes quarterly. These classes are intended for new techs who have never attended a Samsung training, or for techs who need extra help to improve their skills. Attend the in-depth, hands-on 2 day Update or 3 day Basic training at one of our RTCs! You can reserve your seat in training by emailing [email protected]. Additionally, Home Appliance training is available on-demand 24/7 at https://my.plus1solutions.net/clientPortals/ samsung/ Training Schedule Date May 1-2, 2012 City Little Ferry, NJ ME/ASC 2012 2 day Update Training—Session 1 May 3-4, 2012 Little Ferry, NJ ME/ASC 2012 2 day Update Training—Session 2 May 22-23, 2012 Bensenville, IL ME/ASC 2012 2 day Update Training—Session 1 May 24-25, 2012 Bensenville, IL ME/ASC 2012 2 day Update Training—Session 2 June 5-6, 2012 Little Ferry, NJ ME/ASC 2012 2 day Update Training—Session 1 June 7-8, 2012 Little Ferry, NJ ME/ASC 2012 2 day Update Training—Session 2 June 26-27, 2012 Bensenville, IL ME/ASC 2012 2 day Update Training—Session 1 June 28-29, 2012 Bensenville, IL ME/ASC 2012 2 day Update Training—Session 2 Page 22 Comments Volume 7, Issue 5 Home Appliances Newsletter Samsung Tech Talk 2012 Home Appliance Training Now On-Line on Plus 1! Jim Foster Manager, Training /Publications Samsung is pleased to announce that 2012 Appliance Certification courses are now online. Keep your skills up–to-date on our latest models! Go on line and take a course today. Click here to access Plus 1: https://my.plus1solutions.net/clientPortals/samsung/ The 2012 HA on-line certification training is divided into seven courses: 2012 Samsung Refrigerator Troubleshooting Guide (Video - Released 4.30.2012) 2012 Samsung Refrigerator with New Icemaker Training (Video - Released 4.30.2012) 2012 Samsung Wi-Fi Dryer Training (Video - Released 4.30.2012) 2012 Samsung Wi-Fi Washer Training (Video - Released 4.30.2012) 2012 Samsung Laundry Troubleshooting Guide Training (Video - Released 4.30.2012) 2012 Samsung Top Load Washer Training (Video - Released 4.30.2012) 2012 Induction Range Training (Video - Released 04.30.2012) These classes are essential to maintaining your skill set on 2012 Appliance products. Stay on the top of your game. Attend an on-line class today! Page 23